TWD Bicycle Pte MARS User manual

MARS
PEDAL ASSIST ELECTRIC BICYCLE
OWNER’S MANUAL
Copyright© 2016 by TWD Bicycle Pte Ltd ® All rights reserved.
No portion of this manual or any artwork contained herein may be reproduced in any shape or form without
the express written consent of TWD Bicycle Pte Ltd, Singapore.

2
IMPORTANT
This manual contains important information that should be reviewed before riding the
Pedal Assist Electric Bicycle (Pedelec). Any user should read and understand this
manual before riding it. Always wear a helmet and follow the local regulations while
riding your Pedal Electric Bicycle. Obey local traffic rules and regulations at all times.
Ensure this Pedal Assist Electric Bicycle is in good condition before riding. Use
common sense and Ride Safely.
WARNING
When using the Pedal Assist Electric Bicycle for the first time, ensure that you are in
a safe open area to ride before you engage the Pedal Assist System (PAS) feature.
Start on the first level of pedal assist until you are comfortable with how the pedal
assist feature works. Never engage the pedal assist feature unless you are in a
balanced, ready to ride position with both hands on the handlebar controls. Failure to
follow and understand these instructions may result in risk of serious injury or even
fatal, and it may also damage your bicycle and void your warranty.

3
PAGE CONTENT
___________________________________________________________________
PAGE NO
1. PARTS GUIDE ................................................................................................ 4
2. HANDLE BAR ............................................................................................... 5
3. CONTROL UNIT ............................................................................................ 5
4. CHARGING .................................................................................................... 6
5. POWER ON /OFF ......................................................................................... 7
6. DISPLAY INDICATOR .................................................................................. 8
7. LIGHTS ......................................................................................................... 9
8. SHIFTING GEARS......................................................................................... 10
9. BELL ………………. ..................................................................................... 10
10.RIDING …………………………………………………………………………….. 11
11.BATTERY AND SAFETY PRECAUTION..…………………………………….. 12
12.USING THE CHARGER ………..……………………………………………….. 13
13.SERVICING …...………………………………………………………………….. 13
14.IN THE BOX ………………………………………………………………………. 14
15.SPECIFICATION ….……………………………………………………………… 14
16.WARRANTY AND DISCLAIMER ……………………………………………….. 15

4
1. PARTS GUIDE
___________________________________________________________________
1. Wheel
2. Rear Derailleur
3. Chain
4. Crank Set
5. Pedal
6. Seat Post
7. Saddle
8. Frame
9. Fork Suspension
10.Stem
11.Handlebars
12.Brake Lever
13.Control Unit (Display)
14.Suspension Adjuster
15.Front Brake
16.Front Light (when equipped)
17.Kick Stand
18.Motor
19.Rear Light (when equipped)
20.Rear Brake
21.Battery Casing
22.Charger Port / Battery Switch

5
2. HANDLEBAR
___________________________________________________________________
3. CONTROL UNIT
___________________________________________________________________

6
4. CHARGING
___________________________________________________________________
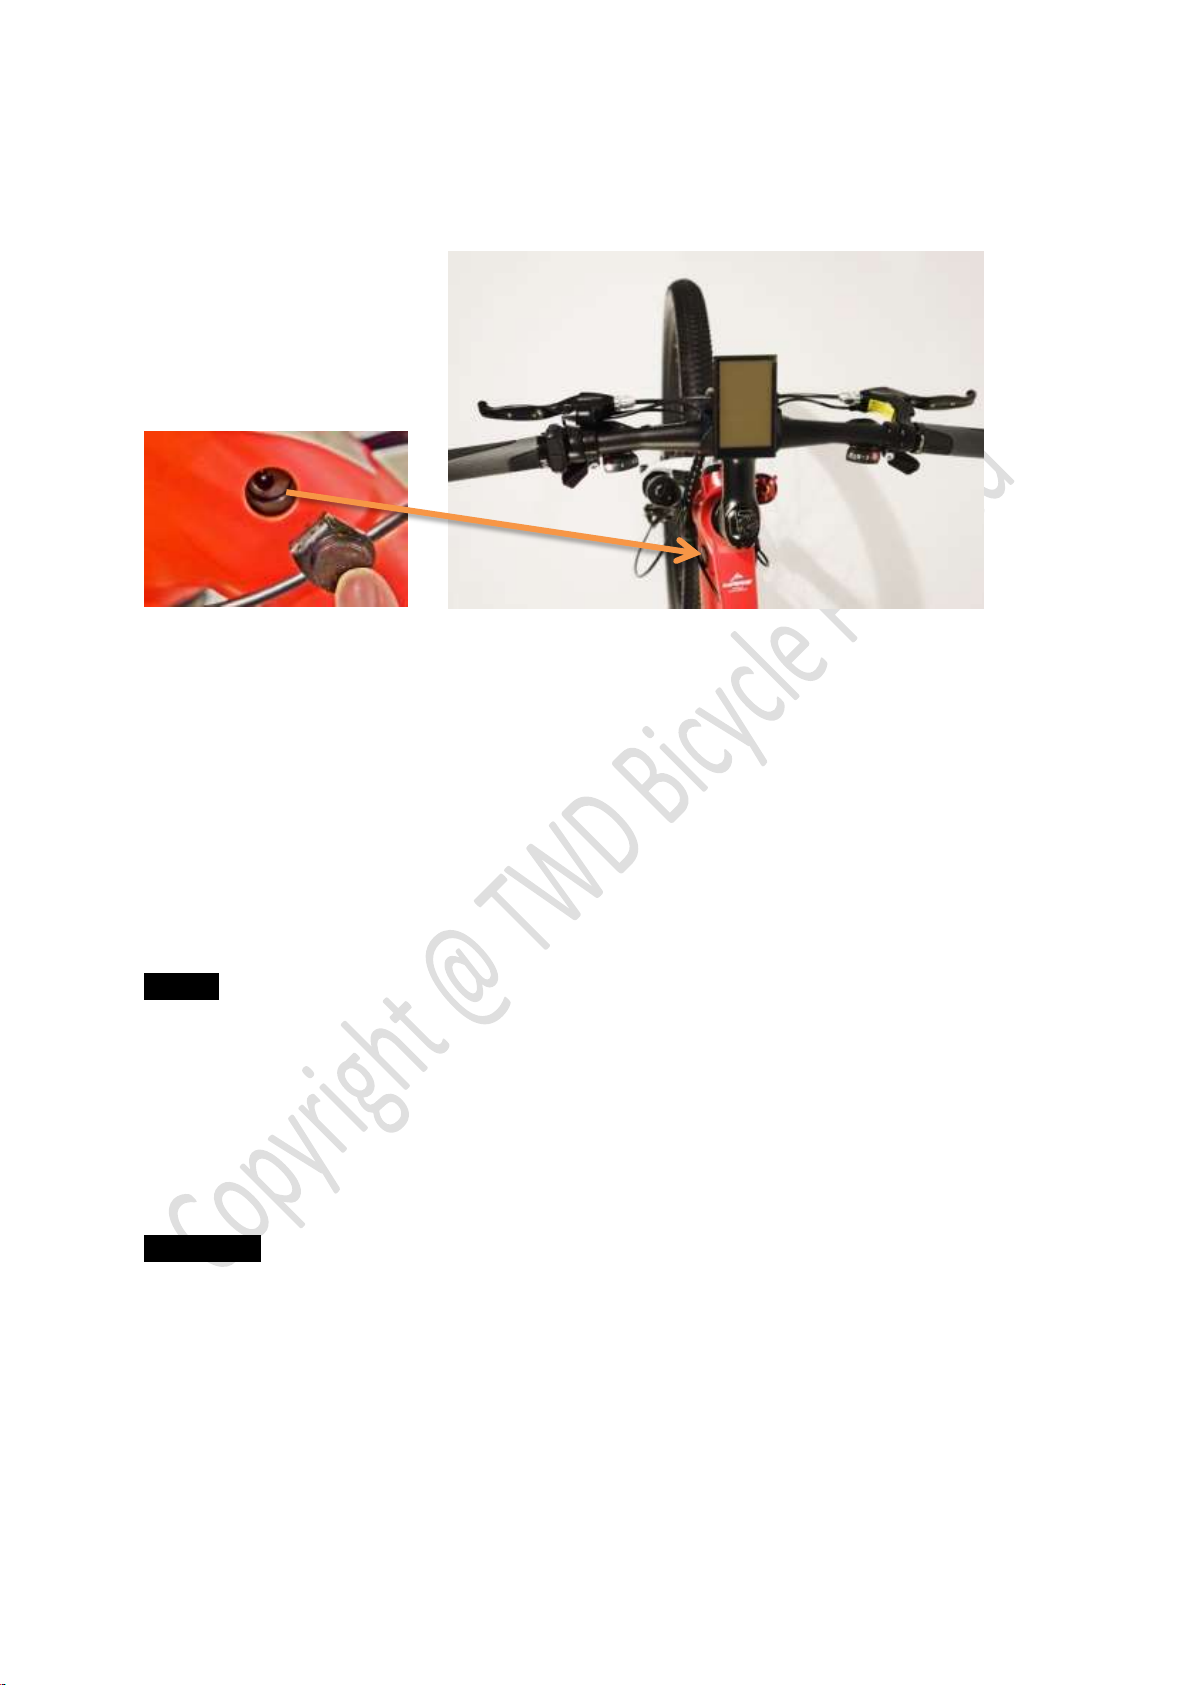
To Charge the Battery:
1. Open the protective flap and insert the charging point of the charger to the battery
module charging port securely.
2. Charge the battery until the charge indicator on the charger LED light turns from
red to green. When fully charged, unplug it and close back the protective flap.
NOTE: THE PROPER STORAGE TEMPERATURE FOR THE LITHIUM ION
BATTERY IS BETWEEN 5°C AND 30°C. BATTERY PERFORMANCE WILL BE
AFFECTED BY EXTREME TEMPERATURES. BATTERY DISTANCE PER
CHARGE MAY NOT BE OPTIMUM WHEN OPERATING IN EXTREME
TEMPRATURES. IT IS STRONGLY RECOMMENDED TO PARK IN A COOL, DRY
ENVIRONMENT. AVOID EXPOSING IT TO HOT SUN OR HEAT
CAUTION: ONLY USE THE ORIGINAL CHARGER AND BATTERY OTHERWISE
WARRANTY WILL BE VOID. DO NOT OPEN OR DISMANTLE CHARGER OR
BATTERY AS IT WILL VOID THE WARRANTY. THE LITHIUM ION BATTERY
SHOULD BE CHARGED IMMEDIATELY AFTER USE. DO NOT STORE THE
BATTERY FOR LONG PERIODS OF TIME WITHOUT CHARGE. IF YOU MUST
STORE THE BATTERY FOR A LONG TIME PERIOD WITHOUT USE, CHARGE IT
EVERY 2 TO 3 MONTHS TO AVOID REDUCING BATTERY’S OPERATING LIFE.
LITHIUM ION BATTERY MUST BE RECYCLED IN ACCORDANCE TO LOCAL
REGULATIONS AND IN SAFELY MANNER TO ENVIRONMENT.

7
5. POWER ON / OFF
___________________________________________________________________
To Power ON and OFF:
1. Set the battery module SWITCH to ON position.
2. To turn ON the control unit, hold the MODE button for 2 seconds.
3. To turn OFF the control unit hold the MODE button for another 2 seconds.
NOTE: WHEN NO ACTIVITY FOR MORE THAN 10 MINUTES. THE SMART
CONTROL UNIT WILL SHUT DOWN ITSELF TO CONSERVE ENERGY

8
6. DISPLAY INDICATORS
___________________________________________________________________
POWER ASSISTANCE LEVEL (PAS)
There are 9 (Nine) levels of pedal assist power. Start off slowly, using the first level
of pedal assist until you get a proper feel for the bike and how it handles in pedal
assist mode. Assistance levels indicate the output power of the motor. The default
value is level “1”.The default power ranges from level “0” to level “9”. Level “1” is the
minimum power. Level “9” is the maximum power. To adjust the desired level, press
UP or DOWN button. While riding, motor output level is indicated in the
varying power bar
NOTE: TO CONSERVE BATTERY ENERGY, CHOOSE THE MINIMUM POWER
ASSIST WHILE PEDALLING.
CAUTION: WHEN ERROR INDICATION APPEARS, POWER OFF YOUR
CONTROL UNIT AND CONTACT YOUR AUTHORISED DEALER FOR SERVICING

9
7. LIGHTS (When Equipped)
___________________________________________________________________
FRONT LED Light ON and OFF:
1. To turn ON the Front Light (when equipped) press and hold the UP button
for 2 seconds. The control unit display backlight will also be ON.
2. To turn it OFF, press and hold the UP button in the same way for another 2
seconds. The control unit display backlight will also be OFF.
REAR LIGHT: turn ON or OFF rear Red LED by pressing the button in the middle.

10
8. SHIFTING GEARS
___________________________________________________________________
FRONT and REAR gears shifting:
1. Shifting gear up, press with your thumb on the low shifter lever
2. Shifting gear down, pull the upper shifter lever one gear at a time
NOTE: YOU NEED TO PEDAL WHEN SHIFTING UP OR DOWN GEARS.
9. BELL
___________________________________________________________________
This bicycle comes with integrated bell at the left brake lever for your convenience.

11
10. RIDING
___________________________________________________________________
After powering on the battery and control module, set the pedal assist power to the
first level. Make sure you are in a safe open area to ride before you engage the
pedal assist feature. Never engage the pedal assist feature unless you are in a
balanced, ready to ride position with both hands on the handlebar controls.
Remember wear a helmet and follow the local regulations.
Once ready, simply pedal the bicycle as normal. You will feel the pedal assist motor
engage and “boost” you along. If you stop pedalling, or engage the brake lever, the
pedal assist feature will stop automatically.
Should you wish to pedal it manually you may set the pedal assist power to “0” or
simply turn it off.
WARNING: YOUR SAFETY AND OTHER ROAD USERS SAFETY ARE
IMPORTANT THEREFORE DO NOT BE DISTRACTED OR OPERATE A MOBILE
PHONE OR OTHER ELECTRONIC DEVICE WHILE RIDING. PLEASE PAY
ATTENTION TO TRAFFIC. WHENEVER POSSIBLE, RIDE ON THE BICYCLE
LANES AND ALWAYS IN THE SAME DIRECTION AS TRAFFIC. KEEP IN MIND
THAT OTHER TRAFFIC USERS MAY UNDERESTIMATE THE SPEED. PLEASE
RIDE IT WITH BOTH HANDS ON THE HANDLEBARS. RIDE SAFELY AND USE
COMMON SENSE.
CAUTION: PLEASE ENSURE IT IS SAFE AND ROAD WORTHY BEFORE
RIDING. HAVE IT CHECKED THROUGHLY ESPECIALLY AFTER BEING
STORED FOR A LONG TIME PERIOD WITHOUT USE.
NOTE: TO EXTEND THE DISTANCE AND TO CONSERVE BATTERY ENERGY,
CHOOSE THE MINIMUM POWER ASSIST WHILE PEDALLING

12
11. BATTERY AND SAFETY PRECAUTIONS
___________________________________________________________________
1. Charge the battery pack for at least 6 hours before using your new pedal assist
bicycle for the first time or until the charge led on the charger turn green.
2. To install the battery, slide the battery pack onto the bike rack steadily and then
lock it into the rack with the supplied key.
3. Switch on the battery power when ready for usage. Switch off the battery power
when the bicycle is not in use.
4. The battery pack works properly at the temperature range of 5º C to 30º C. The
running mileage will shorten if used outside of this temperature range.
5. Remove the battery pack if the bike is not used for an extended period of time, or
if it is stored outdoors to prevent the battery from over exposure to excessive sun
or rain.
6. Store the battery pack in a cool, dry and ventilated place with temperature
between 5º C to 30º C.
7. If the battery is found overheating, leaking, deforming, giving out, has an odd
smell, or is smoking, stop using the battery pack immediately.
8. Do not use the battery pack on other applications or to power other products.
9. Use only the supplied battery and the specified adaptor to charge the battery.
10.Using uncertified, non-recommended adaptor to charge the battery pack may
cause irreparable damage and void the warranty.
11.Keep the battery pack away from children’s reach.
12.For long term storage, the battery should be charged at 60%-80% capacity
(about 3-4 hours). Repeat the same procedure every 2-3 months.
13.The battery pack should be charged promptly when the power is low, to avoid
damage caused by battery self-discharge.
14.Do not use chemical solvent to clean the case of the battery pack or adaptor.
15.Use a soft cloth to wipe and clean any waterlogging or dirt on the surface of the
battery pack and the adaptor.
16.Do not expose the battery for long periods of time to rain or strong sunlight.
17.Do not place the battery pack in a humid environment or submerge in water.
18.Do not put the battery pack into fire.
19.Avoid over-loading the bicycle over 100kg including rider and cargo.
20.Avoid extended climbing of hills over 15 degrees steep for over 15 minutes.

13
12. USING THE CHARGER
___________________________________________________________________
The charger should be examined regularly for damage to the cord, plug, enclosure
and other parts. In the event such damage has occurred, the pedal assist bicycle
should not be charged until the charger is repaired or replaced.
Use only the supplied, recommended charger. Always use caution when charging.
The charger is not a toy and should be operated by an adult. Never operate the
charger near flammable materials or liquids.
Disconnect the charger and unplug it from the pedal assist bicycle when not in use.
Do not exceed the recommended charging time. Always disconnect the charger from
the pedal assist bicycle prior to wiping down or cleaning the pedal assist bicycle with
any liquid.
Use the charger to charge the battery in a cool, dry and well ventilated area, away
from sparks, flames, smoking and combustibles.
13. SERVICING
___________________________________________________________________
Check and maintain your Pedal Assist Electric Bicycle periodically to ensure smooth
and safe riding.
Clean the exterior with damp clothes and wipe clean. Do not spray with water.
Store the bicycle in the cool and dry place.
Before riding, check that all the safety pins are well secured, all mechanicals and
electricals components are functioning properly. Ensure the brakes are functioning
well and the tires properly inflated.
Check for loosen or worn out parts and do not operate your bicycle until they are
repaired or replaced by your authorised dealers.

14
14. IN THE BOX
___________________________________________________________________
1. Pedal Asist Electric Bicycle with built in Battery
2. Owner’s Manual and Warranty
3. Charger and Manual
4. Charger Cable and Plug
15. SPECIFICATIONS
___________________________________________________________________
Control Unit Display: LED DISPLAY
Controller: SINE WAVE CONTROLLER
Sensors: 12 MAGNET SPEED SENSORS, 5 LEVELS
Battery: LITHIUM ION 36V 7.8AH
Charger: 240V/110V, 50-60HZ, 2 A, SMART CHARGER, 4-6HR
Distance: PEDELEC <75KM PER CHARGE
Motor: 250W, 36V (MOTOR CUT OFF SPEED 25KM/H)
Frame: LIGHT WEIGHT 6061-T6 ALUMINIUM
Tyre: 27.5” x 2.1
Brake: TEKRO BRAKE WITH SAFETY E-POWER CUT-OFF
Max Load: 110KG
Weight: 19.8KG
Shifter: SHIMANO 3x7-SPEED RAPID SHIFTER
Rear Derailleur: SHIMANO 7-SPEED
Chain: KMC 7 SPEED
Rim: ALUMINIUM 6061-T6, SPOKE RIM 27.5”
Front Fork:: RST ARES-650B/27.5" SUSPENSION
Wheelbase: 1138
Saddle: VELO VL-1363 278*140*45
NOTE: SPECIFICATIONS MAY SUBJECT TO CHANGE WITHOUT PRIOR
NOTICE

15
16. WARRANTY AND DISCLAIMER
___________________________________________________________________
WARRANTY
TWD Bicycle Pte Ltd warrants that the Mars is free from manufacturing defects and
workmanship under normal conditions and reasonable use:
for the electric motor and frame;
for the specific of days or months as stated in the invoice from the date of original
retail purchase.
WARRANTY EXCLUSIONS
This warranty does not cover:
if it has been modified or repaired by a person other than TWD Bicycle Pte Ltd;
if it has been used for rental or commercial purposes;
if the mark, logo and serial number has been defaced or removed from the
Product;
damage resulting from water, or flood;
damage resulting from causes other than defects in materials and workmanship,
including to accident, abuse, misuse, neglect, improper assembly, improper
repair, improper maintenance, alteration, modification or other abnormal,
excessive or improper use;
damage occurring during shipment or transport of the Product back to TWD
Bicycle Pte Ltd;
products that are not in the original equipment at the time of purchase;
damage resulting from use of products which are defective or incompatible with
the Product;
damage resulting from normal wear and tear, including damage or deterioration
to the surface finish; aesthetics or appearance of the Product;
This warranty is void in its entirety by any modification of the frame, fork, or
components. This warranty expressly provides for the repair or replacement of the
said product and is the sole remedy of the warranty. Any and all other remedies and
damage that may otherwise be applicable are excluded, including but not limited to,
incidental and consequential damages.

16
WARRANTY HANDLING
To make a valid claim under this warranty:
return the product in it is original package;
bring the original dated invoice or receipt;
bring the original warranty registration form or the original extended warranty
form to TWD Bicycle Pte Ltd, 192 Pandan Loop #06-24, Singapore 128381.
Please have the following information available:
Model Number
VIN or Vehicle Identification Number
Motor Number
Customer and Dealer details
If, having inspected the product, TWD Bicycle Pte Ltd accepts that the product is
defective; TWD Bicycle Pte Ltd will (in its sole discretion) either repair or replace the
said product without charge.
GENERAL PROVISIONS
This warranty is governed by and construed under the laws of the country or state in
which the product was purchased. This warranty does not affect your statutory rights.
TWD Bicycle Pte Ltd reserves the right to revise this limited warranty without notice.
PERSONAL DATA CLAUSE
Your personal data is being collected and may be used or disclosed to third parties
(which maybe overseas) for the purpose of servicing the warranty for your Product
and contacting you in relation to the same, or for promotional, marketing, publicity,
research and profiling purposes (the “Purpose”). TWD Bicycle Pte Ltd, will handle
your personal data in compliance with the Singapore Personal Data Protection Act
2012 and all regulations there under. TWD Bicycle Pte Ltd, reserve the right to
charge a reasonable administrative fee for request to access of correct personal
data.

17
PRODUCT DETAILS
Model No:
Motor Serial No:
VIN / Frame No:
Date of Purchase:
Receipt No:
CUSTOMER DETAILS
Customer Name:
Customer Address:
Postal Code:
Contact No (Mobile) :
Contact No (Home):
Email:
Signature of customer:
DEALERS DETAILS
Dealer Stamp
(Name and Address):

18
NOTES
TWD Bicycle Pte Ltd
192 Pandan Loop #06-24. Singapore 128381
www.twdbicycle.com
Table of contents
Other TWD Bicycle Pte Bicycle manuals