TWHEELS E-Bike City User manual

E-Bike City User Manual

Table Of Contents
I. Important Notes
II. Product Overview
III. Product Specifications
IV. Adjustment Instructions
V. Precaution of Riding
VI. Safety Instructions
2

1. The patterns and text descriptions of this manual are only used as instructions for operation and are not used as the basis for inspection
of products.
2. The illustration in this manual may not match the actual product, and the actual sales style shall prevail.
3. The company has the right to improve product performance and related configurations without prior notice.
4. This vehicle can only ride alone and does not carry people.
5. This product is suitable for daily short-distance commuting. Please do not use it for dangerous performances such as competitions
and stunts. Otherwise, it may cause damage to the bicycle or cause injury to the rider.
6. Riding on rainy days may lead to falls and injury, which is not recommended.
7. This product is a general-purpose product. Make sure the product complies with local regulations before using it. Otherwise, all legal
responsibilities shall be borne by the user.
8. If the user modifies or changes the default state of the electric bicycle without permission. Users will bear all legal responsibilities by
themselves caused therefrom shall be borne by the user.
9. Your choice beginning of our service!" In the following days, we will wholeheartedly provide you with convenient, timely, fast and
satisfactory service! Please read the instructions carefully before using them, and do not use them before knowing the characteristics
of this car (please read carefully for the terms "danger", "warning" and "attention").
I.Important Notes
3

II.Product Overview
1. Saddle
2. Battery
3. Transfer Handle
4. Vehicle Code Engraving Position
5. Headlights
6. Front Fork
7. Rear Wheel
8. Motor
9. Rear Light
4
1
92
4
5
3
7
8
6

5
III. Product Specifications
Product Description
Hardware Configuration
Bicycle type Electric Bicycle
Color Cream & Grey
Unit Dimension LxWxH 1950x 650x 1150mm
Package Dimension LxWxH 1580x 240x 830mm
Tires Size 700C*45C
Max Speed 25km/h
Max Load 120kg
Mileage <100km
Load Capacity 120kg
Product Net Weight 21.5kg
Product Gross Weight 30.6kg
Electric Range 35-40KM
Assisting Range 65-75KM
Charging Time 4-6 hours
Torque 42N.m
Motor Rated Power 36V/350V
Shock-absorption Solid Front Fork
Body Material Aluminum alloy
Motor Type Hall Brushless DC Motor
Transmission Carbon belt drive
Sensor Torque sensor
Brake System Front and rear hydraulic disc brakes
Battery Type Lithium battery
Battery Capacity 36V/9.6AH
Battery Charger Power 42V/2A (CE/ Safety)
LCD 3.5 LCD performance

6
IV. Adjustment Instructions
A. Adjustment of Front and Rear Brake System:
Note: The adjustment method of the front and rear brakes is the same.
1. Adjust the rear integrated disc brake by adjusting its upper and lower nuts to make a space of 1.5-3mm
between the disc brake and brake calliper.
2. Adjust the height of the disc brake, and then tighten the nuts.
B. Front Integrated Disc Brake:
Note: If the distance is deviated, use the C screw to adjust, and then tighten the nut.
1. Adjust the rear integrated disc brake by adjusting its upper and lower nuts to make a space of 1.5-3mm
between the disc brake and brake calliper.
2. Adjust the height of the disc brake, and then tighten the nuts.
Tips:
• Rotate the Adjusting nut to rotate the Adjusting nut forward, the brake becomes tight, otherwise it
becomes loose.
• When adjusting, hold the brake handle at the same time, so that when the position of the brake
handle is 1/3 of the total stroke, the brake rubber block can be tightly attached to the brake drum.
Fender Plastic
Water-proof level IPX5
Alarm Device Mechanical Dell
Throttle Type Twist Throttle
Rear Rack & Front Basket Iron
1
2
3

C. Disc Brake:
There is enough clearance between the disc brake and the brake pad
(there is no interference between the brake disc and the brake skin
when rotating, and the best braking effect is appropriate).
Key points of disc brake adjustment:
• Adjust the nut, and lengthen about brake cable.
• Check whether the brake handle has been adjusted to the
appropriate tightness.
• Test ride to ensure effective and normal braking.
D. Belt Adjustment:
1. Loosen the fastening nut A on the side of the left and right movable claws of the rear axle, and
adjust the inner nut B in the middle of the movable claws to make the belt tight enough for sliding
without abnormal noise as shown in the image below;
2. The centre surface of the rear wheel is basically kept on the centre surface of the frame, and at the
same time, tighten the fastening nuts A on the left and right sides of the rear axle with movable
claws.
E. Front Wheel Disassembly:
1. Loosen the left and rear fastening thread of the front axle, remove the nut, remove the front
axle, and remove the front wheel.
2. When assembling, align the center hole of the front wheel with the double arm hole of the
hydraulic front fork, penetrate the front axle into the hole, and tighten the left and right
fastening nuts of the front axle clock wise.
After installation, rotate the front wheel, and there shall be no stuck or loose phenomenon. (The
recommended torque is not less than 18N. m).
F. Rear Wheel Disassembly:
Note: Do not touch the handlebar, head cover, toolbox parts.
Pull the motor cable off the connector, turn the car body over rotate the rear axle nut, rear brake
positioning nut and brake cable in the counterclockwise direction, unpack the chain joint, and
then remove the rear wheel in the direction of the opening.
7
45
7
8
6

H. Instructions for Using the Code Table:
1. Long press the Power key for 3 seconds to switch on/off the E-bike.
2. ODO: Total mileage of this bicycle.
3. TRIP: Miles since the ride.
4. AVG: Average speed of this ride.
5. Press the"+" button to increase the gear. The higher the gear, the faster the speed.
6. Press the"-" button to lower the gear. The lower the gear, the slower the speed.
7. PAS gear: (After pedalling to 6 km/h, start the power assist)
Gear 1: Max 15km/h, Gear 2: Max 20km/h, Gear 3: Max 25km/h.
G. Battery Installation:
The battery is mainly composed of two pieces, cell and protection board PCM (power battery is generally called a battery management system
BMS). The cell is equivalent to the heart of the battery, and the management system is equivalent to the brain of the battery.
The cell is mainly composed of positive electrode material, negative electrode material, electrolyte, diaphragm and Shell, while the protection
board is mainly composed of a protection chip (or management chip), MOS tube, resistor, capacitor, PCB board, etc.
Insert the battery into the seat tube and connect the battery cable, make sure the seat tube lock is tightened tightly and then turn on the battery
switch to ride.
1. Insert the battery into the
seat tube, then connect the
battery cable
4. You can also choosevehicle charge
2. Turn on the battery switch before
use
3. Take out the battery and charge the
battery separately
Red light indicates normal charging
Green light indicates charging comleted
8
Battery Power
Vehicle Status
Switch On/Off
Assist Gear
Speed Display
Multifunctional
Display Area

1. Inspection of the Power Supply Circuit and Lighting Circuit:
V. Precaution of Riding
• Check whether the power supply circuit, lighting circuit and device are damaged; Turn on the power supply, operate the lighting switch, and
check whether the headlights and taillights are on and whether the brightness of the headlights and taillights is normal.
• Check that the right brake handle corresponds to the rear brake, while the left brake handle corresponds to the front brake, and the brake icon is
indicated on the display.
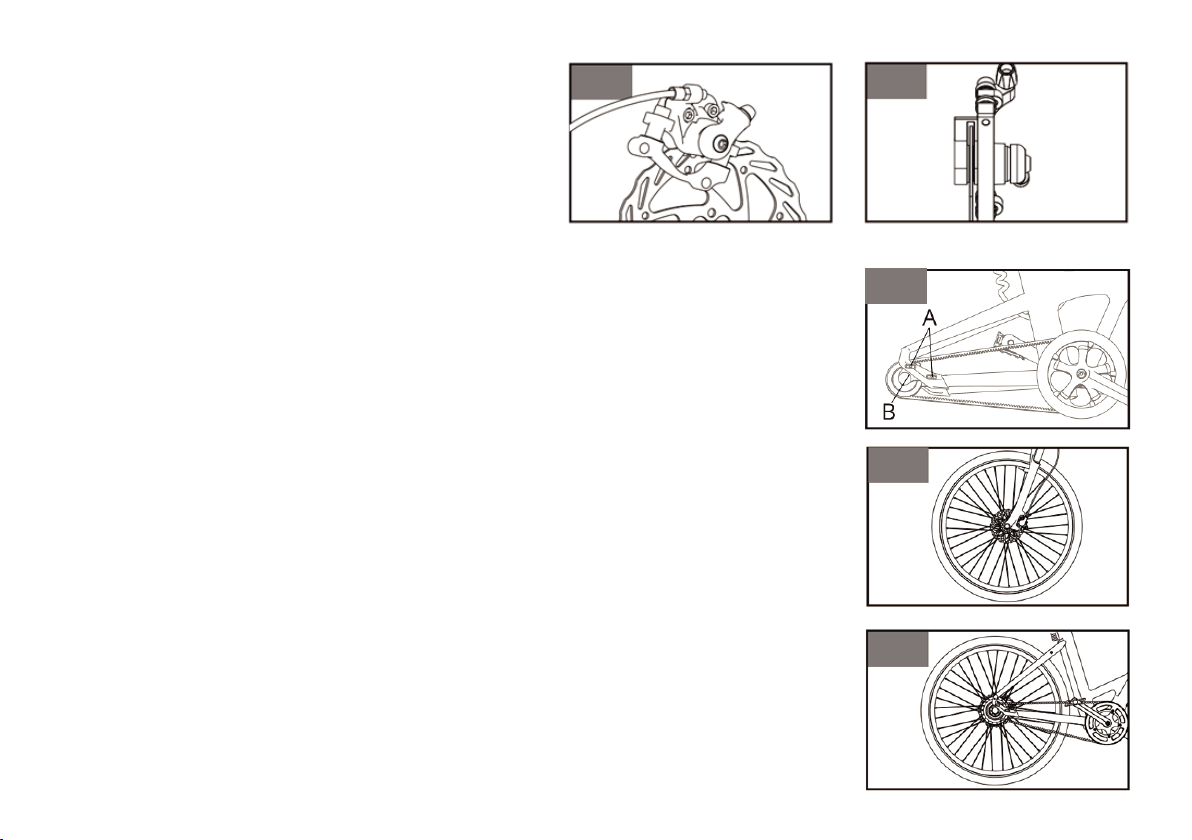
2. Check Of Brake Device:
• Check whether the front and rear brakes can work normally; Check the braking effect of the front and rear brakes to ensure that the brakes are
normal and effective.
• Confirm whether the power-off switch is normal when the rear wheels are off the ground with the support of the whole vehicle.
• Please check the fastening status of each axle to ensure that the front and rear axles and handlebars are fastened reliably.
3. Check the Fastening Status of the Handlebar and Front and Back Wheels:
• Shake the handlebar up, down, front, back, left and right to check whether it is loose or pongee.
• Shake the left and right front and back wheels to check whether there is looseness; and whether the rotating wheel is too tight or stuck.
4. Tire Inspection:
• Check that the wheel inflation pressure is within the range marked on the tire.
• Whether the tire has cracks or abnormal wear.
• Whether the tire is embedded with nails, stones and glass.
• When the tire is used to the tread wear mark, the tire should be replaced. (5)1nspection of the reflector and license plate.
• Check whether the reflector is missing. If it is found missing, contact the after-sales service immediately to reassemble the reflector of the same
specification and model, and the installation position should be consistent with the original bicycle.
• Please do not change the position, modify, disassemble, etc. privately.
• Before each use, check that the function of the reflector is normal and the surface of the reflector is kept clean.
• The Reflector device cannot be blocked by luggage, children's chairs, clothes and other objects, otherwise it will cause potential safety hazards.
• Check whether the license plate is installed firmly, whether the number is clear, whether there is any damage or pollution, and if there is any
should, reinforce, clean or replace it in time.
9

E-Bike Safety:
Please pay attention to the safety of electric bicycles, like;
1. Electric bicycles should not be parked in the building foyer, evacuation stairs, walkways and safety exits.
2. Electric bicycles should not be charged and parked in residential buildings, and should be kept away from combustibles when charging, and the
charging time should not be too long.
Correct use and Maintenance of Battery:
1. Please charge the battery for 12 hours for the first time after purchase or long-term storage. When using it normally, charge it for 12 hours every
two months. When not in use for a long time, please separate the battery from the vehicle power cord, and supplement every half a month.
2. It is forbidden to short-circuit the positive and negative poles of the input and output terminals of the battery pack.
3. Keep away from children, fire sources and heat sources, and it is forbidden to put the battery pack into the fire.
4. Strenuous vibration, impact and extrusion of the battery are strictly prohibited.
5. Pay attention to waterproofing to prevent the battery pack from being exposed to water shower and immersion.
6. The battery pack should be charged with use. When not in use for a long time, be sure to remove it from the whole vehicle for storage.
7. The battery pack should be stored in a clean, dry and ventilated place, and should avoid contact with corrosive substances, away from fire
sources and heat sources.
8. Storage Conditions of battery pack: ambient temperature -20-55°(; Ambient humidity, 65%RH.The temperature of battery operation: -10-45°C.
User Safety:
1. When using electric bicycles, you should abide by traffic regulations and pay attention to driving safety.
2. It is forbidden for people under 16 years old to drive electric bicycles on the road.
3. E-bikes should be driven on non-motorized lanes, lower than the maximum speed specified by local laws and regulations.
4. Do not lend electric bicycles to people who will not operate to avoid injury.
5. Electric bicycles shall carry personnel or articles according to laws and regulations.
6. It is recommended to wear a helmet when riding.
7. Riding on rainy and snowy days, the braking distance will be prolonged, so pay attention to slow down; Heavy rain and other bad weather, try to
avoid traveling.
VI. Safety Instructions
For your keen safety, please read and follow the following instructions:
10

Safe Use Method of Charger:
1. It is forbidden to place any items on the charger.
2. It is forbidden to put any liquid or metal into the charger.
3. It is strictly prohibited to disassemble and modify the charger.
4. When charging, insert the output of the charger into the charging port of the battery pack first, and then insert the AC power plug of the charger
into the Mains socket; It is forbidden to plug and remove the power plug with wet hands.
5. Do not use the charger when thunder and lightning.
6. Do not play with the charger and battery pack when charging.
7. Do not use the charger in unstable, excessive lampblack and dust and excessively humid environments.
8. Keep good ventilation and heat dissipation conditions when the charger works, and avoid using the charger in direct sunlight.
9. When the output of the charger is not connected to the battery pack, do not connect the charger to the mains for a long time.
10. During the charging process, the indicator light of the charger is red. When the indicator light turns green, the battery is fully charged.
11. The normal charging time is 3-10 hours (no more than 12 hours), and the fast-charging station is not allowed to charge.
Precautions for Washing:
1. When washing the bicycle, do not directly splash water on the brake drum, motor and front and rear axle to prevent water from affecting the
service performance and life.
2. Do not use steam or high-pressure water pipes when washing bicycles.
3. Pay special attention to the working condition of the brake after cleaning the vehicle or driving in the water. After cleaning or driving in the
water, the braking effect may decrease. At this time, pay attention to safety when driving slowly.
11
Table of contents
Other TWHEELS Bicycle manuals
Popular Bicycle manuals by other brands

Urban Arrow
Urban Arrow Family quick start guide

Rehatri
Rehatri HP1427 Assembly instructions

Prodeco Technologies
Prodeco Technologies Mariner 500 v4 user guide

Sunrise Medical
Sunrise Medical Recreation-Bike Sport-Bike Shark S Specifications

DOCYKE
DOCYKE L-05 Construction manual

CTM
CTM ETRIKE-LI 24/20 owner's manual