Tycon Power Systems RPMS24 User manual

8000058 Rev 6
17-Aug-23 Pg. 1
Tycon Systems Inc. 930 West 14600 South • Bluffdale, UT 84065 • PH 801-432-0003 • FAX 801-618-4220 • tyconsystems.com
Tycon® RPMS24 Installation Instructions
Congratulations on your purchase of the Tycon MobileSolarPro®portable power system. Please take a few
minutes to review these instructions before startup of the power system.
Caution! Voltage from the solar panels can exceed 65VDC. When connected to grid power, the AC voltage
input will carry 120VAC or 240VAC. Be extremely careful when modifying any wiring or working around the
solar controller or AC/DC battery charger. High Voltage can cause serious injury.

8000058 Rev 6
17-Aug-23 Pg. 2
Tycon Systems Inc. 930 West 14600 South • Bluffdale, UT 84065 • PH 801-432-0003 • FAX 801-618-4220 • tyconsystems.com
Notes:
1. The basic trailer system comes complete with a battery control box outfitted with two to eight
12V 180Ah batteries, a 60A MPPT solar controller with 20A load output, a 600W-900W AC/DC
Battery Charger, a 24VDC to 56VDC 5A 250W voltage converter, a TPDIN-Monitor-WEB remote
power monitor, an 18’ pneumatic extension mast with 12V air-pump, a junction box at top of
pole with a 5 Port Gigabit versatile PoE switch, and 360-1440W of solar panels with travel
cover.
2. When travelling, we
recommend to always
use the solar panel cover
to help protect the solar
panels from flying road
debris. Make sure all
bolts and nuts are tight.
Also, the solar panels
need to be set for 10°
position (nearly
horizontal) and secured
with the included ratchet
straps.
3. When parked, even for
storage, we recommend
to always extend the 4
stabilizers to prevent
trailer damage from high
winds.
4. There are multiple
components included in
the trailer system. Each
component has its own
user guide; therefore,
this user guide will just
touch on the system
basics.

8000058 Rev 6
17-Aug-23 Pg. 3
Tycon Systems Inc. 930 West 14600 South • Bluffdale, UT 84065 • PH 801-432-0003 • FAX 801-618-4220 • tyconsystems.com
Procedures:
1) Trailer Startup
a) Park the trailer in such a way that when deployed, the solar panels won’t be shaded by the
extension mast during peak sun. This usually means that the front of the trailer will be facing
North. Solar panels need to be facing due South in the northern hemisphere.
b) There are 4 outrigger stabilizers that can
be extended 15” or 30”. Extend these
outriggers and use them to level the
trailer.
c) Make sure both PV and Battery
disconnect switches are set to the OFF
position.
d) Set solar panels to face South and set
the tilt angle. Tighten all the adjustment
bolts. Optimum Solar panel tilt depends
on latitude and time of year. There is a
handy tilt calculator at
https://calculators.tyconsystems.com to
help you determine the best tilt angle for your area.
2) Powering up the system
a) Note: The solar controller should always be connected to the batteries before being supplied
with solar power.
b) The system ships with two 30A fuses removed from the battery
cables. Install both fuses to power up the system. The fuse
may spark when inserted. This is normal.
c) Switch the battery disconnect switch to ON, then switch the
solar disconnect switch to SOLAR. The MPPT solar controller
will powerup. The MPPT solar controller has a load output
which supplies power to the 24VDC to 56VDC converter.
d) The TPDIN-Monitor-WEB controls the power going to the top of
the extension pole through two of the on-board relays. Relay
CH1 controls the 56V supply. Relay CH2 controls the 24V
supply. By default, these relays are closed. The TPDIN-
Monitor-WEB allows control of the relays using manual control or based on measured
parameters or ping. To find out more about the TPDIN-Monitor-WEB features and use, refer
to the individual product user guide. The unit ships with DHCP client enabled and fallback IP
is 192.168.1.6

8000058 Rev 6
17-Aug-23 Pg. 4
Tycon Systems Inc. 930 West 14600 South • Bluffdale, UT 84065 • PH 801-432-0003 • FAX 801-618-4220 • tyconsystems.com
3) Pneumatic Extension Mast - Raising
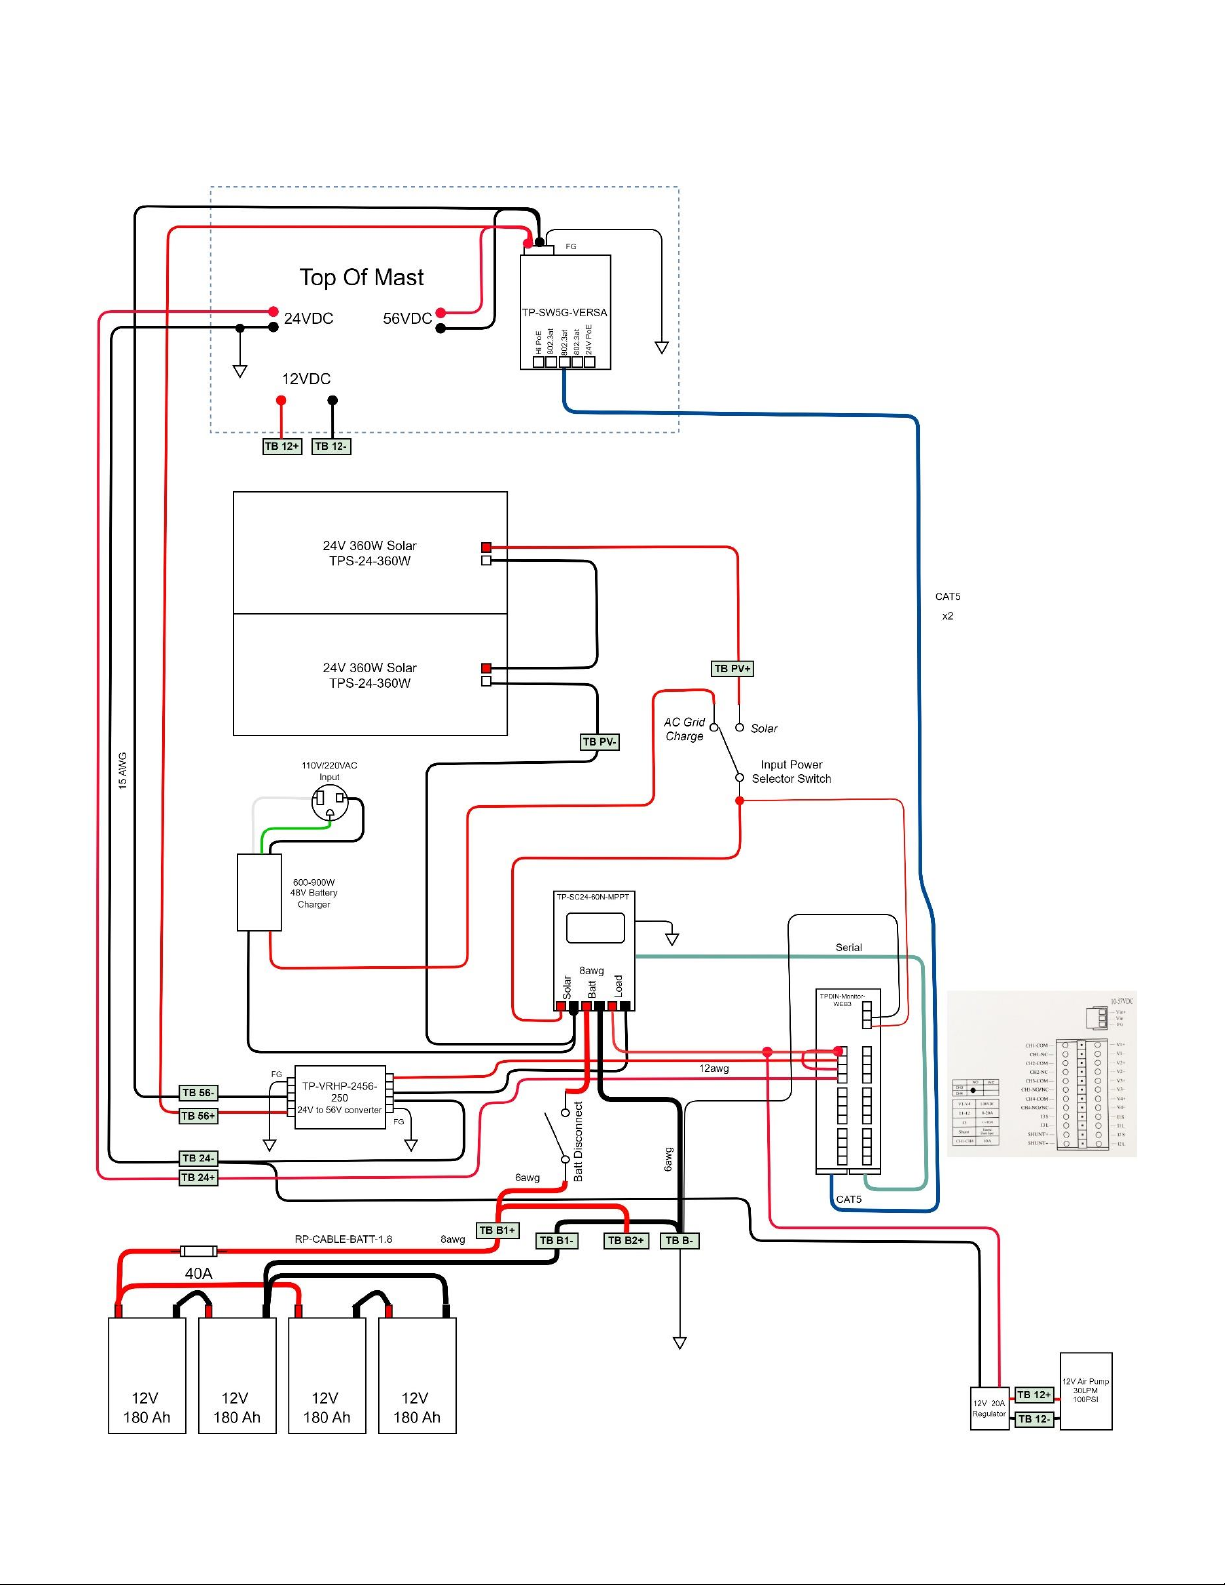
a) The pneumatic extension mast is raised using a 12V automotive air pump. The 12V for the
pump is supplied from the 24V batteries using a 24V to 12V DCDC converter. There is a
pressure regulator with air valve used to raise or lower the mast. The mast has mechanical
locks at 9’,12’,15’ and 18’ positions so the mast can be raised to any of these pre-defined
heights. It takes about 120 seconds to fully extend the mast using the air pump.
b) Near the top of the mast, there is a die cast aluminum enclosure
housing a TP-SW5G-VERSA PoE gigabit switch. The input to
the switch is 56VDC and the outputs are as follows: Port 1 60W
High PoE(4 pair); Port 2-4 802.3at 30W; Port 5 24V 12W
Passive PoE. If it is necessary to connect a laptop or
computer to the switch, connect to port 2,3 or 4 only.
Connecting to port 1 or 5 could cause damage to your
computer Ethernet port.
c) A wire terminal is included inside the housing to supply 24VDC
15A unregulated, 56VDC 5A regulated and 12VDC 10A Max
regulated.
d) Before connecting your equipment. Disconnect the Solar input by switching the solar switch to
OFF then disconnect the Battery using the battery switch. Mount equipment and connect the
equipment to either the PoE switch or the wire terminal, as required. Once the equipment is
connected and tested, the mast can be raised and power can be turned on. Connect battery
first, then connect solar. Load will turn on automatically.
e) Raise the mast by turning the air flow valve to the “UP” position. Turn
on the 12V air-pump using the toggle switch. Note: The pressure
regulator at the airflow valve should be set to 30PSI.
f) You will hear the mechanical locks click into position as the mast is
raised. You can turn off the 12V air-pump at an intermediate height or
after the mast is fully extended. Once the mast is extended turn the
airflow valve to the center position.
4) Pneumatic Extension Mast - Lowering
Note: If mast has been extended for a long time it may become depressurized and will need to first
be pressurized using the air pump before attempting to lower it.
a) Lowering the mast is a little tricky. Don’t relieve all the pressure then pull the
mechanical lock rings. This will cause the mast to fall and bang against the
lower section. This could damage equipment mounted on the mast.
b) To lower the mast slowly:
i) Turn the air flow valve to the “DOWN” position. Immediately pull the bottom lock ring. The
mast will begin to collapse.

8000058 Rev 6
17-Aug-23 Pg. 5
Tycon Systems Inc. 930 West 14600 South • Bluffdale, UT 84065 • PH 801-432-0003 • FAX 801-618-4220 • tyconsystems.com
ii) When the mast section is about half way down, pull the next lock ring. Repeat till all the
lock rings are pulled and the mast has collapsed fully.
5) Charging the batteries from AC power
a) The batteries can be charged using 115VAC or
230VAC grid power. This is useful if you want to fully
charge the batteries before each deployment.
b) CAUTION: Make sure to set the voltage switch on
the TP-BC battery charger to the correct AC voltage.
Default is 115VAC. Failure to set the correct voltage
will damage the battery charger.
c) Connect an extension cord to the weatherproof AC
receptacle on the back of the battery/equipment box. Connect the extension cord to the
proper 10A AC voltage outlet. The battery charging process will start within a few minutes. It
should take about 5hrs minimum to fully charge the discharged batteries.
6) MPPT Solar Controller
a) The advanced MPPT solar controller measures solar
voltage and current, battery voltage, load current and
temperature. You can scroll through the various
readings on the display by touching the buttons on
the controller face. Please refer to the solar controller
user guide for detailed info.
7) Misc. Information
a) The enclosure includes a thermostatically controlled
fan. The fan will turn on automatically if the
temperature inside the enclosure exceeds 45C.
b) The batteries used in the system are AGM type sealed lead acid batteries. They are
maintenance free and should last at least 5 years. Caution: Never store the batteries in a
discharged state, especially in cold temperatures or else the battery life will be reduced.
Always store the batteries fully charged.
c) A wind turbine option is available to add a second source of power to the system. The wind
turbine mounts to a bracket which is included in the optional kit.
d) Replacement fuses:
i) Battery Cables: ATC-Maxi (1.14”) Automotive Fuse 40A
ii) AC/DC Battery Charger: 6x30mm 25A glass fuse

8000058 Rev 6
17-Aug-23 Pg. 6
Tycon Systems Inc. 930 West 14600 South • Bluffdale, UT 84065 • PH 801-432-0003 • FAX 801-618-4220 • tyconsystems.com
RPMS-24 Typical Schematic:

8000058 Rev 6
17-Aug-23 Pg. 7
Tycon Systems Inc. 930 West 14600 South • Bluffdale, UT 84065 • PH 801-432-0003 • FAX 801-618-4220 • tyconsystems.com
Specifications
Model #
Frame
Type
Solar
Panel
Output
Solar
Array
Size
Battery
Capacity
Continuous
Power
Generation*
Reserve
Time
Grid
Charge
Time*
Trailer
Weight
Tongue
Weight
RPMS24-360-360
Mini
360W
39 x 77”
360Ah
78W
28hr
4hr
1340lb
139lb
RPMS24-720-720
Standard
720W
79 x 77”
720Ah
157W
27hr
7hr
1650lb
RPMS24-720-1080
Standard
1080W
119 x 77”
720Ah
180W
24hr
7hr
1700lb
RPMS24-1440-720
Standard
720W
79 x 77”
1440Ah
157W
55hr
14hr
2160lb
257lb
RPMS24-1440-1080
Standard
1080W
119 x 77”
1440Ah
236W
36hr
14hr
2210lb
233lb
RPMS24-1440-BEAST
Standard
1440W
79 x 154”
1440Ah
315W
27hr
14hr
2400lb
RPMS24-720-MINI
Mini
720W
79 x 77”
720Ah
157W
27hr
7hr
1650lb
140lb
RPMS24-720-MINI-3P
Mini
1080W
119 x 77”
720Ah
180W
24hr
7hr
1700lb
107lb
RPMS24-1440-MINI
Mini
720W
79 x 77”
1440Ah
157W
55hr
14hr
2160lb
135lb
RPMS24-1440-MINI-3P
Mini
1080W
119 x 77”
1440Ah
236W
36hr
14hr
2210lb
114lb
*@50%
discharge
This manual suits for next models
10
Table of contents
Other Tycon Power Systems Power Supply manuals