TypeS Startya 8Qi Instruction manual

2
Startya8Qi
Schnellstart Anleitung
Quick Start Manual

DE
1
WirgratulierenDirzuDeinemStartya8Qi
Der Startya 8Qi mit seinen diversen Funktionen und Möglichkeiten wird Dein idealer
Begleiter mit viel Power für Dein Handy, Tablet, Laptop und natürlich Auto.
Seit über 20 Jahren arbeiten wir bei TypeS daran, Dir in Deinem automobilen Alltag
und in Deiner Freizeit mehr Sicherheit und Komfort zu geben.
Diese kleine Anleitung wird Dir dabei helfen, Deinen Startya 8Qi optimal zu nutzen.
Bei Fragen wende Dich jederzeit gerne an uns unter www.typesauto.de
Vielen Dank, dass Du uns Dein Vertrauen schenkst.
BestandteileDeinesStartya8Qi
Anleitung
Aufbewahrungstasche
Powerbank
mit kabelloser
Ladefunktion
USB Kabel mit
Micro USB
Starthilfekabel
Startya8Qi
Schnellstart Anleitung
Quick Start Manual
Startya8Qi
Schnellstart Anleitung
Quick Start Manual

DE
2
USB 5V Ausgang
LED Licht:
Taschenlampe,
Stroboskop und
SOS Blinken
USB-C
9V/5V Ausgang
5V 2A Eingang
5V 2A Eingang
Schalter für Strom und LED Licht
1x drücken: Strom ein/aus
3 Sekunden drücken: LED Licht an
Nochmals kurz drücken: Stroboskop
Nochmals kurz drücken: SOS Blinken
Nochmals drücken: Licht aus
Ladeäche für Geräte,
die kabelloses (induktives)
Laden unterstützen
FunktionenimÜberblick
LED Energieanzeige
= <5%
1 = 5-25%
2 = 26-50%
Starthilfekabel
Anschluss
3 = 51-75%
4 = >76%

DE
3
GeräteladenmitdemStartya8Qi
einschalten
Dein Gerät auf die Ladeäche
legen, wenn es über die induktive
Ladefunktion verfügt
Ladekabel Deines Gerätes mit
dem Startya 8Qi verbinden mittels
Standard USB (2,4A maximale
Ladeleistung) oder USB-C (2A bei
9V bzw. 2,6A bei 5V Ladeleistung)
einschalten
Wichtig: Lade Deinen Startya 8Qi bitte mit dem beiliegenden Micro USB oder einem
USB-C Kabel an USB Stromquellen mit 2A(Class2oderLPS) auf. Bitte lade ihn vor
dem ersten Gebrauch sowie alle 2-3 Monate vollständig auf.
oder

DE
4
StarthilfemitdemStartya8Qi
So gelingt Dir mit wenigen Handgrien die Starthilfe:
1. Schalthebel im Leerlauf (Handschalter) / Neutral, alternativ Park (Automatik).
Handbremse anziehen. Kein Autolicht, Lüftung etc.
2. Ladestatus Startya 8Qi: mindestes 51%
3. Blauen Stecker vom Kabel in die Buchse
unter der Abdeckung Deines Startya 8Qi
stecken.
4. Rote Klemme mit dem positiven
Autobatterie Pol (+) verbinden, dann die
schwarze mit dem negativen Pol (-).
Hinweise
• Niemals die rote (-) und schwarze (-) Klemme miteinander verbinden.
• Nicht über die Batterie beugen beim Verbinden mit den Klemmen.
• Deine Autobatterie ist nicht im Motorraum? Dann ist sie z.B. unter dem
Koerraum oder Fußraum. Detaillierte Informationen ndest Du in Deiner
Auto Bedienungsanleitung.
Rot
Schwarz

DE
5
5. Leuchtet nun das Grüne Licht auf der schwarzen Box am Starthilfekabel?
Ja:du hast nun 30 Sekunden Zeit und bis zu drei Versuche um Dein Auto zu
starten wie gewohnt. Bei manchen Fahrzeugen muss z.B. die Kupplung oder
Bremse getreten werden.
Nein:Blauen Stecker abziehen und erneut einstecken
6. Sobald der Motor startet: Innerhalb von 30 Sekunden erst die schwarze (-) Klemme
und dann die rote (+) Klemme von der Autobatterie entfernen. Motor mindestens 20
Minuten eingeschaltet lassen, damit die Lichtmaschine die Autobatterie laden kann.
7. Den blauen Stecker vom Startya 8Qi abziehen. Fertig!
Es hat etwas nicht funktioniert oder Dein Motor ist von alleine wieder ausgegangen?
Schau auf der nächsten Seite, was die Gründe hierfür sein können.

DE
6
Eshatnichtgeklappt?
Hier stellen wir Dir häuge Probleme und mögliche Lösungen vor:
• Ladestand vom Startya 8Qi unter 51% . Bitte lade ihn auf.
• Getriebe nicht im Leerlauf. Bitte hole das nach, achte dabei auf eine angezogene
Handbremse.
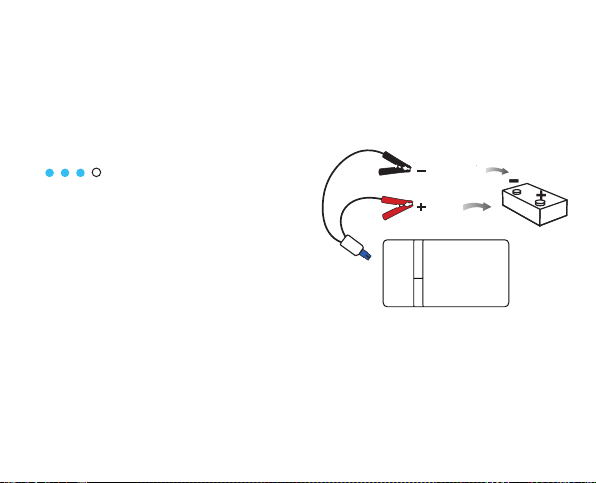
• Dein Motor bewegt sich beim Starthilfeversuch etwas, startet jedoch nicht:
Positioniere die Klemmen des Starthilfekabels anders an den Polen. Warte 60
Sekunden vorm nächsten Startversuch.
• Tiefenentladene Autobatterie: vor allem bei Dieselfahrzeugen ein Problem, da diese
viel Energie für den Start benötigen: ein stärkerer Jump Starter, Pannenhilfe oder
Werkstatt helfen Dir weiter.
• Kaputte Autobatterie, andere defekte Teile wie z.B. Dein Starter, Lichtmaschine
(Generator), Stromverkabelung oder ein Schutzmechanismus Deines Autos
verhindert externe Starthilfe: Pannendienst oder Werkstatt helfen Dir weiter.
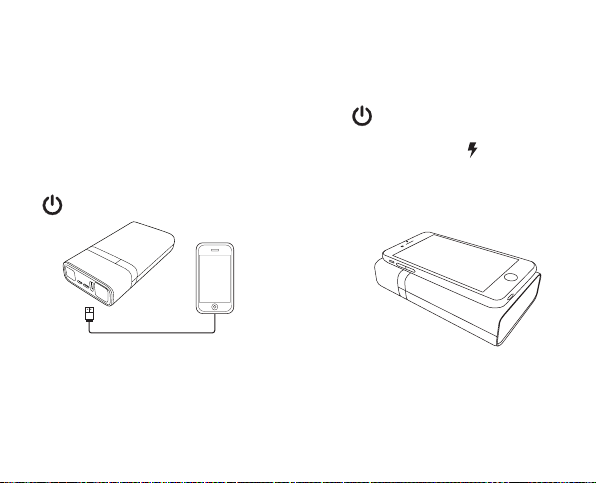
• Dein Startya 8Qi gibt plötzlich keine Energie mehr ab, alle LED sind aus. Der Not
Modus zum Schutz Deines Auto wurde aktiviert. Führe ein Reset durch: verbinde
das MicroUSB Kabel mit dem Startya 8Qi und einer externen Stromquelle, bis die
blauen LED wieder leuchten.
• Der Startya 8Qi lädt sich nicht? Bitte nutze 2A USB Stromquellen.
X X

DE
7
Verbindung erfolgreich, Startya 8Qi bereit für die Starthilfe.
Bereit für den Startversuch, leg los.
Bitte stecke das Starthilfekabel vom Startya 8Qi ab.
Bitte lade Deinen Startya 8Qi auf.
Zuviel Zeit ohne Startversuch vergangen: Bitte trenne das
Starthilfekabel vom Startya 8Qi. Um weiter zu machen, stecke es
wieder an.
Akku leer oder Reset notwendig: Bitte verbinde das MicroUSB
Kabel mit dem Startya 8Qi und einer externen Stromquelle, bis
die blauen LED wieder leuchten. Wenn das nicht funktioniert,
wende Dich an www.typesauto.de
Dieroten/grünenLEDundTöne
Die schwarze Box am Starthilfekabel möchte Dir folgendes mitteilen

DE
8
Hinweise&Warnungen
Wir gehen davon aus, dass Du Deinen Startya 8Qi mit Sorgfalt und Vorsicht
behandelst, um Dich und Deine Umwelt nicht in Gefahr zu bringen:
• Bitte nutze das Gerät nur gemäß Betriebsanleitung, um Verletzungen und
Sachschäden zu vermeiden.
• Das Gerät und sein technisches Zubehör bitte niemals önen oder versuchen zu
reparieren.
• Das Gerät und Zubehör bitte nicht beschädigen oder Explosivstoen, Feuer,
hoher Temperatur sowie Wasser aussetzen. Gerät nur im Bereich –20°C bis +34°C
benutzen und im Bereich –20°C bis +40°C lagern.
• Bitte lade das Gerät nur in gut belüfteten Räumen.
• Ist das Gerät oder sein technisches Zubehör beschädigt, dieses bitte nicht mehr
benutzen.
• Bitte halte das Gerät und sein Zubehör von Kindern fern.
• Dieses Gerät ist nur für Fahrzeuge mit 12V Bordnetz geeignet.
• Das Gerät enthält eine Lithium Ionen Batterie und ist WEEE registriert (WEEE-Reg.-
Nr. DE64377715). Es wird als Elektroschrott von den vorgesehenen Abgabestellen
angenommen. Nicht mit dem Hausmüll entsorgen!

DE
9
• Im Extremfall können Lithium Zellen undicht werden und Flüssigkeit austreten.
Diese Flüssigkeit kann Sach- und Personenschäden verursachen, daher bitte
vorsichtig mit einem Tuch abwischen und das Gerät danach vorschriftsmäßig
entsorgen. Unbedingt Haut- und Augenkontakt vermeiden. Sollte es dennoch zu
Haut- oder Augenkontakt kommen, die Flüssigkeit sofort mit viel Wasser abspülen.
Danach nimm bitte jedenfalls unverzüglich ärztliche Betreuung in Anspruch.
• Wir vertrauen darauf, dass Du Deinen Startya 8Qi und sein Zubehör pegst, nicht
beschädigst und nur bestimmungsgemäß verwendest. Neben den Dir zustehenden
gesetzlichen Mängelrechten gewähren wir daher bis zu 3 Jahre Garantie. Die
Garantieebedingungen ndest Du unter www.typesauto.de.
Wir bei TypeS lieben den Kontakt zu unseren Kunden. Melde Dich bei uns mit Deinen
Anliegen und Anregungen zu Deinem Startya 8Qi, wir werden Dir gerne zuhören und
weiter helfen.
The ‘Qi’ symbol is a trademark of the Wireless Power Consortium

EN
10
CongratulationsonyourStartya8Qi
The Startya 8Qi with its many helpful functions is designed to become your daily
companion, providing energy for your mobile phone, tablet, laptop and of course car.
For more than 20 years our solutions have aimed to increase your safety, comfort,
and peace of mind during your daily life as well as recreation time spent in your ride.
This guide will help you make the most of your Startya 8Qi.
If you have any questions, please feel free to contact us at www.typesauto.de
Thank you for trusting TypeS.
Startya8Qiataglance
User ManualStorage Case
Power Bank
with Wireless
Charging
USB Cable
with
Micro USB
Jumper Cable
with
Smart & Safe
Protection
Startya8Qi
Schnellstart Anleitung
Quick Start Manual
Startya8Qi
Schnellstart Anleitung
Quick Start Manual

EN
11
USB 5V Output
LED Flashlight /
Strobe Light /
SOS Signal
USB Type-C
9V / 5V Output
5V 2A Input
5V 2A Input
Power / Flashlight Button
Push once: Power on/o
Push & hold 3 Seconds: LED ashlight
Push again: Strobe light
Push again: SOS signal
Push again: LED o
Charging pad for devices
supporting wireless
(inductive) charging
Functionsataglance
Jump Start
Socket
Power Level
= <5%
1 = 5-25%
2 = 26-50%
3 = 51-75%
4 = >76%

EN
12
DevicechargingwithyourStartya8Qi
Important: Please charge your Startya 8Qi using the included Micro USB or an USB-C
cable and an USB power source with2A(Class2orLPS). Please charge completely
before rst use and also every 2-3 months.
switch it on
Place your device on the
charging pad area if it supports
inductive charging
Connect the charging cable of your
device to the Startya 8Qi using
standard USB (2.4A maximum
charging capacity) or USB-C (2A at
9V or 2.6A at 5V charging power)
switch it on or

EN
13
JumpstartingwithyourStartya8Qi
How you jump start your ride safely and quickly:
1. Transmission in Neutral (manual) / alternatively Park (automatic).
Apply parking brake. Switch o headlights, Air-condition etc.
2. Charge status Startya 8Qi: minimum 51%
3. Put the blue plug from the cable into
the socket under the cover.
4. Connect the red clamp to the positive auto
battery post (+), then connect the black
with the negative post (-).
Black
Red
Notes
• Your car battery is not in the engine compartment?
Then it may be in the trunk. Consult your car manual for more info.
• Never connect the red (-) with the black (-) clamp.
• Do not bend over the battery when connecting the clamps.

EN
14
5. Check the LED status on the black indicator box at the jumper cable: Green light ?
Yes:you now have 30 seconds and up to three attempts to start your car as usual.
Note: with some vehicles you need to push the clutch or brake.
No:Disconnect the blue plug, put it back in and try jump starting again.
6. Within 30 seconds after successfully starting the engine disconnect the jumper
cables from your car battery. Remove the black (-) clamp rst, then the red (+)
clamp. Keep the engine running for at least 20 minutes or drive the car to recharge
the battery.
7. Disconnect the blue plug from your Startya 8Qi.
It didn’t work or your engine died shortly after it has been jump started? Have a look
on the next page to learn more about potential reasons and solutions.

EN
15
Jumpstartingdidn’twork?
Some common problems and possible solutions:
• Startya 8Qi Charge status below 51% ? Please charge it.
• Transmission not in Neutral / Park? Please change, also apply parking brake.
• Engine does not crank or cranks very slowly? Reposition the clamps, allow
60 seconds before the next jump start attempt.
• You may have a completely discharged car battery. This is especially a problem with
diesel engines, as they require a lot of energy for the start. Only a more powerful
jump starter, roadside assistance or a mechanic can help.
• Car battery is broken, other vehicle components like alternator, voltage regulator,
wiring are not working properly or a protective mechanism prevents external
start-up support: Road assistance or a mechanic can help.
• Your Startya 8Qi suddenly stops emanating energy, all LEDs are o. Jump starter
battery is empty or emergency mode to protect your car has been activated.
Reset needed: connect the Micro USB cable with the Startya 8Qi and an external
2A power source until the blue LEDs light up again.
• You can’t charge the Startya 8Qi? Please use 2A USB power source.
X X

EN
16
Connection succeeded, Startya 8Qi ready for jump starting
Ready to jump start, let‘s do it
Disconnect jumper cable completely
Please charge your Startya 8Qi
Time out after 30 seconds: This status shows after 30 seconds
time out. Disconnect jumper cable completely (from battery and
Startya 8Qi). Reconnect and try again.
Startya 8Qi empty or reset necessary: Please connect it to the
MicroUSB cable and an external power source until the blue
LEDs light up again. If that doesn't work, contact
www.typesauto.de
Infoonred/greenLEDs&Sound
What the black indicator box by the jumper cable tells you

EN
17
Notes&Warnings
We trust you will treat your Startya 8Qi with care and caution to prevent harm to you
and your environment:
• Use only according to instructions in this manual to avoid injuries or
material damage.
• Do not disassemble or try to repair the device and its accessories.
• Do not crush or expose the device to water, explosives, re, high temperature.
• Only operate at temperatures of -20°C to +34°C and store at temperatures of
–20°C to +40°C.
• Charge only inside in well ventilated areas.
• Stop using the Startya 8Qi and its accessories in case of damage.
• Please keep the device away from children.
• This device is for use with 12V vehicles only.
• The Startya 8Qi Lithium-Ion battery is self-contained and not consumer replaceable.
It is registered according to WEEE to ensure proper recycling. (WEEE-Reg.-Nr.
DE64377715) It is accepted as electronic waste by authorized delivery points. Do not
dispose it with household waste!

EN
18
• Under abusive conditions, Lithium-Ion cells may leak and liquid could be ejected
from the battery. This liquid could cause personal injury or material damage.
Please wipe carefully with a cloth avoiding skin contact and then dispose of
the device. If skin or eye contact occurs, immediately ush with water and seek
medical help.
• Since we trust you take care of your Startya 8Qi and its accessories, avoid damage
and only use as intended, we grant a voluntary bring-in guarantee of up to 3 years.
For further guarantee information please go to www.typesauto.de.
We love to interact with our customers. Contact us with your questions and ideas
regarding your Startya 8Qi via www.typesauto.de
The ‘Qi’ symbol is a trademark of the Wireless Power Consortium

Horizon Brands Europe GmbH
Mergenthalerallee 77
65760 Eschborn
Deutschland
www.typesauto.de
Designed in California
Assembled in China
WP ITM: AC56794
ML-56794D_V2_webshop
Table of contents
Languages:
Popular Accessories manuals by other brands

Moog Videolarm
Moog Videolarm IPRS01 Installation and operation instructions

Oregon Scientific
Oregon Scientific THWR288A user manual

TREW
TREW 1500 Series Installation & maintenance manual

Verano
Verano V880 RAPOLLO installation manual

Edimax
Edimax ET-913 V2 series manual

Mini Gadgets
Mini Gadgets HCPowerbank720 user manual