Tytus A10002 User manual

TYTUS Grills Natural Gas ConversionKit
Item # A10002
tĂƌŶŝŶŐ
To reduce the risk of fire, burn hazard or other injury, read the manual carefully and completely before
using your grill.
WarningFor Outdoor Use Only.
Yuestions, Ɖroblems, missing part?
ŽŶƚĂĐƚCustomer Service ǀŝĂ
WŚŽŶĞϴϱϱͲϵϲϵͲϱϭϴϱ
ŵĂŝůSupport@TYTUSgrills.com
1

Natural Gas Safety Instructions
xYour grill is designed to be natural gas convertible, at a pressure of 7" water column (W.C.)(1/4 psig or
1.75 kpa), regulated at the residential meter. Check with your gas utility company for local gas pressure
and with your local municipality for building code requirements. If your residential gas line pressure has not
been regulated to 7" W.C., contact your local gas utility company for professional assistance.
xYou must use the gas pressure regulator supplied with this appliance. This regulator is set for an outlet
pressure of 4" W.C.
xIt is recommended that a shut off valve be installed at the gas supply source outdoors. Install the valve at a
point after the gas pipe exits the outside wall and before the quick disconnect hose, or install it at the
point before the gas line piping enters the ground. See Figure 1˄Page #8).
xYou must use pipe sealing compound or pipe thread tape that’s resistant to the action of natural gas on all
male pipe threads when making connections.
xDisconnect your gas grill from its fuel source when testing the gas supply at high pressures. This gas grill
and its individual shut off valve must be disconnected from the gas supply pipe system during any pressure
testing greater than 1/2 psi (3.5 kPa).
xTurn off your gas grill when testing the gas supply at low pressures. During any pressure testing at
pressures equal to or less than 1/2 psi (3.5 kPa), you must close the individual manual shut off valve to
isolate the grill from the gas supply pipe system.
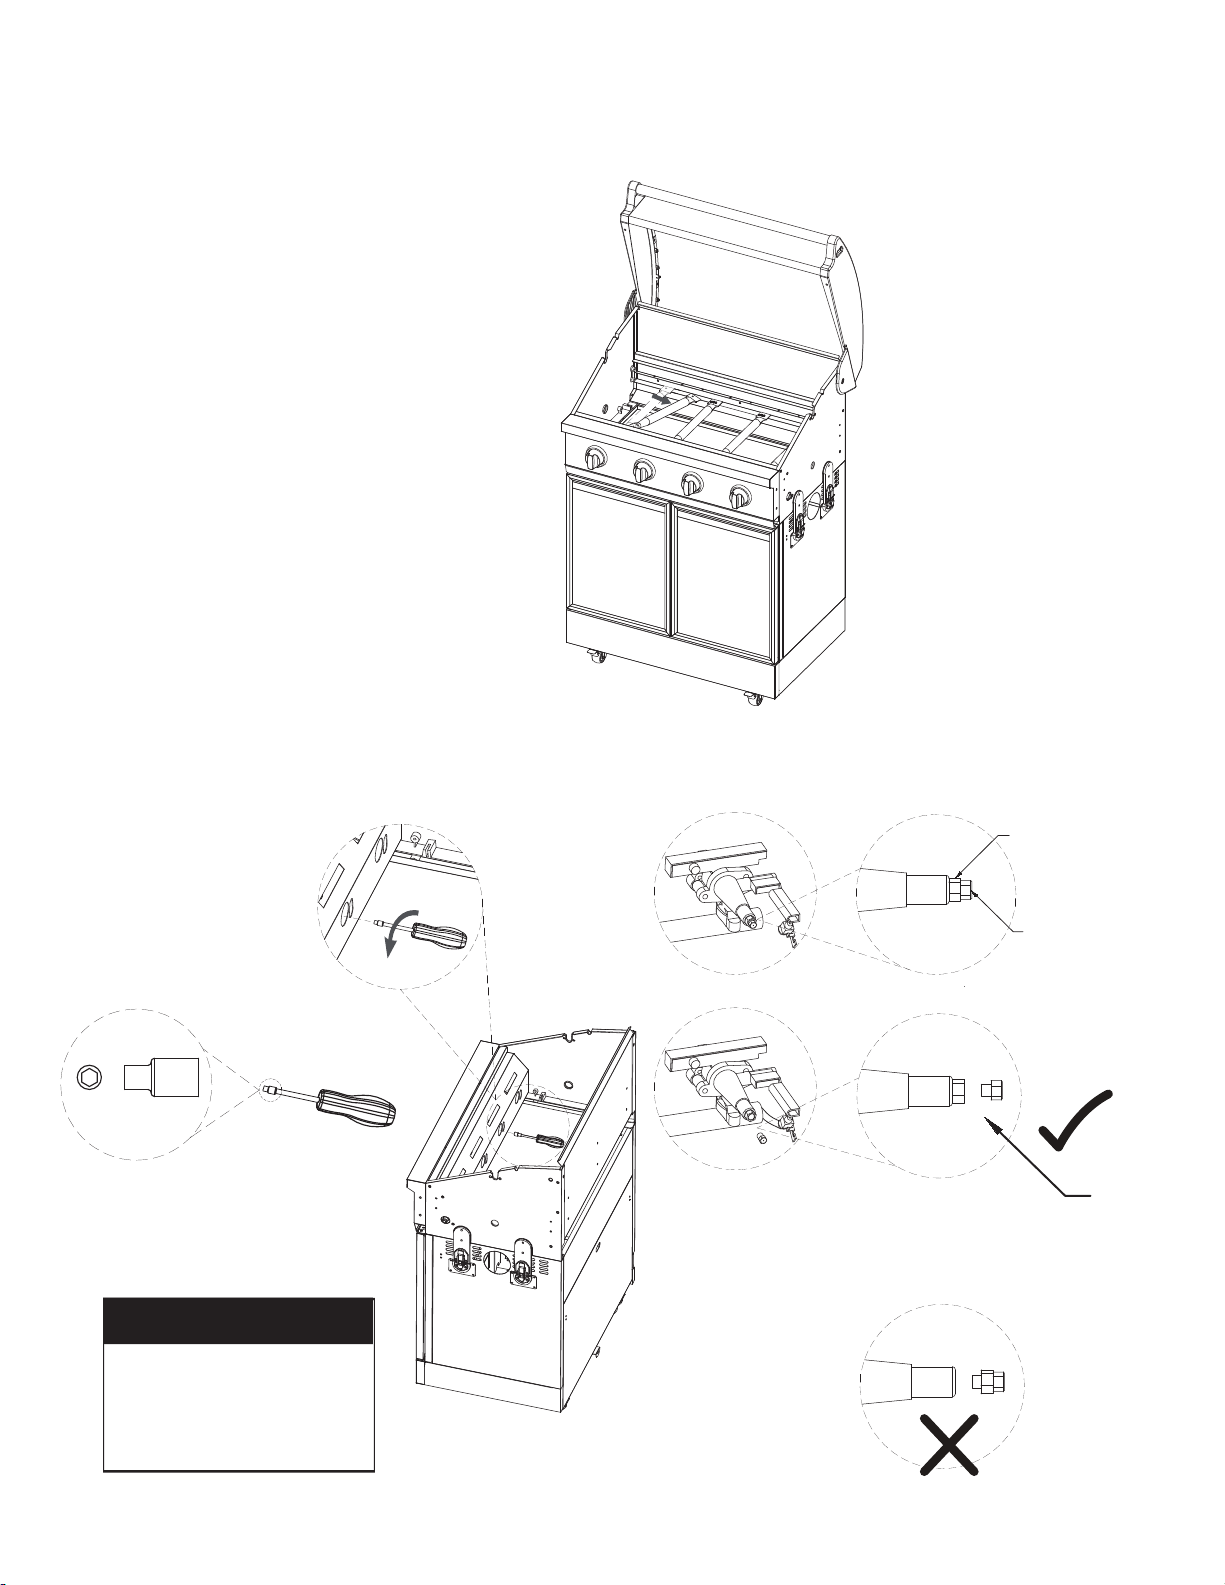
xThe quick disconnect is attached to a 3/8-inch NPT thread from the gas source. The quick disconnect fitting
is a hand-operated device that automatically shuts off the flow of gas from the source when it is
disconnected.
xThe quick disconnect fitting can be installed horizontally or pointing downward. DO NOT install the fitting
with the opening pointing upward because the fitting could collect water and debris.
xDust covers (plastic plugs) are provided with the quick disconnect to help keep the open ends clean while
disconnected.
xThe outdoor connector must be firmly attached to a ridged permanent construction.
xThe quick disconnect MUST BE installed above ground.
xWARNING: Do not route the 10-foot quick disconnect hose under a deck. The hose must be visible and
inspected prior to each grill use.
Gas Line Piping
xIf you are using less than 50 feet of gas line, use a 5/8" O.D. tube. For lengths greater than 50 feet, use
one size larger.
xGas piping may be copper tubing (type K or L), polyethylene plastic tube (with a minimum wall thickness
of 0.062 in.), or standard weight (schedule 40) steel or wrought iron pipe.
xCopper tubing must be tin-lined if the gas contains more than 0.3 grams of hydrogen sulfide per 100 ft.3
of gas.
xPlastic tubing is suitable only for outdoor, underground use.
xGas piping in contact with earth, or any other material which may corrode the piping, must be protected
against corrosion in an approved manner.
xUnderground piping must have a minimum of 18" cover.
Test Connections
All connections and joints must be thoroughly tested for leaks in accordance with local codes and all listed
procedures in the latest edition of ANSI Z21.58-2018/CSA 1.6-2018.
2

Preparation:
Before beginning conversion, make sure all parts are present. Place the grill on flat, level surface.
Make sure all the control knobs are in the OFF position, LP tank valve is closed, and tank is
disconnected from regulator and removed from the grill.
DANGER
Do not use an open flame to check for gas leaks. Be sure there are no sparks or open flames in the
area while you check for gas leaks. This will result in a fire or explosion which can cause serious
bodily injury or death and damage to property.
WARNING
The installation must conform with local codes or, in the absence of local codes, with either the
National Fuel Gas Code, ANSI Z223.1/NFPA 54, or the Natural Gas and Propane Installation Code,
CSA B149.1, or the Propane Storage and Handling Code, CSA B149.2, or the Standard for
Recreational Vehicles, ANSI A119.2/NFPA 1192, and CSA Z240 RV Series, Recreational Vehicle
Code, as applicable.
Convert to Natural Gas
3
Flathead tool
1DWXUDO*DV Regulator
Bracket
Screw
Adaptor
1DWXUDO*DV5HJXODWRU
&RQQHFWLRQ+RVH
1DWXUDO*DV+RVH

4
Step 2: Remove the cotter pins.
Step 1: Remove the flame tamers, cooking grates, and the warming rack.

PP
Step 3: Remove the burners.
Step 4: Remove the LP orifices.
/3RULILFH
5
1*RULILFH
Please make sure to ONLY remove the liquid
propane (LP) orifices for the conversion
process, and DO NOT remove the natural gas
orifices.
:DUQLQJ
If your TYTUS Grill is an Island
model (with side carts) you must
also remove the LP orifice from the
side or sear burner.

Step 5:
Install with the proper
angle for easy installation.
6
Remove the control knobs and use flathead tool to make two counterclockwise turns.
Turning this will allow natural gas to flow when it is connected.
Step 6: Install the burners.
Make sure the cross lighting ports are toward the bottom when
installing.
:DUQLQJ
Failure to turn the control knob
counterclockwise 2 times will result in low heat
setting working improperly.
Turn counterclockwise twice.

Step 7: Install the cotter pins.
Step 8: Install the control knobs.
7

8
Step 9: Install the NG regulator on the bracket and install the kit on bottom box.
Step 10: Connect to the natural gas source.

Step 11: Open the right cabinet door, and pull off the ignition wire attached on the valve.
9
Step 12: Remove 2 screws to remove the sear burner.
If your grill has a SEAR burner:

10
Step 11: Remove 2 screws to remove the side burner.
If your grill has a SIDE burner:
Step 12: Remove the side burner unit from the top
cap.

11
/3RULILFH
1*RULILFH
Please make sure to ONLY remove the liquid
propane (LP) orifices for the conversion process,
and DO NOT remove the natural gas orifices.
Step 13: Remove the liquid propane orifices from the side or sear burner valve and leave
the natural gas orifices in place. Reinstall the side or sear unit.
6mm

16
NATURAL GAS SUPPLY
QUICK
DISCONNECT
INSIDE WALL
OUTSIDE WALL
MALE
FITTING
TO NATURAL GAS
REGULATOR
LOCKING GAS
SHUT OFF VALVE
LOCKING
GAS
SHUT OFF
VALVE
Additional
Hardware Not
Included
12
The TYTUS Grills conversion kit is designed to ONLY fit TYTUS LP convertible Grills
and Grill Islands.
If the hose becomes worn or damaged, please contact customer service.
Figure 1
15.Reinstall the four flame tamers, two cooking grates, and warming rack .
Typical NG Grill Pipe Installation . Hose Requirements.
Step 14: Remove the control knobs and use flathead tool to make two counterclockwise turns.
Turning this will allow natural gas to flow when it is connected. Reinstall the knob.
:DUQLQJ
Failure to turn the control knob
counterclockwise 2 times will result in low
heat setting working improperly.
Turn counterclockwise twice.
Table of contents
Other Tytus Grill Accessories manuals