U-Line H-9424 User manual

PAGE 1 OF 36 0521 IH-9424
1-800-295-5510
uline.com
H-9424
20" AUTO FLOOR SCRUBBER
WARNING! To minimize the risk of electrocution
or injury:
•Disconnect the machine from the main
power socket after use or before performing
maintenance.
•Never allow the machine to be used as a toy.
Be extremely vigilant whenever the machine is
operated by or near children.
•Only operate the machine as indicated in
these instructions. Only use the accessories
recommended by the manufacturer.
•Do not use the machine if the power cable
or plug is damaged. If the machine does not
function as it should or has been dropped,
damaged, left outdoors or has fallen in
water, have it checked and repaired by an
authorized service or repair technician.
•Do not move or transport the machine by
pulling on its power cable. Do not use the
power cable as a handle, close doors on it or
pull it over sharp objects or corners. Do not
run over the power cable with the machine.
Keep the power cable clear of hot surfaces.
•Do not disconnect the machine by pulling on
the power cable. Grip the plug, not the cable,
to disconnect the machine.
•Do not insert objects into the ventilation slots.
Do not operate the machine with blocked
ventilation slots. Remove all dust, dirt, hair and
debris that might be blocking the airflow.
•Keep hair, loose garments, fingers and all
other parts of the body clear of slots and
moving parts.
•Do not use the machine to clean up
flammable or combustible liquids like
gasoline, and do not operate the machine in
areas where such liquids may be present.
•The machine must not be used for purposes
other than those for which it was expressly
designed.
•Respect all safety standards and conditions
applicable to the type of building in
which the machine is to be operated
(pharmaceutical companies, hospitals,
chemical companies, etc.).
•Do not operate the machine in inadequate
lighting, explosive atmospheres, on public
roads or to clean dirt that is hazardous to
health (dust, gas, etc.).
•The machine must be kept indoors at all
times.
•The machine is designed to operate in
temperatures between 39°F and 95°F. It can
be stored in temperatures between 32°F and
122°F when not in use.
•The machine must be used at an altitude
below 6,562'.
•The machine is designed to operate at
relative humidity levels between 0% and 95%.
•The machine must be used exclusively by
people trained in its use and/or who have
demonstrated their ability and have been
expressly authorized to use it.
SAFETY
Para Español, vea páginas 13-24.
Pour le français, consulter les pages 25-37.

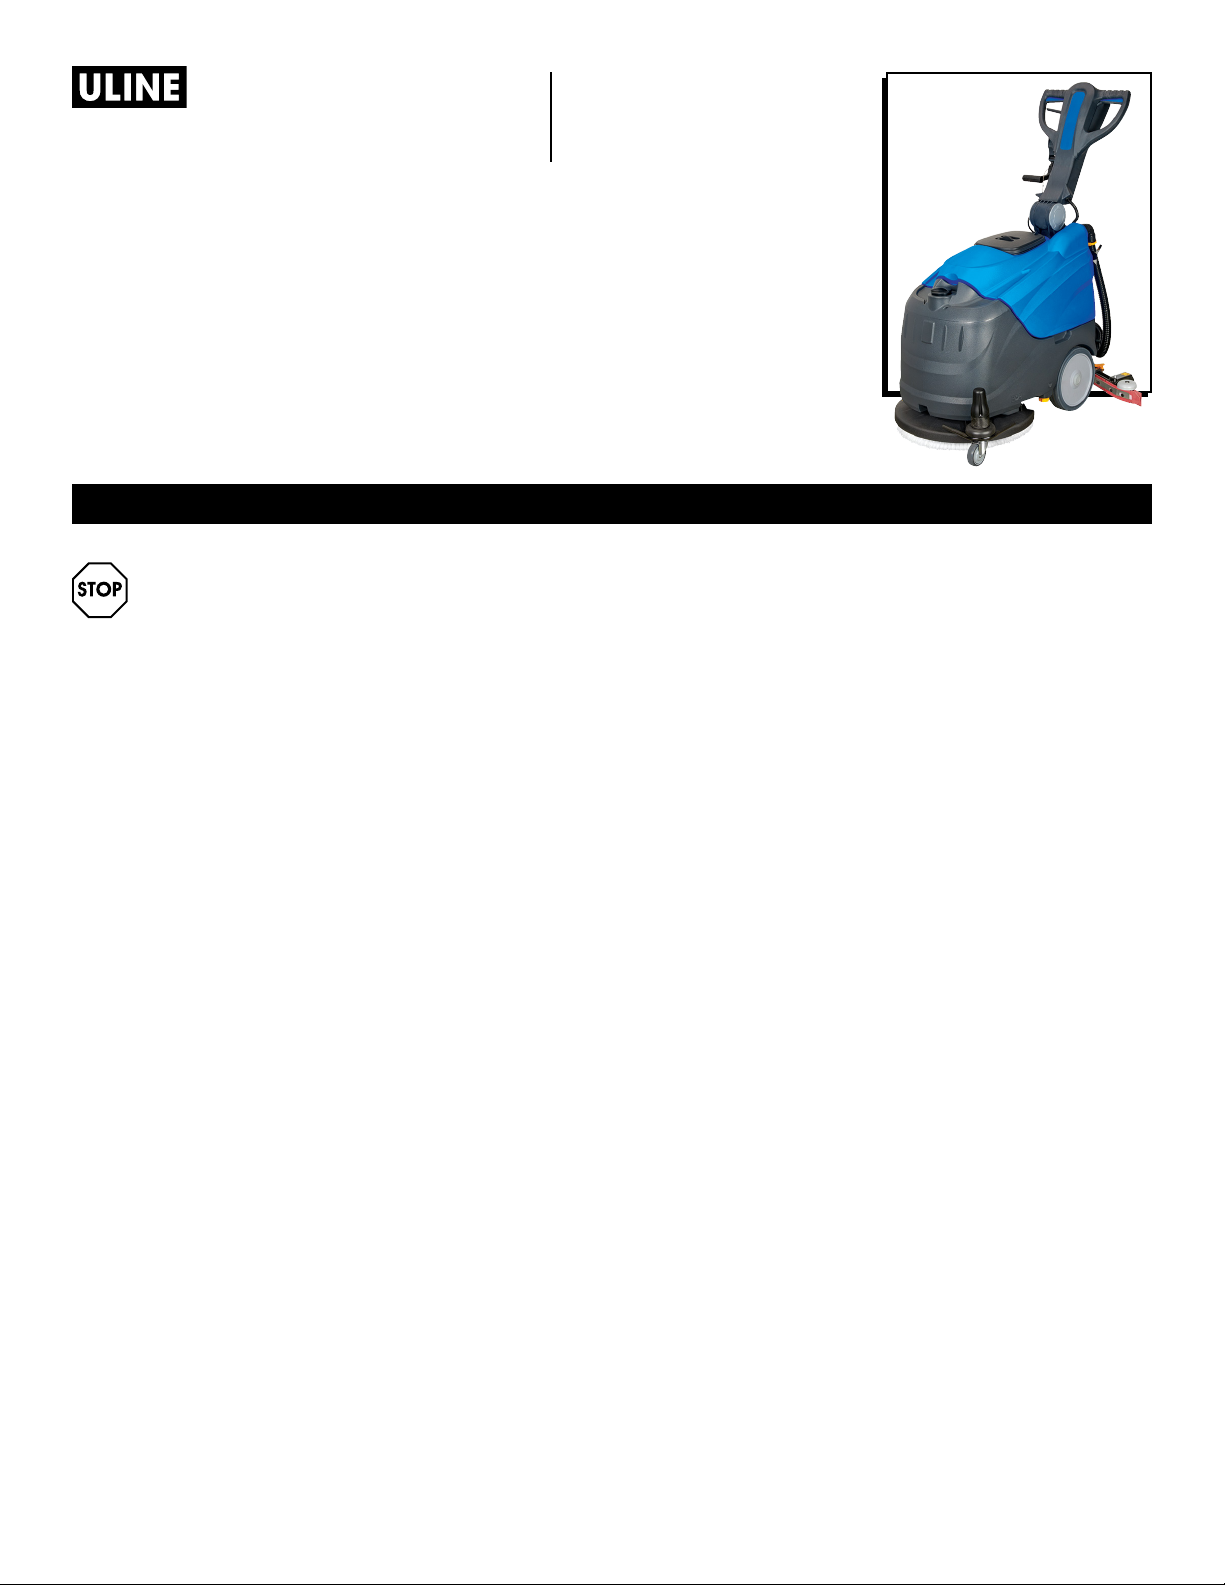
PAGE 2 OF 36 0521 IH-9424
SAFETY CONTINUED
•The machine is not intended for use by
people (including children) with reduced
physical, sensory or mental capabilities, or
lack of experience and knowledge, unless
they are supervised by a person responsible
for their safety and have received instruction
in the use of the machine.
•Never use detergents other than those
specified.
•Keep detergents out of children's reach.
In the event of contact with the eyes,
wash immediately with abundant water. If
ingested, consult a doctor immediately.
•A wide range of personal objects may cause
serious accidents. Before beginning work,
remove jewelry, watches, ties, etc.
•The operator must always use personal
protective equipment: apron or overalls,
nonslip waterproof shoes, rubber gloves,
goggles, ear protectors and mask to protect
the respiratory tract.
•Do not pick up burning or smoking material
like cigarettes, matches or hot ashes. Never
operate the machine on slopes or ramps
of more than 2°. Always maneuver with
care and avoid reversing. If transporting
the machine over ramps or steep slopes, to
prevent it from tipping over or running out of
control, completely empty the detergent and
recovery tanks and remove the batteries.
•Never park the machine on a slope.
•Never leave the machine unattended while
switched on.
•Never use the machine to transport people
or goods or to tow things. Do not tow the
machine.
•Never rest objects of any weight on the
machine for any reason.
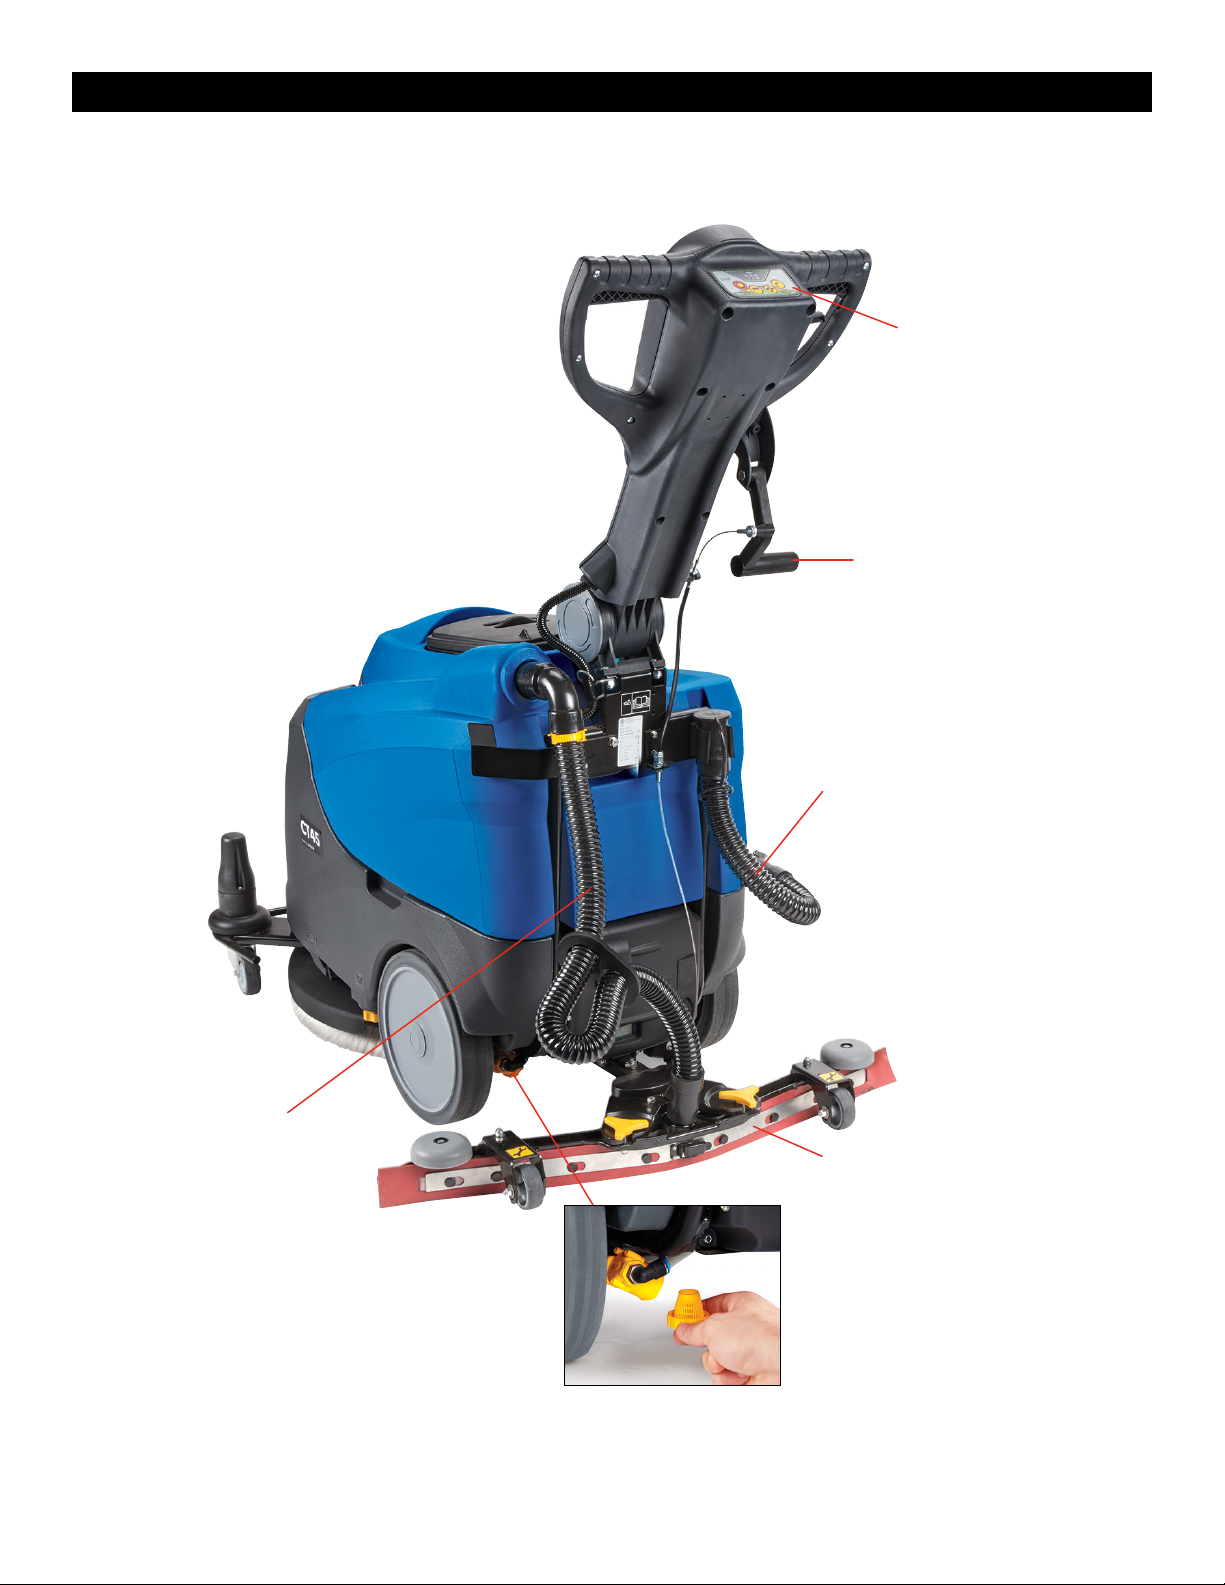
•Do not remove, modify or bypass safety
devices (brush guards, battery covers, fuses,
electric system covers, etc.).
•Always check the condition of the brush
guard before operating the machine. If
any damage is found, do not operate the
machine. Have the guard replaced by
personnel trained and authorized by the
manufacturer.
•Never touch the brush unless the machine is
disconnected from the power supply.
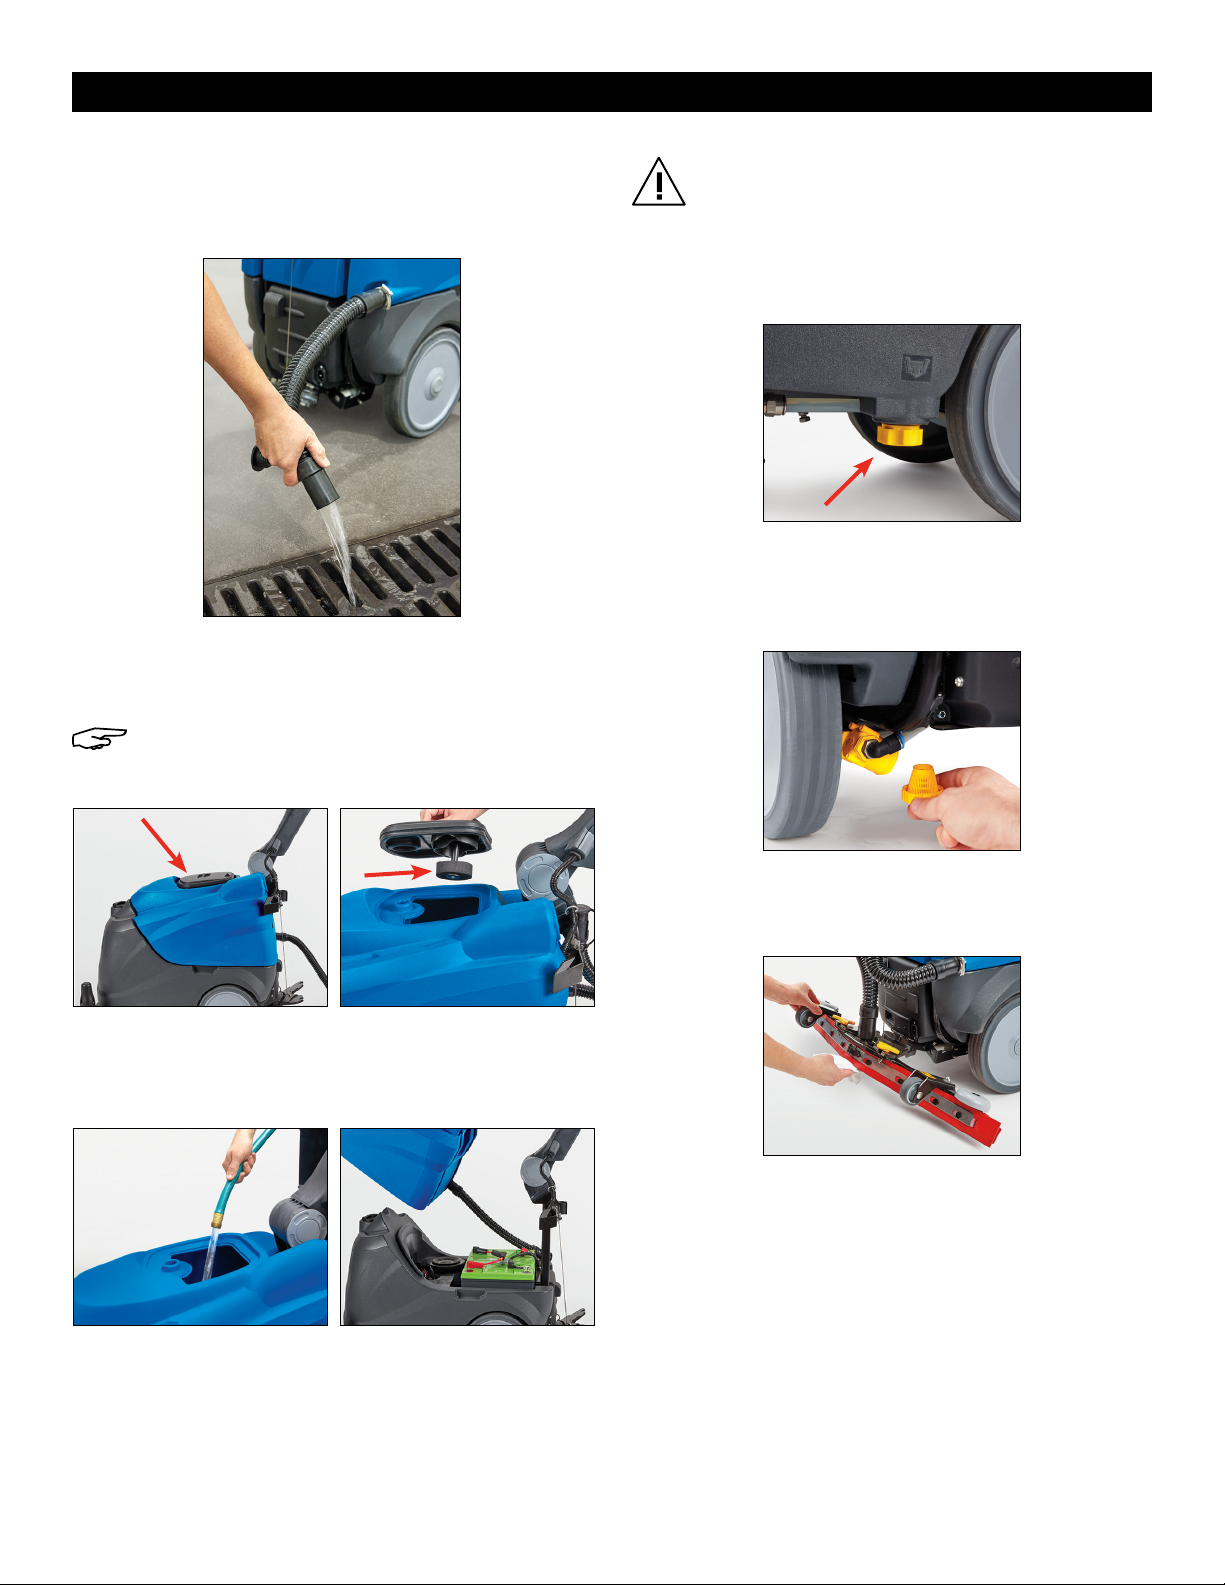
•The fluids collected during use contain
detergent, disinfectant, water, and organic
and inorganic material. They must be
disposed of in accordance with current
legislation.
•Never wash the machine with water jets.
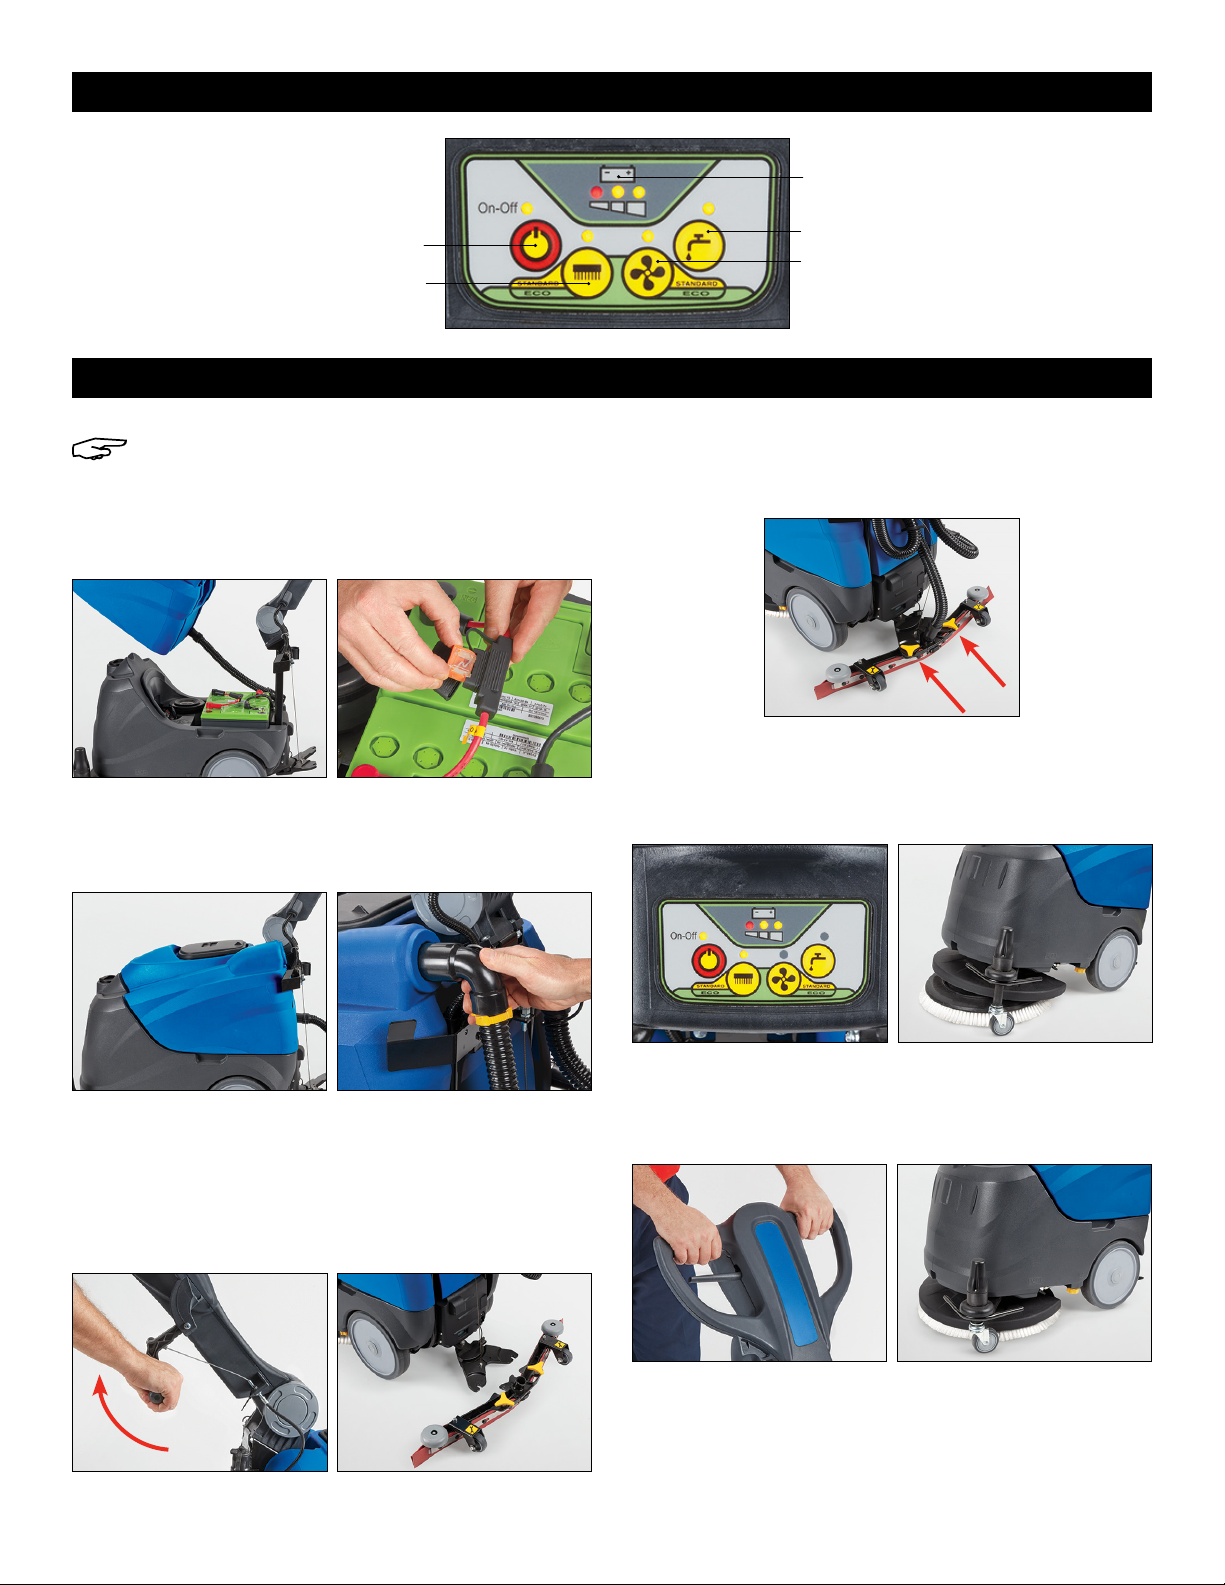
•Use only the battery charger supplied with
the machine to recharge the batteries.
•Always follow the battery manufacturer's
instructions.
•Protect the batteries from impurities such as
metal dust.
•Always keep the batteries clean and dry to
avoid surface leakage currents.
•Never rest metal tools on batteries as they
could cause short circuits and lead to
explosions.
•Never wear metal rings or bracelets when
working on batteries.
•Do not smoke, use open flames or sparks
near batteries.
•Never lift or handle batteries by their
terminals.
•Batteries must be disposed of through proper
channels and not as normal waste.
•Never attempt to remove the battery cover to
add water or acid to the cell(s) inside.

PAGE 3 OF 36 0521 IH-9424
PARTS
Recovery
Tank
Detergent
Tank
Nylon Brush
Detergent Tank Drain
Float Switch
Drive Levers
Handle Release

PAGE 4 OF 36 0521 IH-9424
Control Panel
Squeegee Release
Drain Hose
Recovery
Tank Hose
Squeegee
Assembly
Detergent Tank Filter
PARTS CONTINUED

PAGE 5 OF 36 0521 IH-9424
NOTE: Battery must be fully charged before first use.
INSTALL FUSE
1. Disconnect hoses from recovery tank and remove
tank. Insert fuse. (See Figures 1 and 2)
Figure 1 Figure 2
2. Snap tank into position and place lid on top.
Reconnect hoses to back of tank.
(See Figures 3 and 4)
Figure 3 Figure 4
ASSEMBLE SQUEEGEE
1. Raise squeegee mounting bracket by pulling up
squeegee release handle. Position squeegee bar so
wheels face backward. (See Figures 5 and 6)
Figure 6Figure 5
2. Insert squeegee into slots on squeegee mounting
bracket. Turn yellow knobs clockwise to tighten.
Attach hose. (See Figure 7)
Figure 7
INSTALL BRUSH
1. Turn on brush only. Position brush on floor; move
scrubber over it. (See Figures 8 and 9)
Figure 8 Figure 9
2. Pull drive levers to activate scrubber and spin on
brush. Brush will spin smoothly once seated correctly.
(See Figures 10 and 11)
Figure 10 Figure 11
BUTTON FUNCTIONS:
GENERAL INFORMATION CONTINUED
ASSEMBLY
Fan
Water
Power
Brush
Battery
Indicator

PAGE 6 OF 36 0521 IH-9424
OPERATION
FILL DETERGENT TANK
NOTE: Use a non-foaming detergent with a pH
range between 7 and 11. Be sure to follow the
detergent instructions for proper dilution.
NOTE: Empty the recovery tank each time
detergent tank is filled.
1. Fill detergent tank with water and/or detergent, if
desired. If using detergent, dilute according to
solution instructions. (See Figure 12)
2. Open flow from detergent tank by pushing
detergent tap lever up to horizontal position. Leave
open. (See Figure 13)
Figure 12 Figure 13
BEGIN WORK
1. Lower squeegee by pushing squeegee release
handle down. Turn on unit and press brush button.
All lights will light up and unit is fully functional.
(See Figures 14 and 15)
Figure 14 Figure 15
2. Pull drive levers to begin work. (See Figure 16)
Figure 16
NOTE: The battery should be charged after
every use. For optimal battery life, leave
plugged in when not in use.
WHEN FINISHED CLEANING
1. Turn off machine by pressing the On/Off button
for at least four seconds.
2. Empty the recovery tank (see Maintenance).
3. Raise squeegee and wipe down blade with a
soft cloth.
4. Close the detergent tap.
5. Spin off brush (see Maintenance). Rinse.
6. Charge the battery (see Maintenance).

PAGE 7 OF 36 0521 IH-9424
MAINTENANCE
DAILY MAINTENANCE
1. Use the attached drain hose to empty the dirty
water from the recovery tank. (See Figure 17)
Figure 17
2. Remove lid and check that recovery tank float is
undamaged, clean and moves freely on pin.
(See Figures 18 and 19)
NOTE: The float switch in the recovery tank turns
suction off when the tank is full. If the switch
trips, stop work and empty tank.
Figure 18 Figure 19
3. Clean the recovery tank by rinsing out with water. Fill
the tank with a hose and empty using the drain hose,
or lift off the tank to rinse. (See Figures 20 and 21)
Figure 20 Figure 21
DANGER! Use suitable personal protective
equipment to drain detergent tank.
4. Move machine near a drain to empty tank. Unscrew
the detergent tank drain cap. When tank is
completely empty, screw the cap back on again.
(See Figure 22)
Figure 22
5. Clean the detergent drain filter by unscrewing the
tank filter cap and removing the filter assembly.
Clean thoroughly and re-secure in place.
(See Figure 23)
Figure 23
6. Raise the squeegee and wipe down with a soft
cloth. Check that it is clean and the blades are not
damaged. (See Figure 24)
Figure 24

PAGE 8 OF 36 0521 IH-9424
MAINTENANCE CONTINUED
7. Tilt the scrubber back. It may still rest on the support
caster but be slightly lifted. Activate the scrubber by
pulling the drive levers to spin off the brush. Rinse the
brush. (See Figures 25 and 26)
Figure 25 Figure 26
NOTE: If the red LED battery indicator starts
flashing, the batteries are nearly drained. After
a few seconds, the brush and suction motor
shut down to prevent draining the batteries
excessively. Charge the batteries.
8. Check battery charge. (See Figure 27)
Figure 27
9. To recharge batteries, plug in battery charger using
electrical cord provided with machine. Charge is
complete when the green LED light is on.
(See Figures 28 and 29)
Figure 28 Figure 29
REPLACING THE SQUEEGEE BLADE
Over time, constant rubbing along the floor causes the
squeegee blade to become rounded and cracked.
Check the state of wear frequently and replace as
needed.
a. For perfect drying, adjust squeegee so the edge
of rear blade bends during operation by about
45° with respect to the floor at every point.
b. Adjust the height of the blade by regulating the
height of the wheels positioned on the squeegee.
(See Figure 30)
c. Adjust the slope of squeegee by tightening or
loosening the screw. (See Figure 31)
Figure 30 Figure 31
1. Remove the squeegee blade by releasing the
middle clip. (See Figure 32)
Figure 32
2. Remove the blade retainers by sliding them toward
the outside of the squeegee, then pull them off.
Remove the squeegee blade by pulling it off the
squeegee body tabs. (See Figures 33 and 34)
Figure 33 Figure 34
3. Reuse the same blade by reversing the edge in
contact with the floor. The blades should be reused
until all four edges are worn out and can be
replaced at once.

PAGE 9 OF 36 0521 IH-9424
MAINTENANCE CONTINUED
4. Align the new (or reversed) blades with the tabs on
the squeegee body and push into place.
5. Reposition the two blade retainers on the squeegee
body and fasten the clip.
BRUSH REPLACEMENT
1. Lay the brush on the floor and position the scrubber
over it. (See Figure 35)
2. Activate the scrubber by pulling the drive levers to
spin on the brush. The brush will spin smoothly when
properly engaged with the scrubber. (See Figure 36)
Figure 35 Figure 36
CHECK MOTOR FUSES
NOTE: Fuses need to be replaced with the
correct value. Value is listed on the fuse.
• Main fuse (A) between batteries – 40 amp
• Brush motor (B) – 30 amp
• Vacuum motor (C) – 20 amp
1. Lift off recovery tank. (See Figure 37)
Figure 37
2. Locate fuses. (See Figure 38)
Figure 38
C
B
A
3. Pull off black caps from the brush motor fuse (B) and
the vacuum motor fuse (C). (See Figures 39 and 40)
Figure 39 Figure 40
C
B
4. Check the fuse to see if it is blown by looking in
the fuse window. If the metal wire is present and
not broken, the fuse is good. If the metal wire is
missing or broken, the fuse is bad and needs to be
replaced with a new fuse. (See Figure 41)
Figure 41
NOTE: Battery should be charged after every
use. For optimal battery life, leave plugged in
when not in use.
PERIODS OF INACTIVITY
If the machine will not be used for longer than 3 weeks:
• Remove the squeegee and brush, or pad driver,
wash and put them away in a dry place (preferably
in a bag or wrapped in plastic film) away from dust.
• Ensure the tanks are completely empty and clean.
• Charge the batteries completely.
• Disconnect the main fuse and store the fuse in a dry
place.
DANGER! Do not check the batteries by
sparking.
• The batteries give off flammable fumes. Put out all
fires and hot embers before checking or topping up
the battery level.
• Perform the operations in a ventilated area.
• To avoid permanent damage to the batteries, do
not run them down completely.

PAGE 10 OF 36 0521 IH-9424
TROUBLESHOOTING
OPERATING ISSUE CAUSES RECOMMENDATIONS
The machine does not work. The batteries need to be charged. Charge the batteries.
(See Instructions)
The brush does not rotate. The brush button LED is off.
The brush motor thermal cutout has
tripped; the motor has overheated.
The batteries need to be charged.
The brush motor fuse has blown.
Press the brush button.
Turn off the unit. Let the machine
cool down for at least 45 minutes.
Charge the batteries.
Replace the brush motor fuse.
The machine does not
clean evenly.
The brush or floor cleaning pad is
worn.
Replace the worn brush or floor
cleaning pad.
No detergent is delivered. The detergent button LED is off.
The detergent tank is empty.
The brush motor is off.
The hose delivering the detergent
to the brush is blocked.
The detergent tap is dirty or faulty.
The in-line filter is dirty (left side from
operator's position near the wheel).
Press the detergent button.
Fill the detergent tank.
Turn on the motor by pressing the
brush button.
Unblock and open the detergent
tank tap.
Have the detergent tap cleaned or
replaced.
Clean the filter. Make sure to close
the detergent tap prior to cleaning.
The suction motor does not
start.
The fan button LED is off.
The vacuum motor fuse is blown.
Press the fan button.
Replace the vacuum motor fuse.
The squeegee does not
clean or has poor suction.
The edge of the squeegee blades
in contact with the floor is worn.
The squeegee or hose is blocked or
damaged.
The float switch has tripped (dirty
water drum), is clogged by dirt or
broken.
The suction hose is blocked.
The suction hose is not connected
to the squeegee or is damaged.
Debris is trapped between the
squeegee blades.
Replace the squeegee blades.
Unblock and repair the damage.
Empty the recovery tank or reset
the float switch.
Unblock the hose.
Connect or repair the hose.
Clean out debris from the
squeegee blades.

PAGE 11 OF 36 0521 IH-9424
TROUBLESHOOTING CONTINUED
OPERATING ISSUE CAUSES RECOMMENDATIONS
The machine leaves stripes of
wet floor.
Dust or debris on the floor is
catching on the squeegee blades.
Debris is trapped between the
squeegee blades.
The squeegee blades are worn.
Sweep the floor prior to using the
machine.
Clean out debris from the
squeegee blades.
Replace the squeegee blades.
The batteries do not provide
the nominal work time.
The battery charger is not working. See battery charging instructions.
The battery discharges too
fast during use, even though it
has been charged correctly.
The battery is new and does not
deliver 100% of its expected
capacity.
This is normal. New batteries require
a break-in period of approximately
10 charging cycles. Unplug unit and
use as normal. Charge after use.
ERROR CODE DISPLAY
ERROR CODE ERROR
Brush Button LED:
2 quick flashes / pause / 2 quick flashes. Brush short circuit error.
Brush Button LED:
1 flash / pause/ 1 flash. Overcurrent error.
Fan Button LED:
2 quick flashes / pause / 2 quick flashes. Suction short circuit error.
Fan Button LED:
1 flash / pause / 1 flash. Overcurrent error.
Brush Button LED:
+ Fan Button LED, synchronized flash / pause /
synchronized flash.
Electronic board temperature error.
Brush Button LED:
4 quick flashes / pause / 4 quick flashes. Brush thermal protector error.
Battery Indicator Yellow LED:
7 quick flashes / pause / 7 quick flashes.
Machine on with battery charger
powered error.
Battery Indicator Yellow LED:
5 quick flashes / pause / 5 quick flashes. Excess battery voltage error.

PAGE 12 OF 36 0521 IH-9424
BATTERY CHARGER VISUAL SIGNALS
NOTE: Refer to Battery Charger manual for full
instructions.
OPERATING SIGNALS
Red LED Flashing (twice)
Battery charger is set to charge.
Red LED On
First phase of charge in progress.
Yellow LED On
Second phase of charge in progress.
Green LED On
Charge complete.
TROUBLESHOOTING
Yellow LED Flashing
Unsuitable battery OR battery not connected
OR output short circuit.
Red LED Flashing
Battery has reached its maximum charging time limit.
NOTE: This is normal. New batteries require a break-in
period of approximately 10 charging cycles. Unplug
unit and use as normal. Charge after use.
1
-800-295-551
0
uline.com

PAGE 13 OF 36 0521 IH-9424
H-9424
FREGADORA DE PISOS
AUTOMÁTICA DE 20"
800-295-5510
uline.mx
π
¡ADVERTENCIA! Para minimizar el riesgo de
electrocución o lesiones:
•Desconecte la máquina del enchufe
principal después de utilizarla o antes de
darle mantenimiento.
•No permita que la máquina se utilice como
juguete. Manténgase alerta siempre que la
máquina sea operada por niños o cerca de
ellos.
•Utilice la máquina únicamente como se
indica en estas instrucciones. Solo use los
accesorios recomendados por el fabricante.
•No utilice la máquina si el cable de
alimentación o el enchufe están dañados.
Si la máquina no funciona como debería o
se ha caído, dañado, dejado en exteriores o
mojado, haga que un taller o un técnico de
reparación autorizados la revise y repare.
•No mueva ni transporte la máquina jalando
el cable eléctrico. No use el cable eléctrico
como asa, ni cierre puertas sobre él o lo jale
sobre objetos filosos o esquinas. No pase la
máquina sobre el cable eléctrico. Mantenga
el cable eléctrico alejado de las superficies
calientes.
•No desconecte la máquina jalando el cable
eléctrico. Para desconectar la máquina
agarre la clavija, no el cable.
•No inserte objetos en las ranuras de
ventilación. No opere la máquina con las
ranuras de ventilación bloqueadas. Quite
todo el polvo, la suciedad, el cabello y los
desechos que puedan estar bloqueando el
flujo de aire.
•Mantenga el cabello, ropa holgada, dedos
y todas las partes del cuerpo lejos de las
aberturas y las partes móviles.
•No use la máquina para limpiar líquidos
inflamables o combustibles como gasolina y
no la opere en áreas donde dichos líquidos
puedan estar presentes.
•La máquina no debe utilizarse para fines
distintos a aquellos para los que fue diseñada
expresamente.
•Respete todas las normas y condiciones de
seguridad aplicables al tipo de edificio en
el que se utilizará la máquina (empresas
farmacéuticas, hospitales, empresas
químicas, etc.).
•No utilice la máquina en lugares con
iluminación inadecuada, atmósferas
explosivas, en vías públicas o para limpiar
suciedad peligrosa para la salud (polvo, gas,
etc.).
•La máquina debe mantenerse en el interior
en todo momento.
•La máquina está diseñada para funcionar a
temperaturas entre 4° y 35°C (39° y 95°F). Se
puede almacenar a temperaturas entre 0° y
50°C (32° y 122°F) cuando no esté en uso.
•La máquina debe utilizarse a una altitud
menor a los 6,562'.
•La máquina está diseñada para funcionar en
niveles de humedad relativa entre 0% y 95%.
SEGURIDAD

PAGE 14 OF 36 0521 IH-9424
CONTINUACIÓN DE SEGURIDAD
•La máquina debe ser utilizada
exclusivamente por personas capacitadas
en su uso y/o que hayan demostrado su
habilidad al usarla y estén expresamente
autorizadas para ello.
•La máquina no está diseñada para que
la utilicen personas (incluidos niños) con
capacidades físicas, sensoriales o mentales
reducidas, o con falta de experiencia
y conocimientos, a menos que estén
supervisados por una persona responsable
de su seguridad y hayan recibido
instrucciones sobre el uso de la máquina.
•Nunca utilice detergentes distintos a los
especificados.
•Mantenga los detergentes fuera del alcance
de los niños. En caso de contacto con los
ojos lave inmediatamente con abundante
agua. En caso de ingestión, consulte a un
médico de inmediato.
•Una amplia variedad de objetos personales
puede provocar accidentes graves. Antes
de comenzar a trabajar, retire joyas, reloj,
corbata, etc.
•El operador siempre debe usar equipo
de protección personal: mandil u overol,
zapatos impermeables antideslizantes,
guantes de caucho, goggles, protectores
auditivos y mascarilla protectora del tracto
respiratorio.
•No limpie nada que esté ardiendo o
humeando, como cigarrillos, cerillos o
ceniza caliente. Nunca opere la máquina
en pendientes o rampas de más de 2°.
Maniobre siempre con cuidado y evite ir en
reversa. Si transporta la máquina por rampas
o pendientes pronunciadas, para evitar
que se vuelque o se salga de control, vacíe
completamente los depósitos de detergente
y de recuperación y retire las baterías.
•Nunca estacione la máquina en una
pendiente.
•Nunca deje la máquina desatendida
mientras esté encendida.
•Nunca utilice la máquina para transportar
personas o mercancías ni para remolcar
cosas. No remolque la máquina.
•Nunca apoye objetos de ningún peso sobre
la máquina por ningún motivo.
•No retire, modifique ni omita los dispositivos
de seguridad (protectores de cepillo, tapas
de baterías, fusibles, tapas de sistemas
eléctricos, etc.).
•Siempre compruebe el estado del protector
de cepillo antes de utilizar la máquina.
Si encuentra algún daño, no opere la
máquina. Haga que el personal capacitado
y autorizado por el fabricante reemplace el
protector.
•Nunca toque el cepillo a menos que la
máquina esté desconectada de la corriente.
•Los fluidos recolectados durante el uso
contienen detergente, desinfectante, agua
y material orgánico e inorgánico. Deben
eliminarse de acuerdo con la legislación
vigente.
•Nunca lave la máquina con hidrolavadora.
•Utilice solo el cargador de batería
suministrado con la máquina para
recargarlas.
•Siempre siga las instrucciones del fabricante
de la batería.
•Proteja las baterías de impurezas como el
polvo de metal.
•Siempre mantenga las baterías limpias y
secas para evitar corrientes de fuga en la
superficie.
•Nunca apoye herramientas de metal
sobre las baterías, ya que podrían causar
cortocircuitos y provocar explosiones.
•Nunca use anillos o brazaletes de metal
cuando trabaje con baterías.
•No fume, ni use flamas o chispas cerca de
las baterías.
•Nunca use las terminales para levantar o
manipular las baterías.
•Las baterías deben desecharse a través de
los canales adecuados y no como desechos
normales.
•Nunca intente quitar la tapa de la batería
para agregar agua o ácido a la(s) celda(s)
en el interior.

PAGE 15 OF 36 0521 IH-9424
PARTES
Tanque de
Recuperación
Tanque de
Detergente
Cepillo de
Nylon
Drenaje del Tanque de
Detergente
Interruptor del Flotador
Palancas de Manejo
Asa de Liberación

PAGE 16 OF 36 0521 IH-9424
Panel de
Control
Liberador del
Jalador
Manguera de
Desagüe
Manguera del
Tanque de
Recuperación Ensamble del
Jalador
Filtro del Tanque de Detergente
CONTINUACIÓN DE PARTES

PAGE 17 OF 36 0521 IH-9424
NOTA: La batería debe estar completamente
cargada antes del primer uso.
INSTALAR EL FUSIBLE
1. Desconecte las mangueras del tanque de
recuperación y retire el tanque. Inserte el fusible.
(Vea Diagramas 1 y 2)
Diagrama 1 Diagrama 2
2. Coloque a presión el tanque de recuperación en
la unidad y ponga encima la tapa. Reconecte las
mangueras a la parte trasera del tanque.
(Vea Diagramas 3 y 4)
Diagrama 3 Diagrama 4
ENSAMBLAR EL JALADOR
1. Levante el soporte de instalación para el jalador
tirando hacia arriba del asa de liberación. Coloque
la barra del jalador de modo que las ruedas
queden hacia atrás. (Vea Diagramas 5 y 6)
Diagrama 6Diagrama 5
2. Inserte el jalador en las ranuras del soporte de
instalación. Gire las perillas amarillas en el sentido
de las manecillas del reloj para apretarlo. Conecte
la manguera. (Vea Diagrama 7)
Diagrama 7
INSTALAR EL CEPILLO
1. Encienda solo el cepillo. Coloque el cepillo en el
suelo; mueva la fregadora sobre él.
(Vea Diagramas 8 y 9)
Diagrama 8 Diagrama 9
FUNCIÓNES DE LOS
BOTONES:
CONTINUACIÓN DE INFORMACIÓN GENERAL
ENSAMBLE
Ventilador
Agua
Encendido
Cepillo
Indicador de Batería

PAGE 18 OF 36 0521 IH-9424
FUNCIONAMIENTO
LLENAR EL TANQUE DE DETERGENTE
NOTA: Use un detergente no espumoso con
un rango de pH entre 7 y 11. Asegúrese de
seguir las instrucciones del detergente para la
dilución adecuada.
NOTA: Vacíe el tanque de recuperación cada
vez que llene el tanque de detergente.
1. Si lo desea, llene el tanque de detergente con
agua y/o detergente. Si utiliza detergente, diluya de
acuerdo a las instrucciones de la solución.
(Vea Diagrama 12)
2. Abra el flujo del tanque del detergente empujando
la llave hacia arriba a la posición horizontal. Déjelo
abierto. (Vea Diagrama 13)
Diagrama 12 Diagrama 13
EMPIECE A TRABAJAR
1. Baje el jalador empujando el asa de liberación
hacia abajo. Encienda la unidad y presione el
botón del cepillo. Todas las luces encenderán y la
unidad estará completamente funcional.
(Vea Diagramas 14 y 15)
Diagrama 14 Diagrama 15
2. Jale las palancas de manejo para comenzar a
trabajar. (Vea Diagrama 16)
Diagrama 16
NOTA: Se debe cargar la batería después de
cada uso. Para una duración óptima de la
batería, déjela enchufada cuando no esté en
uso.
AL TERMINAR LA LIMPIEZA
1. Apague la máquina presionando el botón "On/Off"
al menos por cuatro segundos.
2. Vacíe el tanque de recuperación (vea
Mantenimiento).
3. Eleve el jalador y limpie la hoja con un paño suave.
4. Cierre la llave del tanque de detergente.
5. Haga girar el cepillo (vea Mantenimiento). Enjuague.
6. Cargue la batería (vea Mantenimiento).
CONTINUACIÓN DE ENSAMBLE
2. Jale las palancas de manejo para activar la
fregadora y hágalo girar. El cepillo girará sin
problemas una vez que esté correctamente
ensamblado. (Vea Diagramas 10 y 11)
Diagrama 10 Diagrama 11

PAGE 19 OF 36 0521 IH-9424
MANTENIMIENTO
MANTENIMIENTO DIARIO
1. Utilice la manguera de desagüe anexa para vaciar
el agua sucia del tanque de recuperación.
(Vea Diagrama 17)
Diagrama 17
2. Retire la tapa y verifique que el flotador del tanque
de agua sucia no presente daños, esté limpio y se
mueva libremente en el soporte.
(Vea Diagramas 18 y 19)
NOTA: El interruptor del flotador en el tanque
de recuperación apaga la succión cuando el
tanque está lleno. Si el interruptor se dispara,
detenga el trabajo y vacíe el tanque.
Diagrama 18 Diagrama 19
3. Limpie el tanque de recuperación enjuagándolo
con agua. Llene el tanque con una manguera y
vacíe con la manguera de desagüe, o levante el
tanque para enjuagar. (Vea Diagramas 20 y 21)
Diagrama 20 Diagrama 21
¡PELIGRO! Utilice equipo de protección
personal adecuado para vaciar el depósito de
detergente.
4. Acerque la máquina a un desagüe para vaciar
el tanque. Desenrosque la tapa de drenaje del
tanque de detergente. Vuelva a colocar la tapa
cuando el tanque esté completamente vacío.
(Vea Diagrama 22)
Diagrama 22
5. Limpie el filtro de desagüe de detergente
desenroscando la tapa del filtro del tanque y
quitando el conjunto del filtro. Limpie a fondo y
vuelva a asegurarlo en su lugar.
(Vea Diagrama 23)
Diagrama 23
6. Eleve el jalador y límpielo con un paño suave.
Verifique que el jalador esté limpio y las hojas no
estén dañadas. (Vea Diagrama 24)
Diagrama 24

PAGE 20 OF 36 0521 IH-9424
CONTINUACIÓN DE MANTENIMIENTO
7. Incline la fregadora hacia atrás. Puede que aún
descanse sobre la rueda de soporte, pero que esté
ligeramente levantada. Active la fregadora tirando
de las palancas de manejo para hacer girar el
cepillo. Enjuage el cepillo. (Vea Diagramas 25 y 26)
Diagrama 25 Diagrama 26
NOTA: Si el indicador LED rojo de batería
comienza a parpadear, las baterías están
casi agotadas. Después de unos segundos,
el cepillo y el motor de succión se apagan
para evitar que las baterías se agoten
excesivamente. Cargue las baterías.
8. Verifique la carga de la batería. (Vea Diagrama 27)
Diagrama 27
9. Para recargar las baterías, conecte el cargador
de baterías con el cable eléctrico incluido con la
máquina. La carga estará completa cuando la luz
LED esté en verde. (Vea Diagramas 28 y 29)
Diagrama 28 Diagrama 29
REEMPLAZAR LA HOJA DEL JALADOR
Con el tiempo, el roce constante con el piso hace
que la hoja del jalador se redondee y se agriete.
Compruebe el estado de desgaste con frecuencia y
reemplácela según sea necesario.
a. Para un secado perfecto, ajuste el jalador de
modo que el borde de la hoja trasera se doble
durante la operación unos 45° con respecto al
suelo en todos los puntos.
b. Ajuste la altura de la hoja regulando la altura de
las ruedas colocadas en el jalador.
(Vea Diagrama 30)
c. Ajuste el ángulo del jalador apretando o
aflojando el tornillo. (Vea Diagrama 31)
Diagrama 30 Diagrama 31
1. Retire la hoja del jalador soltando el clip de en
medio. (Vea Diagrama 32)
Diagrama 32
2. Retire los dos retenedores de la hoja presionándolos
hacia afuera del jalador y después extrayéndolos.
Retire la hoja de caucho tirando hacia afuera de
las pestañas del cuerpo del jalador.
(Vea Diagramas 33 y 34)
Diagrama 33 Diagrama 34
Other manuals for H-9424
2
Table of contents
Languages:
Other U-Line Scrubber manuals