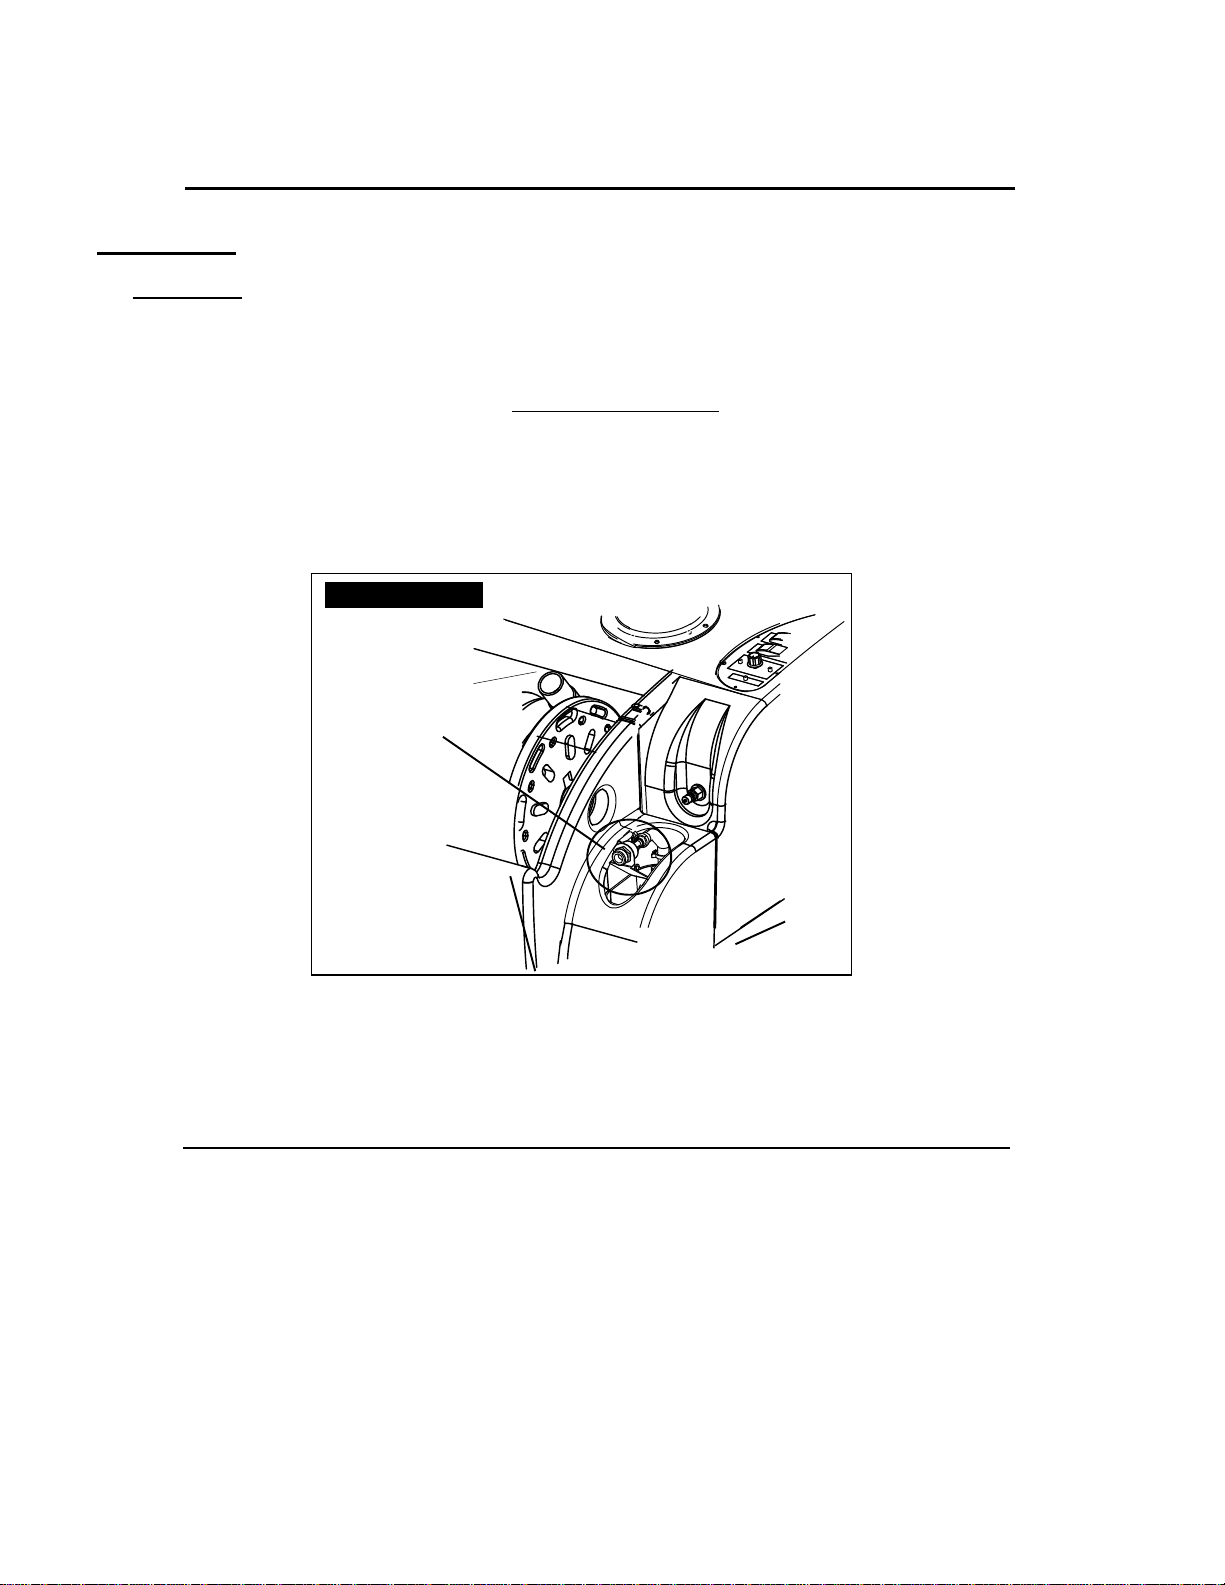
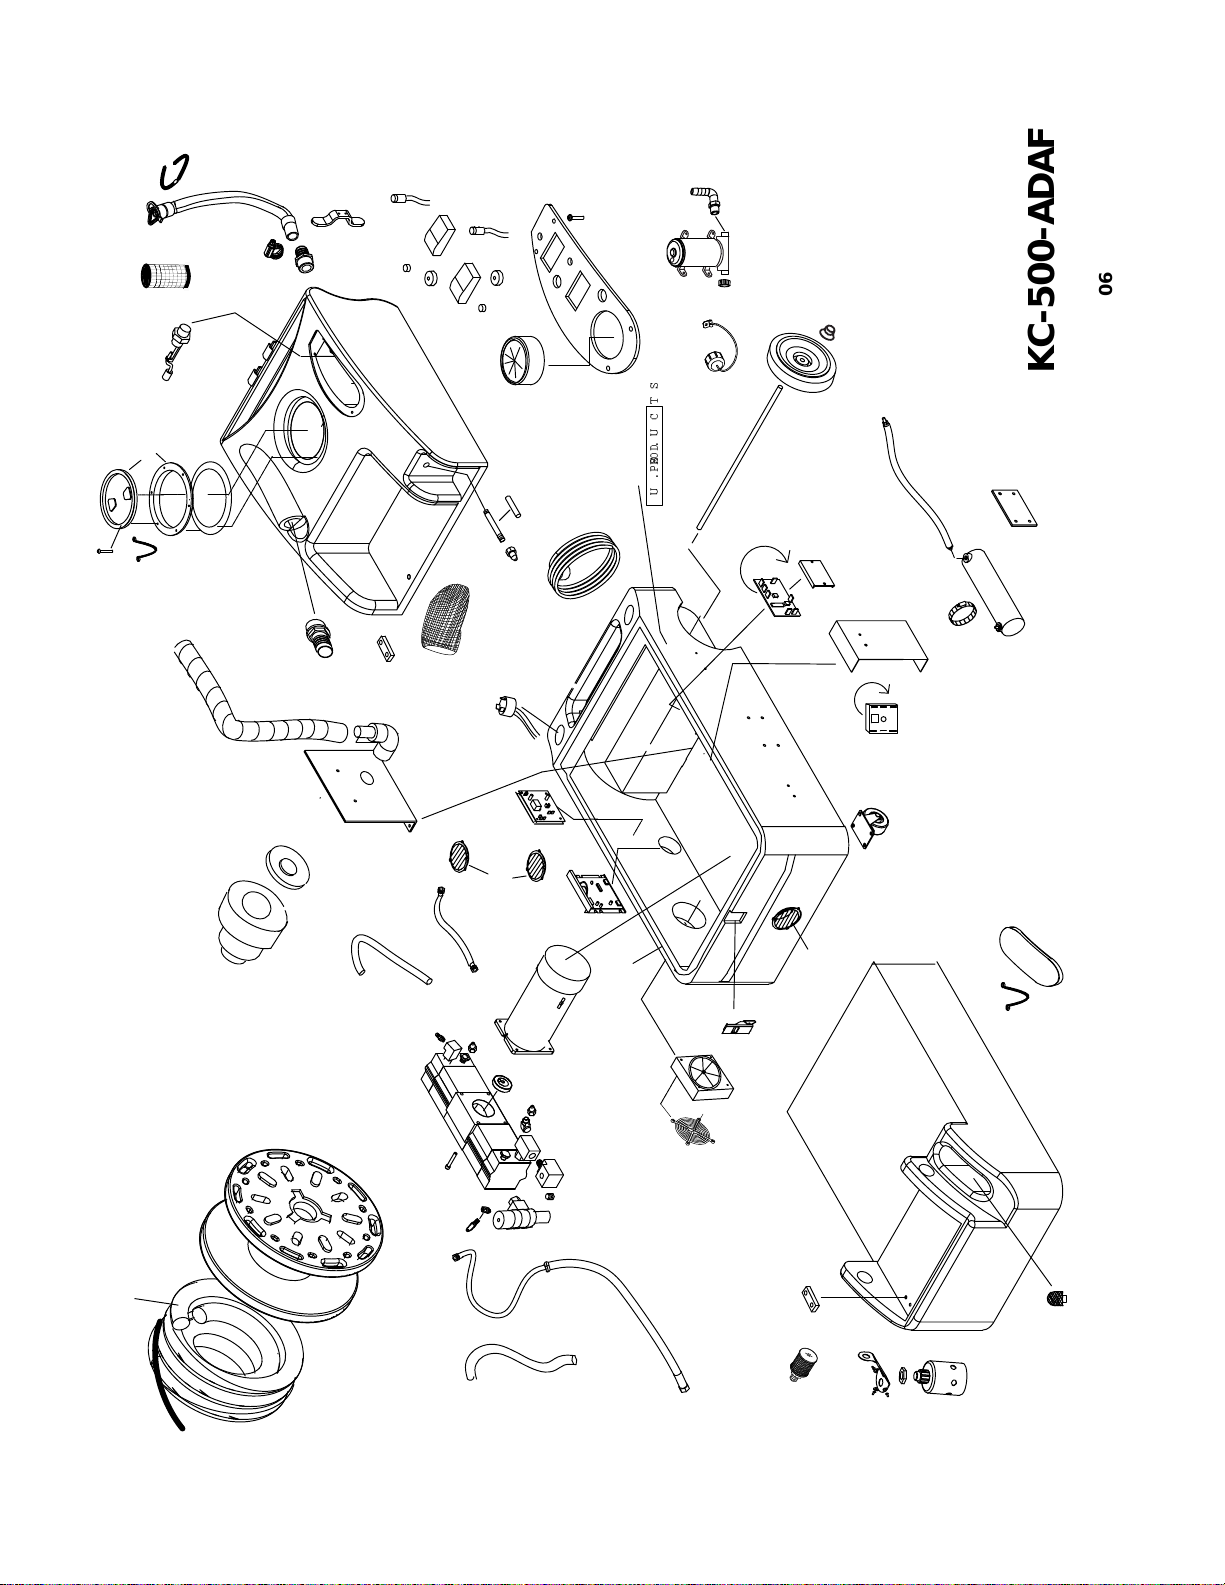
U.S. Products KING COBRA 500-ADAF Operating instructions

KING COBRA
®
500-ADAF
120V
INFORMATION
&
OPERATING
INSTRUCTIONS
U. S. PRODUCTS
4/10 revised 11/10 FORM NO. 56041965
CAUTION: DO NOT OPERATE MACHINE UNTIL YOU HAVE
READ ALL SECTIONS OF THIS INSTRUCTION MANUAL
IMPROPER USE OF THE MACHINE WILL VOID THE WARRANTY
1. Always use a defoamer when foaming occurs to prevent vacuum motor damage.
2. Connect the machine to a properly grounded outlet, only.
3. Keep machine from rain and snow, extremes in temperatures, and store in a heated
location. Use the machine indoors. Do not use outdoors.
4. Use approved chemicals only. NO SOLVENTS.
5. Never use water above 130º F/54º C in the solution tank.

2
IMPORTANT SAFETY INSTRUCTIONS
The KING COBRA-500-ADAF is only suitable for commercial use, for example in hotels, schools,
hospitals, factories, shops, and offices. The KC-500-ADAF is not intended for normal residential
housekeeping purposes.
NOTE: Read all instructions before using this machine.
When using any electrical appliance, basic precautions should always be followed, including the
following warnings:
WARNING!
To reduce the risk of fire, electric shock, or injury:
•Do not leave the machine unattended when it is plugged in. Unplug the unit from the outlet when
not in use and before servicing.
•Never turn on the solution pump without first connecting either the priming hose or your solution
hose to your machine and to your tool.
•Always turn off the pump and release the pressure in the pump before disconnecting hoses.
•To avoid electric shock, do not expose to rain or snow. Use and store indoors.
•Always use solution with a pH between 5 and 10.
•Do not allow to be used as a toy. Close attention is necessary when used near children.
•Use only as described in this manual. Use only the manufacturer’s recommended attachments.
•Never add water over 54° C/130° F to the solution tank.
•Do not use with damaged cord or plug. If the machine is not working as it should, has been
dropped, damaged, left outdoors or dropped into water, return it to a service center.
•Do not pull by the cord, use the cord as a handle, close a door on the cord, or pull the cord around
sharp edges or corners. Do not run the machine over the cord. Keep the cord away from heated
surfaces. To unplug, grasp the plug, not the cord.
•Do not handle the plug, the cord, or the machine with wet hands.
•Extension cords must be 12/3 and no longer than 50 feet. Replace the cord or unplug immediately
if the ground prong becomes damaged.
•Do not put any object into openings. Do not use with any opening blocked; keep free of dust, lint,
hair, and anything that may reduce air flow.
•Keep loose clothing, hair, fingers, and all parts of body away from openings and moving parts.
•Do not pick up anything that is burning or smoking, such as cigarettes, matches, hot ashes, or any
health endangering dusts. Do not use to pick up flammable or combustible liquids such as gaso-
line or use in areas where these liquids may be present.
•Turn off all controls before unplugging.
•Use extra care when cleaning on stairs.
•Connect to a properly grounded outlet only.
•Liquid ejected at the spray nozzle could be dangerous as a result of its temperature, pressure, or
chemical content.

Serial Number: __________________
Model: KC-500-ADAF
Purchase Date:_____________
Write the name and phone number of your distributor:
_____________________________________
_____________________________________
(and be sure to register your purchase to activate your warranty)
RECORD THIS IMPORTANT INFORMATION, AND SAVE THESE INSTRUCTIONS
INSPECTION:
Carefully unpack and inspect your KC-500-ADAF for shipping damage. Each machine is tested and inspected
before shipping. Any shipping damage incurred is the responsibility of the carrier. You should notify the carrier
immediately if you notice damage to the box, the machine, or its parts.
CLEANING SOLUTIONS:
We recommend liquid cleaning chemicals. Powder chemicals may be used, but unless mixed very thoroughly
they could cause a build-up in the pump, lines, and quick disconnects. Any problem caused by a chemical is
not covered by warranty. Use a neutral cleaner with a pH between 5 and 10 to avoid premature wear of the
pump, seals, and/or other components. It is a good idea to test an inconspicuous area of the floor.
MAINTENANCE:
For optimum performance flush the machine with clear water at the end of each working day. Once a month,
minimum, run a flushing compound through the machine to break up any mineral or chemical build-up that
may have formed. The vacuum motor and the pump do not require any scheduled maintenance; however,
the motor may require replacement brushes after 1000 - 1500 hours. Clean the body with an all-purpose
detergent, and protect it with an automobile interior polish. Lubricate the wheels, castors, and quick discon-
nects with an all purpose silicone spray.
PARTS AND SERVICE:
Repairs, when required, should be performed by your authorized distributor who maintains an inventory of
original replacement parts and accessories. Call the distributor from whom you purchased this machine if you
need parts or service. Be sure to specify the machine model. Have your serial number handy.
DANGER: DO NOT USE SOLVENTS, OR ANY CHEMICALS THAT MAY BE
FLAMMABLE, EXPLOSIVE OR COMBUSTIBLE.
3

SWITCH PLATE
PUMP
PRESSURE
ADJUST
TEMPERATURE
ADJUST
CIRCUIT LOCATOR
LIGHT INDICATES
TWO CIRCUITS.
HEATER WILL
AUTOMATICALLY
TURN ON
BYPASS SWITCH.
TURNS THE HEATER ON
WHEN GREEN LIGHT IS
NOT ON
1
2
3VACUUM
ON/OFF
SWITCH
4
5
6
INDICATES
SPRAYING
PRESSURE
PRESSURE
GAUGE
7
RED LIGHT INDICATES
HEATER IS HEATING
SET-UP and OPERATION
4
1. Before each use, inspect the machine, hoses, and cleaning tools for cleanliness and completeness.
Make sure hoses are in good condition and the spray nozzles are tight.
2. If not using the auto-dump feature, just make sure the brass cap is on the drain hose connector on
the dump pump on the rear of the base of the machine.
If you choose to use the auto-dump feature, remove the brass cover on the hose connector on
the dump pump outlet, on the rear of the machine, attach the dump hose, and place the open end
of the hose in a drain. Make sure the recovery tank drain hose is capped tightly, and the lid is tight
on the recovery tank.
3. If you choose not to use the auto-fill feature, just fill the tank with water and cleaning chemical.
Follow chemical directions regarding dilution and mixing. Do not use harsh chemicals; they may
damage seals in pumps and valves.
If you choose to use the auto-fill feature, connect the fill hose to the auto-fill hose connector
(located over the Solution tank fill hole). Turn on the water source -- HIGH PRESSURE IS NOT
NECESSARY -- and allow the tank to fill with water. When using the auto-fill system, the auto-fill
float will automatically turn on and turn off as the tank empties and then fills.
NOTE: Never put water with a temperature exceeding 130 °F / 54 °C in the solution tank
4. Pre-spray the area to be cleaned with a pump-up sprayer, while the tank is filling, if you are not using
cleaning chemicals in the solution tank. Follow chemical directions.
5. Plug in the two power cords. Do not connect both cords to the same outlet. The green, ‘separate
circuit’ locator light (1) on the switch plate should light up. If the locator light does not come on,
check the circuit breaker box in the wall, and/or try different outlets until it does turn on. Although
all systems in the machine may work correctly if you are not on two circuits, a circuit breaker in a
wall panel may trip. If you make sure the green light is turned on, you will prevent tripped circuit
breakers. When the red light is on, the heater is actively heating the water.

6. Connect the red priming hose to the solution outlet Quick Disconnect on the front of the machine and hold
the open end of the hose over the Holding tank or over a bucket.
To prime the pump: turn on the pump. You may notice a ‘tone’ change in the sound of the pump (smoother,
with less of a rattle). Priming usually takes 20 - 60 seconds, but it can take longer if the pump is full of air.
Turn off the pump, then remove the priming hose.
7. Use defoamer to prevent foam.
8. Attach the solution spray hose to the solution quick disconnect. Attach the vacuum hose to the hose barb on
the front of the recovery tank. Connect the other ends of the hoses to the tool.
9. Allow the heater about two minutes to reach operating temperature. It may take a few cycles for the heated
water to warm the hoses and fittings and reach the spray tips.
10. Turn on the solution pump.
11. Turn on the vacuum (3) and turn on the dump pump, if you are using it (3). NOTE: the on/off switch for the
dump pump is on the back of the machine next to the pump. NOTE: the vacuum will start slowly.
12. Begin cleaning.
13. When the job is finished, turn off the water source. Vacuum the remaining solution from the solution tank
into the recovery tank.
14. Run a few gallons of clean water through the system. Drain the recovery tank by opening the drain hose over
a bucket or drain. Unplug the power cords
15. Disconnect the hoses from the cleaning tool. Reel-up the hoses.
16. Clean the machine and the tool. Never store your machine outside, and always keep it from extremes in
temperatures.
NOTE: if the green, circuit locator light does not illuminate when the cords are plugged in, then both cords are
on
the same circuit. Try other outlets with one of the cords until you get the locator light to come on. NOTE: if
the heat switch is turned on when both cords are on the same circuit, the breaker in the wall may trip.
ELECTRIC CIRCUIT LOCATOR
REFER TO THE DIAGRAMS ON THE PREVIOUS PAGES
ELECTRONIC FLOAT SHUT-OFF
When the recovery tank is full, the electronic float switch will turn off the vacuum motor. This will prevent
water from entering the vacuum motor. The float may not work properly if the float filter rod is dirty or if
there is heavy foam in the tank
.
To reset, turn the Vacuum switch off, and empty the tank.
CAUTION: Use care when handling hazardous chemicals.
CAUTION: Never leave the machine running when you are not actively using it.
CAUTION:
Always use a defoamer when foaming occurs to prevent vacuum
motor damage.
DANGER: Do NOT use solvents, or any chemicals that may be flammable, explosive,
or combustible.
5
CAUTION -- NEVER TURN ON THE SOLUTION PUMP BEFORE CONNECTING EITHER
YOUR PRIMING HOSE OR YOUR SOLUTION LINE TO YOUR MACHINE AND TO YOUR
TOOL. If the pump builds pressure before you connect a way to release the pressure
you will not be able to connect a hose

6
USING THE AUTO-FILL AND/OR AUTO-DUMP FEATURES
Operation:
• Attach a 3/4” garden hose to the auto-fill valve, located just above the fill-hole on the solution tank.
Connect the other end of the hose to your water source.• • Make sure the float that hangs from the auto-fill valve into the tank is free of obstruction and can move freely.•
• Turn on the water supply. The auto-fill does not require high pressure -- just turn the water on, but not on full
pressure.
• The auto-fill float will automatically shut-off the flow of incoming water when the tank is nearly full, and it will allow the
valve to open again once the water level has dropped to a predetermined level.
AUTO-FILL
AUTO-FILL
AUTO-FILL HOSE
CONNECTOR
SEE THE NEXT PAGE FOR INFORMATION ON THE AUTO-DUMP FEATURE

7
DANGER: always unplug the King Cobra from the electrical outlet(s) before
cleaning or maintaining. Certain internal components are electrically live,
even with switches in their OFF position.
Dump
Pump
AUTO-DUMP
Dump Hose
Connection
AUTO-DUMP
1 Operation:
Before each use: if necessary, unscrew the stainless steel filter at the bottom of the recovery tank
and clean it.
• Attach a 3/4” garden hose to the dump pump outlet fitting on the pump on the back of the base of the
machine. Refer to illustration below
• Run the other end of the hose into a drain.
• Turn the dump pump switch ON (switch is located on the back of the machine next to the pump).
• NOTE: the dump pump is ‘self-priming.’ You should see water start to flow within 30 seconds of the
pump turning on, if the water level in the tank is high enough. If water does not begin to flow, check
the filter to make sure it is not plugged with debris.
After each job: run clear water though the dump pump to wash out any chemical residue.
Remove and clean the stainless steel filter in the back of the tank. Reinstall the filter once it is clean.
Empty and clean the recovery tank.
Pump
ON/OFF
Switch
DANGER: DO NOT USE OR PICK-UP SOLVENTS, OR ANY
CHEMICALS THAT MAY BE FLAMMABLE, EXPLOSIVE OR
COMBUSTIBLE.

8
U.S.
PRODUCTS
KC-500-ADAF
06-04-2009
120VAC
~
50 52
54
55
56 58
59
60
62
63 65
66 67
69 70 72
73
75
77
79
80
81
82
83
84
85
28
89
20
90
91
92
94
86
}
61
12
3
4
5
6
8
910
11 13
18
20
21
22
23
24
25
27
28
26
29
30
32 34
35
37 38
39
40 42
44
45 47
48
49
80
12
14 15
16
17
10
19

9
KING COBRA-500-ADAF
Part List
1 FP436 Chain, for lid
2 901B Lid, for solution tank
3 HKCR-1 Holding Tank
4 1088 Glide, Teflon, for reel
5 913 Vacuum motor
6 959 Gasket, vacuum
8 1136 Hose, vacuum
9 926 Manifold, gasket
10 907 Hose barb, vacuum inlet
11 2086A Lid & Ring, vacuum tank
12 1074 Gasket, vacuum lid
13 2026 Float, electronic
14 926 Filter, vacuum inlet
15 1060C Cap, drain hose
16 1060B Hose, drain
17 1518 Clamp, hose
18 CWKC-BLK Cord Wrap
19 1130 Strap, hook & loop
20 1088 Glide, for reel
21 925 Hose, pump inlet, 1/2” X 24”
22 FP410 Pump complete, no motor
23 948B Motor, pump drive
24 945D Valve, pressure regulator
25 944 Hose, pump to gauge
26 946 Hose, pump bypass, 3/8” X 24”
27 FP411A Hose, pump to heater, w/QDs
28 928 Louver, 3”
29 FP361 Control board, pump motor speed
30 2088 Pre-filter, vac inlet
32 FP225 Control board, vacuum soft start
34 1062 Receptacle, power cord
35 1057B Power cord, 25 ft
37 45 Quick disconnect, solution output
38 1146 Pipe, 1.4 pipe X 6.85”
39 1144A Tubing, 5/8” X 5”
40 HKCR-1 Tank, solution holding
42 78B Light, Red
44 248 Knob, red
45 FP347 Potentiometer, with wires, for heat
47 FP346 Switch, Heat Bypass
48 FP345 Switch, Vacuum
49 249 Knob, Pump pressure control
50 FP399 Potentiometer, with cable, pump
52 78 Light, green
54 951B Gauge, pump pressure
ITEM PART No DESCRIPTION
120V
6-4-2009
55 943B Plate, switch holding
56 2067 Pump, auto pump out
58 1081 Elbow/Hose barb, 90°
59 239 Coupling, Hose adaptor
60 237 Cap, for hose fitting
61 1128 Label
62 910-21.00 Axle rod, 21”
63 2084 Wheel, 10”
65 27A Axle cap
66 932B Circuit board, dual circuit detect
67 FP336 PCB mounting track, 4”
69 FP194E Heat repair kit
70 918 Heat sink plate
72 198 Clamp, hose
73 FP348 Heat exchanger, complete
75 1134 Hose, Heater to outlet, 29”
77 445 Plate, heater mounting
79 901B Lid, for solution holding tank
80 805 Chain
81 BKCR-BLK Base compartment
82 1043A Gasket, 93.5”
83 1014 Fan, cooling
84 2015 Guard, fan
85 908A Latch and strike
89 HKCR-1 Holding tank
90 2069 Filter, dump pump inlet
91 1320A Bracket
92 1310A Valve, auto-fill shut-off
94 207A Filter, solution pump inlet
ITEM PART No DESCRIPTION
Miscellaneous parts and Assemblies
FP409 Pump and motor, complete w/unloader
950CP Pump rebuild kit, valves and O-Rings
250 Pump rebuild kit, piston and seals
SYP1 Priming hose
FP350C Pressure line and vacuum hose, complete
FP469 Swivel and hose assembly, 16-1/2”
948C Brush, carbon, for pump motor (order 2)

TROUBLE SHOOTING:
IF THIS OCCURS CHECK THIS
Solution tank is empty.
Clogged spray tip.
Pump not running or not primed.
Valve on wand not operating.
Debris is plugging cleaning tool or vacuum hose.
Drain hose is not completely closed. Vacuum tank lid is not closed or seal is
damaged.
No power to motor.
Test the switch.
Test the vacuum motor.
Spraying too long. Try spraying for 8 - 10 seconds, or about three strokes.
Heat exchanger needs to be flushed.
Wrong tool being used. Too much water passing through. Longer hose or larger
diameter hose, than standard.
Heat is not turned on.
No power in the wall outlet - check to see if the breaker has tripped.
No power to the heat switch - check wiring for ‘opens.”
No power out of heat switch, follow troubleshooting steps to isolate the problem.
Call your distributor for additional help.
NO HEAT
MAINTENANCE SCHEDULE
NO SPRAY
LOW SUCTION
NO SUCTION
LOW HEAT
CLEAN FILTERS
CHECK POWER CORD
DESCALE
REPLACE VAC MOTOR BRUSHES
REPLACE PRESSURE REGULATOR
REBUILD PUMP
DAILY MONTHLY YEARLY OTHER
X
XX
XAs needed
Or as needed
Around 1500 hours
KC-500-ADAF
425-322-0133 / 800-257-7982 / FAX: 425-322-0136
11015 - 47th Ave. W. / Mukilteo, WA 98275
VISIT US AT: http://www.usproducts.com
Table of contents
Popular Other manuals by other brands

CAME
CAME R Series manual

GRASS VALLEY
GRASS VALLEY AURORA 7 - ARCHIVE AND RESTORE WORKFLOW Application note

ABB
ABB VD4 12 Installation and service instructions

Carlisle
Carlisle 183G-500 Service manual

Scheppach
Scheppach HC 53dc Translation from the original instruction manual

SentrySafe
SentrySafe EF4728E owner's manual