Screwdriver
Tournevis
Teflon Tape
Ruban Teflon
Groove Joint Pliers
Pince multiprise
Safety glasses
Lunettes de sécurité
Adjustable wrench
Clé à molette
Hex key
Clé hexagonable
4.3.2.
Aerator wrench
Clé d’aérateur
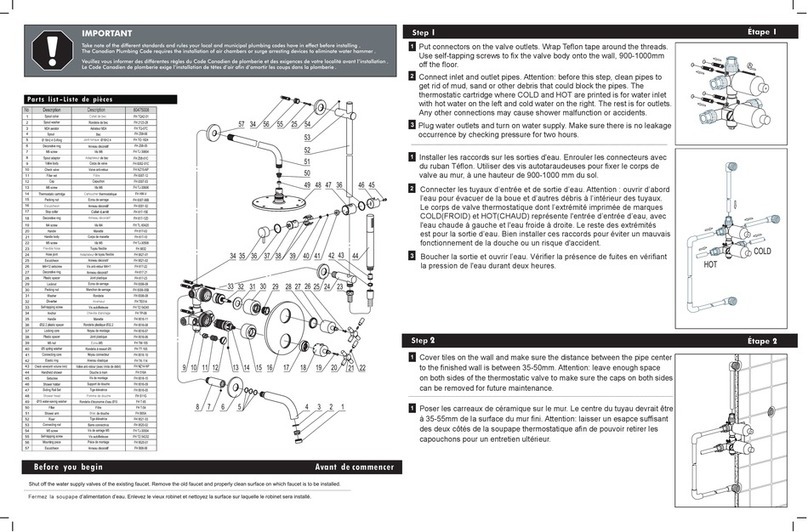
Insert the hand-held shower and the hose down through the
base, then connect the hose to the spout as shown.
Connect braided stainless steel connection hoses to spout .
Tighten with appropriate tool.
Insérez la douche à main et les boyau d'alimentation d'eau
dans la base,puis raccordez les boyau au bec comme illustré.
Raccordez les boyaux tressés en acier inoxydable au bec.
Serrez-les à l'aide de l'outil approprié.
Hose installation
Installation du boyau
Avant de commencer
Before you begin
Insert the spout into the hole of the bathtub as shown.
Assemble the anchor kit, nut and screw in order; fix the
spout's position and direction. Next assemble the nut and
tighten with appropriate tool.
Insert connector into the spout,tighten with clamp spring.
Assemblez dans l'ordre les accessoires suivants : ensemble
d'ancrage, écrou,vis.Fixez la position et l'orientation du bec.
Finalement, posez l' écrou et serrez-le à l'aide de l'outil
approprié.
Insérez le bec dans les ouvertures de la baignoire comme illustré.
Insérez le connecteur dans le bec, puis serrez à l'aide de la
pince à ressort.
Insert water valve, assemble the cartridge locknut and
tighten the anchor kit, nut and screw.
Install handle flange and tighten screw. Assemble the handle
and tighten screw.
Insérez la soupape d'entrée d'eau; fixez l'écrou de la
cartouche et serrez l'ancrage, l'écrou et la vis.
Installez la bride de poignée, puis serrez la vis. Assemblez
la poignée,puis serrez la vis.
Fermez la soupape
.
.
.
.
Step 1 Étape 1
Step 2 Étape 2
Step 3 Étape 3
Spout installation
Installation du bec
Handle installation
Installation des poignées
Passez la base d'alimentation d'eau dans les ouvertures,
puis serrez l' écrou à la main.N'utilisez pas d'outil pour
éviter d'endommager l' écrou
Pass the base down through the hole, and tighten nut by
hand.Don't use tools, to avoid damaging the nut.
Hand-held shower base installation
Installation de base de douche à main
Step 4 Étape 4
Repeat for other handle.
Répétez pour l'autre poignée.
1
2
3
4
5
6
7
8
9
10
11
12
13
14
15
16
17
18
70115075 70115076
Parts list-Liste de pièces
19
20
21
22
23
24
25
26
27
28
29
30
31
32
33
34
35
36
37
38
39
40
41
42
43
44
45
46
47
48
49
50
51
52
53
54
55
56
50P24KW22CR00
8EM5X5
51P24KW22CR00
5YG94017GC00
8J42X2
N56U26
8NM56U26GC00
8RM6X15
81P24T72
K282260TT
80T94017NPAC00
80D33X47CR00
50T2B249CC00
80M23V49
8EM6X6
5DZ2B249CR00
8HM5X8
8J55X25
8XJ105X45X35
8J14X2A
86T23603FM
50G2B202FM
8J22X205
8J36X2
52T2B202FM
8J28X22
8J25X2
5NG2B249CR00
8TH23603
8XJ15X5X5A
51J2B202FM
50J2B202FM
J92031NP0
8J43X335X22
51T2B202AAC00
81T94015
K28226ZTT
8J19X11X2B
8JT91211CR00
8J16X2A
8NM1A201CC00
8JT1303CC00
88T28023CR00
8J39X33X25
8DZSJ000
8J42X27X2
8NM3A403
F0308ACR00
G5660500HM0
H48155CRHM0
8BS30
8BS25
81N85050A
81N85050B
84T16V49
G0640500SD1
50P24KW22NV00
8EM5X5
51P24KW22NV00
5YG94017GC00
8J42X2
N56U26
8NM56U26GC00
8RM6X15
81P24T72
K282260TT
80T94017NPAC00
80D33X47NV00
50T2B249NV00
80M23V49
8EM6X6
5DZ2B249NV00
8HM5X8
8J55X25
8XJ105X45X35
8J14X2A
86T23603FM
50G2B202FM
8J22X205
8J36X2
52T2B202FM
8J28X22
8J25X2
5NG2B249ND00
8TH23603
8XJ15X5X5A
51J2B202FM
50J2B202FM
J92031NP0
8J43X335X22
51T2B202AAC00
81T94015
K28226ZTT
8J19X11X2B
8JT91211CR00
8J16X2A
8NM1A201NV00
8JT1303NV00
88T28023NV00
8J39X33X25
8DZSJ000
8J42X27X2
8NM3A403
F0308ANV00
G5660500HM0
H48155CRHM0
8BS30
8BS25
81N85050A
81N85050B
84T16V49
G0640500SD1
Handle Poignée
Screw Vis
Handle body Corps de la poignée
Cartridge locknut Écrou de la cartouche
O-ring Joint torique
Anchor kit Ensemble d’ancrage
Nut Écrou
Screw Vis
Adapter Adaptateur
Headwork(hot water) Prise d'eau (eau chaude)
Water valve Robinet d'eau
Diverter cover Couvercle de l'inverseur
Body Corps
Aerator Aérateur
Screw Vis
Base Base
Screw Vis
Seal joint Joint d'étanchéité
Fixed component Composante fixe
Converter pipe Tube de convertisseur
Threaded sleeve Douille filetée
Lift rod Tige de levage
Spring Ressort
O-ring Joint torique
Core Corps
Sheath Gaine
Stop valve Clapet de non-retour
Connector Connecteur
Clamp spring Collier
Headwork(cold water) Prise d'eau (eau froide)
O-ring Joint torique
Connector Connecteur
Nut Écrou
Shower holder Support de douche
Base Base
Shower Douchette
Connection hose Boyau de raccordement
Pull-out hose Tuyau rétractable
Allen key Clé hexagonale
Allen key Clé hexagonale
Index(red) Index(rouge)
Index(blue) Index(bleu)
Aerator wrench Clé d’aérateur
Flexible hose Tuyau flexible
O-ring Joint torique
O-ring Joint torique
O-ring Joint torique
O-ring Joint torique
O-ring Joint torique
O-ring Joint torique
O-ring Joint torique
O-ring Joint torique
O-ring Joint torique
Nut Écrou
Elbow Coude
RondelleWasher
Fournies
GARANTIE LIMITÉE À VIE
LIMITED LIFETIME WARRANTY
THANK YOU FOR PURCHASING THIS UBERHAUS DESIGN FAUCET. THESE PRODUCTS HAVE BEEN MADE
TO DEMANDING, HIGH-QUALITY STANDARDS AND ARE LIFETIME GUARANTEED FOR DOMESTIC USE
AGAINST MANUFACTURING FAULTS. THIS WARRANTY DOES NOT AFFECT YOUR STATUTORY RIGHTS.
IF THIS FAUCET SHOULD EVER DEVELOP A LEAK OR DRIP DURING THE WARRANTY PERIOD, WE WILL
FREE OF CHARGE PROVIDE THE CARTRIDGES NECESSARY TO PUT THE FAUCET BACK IN GOOD
WORKING CONDITION UNDER NORMAL INSTALLATION, USE AND SERVICE. REPLACEMENT PARTS MAY
BE OBTAINED BY CALLING MECANAIR CUSTOMER SERVICE DIRECTLY AT 1-866-206-0888 OR VISIT
WWW.MECANAIR.NET. PROOF OF PURCHASE (ORIGINAL SALES RECEIPT) FROM THE ORIGINAL
CONSUMER PURCHASER MUST ACCOMPANY ALL WARRANTY CLAIMS.
THE FAUCET IS GUARANTEED IF USED FOR NORMAL TRADE PURPOSES, AND IS VALID FOR THE
ORIGINAL BUYER ONLY. ANY WARRANTY IS DEEMED INVALID IF THE FAUCET HAS BEEN USED
IMPROPERLY, OR SUBJECT TO NEGLECT. RONA IS NOT RESPONSIBLE FOR ANY COSTS RELATED TO
LABOUR, INJURIES OR ANY OTHER LOSS INCURRED DURING THE PRODUCT INSTALLATION, REPAIR
OR REPLACEMENT, INCLUDING ANY INDIRECT OR CONSEQUENTIAL DAMAGES.
DUE TO CONTINUOUS PRODUCT IMPROVEMENT, WE RESERVE THE RIGHT
TO CHANGE THE PRODUCT SPECIFICATIONS WITHOUT PRIOR NOTICE.
MERCI D’AVOIR ACHETÉ CE ROBINET UBERHAUS DESIGN. CE PRODUIT A ÉTÉ CONÇU POUR RÉPONDRE
À DES NORMES DE HAUTE QUALITÉ TRÈS STRICTES ET EST GARANTI À VIE POUR USAGE DOMESTIQUE
CONTRE TOUT DÉFAUT DE FABRICATION SUIVANT LA DATE D’ACHAT. CETTE GARANTIE N’AFFECTE
PAS VOS DROITS LÉGAUX.
DANS LE CAS OÙ LE ROBINET AURAIT DES FUITES OU DÉGOUTTEMENTS DURANT
LA PÉRIODE DE GARANTIE, NOUS VOUS ENVERRONS LES CARTOUCHES SANS FRAIS AFIN DE LE
REMETTRE EN BONNE CONDITION EN AUTANT QUE LE PRODUIT AIT ÉTÉ INSTALLÉ ET UTILISÉ SELON
DES CONDITIONS NORMALES. LES PIÈCES DE REMPLACEMENT PEUVENT ÊTRE OBTENUES EN
COMMUNIQUANT DIRECTEMENT AVEC LE SERVICE À LA CLIENTÈLE DE MECANAIR AU 1-866-206-0888
OU EN VISITANT LE WWW.MECANAIR.NET. UNE PREUVE D’ACHAT (REÇU ORIGINAL D’ACHAT) DU
CONSOMMATEUR QUI A FAIT L’ACHAT DU PRODUIT DOIT ACCOMPAGNER TOUTE RÉCLAMATION DE
GARANTIE.
CE ROBINET EST GARANTI SI UTILISÉ DE FAÇON NORMALE ET EST VALIDE POUR LE PREMIER
ACHETEUR SEULEMENT. TOUTEGARANTIE EST INVALIDE SI LE ROBINET A ÉTÉ UTILISÉ DE FAÇON
NON RECOMMANDÉE, OU A FAIT L’OBJET DE NÉGLIGENCE. RONA N’EST PAS RESPONSABLE DES
FRAIS DE MAIN-D'OEUVRE, DES BLESSURES OU TOUTE AUTRE PERTE OU DOMMAGES SUBIS
PENDANT L’INSTALLATION, LES RÉPARATIONS OU LE REMPLACEMENT, INCLUANT TOUT DOMMAGE
CONSÉCUTIF OU INDIRECT.
DÛ À L’AMÉLIORATION CONTINUE DE NOS PRODUITS, NOUS NOUS RÉSERVONS LE DROIT DE
MODIFIER LES CARACTÉRISTIQUES DE CE PRODUIT SANS AVERTISSEMENT.


