manuals.online logo
Brands
  1. Home
  2. •
  3. Brands
  4. •
  5. UBERHAUS DESIGN
  6. •
  7. Plumbing Product
  8. •
  9. UBERHAUS DESIGN 75175017 User manual

UBERHAUS DESIGN 75175017 User manual

Bathtub Faucet
Operators’ Manual
Robinet de baignoire
Guide de l'utilisateur
Customer Service / Service à la clientèle : 1-866-206-0888
Our Customer service staff is available to help you. For help with product assembly, to report damaged or missing
parts, or for any other information about this product, please call our toll-free number.
SAVE THIS MANUAL
Keep this manual and the original sales invoice in a safe, dry place for future reference.
Notre personnel du service à la clientèle est disponible pour vous aider. Pour obtenir de l’aide pour le montage de
votre produit, pour signaler des pièces endommagées ou manquantes, ou pour toute autre information à propos
de ce produit, veuillez composer notre numéro sans frais.
CONSERVEZ CE GUIDE
Conservez ce guide avec la facture d'origine dans un endroit sûr et sec pour référence future.
Model/Modèle :75175017
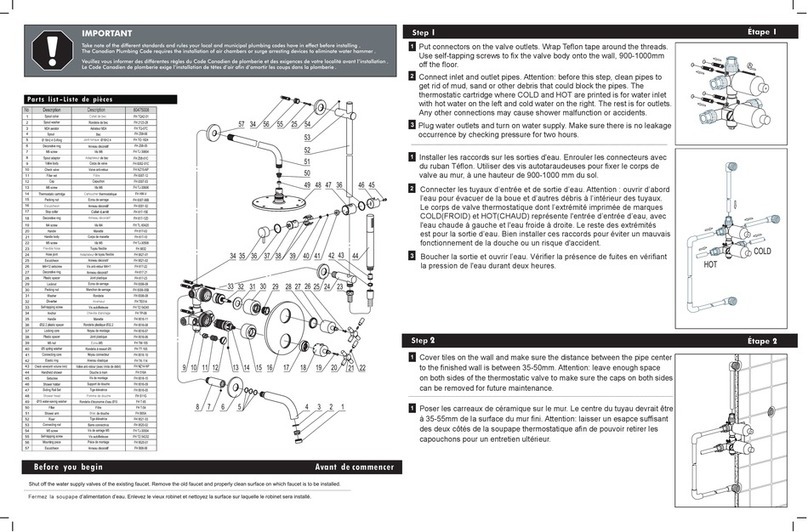
Avant de commencer
Before you begin
Fermez la soupape
2
Remove the plastic protective sheath from the inlet base and the inner
supply tube. Slide the flange through the inner supply tube and attach to
the faucet body with the Allen screw. Insert the inner supply tube into the
inlet base and connect the inlet base and the flange with Allen screw.
Tighten with the Allen key. Install the faucet on the base, tighten
connections with Allen key.
Retirez le manchon de protection de plastique de la base d'entrée et du
tuyau d'alimentation intérieur. Glissez la bride sur le tuyau d'alimentation
intérieur et fixez-la au corps du robinet au moyen de la vis Allen. Insérez le
tuyau d'alimentation intérieur dans la base d'entrée et fixez la base
d'entrée et la bride avec la vis Allen. Serrez au moyen de la clé Allen.
Installez le robinet sur la base, serrez les connexions au moyen de la clé
Allen.
2
Liste de pieces 75175017
Qty/Qté
DescriptionDescriptionNo
1 Faucet body
2 Check valve
3 O ring
4 Connector
5 Handshower holder
6 Washer
7 Spring Washer
8 Countersunk pan head screw
9 Shower hose
10 Handshower
11 O ring
1PCS
2PCS
1PCS
1PCS
1PCS
2PCS
1PCS
1PCS
1PCS
1PCS
4PCS
12 Diverter valve
13 Lever body
14 Lever
15 O ring
16 Spring washer
17 Countersunk pan head screw
18 O ring
19 Screw cap
20 Lever body
21 Countersunk pan head screw
22 O ring
23 Screw hole plugs
24 Nut
25 Lever
27 Positioning ring
28 Cartridge
29 O ring
30 Escutcheon
31 Rubber ring
32 Pan head cap screws
33 Flange
34 Nuts
35 Inlet base
36 Anchor
26 Cover
Corps du robinet
Clapet antiretour
Joint torique
Connecteur
Support de douche à main
Rondelle
Rondelle à ressort
Vis à tête cylindrique large fraisée
Boyau de la douche
Douche à main
Joint torique
Inverseur
Corps du levier
Levier
Joint torique
Rondelle à ressort
Vis à tête cylindrique large fraisée
Joint torique
Vis capuchon
Corps du levier
Vis à tête cylindrique large fraisée
Joint torique
Chevilles de trous de vis
Écrou
Levier
Anneau de positionnement
Cartouche
Joint torique
Écusson
Joint de caoutchouc
Vis d'assemblage à tête cylindrique large
Flasque
Écrous
Base d'entrée
Ancrage
Couvercle
1PCS
1PCS
1PCS
1PCS
1PCS
1PCS
1PCS
1PCS
1PCS
1PCS
1PCS
1PCS
1PCS
1PCS
1PCS
1PCS
10PCS
1PCS
1PCS
8PCS
1PCS
2PCS
1PCS
4PCS
1PCS
1
1
Drill 4 holes in the double floor to match holes on the inlet base. Insert the
anchors in the floor by the holes of the base, making sure that the inlet
base is even with the floor. Install water supply lines under the floor and
connect to the water inlet on the inlet base. Insert the plug into the inlet
base and tighten with the flange. Turn on the water supply. Keep pressure
for two hours. Check connections for leaks. Close water supply and remove
the flange and the plug. Put on the plastic protective sheath and install tiles
on the floor.
Percez 4 trous dans le double plancher qui correspondent aux trous de la
base d'entrée. Insérez les ancrages dans le plancher en passant par les trous
de la base, en vous assurant que la base d'entrée soit bien à plat avec le
plancher. Installez les tuyaux d'alimentation d'eau sous le plancher et
branchez-les à l'entrée de l'eau de la base. Insérez les bouchons dans la base d'entrée et serrez-les au moyen
de la bride. Ouvrez l'eau. Maintenez la pression pendant deux heures. Vérifiez les connexions pour vous assurer
qu'il n'existe pas de fuites. Fermez l'eau et retirez la bride et les bouchons. Installez le manchon de protection de
plastique et posez les carreaux sur le plancher.
19
20
21
22
23
24
25
29
30
31
33
35
36
34
1
32
26 27 28
2 3 11 5 6 7 8 10
2
18 17 15 14 12
16 7 13
4 9
29
75175017
GARANTIE LIMITÉE À VIE
LIMITED LIFETIME WARRANTY
THANK YOU FOR PURCHASING THIS UBERHAUS DESIGN FAUCET. THESE PRODUCTS HAVE BEEN MADETO
DEMANDING, HIGH-QUALITY STANDARDS AND ARE LIFETIME GUARANTEED FOR DOMESTIC USE AGAINST
MANUFACTURING FAULTS. THIS WARRANTY DOES NOT AFFECT YOUR STATUTORY RIGHTS.
IF THIS FAUCET SHOULD EVER DEVELOP A LEAK OR DRIP DURING THE WARRANTY PERIOD, WE WILL FREE
OF CHARGE PROVIDE THE CARTRIDGES NECESSARY TO PUT THE FAUCET BACK IN GOOD WORKING
CONDITION UNDER NORMAL INSTALLATION, USE AND SERVICE. REPLACEMENT PARTS MAY BE OBTAINED
BY CALLING MECANAIR CUSTOMER SERVICE DIRECTLY AT 1-866-206-0888 OR VISIT WWW.MECANAIR.NET.
PROOF OF PURCHASE (ORIGINAL SALES RECEIPT) FROM THE ORIGINAL CONSUMER PURCHASER MUST
ACCOMPANY ALL WARRANTY CLAIMS.
THE FAUCET IS GUARANTEED IF USED FOR NORMAL TRADE PURPOSES, AND IS VALID FOR THE ORIGINAL
BUYER ONLY. ANY WARRANTY IS DEEMED INVALID IF THE FAUCET HAS BEEN USED IMPROPERLY, OR
SUBJECT TO NEGLECT. RONA IS NOT RESPONSIBLE FOR ANY COSTS RELATED TO LABOUR, INJURIES OR
ANY OTHER LOSS INCURRED DURING THE PRODUCT INSTALLATION, REPAIR OR REPLACEMENT, INCLUDING
ANY INDIRECT OR CONSEQUENTIAL DAMAGES.
DUE TO CONTINUOUS PRODUCT IMPROVEMENT, WE RESERVE THE RIGHT TO CHANGE THE PRODUCT
SPECIFICATIONS WITHOUT PRIOR NOTICE.
MERCI D’AVOIR ACHETÉ CE ROBINET UBERHAUS DESIGN. CE PRODUIT A ÉTÉ CONÇU POUR RÉPONDRE
À DES NORMES DE HAUTE QUALITÉ TRÈS STRICTES ET EST GARANTI À VIE POUR USAGE DOMESTIQUE
CONTRE TOUT DÉFAUT DE FABRICATION SUIVANT LA DATE D’ACHAT. CETTE GARANTIE N’AFFECTE PAS
VOS DROITS LÉGAUX.
DANS LE CAS OÙ LE ROBINET AURAIT DES FUITES OU DÉGOUTTEMENTS DURANT LA PÉRIODE DE
GARANTIE, NOUS VOUS ENVERRONS LES CARTOUCHES SANS FRAIS AFIN DE LE REMETTRE EN BONNE
CONDITION EN AUTANT QUE LE PRODUIT AIT ÉTÉ INSTALLÉ ET UTILISÉ SELON DES CONDITIONS
NORMALES. LES PIÈCES DE REMPLACEMENT PEUVENT ÊTRE OBTENUES EN COMMUNIQUANT
DIRECTEMENT AVEC LE SERVICE À LA CLIENTÈLE DE MECANAIR AU 1-866-206-0888 OU EN VISITANT
LE WWW.MECANAIR.NET. UNE PREUVE D’ACHAT (REÇU ORIGINAL D’ACHAT) DU CONSOMMATEUR QUI A
FAIT L’ACHAT DU PRODUIT DOIT ACCOMPAGNER TOUTE RÉCLAMATION DE GARANTIE.
CE ROBINET EST GARANTI SI UTILISÉ DE FAÇON NORMALE ET EST VALIDE POUR LE PREMIER ACHETEUR
SEULEMENT. TOUTEGARANTIE EST INVALIDE SI LE ROBINET A ÉTÉ UTILISÉ DE FAÇON NON
RECOMMANDÉE, OU A FAIT L’OBJET DE NÉGLIGENCE. RONA N’EST PAS RESPONSABLE DES FRAIS DE
MAIN-D'OEUVRE, DES BLESSURES OU TOUTE AUTRE PERTE OU DOMMAGES SUBIS PENDANT
L’INSTALLATION, LES RÉPARATIONS OU LE REMPLACEMENT, INCLUANT TOUT DOMMAGE CONSÉCUTIF OU
INDIRECT.
DÛ À L’AMÉLIORATION CONTINUE DE NOS PRODUITS, NOUS NOUS RÉSERVONS LE DROIT DE MODIFIER
LES CARACTÉRISTIQUES DE CE PRODUIT SANS AVERTISSEMENT.
3
3
Connect the handshower to the faucet body and tighten them with the screws.
Connect the handshower and the handshower holder to the shower hose. Turn on
the water supply to check if everything is correct and functional.
Branchez la douche à main au corps du robinet et serrez-la au moyen des vis.
Branchez la douche à main et son support au boyau de la douche. Ouvrez l'eau
pour vérifier que tout fonctionne correctement et sans fuite.
4
4
Vérifier l’étanchéité des raccords en ouvrant lentement l’alimentation d’eau. En cas de
fuite, couper l’alimentation puis serrer les raccords d’un quart de tour avec l’outil
approprié. Répéter au besoin.
Ouvrir l’eau chaude et l’eau froide pendant au moins une minute afin d’évacuer l’air
emprisonné dans la tuyauterie. Couper l’alimentation d’eau de nouveau.
Rétablir I’alimentation d’eau.
Verify that there are no leaks by slowly opening the hot and cold water. In case of a leak,
shut off the water supply and tighten connectors 1⁄4 turn using the appropriate tool.
Repeat if necessary.
Turn faucet on and leave both hot and cold water running for at least one minute to
evacuate all air trapped in the pipes. Turn off water.
You can now turn on water supply.
Testing connections
Vérification des raccordements
Your UBERHAUS Design faucet is now installed and ready to use!
Votre robinet UBERHAUS Design est maintenant installé et prêt à être utilisé!
Assurez-vous que le robinet est fermé lorsqu'il n'y a personne à la maison pour prévenir l'inondation de votre
demeure.
Nettoyez régulièrement la surface du robinet avec une solution de nettoyage neutre. Puis, essuyez le robinet
au moyen d'un linge de coton souple et doux pour le maintenir brillant.
Make sure the faucet is turned off when nobody is home to prevent flooding your home.
Regularly clean the surface of the faucet with neutral wash solution, then dry it with a piece of soft cotton cloth
to keep it bright.

Other UBERHAUS DESIGN Plumbing Product manuals

UBERHAUS DESIGN 75175015 User manual

UBERHAUS DESIGN

UBERHAUS DESIGN 75175015 User manual

UBERHAUS DESIGN 70115075 User manual

UBERHAUS DESIGN

UBERHAUS DESIGN 70115075 User manual

UBERHAUS DESIGN 70115002 User manual

UBERHAUS DESIGN

UBERHAUS DESIGN 70115002 User manual

UBERHAUS DESIGN 80475002 User manual

UBERHAUS DESIGN

UBERHAUS DESIGN 80475002 User manual

UBERHAUS DESIGN 70115004 User manual

UBERHAUS DESIGN

UBERHAUS DESIGN 70115004 User manual

UBERHAUS DESIGN 80475008 User manual

UBERHAUS DESIGN

UBERHAUS DESIGN 80475008 User manual

Popular Plumbing Product manuals by other brands

Hans Grohe AXOR Urquiola 11041000 Instructions for use/assembly instructions

Hans Grohe

Hans Grohe AXOR Urquiola 11041000 Instructions for use/assembly instructions

METHVEN FLEXISPRAY quick start guide

METHVEN

METHVEN FLEXISPRAY quick start guide

Hans Grohe MyCube S Instructions for use/assembly instructions

Hans Grohe

Hans Grohe MyCube S Instructions for use/assembly instructions

Delabie 130120 manual

Delabie

Delabie 130120 manual

Moen 84470 installation instructions

Moen

Moen 84470 installation instructions

Elkay DRKAD2822 Specifications

Elkay

Elkay DRKAD2822 Specifications

BELLOSTA bellini 6305/4 Installation instruction

BELLOSTA

BELLOSTA bellini 6305/4 Installation instruction

Kohler K-5331T-S-0 Installation and care guide

Kohler

Kohler K-5331T-S-0 Installation and care guide

Grohe Veris 19 343 manual

Grohe

Grohe Veris 19 343 manual

Kohler K-15246X-S Installation and care guide

Kohler

Kohler K-15246X-S Installation and care guide

Teuco Sauna J user manual

Teuco

Teuco Sauna J user manual

Moen T6620BN manual

Moen

Moen T6620BN manual

Oras Electra 6660 Installation and maintenance guide

Oras

Oras Electra 6660 Installation and maintenance guide

BELLOSTA baby-s 7205/3/A installation instructions

BELLOSTA

BELLOSTA baby-s 7205/3/A installation instructions

Fontana Showers FS145112 installation instructions

Fontana Showers

Fontana Showers FS145112 installation instructions

Moen Show House TS883 Series owner's manual

Moen

Moen Show House TS883 Series owner's manual

Dallmer 300 PC KS Installation

Dallmer

Dallmer 300 PC KS Installation

SUMERAIN S6119CP installation guide

SUMERAIN

SUMERAIN S6119CP installation guide

manuals.online logo
manuals.online logoBrands
  • About & Mission
  • Contact us
  • Privacy Policy
  • Terms and Conditions

Copyright 2025 Manuals.Online. All Rights Reserved.