Uclear HBC 120 User manual

Snow Helmet Communicator
HBC 120
US-PUB#2A
User Manual

Notices
This device complies with Industry Canada license-exempt RSS
standard(s). Operation is subject to the following two conditions:
(1) this device may not cause interference, and (2) this device
must accept any interference, including interference that may
cause undesired operation of the device.
This Class
}
B
~
digital apparatus complies with Canadian
ICES-003.
Cet appareil s’accorde avec Industrie Canada licence-exempte
RSS standard.
(1) cet appareil ne peut pas causer l’intervention, et (2) cet
appareil doitaccepter de l’intervention, y compris l’intervention qui
peut causer l’opération non désirée de.
Cet appareil numérique de la classe B est conforme à la norme
NMB-003 du Canada

Notices
TECHNICAL SUPPORT:
For additional information please visit our website at
www.uclear-digital.com
For customer and technical support in the US and Canada,
please contact:
BITwave USA LLC
1093 E lron Eagle Dr. #115
Eagle, ID 83616
1-855-BIT-WAVE
COPYRIGHTS:
Copyright © 2011 BITwave Pte Ltd & FSC. All rights reserved.
No part of this guide may be reproduced in any form or by any
process whatsoever without prior written consent from BITwave
Pte Ltd and FSC.
LICENCES:
The trademark and logo is exclusively owned by
BITwave Pte Ltd & FSC. Any use of the mark by any other
parties without prior written permission of BITwave Pte Ltd &
FSC constitutes an infringement of legal rights.
The Bluetooth trademark is owned by Bluetooth SIG and is
used under license by BITwave Pte Ltd & FSC.
FCC COMPLIANCE STATEMENT FCC ID:NMC2010HBC100A This
device complies with part 15 of the FCC rules. Operation is subject
to the following two conditions:
(1) This device may not cause harmful interference, and
(2) This device must accept any interference received, including
interference that may cause undesired operations.
Welcome to
HBC120 Ski and Snowboard Helmet Communicator
User Manual
HBC120 helmet
communicator Hi-fi stereo headset 18”extension Cord
control unit
Strap Attachment Side Mounted An AC charger and
Chip Helmet Strap USB charging cable
A metal mounting Microphone
Note: The manufacturer is not responsible for any radio or Tv
interference caused by unauthorized modifications to this
equipment. Any modifications to the equipment will void the
manufacturer’s warranty.
bracket with User manual
double sided tape Alignment Inserts

Contents
Contents ---------------------------------------------2
Quick User Guide ------------------------------------ 3
Warnings and Safety Instructions ------------------ 7
Features ---------------------------------------------9
Installation ------------------------------------------10
General Operations ---------------------------------14
Mobile Phone Operations ---------------------------16
Music Streaming Operations -----------------------18
Intercom Operations ------------------------------- 19
Button Configurations Summary ------------------ 20
Status Indicator Configurations Summary --------21
Technical Data --------------------------------------22
Troubleshooting Operational Tips ------------------ 23
Notices ----------------------------------------------24
Notices
PERSONAL SAFETY:
Do not open the seal of the hardware, tamper, repair or modify
any parts. Do not touch the product with metal objects or parts or
chemical products. Violation of the above will lead to
potential fire hazards and mishaps.
Please contact the technical support or your local supplier if
your product malfunctions.
Always comply with the local law and traffic regulations. Where
use of the product is not permitted or allowed by any laws and
regulations including the traffic laws of your country, we warn
you not to go against such restrictions. You will bear the full
responsibilities of any breaches of law and regulations.
You should not allow the operations or use of the product or any
attempts to use it by any persons including yourself to
compromise anyone’s safety including your own or to cause
harm to any vehicles, property, objects, livestock, inventories,
assets and the like under any circumstances. You or any users
of the product are to take all necessary safety measures and
precautions and to remain alert to all surrounding conditions.
You are warned not to operate the product if you are not
physically capable of doing so in a safe manner, if you have or
will consume any alcohol or any mind-altering substance during
its operation so that your alertness is compromised or if you
have any medical conditions or needs that may compromise
your abilities to do so in a safe manner.
We warn you of the inherent, unforeseeable and unlimited risks
and dangers in using the product while in traffic, including injury
or illness, strains, fractures, partial and/or total paralysis, death
or other ailments that could cause serious disability due to any
causes.
This product is only for use by persons eighteen (18) years of
age and above who have understood the warnings, risks and
the terms of use.
You confirm that you have read this release of liability and fully
understand its terms and that you have given up substantial
rights by using or attempting to use the product.

Notices
All risks from operating or usage of the product rest solely and
entirely with the user of this product, the original purchaser or
any third parties, who assumes full responsibility for all injuries,
losses and/ or damages, whether caused in whole or in part by
the negligence, omissions or other conduct of others, including
that of BITwave, FSC and all their representatives, partners,
agents, distributors, suppliers, resellers and all others in its
supply and distribution chain either due to the designer’s or
manufacturer’s negligence or omissions or any third parties
Answer/Music
Toggle button
Status
indicator
Quick User Guide
Your HBC120 at a glance
Up button
Speaker /
charging socket
Down button
involved.
CORRECT DISPOSAL OF THIS PRODUCT:
Do not dispose this product with other household wastes at the
end of its working life. There is a separate collection system for
GENERAL FUNCTIONS
Before using your HBC120 please charge it first!
Attach
used electronic products in accordance with legislation that
requires proper treatment, recovery and recycling.
Household users should contact either the retailer where they
purchased this product, or their local government office, for
details of where and how they can take this item for
environmentally safe recycling. Business users should contact
their suppliers and refer to the terms and conditions of the
purchase contract. This product should not be mixed with other
commercial wastes for disposal.
PRODUCT INFORMATION:
BITwave, FSC and all their representatives, agents, distributors,
suppliers or resellers shall not be held responsible for any
consequences arising from any errors or omissions in the guide or
resulting directly or indirectly from the use of the information
herein. BITwave and FSC reserve the right to amend or improve
the product design or user guide without any restrictions and
without any obligation to notify users.
All information here is accurate as of the date of printing.
Please check for the latest version of any the modified or
upgraded product on the website www.uclear-digital.com from
time to time.
26
Charger
Charge
Check Bluetooth phone capabilities before use
To charge, use the provided charging cable by connecting
it either to a USB port or to the adaptor provided.
While charging, the status indicator light will be red.
Upon fully charged, the status indicator light will be blue.
Low Battery Indicator
You need to charge the helmet communicator when the
status indicator light blinks red twice every 2 seconds with
a beep every minute.
Install Speakers
Make sure the speaker wire
is inserted into the main unit.
lnsert the speaker wire into the control unit until you
can no longer see the 3 ribs on the speaker wire plug.

Quick User Guide
Power On Reset
Hold Answer for 2 seconds. Press all 3 buttons
together.
Power Off
Hold Answer for 5 seconds.
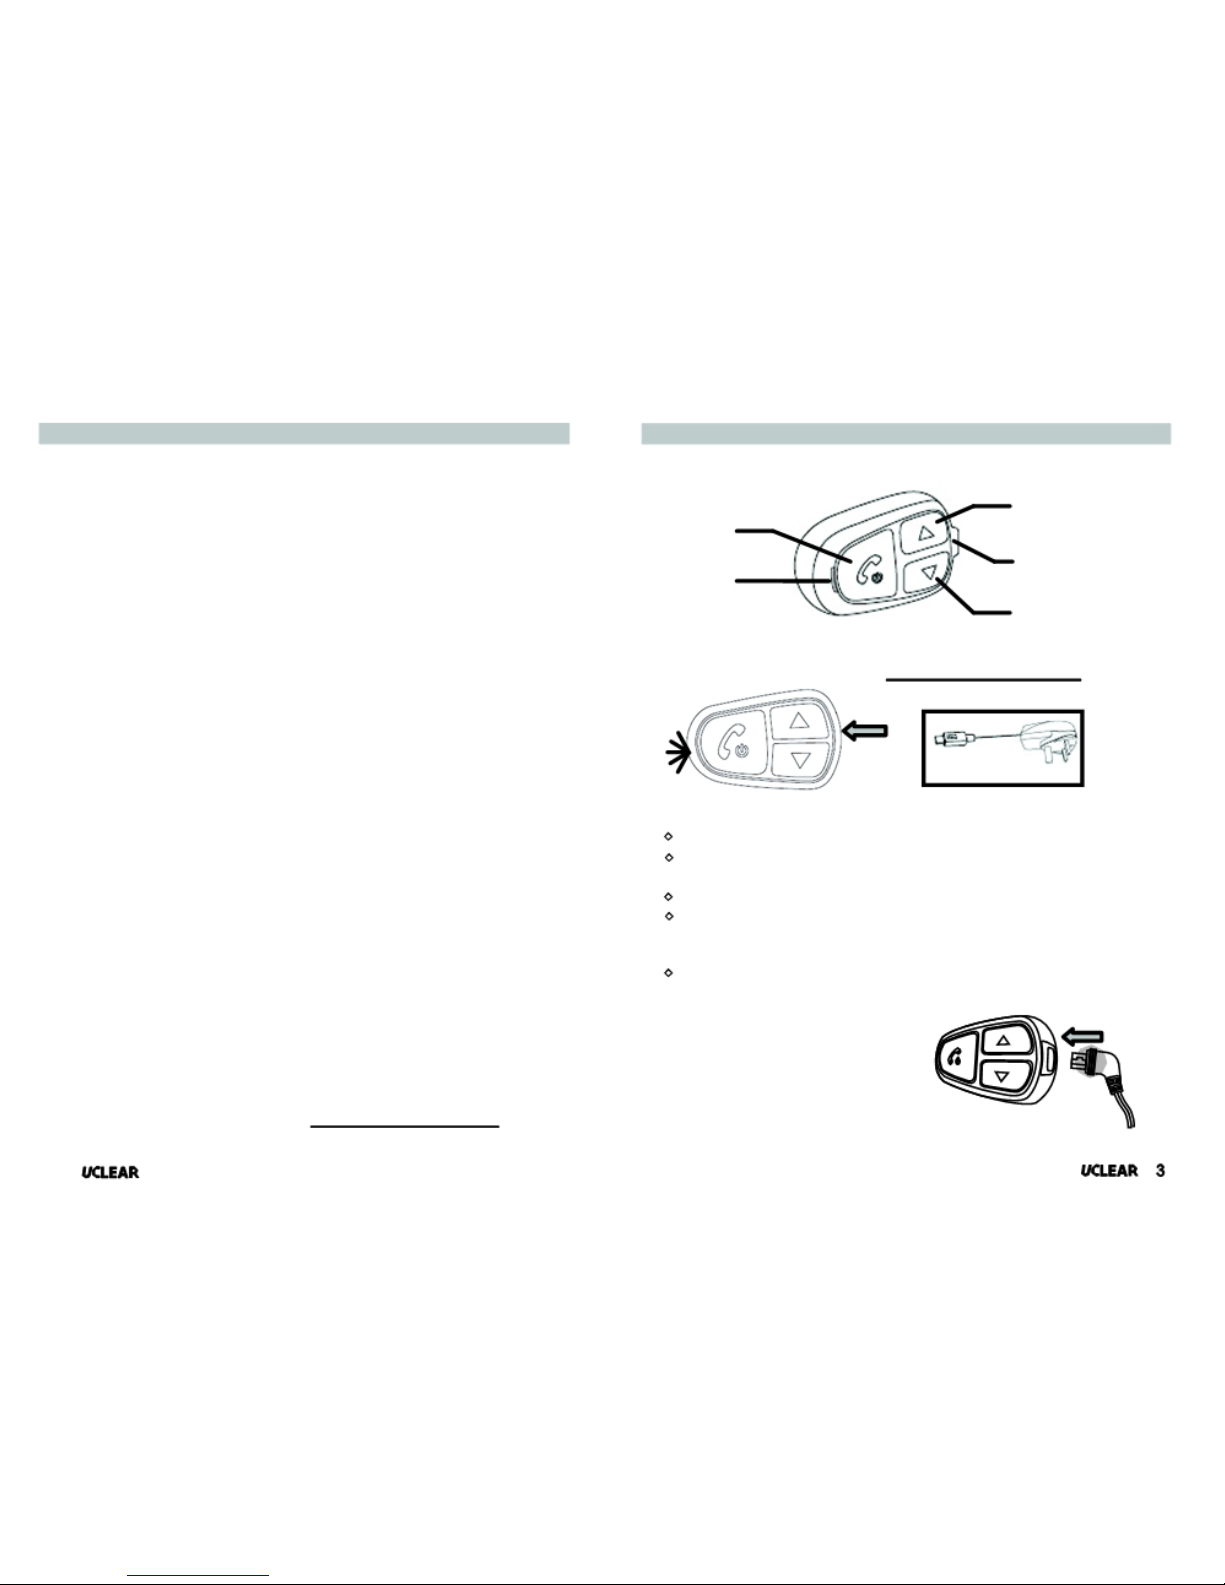
Volume Up Volume Down
Press Up once. Press Down once.
*NOTE: The volumes for mobile phone, music and intercom
functions are controlled separately.
MOBILE PHONE FUNCTIONS
Pairing your HBC120 with your mobile phone
Pairing
Check Bluetooth phone capabilities before use.
Hold Up and Down buttons together for 2 seconds. The
status indicator light will blink blue then red.
From your mobile phone Bluetooth menu, search for
‘HBC120 Snow’.
If your phone requires a password, enter ‘0000’.
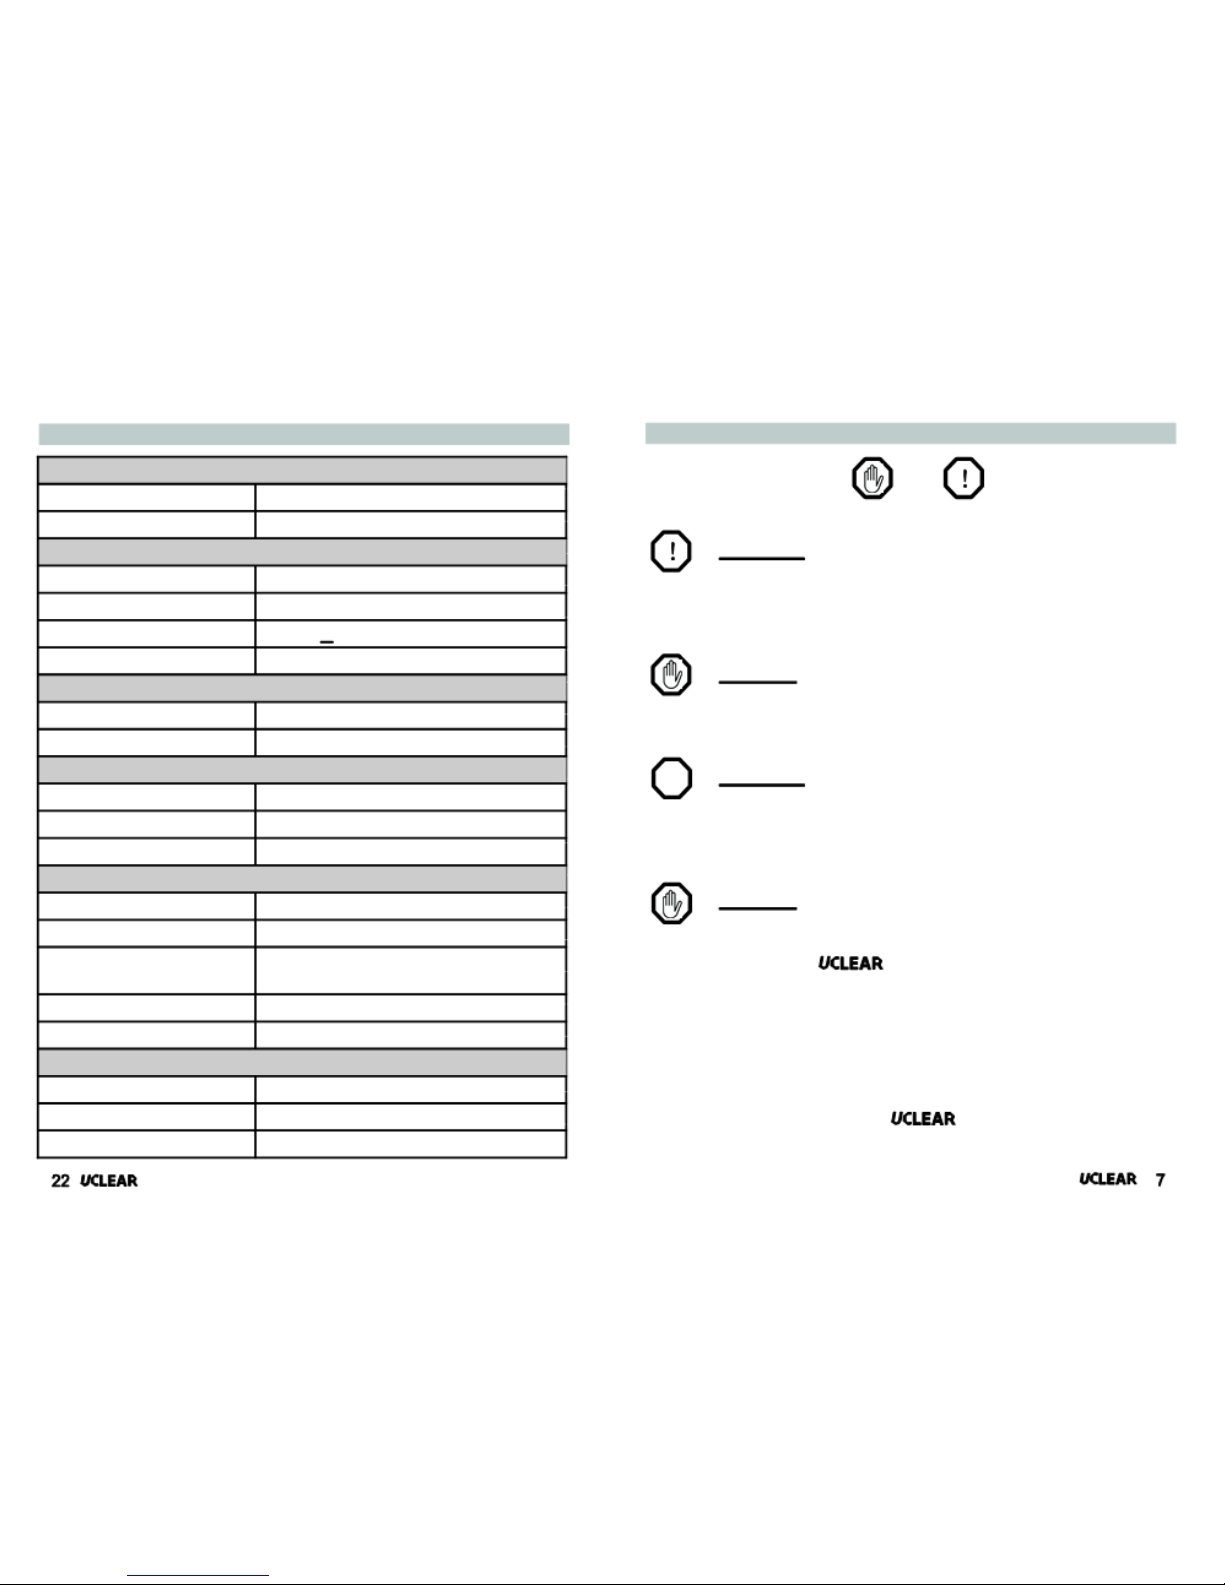
Notices
Warranty does not cover data recovery and physical deterioration
due to use, damages resulting from accidents, storage , loss or
data loss or damage during repairs or transits . The sender will
bear all transportation charges for functioning products but
which were declared defective.
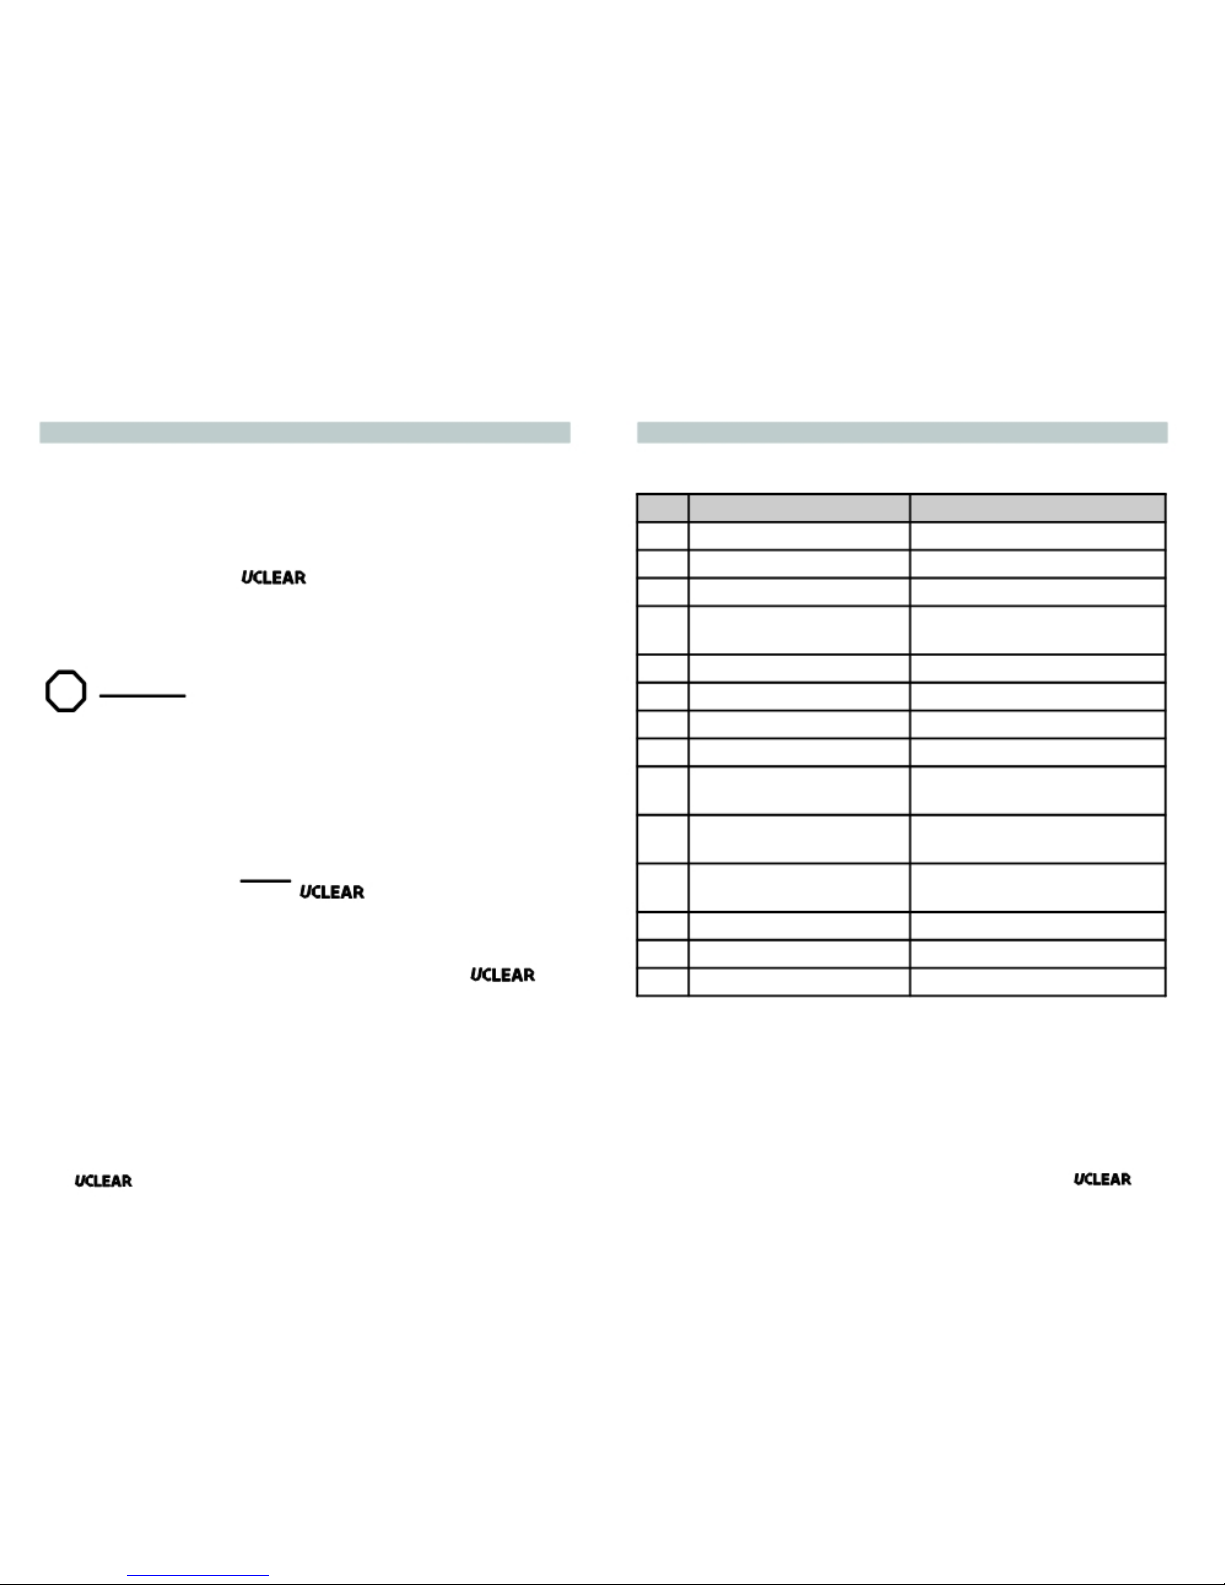
LIMITATIONS OF WARRANTY:
All product warranties for the product by are limited
to those mentioned in the product manual.
WAIVER AND DISCLAIMER:
BITwave, FSC and all their representatives, agents, distributors,
suppliers and resellers shall not be liable and will be held harmless
from any and all litigation, claims, debts, demands, actions and
liability which may arise, directly or indirectly, from operating or
using the product for any damages, losses, distress, pain, suffering,
discomfort, loss and injuries including bodily harm illness, strains,
fractures, partial and/or total paralysis, death or other ailments
that could cause serious disability either to any persons, or any
parties whether the user or other third parties or their possessions,
or to any goods, vehicles, properties, assets among others including
your own suffered by any persons, organizations, or any third
parties whether physical or otherwise and which may accrue to
you in the future, to the fullest extent permitted by law as a result
of the use, operation, malfunctioning, misuse, disposal or repairs
of the product or any other reasons, conditions or circumstances
or attempts to do so whether due negligence, omissions or
otherwise of BITwave, FSC or any of their representatives,
partners, agents, distributors, suppliers, resellers, designer,
manufacturer or any others in its supply and distribution chain or
any third parties involved.
4

Notices
BATTERY WARNING:
The helmet communicator contains a rechargeable
lithium ion polymer battery. To reduce risks of fire or burns, do
not
disassemble, crush, puncture, short external contacts or dispose
in fire
or water.
CHARGING NOTICE:
To reduce the risk of personal injury, electrical shock, fire or
damage to equipments, please follow all the instructions below:
- Do not immerse the product, AC adaptor or speakers in water.
Answer Incoming Call
Use voice pickup, say ‘hello’
or ‘pickup’.
OR
Manually press Answer
button once.
Reject/ End Incoming Call
Quick User Guide
Last Number Redial
Hold Answer and Up
button for 2 second.
- Do not install, place or use the product near any source of heat
for example: stove, radiator, oven, toaster, coffee maker or
other apparatus that gives off heat.
- Always use the provided AC power adaptor and cable included
in the package to charge the product. Use of any incorrect
power supply to charge the product may cause permanent
damage to the product and render the warranty void.
Hold Answer button for 2 seconds.
3 Way Calling Voice Dial
WARRANTY: (Applies only to customers outside of the USA and
Canada. For customers in the USA and Canada, please refer to
the warranty card. )
To swap between 2
concurrent calls, press
the Answer button once.
MUSIC STREAMING FUNCTIONS
Hold Answer and Down
button for 2 second.
Without prejudice of legal warranty, the product is covered under
a 1 year warranty by manufacturer from the date of purchase.
Please provide the proof of purchase when you return the item
to the supplier.
The warranty covers manufacturing defects only.
The warranty is voided by any unauthorized repairs, misuse,
misapplication, tampering of the product, modifications, upgrading
or results of any failures to follow the guidelines as set out in the
product brochure or by any of the actions specified in this brochure
or anywhere in our technical publishing released to the public
from time to time which would have voided the warranty.
*NOTE Check the functionality of your music device to
ensure that it has Bluetooth capabilities.
Pairing (for Music Play/ Stop (Quick Mute
Bluetooth adaptor Only) Functions)
Hold Up and Down buttons Press the Answer button once
together for 2 seconds. to stop the music. Press the
Answer button 2 times to
24 5
resume the music.

Quick User Guide
Backtrack Fast Forward
Press the Down button Press the Up button 2
2 times. times.
INTERCOM FUNCTIONS
Pairing your HBC120 to another HBC120
Helmet 1 Helmet 2
(Master Unit) (Secondary Unit)
Pairing (Needs to be done once)
The helmet communicator needs to be switched off
before performing the following steps:
Press Answer and Down buttons for 5 seconds on
helmet 1 & press Answer and Up buttons for 5
seconds on helmet 2.
Initiate or Terminate Conversation
(Toggle Functions)
Hold the Up button for 2 seconds.
Troubleshooting Operational Tips
- The sound quality and voice activation feature are dependent
on the capabilities of your mobile device (e.g. mobile phone).
Make sure that your mobile or pairing device is using the
most current software updates.
- For best sound quality try adjusting volume levels of your
master pairing device to 70% or until you achieve best
results.
- Try experimenting with your pairing device, turn the volume
to 50%,75% and 100% to find which combination works best
for your settings.
- The HBC120 will fit on most ski and snowboard
helmets. As long as your helmet has speaker pockets or a
place for the speakers, the HBC120 will most likely
work with your helmet.
- You can use the HBC120 on most helmets:
Ski and Snowboard, Snowmobile
Motorcycle, Motocross, ATV
Your helmet needs speaker pockets and a mounting surface
for
the control unit.

Technical Data
Unit
Dimensions (L x W x H)
6 0mm x 4
0mm x 15mm
W e
i g
ht
3 0
g
Warnings and Safety Instructions
This manual uses the and icons to highlight
certain instructions. Below is an explanation of the icons.
Audio
Frequency response 30Hz to 20kHz
Sampling rate 48kHz, 16 bit
Attention
- This icon highlights special instructions and precautions
intended to avoid damage to the system. Non-compliance
SPL 105dB + 2dB may void the product warranty.
THD 0.5%
Bluetooth
Warning
Specifications Version 2.1 EDR, Class 2 - This icon provides precautions important to prevent injuries
Profiles HSP, HFP, A2DP, AVRCP, Intercom to the user.
Radio ! Attention
Carrier frequency 2.4 - 2.483 GHz
Range Up to 10m (open field)
RF output power -6 dBm to 4 dBm
- Please read through the operating instructions to understand
how to operate the system, in particular the safety
instructions.
Power
Power consumption 200mW (max) Warning
Power input (charging) 5V / 400mA / 2W
Built-in battery 3.7V, 570mAh, Lithium-ion Polymer
(Rechargeable)
- Please note that there are some countries that by law disallow
the rider to set the helmet communicator to a volume
that prevents you from perceiving the surrounding.
Music/talk time Up to 10 hours
Standby time 400 hours - Please note that in some countries the use of both speakers
simultaneously is authorized only out of pubic traffic
Temperature
Operation temperature -10°C to +60°C (14°F to +140°F) conditions.
- Please check with the relevant authorities for local safety
Charging temperature 0°C to +45°C (+32°F to +113°F) legislation before using the helmet communicator on
Storage temperature -40°C to +80°C (-38°F to +176°F) the road.

Warnings and Safety Instructions Status Indicator Configurations Summary
- Prolonged exposure to loud sounds may lead to permanent The table below shows the status indicator configurations.
hearing damage.
- Do not attempt to place an outgoing call through the mobile
phone while riding on the motorcycle at any point of time.
State
1 Off (No power) Status Indicator
-
- Please do not use the helmet communicator in any
way that may distract you or hinder your judgment while on
2 On (BT*not connected)
3 On (BT*connected) Blink blue fast
Blink blue slowly
the move. Never ever compromise your safety and the safety 4 Phone & Music device Blink blue & red alternately
of others. Pairing mode
5 Call in progress Blink blue very slowly
! Attention 6 In-coming call Blink blue & red alternately
- Charging and handling rechargeable battery products
incorrectly may cause them to overheat, catch fire or explode.
To prevent this please follow the instructions below:
i) Never change the batteries yourself, always bring it to an
authorized dealer to perform the replacement for you.
ii)When charging, use ONLY the charging cable provided or a
replacement cable from the dealer. Using similar,
compatible or any other cables may lead to permanent
product damage and will void the product warranty.
7 Battery low
8 Power down
9 Intercom connected
10 Intercom Pairing mode
(master unit)
11 Intercom Pairing mode
(secondary unit)
12 Battery charging
Blink red every 2 seconds
Blink red 5 times
Blink blue twice every 2
seconds
Blink purple fast
Blink purple slowly
Solid Red
- Never make any modifications to any parts of the
helmet communicator in any way as it may cause the system to
malfunction causing hurt to you.
- Do not modify your helmet to use with this system - it is not
necessary to do so.
13 Battery fully charged Solid Blue
14 Battery faulty Solid purple
* BT - Bluetooth
8 21

Button Configurations Summary
The table below shows the button configurations.
Action Button
Common Instruction Commands
Features
The
helmet communicator has three main
functions: to listen to music, make mobile phone calls,
and for intercom conversation all via wireless Bluetooth.
Power on Hold Answer for 2 seconds Mobile Phone Functions
Power off
Activate Bluetooth pairing
Volume up
Hold Answer for 5 seconds
Hold Up & Down for 2 seconds
Press Up once
• Bluetooth phone audio capabilities, HFP & HSP Profile.
•Voice activated call pick up.
Volume down Press Down once
R e
s e t
P r
e s
s Answer, Up & Down once Music Streaming Functions
Voice Calling •Bluetooth music streaming with hi-fi and stereo capabilities,
Pick up incoming call Press Answer once A2DP Profile.
End call in progress Hold Answer for 2 seconds •Bluetooth Audio/Video Remote Control capability, AVRCP
Reject incoming call Hold Answer for 2 seconds profile.
Voice dial Hold Answer & Down for 2 seconds
Last number redial Hold Answer & Up for 2 seconds
Music Streaming
Intercom Functions
• Helmet to helmet intercom range via two helmet
P l
ay
P r
e s
s Answer 2 times communicator up to 10m range.
Stop/Quick Mute
P r
e s
s Answer 1 time
Fast forward track Press Up button 2 times Advanced Product Features
Backtrack Press Down button 2 times
Intercom
Pairing as helmet 1 While unit is off, hold Answer and
(m aster unit) Down for 5 seconds
Pairing as helmet 2 While unit is off, hold Answer and
(secondary unit) Up for 5 seconds
Connect intercom Hold Up for 2 seconds
Disconnect intercom Hold Up for 2 seconds
•Self adaptive intelligent noise cancellation algorithms ensure
conversations on the go are clear even in noisy environments.
• Voice controlled incoming call answering.
•
The weather resistant engineered design ensures the
possibility of communication rain, snow or shine.
•The integrated microphone array technology allows you to
communicate without the hassle of using boom microphones.
20 9

Installation
The HBC120 helmet communicator package
contains :
A HBC120 helmet
communicator control unit
A pair of hi-fi stereo headset with embedded
microphones
18”extension Cord
A metal mounting bracket with double sided tape
Side Mounted Helmet Strap
Goggle Attachment Clip Strap
Microphone Alignment
Inserts
An AC charger and USB charging cable
A user manual
10
Intercom Operations
To use the intercom profile on the helmet communicator
for the first time, you need to first connect the two
helmet communicators wirelessly by pairing.
Pairing
•Pairing readies one helmet communicator to search
for the other helmet communicator. This pairing
process needs to be carried out only once.
•With both helmet communicators powered off, hold
the Answer and Down button for 5 seconds to pair helmet 1
(master unit) and hold Answer and Up buttons for 5 seconds
to pair helmet 2 (secondary unit). The status indicator for
both helmets will blink blue and red alternately while trying to
connect to each other.
•During the pairing process, please ensure that there are no
other intercom units in close proximity.
•It is recommended that after the pairing process is successful.
Restart both helmet communicators.
After pairing the two helmet communicators,
you may now use the intercom profile.
Initiate Intercom (Toggle function)
•To start conversation, hold the Up button for 2 seconds. •In the
event where the link breaks during the conversation,
you will need to re-initiate it when the helmets come back
into Bluetooth range.
T erminate Intercom (Toggle function)
• To end the conversation, hold the Up button for 2 seconds.
* Note: Pairing between 2 units only needs to be done one time.
After the initial pairing, initiate or terminate a conversation by
pressing the Up button for 2 seconds. 19

Music Streaming Operations
To use the helmet communicator with your music device
you must connect them wirelessly through Bluetooth
pairing. This step is only required for Bluetooth music
streaming devices.
Pairing
• To connect the helmet communicator to a Bluetooth music
device, hold the
Up
and
Down
buttons for 2 seconds. This
puts
the helmet communicator into pairing mode. The
status
indicator will blink blue and red alternately.
•
Next, put the Bluetooth music device into pairing mode.
Both the helmet communicator and the music device should
Installation
Install Speakers
• Use the plastic inserts (optional) to ensure a firm and
secure mounting area for the speaker.
• Insert the plastic inserts in the ear pocket/pads. If necessary
carefully trim the plastic inserts with a pair of scissors to fit
helmet.
• The microphones MUST be placed
facing out.
• Left and right speakers must be installed
symmetrically.
automatically pair together.
After pairing the helmet communicator to a music device,
you may use the helmet communicator to wirelessly listen
to music stored on the device.
In order to use the helmet communicator to remotely
control the music streaming device, the music device
Bluetooth Audio/music streaming device needs to have
/Video Remote Control capability, AVRCP profile.
Play & Stop
• The Play and Stop command is a toggle function. To play
music, press the Answer button 2 times. Pressing the Answer
button 1 time will pause the music.
Fast Forward
•
To skip to the next track, press the
Up
button 2 times.
Backtrack
•
To skip to previous track, press the
Down
button 2 times.
Microphone
• Make sure the speaker wire is inserted into the main unit.
lnsert the speaker wire into the control unit until you can no
longer see the 3 ribs on the speaker wire plug.
Your HBC120 helmet communicator package comes
with 3 types of mounting brackets: a goggle attachment
clip, a side mounted helmet strap and a metal mounting
bracket. Use any one of the brackets to install the HBC120
control unit onto your helmet.

Installation
Mounting Control Unit on Goggle Strap
• Use the Goggle Attachment Clip to install the control unit on to
goggle strap.
• Fold Goggle Attachment Clip around of the goggle strap on the
left side of the helmet. Use the Velcro to ensure a secure hold on
the goggle strap.
Mounting Control Unit using the Side Mounted Helmet Strap.
• Install Side Mounted Helmet Strap on left side of helmet .
• Wrap Side Mounted Helmet Strap around the 2 straps on the
helmet.
• Make sure that the Side Mounted Helmet Strap is installed with
2 side holes at the top of the clip are at the top and the metal
prong on the clip is point down.
• Use the Velcro to secure Side Mounted Helmet Strap in Place.
Mobile Phone Operations
Voice Call
• To activate the voice call feature, hold the Down and Answer
buttons for 2 seconds. The accuracy of the voice dialing
,
feature is dependent on your mobile phone s capabilities.
Last Number Redial
• To redial the last number, hold the Up and Answer buttons
for 2 seconds. The capability of this function is dependent on
the mobile phone used.
3 way calling
• While on a call, if an incoming call comes in, you may answer
the call by pressing the Answer button once.
• To swap between 2 concurrent calls, press the Answer button
once.
• To end a call during a 3 way call, holding the Answer button
for 2 seconds will end the active call. Upon terminating
the active call, the call on hold will become active.
Music Feature
• If the mobile phone supports A2DP/AVRCP profile, user may
activate the music by playing it directly from the phone or by
controlling the phone via the helmet. To operate refer to
Install Metal Mounting Bracket
• Identify a position on the helmet to adhere the Metal Mounting
Bracket.
12
Music Streaming Operations section. Should the documented
steps fail to activate A2DP/ACRCP profiles, please refer to the
user manual of your pairing device (e. g. phone, ipod, etc...).
17

Mobile Phone Operations
To use the helmet communicator with your mobile
phone for the first time, you must first connect them
via Bluetooth pairing.
Pairing
•To connect the helmet communicator to a mobile phone,
hold the Up and Down buttons for 2 seconds. This puts the
helmet communicator into paring mode. The status
indicator will blink blue then red.
• Next, turn on the mobile phone Bluetooth functions and
search for Bluetooth devices. Select ‘HBC120 Snow’ to
pair with the desired device.
•When prompted to enter a passcode, enter ‘0000’ .
*Most mobile phones will automatically connect with both
phone and music Bluetooth capabilities when paired with the
helmet communicator.
After pairing the helmet communicator to your mobile
phone, you may now use the helmet communicator to
answer your calls or make outgoing calls or listen to
music.
Installation
• Peel off the double sided tape protective film.
•Carefully place the Metal Mounting Bracket onto the position
identified in step 1. (You may only do this step once)
•Make sure that permanent metal mounting clip is installed
showing the UCLEAR Logo right side up with the 2 side holes
at the top and the metal prong pointing down.
•Apply slight pressure onto the metal mounting bracket to
ensure that the metal mounting bracket is firmly secured.
Install Main Unit
•Slide main unit onto the clip bracket. You should hear a ‘click’
sound when fully inserted.
•Fully insert the speaker USB connector.
Using the Extension Cord
• The 18” extension cord allows you carry the control unit on you
or in your jacket rather than on your helmet.
Voice Activated Pick Up Calls
• When a call comes to the mobile phone, say ‘hello’ or ‘pick-
up’ to answer the call OR press the Answer button once.
Reject Calls
•To reject an incoming call or an incorrectly placed outgoing
call hold the Answer button for 2 seconds.
• Plug the male speaker cable end into the 18” extension cord then
• fully plug the extensions cord into the control unit.
You make carry the control unit on or in your jacket rather than on
your helmet.
13
16

General Operations
Your HBC120 helmet communicator is now setup
and ready to go!
Up button
General Operations
Charging the Unit
•To charge the helmet communicator, connect the provided
charging cable to the speaker/ charging socket. Upon
Answer/Music
Toggle button Speaker/
charging
Status socket
indicator Down button
The operations described here are applicable to all modes
of operations.
Power On
•Hold the Answer button for 2 seconds to power on the helmet
communicator. The status indicator will blink blue and a
power up tone can be heard.
Power Off
•To switch off the helmet communicator, press and hold the
Answer button for 5 seconds. The status indicator will blink
red 5 times followed by a long beep before fully shutting
down.
Power Save Mode (Auto Power Off)
• If the intercom feature has been in use, and all other
Bluetooth devices have been disconnected, the system will
auto shutdown in 1 hour. If the intercom feature has not been
in use and the HBC100 has not connected to any other device,
the system will auto shutdown in 10 minutes.
Low battery
•When the battery level is low, the status indicator light will
flash red twice every 2 seconds while emitting a warning
beep every minute.
charging, if the unit is on, the system will automatically
initiate power down.
Volume Control
•The volume control of the helmet communicator can be
controlled using the Up and Down buttons. Pressing the Up
or Down button will increase the volume respectively.The
volume control for each mode is independent of each other.
Automatic Speaker Loudness (Communication only)
• The speaker loudness will be automatically adjusted
depending on the environment noise level. However you can
still adjust the volume manually.
Automatic Pairing
•The helmet communicator has the ability to connect to the
last paired device automatically for two features - music and
mobile phone.
•Automatic pairing of the helmet communicator with music
devices is dependent on the music devices.
Automatic Profile Switch
•The helmet communicator supports multiple profiles
concurrently, but at any point of time only one profile is
active. The automatic profile switch determines which profile
should be active at any point of time starting from the highest
priority: (1) Mobile Phone functions (2) Intercom functions
and (3) Music functions.
•
The helmet communicator can be paired to more than 1 device.
However to achieve the most out of the helmet communication,
we do not recommend pairing more than 2 devices to the helmet
communicator at one time
Table of contents
Other Uclear Headset manuals