Uebo M200 User manual

www.uebo.net
M200 MEDIA PLAYER USER MANUAL

2 / 68
TABLE OF CONTENTS
1. INTRODUCTION .........................................................................................4
1.1 Preface..............................................................................................................4
1.2 Packing List .....................................................................................................5
1.3 Cautions ...........................................................................................................5
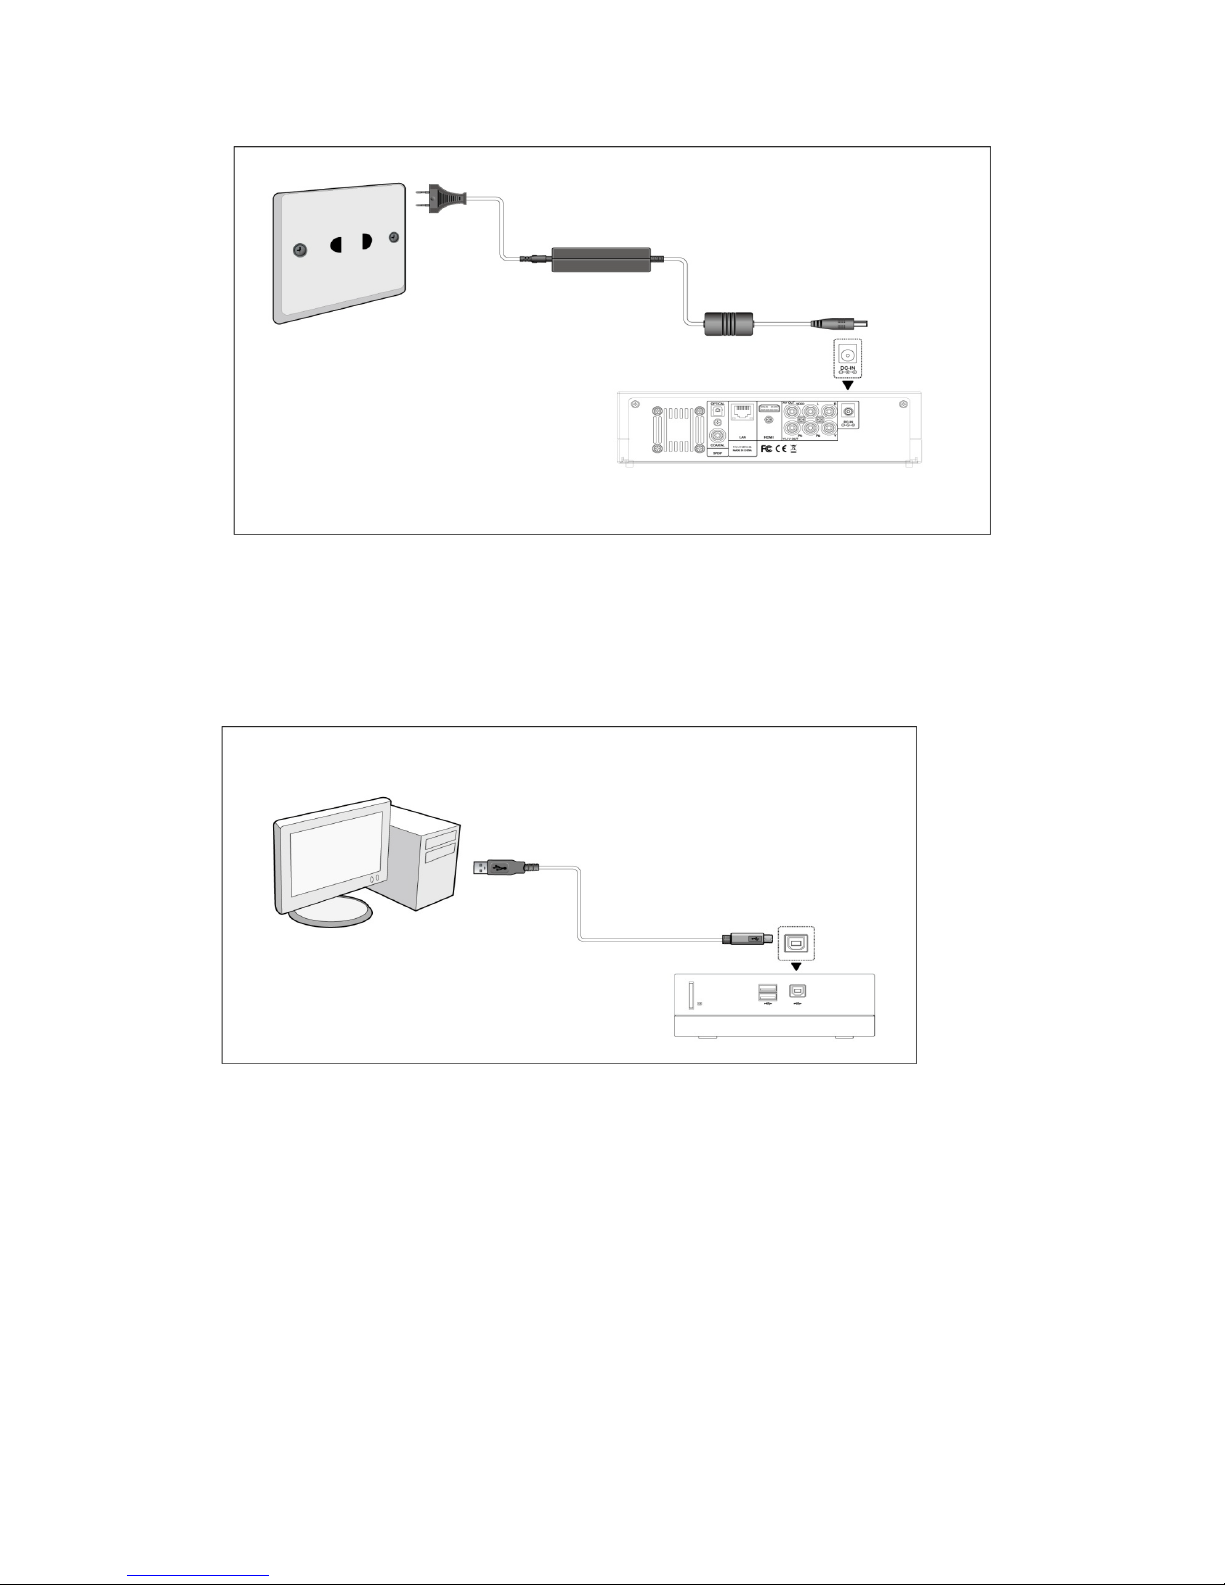
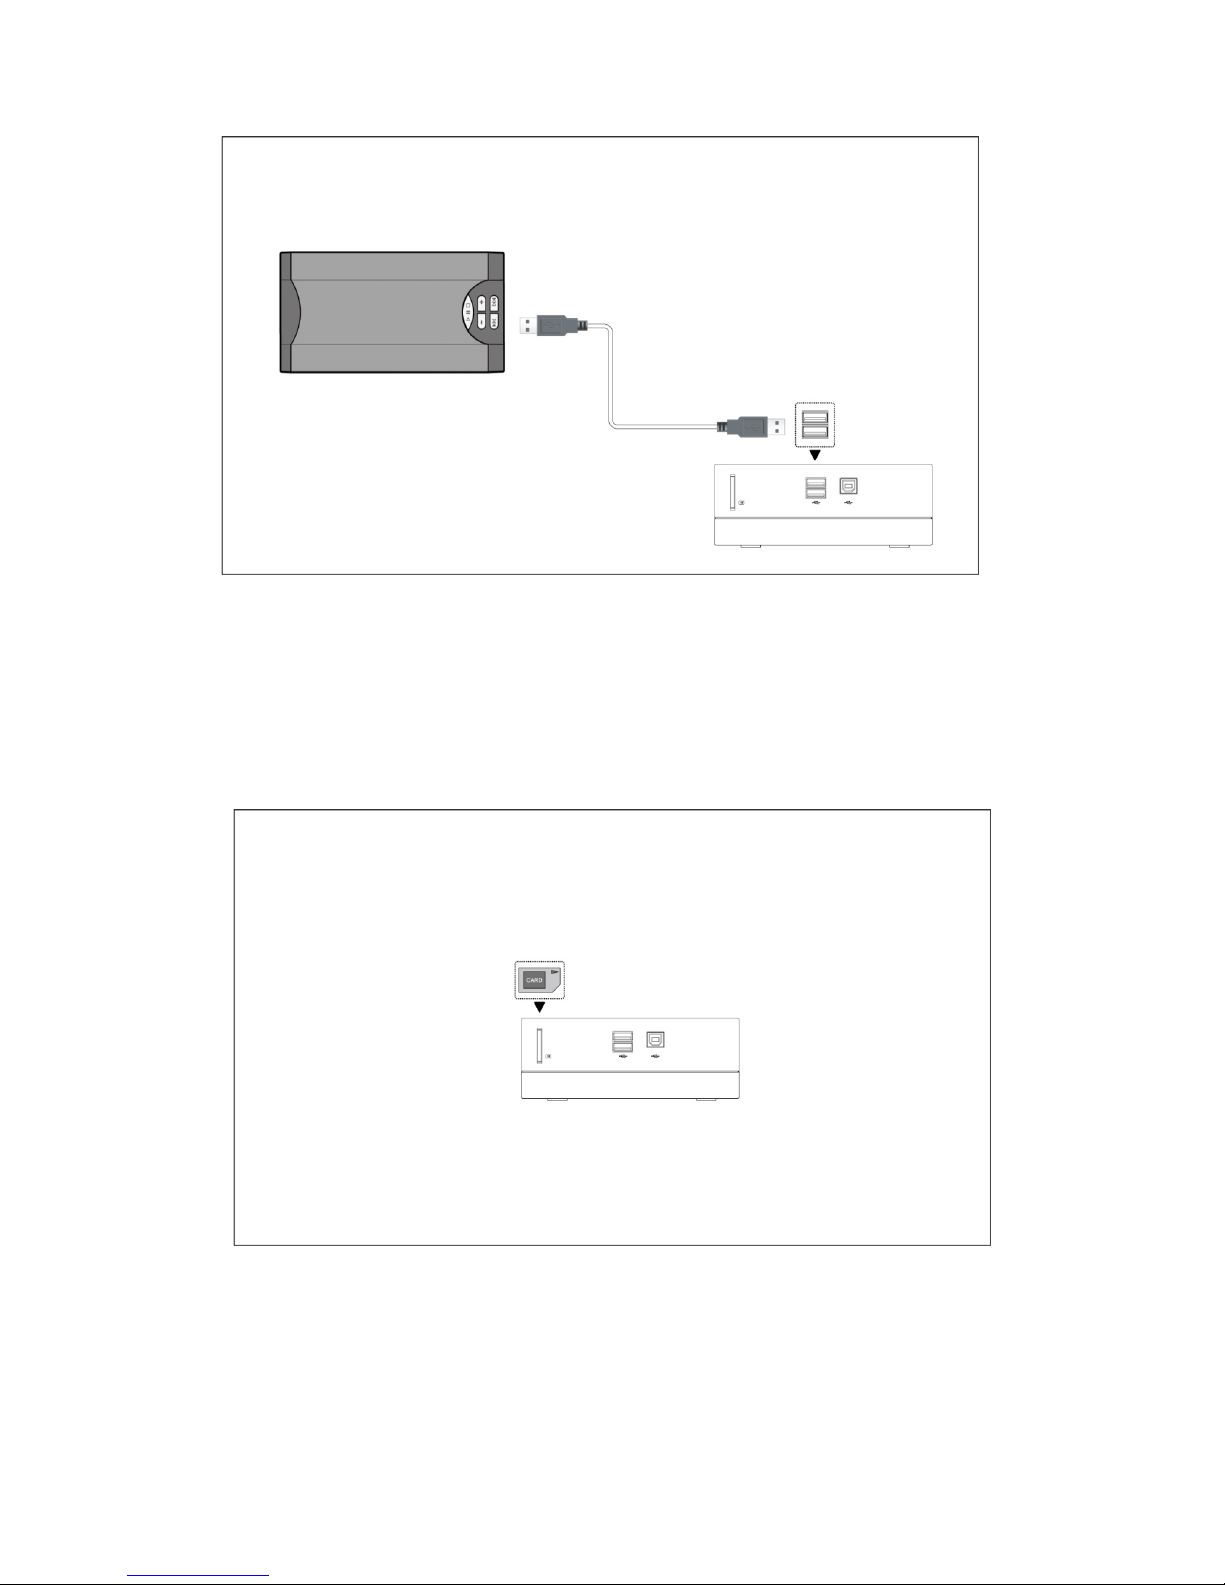
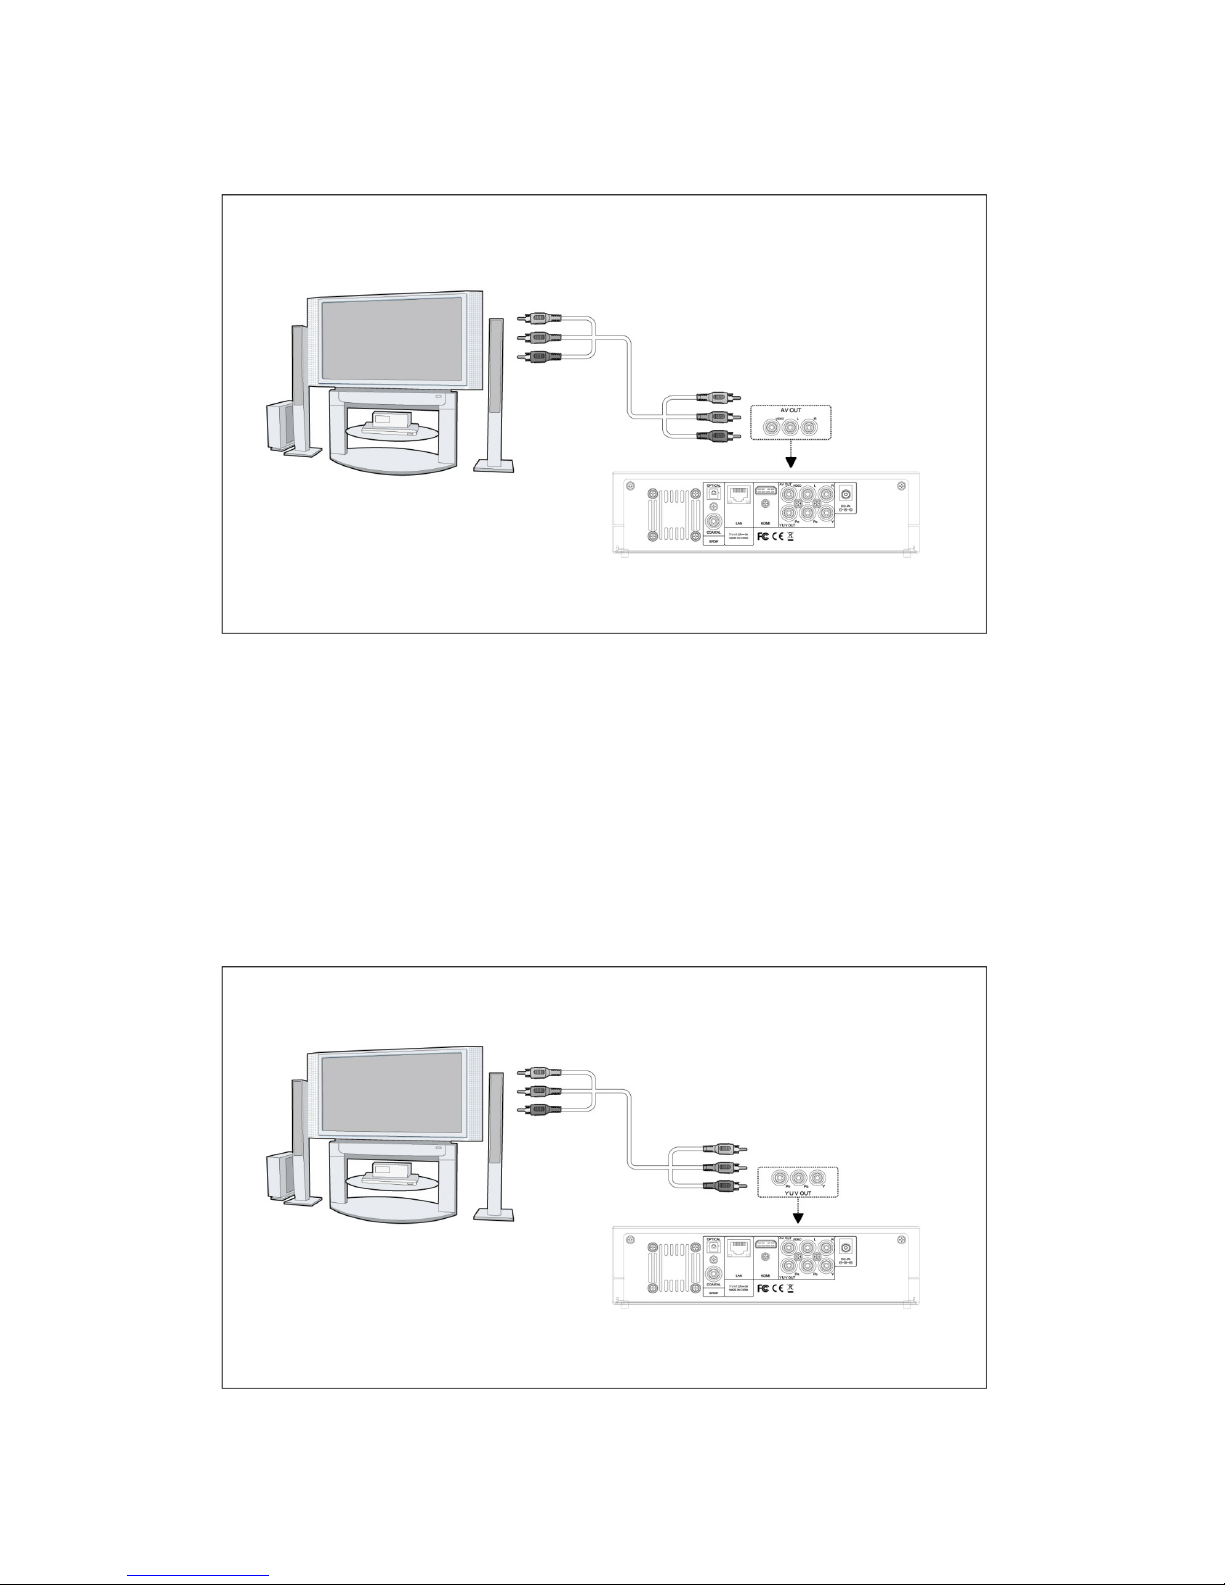
1.4 Connection .......................................................................................................6
1.5 Power On / Off...............................................................................................12
1.6 Menu Language .............................................................................................12
1.7 HDD Format ..................................................................................................12
2.1 Remote Control..............................................................................................14
2.2 Front View......................................................................................................16
2.3 Rear View.......................................................................................................17
2.4 Side View .......................................................................................................17
3. SETUP MENU ...........................................................................................18
3.1 Changing Audio Settings ...............................................................................18
3.2 Changing Video Settings................................................................................19
3.3 Changing Network Settings ...........................................................................20
3.4 Changing System Settings .............................................................................25
3.5 Miscellaneous ................................................................................................26
4. MEDIA BROWSER MENU ........................................................................27
4.1 Browsing All ..................................................................................................28
4.2 Browsing Music .............................................................................................28
4.3 Browsing Photos ............................................................................................29
4.4 Browsing Movies ...........................................................................................29
4.5 A/V Streaming via Network...........................................................................30
4.6 A/V Streaming via UPnP-server ....................................................................32
4.7 Renaming / Deleting Files .............................................................................39
4.8 Managing the Playlist ....................................................................................40
5. FILE COPY MENU.....................................................................................41
6. MEDIA LIBRARY.......................................................................................42
6.1 Music library..................................................................................................43
6.2 Photo Library .................................................................................................45
6.3 Movie Library ................................................................................................47
7. INTERNET RADIO ....................................................................................49
8. BITTORRENT, NAS & WEB SERVER FUNCTION...................................52
8.1 Add a New Torrent.........................................................................................52
8.2 Download Menu.............................................................................................53
8.3 BT Setup Menu ..............................................................................................53
8.4 Built-in Web Server........................................................................................54
8.5 NAS Function (SAMBA) ..............................................................................58
9. INTERNET CHANNELS (INTERNET MULTIMEDIA SERVICE) MENU....59
9.1 Picasa .............................................................................................................59

3 / 68
9.2 News ..............................................................................................................59
9.3 Flickr ..............................................................................................................59
9.4 Weather ..........................................................................................................59
10. UPGRADING THE FIRMWARE ..............................................................60
11. APPENDIXES ..........................................................................................61
11.1 Specifications ...............................................................................................61
11.2 Frequently Asked Questions (FAQ) .............................................................62
11.3 Copyrights and Trademarks .........................................................................64
11.4 Warranty .......................................................................................................65
11.5 GPL Statement .............................................................................................68

4 / 68
1. INTRODUCTION
1.1 Preface
Congratulations on your purchase of UEBO M200 Media Player. We hope you will enjoy using
it as much as we did designing it.
M200 Media Player Has the Following Functionalities:
A/V Output
•HDMI V1.3 for high-definition video and digital audio.
•Composite & component video and stereo audio for analog audio-visual connection.
•S/PDIF coaxial & optical interface for high-fidelity digital audio.
•Adjustable video output resolution (NTSC, PAL, 480p, 576p, 720p, 1080i and 1080p).
Multimedia Playback
Supports major audio, video and image file formats (1080p HD video decoding).
•Supported Video formats:
AVI/MKV/TS/TP/TRP/M2TS/MPG/MP4/M4V/MOV/VOB/ISO/IFO/DAT/
WMV/ASF/RM/RMVB/FLV.
•Supported music format: MP3/OGG/WMA/WAV/AAC/FLAC.
•Supported picture format: HD JPEG/JPG/BMP/GIF/TIF/PNG.
•Photo slide show with background music.
Network Feature
•A/V streaming/transmission via Ethernet (10M/100M) & Wi-Fi (802.11b/g/n, optional).
•File sharing via built-in SAMBA server.
•A/V streaming via UPnP/DLNA Media Server.
•BitTorrent download (controlled and managed via web server).
•Internet Radio (SHOUTcast).
File Copy
•Supports copying and moving files among Memory Card, USB, HDD and Network
USB 2.0 Support
•USB PLAYER port (for computer connection).
•USB HOST port x 2 (for USB storage devices).
IMPORTANT: all of the information presently found in this manual is valid at this time. However,
as we continue to update and improve on our feature set, some information may become
obsolete. You can find the most up-to-date information on our website at
http://www.uebo.net.

5 / 68
1.2 Packing List
Part Quantity
M200 Media Player 1
Composite A/V Cable 1
USB cable 1
Remote Control 1
AA Batteries 2
AC/DC Adaptor 1
Resource CD (with User Manual) 1
IMPORTANT:
The actual contents of your package may be different from the packing list included in this
manual.
1.3 Cautions
In order to ensure both your safety and the proper operation of the M200 Media Player, please
note the following before operating the Player:
1.3.1 Proper Usage
1. You should not modify this Player in any way, as this will void your product warranty.
2. If you want to install the hard drive in the Player, please follow the instructions
provided in this manual on Hard Drive Installation and exercise great caution.
1.3.2 Power
1. The Player power voltage is DC 12V.
2. To operate this Player, please connect the supplied AC adapter to the Player’s power
connector at the back and connect the other end to the wall power plug.
3. Make sure the power cable is not subjected to weight pressure or sharp objects that
might damage the outer shell of the cable and expose the inside wire.
4. To avoid the risk of electric shock, please be sure to unplug the power adapter before
cleaning the Player.
5. Never connect the power adapter to the Player if it is in a wet, high humidity or dusty
environment.
6. Do not replace the power adapter, power cable or power connector with a 3rd party
product; instead, call UEBO Customer Service to obtain the replacement part.
1.3.3 Radio Interference
•This Player complies with Part 15 of the FCC Rules. Operation of this Player is
subject to the following two conditions: 1), this Player must not cause harmful
interference and 2), must accept any interference received, including interference
that may cause undesired operation.
1.3.4 Repair
If you experience problems in operating the Player, or need the Player repaired, please call

6 / 68
UEBO Technical Support. Contact information for Technical Support can be found in the
Service section of our website, http://www.uebo.net.
1.3.5 Disposing off the Player
UEBO strongly encourages recycling of this Player if and when you decide to dispose of it.
Since each city has different regulations with respect to recycling, please consult your local
recycling information center for advice on proper methods of disposal.
1.3.6 A WARNING Regarding the Hard Disk
The Player uses an internal hard disk for media data storage. If you need to format the hard
drive after the initial format, you should first read the <Frequently Asked Questions> section
with care, as well as check our website for the most-up-to-date information.
1 Physical impact may create a bad sector in the hard disk. If this is the case, the best
way to fix the problem is to connect the hard disk to the Windows PC and run a
CHKDSK command.
2 All data stored in the Player may be lost due to physical impact, electrical shock,
power failure, HDD format and other causes, so please backup your data regularly.
3 It is recommended that in order to maintain consistent hard disk performance, you
should routinely perform defragmentation (by connecting it to your PC and run Disk
Defragmentation utility) of the hard disk after long periods of usage.
1.3.7 Others
1 DO NOT disassemble the Player; doing so will void your Player Hardware Warranty.
2 DO NOT operate the Player near water or in a wet or highly humid environment, so as
to avoid electrical shock.
3 DO NOT use the Player during a thunderstorm as there may be a remote risk of
electric shock from lightning.
4 DO NOT hit the Player with a hard object.
5 DO NOT shake the Player, as this could cause damage to the hard disk.
6 DO NOT place the Player close to an electromagnetic or magnetic field, as this could
cause damage to the hard disk.
7 Keep the Player and its cables away from children, so as to protect them from
electrical shock or suffocation hazard.
1.4 Connection
1.4.1 Connecting the Power Supply
1 Follow the instructions below and connect the AC adaptor to the Player’s DC IN jack.
2 Follow the instructions below and plug the AC adaptor into the power outlet.

7 / 68
1.4.2 Connecting to a PC
In order to access the contents of the internal hard disk (purchased separately):
1 Make sure the Player’s power is on.
2 Plug in the square connector of the USB cable to the Player’s USB PLAYER port.
3 Plug the rectangular connector of the USB cable into the computer.
1.4.3 Connecting the USB Player
In order to access the contents of the external USB devices (purchased separately):
1 Make sure the Player’s power is on.
2 Plug the USB stick, USB HDD, USB Camera, USB Camcorder, or any USB storage
devices into the USB HOST port of this Player.
3 You can then browse the contents of the connected USB devices.

8 / 68
1.4.4 Connecting the Memory Card
The Player has a built-in memory card slot, which enables you to view the contents of the
memory card. To do this, please follow these instructions:
1 Insert the memory card into the memory card slot on the Player’s side.
2 Make sure to properly orient the memory card before insertion. And remember that the
memory card can only be inserted from one direction, so don’t try to force it in from
another.
1.4.5 Connecting to a TV
1.4.5.1 A/V OUT (Composite A/V)
1 Plug the composite cable connector (3 colors - Yellow/Red/White) into the Player’s
A/V OUT jack.

9 / 68
2 Plug the other end of the composite cable into your TV’s A/V IN jack.
3 Changing the input on the TV to the jack you used in step 2.
1.4.5.2 Y/Pb/Pr Component OUT
1 Plug the component cable (3 colors – Yellow, Blue and Red) into the Player’s Y/Pb/Pr
jack.
2 Plug the other end of the component cable into your TV’s Y/Pb/Pr jack.
3 The component cable does not carry audio; to facilitate audio connection, please do
one of the following :
a) Use the audio output from the A/V OUT jack;
b) Use the audio output from the S/PDIF Coaxial or Optical jack.

10 / 68
1.4.5.3 HDMI OUT
1. Plug one connector from your HDMI cable to the Player’s HDMI jack.
2. Plug the other connector from your HDMI cable into the TV’s HDMI jack.
IMPORTANT: The HDMI cable is an optional accessory and is sold separately.
1.4.6 Connecting to a Digital Amplifier
To enjoy special sound processing by Dolby Digital, DTS, or MPEG (Please refer to “3.1
Changing Audio Settings” for configuration), do the following:
1. Plug the coaxial RCA connector into the Player’s S/PDIF coaxial jack.
2. Connect the other end of the coaxial RCA cable to your amplifier or your home stereo
system.
3. Using your optical TOSLink cable is another option. Connect the TOSLink cable to the
optical jack.
4. Connect the other end of the TOSLink cable to your Amplifier or home stereo system.
NOTE:We do not supply TOSLink Optical fibers or Coaxial RCA cables.

11 / 68
1.4.7 Connecting to a LAN
To connect to a LAN (Local Area Network) you need a CAT5, CAT5e or CAT6 network cable
(not supplied).
1. Connect one end of the network cable to the Player’s RJ45’s LAN jack.
2. Connect the other end of the network cable to the network router/switch/hub.
1.4.8 Connecting to a WLAN
To connect to the Wireless LAN, you will need a compliant 802.11G or 802.11n USB Wireless
Adapter from UEBO. This USB Wireless Adapter is an optional item you can purchase
separately by going to the http://www.uebo.net site. Once you have obtained the USB
Wireless Adapter, you can set it up by following these steps:
1. Make sure the Player’s power is on.
2. Plug the USB Wireless Adapter into the USB host port of the Player.
3. Refer to Section 3.3, “Changing Network Settings,” for wireless setup instructions.

12 / 68
1.5 Power On / Off
Power On
After connecting the DC IN jack, press the power button on the front panel; the Player will boot
up and enter the home screen, then the power indicator will turn blue.
Power Off
Press the power button on the front panel; the Player will enter standby mode and the power
indicator will turn red. To power off the Player, unplug the power cord, power off the Player.
1.6 Menu Language
The Player’s system language can be set not only to English but to other languages as well.
You can select the language you want in the Setup menu, which should take effect
immediately.
1.7 HDD Format
For users who wish to install a new SATA HDD into the Player, below are the steps you need to
follow in order to format the hard disk on the Player before usage:
Step 1: Select OK on the Warning page, then press ENTER to confirm. You will see this
message after you have installed the hard disk and powered on the Player.

13 / 68
NOTE: This page can be also accessed via the Setup->System->HDD Format menu.
Step 2: Select Format, press ENTER and then the hard disk formatting process will begin.
IMPORTANT: Please make sure that the hard disk does not contain any important data as
all files will be erased.
The formatting process should be finished within a few minutes. Once completed, the hard
disk provides the Player with media file storage.
IMPORTANT: HDD formatting will remove all data stored on the hard disk drive, so please
proceed with caution.

14 / 68
2. PLAYER INFORMATION
2.1 Remote Control
All instructions in this manual can be carried out using the Remote Control buttons.
Below is a list of the Player’s buttons and their functions:
1. STANDBY 2. MUTE
3. TV SYSTEM 4. BROWSER
5. NUMERIC
BUTTONS
6. REPEAT
7. FR 8. VOL-
9. FF 10. PLAY
11. HOME 12. NAVIGATIONAL
BUTTONS
13. MENU 14. PAUSE/STEP
15. SLOW 16. INS REPLAY
17. CM SKIP 18. SELECT
19. CONFIRM 20. AUDIO
21. SUBTITLE 22. ZOOM IN
23. ZOOM OUT 24. A-B
25. ANGLE 26. SETUP
27. RETURN 28. STOP
29. NEXT 30. VOL+
31. PREV 32. GOTO
33. COPY 34. MUSIC
35. INFO
No. Button Function
1 STANDBY Press to enter standby mode or wake-up.
2 MUTE Press to mute audio output, press again to resume.
3 TV SYSTEM Press to switch between NTSC, PAL, 480P, 576P, 720P, 1080I
and 1080P.

15 / 68
4 BROWSER Press to enter the Media Browser menu.
5 NUMERIC
BUTTONS
Press to enter numeric input when changing settings.
6 REPEAT Press to set repeat option: One, All and Shuffle.
7 FR Press to fast rewind the current playback; press repeatedly to
select speeds.
8 VOL- Press to decrease volume.
9 FF Press to fast-forward the current playback; press repeatedly to
select speeds.
10 PLAY Press to begin playback.
11 HOME Press to enter the home screen.
12 NAVIGATIONAL
BUTTONS
Press the arrow buttons to select menu options and the ENTER
button to confirm.
13 MENU Press to activate tools menus:
Press in the Media Browser menu to rename and delete
files.
Press My Shortcuts in NET of the Media Browser menu
in order to add shortcuts to network access.
14 PAUSE/STEP Press to pause in the current playback; press again to step to
the next frame; press the P L AY button to resume playback.
15 SLOW Press to play back in slow motion; press the P L AY button to
resume regular playback.
16 INS REPLAY Press to backward 10 seconds in the current playback;
especially suitable for sport programs.
17 CM SKIP Press to advance 30 seconds in the current playback.
18 SELECT Press to select files from the Media Browser and File Copy
menu.
19 CONFIRM Press to confirm and add selections to the playlist.
20 AUDIO Press to select an audio track.
21 SUBTITLE Press to set subtitle options.
22 ZOOM IN Press to zoom in at the image (photos or videos).
23 ZOOM OUT Press to zoom out the image (photos or videos).
24 A-B Press to set the beginning and endpoints of a section to be
repeated.
25 ANGLE Press to change the view angle during DVD (with multi-angle)

16 / 68
playback.
26 SETUP Press to enter the Setup menu.
27 RETURN Press to return to the previous screen while navigating menus.
28 STOP Press to stop playback.
29 NEXT Press to view the next file / page down.
30 VOL+ Press to increase the volume.
31 PREV Press to view the previous file / page up.
32 GOTO Press to jump to a specific point on a title, using Title, Chapter
and Time.
33 COPY Press to enter the File Copy menu.
34 MUSIC Press to start playing music from the music playlist.
35 INFO Press to hide or display the Information Bar during playback.
2.2 Front View
1. Infrared receiver window 2. USB indicator
3. Download indicator 4. Power indicator
5. Power button

17 / 68
2.3 Rear View
1. S/PDIF OPTICAL jack (TOSLink) 2. S/PDIF COAXIAL jack
3. RJ45 LAN socket 4. HDMI jack
5. A/V OUT jack 6. Y/Pb/Pr OUT jack
7. DC IN jack
2.4 Side View
1. Memory Card slot 2. USB HOST port (A-Type) x 2
3. USB PLAYER port (B-Type)

18 / 68
3. SETUP MENU
The Setup menu allows you to personalize and configure your preferences.
To select a Setup option:
1 Select the Setup icon on the home screen, or press the SETUP button on the remote
control.
2 Use the LEFT/RIGHT Navigational Buttonsto select an option and then press ENTER.
There are five (5) Setup options, including Audio, Video, Network, System and MISC. Use
the UP/DOWN navigational buttons to select a menu and then press ENTER to confirm.
Then press RETURN to cancel and display the previous menu screen.
3.1 Changing Audio Settings
Use this menu to configure audio settings.
Night Mode
Choose between OFF / ON / COMFORT. Choosing the ON option will enable you to decrease,
the audio output volume.

19 / 68
Digital Output
Choose between HDMI LPCM / HDMI RAW / SPDIF LPCM / SPDIF RAW. In HDMI RAW or
SPDIF RAW mode, Dolby Digital, DTS or MPEG sound will be passed on to the HDMI TV or
Amplifier for processing.
3.2 Changing Video Settings
Use this menu to configure video settings.
Aspect Ratio
•Pan Scan 4:3: Displays a wide format picture onscreen while cutting off the left and right
portions; select when a standard 4:3 TV is connected.
•Letter Box 4:3: Displays a wide format picture with two black borders on the top and
bottom of the screen; select when a standard 4:3 TV is connected.
•16:9: Displays the 4.3 format picture onscreen; select when a 16:9 TV is connected.
Zoom Out
•Select to zoom out the image size during video playback.
Brightness
•Adjust the level of brightness.
Contrast
•Adjust the level of contrast.
Hue
•Adjust the level of hue.
Saturation
•Adjust the level of saturation.
Video SYSTEM
•Select to adjust video output resolution: NTSC / PAL / 480P / 576P / 720P 50HZ / 720P

20 / 68
60HZ / 1080I 50HZ / 1080I 60HZ / 1080P 50HZ / 1080P 60HZ/HDMI Auto.
1080P 24FPS
•Choose this option to enable or disable 1080P 24HZ support. IMPORTANT: A TV set with
1080P 24HZ (24P) mode is required.
Screen Size
•Adjust the video output size according to the size of the TV screen.
Seamless Playback
•Provides uninterrupted playback of video files (.ts,m2ts)
(the naming of the files should be alike, e.g., “abc01.ts” and “abc02.ts”, etc).
3.3 Changing Network Settings
Use this menu to configure Ethernet and WLAN (Wireless Local Area Network) settings.
Wired LAN Setup
•DHCP IP (AUTO)
Select to obtain IP address automatically.
•FIX IP (MANUAL)
Select to manually input the IP Address, Subnet Mask, Default Gateway and DNS Server
IP Address.
Wireless Setup
•Selecting a Connection Profile
Other manuals for M200
1
Table of contents
Other Uebo Media Player manuals