UFactory xArm User manual

1

2
Table
1. General Presentation..................................................................................3
1.1. 6 Axis Force Torque Sensor Introduction...........................................3
1.2. Singal Hub ................................................................................................3
2. Safety..............................................................................................................4
2.1. Warning .....................................................................................................4
2.2. Risk Assessment and Final Application.............................................5
2.3. Validity and Responsibility ...................................................................6
3. Installation ....................................................................................................6
3.1. Scope of Delivery ....................................................................................7
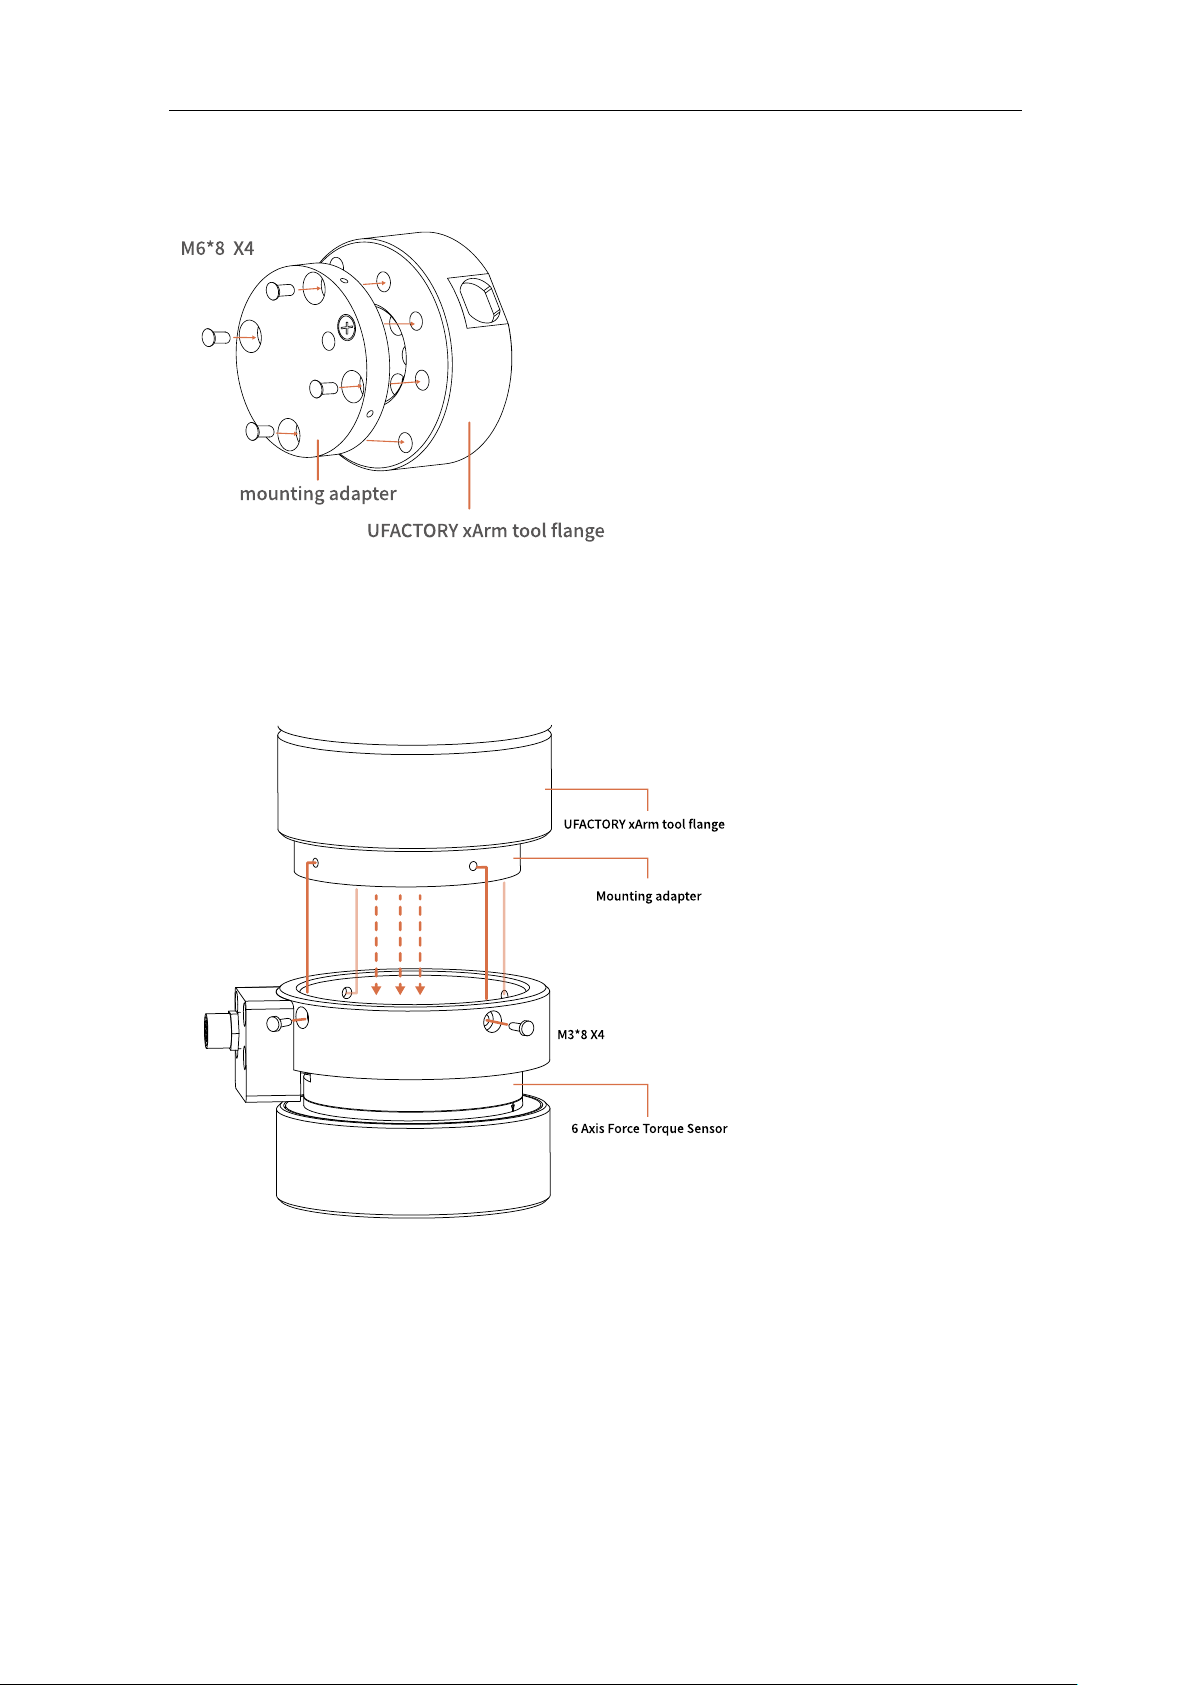
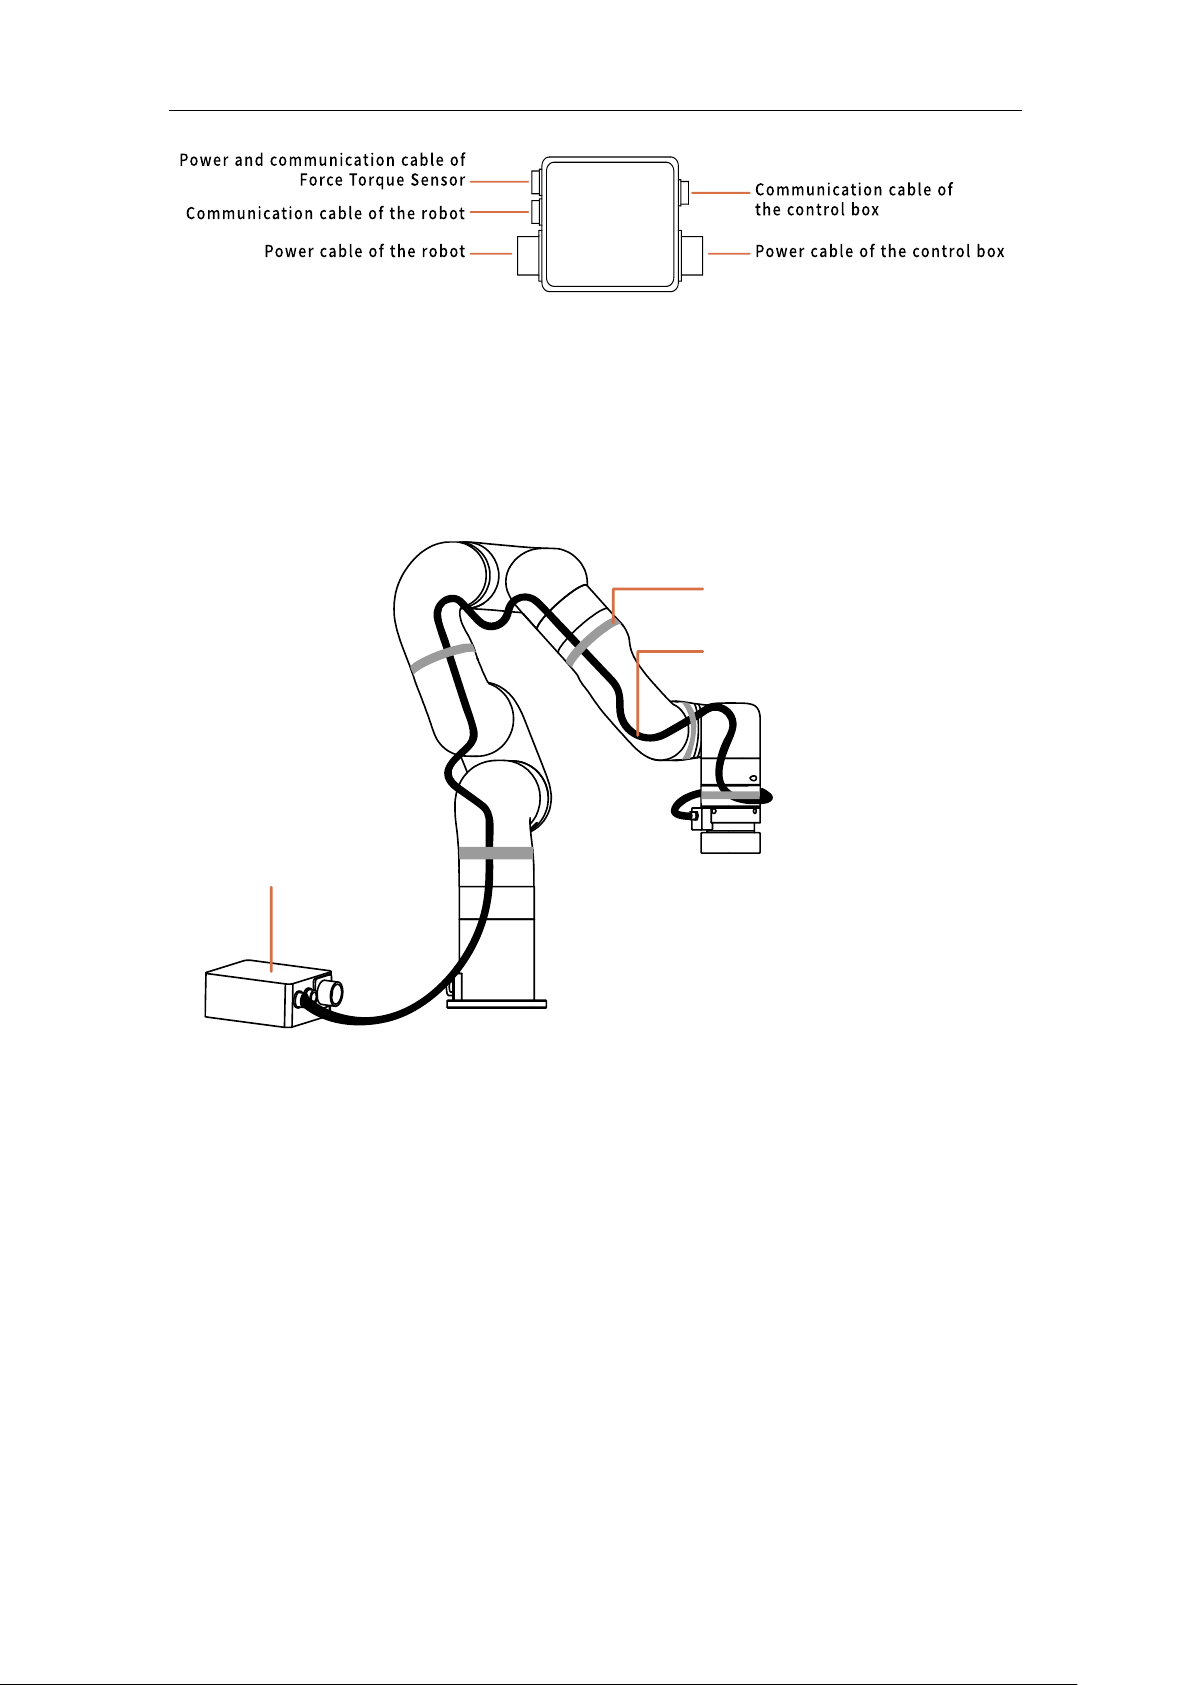
3.2. Mechanical Installation .........................................................................8
4. Control..........................................................................................................11
4.1. Control 6 Axis Force Torque Sensor through Python-SDK ..........11
4.2. Control 6 Axis Force Torque Sensor through C++ SDK .................11
5. 6 Axis Force Torque Sensor Error Code ................................................12
6. 6 Axis Force Torque Sensor Specifications..........................................13
7. After-sales Service ....................................................................................14

3
1. General Presentation
1.1.6 Axis Force Torque Sensor Introduction
6 Axis Force Torque Sensor
The xArm 6 Axis Force Torque Sensor is designed for force and torque
data acquisition on xArm, it can simultaneously measure the force and
torque in three-dimensional space. It is installed on the xArm tool flange,
a flexible cable is used for power and communications.
1.2.Singal Hub
The 6 Axis Force Torque Sensor needs to be used with the signal hub. The
signal hub has five electrical interfaces.

4
Singal Hub
2. Safety
The operator must read and understand all the instructions below before
running the 6 Axis Force Torque Sensor.
2.1.Warning
1. The 6 Axis Force Torque Sensor needs to be properly installed before
operating.
2. Do not install or operate the 6 Axis Force Torque Sensor that is
damaged or lacking parts.
3. Never supply the 6 Axis Force Torque Sensor with an alternative
current (AC) source.
4. Make sure all cord sets are always secured at both ends, the 6 Axis
Force Torque Sensor end & Robot end.
5. Always satisfy the 6 Axis Force Torque Sensor’s load specifications.

5
6. Be sure nothing is in the robot and the 6 Axis Force Torque Sensor path
before using.
Caution
The term "operator" refers to anyone responsible for any of the following
operations on the 6 Axis Force Torque Sensor:
● Installation
● Control
● Maintenance
● Inspection
● Decommissioning
● Calibration
This documentation explains the various components of the 6 Axis Force
Torque Sensor and general operations regarding the whole life-cycle of
the product from installation to operation and decommissioning.
The drawings and photos in this documentation are representative
examples and differences may exist between them and the delivered
product.
2.2.Risk Assessment and Final Application
The 6 Axis Force Torque Sensor is meant to be used on an industrial robot.
The robot, force torque sensor and any other equipment used in the final
application must be evaluated with a risk assessment. The robot

6
integrator must ensure that all local safety measures and regulations are
respected. Depending on the application, there may be risks that need
additional protection/safety measures, for example, the work-piece 6
Axis Force Torque Sensor is manipulating may be inherently dangerous
to the operator.
2.3.Validity and Responsibility
Always comply with local and/or national laws, regulations and
directives on automation safety and general machine safety.
The unit may be used only within the range of its technical data. Any
other use of the product is deemed improper and unintended use.
UFACTORY will not be liable for any damages resulting from any
improper or unintended use.
3. Installation
The following subsections will guide you through the installation and
general setup of 6 Axis Force Torque Sensor.
(1) The Scope of Delivery section
(2) The Mechanical Installation section
Warning
Before installing:

7
Read and understand the safety instructions related to the 6 Axis Force
Torque Sensor.
Verify your package according to the Scope of delivery and your order
info.
Have the required parts, equipment and tools listed in the requirements
readily available.
Installing:
Satisfy the environmental conditions.
Do not operate the 6 Axis Force Torque Sensor, or even turn on the power
supply, before it is firmly anchored and the danger zone is cleared.
3.1.Scope of Delivery
The 6 Axis Force Torque Sensor Kit generally includes these items:
①6 Axis Force Torque Sensor *1
②Mounting Flange *1
(Product Image for reference only, please prevail in kind)

8
③Signal Hub*1
④Power cable for the Robotic Arm*1
⑤Communication cable for the Robotic Arm*1
⑥Power/Communication cable for 6 Axis Force Torque Sensor*1
⑦M3*8 Head hexagon socket screws (6) and M3 spring washer (6)
⑧M6*8 Head hexagon socket screws (6) and M3 spring washer (6)
⑨2.5MM L type wrench*1
⑩5MM L type wrench*1
⑪Velcro (3 meters)
3.2.Mechanical Installation
1. Press down the E stop button on the control box.
2. Install the Mounting Flange on the end flange using 4 M6*8 screws

9
(spring washer must be used together).
3. Install the 6 Axis Force Torque Sensor on the Mounting Flange using 4
M3*8 screws (spring washer must be used together).
4. Cable connection with Signal Hub:
Connect 5 cables in sequence according to the electrical interface
definition of the Signal Hub.

10
5. Using Velcro to stick the power/communication flexible cable to the
robotic arm.
(Don’t stick it too tight, don’t stick the Velcro on the torque sensor)
6. Press up E stop button on the control box.

11
4. Control
4.1.Control 6 Axis Force Torque Sensor through
Python-SDK
For details on controlling 6 Axis Force Torque Sensor with python-SDK,
please refer to the link below:
https://github.com/xArm-Developer/xArm-Python-SDK/blob/master/ex
ample/wrapper/common/8003-force_control.py
ft_sensor_enable():enable force torque sensor
ft_sensor_set_zero():set the current state to the zero point of the force
torque snesor
ft_sensor_app_set() :set control mode of the force torque sensor
get_ft_sensor_data():get the data of the force torque sensor
ft_ext_force:get the data after filtering, load and offset compensation
ft_raw_force:get the raw data of the force torque sensor
4.2.Control 6 Axis Force Torque Sensor through C++ SDK
https://github.com/xArm-Developer/xArm-CPLUS-SDK/blob/master/example/

12
8003-force_control.cc
5. 6 Axis Force Torque Sensor Error Code
Software Error Code
Error Handling
C50
Six-axis Force Torque Sensor Error
Please check the sensor error code, locate the problem, and power on
again. If it cannot be resolved, please contact technical support.
C51
Six-axis Force Torque Sensor Mode Setting Error
Please make sure that the robotic arm is not in Manual Mode, check
whether the given value of this command is 0/1/2
C52
Six-axis Force Torque Sensor Zero Setting Error
Please check the sensor communication wiring and whether the power
is normal.
C53
Six-axis Force Torque Sensor Overload
Please reduce the payload or applied external force.
SDK Error Code
Error Handling
40
Six-axis Force Torque Sensor Communication Failure
Please check whether the wire between the Data Collector and the
Six-axis Force Torque Sensor is connected properly
41
The Data detected by the Six-axis Force Torque Sensor is Abnormal
Please contact technical support
42
Six-axis Force Torque Sensor X-direction Torque Exceeds Limit
Please reduce the force applied in the X direction
43
Six-axis Force Torque Sensor Y-direction Torque Exceeds Limit
Please reduce the force applied in the Y direction
44
Six-axis Force Torque Sensor Z-direction Torque Exceeds Limit
Please reduce the force applied in the Z direction

13
45
Six-axis Force Torque Sensor Tx Torque Exceeds Limit
Please reduce the torque applied around the X axis
46
Six-axis Force Torque Sensor Ty direction Torque Exceeds Limit
Please reduce the torque applied around the Y axis
47
Six-axis Force Torque Sensor Tz direction Torque Exceeds Limit
Please reduce the torque applied around the Z axis
49
Six-axis Force Torque Sensor Failed to Initialize
Please check
1. Whether the baud rate of the Data Collector and the Six-axis Force
Torque Sensor are the same.
2. Whether the wire between the Data Collector and the Six-axis Force
Torque Sensor is connected properly.
For error codes that are not listed in the above table: Please click “Clear Error” clear the error.
If it reports the same error repeatedly, please contact technical support.
6. 6 Axis Force Torque Sensor Specifications
Fx, Fy
Fz
Tx, Ty, Tz
Load capacity
150N
200N
4Nm
Resolution
100mN
150mN
5mNm
Hysteresis
2.5%FS
1%FS
1%FS
Crosstalk
3%FS
3%FS
3%FS
Overload capacity
150%
150%(Fz+)
300%(Fz-)
150%

14
weight
595g
7. After-sales Service
1. After-sales policy:
For the detailed after-sales policy of the product, see the official
website:
https://www.ufactory.cc/pages/warranty-returns
1. The general process of after-sales service is:
(1) Contact UFACTORY technical support (support@ufactory.cc) to confirm
whether the product needs to repair and which part should be sent back
to UFACTORY.
(2) After the bill of lading on UPS/DHL, we will send the invoice and label
to you by mail. You need to make an appointment with the local
UPS/DHL and then send the product to us.
(3) UFACTORY will check the product warranty status according to the
after-sales policy.
(4) Generally, the process takes around 1-2 weeks except for shipment.
Note:

15
1. Please keep the original packaging materials of the product. When
you need to send the product back to get repaired, please pack the
product with the original box to protect the product during the
transportation.
Other manuals for xArm
3
Table of contents
Other UFactory Accessories manuals