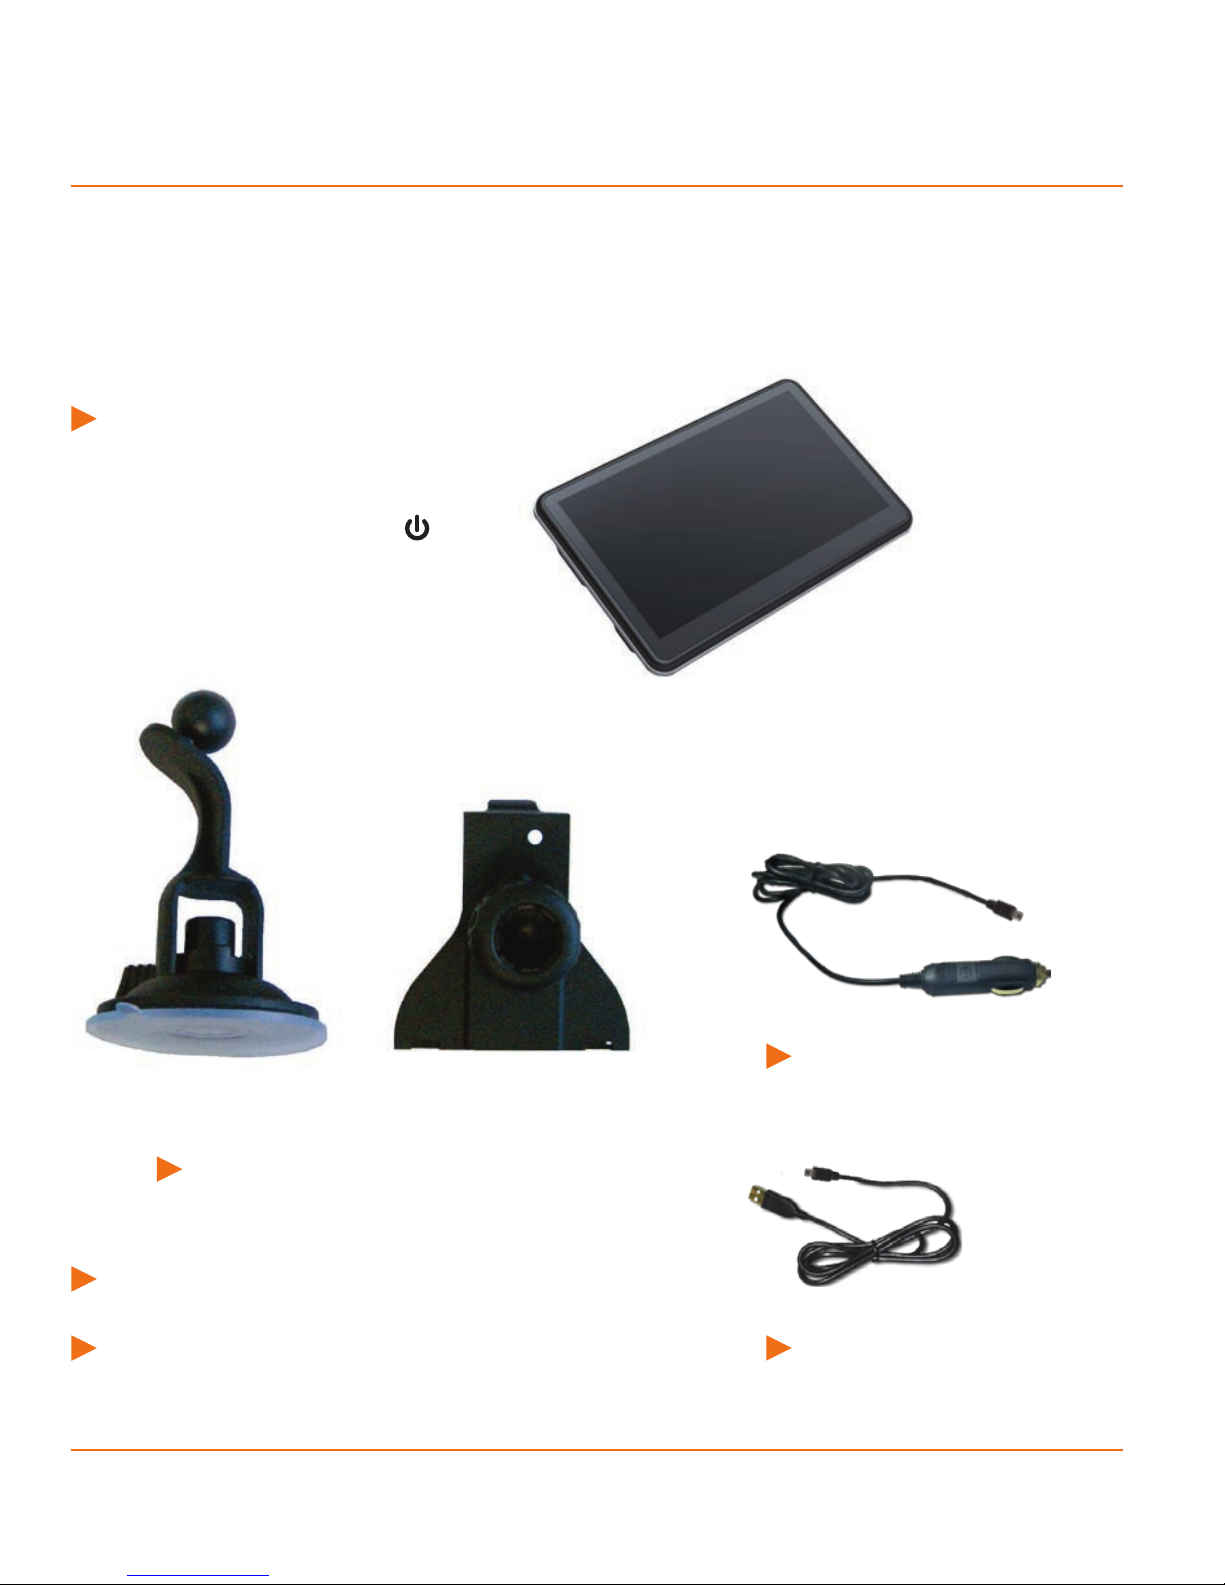
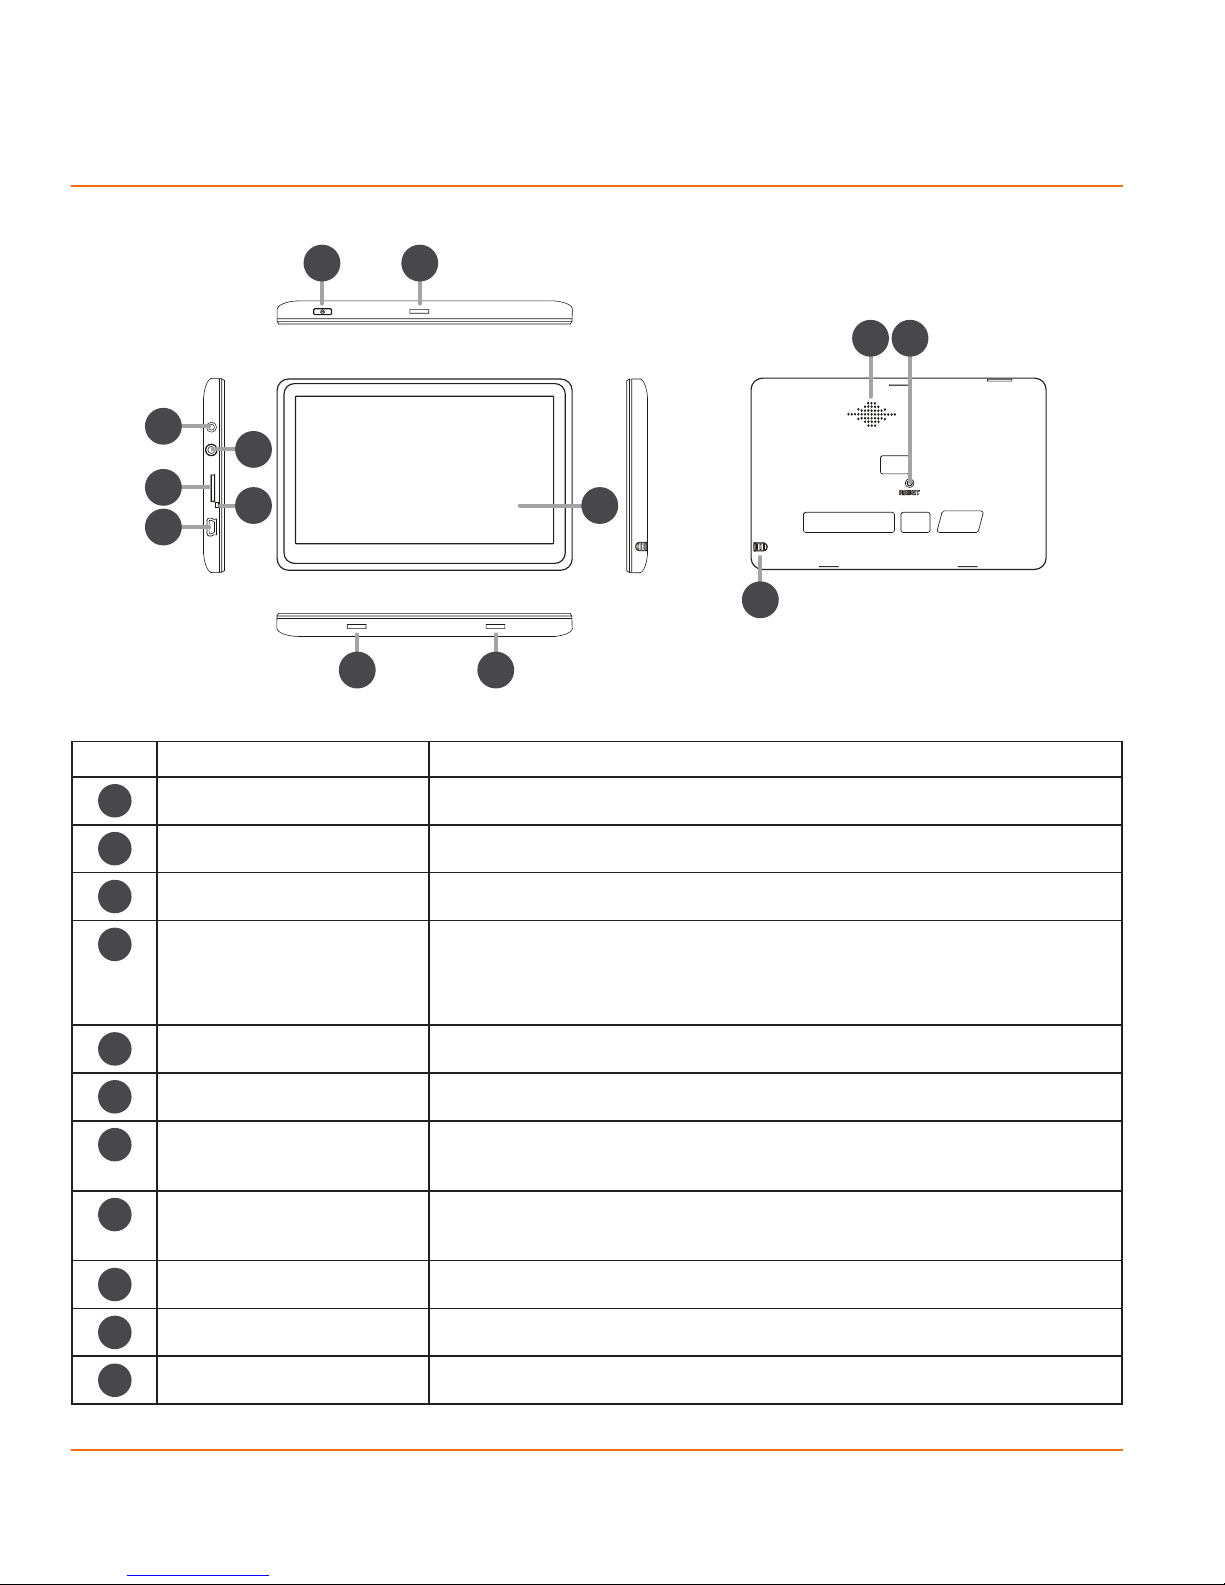
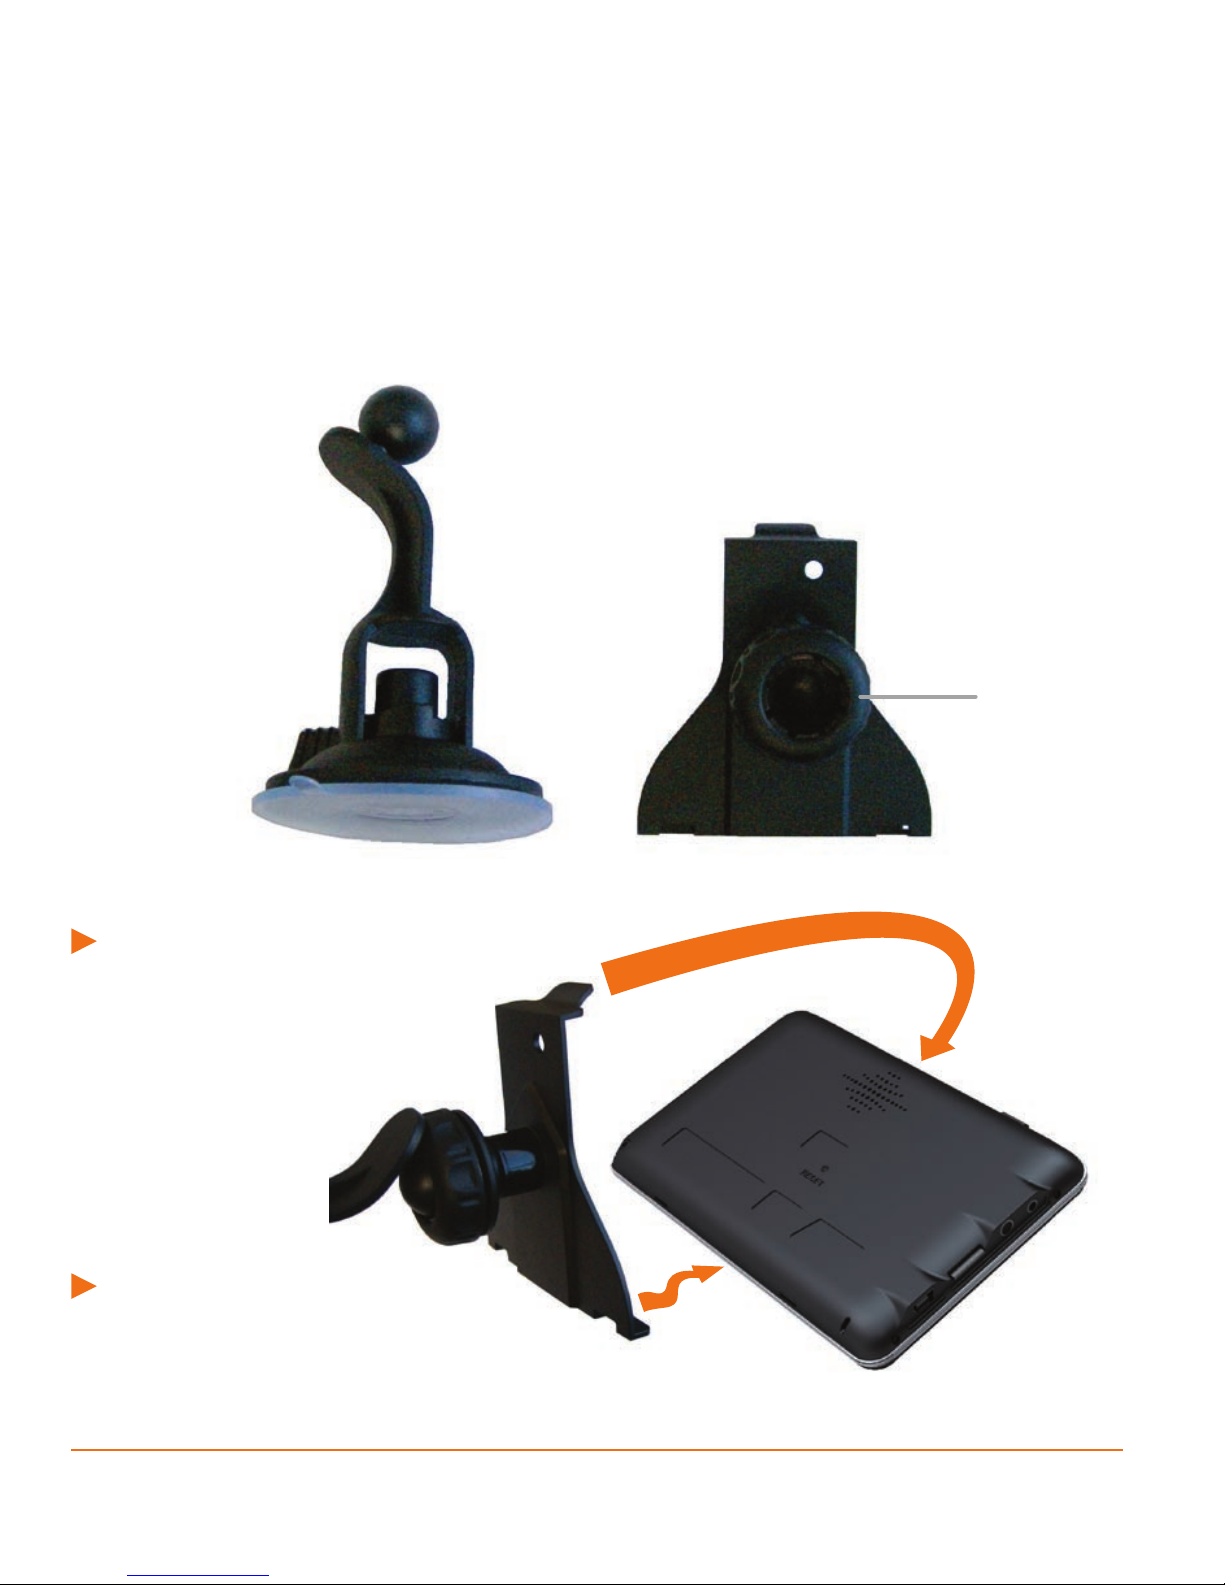
Uniden iGO50 User manual

iGO50
iGO43
iGO35
In-Car Navigation
For more exciting new products please visit our website:
Australia: www.uniden.com.au
New Zealand: www.uniden.co.nz

Page 2
Thank you for purchasing this Uniden product. Read the Quick Start Guide rst
and start using your device right away. This document is the detailed description of
the navigation software. You can easily discover your device while you are using
it; however, we still recommend that you read this manual to fully understand the
screens and the features of your software.

Page 3
Table of Contents
What Do I Do First? 6
Make Sure These Items Arrived in the Box 6
Plug it in 7
Hardware Keys 8
How Do I Put It in My Car? 9
Safety considerations 9
Attaching the Windshield Mount 10
Adjusting the Windshield Mount 11
Mount to the Windshield 11
Removing the Windshield Mount 11
1 Warnings and Safety information 12
2 Getting started 13
2.1 Startup screen: the Map and Navigation menu 15
2.2 Buttons and other controls on the screen 16
2.2.1 Using keyboards 18
2.2.2 Beyond single screen tap 19
2.3 Map screen 20
2.3.1 Navigating on the map 20
2.3.2 Position markers 22
2.3.2.1 Vehimarker and Lock-on-Road 22
2.3.2.2 Selected Map location (Cursor) and selected map object 23
2.3.3 Objects on the map 23
2.3.3.1 Streets and roads 23
2.3.3.2 Turn preview and Next street 24
2.3.3.3 Lane information and Signposts 25
2.3.3.4 Junction View 26
2.3.3.5 3D object types 26
2.3.3.6 Elements of the active route 27
2.3.4 Manipulating the map 28
2.3.5 Quick menu 30
2.3.6 Checking the details of the current position (Where Am I?) 34

Page 4
3 Navigating 36
3.1 Selecting the destination of a route 36
3.1.1 Entering an address or part of an address 37
3.1.1.1 Entering an address 37
3.1.1.2 Entering the midpoint of a street as the destination 40
3.1.1.3 Selecting an intersection as the destination 42
3.1.1.4 Selecting a city/town centre as the destination 44
3.1.1.5 Entering an address with a postal code 46
3.1.1.6 Tips on entering addresses quickly 48
3.1.2 Selecting the destination from the Places of Interest 49
3.1.2.1 Quick search for a Place of Interest 50
3.1.2.2 Searching for a Place of Interest using preset categories 51
3.1.2.3 Searching for a Place of Interest by category 54
3.1.2.4 Searching for a Place of Interest by name 58
3.1.2.5 Selecting nearby assistance from ‘Where Am I?’ 61
3.1.3 Selecting a map location as the destination 63
3.1.4 Selecting the destination from your Favourites 64
3.1.5 Selecting the most likely destination (Smart History) 66
3.1.6 Selecting the destination from the History 67
3.1.7 Entering the coordinate of the destination 68
3.1.8 Building the route from the list of destinations (Create Route) 70
3.2 Viewing the entire route on the map 71
3.3 Checking route parameters and accessing route related functions 72
3.4 Modifying the route 73
3.4.1 Selecting a new destination when already having a route:
New Route, Waypoint of Final Destination 73
3.4.2 Setting a new starting position for the route 74
3.4.3 Editing the list of destinations (Edit Route) 76
3.4.4 Pausing the active route 76
3.4.5 Cancelling the active route 77
3.4.6 Checking route alternatives when planning the route 77
3.4.7 Changing the route planning method (route alternatives) 78
3.4.7 Changing the vehicle used in route planning 80
3.4.8 Changing the road types used in route planning 81

Page 5
3.5 Saving a location as a Favourite destination 82
3.6 Saving a location as an alert point 83
3.7 Editing an alert point 84
3.8 Watching the simulation of the route 85
4 Lorry navigation 87
4.1 Setting up lorry parameters 87
4.2 Setting up driving time alerts 89
5 Reference Guide 91
5.1 Concepts 91
5.1.1 Smart Zoom 91
5.1.2 Daytime and night colour themes 91
5.1.3 Colour theme in tunnels 92
5.1.4 Route calculation and recalculation 92
5.1.5 Green routing 95
5.1.6 Road Safety Cameras and Other Proximity Alerts Points 96
5.1.7 Speed limit warning 97
5.1.8 Battery and GPS position quality indicators 98
5.2 ‘More’ menu 99
5.3 Settings menu 101
5.3.1 Sound and Warnings 102
5.3.2 Customise Quick menu 105
5.3.3 Lorry settings 105
5.3.4 Route Settings 106
5.3.5 Green routing settings 111
5.3.6 Map Settings 112
5.3.7 Visual guidance settings 113
5.3.8 Display settings 114
5.3.9 Regional settings 114
5.3.10 Trip monitor settings 115
5.3.11 Log Collection settings 115
6 Glossary 117
7 End User Licence Agreement 119
8 Limited One Year Warranty 125

Page 6
What Do I Do First?
Make Sure These Items Arrived in the Box
If anything listed here is missing or damaged, contact your place of purchase
immediately.
iGO50, iGO43 or iGO35
GPS navigation device
Press and hold the power
button at the TOP of the device
to start or resume the navigation
programme.
Owners Manual
Quick Start Guide sheet USB cable
DC (car) adapter
Part 1 Part 2
Windshield Mount (2 part)

Page 7
Plug it in
Connect the power adapter to the power connector on the lower left side of
the device.
Plug the other end into your car’s cigarette lighter (or any standard 12VDC -
24VDC outlet).
Only use the power adapter that comes with your device. Any other adapter
might damage the device.
Press and hold the power button at the top of the device to turn it on/off.
Whenever it senses power coming in the LCD screen turns on and the device
resumes from it’s last status. You can turn the LCD screen on/off anytime you
want: just momentarily push the power button.

Page 8
Hardware Keys
Ref Component Description
1Power Key Power on/off/sleep
2Bracket Block Slot Bracket Block Slot
3Speaker Speaker
4Reset If the device fails to operate properly, try resetting the
device. Press the reset button by using the touch pen
or a similar tool.
5Touch-pen Touch-pen
6Display Screen Display Screen
7Mini USB Port Charge the GPS device by connecting AC adaptor or
car charger
8Power Indicator The light is red during charging, it will turn green
when the battery is fully charged.
9micro SD card slot micro SD card slot
10 Earphone Jack Earphone Jack
11 N/A N/A
1 2
3 4
10
8 6
11
9
7
2 2
5

Page 9
How Do I Put It in My Car?
Safety Considerations
Don’t install any device where it will block your view (including your mirrors!)
while you’re driving.
Keep your attention on the road! Don’t try to operate or focus on any device
while you’re driving. If you have to concentrate on a device, pull off the road
for a few minutes.
It’s a good idea to take valuable items with you when you leave you car—that
includes GPS devices. If you can’t take the device with you, lock it in the glove
compartment or hide it somewhere. And don’t forget to take down the
windshield mount: you don’t want to remind any potential thieves that you
might have some valuable mobile electronics in the car.
Don’t leave the device in direct sunlight for a long period of time or where the
temperature could go above 60º C (140º F).

Page 10
Attaching the Windshield Mount
Assemble the Windshield mount.
1) Loosen the locking collar on part 2.
2) Push the ball joint of Part 1 through the locking collar into part 2.
Insert the bracket hook into
the notches at the bottom of
the device.
Part 1 Part 2
Rotate the bracket
up so the head ts
into the gap.
Locking
collar

Page 11
Adjusting the Windshield Mount
Mount on the Windshield
Make sure the device does not block your view of the road or your mirrors.
Once you decide where you want the device, hold the suction cup in that position,
then adjust the mount so you have the best view of the device.
1) Press the suction cup at against the windshield.
2) Push the suction lock up (clockwise) until it snaps into place.
3) Adjust the unit & bracket to a nal position. Tighten the locking collar to secure.
4) Gently pull on the mount to make sure it is secure.
If you have trouble getting the suction cup to stick:
Clean the spot with an ammonia-free cleanser.
Dry the spot completely (use a lint-free cloth, if possible).
Make sure the spot is smooth and at (suction cups won’t stick well on a
curved or textured surface).
Removing the Windshield Mount
When you release the suction latch, make sure you’re holding or somehow
supporting the device.
Lift the suction latch and use the plastic pull tab to pull the suction cup off of the glass.
Turn the windshield
mount arm to
a suitable angle for
mounting.
Locking
collar
Suction lock

Page 12
1 Warnings and Safety information
This software is a navigation system that helps you nd your way to your
destination with the built-in GPS receiver. The software does not transmit your
GPS position; others cannot track you.
If you accept this when rst using the application, it collects usage information
and GPS logs that may be used for improving the application and the quality and
coverage of maps. The data is processed anonymously; no one will be able to
track any personal information. If you change your mind later, you can enable or
disable the log collection in Log Collection settings (page 115).
It is important that you look at the display only when it is safe to do so. If you are
the driver of the vehicle, we recommend that you operate your software before
you start your journey. Plan the route before your departure and stop if you need
to change the route.
You must obey the trafc signs and follow the road geometry. If you deviate from
the recommended route, your software changes the instructions accordingly.
Never place your device where it obstructs the driver’s view, where it is in the
deployment zone of an airbag or where it might cause injuries in an accident.
For more information, consult the End User Licence Agreement (page 119).

Page 13
2 Getting started
The software is optimised for in-car or pedestrian use. There is no need to use a
stylus. You can use it easily by tapping the screen buttons and the map with your
ngertips.
When using the navigation software for the rst time, an initial setup process starts
automatically. Do as follows:
1. Select the written language of the application interface. Later you can change
it in Regional settings (page 114).
2. Read the End User Licence Agreement. Tap to continue.
3. The Conguration wizard starts in the selected language. Tap to
continue.
4. Select the language and speaker used for voice guidance messages. Later
you can change it in Regional settings (page 114).

Page 14
5. If needed, modify the time format and unit settings. Later you can
change them in Regional settings (page 114).
6. If needed, modify the default route planning options. Later you can change
them in Route settings (page 106).
7. The initial setup is now complete. The Conguration wizard can be restarted later
from the Settings menu (page 101).
8. The software offers you to watch the tutorial that leads you through the basic steps
of navigation. Tap if you would like to get an instant understanding of
the functions of your software. You can run it later if you choose .
9. You are now asked whether you allow the software to collect usage
information and GPS logs that may be used for improving the application
and the quality and coverage of maps. Tap to allow the

Page 15
anonymous statistics or to disable this function. Later you can
turn them on or off individually in Log Collection settings (page 115)
After the initial setup, the Map screen appears and the device looks for GPS
signal. A view of the sky is required to lock onto GPS. For the initial start this may
take a few minutes. you can start using the software. This is the screen you see
every time navigation starts.
2.1 Startup screen: the Map and Navigation menu
The software starts with the map screen. For rst time users touch to
open the Navigation menu.
From the Navigation menu you can reach all parts of the software.
You have the following options:
• Tap to select your destination by entering an address or selecting a
place of interest, a location on the map or one of your Favourite destinations.
You can also look up your recent destinations from the Smart History, enter a
coordinate or use the location saved in a photo.
• Tap to display the route parameters and the route in its full length on
the map. You can also perform route-related actions such as cancelling your
route, picking route alternatives, simulating navigation or adding the
destination to your Favourites.
• Tap to customise the way the navigation software works, watch the
Tutorial, simuate demo routes, or to run some additional applications.

Page 16
• Tap to start navigating on the map. The button itself is a miniature
live map that shows your current position, the recommended route and the
surrounding map area. Tap the button to enlarge the map to the full screen.
• Tap to stop navigation and exit the software.
2.2 Buttons and other controls on the screen
When you are using the software, you usually tap buttons on the touch screen.
You only need to conrm selections or changes if the application needs to restart,
it needs to perform a major reconguration, or you are about to lose some of your
data or settings. Otherwise, the software saves your selections and applies the
new settings without conrmation as soon as you use the controls.
Type Example Description How to use it
Button
Tap it to initiate a
function, to open a
new screen, or to set
a parameter.
Tap it once.
Button
with
value
Some buttons
display the current
value of a eld or
setting. Tap the
button to change
the value. After the
change, the new
value is shown on
the button.
Tap it once.

Page 17
Icon
Shows status
information.
Some icons also
function as a
button. Tap them
once.
List
When you need to
select from several
options, they appear
in a list.
Grab the list
anywhere and slide
your nger up or
down. Depending
on the speed of the
sliding, the list will
scroll fast or slow,
only a bit or till the
end. Alternatively,
move between
pages with the
and
buttons and tap the
value that you want.
Slider
When a feature can
be set to different
values in a range,
the software shows
an indicator on a
gauge that displays
and sets the value.
• Drag the handle to
move the slider to
its new position.
• Tap the slider
where you want the
handle to appear;
the thumb jumps
there.
Switch
When there are
only two choices, a
checkmark shows
whether the feature
is enabled.
Tap it to turn the
switch on or off.

Page 18
Virtual
keyboard
Alphabetic and
alphanumeric
keyboards to enter
text and numbers.
Each key is a touch
screen button.
2.2.1 Using keyboards
You only need to enter letters or numbers when you cannot avoid it. You can type
with your ngertips on the full-screen keyboards and you can switch between
various keyboard layouts, for example English, Greek or numerical.
Task Details
Switching to another keyboard
layout, for example from an English
keyboard to a Greek keyboard
Tep the button and select the
new keyboard layout from the list.
Correcting your entry on the
keyboard Tap to remove the unneeded
character(s).
Tap and hold the button to delete several
characters or the entire input string.
Entering a space, for example
between a rst name and a family
name or in multi-word street
names
Tap the button at the bottom centre
of the screen.
Entering numbers and symbols
Tap to switch to a keyboard offering
numeric and symbol characters.
Finalising the keyboard entry
(accepting the suggested search
result) Tap .

Page 19
Finalising the keyboard entry
(opening the list of search results) Tap .
Finalising the keyboard entry
(saving your input) Tap .
Cancelling the keyboard entry
(returning to the previous screen) Tap .
2.2.2 Beyond single screen tap
You usually need to tap the screen only once. However, some useful features can
be accessed with combined touch screen tapping. Those are the following:
Action Details
Tapping and
holding the
screen
Tap and keep pressing the following buttons to reach extra
functions:
• Tap and hold on list and menu screens: the Map
screen appears.
• Tap and hold any of the , , , , and
buttons on the Map screen: you can rotate, tilt or scale the map
continuously.
• Tap and hold on keyboard screens: you can delete
several characters quickly.
• Tap and hold or in long lists: you can scroll pages
continuously.

Page 20
Gestures
(drag&drop)
You need to drag and drop the screen only in cases like:
• Moving the handle on a slider.
• Scrolling the list: grab the list anywhere and slide your nger up
or down. Depending on the speed of the sliding, the list will scroll
fast or slow, only a bit or till the end.
• Moving the map in map browsing mode: grab the map, and
move it in the desired direction.
2.3 Map screen
2.3.1 Navigating on the map
The Map screen is the most frequently used screen of the software.
The map is displayed in black and white when there is no GPS position:
This map shows the current position (the Vehimarker, a blue arrow by default), the
recommended route (an orange line), and the surrounding map area.
When there is no GPS position, the Vehimarker is transparent. It shows your last
known position.
You see coloured dots circling around a satellite symbol in the top left corner. The
more green dots you see, the closer you are to get the valid GPS position.
When GPS position is available, the Vehimarker is displayed in full colour, now
showing your current position.
This manual suits for next models
2
Table of contents
Other Uniden Car Navigation System manuals

Uniden
Uniden GNS 8400 User manual

Uniden
Uniden Maptrax GPS352 User manual

Uniden
Uniden TRAX350 User manual

Uniden
Uniden IGO500 User manual

Uniden
Uniden GNS 8360 User manual

Uniden
Uniden TRAX4300 User manual

Uniden
Uniden GNS8431 User manual

Uniden
Uniden GNS 8360 User manual

Uniden
Uniden Maptrax GPS352 User manual

Uniden
Uniden TRAX5000 User manual