Uniden Guardian App Cam 26 User manual

Guardian App Cam 26
IP Camera
For more exciting new products please visit our website:
Australia: www.uniden.com.au

2 3
INSTRUCTIONS
Damages caused by non-compliance with this Owner’s Manual will void the
warranty! We will not assume any liability for damages to items or persons
caused by improper handling or non-compliance with the safety notices!
Any warranty claim will be null and void in such cases.
• Do not drop, puncture or disassemble the camera. This camera is not
waterproof. DO NOT expose the camera to water or moisture.
• Never tug on the power cords. Use the plug to unplug it from the outlet.
• Do not expose the camera to high temperature or leave it in direct
sunlight. Doing so, may damage the camera or cause temporary camera
malfunction.
• Use the devices with care. Avoid pressing hard on the camera body.
• For your own safety, avoid using the camera or power off the camera
when there is a storm or lightning.
• Disconnect the power adaptor during long periods between usage.Use
only the accessories and power adaptors supplied by Uniden.
WIRELESS DEVICES OPERATING RANGE
Ensure the signal reception is acceptable between the camera(s) and the
WiFi router. If necessary, reduce the distance between them to improve
overall system performance. As local internet environments may vary,
your device may indicate that the camera is disconnected or may display a
black screen. If this occurs, refresh the app.
IMPORTANT SAFETY PRECAUTIONS

2 3
CONTENTS
INSTRUCTIONS.................................. ............................................................................... 2
CONTENTS......................................... ............................................................................... 3
OVERVIEW. ........................................................................................................................ 4
Features.................................................. ........................................................................................ 4
System................................................. ........................................................................................ 4
Guardian App Cam 26 Indoor Camera . ...................................................................................... 4
Uniden’s AppCam App ........................ ........................................................................................ 5
WHAT’S IN THE BOX?....................... ............................................................................... 6
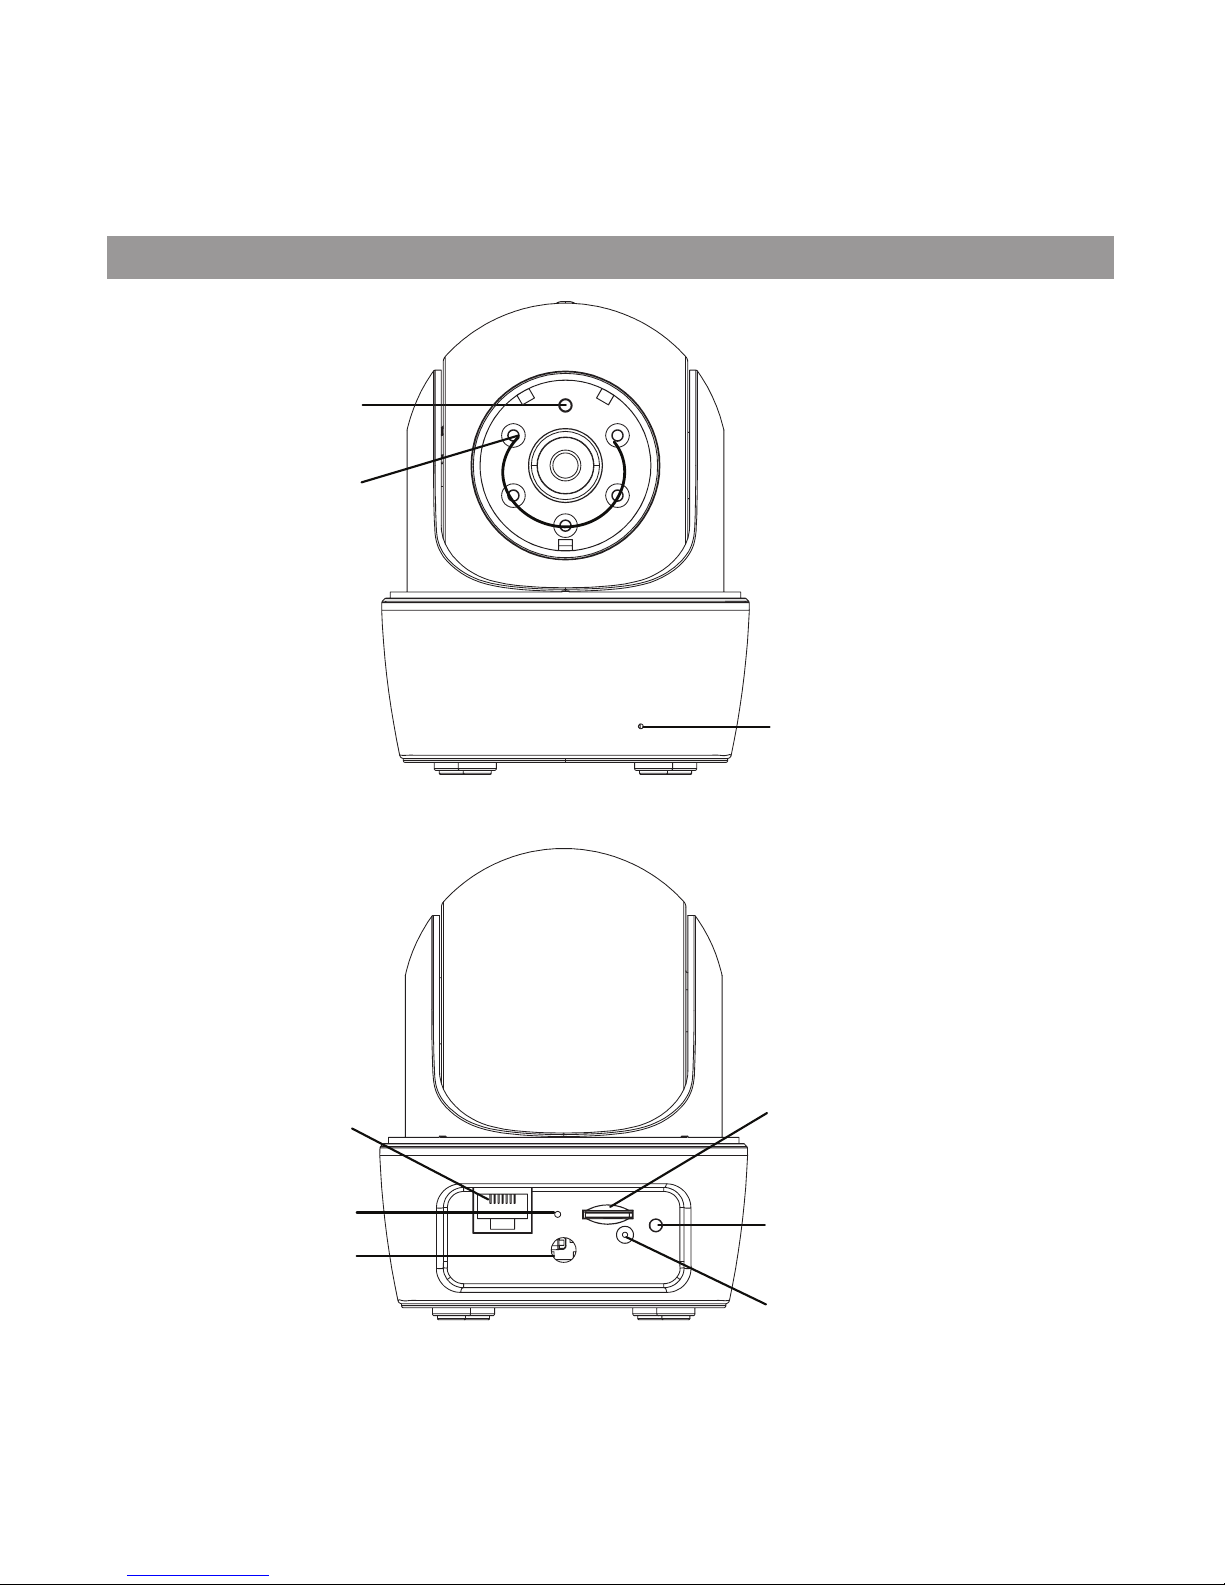
GETTING TO KNOW YOUR CAMERA ............................................................................. 7
NETWORK SETUP............................. ............................................................................... 8
Overview ................................................. ........................................................................................ 8
Prerequisites ........................................... ........................................................................................ 8
Set Up Camera And Smartphone/Tablet ....................................................................................... 8
Connect Camera And Mobile Device...... ........................................................................................ 9
Connect Camera And WiFi Router.......... ........................................................................................ 9
Mounting the Plate and Camera ............. ...................................................................................... 10
Set Time Zone/Daylight Savings Time .......................................................................................... 10
Setting up email alert .................................................................................................................... 11
OPERATION OVERVIEW................................................................................................. 13
USING THE APP............................................................................................................... 14
Accessing your cameras......................... ...................................................................................... 14
Snapshot Vs LIVE Video Screen ............ ...................................................................................... 15
Snapshot Screen Overview..................... ...................................................................................... 15
LIVE Video Screen Overview.................. ...................................................................................... 22
Turn Off the App...................................... ...................................................................................... 23
MAINTAINING YOUR SYSTEM ......... ............................................................................. 24
TROUBLESHOOTING ..................................................................................................... 25
SPECIFICATIONS .............................. ............................................................................. 28
WARRANTY........................................ ............................................................................. 30

4 5
OVERVIEW
Uniden’s Guardian App Cam 26 system works with your smartphone
or wireless device to create a powerful home security network. No PC
interface is needed to view video on your smartphone or wireless devices.
The wireless Guardian App Cam 26 offers superior quality video with true
colour. It is suitable for day or night time use.
The Guardian App Cam 26 camera is an indoor camera. Also, as dust,
grime, and cobwebs accumulate on the camera glass, they can reflect light
from the infrared LED and might lower video quality. Periodically clean the
lens glass with a soft cloth.
FEATURES
System
• No PC required
• Wired connection to router
• WiFi connection to router
• P2P connection
• Records HD 720P up to 20fps
• Manual/Motion recording to microSD (not included)
• Supports up to 32GB microSD (not included)
• High quality H.264 video
• Two-way audio
Guardian App Cam 26 Indoor Camera
• IR cut filter switch
• Compact design
• Night vision range – up to 12 metres

4 5
• Built-in microphone and speaker
• microSD card slot (microSD card not included)
Uniden’s AppCam App
• Multiple camera viewing and management from single app
• Remote access to recorded video
• Remote snapshot & recording control
• Event notification/Email alert

6 7
WHAT’S IN THE BOX?
QUICK START
GUIDE
Guardian App Cam 26
Camera Antenna
5V/1.5A Power Adaptor Quick Start Guide
Screws and Anchors
Ethernet Cable
If any item is missing or damaged, contact your place of purchase immediately.
Never use damaged products!
Need Help? Get answers at our website:
www.uniden.com.au for Australian model
Mounting Bracket

6 7
GETTING TO KNOW YOUR CAMERA
Light Sensor
LAN Port
Reset
Antenna
Jack
Microphone
Infrared LEDs
MicroSD Card Slot
Status LED
Power Jack

8 9
NETWORK SETUP
OVERVIEW
There are two methods of connecting the Guardian App Cam 26 camera to
your mobile device. One method is wireless and the other method has the
camera connected directly to the router using the provided Ethernet cable.
The add camera procedures themselves are identical. In the setup
procedures that follow, the wired connection instructions are noted where
applicable.
PREREqUISITES
• Your router must support WPA/WPA2 security and it must be turned on.
• You must have an available WiFi-enabled mobile device (Android or iOS
smartphone/tablet).
• The Guardian App Cam 26 and your mobile device must connect to the
same WiFi router for setup.
SET UP CAMERA AND SMARTPHONE/TABLET
1. Download the Guardian App (search for - Uniden® AppCam™) from the
Apple App store (iOS) or Play Store (Android) on to your device.
2. Connect the antenna to the camera.
3. Wireless Setup - Connect the camera to power. After about 45
seconds, the camera goes through a Pan/Tilt cycle and the green LED
begins to flash (3-flash/pause pattern), indicating that the camera is in
Pairing mode.
Wired Setup - Connect the camera to your router using the Ethernet
cable, provided. Connect to power. After about 45 seconds, the camera
goes through a Pan/Tilt cycle and the green LED begins to flash
(3-flash/pause pattern), indicating that the camera is in Pairing mode.
Go to Step 2 in the next section - Connect Camera and Mobile
Device.

8 9
Make a note of your DID code. It can be found on the base of the camera.
CONNECT CAMERA AND MOBILE DEVICE
1. If you are connecting wirelessly, from your mobile device’s settings, go
to
WiFi
. Select the Guardian App Cam 26 to connect your device to it.
The camera listing will be HD-XXXXXX where XXXXXX are the last 6
digits on the camera label. Enter the default password, 12345678. Your
mobile device is now connected to the camera.
2. Launch the app and tap the
Add New System
icon.
3. The
System Information
screen displays. Name the camera and
tap
Search
.
4. The
Search in LAN
result box displays. The camera’s DID should
display. Tap the DID number.
5. The
System Information
screen displays again. This time, enter the
security code (123456); tap
Save
. Tap
YES
, then
OK
at the next
prompts.
6. The
snapshot
screen displays. Tap it to access LIVE view.
7. The Modify Security Code prompt displays. Change security code and
tap OK.
8. The app now displays LIVE video.
CONNECT CAMERA AND WIFI ROUTER
1. From the LIVE view, tap Back icon ( ), the System icon ( ), and
then the System Setting icon (
From the LIVE view, tap Back icon (
). The
System Information
screen
displays.
2. Tap
Advanced
. Enter the Admin password (123456).
3. Scroll to
WiFi
on the Advanced Settings list. Tap
Manage WiFi Network.
Select your router from the drop-down list and enter your router’s
password. Tap
Connect
.
When connected to the LIVE view for the first time, the user is forced to
change the security code.

10 11
Your camera will reboot and reconnect to the router. If using the
wired set up process, unplug the Ethernet cable from the router
and camera during the reboot process. Wait 2 - 3 minutes until
the camera runs through the Pan/Tilt mode and the LED returns
to the steady on state to continue.
4. The camera screen indicates that it is disconnected. Tap the System
icon and then the Refresh icon. The camera refreshes and reconnects
to the router you chose. The app displays a snapshot of the video
image.
At this point, the green LED is steady on.
SET TIME ZONE/DAYLIGHT SAVINGS TIME
It is important to set the correct time zone and daylight savings time
indication on your camera to ensure correct date/time stamp on the video
files.
MOUNTING THE PLATE AND CAMERA
1. Hold the mounting plate where you want to mount
it and mark the location of the screw holes.
2. Use the included screws and anchors to attach
the mounting plate to the
wall.
3. Use the enclosed screws
to screw the camera to the
bracket.
1. Access the
Advanced Settings
list (see Connect Camera and WiFi
Router, described previously).
2. From the
Advanced Settings
list, scroll to
Time Zone
.
3. Select your time zone.
4. Set the Daylight Savings Time indicator.
5. Tap
Back
, and exit the
Advanced Settings
list.

10 11
SETTING UP EMAIL ALERT
1. In LIVE view, tap the Back icon ( ), the System icon ( ), and then
the System Setting icon (
In LIVE view, tap the Back icon (
).
2. The
System Information
screen displays with the e-mail option as well as
the
Advanced
tab.
3. Tap the
ENABLE EMAIL ALERT
box (Android) or slide the
ENABLE EMAIL
ALERT
button to
ON
(iOS) to turn on email notification when the camera
begins recording when it detects movement.
4. Tap
Advanced Settings
and scroll to
E-Mail Setting
. Refer to the table on
page 12. Enter your e-mail information in the Username and Receiver
field. You can use the same email address in both the fields.
5. Tap
OK
to save your modification.
Set up the email alert so you can be notified when the motion sensor
triggers automatic recording.
Android iOS
Android iOS

12 13
For Gmail
SMTP Server smtp.gmail.com Enter this.
SMTP Port 465 Enter this.
full, including ‘@gmail.com’.
Password XXXXXXXXXXX Enter the password for this
gmail account.
where you want the alerts
sent.
Setting up a gmail account is recommended. Check the SSL box and use
the data in the following table:
PUSH/EVENT NOTIFICATION
For Android devices: Tap to set up the Push Notification feature.
For iOS devices: Enable event notification through the settings (Settings/
Notification/UnidenAppCam/Notification Center).
You can set your smartphone or device to notify you when there is a new
recorded file.

12 13
OPERATION OVERVIEW
To ... Do This:
View LIVE Video Tap the image on the
Snapshot
screen.
Start Recording From the
LIVE Video
screen, tap . The
camera will record for 1 minute.
View Recorded Files 1. From the
Snapshot
screen, tap .
2. Tap from the three icons displayed on
the snapshot image.
3. Select a time range of videos to view.
4. Tap your selection from the list of recorded
files that now displays. The recorded video
begins playing.
Delete Recorded Files 1. From the
Snapshot
screen, tap .
2. Tap from the three icons displayed
on the snapshot image. A list of recorded
videos displays.
3. Android - Tap the pencil icon at the bottom
of your list of recorded files. You can now
tap the X to select a file to delete.
iOS - Tap
DELETE ALL
or
DELETE ONE
from
the icons along the bottom of the event list.
Take a Snapshot 1. From the
LIVE Video
screen, tap .
2. The snapshot is saved on your mobile
device.
View Snapshots Your snapshots are named with a time stamp
and saved into the Photo gallery/Snapshot
folder on your mobile device.

14 15
After you’ve set up your system, use the Uniden AppCam app to manage
your Guardian App Cam 26 operations and to take snapshots and remotely
view LIVE or recorded video on your smart phone or tablet device. You
can view up to 12 independant Guardian App Cam 26 cameras on the
Uniden AppCam app.
ACCESSING YOUR CAMERAS
1. Run the Guardian App (Uniden AppCam app).
2. If you have multiple cameras on your app, each camera will display in
a separate block. Review the names for each camera and tap the block
for the camera you want to view.
3. The
Snapshot
screen displays for that camera. See page 16 for actions
available from the
Snapshot
screen. Tap the screen image.
4. LIVE video displays. See page 22 for actions available from the
LIVE
Video
screen. Tap
to return to the
Snapshot
screen.
USING THE APP
As the Uniden App is constantly under development to enrich user experience, the icons/
screens shown in this manual may vary slightly from the actual app. This OM uses icons
from the Andriod device for most of the steps.

14 15
Android iOS
Snapshot LIVE Snapshot LIVE
SNAPSHOT SCREEN OVERVIEW
The
Snapshot
screen displays a snapshot image from the camera and four
function icons.
Add Another Camera
The icon allows you to add another camera to your network. Follow the
same procedures beginning with Step 2 on page 9.
SNAPSHOT VS LIVE VIDEO SCREEN
The
Snapshot
and
LIVE Video
screens control operations. The
Snapshot
screen lets you add more cameras, configure advanced settings, access
and manage recorded files, update the camera connection status, and
check app version.
The
LIVE Video
screen lets you take snapshots and record LIVE video. You
can also control the sound.

16 17
Android
iOS
Accesses
System Information - Advanced
Screen. This screen lets you configure the
camera and set notification alerts. See page
17 for details.
Deletes the camera from the app.
Event List lets you check and play back
recorded events and files. (See page 20 for
details.)
Update
Tap to update the camera’s connection status.
System Settings
The icon allows you to configure the advanced settings, remove the
camera connection, and play back the recorded video clips. Tap and
the following three icons display in the center of the snapshot image:

16 17
Android iOS
• The PIN lock is a unique security code you must enter when you start the
app.
• APP information displayed includes APP and API version information.
• Android systems can also enable event notification through this button.
- iOS systems enable event notification through the iPhone settings
(Settings/Notification/UnidenAppCam/Notification Center).
System Information - Advanced Screen Details
Tap to display the
System Information
screen again with a tab for
Advanced settings. From this screen (see page 11 for an image of this
screen), you can set email alerts and event notifications as well as
configure specific camera settings.
Information
Tap to set up and enable PIN lock or to check the app information.
Advanced
Tap the
Advanced
tab to configure various settings in your device, such
as the time zone, device password, and video setting. These settings are
displayed in a list of fields, each field contained in its own block.

18 19
•
Video Setting
:
Record FPS
Better Streaming
(VGA) Better Image (VGA) HD Better
LIVE View
(Video Quality) VGA 25fps
256kbps VGA 20fps
768kbps HD 10fps
1Mbps
Record
(SD Card) HD 20fps
1.5Mbps HD 20fps
1.5Mbps HD 10fps
1Mbps
- Screen Orientation
The options available are Normal, Flip, Mirror and Filp and Mirror.
- Video Quality
Scroll down to find the field you want to set. You can also format the
microSD card or check the device information here.
The Advanced field blocks are:
•
Admin Password
: The security code for your advanced settings. The
default Admin Password is 123456. Change the default password to one
you set yourself.
•
Time Zone
: Turns daylight savings time on and off and sets up the time
zone for your system.
•
Device security code
: Change the default code (123456) to a security
code of your choosing for your camera.
Normal The image on the device appears as seen by the naked eye.
Flip: Use this option to flip the images (i.e., if you attached the camera
to the ceiling, then use this option to flip the images that have been
turned upside down back to normal).
Mirror: Use this option to view the images as it would appear if seen in a
mirror (reversed side).
Flip and
Mirror:
Use this option to view flipped and mirrored images.

18 19
- Environment Mode
This mode enables you to select the power line frequency used at the
location of the App Cam 26. The frequency depends on the geographic
location. The images may not be very clear if the frequency selected is
not correct. Suggested frequency in Australia is 50Hz.
- Low Light Enhancement
This mode improves the night view video image - Level 5 (highest).
•
WiFi Setting
: Set up your WiFi connection.
•
Sensitivity Setting
: Turn on or off the motion detection sensitivity setting.
•
Email Setting
: Allows you to configure the email environment, email
account, and password. You can also set up encryption for data
transmission.
•
SD Card Setting
: Lets you reformat the SD card and enable/disable the
ability to overwrite the microSD card as space is needed.
• Profile
Setting
: Allows you to save the profile of one camera to apply it
to future cameras. You can then customize additional camera using this
profile as a base.
•
Device Information
: Check the model, camera’s firmware version, and
storage status.
Unless stated otherwise, the screen returns to the main list of
Advanced setting fields after you enter the requested information in
a specific field.
Delete Camera Connection
Tap the Delete icon ( ) to remove a camera from your system. Tap
NO
to keep the camera connection or
YES
to delete it. A confirmation screen
displays.

20 21
Event List Details
Android
1. Tap the Event List icon ( ) to select a date range of recorded files to
display. View a list of recorded video files.
2. Tap the start date and end dates to set the date range. A list of files
displays.
When you set a filter, be sure the Time Zone feature is set
accurately in the Advanced fields to reflect the current time zone
for the camera, not the time zone where you are. See page 10 for
details.
3. Tap the file you want to view and it begins to play.
• Tap the pencil icon to select recorded files to delete. Tap the box on the
right side of the entry to select it for deletion.
• Tap on
SEARCH
(magnifying glass icon) to set up a date range filter. You
can use this to change date ranges.
Other manuals for Guardian App Cam 26
1
Table of contents
Other Uniden IP Camera manuals

Uniden
Uniden App Cam XLight User manual

Uniden
Uniden AppCam Solo User manual

Uniden
Uniden Guardian App Cam 24 User manual

Uniden
Uniden Guardian App Cam 26 User manual

Uniden
Uniden AppCam 21 User manual

Uniden
Uniden APPCAM 24HD User manual

Uniden
Uniden Guardian App Cam 25 User manual

Uniden
Uniden G24 Series User manual