manuals.online logo
Brands
  1. Home
  2. •
  3. Brands
  4. •
  5. Unilamp
  6. •
  7. Underwater Lighting
  8. •
  9. Unilamp VOLGA/1 - CV Wall Recess Under Water User manual

Unilamp VOLGA/1 - CV Wall Recess Under Water User manual

This manual suits for next models

1

Other Unilamp Underwater Lighting manuals

Unilamp Acqua/1 User manual

Unilamp

Unilamp Acqua/1 User manual

Unilamp ATOM 7480-0-2-899-91 User manual

Unilamp

Unilamp ATOM 7480-0-2-899-91 User manual

Popular Underwater Lighting manuals by other brands

S.R.Smith Mod-Lite PowerPass Wireless Faq

S.R.Smith

S.R.Smith Mod-Lite PowerPass Wireless Faq

Keldan VIDEO 18X 25000lm CRI82 operating instructions

Keldan

Keldan VIDEO 18X 25000lm CRI82 operating instructions

Oase ProfiLux Garden LED RGB operating instructions

Oase

Oase ProfiLux Garden LED RGB operating instructions

Oceanled DISCOVER D3 Installation & operation manual

Oceanled

Oceanled DISCOVER D3 Installation & operation manual

NORBIT AQUA FCL600 quick guide

NORBIT

NORBIT AQUA FCL600 quick guide

LIGMAN NEMO 2 installation manual

LIGMAN

LIGMAN NEMO 2 installation manual

Luxor LED-SUWL30-XX user manual

Luxor

Luxor LED-SUWL30-XX user manual

RGBlue System 01/02:re instruction manual

RGBlue

RGBlue System 01/02:re instruction manual

LIGMAN OR-60895 installation manual

LIGMAN

LIGMAN OR-60895 installation manual

hentech HT023C instruction manual

hentech

hentech HT023C instruction manual

hentech HT001BL-T1 instruction manual

hentech

hentech HT001BL-T1 instruction manual

OMD 5000w Tungsten Instructions for use

OMD

OMD 5000w Tungsten Instructions for use

EVA EVA Q2 MONO Mounting instructions

EVA

EVA EVA Q2 MONO Mounting instructions

EasyPro EPL20 Instructions for operation

EasyPro

EasyPro EPL20 Instructions for operation

PXM PxAqua 3 SF 12V user manual

PXM

PXM PxAqua 3 SF 12V user manual

LIGMAN ANNET 1 installation manual

LIGMAN

LIGMAN ANNET 1 installation manual

ccei Mini Brio M12 Technical manual

ccei

ccei Mini Brio M12 Technical manual

Oceanled Sport Colours DMX 012117CD Product guide

Oceanled

Oceanled Sport Colours DMX 012117CD Product guide

manuals.online logo
manuals.online logoBrands
  • About & Mission
  • Contact us
  • Privacy Policy
  • Terms and Conditions

Copyright 2025 Manuals.Online. All Rights Reserved.

1/4
INSTALLATION MANUAL
PRODUCT NAME : VOLGA/1 - CV Wall Recess Under Water
1
PVC pipe 1"
¢¹Ò´·Í PVC 1 ¹ÔéÇ
FR-DM-17 REV.03 EFF 15/09/17Last Revised On : 15/12/2022 REV.00
IP68
lll
No. Ordering Code
1.
2.
3.
Input
2 Meters cable pre-wired
from the factory.
ÊÒÂä¿ÂÒÇ2àÁµÃ»ÃСͺÁÒ
¾ÃÍÁ¡ÑºµÑÇâ¤Á¨Ò¡âç§Ò¹
141
108
2
7418-4-2-361-91
7418-A/6/C/H/U/0-2-429-91
7418-A/6/C/H/U/0-2-430-91
Constant Voltage-remote
driver 24V
( Output from SELV system only)
( ¡ÃÐáÊ俵ͧÁÒ¨Ò¡Ãкºáç´Ñ¹ä¿¿Ò
µèíÒ¾ÔàÈÉ¢Ñé¹»ÅÍ´ÀÑÂà¾Õ§à·Ò¹Ñé¹)
VOLGA/1 - CC Wall Recess Under Water
7418-A/6/C/H/U/0-2-431-91
7418-B/C/H/U/0-2-372-91
7418-B/C/H/U/0-2-373-91
7418-B/C/H/U/0-2-374-91
7419-4-2-355-91
7419-A/6/C/H/U/0-2-561-91
4.
5.
6.
7.
8.
9.
10.
11.
12.
13.
û1"
û70
108112
141
Gel-Filled IP68 Connector Cable Diameter
4.8-6mm.
available separately /ᡨíÒ˹ÒÂ
Ordering Code/ÃËÑÊÊÑè§«×éÍ : 0247-0-9-000-00
'See connecting detail on Accessories manual.'
´ÙÃÒÂÅÐàÍÕ´·Õè¤ÙÁ×Í¡ÒõԴµÑ駢ͧ Accessories
Cable size : 2x1.00 mm.
Ø
4.8-6mm.
¢¹Ò´ÊÒÂä¿
74
2
Please note the wall level.
¢ͤÇÃÃÐÇѧ :
¼ÔÇ˹ҢͧµÑÇâ¤Á¡Ñº¼ÔǾ×é¹
¤ÇÃÍÂÙã¹ÃйҺà´ÕÂǡѹ
Wall recess housing
¡Åͧ½§¼¹Ñ§
Constant Current
500mA /700mA/1200mA
( Output from SELV system only)
(¡ÃÐáÊä¿¿Òµͧà»¹áººáç´Ñ¹µèíÒ¾ ÔàÈÉ
à·Ò¹Ñé¹à¾×èͤÇÒÁ»ÅÍ´ÀÑÂ)
Warra nty void if re moved.
ÊÔé¹ÊØ´¡Òà ÃѺ» ÃС Ñ ¹Ë Ò¡¶ Ù¡á¡ ÐÍÍ¡
Warranty void if
removed.
ÊÔé¹ÊØ´¡ÒÃÃѺ»ÃСѹ
ËÒ¡¶Ù¡á¡ÐÍÍ¡
112
141
û1"
105
110
R2.75
14.
7419-A/6/C/H/U/0-2-562-91
7419-A/6/C/H/U/0-2-563-91
7419-B/C/H/U/0-2-366-91
7419-B/C/H/U/0-2-367-91
7419-B/C/H/U/0-2-368-91
Light Emitting Diodes
(LED)
-
+
1-14
1.
Warning :
¢ͤÇÃÃÐÇѧ
The manufacturer will not be liable or held responsible for any incorrect installation, misuse or improper use and
unauthorised modification to the fittings. Failure to comply with mentioned warning may cause serious damage or
serious injury to persons, animals or objects. If any modification is required please consult your dealer for the details.
·Ò§¼Ù¼ÅÔµäÁÊÒÁÒöÃѺ¼Ô´ªÍºã¹¤ÇÒÁàÊÕÂËÒÂã´æ·Õèà¡Ô´¨Ò¡¡ÒÃ
µÔ´µÑé§äÁ¶Ù¡ÇÔ¸Õ, ãª§Ò¹¼Ô´»ÃÐàÀ·ËÃ×Í´Ñ´á»Å§µÑÇâ¤Áã¹·Ø¡¡Ã³Õ «Öè§ ÊÔè§¼Ô´»¡µÔàËÅÒ¹Õé ÍÒ¨·íÒãËà¡ Ô´ÍѹµÃÒ¡Ѻ ¤¹ ÊѵÇ ÊÔ觢ͧ
ËÒ¡ÁÕ¢ÍʧÊÑÂËÃ×ÍÁÕ¤ÇÒÁµͧ¡Òûà Ѻáµ§µÑÇâ¤Á ãËàËÁÒÐÊÁ¡Ñº¡ÒÃãª§Ò¹ ¡ÃسҵԴµ͵ÑÇá·¹¨íÒ˹ÒÂËÃ×ͼÙ¼ÅÔµ
Where damage has occured to the fittings, please make the replacement with standard parts before use.
㹡óշÕèÁÕªÔé¹Êǹ»ÃСͺã´à¡Ô´¤ÇÒÁàÊÕÂËÒÂ¡ÃØ³Òà»ÅÕ蹪Ôé¹Êǹ
ãËÁ¡͹¡ÒÃãª§Ò¹·Ø¡¤ÃÑé§ à¾×èͤÇÒÁ»ÅÍ´ÀÑÂ
2/4 FR-DM-17 REV.03 EFF 15/09/17FR-DM-17 REV.03 EFF 15/09/17
2.
3
ÊÔé ¹ÊØ ´ ¡Ò à ÃÑ º »Ã Ð¡Ñ ¹ Ë Ò ¡ ¶Ù ¡á¡ ÐÍÍ ¡
Installation complete
¡ÒõԴµÑé§àÊÃç¨ÊÁºÙó
Control box
µÙ¤Çº¤ØÁÃкºä¿¿Ò
Max
¤ÇÒÁÅÖ¡ÁÒ¡ÊØ´
1.5 m
.
1.
Remark :
ËÁÒÂà˵Ø
Installation should be carried out by a qualified electrician
in accordance with appropriate national wiring regulation.
¡ÒõԴµÑé§â¤Áä¿¿ÒáÅÐÍØ»¡Ã³ ¤ÇôíÒà¹Ô¹¡ÒÃâ´ÂªÒ§ä¿¿Ò
·ÕèÁÕ¤ÇÒÁÃÙáÅФÇÒÁªíÒ¹Ò 㹡ÒõԴµÑé§ÍØ»¡Ã³ä¿¿Ò
â´Â੾ÒеÒÁÁÒµÃฐÒ¹¢Í§¡ÒÃä¿¿Ò
Disconnect the power before changing the lamp.
»´ÊÇÔ·ªä¿·Ø¡¤ÃÑé§·Õèà»ÅÕè¹ËÅÍ´ä¿
This is class 3 luminaire fixture.
â¤Á俪¹Ô´¹Õé¨Ñ´ÍÂÙã¹ »ÃÐàÀ· 3 ( CLASS III ) ¤×Íãªä¿âÇÅ·µèíÒ
Do not exceed the maximum wattage.
ËÒÁãªËÅÍ´ä¿·ÕèÁÕ¢¹Ò´Çѵµà¡Ô¹¡ÇÒ·ÕèÃÐºØ ËÃ×ÍãªËÅÍ´¼Ô´»ÃÐàÀ·
Don't touch LED while maintaining or cleaning.
ËÒÁÊÑÁ¼ÑÊËÅÍ´ LED ¢³ÐºíÒÃØ§ÃÑ¡ÉÒ ËÃ×Í·íÒ¤ÇÒÁÊÐÍÒ´
2.
3.
4.
5.
4
Last Revised On : 15/12/2022 REV.00
3/4 FR-DM-17 REV.03 EFF 15/09/17FR-DM-17 REV.03 EFF 15/09/17
Clean the products regularly to maintain good light output and prolong surface
quality .
Only use solvent-free cleaning solutions on the products.
·íÒ¤ÇÒÁÊÐÍÒ´¼ÅÔµÀѳ±à»¹»ÃШíÒà¾×èÍÃÑ¡ÉÒ¤ÇÒÁÊͧÊÇÒ§·Õè´ÕáÅÐÂ×´ÍÒÂØ¤Ø³ÀÒ¾¾×é¹¼ÔÇ
ãª¹éíÒÂÒ·íÒ¤ÇÒÁÊÐÍÒ´·ÕèäÁÁÕáÍÅ¡ÍÎÍÅËÃ×͵ÑÇ·íÒÅÐÅÒ¡Ѻ¼ÅÔµÀѳ±à·Ò¹Ñé¹
The luminaire should be positioned so that prolonged staring into the luminaire at
a distance closer than 0.5m in not expected.
µíÒá˹§·ÕèµÔ´µÑ駴ǧâ¤Á¤ÇÃÍÂÙ㹨ش·ÕèáʧäÁÊͧà¢ҴǧµÒâ´ÂµÃ§à»¹àÇÅÒ¹Ò¹ ËÒ¡à¢Òã¡Åã¹
ÃÐÂйÍ¡ÇÒ 0.5 Á.
Any damaged safety glass cover must be replaced only with the original
spare part.
àÁ×èÍ¡ÃШ¡à¡Ô´¤ÇÒÁàÊÕÂËÒ à¾×èͤÇÒÁ»ÅÍ´ÀѤÇÃÊÑè§ÍÐäËÅá·¨Ò¡¼Ù¼ÅÔµà·Ò¹Ñé¹
Not using chemical compounds and aggressive agents such as , weed repellents
fertilizers , acid solvent and contaminated irrigation water near the Luminaires.
ËÒÁãªÊÒÃà¤ÁÕàª¹ »ØÂ, ÂÒ¡íҨѴÈѵÃپת, »Ù¹¢ÒÇ, ÊÒÃÅÐÅÒ·Õèà»¹¡Ã´ áÅйéíÒ»¹à»͹ÊÒÃà¤ÁÕ
ºÃÔàdz·ÕèµÔ´µÑé§â¤Áä¿
NO
Cable Size/¢¹Ò´ÊÒÂä¿ : 2x1.00 mm.
Ø
4.8-6 mm.
2
In case the supply cable is exposed to sunlight use UV resistant cable.
¡Ã³Õ·ÕèÁÕ¡ÒõԴµÑé§â¤Á俹͡ÍÒ¤Òà ËÃ×Íâ¤Áä¿·ÕèÁÕ¡ÒÃá¼ÃѧÊÕÂÙÇÕ ÊÒÂ俵ͧÊÒÁÒö»ͧ¡Ñ¹ ËÃ×Í ÁÕ¡Òûͧ¡Ñ¹äÁãË¶Ù¡ÃѧÊÕÂÙÇÕä´
NO
This luminaire is designed to be used underwater. To avoid overheating, do not
turn on the light if it is not submersed.
à¾×èÍËÅÕ¡àÅÕ觤ÇÒÁÃ͹ÊÐÊÁ·ÕèÍÒ¨·íÒãËà¡Ô´ÍѹµÃÒ ËÒÁà»´ä¿ËÒ¡â¤ÁäÁä´ÍÂÙãµ¹éíÒ
Last Revised On : 15/12/2022 REV.00
LED
Our products are installed with electronic components with the protection against
overvoltage according to IEC 61547. The customers have to install the additional
overvoltage protection devices (against surge, transients, etc) in their electrical
system to avoid the risk of damage.
Failing to do so will end the product warranty.
¼ÅÔµÀѳ±¢Í§àÃÒÁÕ¡ÒõԴµÑé§ÍØ»¡Ã³ÍÔàÅç¡·Ã͹ԡÊÊíÒËÃѺ¡Òûͧ¡Ñ¹áç´Ñ¹ä¿à¡Ô¹µÒÁÁÒµÃฐÒ¹ IEC
61547 áÅÐÅÙ¡¤ÒµͧµÔ´µÑé§ÍØ»¡Ã³»ͧ¡Ñ¹áç´Ñ¹ä¿à¡Ô¹à¾ÔèÁàµÔÁ (»ͧ¡Ñ¹ä¿¡ÃЪҡ ,ä¿¿ÒÅѴǧ¨Ã
ÏÅÏ)ã¹Ãкºä¿¿Ò´Ç à¾×èÍËÅÕ¡àÅÕ觤ÇÒÁàÊÕè§·Õè¨Ðà¡Ô´¤ÇÒÁàÊÕÂËÒ ËÒ¡äÁ´íÒà¹Ô¹¡Òôѧ¡ÅÒÇ
¡ÒÃÃѺ»ÃСѹ¨ÐÊÔé¹Êشŧ
4/4 FR-DM-17 REV.03 EFF 15/09/17FR-DM-17 REV.03 EFF 15/09/17
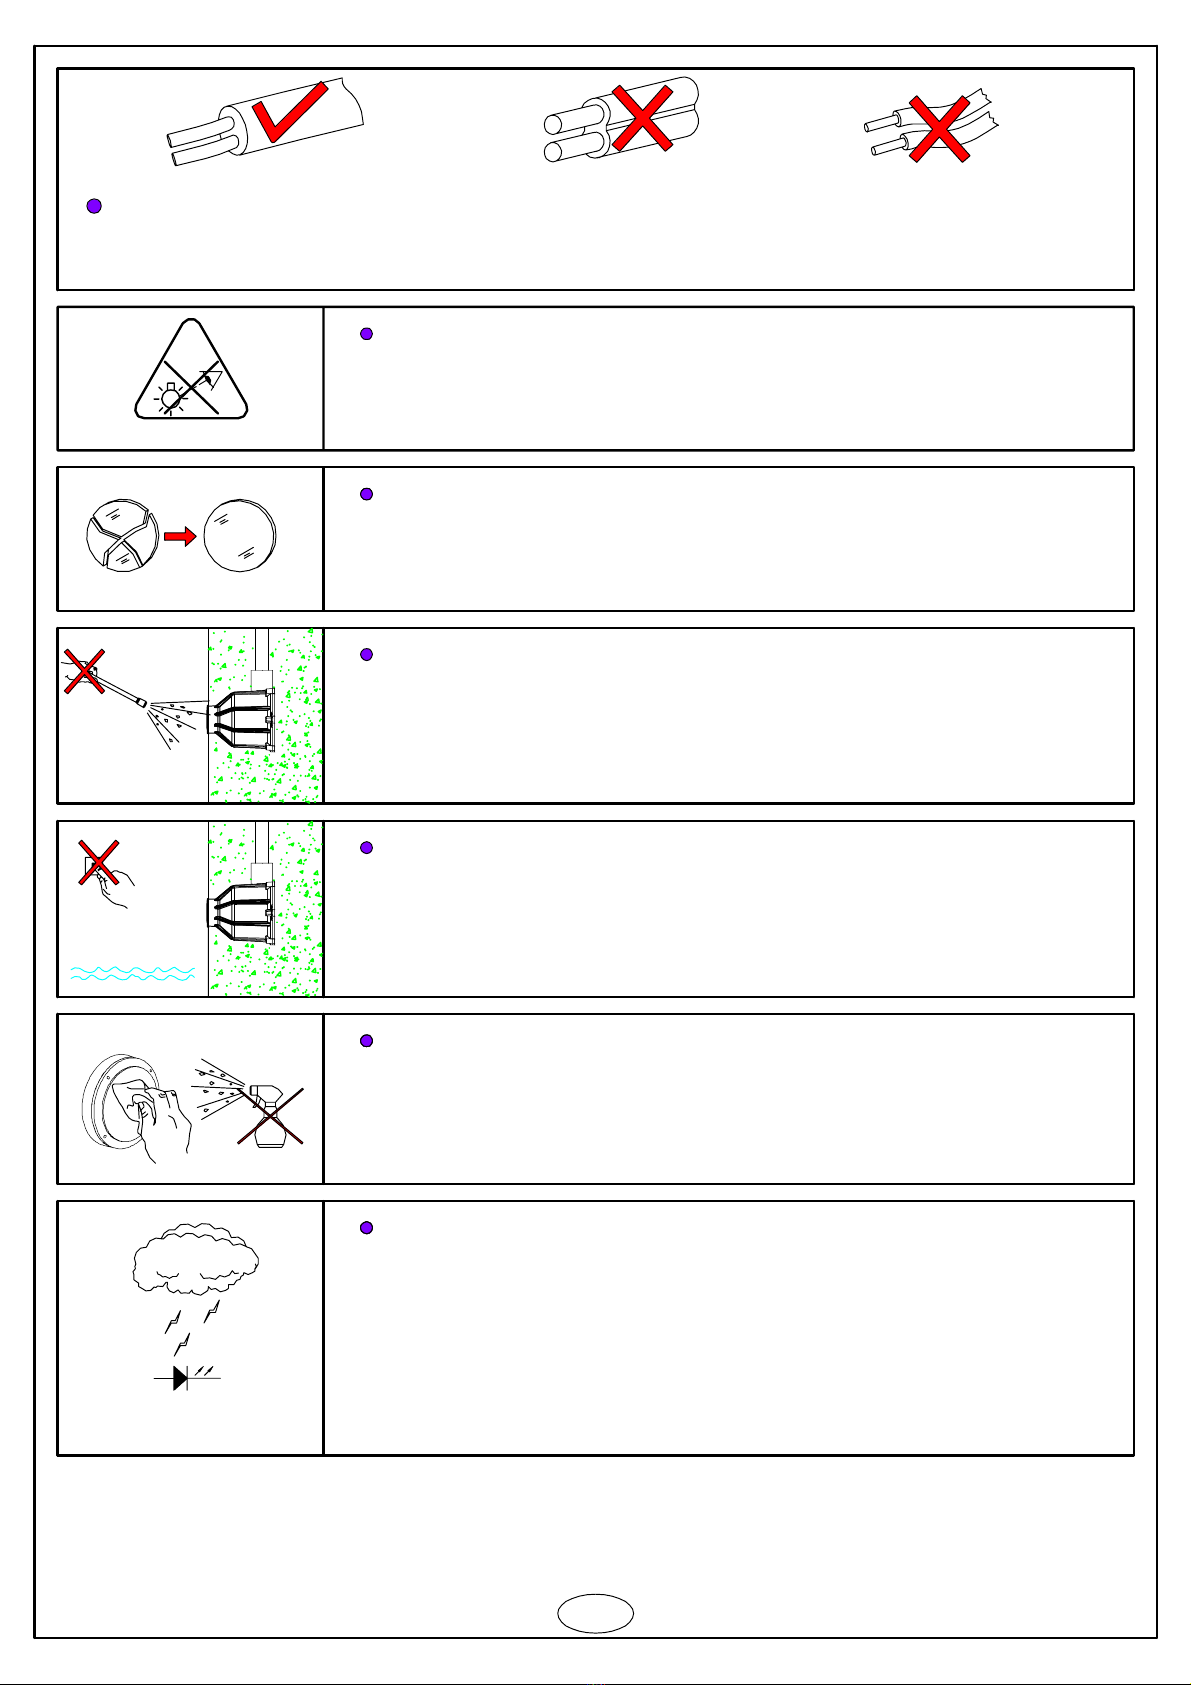
Do not use a high pressure washer to clean the products.
ËÒÁãªà¤Ã×èͧ©Õ´¹éíÒáç´Ñ¹Ê٧㹡Ò÷íÒ¤ÇÒÁÊÐÍÒ´¼ÅÔµÀѳ±
Environmental protection: Waste electrical products should not be disposed of
with household waste. please recycle where facilities exist.check with your local
authority or retailer for recycling advice According to directive 2002/96/CE and
directive 2012/19/EU Waste Electrical and Electronic Equipment (WEEE).
ËÒÁ·Ôé§¼ÅÔµÀѳ±¹ÕéÃÇÁ¡Ñº¢ÂÐ㹤ÃÑÇàÃ×͹ª¹Ô´Í×è¹æàÁ×èÍÊÔé¹ÊØ´ÍÒÂØ¡ÒÃãª§Ò¹â»Ã´á¡¼ÅÔµÀѳ±ÍÍ¡
¨Ò¡¢Í§àÊÕ»ÃÐàÀ·Í×è¹æáÅÐÃÕä«à¤ÔÅÍÂÒ§àËÁÒÐÊÁà¾×èÍÊ§àÊÃÔÁ¡ÒùíÒ·ÃѾÂҡáÅѺÁÒãª«éíÒ«Ö觨ЪÇÂ
»ͧ¡Ñ¹ÍѹµÃÒµÍÊÔè§áÇ´ÅÍÁËÃ×ÍÊØ¢ÀÒ¾¢Í§Á¹ØÉÂ·Õèà¡Ô´¨Ò¡¡Ò÷Ôé§¢ÂÐâ´ÂäÁÁÕ¡ÒäǺ¤ØÁ
ÍÒ§ÍÔ§µÒÁÃÐàºÕº 2002/96/CE áÅÐÃÐàºÕº 2012/19/EU Waste Electrical and
Electronic Equipment (WEEE).
1.
2.
3.
4.
5.
6.
Replacing the LED module
ÇÔ¸Õ¡ÒÃà»ÅÕè¹ LED module
Contact your sales representative for replacement LED modules. Make sure that the replacement module
match the initially supplied module. Note the part number printed on the LED module.
àµÃÕÂÁ LED module ãËµÃ§¡ÑºÃØ¹· Õèµͧ¡ÒÃà»ÅÕè¹â´ÂµÃǨÊͺ·ÕèËÁÒÂàÅ¢·Õè¾ÔÁ¾º¹LED modules áÅÐ µÔ´µ͵ÑÇá·¹¢ÒÂà¾×èÍÊÑè§«×éÍ
LED modules ·Õèµͧ¡ÒÃà»ÅÕè¹
The LED module can be replaced by qualified persons using standard tools.
¡ÒÃà»ÅÕè¹ LED module µͧ·íÒâ´ÂªÒ§¼ÙªíÒ¹ÒáÅÐãªà¤Ã×èͧÁ×Í·Õèä´ÁÒµÃฐÒ¹
Disconnect power before opening the luminaire housing.
µÑ´áËÅ§¨ÒÂä¿¡͹·Õè¨Ðà»´µÑÇâ¤Á
Replace the old LED module with the new LED module. Reapply thermal interface material as supplied with the
new LED module.
¶Í´ LED module ·ÕèªíÒÃØ´ÍÍ¡ ¨Ò¡¹Ñ ¹·íÒ¤ÇÒÁÊÐÍÒ´¨Ø´ÇÒ§ËÅÍ´ áÅǨ֧·íÒ¡ÒûÃСͺ LED module ãËÁ áÅе ͧà»ÅÕè¹
á¼¹Thermal Pad ËÃ×Í Thermal Grease ´Ç·ء¤ÃÑé§
Inspect gaskets and if required replace with new gaskets. Defective luminaire covers must be replaced. Inspect
correct wiring of replaced LED module.
µÃǨÊͺ»ÃÐà¡ç¹áÅЪÔé¹Êǹ¢Í§µÑÇâ¤Á ¶ÒªíÒÃØ´àÊÕÂËÒÂãË·íÒ¡ÒÃà»ÅÕè¹ãËÁ áÅеÃǨÊͺ¡ÒÃà¢ÒÊÒÂ俢ͧ LED module
·Õèà»ÅÕè¹ãËÁ¶Ù¡µͧËÃ×ÍäÁ
Close the luminaire housing before reconnecting power.
»´½Ò¤ÃͺÅçͤâ¤Áä¿ãËàÃÕºÃÍ¡͹à»´ä¿
LED LED
To replace the LED module or the entrire luminaire.Please consult your
sales representative.
ËÒ¡µͧ¡ÒÃà»ÅÕè¹ LED
module
ËÃ×Íâ¤Áä¿â»Ã´µÔ´µ͵ÑÇá·¹¢Ò¢ͧ¤Ø³
Last Revised On : 15/12/2022 REV.00
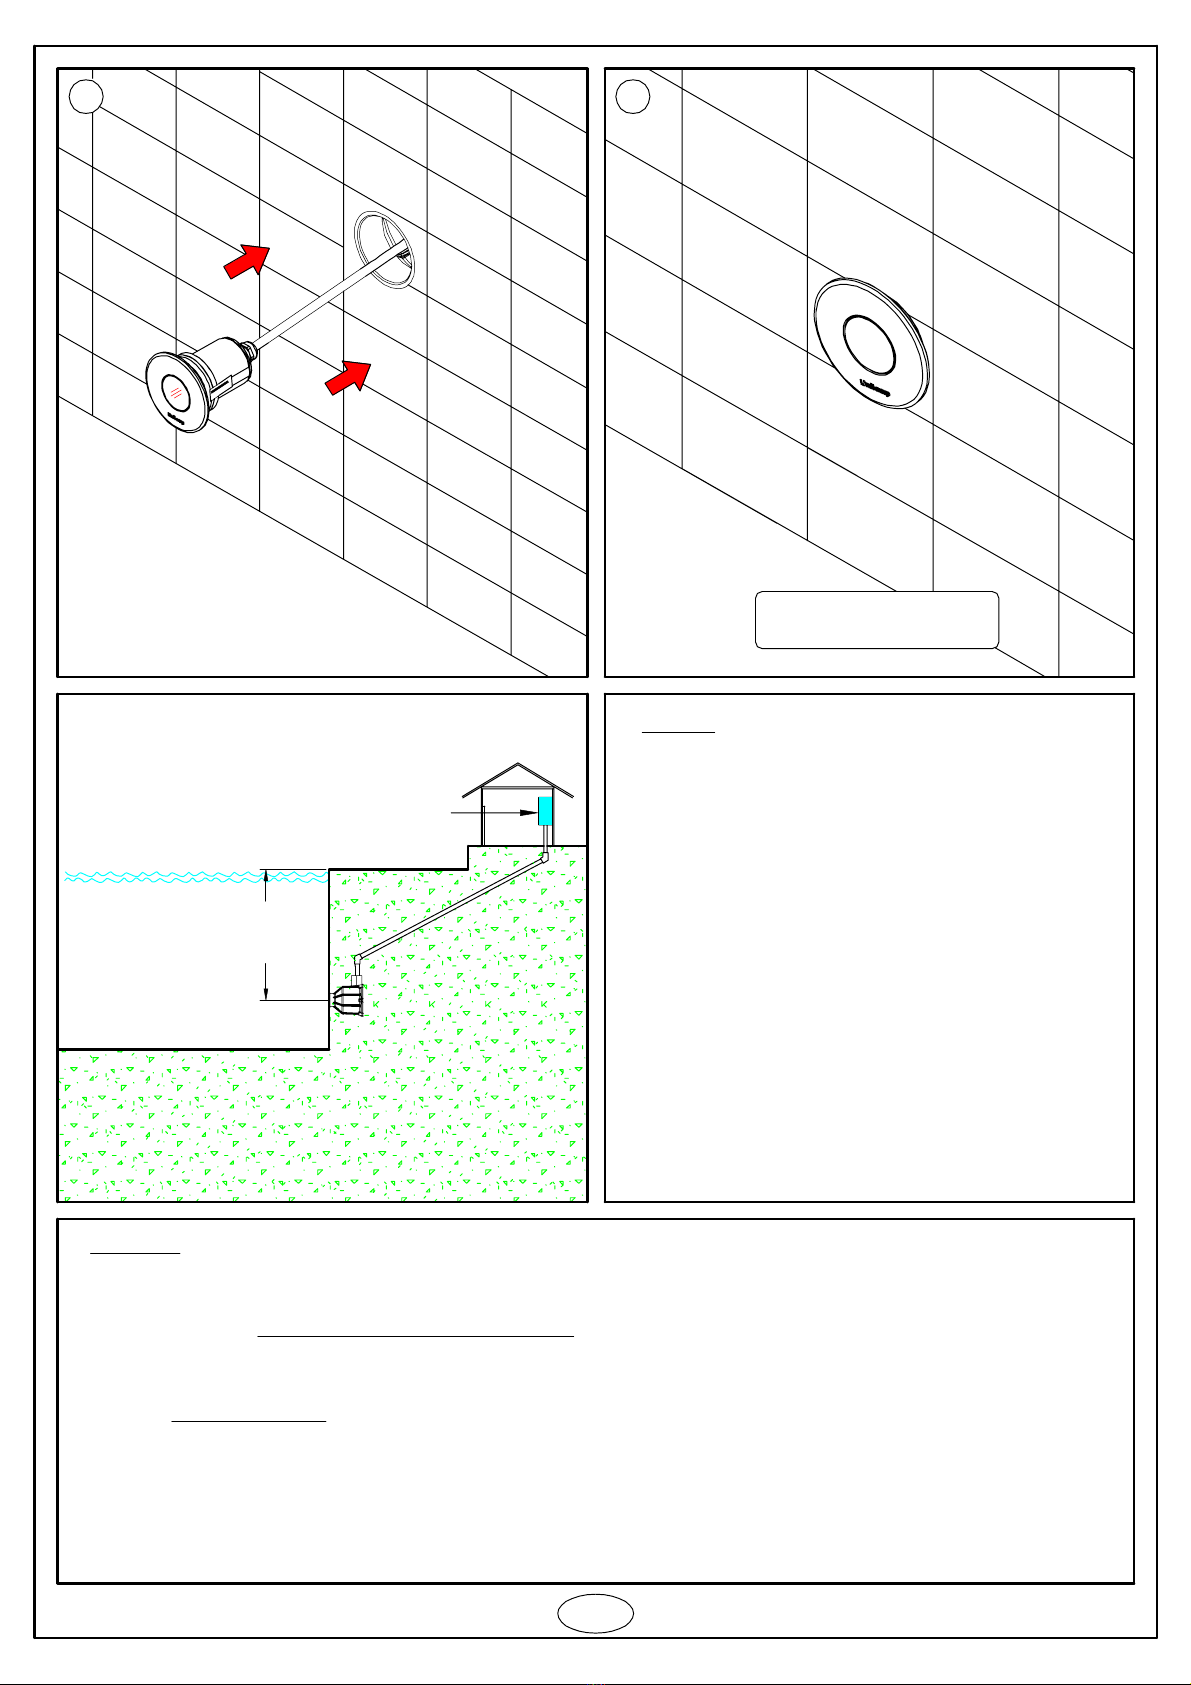
Only use the supplied stainless screws to mount the luminaire. Otherwise corrosion
will occur and the warranty will be voided.
ãªÊ¡ÃÙÊ൹àÅÊ·ÕèãËÁÒ¾ÃÍÁâ¤Áä¿à·Ò¹Ñé¹ã¹¡ÒõԴµÑé§â¤Áä¿ÁԩйÑ鹨Ðà¡Ô´¡ÒáѴ¡Ã͹
áÅСÒÃÃѺ»ÃСѹ¨Ðà»¹âÁ¦Ð
Only use supplied screws