Uniqscan UB800 User manual

~ 1 ~
1. It's available for indoor use, if using outdoors, must be protected by waterproof
canopy.
2. Choose the smooth and stable installation place, don't touch the detector during
security checking to avoid false alarm.
3. Make sure there's no big metal object or strong magnetic field around the detector
within 1~2 meters.
4. Detector probe mustn't install in high temperature or wet circumstance.
5. Please wait 1 minute for its self-diagnosing when machine starts.
6. Do not disassemble the control units except for the professional technician.
7. Follow the user manual carefully and make sure the right wire connection before
starting.
※Please read carefully the following considerations to avoid the
potential damage during installation.

~ 2 ~
【PRODUCT SPECIFICATION】
Walk Through Metal Detector is mainly used for routine security checking. When the
passengers carry metal content over preset parameters value, the detector will
automatically alarm, meanwhile side LED lights will accurately indicate the alarm
location. It greatly helps security guards faster and easier to find out the prohibited
metal objects, such as guns, knives, keys…etc.

~ 3 ~
【INSTALLATION GUIDE】
1. Stationary Metallic objects
When installing walk through metal detector,
it should stay away from the stationary or
fixed bulk metal items at least 30cm;
otherwise it will affect the sensitivity,
causing false alarm. Metal items include
aluminum alloy / stainless steel doors and
windows, with reinforced wall, etc.
2. Movable Metallic Items
Installation near movable items, it should stay
away from the detector at least 0.5-2 meters
to avoid false alarm. Especially install the
detector at factory gate or ground floor.Pls
pay attention to the effect of rolling gate, iron
walk through metal detectors, elevators and
cars on the detector.
3. Vibration effection
The installation ground should be flat and fixed, to prevent vibration. Especially when
there is unstable metal articles under the detector, the vibration will course
unnecessary alarm.

~ 4 ~
4. Electromagnetic Radiation and Electromagnetic Interference
The detector use bilateral transceiver technology, therefore, any electromagnetic
interference sources and electromagnetic radiation source is not allowed to close the
detector. The recommend minimum distance is 0.5m to 4 m, and actual distance will
depend on environment and sensitivity.
The electromagnetic interference sources
and electromagnetic radiation sources are
as follows:
Electrical Control Box, Radio Equipment,
Interphone, Electronic Computer And
Peripheral Equipment, Video Monitor, High Power Motor, Power Transformer, Ac
Power Lines, Thyristor Control Circuit (High Power Switching Power Supply, Inverter
Welder), Engine, Motor etc.
5. Tips for working in line
When installing the detectors in line, the distance between two walk through metal
detectors cannot be less than 50cm. Specific distance parameters according to the
actual environment and sensitivity level.
6. Can not install the detector in windy place
It would cause false alarm if the detector swing in the wind during working.

~ 5 ~
【PERFORMANCE AND FEATURES】
Multizones zones: 33 overlapping network detection zone, bilateral transmit
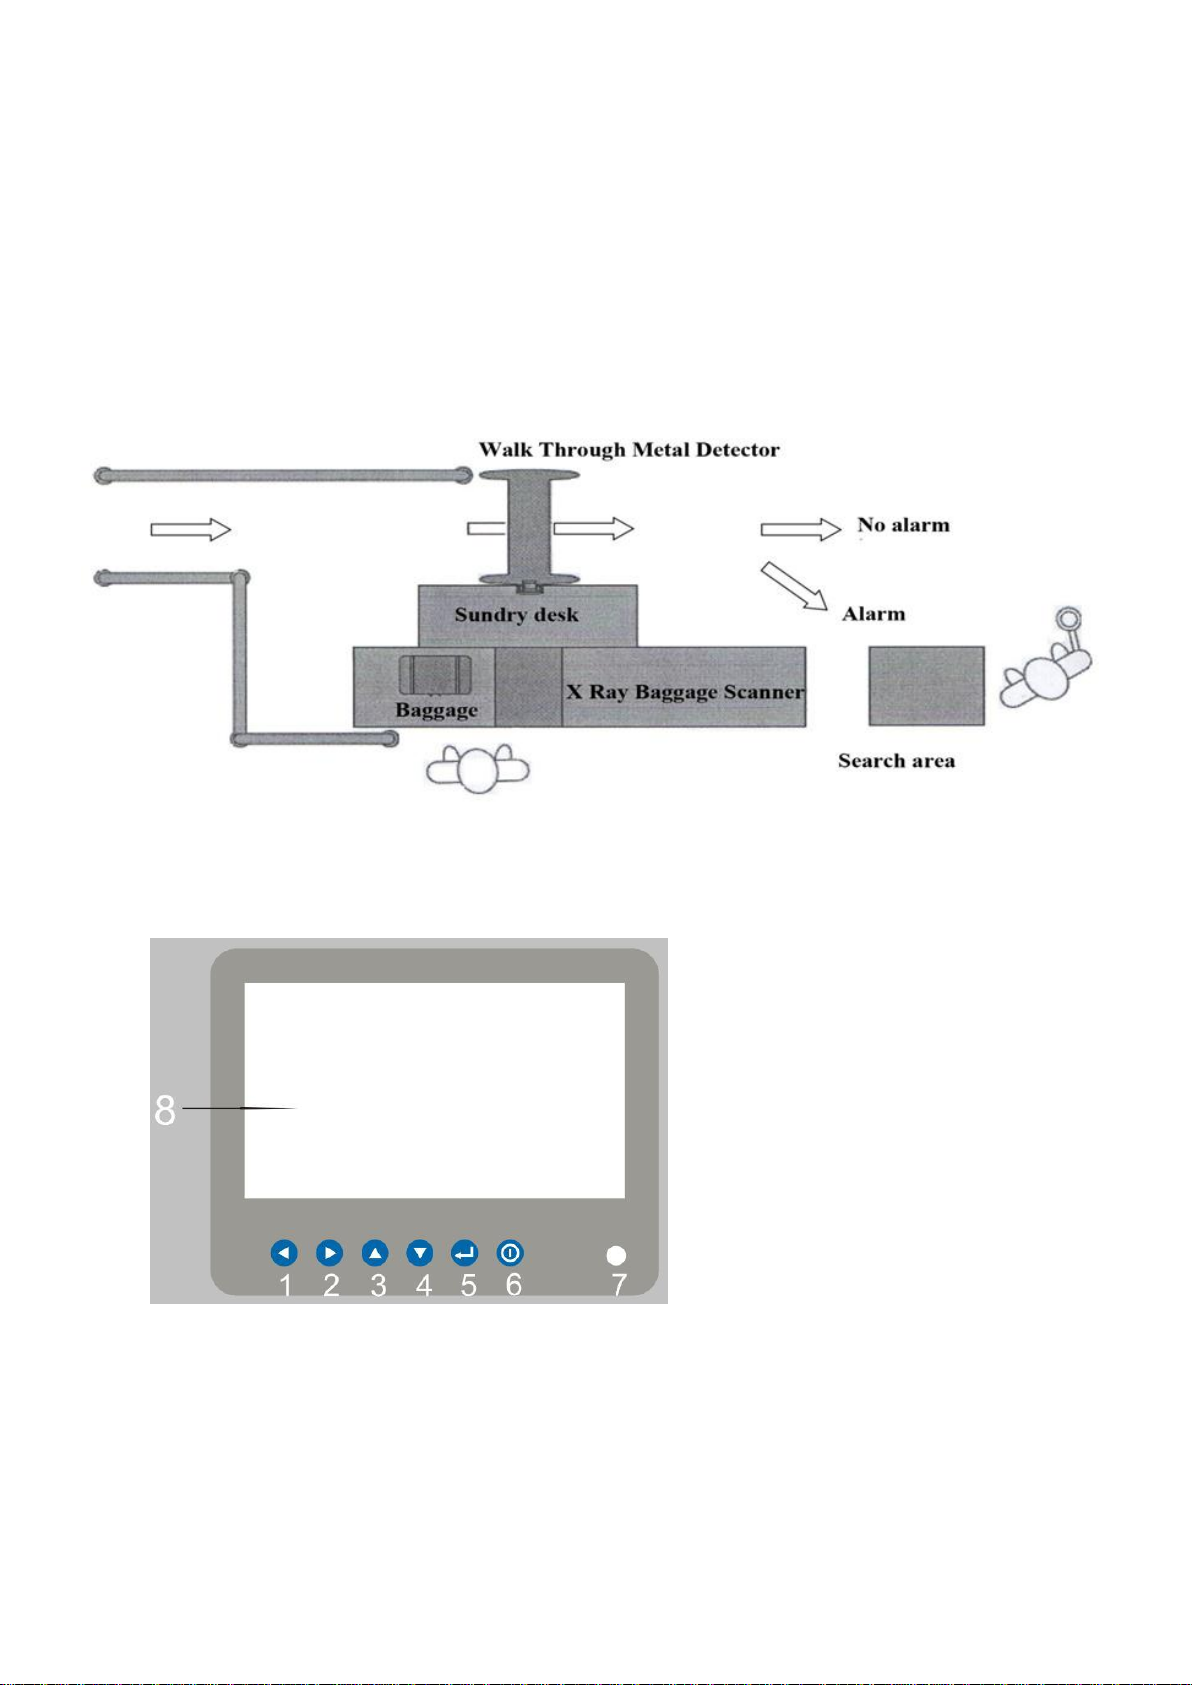
7 inch LCD screen display ,English Software ,easy to operate.
Sound & LED alarm: Two Sides LED indicator easily show where the metal is.
999 level Sensitivity Adjustable: each detection zone has 999 sensitivity
levels .Preset metal size, you can exclude the coins, keys, jewelry, belt buckle etc.
15 preset programs for security applications
DSP Technology: digital signal processing technology and excellent
anti-interference capability.
100 frequencies for option. To work with neighbouring gates at 40cm
Alarm volume range from level 1 to 9
Alarm tones: Change from 0 to 9 (10 different tones for choosing)
Detecting speed: up to 100 passenger/ min.
Anti-interference function, using advanced interactive transmitting and receiving
to avoid interference.
Password Protection: The sensitivity and programing parameters can only be
changed by the authorized person with correct password. It’s to avoid misoperation
Harmless to human body: harmless to heart pacemaker, pregnant women,
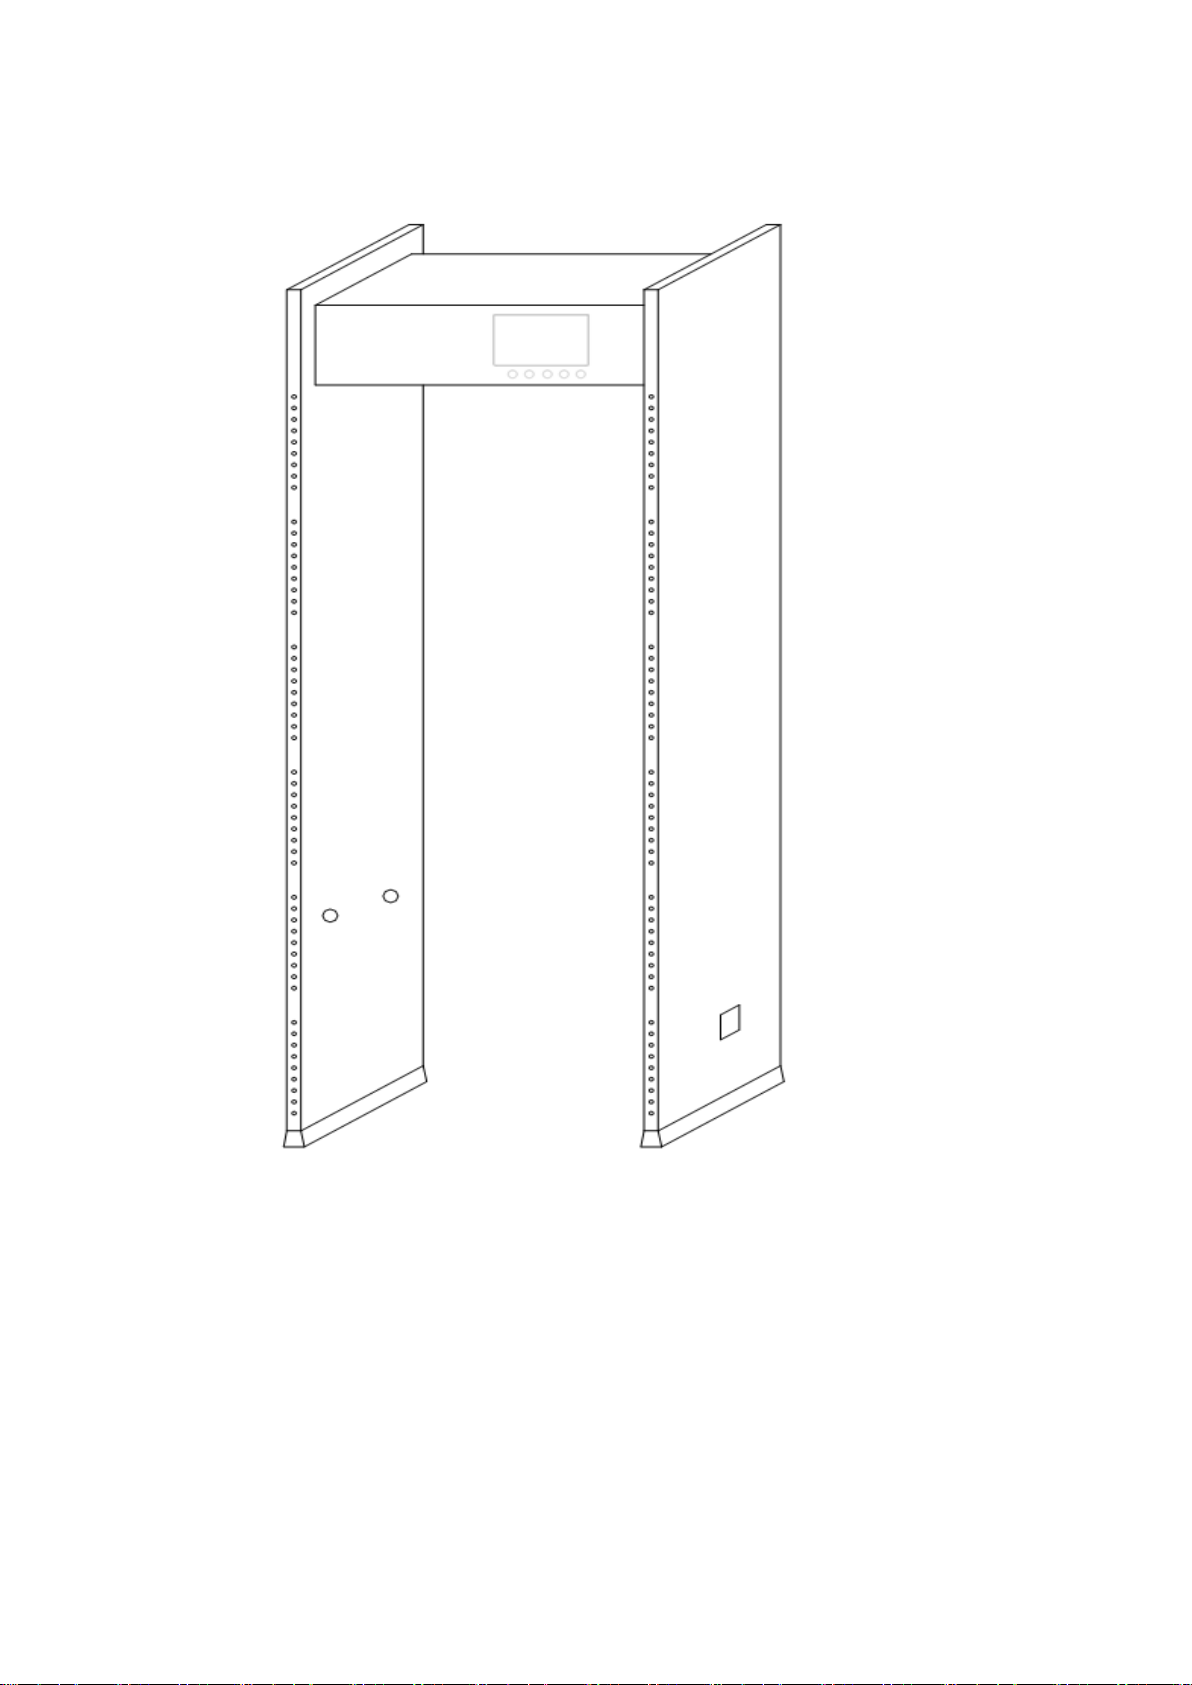
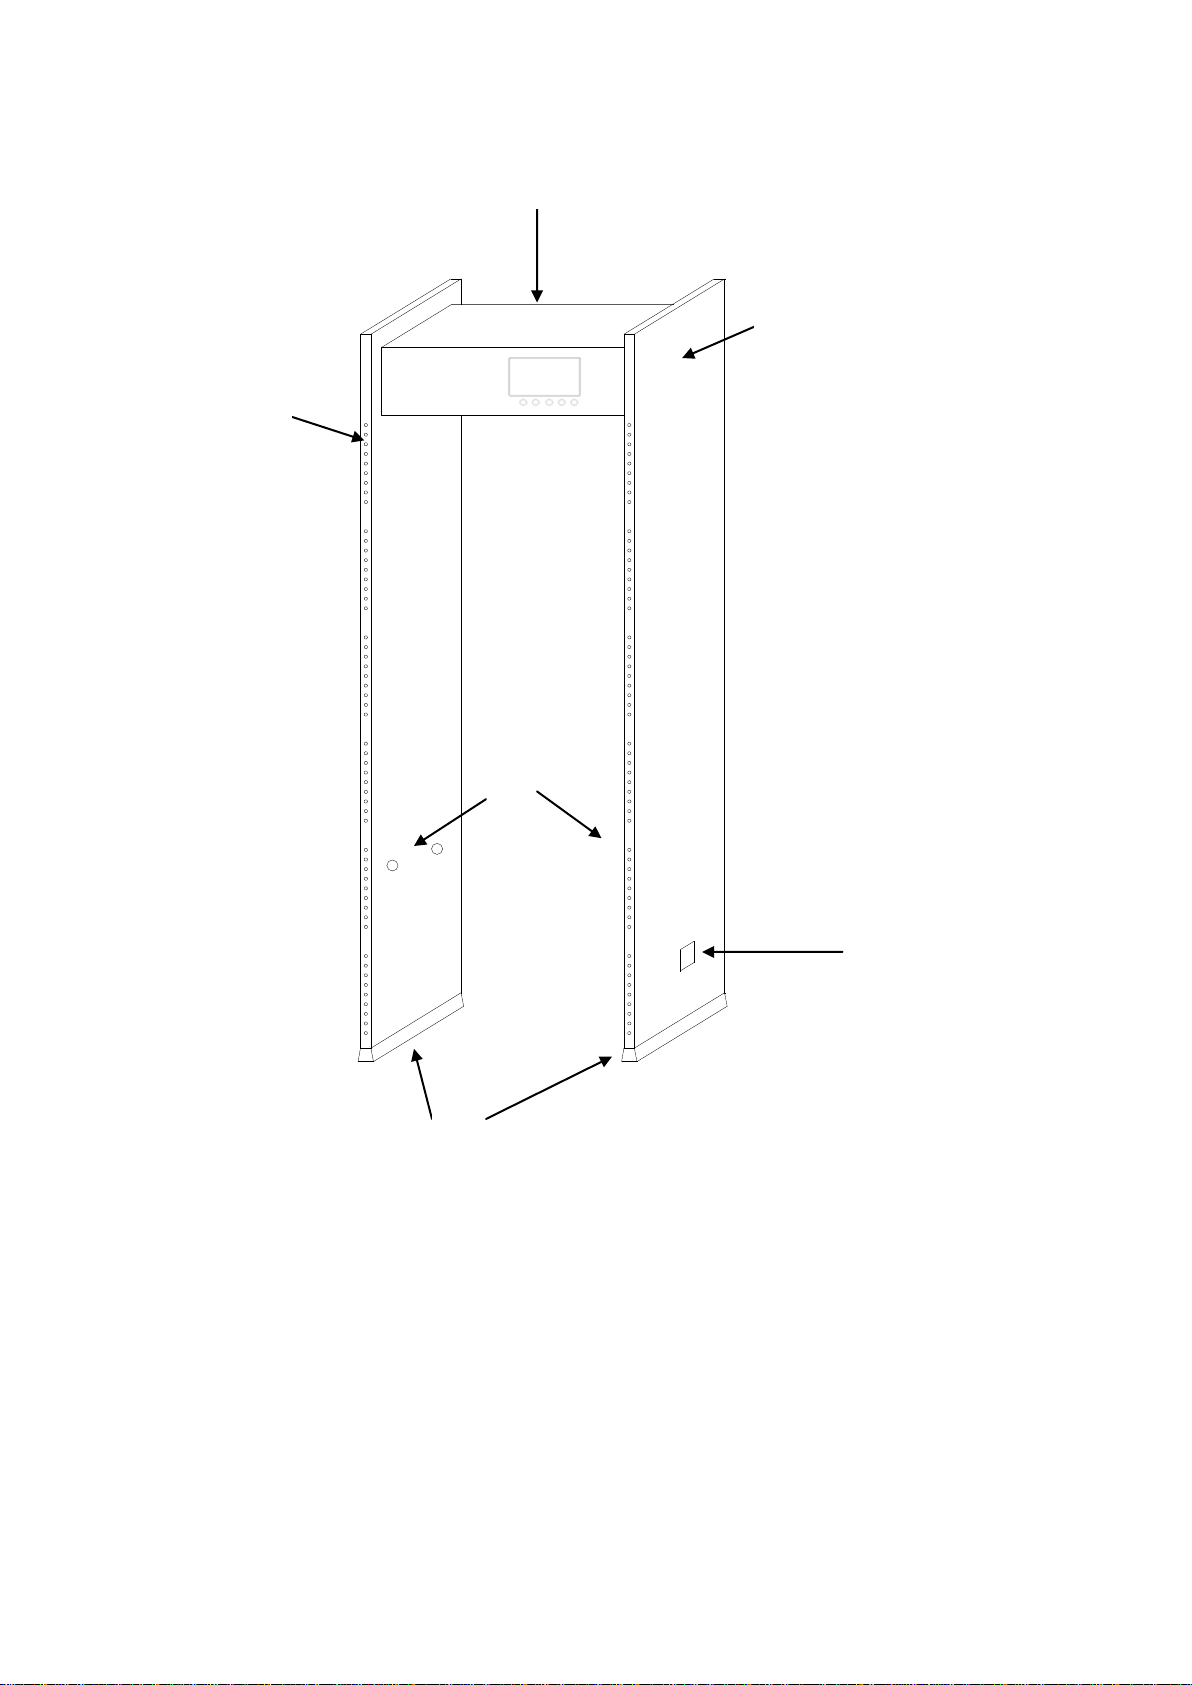
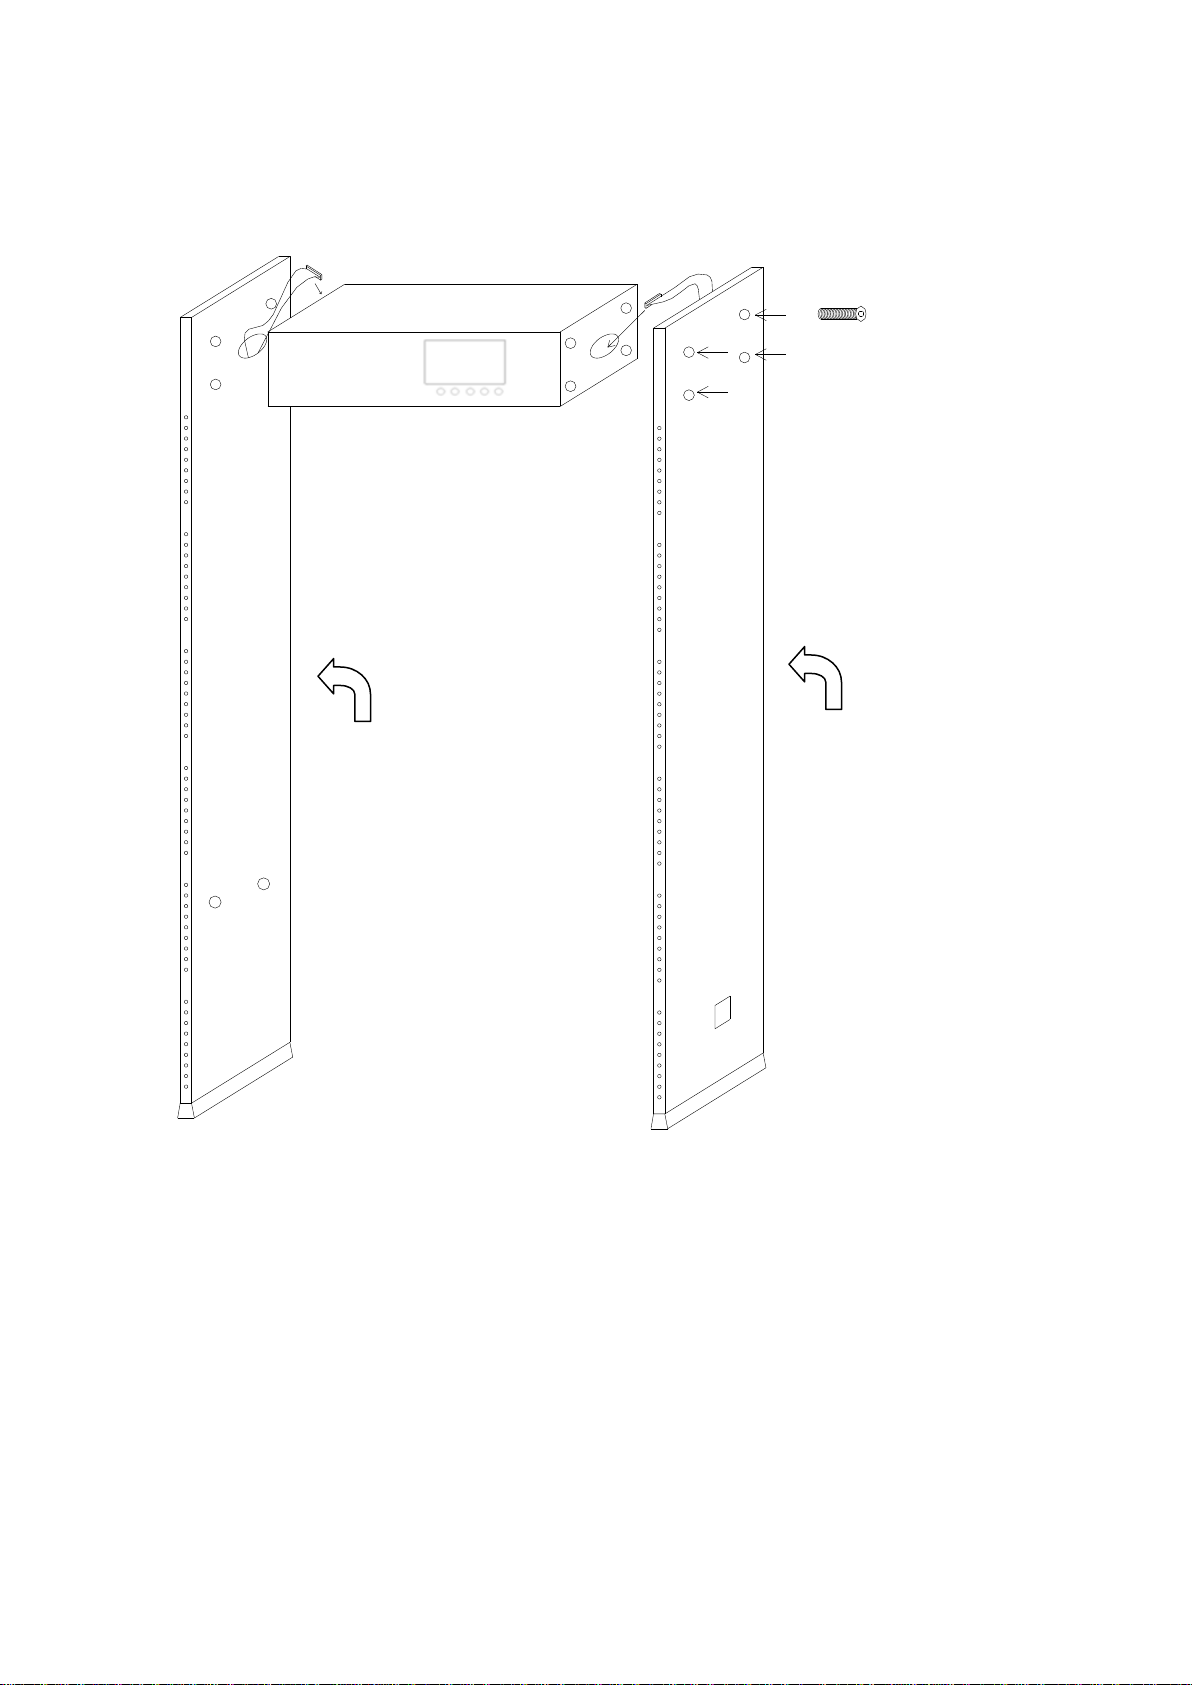
Easy to install: the system is integrated design, just 5 minutes to complete the
installation or disassemble.
Li-Battery backup for 4-8 hours for option.

~ 6 ~
【PARTS】
1. Main Control Unit 2. Side LED indicator
3. Side door frame panel 4. Infrared Sensor
5. Waterproof Foot Cover 6. Power supply socket
2
4
5
6
3
1

~ 7 ~
【INSTALLATION】
Left door panel Right door panel
1. Remove the package of control unit and door panel.
2. Put the control unit case and door panels as above picture shown, then connect the
left and right door panel with the control unit case by bolts and nuts. Tighening
screws.
3. Probe line of the left and right door panel tight inserted into the motherboard
corresponding socket respectively.

~ 8 ~
4. Install the screw on the control unit case cover.
5. Lift the walk through metal detector to the vertical position and move to the
assigned position.
6. Plug power cable
【CONTROL PANEL】
There are six buttons on the operation panel.
1. LEFT: Turn left
2. RIGHT: Turn right

~ 9 ~
3. UP: Turn upward and number increase
4. DOWN: Turn downward and number decrease
5. ENTER: Confirm
6. POWER: Turn on/off
7. Infrared Remote Control
8. 7 inch color LCD screen
Remote control:
: Turn ON/OFF, Can turn on/off detector quickly
: Back to normal working status (PASS CTN, ALARM CTN)
: Confirm / Enter / Save
: menu back
: Turn upward and number increase
: Turn downward and number decrease
: Turn left

~ 10 ~
: Turn Right
Numbers Key 0-9 :Enter the numbers to change the parameters directly
【NORMAL WORKING STATUS】
1. Into the self checking interface
After powered on, the walk through metal detector automatically enter into self
checking interface.
2. LCD screen normal working status as below:

~ 11 ~
The green bars below indicate the interference strength.
Press the Enter key to enter into password interface, the up key increase the number,
the down key reduce the number, right key let the cursor turn right;
Initial password: 000000
3. Press the Enter key to enter the menu interface, the up,down, left and right keys to
select the menu item. Press Enter key to open the submenu, press the power button
to exit the menu.

~ 12 ~
4. Sensitivity: According to the requirements, use the left and right keys to select the
sensitivity of Grade and Whole.
Press Enter key to enter the submenu. Press power key to return to the previous
menu.
5. Grade: Into the Zone setting default selected 1-6 zones self-learning mode, the up
and down keys to select the location to enter the single-zone self-learning mode.
If for manual adjusting parameters, press the left or right button to select the
current areadigit to ones digit, tens digit, hundreds digit.
The up and down key to adjust the digit 0-9, the sensitivity 0-999, total 1000
sensitivity can be adjusted, left and right adjust to ten digit or hundred digit. Press
Enter key to save the data and enter the next area. Press Power key to return to the
self-learning mode.

~ 13 ~
6. Whole: The overall sensitivity setting, left and right keys to select the High or Low
sensitivity. Press Enter key to save and return to the previous menu.
7. Frequency: According to the site requirements on the walk through metal detector
operating frequency required, use the left and right key to select the operating
frequency of automatic adjusting or manually adjust to set the working frequency
band. Press Enter key to enter the submenu. Press power key to return to the
previous menu.

~ 14 ~
8. Automatic: Working frequency left and right keys to select the switch, Press Enter
key to save the changes and return to the previous menu.
Note: After the Working frequency automatically opened, the walk though metal
detector will automatically check the magnetic field around and choose the best
frequency to adapt to the current environment every time,so the boot time will be
extended. After finished adjusted, can turn off automatic opening working frequency
function.

~ 15 ~
9. Manually: The Working frequency manually set 0-99. Total 100 available bands.
Left and right keys to increased as 10 digit, the up and down keys increased as 1
digit, the Enter key to save and return to the previous menu.
10. Alarm Set: The Ring setting, LED setting, Zone setting as below.
Left, right key to select the item. Press Enter key to enter the submenu, press power
key to return to the previous menu.

~ 16 ~
11. Ring setting: you can check the alarm tones (1-9 adjustable), alarm volume (0-9
adjustable), alarm time lasts (0-9 adjustable), key volume (0-9 adjustable).
Left and right key to select the item, up and down key to adjust parameters. Press
Enter key to save the data and return to the previous menu.
12. LED setting: LED lights up time (0-9 adjustable), up and down key to adjust the
numbers. Press Enter key to save and return to the previous menu.
13. Zone setting: can be divided into 6/12/18 zones and 33 zones. Left, right key to
select the item. Press Enter key to save and return to the previous menu.

~ 17 ~
14. Date/ Time: The walk through metal detector date/ time can be set. Up and down
key to adjust the date and time parameters, left and right key to increase/reduce the
numbers of Date. Press Enter key to save and return to the previous menu.
15. Language: Set the language. Left, Right key to select the language.
Note: Currently only English language option. If need customize other languages,
pls contact us.

~ 18 ~
16. Password Set: Up and down key to adjust the numbers, left and right key to
change the position. Press Enter key to confirm the password into the next item.
After changed the password successfully, return to the previous menu, press the
Power button directly return to the previous menu.
17. Alarm query: Up and down key to adjust date, month, year value, left and right
keys to select the adjusting items. 0 shows the alarm record of that date.
Press Enter key to enter the alarm recording interface, the data display content for
the alarm location strength, and LED lights.
18. More: Brightness, Signal out, situation, Device Info.
Left, right key to select the item, press Enter key to enter the submenu, press Power

~ 19 ~
button to return to the previous menu.
19. Brightness: Screen brightness setting. Left and right to adjust the brightness. Press
Enter key to save and return to the previous menu.
20. Signal out: left and right key to select the item. Press Enter key to save and return
to the previous menu.

~ 20 ~
21. Situation: 15 different options.
Up, Down, Left, Right Select the item. Press Enter key to save and return to the
previous menu.
22. Device Info: View the software version and ID, press the Enter key or the power
button to return to the previous menu.
Table of contents