Unique Perspectives Point-It! Pro User manual

Point-It! Pro Quick Guide November 2021
Unique Perspectives Ltd.
www.housemate.ie ● info@housemate.ie
Ballyline ● Callan ● Co. Kilkenny ● Ireland
Phone: +353 56 7725913
Page 1 of 12
Quick Guide to the Bluetooth Point-It Pro!
This quick guide describes how to use the Bluetooth version of the Point-It! Pro joystick and how to
pair your Bluetooth Point-It! with an Android, MAC, PC, iPAD or iPhone.
Note: The Bluetooth Point-It! can be used to operate the mouse pointer on Android devices, iOS devices
running 13 or higher, Windows & MAC computers.

Point-It! Pro Quick Guide November 2021
Unique Perspectives Ltd.
www.housemate.ie ● info@housemate.ie
Ballyline ● Callan ● Co. Kilkenny ● Ireland
Phone: +353 56 7725913
Page 2 of 12
Getting Started
The Point-It! Pro is a standard Bluetooth HID (human interface device) supporting the Bluetooth
mouse profile. It can be paired with up to 8 devices and includes special programmable features to
enable a user to change mouse speeds, perform drag operations, independently switch between
devices and other operations.
Connections & Mounting
Status LED
Fast Flashing Blue = Not paired.
Slow flashing blue = Paired, but
not connected.
Steady Blue = Connected.
Orange = Charging.
Power on &
Left click (if a switch is
connected into the Left
switch input this button
is disabled).
Right
Switch
Left
Switch
USB C charging input
Program button
2 x M4 mounting
holes
Proportional non-
contacting joystick to
move the mouse pointer.

Point-It! Pro Quick Guide November 2021
Unique Perspectives Ltd.
www.housemate.ie ● info@housemate.ie
Ballyline ● Callan ● Co. Kilkenny ● Ireland
Phone: +353 56 7725913
Page 3 of 12
Pairing with an Android/MAC or PC
Step 1: Search for Devices
On an Android device go to SettingsBluetooth and then choose Scan for devices.
On a MAC go to System Preferences->Bluetooth. Turn Bluetooth on. The MAC will
automatically start scanning for nearby devices.
On a PC go to Start->Settings->Devices->Bluetooth. Turn Bluetooth on and then click
Add a Device->Bluetooth.
Step 2: Turn on Point-It!
Turn on the Point-It! by pressing the top button or a switch connected to the left switch input. The
unit will beep and the Blue LED will flash rapidly indicating that it is not paired with any devices.
After a moment Point-It! Pro should appear in the list of Bluetooth devices. When it does click on
it to start the pairing process.
Step 3: Confirm connection request
After a moment a Bluetooth connection request dialog may appear. If it does choose Yes.
Your device should then connect to Point-It! and if successful will appear as connected in the list of
Bluetooth devices. You should also hear Point-It! emit the connect sound, a low pitched beep,
followed by a high pitched beep and the Blue LED should stop flashing. You should now be able to
move the mouse pointer and make a left click.
Note: If the joystick is not moved for 5 minutes the Point-It! will disconnect and switch off to save
battery. When you turn it on again the Blue LED will flash slowly to indicate that it is paired with a
device and attempting to reconnect to it. A failed connection is indicated by a low pitched beep. The
Point-It! will continue to attempt to reconnect for 1 minute. If it does not reconnect, check your
device and ensure that Bluetooth is turned on.
Pairing with an iOS
From iOS 13 you can use accessibility features to control a mouse pointer on an iPAD or iPhone using
your Point-It!
Step 1: Search for Devices
Go to SettingsAccessibilityTouchAssitiveTouchDevicesBluetooth
Devices.

Point-It! Pro Quick Guide November 2021
Unique Perspectives Ltd.
www.housemate.ie ● info@housemate.ie
Ballyline ● Callan ● Co. Kilkenny ● Ireland
Phone: +353 56 7725913
Page 4 of 12
Step 2: Turn on & pair Point-It! Pro
Turn on the Point-It! by pressing any left button. It should beep. After a moment Point-It! Pro
should appear in the list of Bluetooth devices. When it does click on it to start the pairing process.
After a moment it should appear as Connected.

Point-It! Pro Quick Guide November 2021
Unique Perspectives Ltd.
www.housemate.ie ● info@housemate.ie
Ballyline ● Callan ● Co. Kilkenny ● Ireland
Phone: +353 56 7725913
Page 5 of 12
Step 3: Turn on Assistive Touch
Return to SettingsAccessibilityTouchAssitiveTouch and turn on Assistive Touch.
Now when you move your joystick you should see the mouse pointer (a circle) move on the screen.

Point-It! Pro Quick Guide November 2021
Unique Perspectives Ltd.
www.housemate.ie ● info@housemate.ie
Ballyline ● Callan ● Co. Kilkenny ● Ireland
Phone: +353 56 7725913
Page 6 of 12
Operation with Android/iOS/PC/Mac (HID Mouse Profile)
Joystick Modes
In Normal mode use the joystick to move the mouse pointer. Use the top button or a switch
connected to the left input to make a Left click. Use a switch connected to the right input to perform
a Right click, change Mouse Speed or switch between paired devices.
In Joystick+Switch mode use the joystick to move the mouse pointer as normal. However, to
perform a mouse action, press the top button or a switch connected to the left input. Then, deflect
the joystick depending on what action you require according to the diagram below.
In Joystick Flick mode, flick the joystick briefly in the direction according to what action you
require. To perform a genuine mouse move keep the joystick deflected in the desired direction until
it starts moving.
How to select the Joystick Mode, the function of the Right switch and other options are explained in
the next section.
Ball knob version of the
Point-It! Pro with a
twister switch for
control of the left click.
Double Click or
Middle Click.
Left Click Right Click, Mouse Speed,
or Change Device (Smart
Mode 2 only).
Drag Lock (after you have finished
dragging flick again to release the drag).

Point-It! Pro Quick Guide November 2021
Unique Perspectives Ltd.
www.housemate.ie ● info@housemate.ie
Ballyline ● Callan ● Co. Kilkenny ● Ireland
Phone: +353 56 7725913
Page 7 of 12
Programmable Settings
Step 1: Choose Program mode
Make sure the Point-It! is switched on and then press and hold the program button, located through
a hole in the bottom of the joystick. An Allen key is provided to enable you to do this. When you first
press the program button you will hear a low-pitched beep. Keep holding the button until you hear a
mid-pitched beep and then release the button. You are now in program mode.
Step 2: Select the Joystick mode
The joystick can be set to Normal, Joystick+Switch or Joystick Flick. In Program mode,
deflecting the joystick selects the joystick mode. Deflect the joystick left to select Normal (1 beep).
Deflect the joystick backwards to select Joystick+Switch(2 beeps). Deflect the joystick to the right
to select Joystick Flick(3 beeps).
Step 3: Select the Joystick forward function.
When Joystick+Switch or Joystick Flick mode is selected the forward deflection can be
programmed to be either a double click or a centre click. Deflect the joystick forward to toggle
between the two options. 1 beep indicates Double Click, 2 beeps indicates Centre Click. On
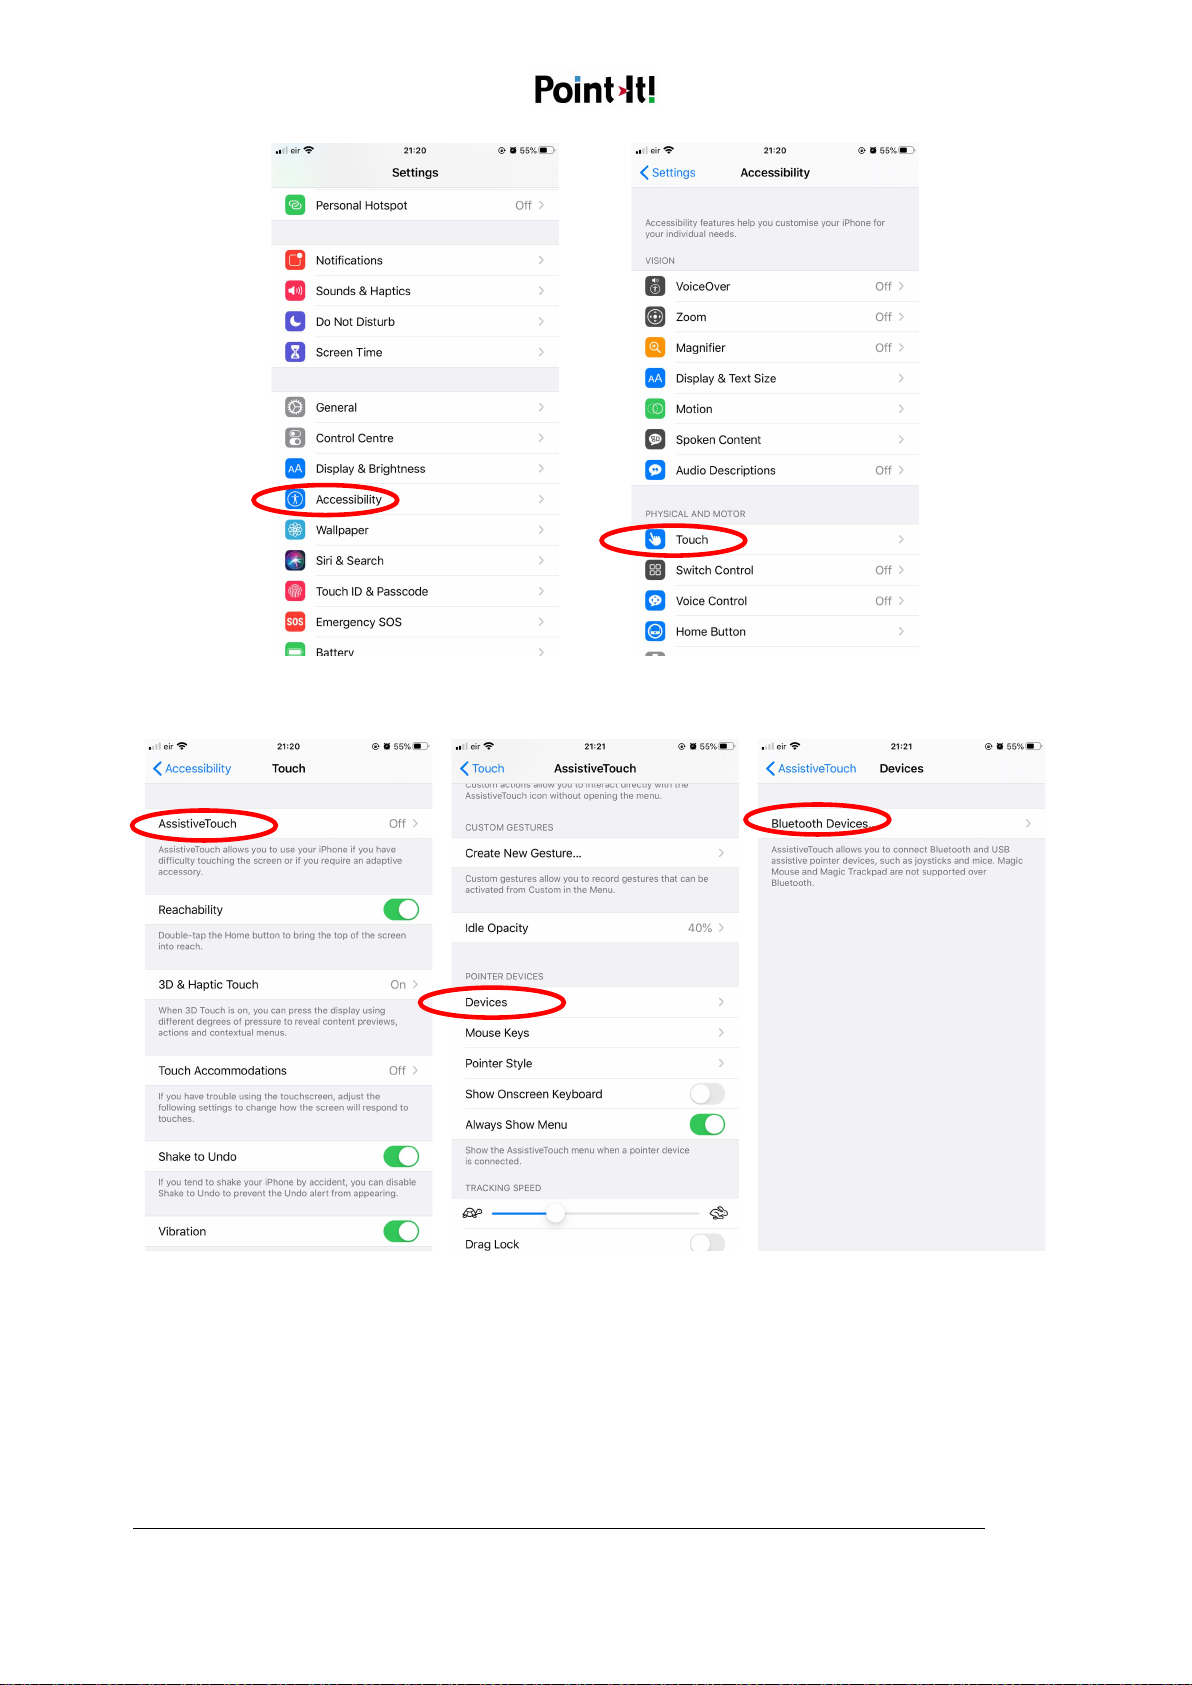
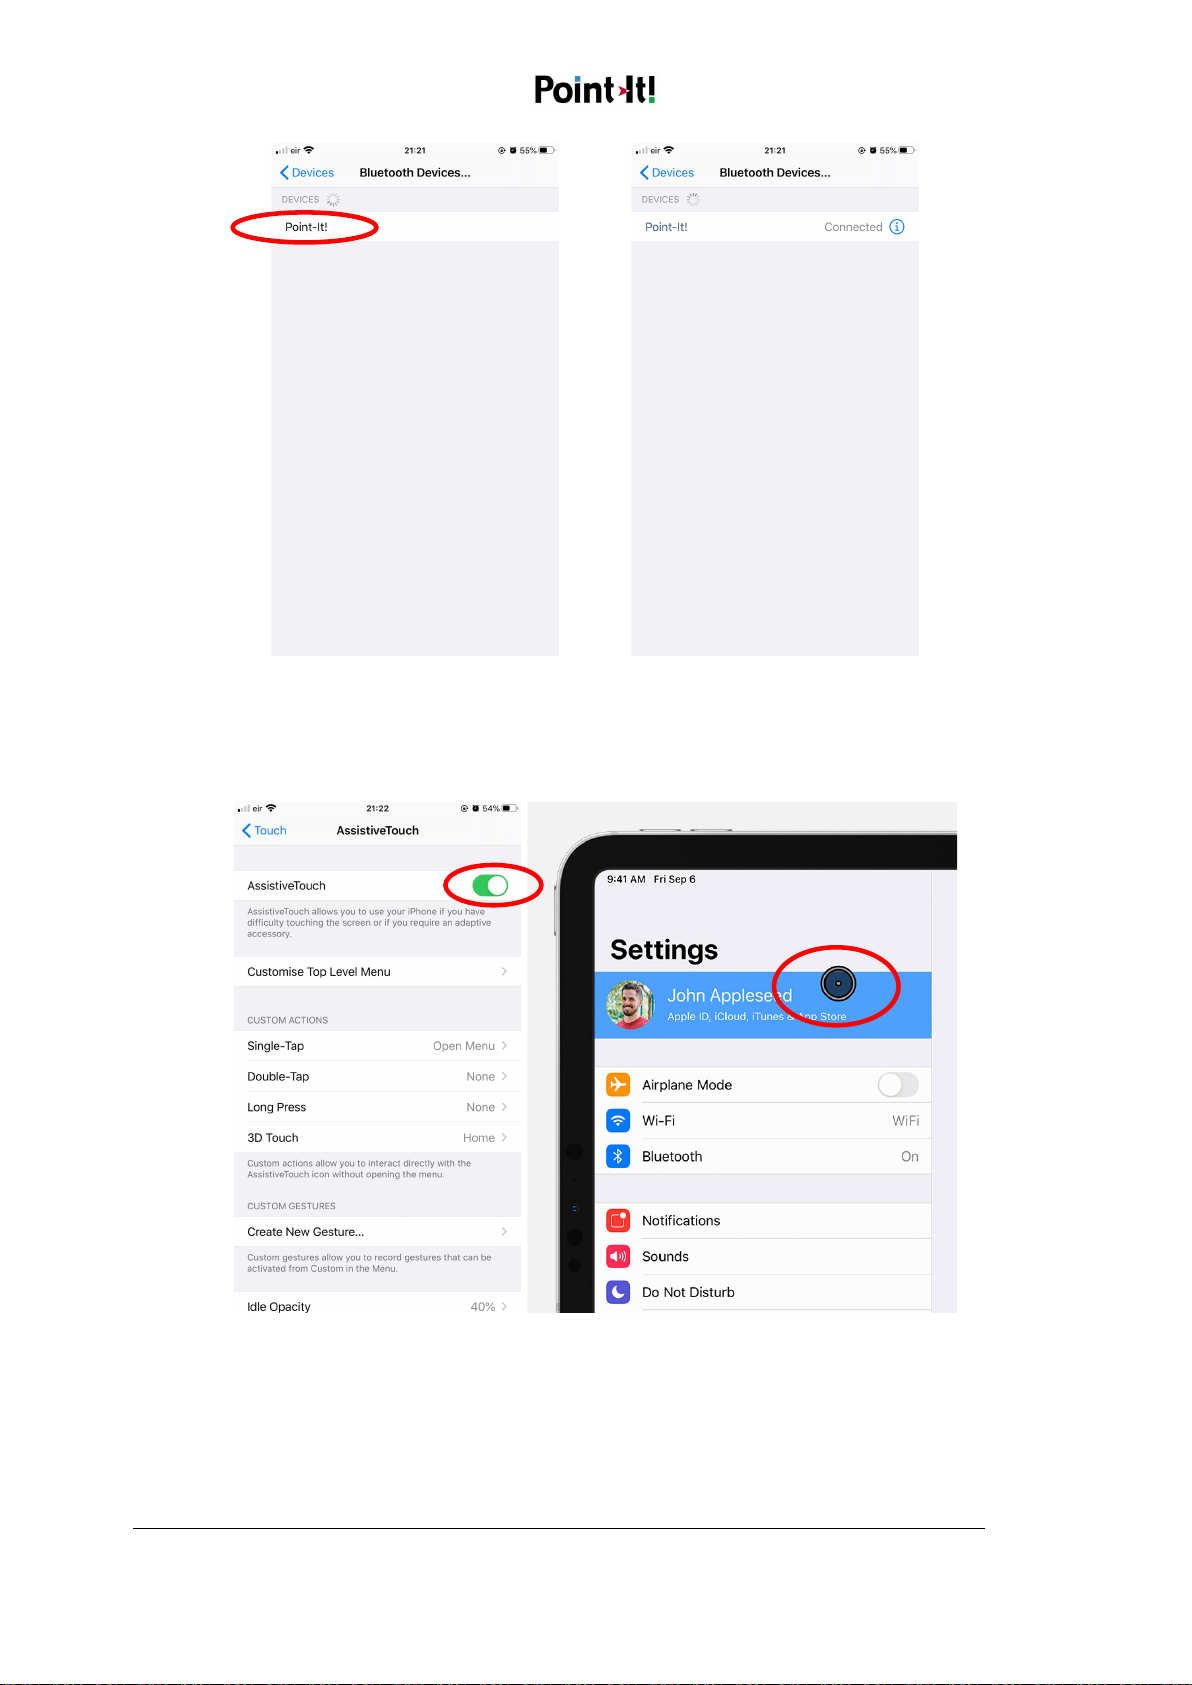
iOS devices you can program the actions of the 3 mouse buttons (left/centre/right) at
SettingsAccessibilityTouchAssitiveTouchDevicesPoint-It! Pro.
Step 4: Select the Drag lock time.
The drag lock time is the length of time you must hold the top button (or left switch) before the
drag lock is enabled. In program mode pressing the top button or left switch input selects the drag
lock time. Press the button to hear what the drag lock time is already set to. 1 beep = 2 second, 2
beeps = 3½ seconds, 3 beeps = 5 seconds, 4 beeps = disabled. If you want to change the drag lock
time press and hold the button, or switch, until you hear a second set of beeps indicating the new
drag lock time.
Step 5: Select the Right Switch function.
The Right Switch input can be programmed to one of four functions: Right Mouse Click,
Mouse Speed, Smart Mode 1 and Smart Mode 2. Press a switch connected to the right switch
input to hear what the Right Switch is programmed to do. 1 beep = Normal (Right mouse click), 2
beeps = Change Mouse Speed, 3 beeps = Smart Mode 1, 4 beeps = Smart Mode 2. If you want to
change the right switch function press and hold the switch, until you hear a second set of beeps
indicating the new function. Smart Mode is further explained in the next section.
Step 6: Exit program mode
To exit program mode press the program button again. The Point-It! will emit a long low beep as the
changes are saved.
Note: In program mode Point-It! will automatically turn off without saving any changes if there is no
activity for 5 minutes.

Point-It! Pro Quick Guide November 2021
Unique Perspectives Ltd.
www.housemate.ie ● info@housemate.ie
Ballyline ● Callan ● Co. Kilkenny ● Ireland
Phone: +353 56 7725913
Page 8 of 12
Smart Modes
Smart Mode enables the user to independently switch between devices. However, before you can
use Smart Mode you must pair the Point-It! with another device. To pair with another device you
must manually turn off Bluetooth on the first device before the Point-It! Pro becomes visible on the
second device. Once paired you can turn the Bluetooth back on the first device and use the Right
switch to toggle between them. Before Smart Mode will function correctly Point-It! must be allowed
to turn off after any additional pairing, either by waiting for the timeout (5 minutes), or by
momentarily turning off the Bluetooth on the device it is connected to.
Smart Mode 1
Press
the Right switch to d
isconnect from the current device and connect to
the next device in the list of paired devices. The Point-It! will beep 1 or more
times depending on which device in the list it is going to connect to. Once
for the first device, twice for the second device, and so on, up to a maximum
of 8 devices. When the Point-It! times out and turns off it will always attempt
to connect to the last device it was connected to when it is turned on again.
Smart Mode 2
This version of Smart Mode is spe
cific to the
Joystick+Switch
and
Joystick Flick modes. In this mode it is the right deflection of the joystick
that changes device, rather than the connected switch. In this case a switch
connected to the Right input sets the mouse speed.
Resetting the Point-It! Pro
You can reset the Point-It! to default settings and unpair all devices using the program button.
Default Settings
Joystick Mode
Normal
Right Switch
Right mouse click
Drag lock time
5 seconds
To reset the Point-It! Pro
Make sure the Point-It! is switched on and then press and hold the program button, located through
a hole in the bottom of the joystick. An Allen key is provided to enable you to do this. When you first
press the program button you will hear a low-pitched beep. After a moment you will hear a mid-
pitched beep. Keep holding the button until you hear a third high-pitched beep. At this point release
the program button. The Point-It! will make a long high-pitched beep as it resets and then turns off.
All settings will have been restored to the defaults listed above and all previous pairings forgotten.
When you turn on the Point-It! again the blue LED should flash rapidly indicating that it is not paired
with any devices.

Point-It! Pro Quick Guide November 2021
Unique Perspectives Ltd.
www.housemate.ie ● info@housemate.ie
Ballyline ● Callan ● Co. Kilkenny ● Ireland
Phone: +353 56 7725913
Page 9 of 12
Dwell Click Android App
Dwell Click is a companion app to the Point-It! and can be used to control an android device
without having to press a button. A highly visible cross-hairs is displayed on the screen and when
you “dwell” at a particular location a click is automatically generated. Download Dwell Click from the
Google Play Store.
Charging the Point-It! Pro
Connect the Point-It! to the charger provided or to a USB socket on your computer using the USB C
cable provided. The LED will illuminate orange when the battery is on charge.
The Point-It! Pro contains a 350mAh Li-Polymer battery. Under continuous operation from a full
charge the battery will last 6 hours. However, because the Point-It! power-saves when not in use,
normal battery life will be considerably longer.
Note: The USB C socket on the Point-It! Pro is for charging purposes only and will not be recognised
as a mouse when you plug it into a computer’s USB port. A USB version of the Point-It! Pro is
available if you do not wish to use Bluetooth. Contact your supplier for further details.

Point-It! Pro Quick Guide November 2021
Unique Perspectives Ltd.
www.housemate.ie ● info@housemate.ie
Ballyline ● Callan ● Co. Kilkenny ● Ireland
Phone: +353 56 7725913
Page 10 of 12
Mounting
If necessary, the Point-It! can be mounted with a suitable mounting kit using M4 screws. The choice
and construction of the mount will depend upon the user’s needs. Suitable mounting plates and
brackets are available from www.rehadapt.com.
Rehadapt L3D GA mounting plate
Rehadapt TC L3D mounting system
Warning !!
For safe installation, select a screw length between 6mm and 10mm to attach the
Point-It! to the mounting plate.
Twister Switches
The Point-It! can be supplied with Mo-Vis “Twister” switches (www.mo-vis.com) and a rotatable
mounting ring as shown below. Together these accessories enable you to position a switch in almost
any position. Loosen the mounting ring with the Allen key provided to rotate the ring about the body
of the Point-It! or to raise, lower or rotate the switch.

Point-It! Pro Quick Guide November 2021
Unique Perspectives Ltd.
www.housemate.ie ● info@housemate.ie
Ballyline ● Callan ● Co. Kilkenny ● Ireland
Phone: +353 56 7725913
Page 11 of 12
Maintenance
The Point-It ! should be regularly checked for integrity. Loose, damaged or corroded connectors or
terminals, or damaged cabling should be reported to your Service Centre and be replaced
immediately.
The USB charging cable of Point-It ! should be regularly checked for integrity.
The Lithium battery, if fitted, should be regularly checked for corrosion or leakage. Occasionally
remove the cover and check for leakages, corrosion and evidence of over-heating.
If you are not using your Point-It! for an extended period disconnect the battery.
All switches connected to the Point-It ! should be regularly tested to ensure that they function
correctly.
The Point-It ! should be kept free of dust, dirt and liquids. If necessary wipe with a cloth dampened
with warm water or alcohol. Do not use solvents or abrasive cleaners.
Where any doubt exists, consult your nearest Service Centre or Agent.
There are no user-serviceable parts within the Point-It !. Do not attempt to open the case except to
inspect or disconnect the battery.
In accordance with the requirements of CE marking of this device and the Company’s policy, it is
requested that re-occurring faults or defects be reported back to Unique Perspectives Ltd.
Safety & Misuse
Do not install, maintain or operate the Point-It ! without reading, understanding and following the
proper instructions and manuals, otherwise injury or damage may result.
Do not operate the Point-It ! if it behaves erratically, or shows abnormal response, heating, smoke or
arcing. Turn the unit off, disconnect all cables, disconnect the battery, and consult your service
agent.
Ensure the Point-It ! is turned off when not in use and never leave the Point-It ! and associated PC or
MAC switched on or plugged into the mains unattended or overnight.
No connector pins should be touched, as contamination or damage due to electrostatic discharge
may result.
Point-It is designed to resist water penetration. However, if a spillage occurs Turn the unit off,
disconnect all cables, and consult your service agent. Once turned off any spillage over the Point-It !
should be wiped dry without delay. The Point-It ! may not be used outdoors.

Point-It! Pro Quick Guide November 2021
Unique Perspectives Ltd.
www.housemate.ie ● info@housemate.ie
Ballyline ● Callan ● Co. Kilkenny ● Ireland
Phone: +353 56 7725913
Page 12 of 12
Most electronic equipment is influenced by Radio Frequency Interference (RFI). Caution should be
exercised with regard to the use of portable communications equipment in the area around such
equipment. While the manufacturer has made every effort to ensure that RFI does not cause
problems, very strong signals could still cause a problem.
Report any malfunctions immediately to your Service Agent.
Sales & Service Information
For Sales and Service advice, or in case of any difficulty, please contact:
Unique Perspectives Ltd.
Ballyclovan
Callan
Kilkenny
R95D9E8
Ireland
Telephone:
WEB:
EMAIL:
+353 56 7725913
www.housemate.ie
NOTE:
The Point
-
It! should be clearly label
l
ed with the manufacturer’s service agent’s
contact
information.
CE Marking
The Point-It! Pro is marketed as a technical aid for people with disabilities and satisfies the
requirements of Medical Devices Regulation MDR 2017/745.
Point-It! is classified as a Class 1 medical device.
Table of contents
Other Unique Perspectives Medical Equipment manuals