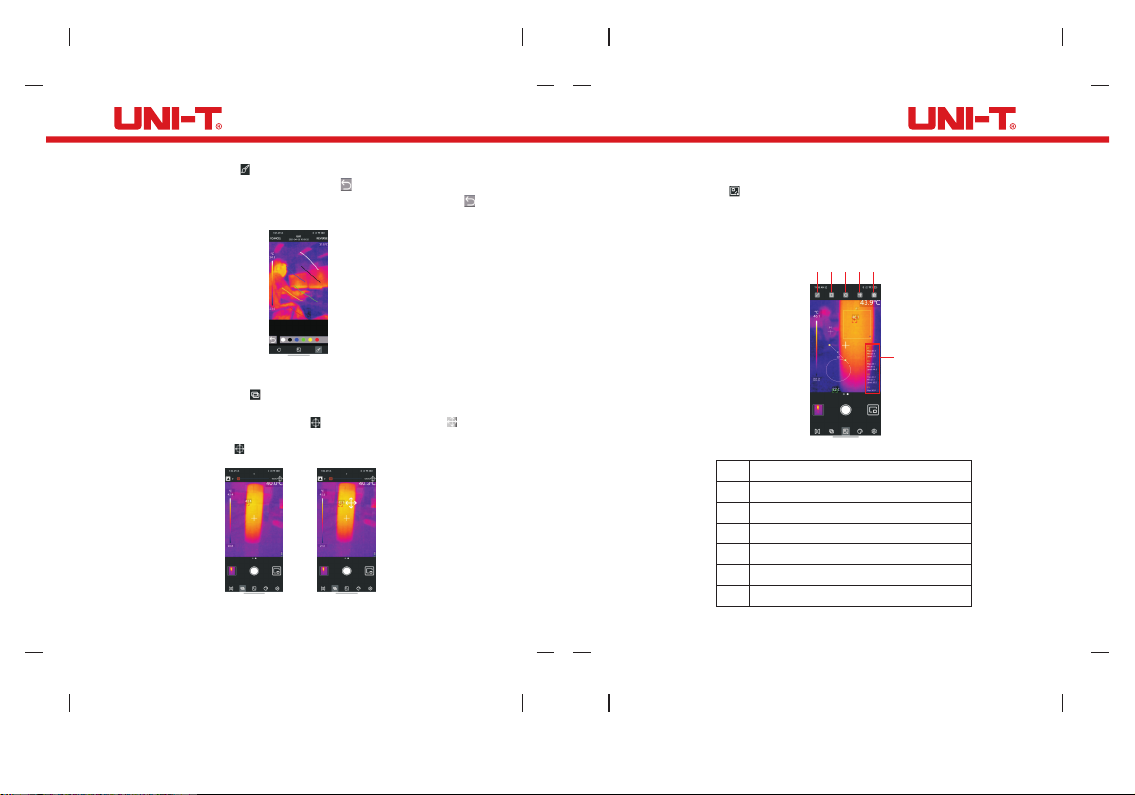
Unit UTi120Mobile User manual

Thermal Imager for Smart Phone
UT i120Mobile
P/N:110401110192X

2
Thank you for purchasing this brand new UTi120Mobile Smart Phone
Thermal Camera. In order to use this product safely and correctly,
please read this manual thoroughly, especially the safety notes.
After reading this manual, it is recommended to keep the manual at
an easily accessible place, preferably close to the device, for future
reference.
Uni-Trend guarantees that the product is free from any defect in material
and workmanship within one year from the purchase date. This warranty
does not apply to damages caused by accident, negligence, misuse,
modification, contamination or improper handling. The dealer shall not
be entitled to give any other warranty on behalf of Uni-Trend. If you
need warranty service within the warranty period, please contact your
seller directly.
Uni-Trend will not be responsible for any special, indirect, incidental
or subsequent damage or loss caused by using this device.
Preface
Limited Warranty and Liability
UT i120Mobile User Manual

3 4
120×90
≤25Hz
8-14μm
17 mμ
<60mK
50° H ×38° V( ) ( )
Focus-free
Central point/highest temperature/
lowest temperature
-20°C~400°C
Temperature>-10 ±2% or ±2
(whichever is greater,
ambient temperature: 25°C)
°C, °C
Celsius Fahrenheit °F(°C), ( )
0.1°C
0.01-1.0 adjustable( )
Iron Red Rainbow Gray Scale Red Hot
Black White, Lava, High-Contrast Rainbow
, , , ,
Point line rectangle circle
(can add up to 6 figures)
, , ,
IR resolution
Output frame rate
Response wave band
Pixel size
NETD
Field of view (FOV)
Focusing mode
Measurement
functions
Measurement range
Accuracy
Unit
Measurement
resolution
Emissivity
Palette
Analysis objects
Table of Contents 1. Specifications
UT i120Mobile User Manual UT i120Mobile User Manual

5 6
Simultaneous display of mobile phone
camera image and infrared image
Real-time tracking of the highest/lowest
temperature in the thermal image
The temperature is customizable.
Saved photos can be edited.
Video editing is not supported.
USB_UVC Type-C( )
0+45~°C
-20 +60~°C
10%85%non-condensing~,
2000m
CE RoHS FCC, ,
2m
Take photos/videos
PiP
(Picture-in-Picture)
High/low temperature
tracking
High/low
temperature alarm
Photo editing
Image data interface
Operating temperature
Storage temperature
Relative humidity
Operating altitude
Certifications
Accessories
Drop proof
2. Connection
Open the APP. If the device is not detected, the following interface will
appear as shown in Figure 1. At this time, users can still enter the
"Photos" and "Setting" pages, but other functions are unavailable. Insert
the product into a smart phone, a prompt "Open UTi120Mobile to process
the UNIT Applicationl Device?" will pop up. Click OK to connect to the
device (if users want to connect directly without a prompt next time, check
the box below "Always open UTi120Mobile after connecting to the UNIT
Application Device" before clicking OK).
The words "Loading..." and "Calibrating..." will appear when detecting
the device as shown in Figure 2.
User manual, Type-C male to female
extension cable, Micro USB to
Type-C interface adapter
Figure 2
Figure 1
UT i120Mobile User Manual UT i120Mobile User Manual

7 8
1
2
3
4
5
6
7
8
9
3. Display
The initial state of the device after startup is shown in below. Figure 3
The palette is by default, and the main page is divided into Iron Red
the following sections.
Description
Upper temperature limit
Temperature distribution slider
Lower temperature limit
Photos
Menu bar
PiP
Start taking photos/videos/finish taking videos
Center point cursor
Temperature of the current center point
No.
4. Photos
After opening the APP, click on Photos (No.4 in Figure 3) to enter the
photos/videos interface as shown in Figure 4. and users can view and
select these photos/videos.
4.1 Select/Cancel (Figure 5)
Click "Select" and then click a photo/video, the photo/video will be
selected, and there will be a checked checkbox on the corresponding
thumbnail. Click "Cancel", and the checkbox will disappear.
When a photo/video is selected, it can be shared or deleted, and the
icons are Share and Delete respectively.
1
2
3
4
5
6
7
8
9
Figure 3
Figure 4 Figure 5
UT i120Mobile User Manual UT i120Mobile User Manual

9 10
4.2 View (Figure 6)
Click on a photo to enter the viewing interface, and users can perform
functions such as Share/PiP/Delete/Blending/Edit. Click "Delete", and
it will prompt "Delete this file?” Select "YES" to delete the photo and
return to the photo interface.
Click on a video to enter the viewing interface, and users can perform
functions such as Play/Share/Delete. Click on the screen, and the icon
will appear. Users can Pause/Fast Forward/Rewind the
video by using this icon or dragging the progress bar below.
4.3 PiP/Blending (Figure 8)
Click the icon , a small PiP window will appear in the lower right
corner. Users can also click on the icon to check the blending
situation, and drag the upper slider to adjust the blending ratio of
visible light and infrared light.
Figure 6
Figure 7
Figure 8
UT i120Mobile User Manual UT i120Mobile User Manual

11 12
Remarks: When using a Type-C extension cable to connect to
the product, the relative distance between the visible light
camera and the product camera is unfixed and the blending
effect is not good. Therefore, it is not recommended to perform
the blending function when using a Type-C extension cable.
4.4 Edit
Click "Edit" in the photo viewing interface to enter the editing interface.
Users can edit the current photo, and click "Cancel" to cancel the
previous operation. After saving the editing operation, enter the editing
interface again and click "Restore" in the upper right corner to restore
the photo to its original state.
The specific editing operations are as follows:
1) Rotate the photo: click the icon to change the photo direction.
2) Add an analysis object: click the icon to display the following
interface. These analysis objects can be moved/added/deleted.
Clicking the PiP and blending icons can turn of f these two functions,
and a prompt "No visible light" will pop up.
The infrared thermal imaging photos taken by UTi120Mobile App can
be edited while viewing.
UT i120Mobile User Manual UT i120Mobile User Manual

13 14
1
2
3
4
5
6
1 2 3 45
6
3) Brush: click the icon , the following interface will appear . Users
can mark a photo in different colors. Click to withdraw the previous
operation, after clicking "Finish", enter the interface again, click
can still withdraw the previous operation.
5. Visible Light Blending
When users click the icon , a slider for adjusting blending will appear
at the top. Dragging the slider can adjust the blending ratio of visible
light and infrared light. Click the icon , and the blending icon will
appear. Drag the icon, and it will display the blending situation of the
relevant position. Click again, the blending icon will disappear.
6. Add Analysis Objects
Click the icon to enter the interface for adding analysis objects, as
shown in the figure below. Users can add/move/delete analysis objects
(point/line/area), and only six objects can exist at the same time. After
adding an analysis object and taking a photo, the added object can
still be deleted.
Description
Add a line
Add a rectangle
Add a circle
Add a point
Delete the selected analysis object
Temperature analysis area
No.
UT i120Mobile User Manual UT i120Mobile User Manual

15 16
6.1 Point
Clicking the icon can add a point temperature analysis object and
expand a semi-transparent information bar on the right side of the
interface to display the temperature information of the analysis objects.
Click once to add one point. If users drag a point to change its position,
the temperature information of the point will be updated synchronously,
and up to 6 point analysis objects can be added.
6.2 Line
Clicking the icon can add a line temperature analysis object and
expand a semi-transparent information bar on the right side of the
interface to display the temperature information of the analysis objects.
Click once to add one line. If users drag a line to change its position,
the temperature information of the line will be updated synchronously,
and up to 6 line analysis objects can be added.
6.3 Area
Clicking the icon can add a rectangle temperature analysis object
and expand a semi-transparent information bar on the right side of the
interface to display the temperature information of the analysis objects.
Click once to add one rectangle. If users drag a rectangle to change
its position, the temperature information of the rectangle will be updated
synchronously, and up to 6 rectangle analysis objects can be added.
Clicking the icon can add a circle temperature analysis object and
expand a semi-transparent information bar on the right side of the
interface to display the temperature information of the .analysis objects
Click once to add one circle. If users drag a circle to change its position,
the temperature information of the circle will be updated synchronously,
and up to 6 circle analysis objects can be added.
7. Palette (Figure 9)
In the main interface, click the icon to open the palette selection
interface, as shown in the figure below. This APP provides Iron Red,
Rainbow, Gray Scale, Red Hot, Black White, Lava, High-Contrast
Rainbow palettes for users to choose according to different scenes or
preferences.
8. Setting (Figure 10)
Click the icon to enter the setting interface, as shown in the figure
below. In the setting interface, users can perform functions such as
selecting language/temperature unit/temperature mark, setting high
and low temperature alarm/emissivity/measurement distance, and
viewing version information.
6.4 Delete Selected Analysis Objects
Clicking the icon can delete the selected temperature analysis
object.
Figure 9 Figure 10
UT i120Mobile User Manual UT i120Mobile User Manual

17 18
8.1 Language
Users can select the language according to their needs. The APP
currently supports Chinese (default) and English.
8.2 Temperature Unit
The default temperature unit is Celsius (°C), and users can switch to
Fahrenheit (°F) as needed.
8.3 Temperature Mark
Users can set Max Temp Mark, Min Temp Mark and Center Mark. After
turning on these marks, the main interface will display the corresponding
marks (Max Temp Mark: red, Min Temp Mark: green, Center Mark: a
central cross cursor). If the marks are not turned on, the main interface
will only display the temperature distribution slider, as shown in the
figure.
UT i120Mobile User Manual UT i120Mobile User Manual

19 20
8.4 Temperature Alarm
Users can set Temperature Alarm Max and Temperature Alarm Min.
After setting, when the temperature exceeds the Temperature Alarm
Max, a red triangle will appear. When the temperature is lower than
the Temperature Alarm Min, a green inverted triangle will appear.
If the Temperature Alarm is turned on, but the corresponding temperature
value is not set, a prompt "The temperature setting is wrong. Please
check!" will pop up.
8.5 Emissivity
The default value of emissivity is 0.95. Users can adjust the temperature
measurement parameters according to the different measured objects
to improve the measurement accuracy.
UT i120Mobile User Manual UT i120Mobile User Manual

21 22
8.6 Distance
The default distance is 0.6m. Users can adjust it according to their
requirements.
8.8 About
It includes the APP Version and the Model Version.
9. Switch Photo/Video Function
Slide the camera button left/right to switch between taking photos/
videos. Both photos and videos will be automatically saved in the Photo.
8.7 Help
Open the product instruction manual.
UT i120Mobile User Manual UT i120Mobile User Manual

23 24
11. PiP
Click the icon on the main interface, the APP will open the phone
camera and display a small PiP window. Click the icon again to cancel
the PiP. When double-clicking anywhere in the small window, the visible
light and infrared light display windows will be interchanged, and double
-clicking the small window again will restore the state.
12. Switch Camera
Click the icon to switch the front/rear camera of the mobile phone,
and the infrared light image will be mirrored.
light cameras of the mobile phone can be switched at the same time,
and the infrared thermal image can be mirrored.
The front and rear visible
13. Auto/Manual Call Shutter
1)
temperature measurement needs when operating;
The App will automatically call the shutter according to the
2) Clicking the cross cursor can manually call the shutter.
Please do not violently disassemble the product to avoid irreversible
damage.
Please avoid hard objects scratching the device lens.
Please do not point the product lens at high-intensity energy sources
(including the sun, laser emission equipment and the reflection
sources of these equipment), otherwise it may affect the measurement
accuracy, and damage the infrared detector of the product.
Please put the product into the plastic box when it is not used.
14. Notes
measurement needs when operating;
The App will automatically call the shutter according to the temperature
Do not use soluble liquids on the device, as this may cause device
damage.
When using the device, please try to keep it stable and avoid violent
shaking.
10. Start/End Taking Photos/Videos
Slide the camera button left/right to enter the recording mode. Click
the recording button to start recording, and the recording duration will
be displayed on the top. Click the button again to end the recording.
15. FCC Compliance statement
This device complies with Part 15 of the FCC Rules. Operation is subject
to the following two conditions: (1) this device may not cause harmful
interference, and (2) this device must accept any interference received,
including interference that may cause undesired operation.
UT i120Mobile User Manual UT i120Mobile User Manual

尺寸:10 0* 80 mm
UTi120Mobile P/N:110401110192X
1
Table of contents
Other Unit Laboratory Equipment manuals
Popular Laboratory Equipment manuals by other brands

Thermoline Scientific Equipment
Thermoline Scientific Equipment TGO-80W operating instructions

TESTING
TESTING 1.0206.01 operating instructions

Chopin
Chopin Alveo PC graph Quick installation and first test

CURIOSIS
CURIOSIS Celloger Mini Plus Quick manual

Hermle
Hermle Z300 instruction manual

Thermo Scientific
Thermo Scientific Multidrop Combi+ user manual

MKS
MKS Cirrus2 Hardware manual

DDS Calorimeters
DDS Calorimeters CAL3K-A installation guide

Seiler
Seiler Coolscope 985 LED owner's manual

Markes International
Markes International HiSorb Agitator U-HSAG-20 Instructions for use

Micromeritics
Micromeritics MicroStar 022 installation guide

Haemonetics
Haemonetics TEG 6s user manual