UNITED DUE-2236 User manual

1
DUE-2236 DEHUMIDIFIER
Owner’s Manual
KEEP THESE INSTRUCTIONS FOR FUTURE REFERENCE

2
Thank you for choosing a UNITED Dehumidifier to provide you and your family with your
home comfort needs. This owner’s manual will provide you with valuable information
necessary for the proper care and maintenance of your new dehumidifier. Please take a
few moments to read the instructions thoroughly and familiarize yourself with all the
operational aspects of this dehumidifier.
This unit removes unwanted moisture from the air to create a more comfortable
environment in your home or office. It can be conveniently moved from room to room
within your home.
FEATURES
Powerful Dehumidifying Capability
Taking advantage of refrigeration technology, the dehumidifier powerfully removes
moisture from the air to decrease the humidity level of the room and keep the indoor
air dry and comfortable.
Lightweight Portable Design
The dehumidifier is built to be compact and lightweight. The casters on the bottom of
the unit make it easy to move from room to room.
Low Temperature Operation with Automatic Defrost
When the unit is running in a room temp. between 5℃and 12℃, it will be stop to defrost for every
30 minutes
When the unit is running in a room temp between 12℃and 20℃, it will be stop to defrost for every
45 minutes
Adjustable Humidistat
Adjust the desired humidity level by the humidistat.
Timer On / Off
Program the unit to turn on and off automatically.
Quiet Operation
The dehumidifier operates with a low noise level.
Energy Efficient
The power consumption of the unit is low.

3
SAFETY WARNINGS
When using the unit, please observe the following safety precautions:
1. Unplug the power supply cord before cleaning or storage.
2. DO not submerge the unit in water, or place the unit close to water.
3. Do not put the unit close to heat-generating devices or near flammable and dangerous
materials.
4. Never put your fingers or objects into the intake or discharge ducts.
5. Do not sit or stand on the unit.
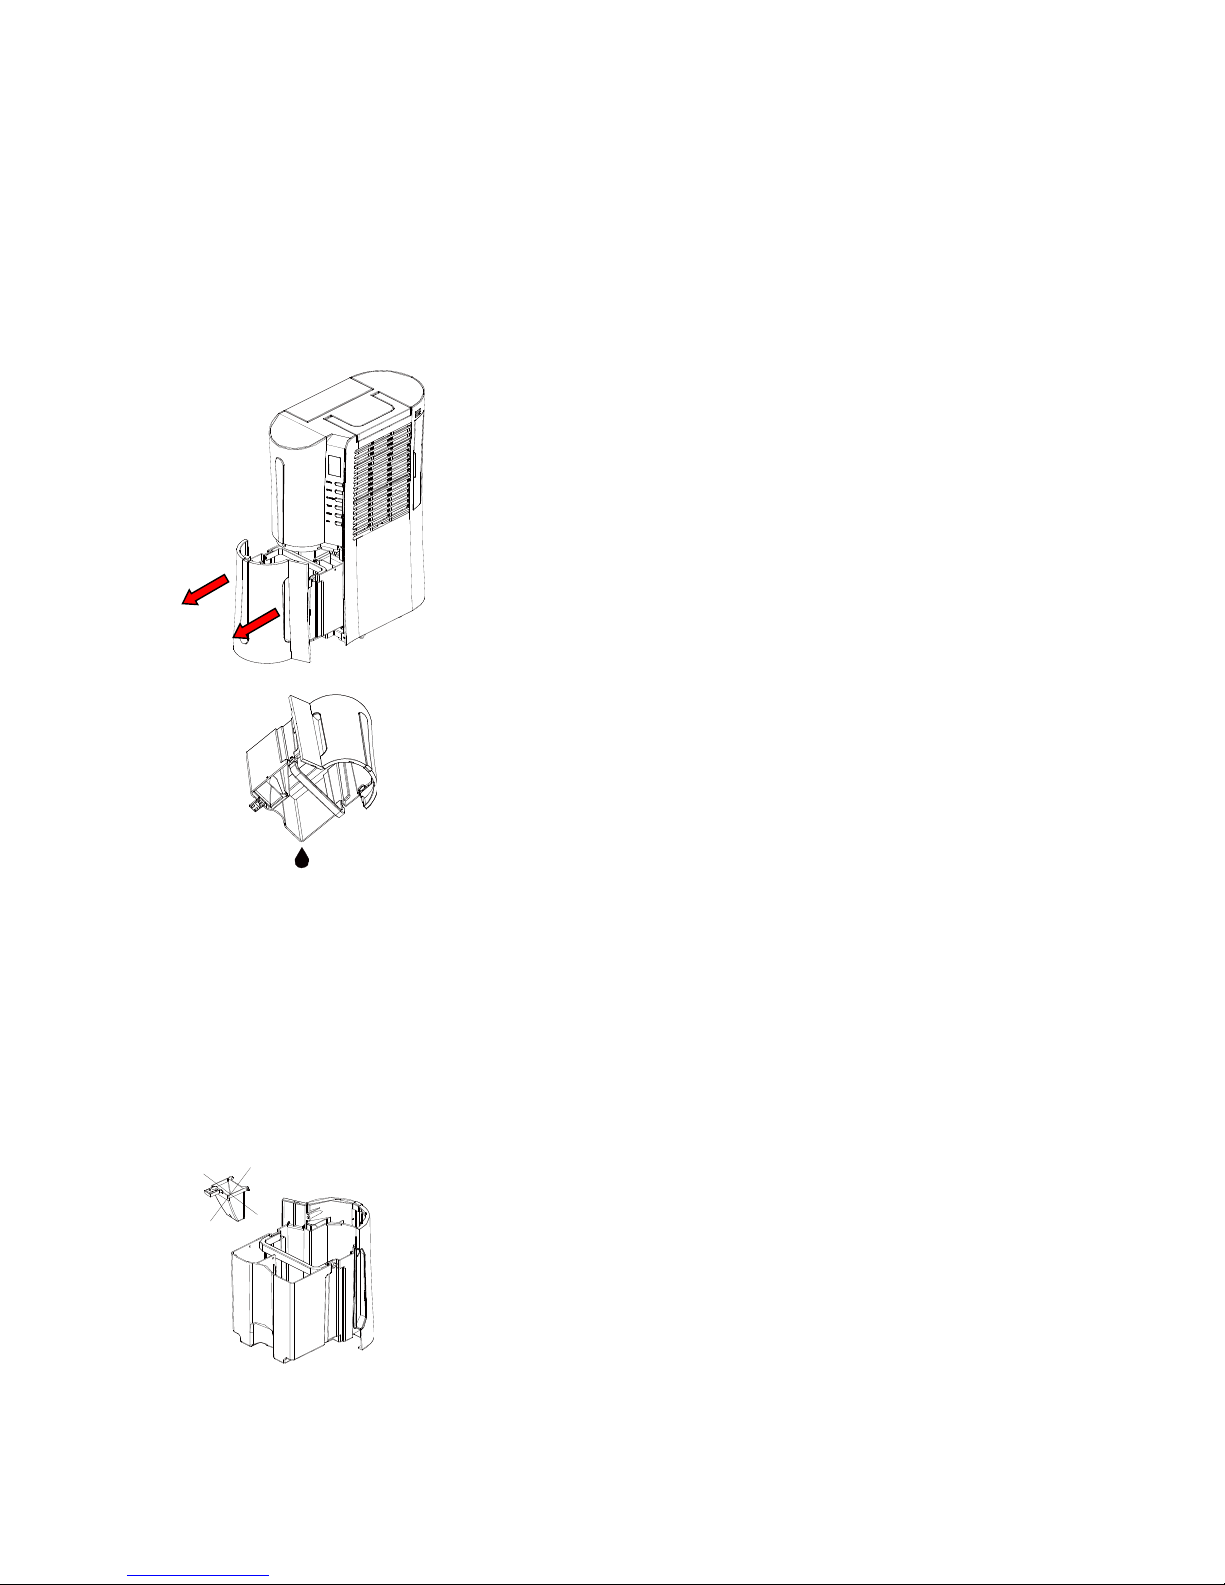
6. Discard water that has collected in the tank as required
7. Do not operate the dehumidifier in a closed area such as inside a closet, as it may cause a
fire
8. Do not sue the unit near edible items ,objects of art, or scientific materials
9. Install drain piping at a downhill grade to make sure that condensed water can be drained
continuously.
10.If the power supply cord is damaged it must be replaced by the manufacture or a qualified
service agent.
11.The appliance must be positioned so that the plug is accessible.
12.Please keep a distance 20 cm around unit and the wall or other objects to ensure air
circulation.
13.The appliance shall be installed in accordance with local national wire regulations.
14.The appliance is for indoor use only.
15.The appliance can not be used in public transportation.
16.This appliance is not intended for use by persons (including children) with reduced
physical sensory or mental Capabilities, or lack of experience and knowledge, unless they
have been given supervision or instruction concerning use of the appliance by a person
responsible for their safety.
17.Children should be supervised to ensure that they do not play with the appliance.
18.The appliance shall not be installed in the laundry
19.Appliances that are obviously damaged must not be operated.
20.R134a is a kind of fluorinated greenhouse gases covered by the Kyoto Protocol. Its total
global warming potential (GWP) is 1430
21.This appliance can be used by children aged from 8 years and above and persons with
reduced physical, sensory or mental capabilities or lack of experience and knowledge if
they have been given supervision or instruction concerning use of the appliance in a safe
way and understand the hazards involved. Children shall not play with the appliance.
Cleaning and user maintenance shall not be made by children without supervision.
The dehumidification capacity is rated at a room temperature of 30℃with a relative humidity of
80%. If specifications are improved after this pointing, the product nameplate will reflect the new
specifications. The operational temperature is in the range of 5℃to 35℃. If the room temperature
is outside of this range, the unit will not operate normally.

4
PRODUCT DIAGRAM
Parts
1. Water tank
2. Front cover
3. Control panel
4. Louver
5. Top cover
6. Handle
7. Air filter
8. Right cover
9. Wheel or Rubber feet
10.Supply cord

5
OPERATING INSTRUCTIONS
LCD INDICATORS
1. Power Led
2. Set-Led
3. Timer-Led
4. Swing-Led
5. Ion-Led
6. Low-fan Led
7. High-fan Led
8. Water full Led
9. Humidity level & Timer Led

6
Push Button Functions
A. Power Push Button
B. Fan Speed Push Button
C. Adjustable Humidity Push Button
D. Timer Push Button
E. Louver setting Button
F. ION Button
OPERATING INSTRUCTIONS
1. The Power indication light will turn on in green when the unit is plugged in, regardless of
whether the unit is operating or not.
2. Press “Power Push Button” once to start operation. Press it again to stop operation.
3. Press “Fan Speed Push Button”as follows:
Press to set the desired fan speed. It can be adjusted between high speed and low speed.
4. Press “Adjustable Humidity Push Button”to set the desired humidity level in the room,
which can be set from 40% to 80% at 5% intervals.
After a period of working, when environment humidity is lower than the selected humidity by
2%, compressor will stop and fan stops working 3 mintues later; When environment humidity
is equal to or higher than the selected humidity by 2%, compressor will restart once 3-minute
compressor protection time over.
5. Press “Timer Push Button”to set the timer:
Press the button to program the time when the unit turns on and turns off. If you want to
cancel the timer programming, press the button to adjust the time at 00, and each time you
press the button, it will be circulate from 00-01-02……23-24. It is the programmed time to
switch the machine. The programmed time will be cancelled if you push the power button.
The programmed time remains unchanged if the machine stops to operate due to water full
or during defrosting
6. “Louver setting Button”:
Press “Louver setting Button” to set swing function and the indication lights。
7. Press “ION” button
When press “ION Button”,the Ion function will be open and the indication lights.

7
DRAINING THE COLLECTED WATER
When the drainage tank is full, the tank full indicator light will turn on, the operation will
stop automatically and the buzzer will beep 15 times to alert the user, that the water need
to be emptied from the drainage tank.
Emptying the Drainage Tank
1. Lightly press on the sides of the tank with both hands and pull the tank out gently..
2. Discard the collected water
NOTE
1. Do not remove the float from the water tank. The water full sensor will no longer be able to
detect the water level correctly without the float and water may leak from the water tank.

8
2. If the drainage tank is dirty, wash it with cold or lukewarm water. Do not use detergent,
scouring pads, chemically treated dust cloths, gasoline, benzene, thinner, or other
solvents, as these can scratch and damage the tank and cause water leakage
3. When replacing the drainage tank, press the tank firmly into place with both hands. If the
tank is not positioned properly, the “TANK FULL” sensor will be activated, and the
dehumidifier will not operate.
Warning
When you remove water tank, unit is automatically switched off for safety reasons. After
replacing water tank, please activate the unit by pressing Power button.
Continuous Water Drainage
The unit features a continuous drainage port .Using a plastic pipe (with an inner diameter
of 10mm) inserts into drain hole (on intermediate plate), reach out from side of water tank,
install it in place, and arrange the drain pipe.
The water in the drainage tank can be continuously drained out from the continuous port
on the unit.

9
MAINTENANCE
Cleaning the Dehumidifier
To clean the Body
Wipe it with a soft damp cloth.
To Clean the Air Filter
1. Open the inlet grill firstly and remove the air filter
2. Clean the air filter
Run a vacuum cleaner lightly over the surface of the air filter to remove dirt. If the air filter
is exceptionally dirty, wash it with warm water and a mild cleanser and dry thoroughly.
3. Attach the air filter
Insert the filter into the grill smoothly, and place the inlet grill into right place.

10
Storing the Dehumidifier
When the unit is not being used for a long period of time and you want to store it note the
following steps:
1. Empty any water left in the drainage tank.
2. Fold up the power supply cord and put it in the water tank.
3. Clean the air filter
4. Discard in a cool and dry place .
Clearance
Maintain the minimum clearance around the dehumidifier when the unit is operating as
shown in the left drawing.

11
TROUBLESHOOTING
If a condition listed below occurs, please check the following items before calling customer
service.
Problem
Possible Cause
Solution
The unit doesn't
operate
Has the power cord been
disconnected?
Plug the power cord
into the outlet.
Is the tank full indication
lamp blinking? (The tank is
full or in a wrong position.)
Empty the water in the
drainage tank and then
reposition the tank.
Is the temperature of the
room above 35℃or below
5℃?
The protection device
is
activated and the unit
cannot be started.
The dehumidifying
function doesn't work
Is the air filter clogged?
Clean the air filter as
instructed under
"Cleaning the
dehumidifier".
Is the intake duct or
discharge duct
obstructed?
Remove the
obstruction from the
discharge duct or
intake duct.
No air is discharged
Is the air filter clogged?
Clean the air filter as
instructed under
"Cleaning the
dehumidifier".
Operation is noisy
Is the unit tilted or
unsteady?
Move the unit to a
stable, sturdy location.
Is the air filter clogged?
Clean the air filter as
instructed under
"Cleaning the
dehumidifier".

12
NOTICE ABOUT RECYCLING
Your product is designed and manufactured with high quality materials and
components which can be recycled and reused.
This symbol means that electrical and electronic equipment, at their
end-of-life,
should be disposed of separately from your household waste. Please
dispose of this equipment at your local community waste collection/ recycling
centre.
In the European Union there are separate collection systems for used electrical and
electronic products.
Please help us to conserve the environment we live in!
DECLARATION OF CONFORMITY
Herewith, Amiridis-Savvidis S.A. states that this product, complies with the requirements of
below directives:
EMC-Directive: 14 / 30 / EU
Low Voltage Directive: 14/ 35 / EU
ErP Directive 09 / 125 / EC
CE Marking: 93 / 68 / EEC
RoHS Directive: 11 / 65 / EU
The detailed declaration of conformity can be found at www.united-electronics.gr
Exclusive importer in Greece:
Amiridis –Savvidis S.A.
87A, 17th Noemvriou str, P.C. 55534
Thessaloniki –Greece
T: +302310944944 | F: +302310944940
www.amiridis-savvidis.gr
Table of contents
Other UNITED Dehumidifier manuals
Popular Dehumidifier manuals by other brands

Dehutech
Dehutech DT-3500 Technical manual

Optimum
Optimum OT-7150 operating instructions

Fortress Technologies
Fortress Technologies FDH2814 user manual

Nobu
Nobu AK-20L user manual

Royal Sovereign International
Royal Sovereign International RDHC-150P owner's manual

Cas Hire
Cas Hire WDS 40 operating instructions