Unitron iCube User manual

Complete guide to iCube
Wireless programming

2
Table of contents Overview
iCube enables the wireless transfer of fitting data from your
computer directly to your client’s hearing instruments.
For further information, please visit the Unitron website:
www.unitron.com
Use the diagram below to identify the components of the
iCube programmer:
Legend
1 Right side fitting indicator
2 Battery indicator
3 Bluetooth / left side
fitting indicator
4 Not supported
5 ON/OFF button
6 Bluetooth® pairing button
7 Reset button (covered)
8 Detachable cover
9 Audio & FM connection
(not supported)
10 USB charging and
programming connection
iCube accessories
• USB cable, 3 m (10 ft.)
• iCube charger
• USB Bluetooth adaptor
Contents may vary depending on country.
front back
1
6
2
7
3
8 9 10
4
5
Overview ......................................................................................................2
First time setup ........................................................................................... 3
Connecting iCube to your computer ........................................................... 3
iCube system configuration options ............................................................5
Battery status .............................................................................................. 6
Operating time ............................................................................................ 6
Using iCube with a client ............................................................................. 6
Quick reference page ...................................................................................7
Indicator lights ............................................................................................ 8
Using iCube without a client ...................................................................... 11
Detecting and programming hearing instruments .................................... 11
Reset button .............................................................................................. 11
Important information ............................................................................... 11
Troubleshooting guide ...............................................................................13
Notices ....................................................................................................... 14
® Bluetooth is a registered trademark of Bluetooth SIG Inc.

3
First time setup
Charging the iCube prior to setup
Connect the iCube charger by plugging the power supply
into a power outlet and the mini USB plug into the iCube as
shown below. Alternatively you can charge your iCube with
the USB cable using the USB port on your computer system.
Your iCube battery can be charged hundreds of times. If the
operating time of your iCube reduces substantially, please
contact your local Unitron representative.
Prior to the first use, ensure that the iCube battery is fully
charged.
Note: When charging your iCube for the first time, leave it to
charge for at least three hours (even if the battery indicator
starts flashing earlier).
Turning iCube on/off
To turn ON your iCube, press and hold the ON/OFF button for
about a second until you see the battery indicator turn ON.
Once your iCube is fully operational, the battery indicator will
flash slowly.
To turn OFF your iCube, press and hold the ON/OFF button
for about two seconds until you see the battery indicator turn
ON. Release the ON/OFF button. Once you release the ON/
OFF button, the battery indicator will go dark and your iCube
is OFF.
Connecting iCube to your computer
iCube allows you to wirelessly program hearing instruments
via a Bluetooth connection.
Alternatively it can be used with a wired USB connection for
places where Bluetooth connections are not allowed.
In either case, before you can start using your iCube, it needs
to be connected with your computer.
Connecting via Bluetooth
Connecting your iCube via Bluetooth is done in three steps:

4
1. Prepare the Bluetooth connection on your computer
To use iCube wirelessly via Bluetooth, make sure that you
have the Bluetooth function enabled. For specific instructions
please refer to the documentation of the computer and
operating system you are using.
If you are using NoahLink and you have already installed the
corresponding external Bluetooth adaptor, you can use that
same adaptor for iCube. If your computer is neither equipped
with Bluetooth built in nor with a NoahLink compatible
Bluetooth adaptor, use the Bluetooth adaptor accessory.
Refer to the “quick start guide” document available with the
adaptor’s Software CD and follow the instructions.
Note: iCube works within a Bluetooth operating range of up to
10 meters (33 ft.) of the fitting computer.
2. Start the connection wizard for iCube
With Bluetooth functionality turned ON, you can now initiate
the setup process. In the fitting software, either select iCube
as the programming device and click on Detect or:
• In TrueFit, select Options > iCube Configuration
• In U:fit, select Options > iCube
and then click on Add iCube to start the iCube pairing wizard.
3. Pairing iCube with your computer
After you select Add iCube, the pairing
wizard will guide you through the process
of pairing iCube with your computer. Pairing
is necessary to control which Bluetooth
devices are permitted to communicate with
each other. It needs to be completed only
once, before first use. It’s completed in 3
easy steps:
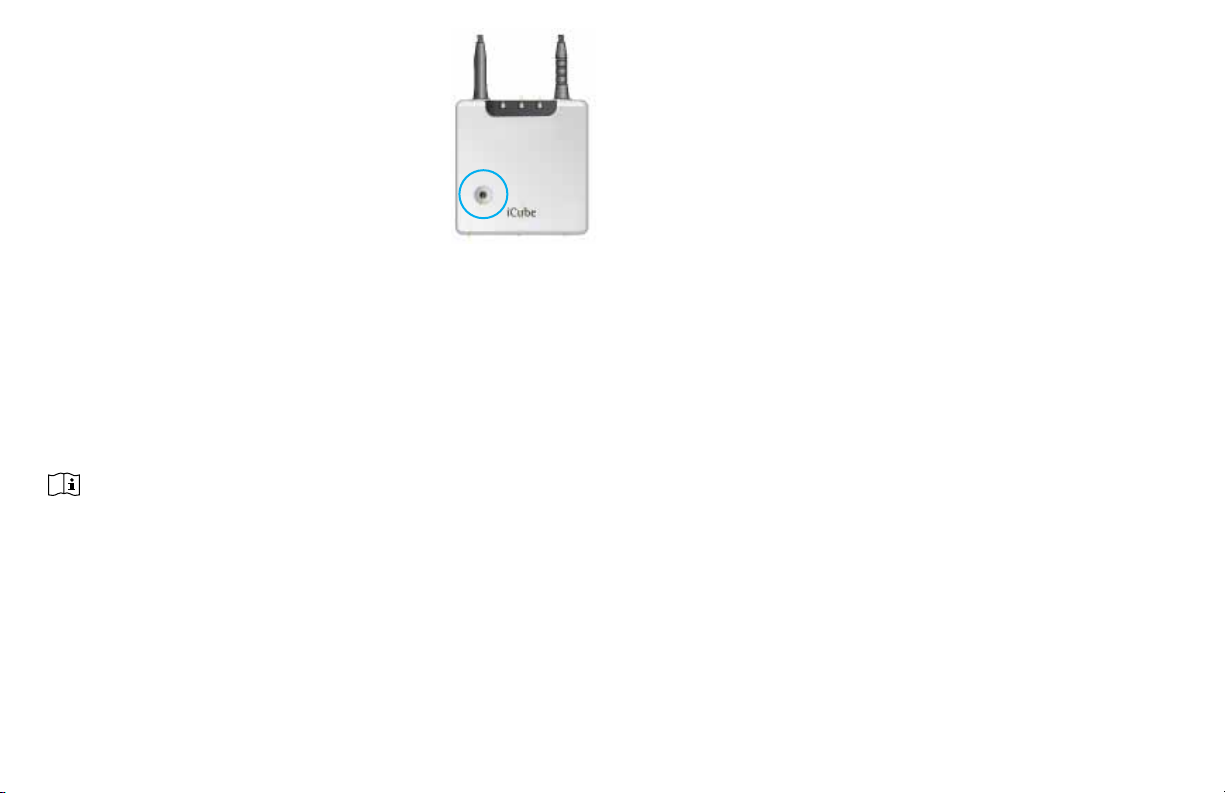
1. Turn on your iCube. To initiate the pairing process on
iCube, set the device into pairing mode by pressing and
holding the Bluetooth pairing button for 2 seconds until
the Bluetooth indicator is blue and flashing fast. iCube
is now in pairing mode for two minutes or until pairing is
completed.
2. Follow the on-screen instructions to complete pairing and
finish the connection process for iCube. Upon successful
pairing the serial number of the detected iCube will be
listed in the dialog box.
3. To end the process, click on close.

5
Removing a Bluetooth pairing
If you wish to delete the Bluetooth pairing
from your iCube, press and hold the
Bluetooth pairing button for about 10
seconds until the Bluetooth indicator is lit
solid blue.
Connecting via USB cable
1. To connect your iCube via USB cable instead of
Bluetooth open the iCube Configuration window:
• In TrueFit, select Options > iCube Configuration
• In U:fit, select Options > iCube
2. Connect your iCube via the USB cable to your
computer.
Note: When connecting iCube for the first time via USB, your
computer will start searching for the associated driver
software. Depending on the operating system, you may be
presented with an installation wizard: Found New Hardware
Wizard. If so, let your computer automatically install the
necessary driver software. The driver software has already
been installed during the fitting software installation and
should be identified by the wizard. It is not necessary to insert
the installation CD.
3. To allow the fitting software to use the connected
iCube:
• In TrueFit, select Check in the iCube connected via USB
box
• In U:fit, select Detect in the USB connected iCube dialog
box
Upon successful detection the serial number of the
connected iCube is displayed.
iCube system configuration options
Start the iCube pairing wizard:
• In TrueFit, select Options > iCube Configuration
• In U:fit, select Options > iCube
To remove a listed iCube, click Remove iCube.
In cases where multiple iCubes are paired with a computer,
you can choose the default iCube by selecting the iCube with
the desired serial number. The asterisk indicates which iCube
is currently being used as the default.

6
Battery status
While turned ON, your iCube indicates the battery status on
the battery indicator LED as follows:
• Yellow, slow flash – Battery level is high.
• Yellow, fast flash – Battery level is low.
Once the fast flashing starts, your iCube will still operate for
about an hour, but you should recharge the battery as soon
as possible.
The current battery status is also displayed in the software:
• In TrueFit, in the expanded Connections tab of the Quick
View Pane
• In U:fit, in the iCube Configuration dialog
For safety reasons, recharge the battery only with chargers
supplied by Unitron.
During the charging process, the battery indicator is lit solid.
Once the battery is fully charged, the battery indicator will
start flashing slowly. Normally, charging an empty battery
takes about 90 minutes. It is safe to leave the charger
connected overnight – the battery cannot be overcharged.
Operating time
Fully charged, your iCube will operate for up to four hours in
normal use.
Battery consumption and the operating time of the iCube
greatly depend on the usage of the device. Heavy use will
reduce the operating time of your iCube between battery
recharges.
Using iCube with a client
Batteries need to be inserted into the hearing aids and the
hearing aids need to be turned on prior to detection.
Before using iCube to fit a client with
hearing aids, make sure the battery is
sufficiently charged. Unplug the charging
cable from the iCube and turn it ON.
Wearing iCube
Open the neckloop by unplugging the
jack, and place iCube around your
client’s neck as shown. (Re)connecting
the neckloop will activate the built-in
antenna and enable iCube to operate
correctly.

7
Quick reference page
The following insert can be removed from this
booklet for use as a quick reference guide.

8
Indicator lights
Battery indicator
Yellow - Slow flash
Battery full
Yellow - Fast flash
Battery empty
Yellow - Lit solid
Battery charging
Fitting status indicator
Red - Right fitting status indicator flashing fast
Programming the right hearing instrument
Blue - Left fitting status indicator flashing fast
Programming the left hearing instrument

9
Software indicator
iCube can be upgraded whenever new functionalities are available.
Follow the instructions provided together with the new software version.
Indicators
Red/yellow/blue - All three indicators flash fast
iCube is being upgraded
Red/yellow/blue - All three indicators lit solid
This may indicate a software problem. Refer to Troubleshooting section.


11
Using iCube without
a client
When programming hearing
instruments without having your
clients wear them, make sure they
are turned on, and are in range of the
iCube. Please note that they are best
positioned inside the loop.
Detecting and programming hearing
instruments
In wireless fittings, it is necessary to tell the software which
hearing instrument is the left and which is the right. Click the
Detect button on the detection screen. A window appears
showing the detected hearing instruments.
Assign (or reassign) each hearing instrument to the desired
side (left or right). You can play a beep identification to
confirm that left and right have been selected properly.
Continue as usual with the fitting.
During the programming of hearing instruments, the right
side and the left side fitting indicator flash fast red, and blue,
respectively.
Reset button
If, for some reason, iCube becomes
unresponsive, remove the cover by
sliding it upwards. Press the reset button.
The Bluetooth pairing will not be lost.
If all three indicators on your iCube are
lit solid, this may indicate a software
problem. Refer to Troubleshooting
section.
Important information
Maintenance and care
• Clean iCube using a damp cloth. Never use household
cleaning products or alcohol to clean the device.
• Protect iCube from excessive moisture, heat, excessive
shock and vibration.
• When iCube is not in use, turn it OFF and recharge it so it
will be sufficiently charged and ready for the next fitting
session.
Safety notice and other important information
• Keep this device out of reach of children under 3 years.
iCube

12
• Persons using medical devices such as pacemakers are
not permitted to use this device.
• X-ray radiation (e.g. CT scans, MRI scans) may
adversely affect the correct functioning of this device.
We recommend that you keep iCube outside the X-ray
radiation procedure rooms.
• High-powered electronic equipment, larger electronic
installations and metallic structures may impair and
significantly reduce the operating range.
• External devices may only be connected if they have been
tested in accordance with applicable IEC Standards.
Important information
• The digitally-coded, inductive transmission technology
used in this device is extremely reliable and experiences
virtually no interference from other devices. It should be
noted, however, that when operating the device near a
computer terminal or other strong electromagnetic fields,
it may be necessary to be at least 60 centimeters (24”)
away to ensure proper operation.
• If the hearing instruments do not respond to the device
because of an unusual field disturbance, move away from
the disturbing field.
• Use only original Unitron accessories.
• Opening iCube might damage it. If problems occur which
cannot be resolved by following the remedy guidelines
in the troubleshooting section of this user guide, contact
your local Unitron representative.
• iCube may only be repaired by an authorized service
center.
• Do not make any changes or modifications to this device.
• Do not unplug the neckloop when iCube is saving data to
the hearing instruments. Keep the neckloop closed when
iCube is not in use or stored on the iCube charger.
• If you use several iCubes in the same building, be aware
that their inductive field can disturb one another if within a
range of 2 meters (6 feet). This may even occur when used
in different rooms.
• Do not use iCube while charging.

13
Troubleshooting guide
Cause Possible remedy
iCube is no longer recognized by the computer to which it was
previously paired
The Bluetooth functionality
of your computer may be
disabled
Find the Bluetooth settings on
your computer and turn Bluetooth
functionality ON
iCube is out of range Move iCube closer to your computer
iCube turns OFF
The battery is empty Charge iCube
iCube is unresponsive and all three indicators are lit solid
This may indicate a software
problem
Unplug the USB cable and press the
reset button. If the problem persists,
delete the Bluetooth pairings and press
the reset button again. If the problem
still persists, contact your local Unitron
representative.
Declaration of conformity
Unitron Hearing declares under its sole responsibility
that the iCube is in conformity with the following
standards or other standardizing documents:
Radio: EN 300-330
EN 300 328
EMC: EN 60601-1-2
Safety: EN/IEC 60601-1
Implementing the provisions of the MDD 93/42/EEC (Medical
Device Directive), R&TTE Directive 1999/5/EC (Radio and
Telecommunications Terminal Equipment), EMC Directive
2004/108/EC (Electromagnetic Compatibility) and LVD
2006/95/EC (Low Voltage Directive).

14
Notices
Notice 1
This instrument is certified under:
FCC ID: VMY-ICUBEU
IC: 2756A-ICUBEU
This device complies with Part 15 of the FCC Rules and with
RSS-210 of Industry Canada. Operation is subject to the
following two conditions:
1. this device may not cause harmful interference, and
2. this device must accept any interference received,
including interference that may cause undesired
operation.
Changes or modifications made to this equipment not
expressly approved by Unitron Hearing may void the FCC
authorization to operate this equipment.
Notice 2
This Class B digital apparatus complies with
Canadian ICES-003.
Notice 3
This equipment has been tested and found to comply with
the limits for a Class B digital device, pursuant to Part 15 of
the FCC Rules.
These limits are designed to provide reasonable protection
against harmful interference in a residential installation.
This equipment generates, uses, and can radiate radio
frequency energy and, if not installed and used in accordance
with the instructions, may cause harmful interference to
radio communications. However, there is no guarantee that
interference will not occur in a particular installation.
If this equipment does cause harmful interference to radio or
television reception, which can be determined by turning the
equipment off and on, the user is encouraged to try to correct
the interference by one or more of the following measures:
• Reorient or relocate the receiving antenna
• Increase the separation between the equipment and
receiver
• Connect the equipment into an outlet on a circuit different
from that to which the receiver is connected
• Consult the dealer or an experienced radio/TV technician
for help.
The CE symbol is confirmation by Unitron that this Unitron

15
0682
This instrument is certified under:
FCC ID: VMY-ICUBEU
IC: 2756A-ICUBEU
Australia & New Zealand
Brazil
China
Japan
South Korea
product meets the requirements of directive 93/42/EEC on
medical devices and the R&TTE Directive 1999/5/EC on Radio
and Telecommunication Terminal Equipment.
The symbol with the crossed out disposal bin indicates that
this product shall not be treated as household waste. Please
hand over your old or unused product to the applicable
collection point for the recycling of electrical and electronic
equipment or bring your old product to your hearing care
professional for appropriate disposal. By ensuring this
product is disposed of correctly, you will help prevent
potential negative effects on the environment and human
health.
Operating conditions:
This product has been designed for trouble-free operation
without restrictions when used as intended, unless otherwise
stated in this user guide.
Transportation and storage conditions:
Temperature should not exceed limits of –20°/60° Celsius at
a relative air humidity of 65% for extended periods during
transportation and storage. Air pressure between 500 and
1100 hPa is not detrimental to this device.

Contact us
International - +1 519 895 0100
European Representative & Germany - +49 711 658538 0
Canada - 1 800 265 8255
U.S. - 1 800 888 8882
U.K. - 01925 247810
France - 0821 02 9000
Netherlands - +31 88 600 88 10
China - 512 6258 2258
New Zealand - 0800 864 8766
Australia - 1800 212 313
Belgium - +32 (0) 2 468 19 81
South Africa - (011) 467 7662/52
Sweden - +46 (0) 8 546 20 960
Denmark - +45 3832 1229
India - +91-22-26871151
Russia - +7 495 788 02
Colombia - 57 1214 9847
Spain - +34 902 494 960
Korea - +82 10 3414 8366
20 Beasley Drive, P.O. Box 9017,
Kitchener, ON N2G 4X1 Canada
D/11-038 029-5732-02
Other manuals for iCube
1
Table of contents
Other Unitron Motherboard manuals