Tenways AGO X User manual

AGO X
USER MANUAL
Energized Urban Ride

Scan the QR code to access the user manuals in German /
Dutch / French / Italian / Spanish
User manuals in English / German / Dutch / French / Italian /
Spanish are also available inside the TENWAYS App.
QR Code
FIND YOUR LANGUAGE

ASSEMBLE YOUR TENWAYS E-BIKE
INDEX
BIKE USAGE
IMPORTANT REMINDERS
DISPLAY OPERATIONS
Toolbox checklist
Bicycle structure and components
Assembly steps
Display size
Features and parameters
Buttons
Operation methods
User menu
Connect to the TENWAYS app
Before your first ride
Routine maintenance
Frame code
Warranty
FAQ
Warnings
01
02
04
19
20
21
22
26
31
32
33
36
38
39
40

Bike box
1
Tool Box
2
3
Battery Box
TOOLBOX CHECKLIST
Bicycle Pedals L Bicycle Pedals R
No.3 Hex Key
No.5 Hex Key
No.10 Wrench
No.15 Wrench
No.4 Hex Key
Phillips Head
Screwdriver
Rear Reflectors
Front Reflectors
Portable Air Pump
Accessories
Charger and adapter
Bicycle Pedals L
Bicycle Pedals R
Portable Air Pump
Front & Rear Reflectors
Tools
No.3 Hex Key
No.4 Hex Key
No.5 Hex Key
No.10 Wrench
No.15 Wrench
Phillips Head Screwdriver
001 Toolbox checklist

Saddle
Rear Carrier
Mudguard
Rear Light
Frame
Brake Clamps
Battery
Pedals
Seat Post
Seat Post Clamp
Handlebar Grip
Mudguard support
Cassette
Rear Derailleur
Chain
Crank
Mid-drive Motor
Brake Disc
Mid-drive Motor
Brake Clamps
Brake Lever
Stem
Headlight
BICYCLE - STRUCTURE AND COMPONENTS
Front fork
Front Mudguard
Spokes
Rim
Tire
002 Bicycle structure and components

INSTALL THE REFLECTORS
10.
ADJUST THE HEIGHT OF THE SADDLE
09.
ASSEMBLE YOUR
TENWAYS E-BIKE
01.
INSTALL THE HANDLEBAR
DETACH THE FRONT WHEEL
02.
INSTALL THE KICKSTAND
03.
REMOVE THE QUICK RELEASE FROM THE
FRONT FORK AND PRE-INSTALL IT ON
THE FRONT WHEEL
04.
INSTALL THE FRONT WHEEL
05.
INSTALL THE BATTERY
07.
INSTALL THE PEDALS
08.
INSTALL THE FRONT MUDGUARD
06.
003 Assemble your TENWAYS e-bike

12
01
Hold down the front fork with one
hand and turn the stem to the fron,
then remove its front attachment
with No.4 Hex Key.
Tools needed: No.4 Hex Key
No.3 Hex Key
No.5 Hex Key
No.4 Hex Key
01.
INSTALL THE HANDLEBAR
004 Assemble your TENWAYS e-bike

1
2
4
3
02
Put the handlebar into the stem handlebar
slot, then align their centers. Use the
No.4
Hex Key to tighten the screws in
diagonal
order (with 5–6 Nm torque).
INSTALL THE HANDLEBAR
No.3 Hex Key
No.5 Hex Key
No.4 Hex Key
Tools needed: No.4 Hex Key
01.
005 Assemble your TENWAYS e-bike

1
2
Tools needed: No.4 Hex Key
Attention:
Only connect cable connectors
of the same color. Connection between
cable connectors of different colors could
potentially damage the bike.
03
Adjust the direction of the headset,
and use the No.4 Hex Key to tighten
the screws at the stem and front fork
(with 5–6 Nm torque).
04
Match the colors of the cable connectors,
and connect the display cables.
01.
INSTALL THE HANDLEBAR
006 Assemble your TENWAYS e-bike

Removable
Plastic Covers
Detach the front wheel and remove
the plastic protective covers on both
sides of the wheel.
Attention:
You must remove the front
wheel in the direction of the spokes to
avoid scratching them.
02.
DETACH THE FRONT WHEEL
007 Assemble your TENWAYS e-bike

1
2
01
Fix the kickstand to the frame with
the No.5 Hex Key; the torque should
be 9-12Nm.
Tools needed: No.5 and
No.4 Hex Keys
02
Adjust the length of the kickstand with
the No.4 Hex Key ( it is recommended to
adjust the length of the kickstand to
the
maximum ); the torque should be 5-7Nm.
03.
INSTALL THE KICKSTAND
008 Assemble your TENWAYS e-bike

1
3
2
01
Loosen the nut and detach the quick
release.
02
Remove all wrapping material from
the quick release.
03
Install the quick release on the front
wheel in the direction shown in the
figure, and then tighten the nut.
Note: There is no need for you to fully
tighten the nut at this time.
Note: When installing
the quick release
spring,
ensure that the direction
is the
same as when it was removed.
04.
REMOVE THE QUICK RELEASE FROM THE FRONT
FORK AND PRE-INSTALL IT ON THE FRONT WHEEL
No.3 Hex Key
No.5 Hex Key
No.4 Hex Key
009 Assemble your TENWAYS e-bike

1
2
01
Set the quick release lever to the open
position, and remove the protective
sheets from the brake clamps. Guide
the front fork to the front wheel; make
sure that the front wheel is centered,
and the brake disc is in the middle of
the brake clamps.
02
Tighten the quick release nut, and then
turn it to the closed position as shown
in the figure.
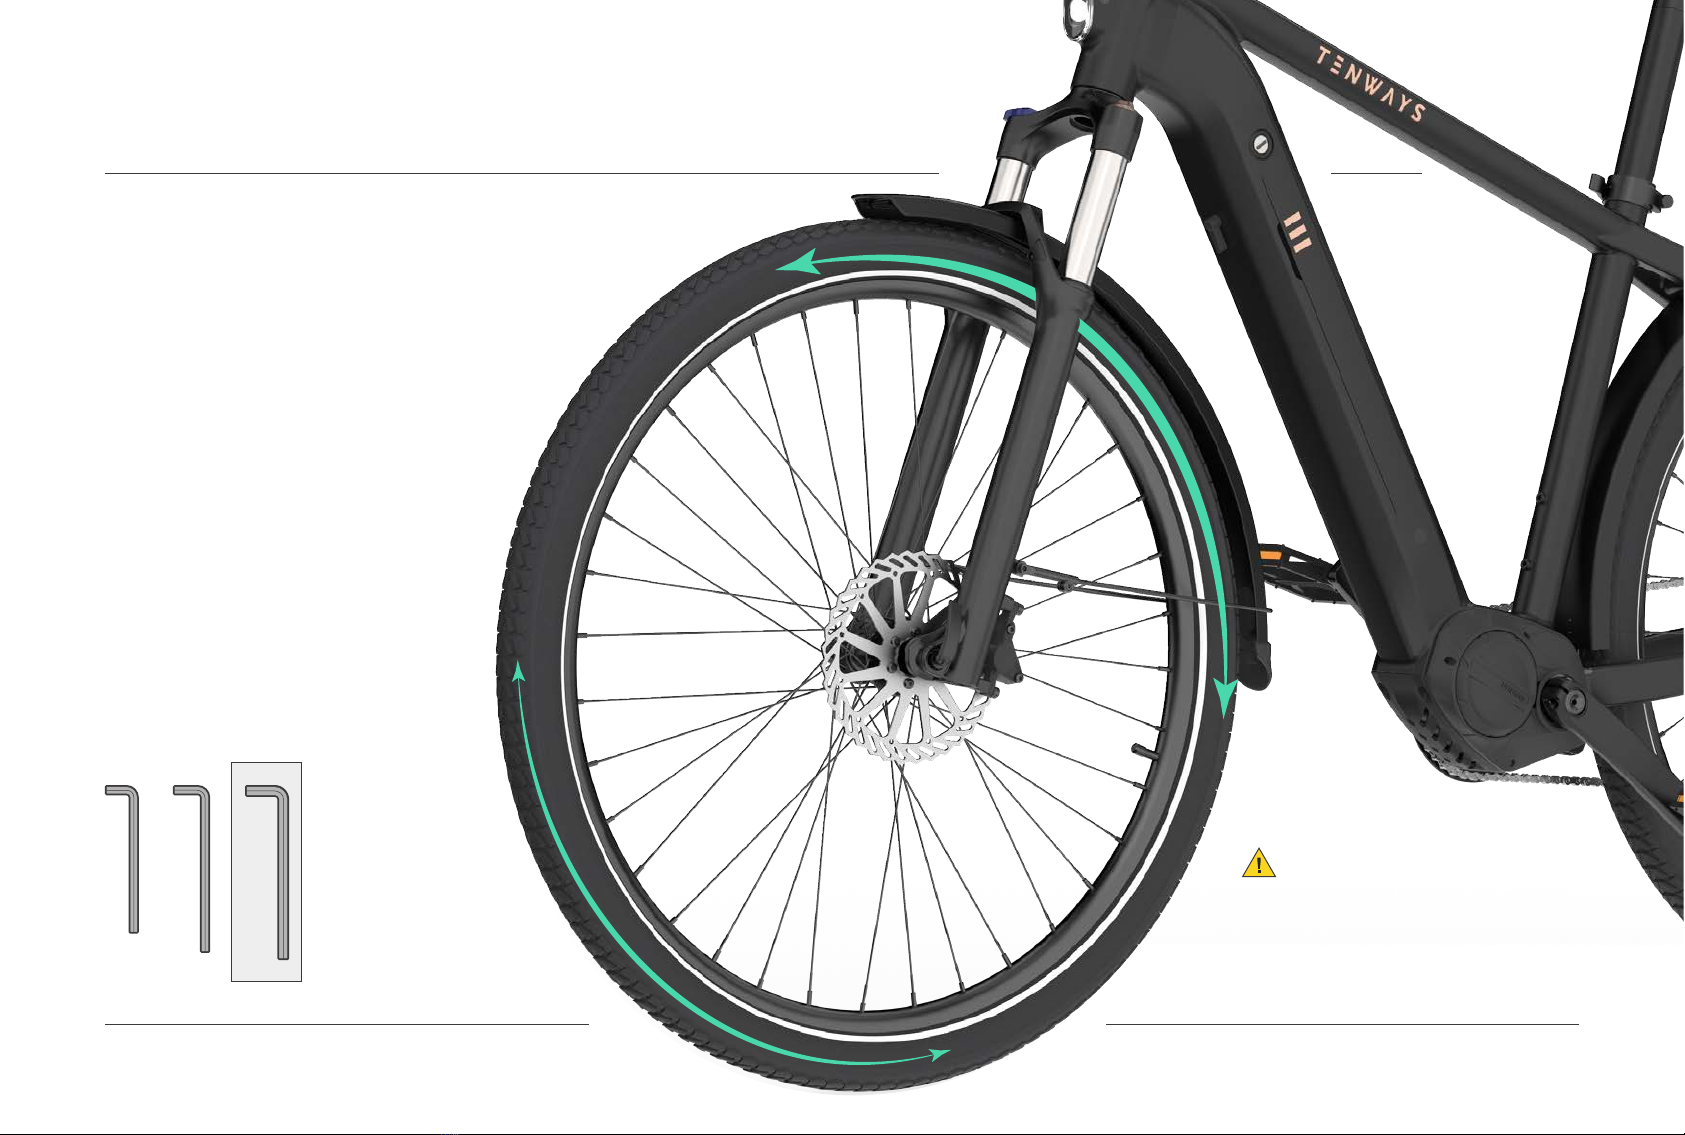
Tools needed: No.5 Hex Key
05.
INSTALL THE FRONT WHEEL
010 Assemble your TENWAYS e-bike
No.3 Hex Key
No.5 Hex Key
No.4 Hex Key
03
Push the bike back and forth and
press the brake to check if the front
wheel wobbles. If so, please repeat
step 2 until you feel enough resistance
when closing
the quick release lever.
04
Turn the front wheel by hand and
check if there are any signs of scraping.
Tools needed: No.5 Hex Key
Note: This step is very important.
Please follow the instructions care-
fully. (Keep the brakes’ protective
sheets in a safe place for future use. )
05.
INSTALL THE FRONT WHEEL
011 Assemble your TENWAYS e-bike

INSTALL THE FRONT WHEEL
05.
Tools needed: No.5 Hex Key
05
If yes, please follow the steps below to make
adjustments:
▪Use the No.5 Hex Key to slightly loosen the
mounting screws of the brake clamps so that
they can move slightly.
▪Press the front brake 3 to 5 times.
▪Hold the front brake lever and tighten the
mounting screws of the brake clamps.
▪Turn the front wheel by hand and check for the
friction sound.
▪If the friction source can be heard, loosen the
mounting screws of the brake clamps.
▪Manually adjust the position of the brake
clamps to center the disc, and tighten the
screws again.
No.3 Hex Key
No.5 Hex Key
No.4 Hex Key
012 Assemble your TENWAYS e-bike

No.3 Hex Key
No.5 Hex Key
No.4 Hex Key
Side View
Front View
01
Adjust the distance between
the mudguard and the tire, then
use the No.5 Hex Key to fix the
mudguard lug to the front fork.
The torque should be 8-10 Nm.
02
Use the No.4 Hex Key to fix the
mudguard
supports. The torque
should
be 3-4 Nm.
Tools needed: No.4 and
No.5 Hex Keys
INSTALL THE FRONT MUDGUARD
06.
013 Assemble your TENWAYS e-bike

Battery Pack Front
01
Tilt and slide the lower end of the battery
into the battery slot, and then press the
upper end upwards by hand.
02
You will hear a click when the battery is
firmly seated.
Battery Pack Right
07.
INSTALL THE BATTERY
014 Assemble your TENWAYS e-bike

15mm Wrench
L
R
Note:
Do not install the pedals
forcibly if you feel great resistance.
01
Distinguish between the left and right
pedals. The right and left pedals are
marked by an R and an L respectively.
The right pedal is used for the side with
the crankset, while the left one is used
for the other side.
02
Tighten the right pedal clockwise and
the left pedal counterclockwise.
03
If you feel great resistance, stop
tightening the pedals. Then, realign
and install the pedals again.
Tools needed: 15mm Wrench
08.
INSTALL THE PEDALS
015 Assemble your TENWAYS e-bike

ADJUST THE HEIGHT OF THE SADDLE
09.
Note:
a. The height of the seat post should
not exceed the marked safety line.
b. The height of the seat post is set to
the minimum when fully inserted.
Open the seat post clamp, adjust the saddle
to a suitable height, and lock the clamp.
Assemble your TENWAYS e-bike 016

Rear Reflector
Front Reflector
Phillips Head
Screwdriver
1
2
01
Distinguish between the front reflector
and the rear one. The rear reflector is
red, while the front one is white.
02
Use the Phillips Head Screwdriver
to install the rear reflector to the seat
post and the front one to the handlebar.
Tools needed: Phillips head screwdriver.
09.
INSTALL THE REFLECTORS
017 Assemble your TENWAYS e-bike
Table of contents
Other Tenways Bicycle manuals


