UNLU NITOR M5 User manual

KULLANMA / BAKIM KILAVUZU ve
YEDEK PARÇA KATALOĞU
KULAKLI PULLUK
USER / MAINTENANCE MANUALS and
SPARE PARTS CATALOG
Version No: 2018-001
MEKANİK AYARLI DÖNER
NITOR M5
5 SOKLU
5 FURROWS
MECHANICAL ADJUSTABLE
REVERSIBLE PLOUGH


This handbook contains the usage and maintenance
instructions with spare parts for the indicated plough.
Users have to obey the instructions in order to
prevent any possible casualties. Otherwise,
manufacturer is not responsible for any accidents
occur from negligence of the user.
+90 444 30 08
Fax : +90 236 214 00 39 - 40 – 41
Kalitesi ve güvenilirliği kanıtlanmış ürünümüzü tercih
ettiğinizden dolayı teşekkür ederiz.
Firmamızda farklı tipte pulluklar üretilmektedir. Tarla
testlerimiz sonucunda, pulluklarımızın uygun sürüş tekniği
ile iyi performans gösterdiği kanıtlanmıştır. Pullukta
yapılan başarılı ayarlamalar sonucunda, traktör ile toprak
arasında maksimum uygunluk sağlanmış olur. Bunun
sonucunda zamandan ve yakıttan tasarruf edilir.
Pulluklarımız, farklı tip traktörlere kolayca takılabilmesi
bakımından, üç nokta askı sistemi ile tasarlanmıştır.
DÜŞÜNCELER INTRODUCTION
Thank you to prefer our qualified and reliable product.
Our firm is manufacturing different types of ploughs.
The field experiments are proved that our ploughs can be
worked effectively with the proper adjustments and
driving methods. Thanks to these proper adjustments and
driving methods; we ensure the maximum compatibility
between tractor and soil type. Also, it contributes
the better ploughing conditions with the time and
fuel savings.
Three points hitch design allows easy attachment for
the plough and different types of tractors.
E-Mail : [email protected]
Adres (Address) : Muradiye Mah. Demiryolu Cad. No:28 Yunusemre / MANİSA
Telefon (Telephone) : +90 236 214 00 34 - 36 - 37 - 38 ( pbx )
Web : www.unluziraat.com.tr
www.unluagriculture.com
Öneri ve şikâyetleriniz için lütfen bizimle irtibat
kurunuz.
Makinayı teslim alırken,nakliye esnasında hasar
meydana gelip gelmediğini ve parçaların eksik olup
olmadığını lütfen kontrol ediniz! İrsaliyeyi esas alarak
ısmarlanmış özel donanımlara dahil olarak teslim edilen
makina aksamının eksiksiz olduğunu kontrol ediniz.
Sadece anında bildirilen itirazlar durumunda maddi hasar
tazminatları mümkün olur!
Bu el kitabı; pulluğun kullanım, bakım ve yedek parça
özellikleri hakkında bilgi içermektedir.
Kullanıcılar, bu kitapçıkta yer alan güvenlik ve
kazaların önlenmesi ile ilgili uyarılara uymalıdırlar.
Aksi halde, meydana gelebilecek kazalardan üretici
firma sorumlu değildir.
While receiving, please check the machine for the
occurance of any damage during shipment and for any
missing part. Damage compensation is applied only if
immediate notice is given.
Please, contact us for your suggestions or any
complaints.

Page
İÇERİK
CONTENTS
3. Preparation Before Tillage …………………….... 12
2.2 General and Technical Information’s …........ 10
2. General and Technical Information’s .................. 9
2.1 Descriptions …………………………………... 9
3.1 Preparation of Tractor Before
Attaching The Plough ......................................... 12
1.1 Security and pictorial warning signs........ 6
1. Safety Provisions ………………………………… 2
1.1.1 General Matters....................................... 6
1.1.2 Meaning of pictorial warning signs............ 6
1.2 Positioning pictorial warning signs and
other signs ................................................ 8
1.2 Resimli ikaz işaretlerinin ve diğer işaretlerin
1.1.2 Resimli İkaz İşaretlerinin Anlamı............... 6
1.1.1 Genel Hususlar.......................................... 6
1. Güvenlik Önlemleri …………………………….. 2
3.2 Attaching The Plough to Tractor ………....... 13
3.3 Removing The Plough ………………………. 14
3.4 Adjustments Before Tillage ………............... 14
3.5 Adjustments During Tillage ….……………... 15
5. Rotating Plough ………………………………….. 15
6. Carriage and Parking Position …………………. 17
7. Maintenance ……………………………………… 18
9. Problems and Solutions …………………………. 21
8. Optional Parts …………………………………….. 20
Sayfa
10. Yedek Parça Listesi ....................................... 22 10. Spare Part List ................................................ 22
1.1 Güvenlik ve Resimli İkaz İşaretleri............ 5
konumlandırılması..................................... 7
2. Genel Açıklamalar ve Teknik Bilgiler………….. 8
2.1 Açıklamalar..……………………….............. 8
2.2 Teknik ve Genel Bilgiler …………………… 9
3. İş Durumuna Hazırlık ………………………….. 11
3.1 Pulluk Takılmadan Önce Traktör Ayarı..….. 11
3.2 Pulluğun Traktöre Bağlanması..…………… 12
3.3 Pulluğun Traktörden Ayrılması.…………… 13
3.4 Sürüm Öncesi Yapılacak Ayarlar ………… 13
3.5 Sürüm Esnasında Yapılan Ayarlar ……….. 14
4. Sürme Derinlik Ayarı ………………………........ 15 4.
Tillage Depth ....................................................... 16
5. Pulluğun Döndürülmesi ……………………….... 15
6. Taşıma ve Park Etme …………………………... 16
7. Bakım ……………………………………….......... 17
9. Problemler ve Çözümler
............................... 20
7.1 Bakım Çizelgesi .......................................... 18
7.1 Maintenance Chart ..................................... 19
8. Opsiyonel Parçalar ……………………………… 19
www.unluziraat.com.tr
www.unluagriculture.com

Pulluğu kullanmadan önce kullanma ve bakım el
kitabını dikkatlice okuyunuz.
6. Pulluk üzerinde herhangi bir canlı veya cisim
7. Pulluk traktöre bağlı iken, sürücü belgesi olmayan,
17. En fazla özeni, pulluğun traktöre takılması ve
sökülmesi esnasında gösteriniz.
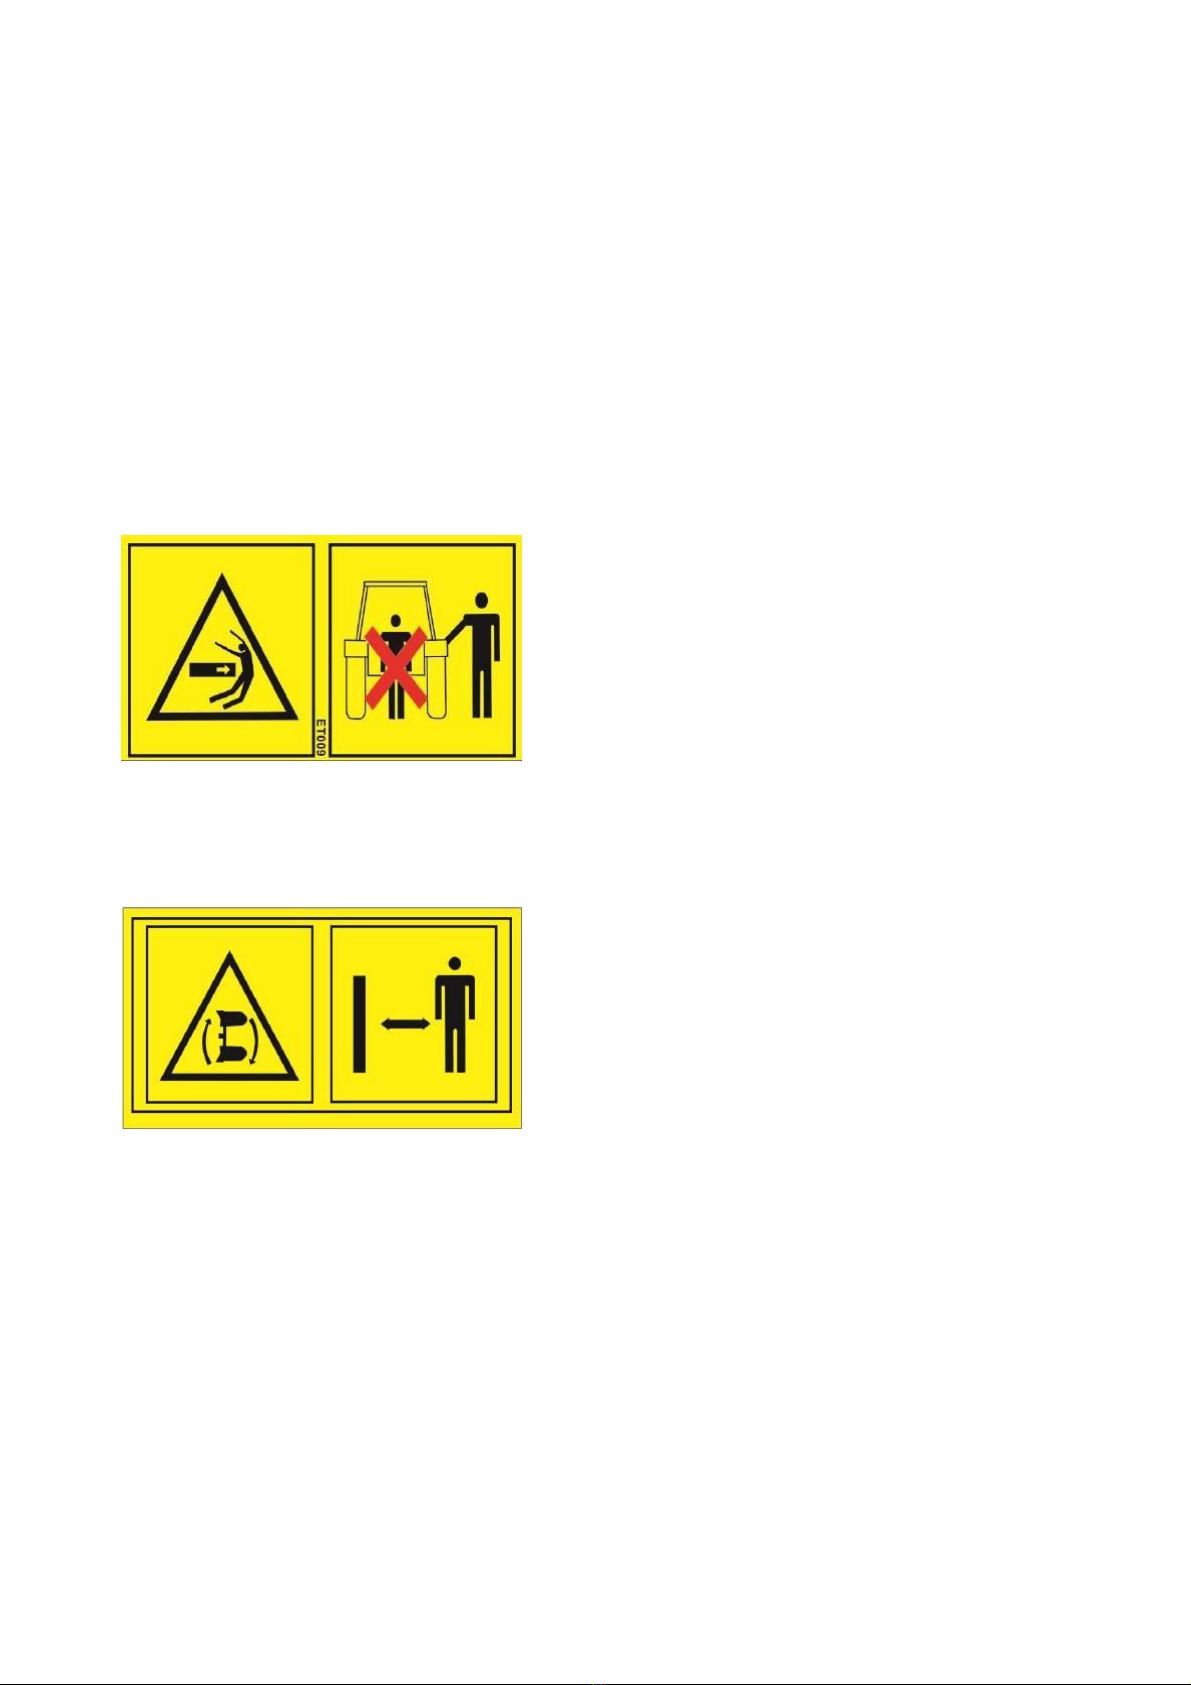
11. Pulluk üzerine yapıştırılmış olan uyarı
işaretlerinde, kazaların nasıl önlenebileceği
gösterilmektedir.
8. Pulluk monte edildiğinde, ağırlık traktör aksının
üzerine etki eder.
deneyimsiz ve sağlık sorunları nedeni ile traktör
kullanması uygun bulunmayan kişilerin traktörü
kullanması yasaktır.
taşınması kazalara ve yaralanmalara sebebiyet
verebilir.
4. Pullukla ilgili yapılacak tüm işlemler ve
ayarlamalardan önce, traktör kontak anahtarının
kapalı ve el freninin çekili konumda olması
gereklidir.
3. Pulluk traktöre bağlanmadan önce pulluk üzerinde
ki tüm civata sıkılıkları konrol edilmelidir.
2. Bu el kitabında, kazaların önlenmesiyle ilgili
hususlar açıklanmıştır. Bu kurallara uyulması
gereklidir.
işaretler pulluk üzerine yapıştırılmıştır.
5. Traktöre bağlanan pulluk ile çalışmaya
başlamadan önce çevresindeki kişi veya kişiler
uyarılmalıdır.
16. Do not start tillage without any knowledge on
the operations and the controls.
14. After mounting the plough to tractor do not
make sudden speed while using the plough.
7. When the plough is attached,tractor must not be
driven by an in experienced person,who has no
driving license or a person who has health
problems.It is definitely forbidden.
6. Transportation of any live or subjects on the
plough body can lead to accidents or injuries.
5. All persons around the plough should be
warmed before starting to work.
Kullanıcılar, bu kitapçıkta yer alan güvenlik ve
kazaların önlenmesi ile ilgili uyarılara uymalıdırlar.
Aksi halde meydana gelebilecek kazalardan üretici
firma sorumlu değildir.
1. Şekil-1’de, tehlike uyarı işaretleri açıklanmış ve bu
well.
2. In order to prevent any possible casualties , all
instructions are described in this handbook. Users
have to obey all of these instructions.
4. Before the adjustments and other operations,
the engine must be switched off and the tractor
must be braked.
3. Please check all tightness of bolts before
connecting the plough to tractor.
10. Please check all security tools before starting
the tractor and plough in a safe handling and
use.
14. Pulluk traktöre monte edildikten sonra çalışma
esnasında ani hızlanmalar yapılmamalıdır.
12. Bulunduğunuz ülkenin yol işaretlerine ve trafik
kurallarına her zaman uyunuz.
10. Traktör ve pulluğu çalıştırmaya başlamadan önce,
güvenli bir taşıma ve kullanım için, her zaman
bütün güvenlik araçlarını kontrol ediniz.
11. The attached caution signals on the plough
illustrate how to avoid any possible accidents.
18. Never leave the driving seat while the tractor
is moving.
18. Traktör hareket halindeyken, sürücü koltuğundan
ayrılmayınız.
8. After the attachment of plough, the weight shifts to
the tractor’s axles.
Carefully read the instructions before using the
plough.
Users have to obey the instructions in order to
prevent any possible casualties. Otherwise,
manufacturer is not responsible for any accidents
occur from negligence of the user.
1. On figure-1 , caution signals are explained.
These signals are attached on the plough, as
16. Çalışmaya başlamadan önce, her zaman
operasyon ve kontrollerin bilinmesi gerekir.
13. Traktör aksı üzerine gelen maksimum yük
durumuna, toplam değişken ağırlığa, taşıma
ayarlarına ve yol işaretlerine uyunuz.
13. Obey the maximum permissible weight on
the tractor’s axles, the total variable weight,
the carriage settings and the highway codes.
9. Traktöre bağlı olan pulluk ile sürüm işlemi
yapılırken maksimum hız 8-9 km/s hızla
yapılmalıdır.
9. While ploughing with the plough ,the speed must
be maximum 8-9 km/h
1. GÜVENLİK ÖNLEMLERİ 1. SAFETY PROVISIONS
15. Sürmeye başlamadan ve işletmeye almadan önce
yakın alanları kontrol ediniz! (Çocuklar!) Yeterli bir
görüş mesafesi olmasına dikkat ediniz!
15. Before you start ploughing check the near field!
(Children!). Pay attention to the fact that there is
enough visibility range.
12. Obey the highway codes of your country.
17. While attaching or removing the plough,maximum
attention must be paid.
www.unluziraat.com.tr
www.unluagriculture.com

olarak minimum 50cm havada olmalıdır.
21. Kaldırma işlemi sırasında dikkatli olunuz.
Emniyet mesafesini koruyunuz.
19. Pulluk takılıyken; özellikle traktörün yol
tutuşunu, direksiyon hâkimiyetini ve fren
kapasitesini hatırlayınız.
19. When the plough is attached on the tractor,
keep in mind the tractor’s stabilization,
steering and breaking ability.
20. While removing the plough, leave the lower
link arms down and ensure the plough is
placed on the ground.Then,stop the engine,
brake the wheels,and take out the starter key.
Transporting of plough must be done with
the machine which has capacity of 1,5
times larger than of it.
21. Pay attention while lifting the plough.
Safety distance must be kept.
20. Pulluğu traktörden ayırma işlemi esnasında,
hidrolik kollarını aşağıya indirerek, pulluğun
yere oturmasını sağlayınız. Motoru stop
ediniz, el frenini çekiniz ve kontak anahtarını
yerinden çıkarınız.
22. Dışarıdan yapılan manevra veya kaldırma
operasyonu esnasında kesinlikle pulluk
traktör arasında bulunmayınız.
22. While rotating or lifting the plough from the
out of tractor, do not stand between the
tractor and the plough.
23. Pullukla birlikte taşıma işlemi gerçekleştirirken
hidrolik kumanda kolunu kilitli pozisyona
ayarlayınız.
23. The hydraulically control levers must be locked
when the plough is on the carriage position.
24. Pulluğu taşıma işlemi kendi kapasitesinden
1.5 kat daha büyük olan makineler ile taşıma
işlemi yapılmalıdır.
24.
25. Pulluk taşınma esnasında yerden yaklaşık 25. During transportation the plough must
be minumun 50 cm up to the ground.
26. The genuine spare parts must be used and
they must be demanded from the manufacturer.
26. Yedek parçalarınızı üreticinizden temin ediniz
ve mutlaka orijinal yedek parça kullanınız.
27. The caution sign stickers must be always
legible and clean.The illegible stickers must
be replaced with the new ones. Local dealers
have to supply these caution sign stickers.
28. This handbook is for user / maintenance
manuals and spare parts catalog.It must be
kept until the end of plough’s usage time.
29. The supplier can not be held liable at the
damages arising from the arbitrary
revisions done by the user on the machine!
30. Keep the safety warning labels clean and
legible. Change the deforrmed labels.
31. Link the plough and the other accessories to
the tractor according to instructions. Your
driving capability is influenced by the
implements and the weights. Therefore pay
more attention to steering and break.
32. When turning the bends please consider
the wide load protrusion and side-slip
mass of the machine
33. Avoid the large clothes! The user should
not wear large garments that do not fit to
his/her body.
27. Taşıma işlemi ile ilgili uyarı işaretleri pulluk
üzerinde her zaman görünür ve temiz olmalıdır.
Pulluk üzerindeki okunaksız olan uyarı işaret-
lerinin yenilenmesi zorunlu bir gerekliliktir. Bu
yenileme işlemlerini bayiinizden yapmanız
mümkündür.
29. Makinede keyfi değişiklikler yapılması
üreticinin bundan dolayı oluşan hasarlar
için sorumluluğunun ortadan kalkmasına
neden olur!
30. Güvenlik uyarılarının bulunduğu etiketleri
temiz ve okunaklı durumda tutun! Hasarlı
olanlar değiştirilmelidir!
31. Cihazları talimatlara uygun şekilde bağlayın.
Sürüş tutumu, direksiyon ve fren kabiliyeti
cihaz ve ağırlıklardan etkilenir. Bu nedenle
yeterli direksiyon ve fren kabiliyetine dikkat
edin!
32. Virajları alırken geniş yük çıkıntısını ve
makinenin savrulma kütlesini göz önünde
bulundurun!
33. Kullanıcının giysileri bol olmayacak şekilde
vücuduna oturmalıdır.Bol giysilerden
sakınınız!
28. Kullanım ve bakım el kitabınızı ürününüz
eskiyinceye kadar saklayınız.
34. Aşınan alt takım parçaları yenileri ile
değitirilmelidir. Aksi taktirde istenilen sürüm
gerçekleşemez.
34. The elements of the plough that works in
the soil should be replaced when worn out.
Otherwise desired level of ploughing quality
can not be obtained.
www.unluziraat.com.tr
www.unluagriculture.com

35. Make sure that the plough is standing
steadily on its support leg after ploughing
process. Otherwise the plough might tilt
over and cause serious injury.
36. Never weld any part or any place on the
plough. The plough is made of hardened
steel and the welding inversely affects the
durability of the plough.
37. During the linkage of hydraulic cylinders and
motors the hydraulic hoses should be
connected as proposed.
38. When connecting the hoses to the hydraulic
system of the tractor one should assure that
there is no hydraulic pressure at either side.
(tractor side and plough side)
39. Regularly check the hydraulic hose lines.
Replace them in case of damage or wear in
accordance with the technical requirements of
the producer.
40. The fluids (hydraulic oil) might escape under
high pressure, contact with your skin and
cause severe injury! In case of injury seek
medical advice immediately.
41. If you are to work on the hydraulic system,
detach the plough first. Remove the pressure in
the hydraulic system and stop the engine.
42. Regularly check the tyre pressure and keep the
tyre pressure at proposed level.
43. When transporting the plough on the road
the maximum allowable speed is 25 km/h.
Higher speeds bring about overstrain on
the tractor and the plough and this may
cause substantial damages.
44. When transporting on the road open to
traffic, the rules and the legislations of the
related country must be followed.
46. All bolts and nuts should be tightened after the
first use. Thereafter they should be checked
every 20 work hour and if necessary
re-tightened or replaced.
35. Sürme işlemi bittikten sonra pulluğunuzu
muhakkak destek ayağının üzerinde
dengeli bir biçimde durduğundan emin
olunuz. Aksi takdirde pulluk devrilebilir ve
ciddi yaralanmalara sebebiyet verebilir.
36. Pulluğun herhangi bir yerinde asla kaynak
işlemi yapmayın. Pulluk sertleştirilmiş
çelikten yapılmıştır ve herhangi bir kaynak
pulluğun dayanımını olumsuz olarak etkiler
37. Hidrolik silindirlerin ve motorların bağlanması
sırasında hidrolik hortumların öngörülen
bağlantısına dikkat edilmesi gerekmektedir!
38. Hidrolik hortumların traktör hidroliğine
bağlanması sırasında, hidroliğin hem traktör,
hem de makine tarafında basınçsız olmasına
dikkat edilmelidir!
39. Hidrolik hortum hatlarını düzenli olarak kontrol
edin, hasar ve eskime durumunda değiştirin!
Değişim hatları, cihaz üreticisinin teknik
gerekliliklerine uygun olmalıdır!
40. Yüksek basınç altında dışarı çıkan sıvılar
(hidrolik yağı) cilde nüfuz ederek ağır
yaralanmalara yol açabilir! Yaralanma halinde
derhal doktora başvurun! Enfeksiyon tehlikesi!
41. Hidrolik sistemdeki çalışmalardan önce cihazı
indirin. Sistemi basınçsız hale getirin ve motoru
durdurun!
42. Lastik hava basıncını düzenli aralıklarla kontrol
ediniz! Öngörülen hava basıncına dikkat ediniz!
43. Pulluğun taşıması esnasında traktör
maksimum 25 km/h hızla ilerlemelidir.Daha
yüksek hızlar traktörde ve pullukta aşırı
zorlanmalara sebep olur.Bu drurum büyük
hasarlara sebep olabilir.
46. Tüm cıvatalar ve somunlar ilk kullanımdan
sonra sıkılmalı, ardından her 20 çalışma
saatinde bir kontrol edilmeli ve gerekiyorsa
tekrar sıkılmalı ya da değiştirilmelidir (kesme
cıvatası).
47. Aşınan alt takım parçaları yenileri ile
değitirilmelidir. Aksi taktirde istenilen sürüm
gerçekleşemez.
47. The elements of the plough that works in
the soil should be replaced when worn out.
Otherwise desired level of ploughing quality
can not be obtained.
44. Trafiğe açık yollarda taşımayla ilgili söz
konusu ülkenin yasama mercilerince
öngörülen trafik kurallarına ve mevzuatına
uyulmalıdır!
48. Yüksek basınçlı temizleyicileri yatak ve hidrolik
parçalarını temizlemek için kullanmayın. Fazla
yüksek basınçla yapılan temizlikte boya
hasarları oluşabilir! Paslanma tehlikesi!
49. Açık havada uzun süre bırakılacaksa piston
kollarını temizleyin ve ardından gres ile koruma
altına alın.
49. If the plough is to stay outdoors a long time,
clean the piston rods and then put them under
grease protection.
48. Do not use high pressure cleaners to clean
hydraulic and moving parts. High pressure
cleaning might cause paint damage.
(Corrosion risk!)
www.unluziraat.com.tr
www.unluagriculture.com

Makine, güvenli bir çalışma sağlayan tüm
tertibatlarla donatılmıştır. Fonksiyon güvenliği
göz önünde bulundurularak tehlikeli yerlerin
tam olarak emniyete alınamadığı yerlerde,
artık tehlikelere işaret eden resimli ikaz
işaretleri bulunmaktadır. Hasarlı, kaybolmuş
veya okunaksız hale gelmiş resimli ikaz
işaretlerinin derhal yenilenmesi gerekmektedir.
Lütfen resimli ikaz işaretlerinin anlamlarını öğreniniz.
Aşağıdaki açıklamalarda bunlar ayrıntılı şekilde
belirtilmektedir.
İşletmeye almadan önce işletme kılavuzunu ve güvenlik
talimatlarını okuyunuz ve bunlara dikkat ediniz.
1.1 Güvenlik ve resimli ikaz işaretleri
1.1.1 Genel Husular
1.1.2 Resimli ikaz işaretlerinin anlamı
The machine is equipped with all devices that
provides a secure work. You will see some
pictorial warning signs on the machine which
refers to a risk or danger. Pay attention to
those warning signs. Damaged, lost and
illegible warning signs should immediately be
replaced.
Please learn the meaning of pictorial warning signs
which are described below in detail.
Before operating your plough please read the
operational manual, and security instructions
carefully
1.1 Security and pictorial warning signs
1.1.1 General Matters
1.1.2 Meaning of pictorial warning signs
www.unluziraat.com.tr
www.unluagriculture.com
Etiket / Tag - ET010
DİKKAT !
İşe başlamadan önce
kullanım kılavuzuna
bakınız.
WARNING !
Read the manuel
before tillage.

www.unluziraat.com.tr
www.unluagriculture.com
WARNING !
Check the screw
tightness.
DİKKAT !
Civata sıkılıklarını
kontrol ediniz.
DANGER !
While lifting the plough
from the out of tractor,
don’t stand between the
tractor and the plough.
Keep safety distance.
TEHLİKE !
Dışarıdan yapılan
kaldırma manevrası
esnasında kesinlikle
pulluk ile traktör arasında
bulunmayınız. Güvenlik
mesafesini koruyunuz.
DANGER !
While attaching the plough,
keep safety distance case
of squash danger.
TEHLİKE !
Askıya alma işlemi
sırasında ezilme tehlikesine
karşı güvenlik mesafesini
koruyunuz.
DANGER !
Keep safety distance
while parking the
plough parked.
TEHLİKE !
Pulluğu park ederken
güvenlik mesafesini
koruyunuz.
Etiket / Tag - ET011
Etiket / Tag - ET009
Etiket / Tag - ET008
Etiket / Tag - ET007

Şekil / Figure - 1
1.2
Resimli ikaz işaretlerinin ve diğer işaretlerin konumlandırılması
1.2
Positioning pictorial warning signs and other signs
www.unluziraat.com.tr
www.unluagriculture.com

2.1. Açıklamalar
2.1. Descriptions
2. GENEL AÇIKLAMALAR ve
TEKNİK BİLGİLER
2. GENERAL and TECHNICAL
INFORMATION
1. 3 Nokta Askı Düzeneği
2. Ürün Etiketi
3. Hidrolik Silindir
4. Kulak
5. Uç Demiri
6. Taban Demiri
7. Ok
8. Çatı
9. Derinlik Ayar ve Taşıma Tekerleği
1. 3 Point Hitch
2. Identification Plate
3. Hydraulic Cylinder
4. Mouldboard
5. Share
6. Landslide
7. Beam
8. Frame
9. Depth Control and Transport Wheel
Şekil / Figure - 2
www.unluziraat.com.tr
www.unluagriculture.com

Nadas ve anızlı toprakların işlenmesi,
Toprağın kabartılması, parçalanması ve
devrilmesi,
Gübre ve bitki artıklarının toprağa kapatılması soil.
Our ploughs are in Category II and designed with 3
point hitch.
Ploughing the fallowed and stubble fields.
Cutting, breaking and overturning the soil.
Overturning the plant residues and fertilizer into
ÜNLÜ ploughs are developed for modern farmers
who focus on professional farming, functional equipment
and economical operation. We have achieved this
through our unique design and well-thought-out every
single details. Also, heat - treated pieces on ÜNLÜ
ploughs allows to be used for a long period. Our ploughs
can be used for;
ÜNLÜ pullukları; kullanışlı donanımla ve düşük
maliyetlerle, profesyonel çiftçiliğe odaklanmış, çağdaş
çiftçiler için üretilmiştir. Bunu, en ince ayrıntıları dahi
düşünerek ortaya çıkardığımız eşsiz tasarımımız
sayesinde başardık. Ayrıca, üretim aşamasında, ısıl
işleme tabi tutulmuş pulluklarımız, müşterilerimize uzun
süreler hizmet sağlamaktadır. Pulluğumuzu;
2.2. Teknik ve Genel Bilgiler 2.2. General and Technical Information
amacı ile kullanabilirsiniz.
Pulluklarımız Kategori II' de 3 nokta askı sistemine göre
tasarlanmıştır.
Tablo / Table - 1
www.unluziraat.com.tr
www.unluagriculture.com
KOD AÇIKLAMA ARA AĞIRLIK GÜÇ
CODE DESCRIPTION WEIGHT POWER
(cm.) (kg.) (mm.) (mm.) (HP) (mm.)
DM1200050975 5Soklu 9'' 75 970 1150-1600 720 80-105 190-230
Furrows
TEORİK İŞ
GENİŞLİĞİ
ÇATI
YÜKSEKLİĞİ
SÜRME
DERİNLİĞİ
BEAM
DISTANCE
WORKING
WIDTH
FRAME
CLEARANCE
WORKING
DEPTH
GÖVDE / FRAME SIZE : 120x100x8.8

GÖVDE / FRAME SIZE : 140x140x8.8
GÖVDE / FRAME SIZE : 120x120x8.8
www.unluziraat.com.tr
www.unluagriculture.com
Tablo / Table - 2
KOD AÇIKLAMA ARA AĞIRLIK GÜÇ
CODE DESCRIPTION WEIGHT POWER
(cm.) (kg.) (mm.) (mm.) (HP) (mm.)
DM1220051285 5Soklu 12'' 85 1280 1500-2250 780 105-135 270-310
Furrows
DM1220051291 5Soklu 12'' 91 1300 1500-2250 780 105-135 270-310
Furrows
DM1220051295 5Soklu 12'' 95 1320 1500-2250 780 105-135 270-310
Furrows
DM1220051485 5Soklu 14'' 85 1300 1500-2250 780-850 115-145 300-350
Furrows
DM1220051491 5Soklu 14'' 91 1320 1500-2250 780-850 115-145 300-350
Furrows
DM1220051495 5Soklu 14'' 95 1340 1500-2250 780-850 115-145 300-350
Furrows
DM1220051685 5Soklu 16'' 85 1550 1500-2250 800-870 135-165 350-400
Furrows
DM1220051691 5Soklu 16'' 91 1565 1500-2250 800-870 135-165 350-400
Furrows
DM1220051695 5Soklu 16'' 95 1620 1500-2250 800-870 135-165 350-400
Furrows
DM1220051615 5Soklu 16'' 105 1650 1500-2250 800-870 135-165 350-400
Furrows
TEORİK İŞ
GENİŞLİĞİ
ÇATI
YÜKSEKLİĞİ
SÜRME
DERİNLİĞİ
BEAM
DISTANCE
WORKING
WIDTH
FRAME
CLEARANCE
WORKING
DEPTH
KOD AÇIKLAMA ARA AĞIRLIK GÜÇ
CODE DESCRIPTION WEIGHT POWER
(cm.) (kg.) (mm.) (mm.) (HP) (mm.)
DM1420051285 5Soklu 12'' 85 1340 1500-2250 780 105-135 270-310
Furrows
DM1420051291 5Soklu 12'' 91 1350 1500-2250 780 105-135 270-310
Furrows
DM1420051485 5Soklu 14'' 85 1350 1500-2250 780-850 115-145 300-350
Furrows
DM1420051491 5Soklu 14'' 91 1360 1500-2250 780-850 115-145 300-350
Furrows
DM1420051495 5Soklu 14'' 95 1375 1500-2250 780-850 115-145 300-350
Furrows
DM1420051415 5Soklu 14'' 105 1400 1500-2250 780-850 115-145 300-350
Furrows
DM1420051691 5Soklu 16'' 91 1600 1500-2250 800-870 135-165 350-400
Furrows
DM1420051695 5Soklu 16'' 95 1650 1500-2250 800-870 135-165 350-400
Furrows
DM1420051615 5Soklu 16'' 105 1775 1500-2250 800-870 135-165 350-400
Furrows
TEORİK İŞ
GENİŞLİĞİ
ÇATI
YÜKSEKLİĞİ
SÜRME
DERİNLİĞİ
BEAM
DISTANCE
WORKING
WIDTH
FRAME
CLEARANCE
WORKING
DEPTH
DM1420516115 5Soklu 16'' 1152380 1500-2250 800-870 135-165 350-400
Furrows
Tablo / Table - 3

traktörün önüne düzenli şekilde yerleştirilmelidir.
(Ek ağırlığı kontrol ediniz.)
Taşıma işlemi esnasında, salınımı engellemek
with the plough.
Tyres pressure of tractor must be sufficient.
In order to ensure steering and braking ability,
additional ballast must be placed correctly. (Check
the additional ballasts)
Traktörün çekiş gücü pullukla uyumlu olmalıdır.
Traktör lastik basıncı yeterli olmalıdır.
Yol tutuş ve fren kapasitesi için, denge ağırlıkları,
Sol ve sağ hidrolik kolları eşit aralıkta olmalıdır.
Propelling power of tractor must be convenient
3. İŞ DURUMUNA HAZIRLIK 3. PREPARATION BEFORE TILLAGE
3.1. Preparation of Tractor Before Attaching
3.1. Pulluk Takılmadan Önce Traktör Ayarı Plough
Şekil / Figure - 4
Şekil / Figure - 5
Şekil / Figure - 3
Uygun bir direksiyon hâkimiyeti ve güvenli bir
sürüş için traktörün toplam ağırlığının en az %20’si
ön aksta bulunmalıdır. (Şekil-3)
In order to ensure the safety steering and driving
ability, at least 20% of total weight of tractor must
be shifted to the front axle. (Figure-3)
(Şekil-4)
The distance between left and right lower link
arms must be equal. (Figure-4)
için, yan kol gergi zincirlerinin (4) boşluğunu
kontrol edin. (Şekil-5)
In order to prevent swinging of the lower link arms
(4) on carriage position, check the slackness of
arms. (Figure-5)
www.unluziraat.com.tr
www.unluagriculture.com

P1
1
P2
Traktör hidrolik kollarını pozisyon kontrolüne
Tillage process is performed by one of these two
ways; traction control or mix control.
3.2. Attaching Plough to Tractor
Hydraulically control levers must be on the
3.2. Pulluğun Traktöre Bağlanması
yeterli değilse ilave edin.
Pulluğu indirme ve kaldırma işlemlerinde, hidrolik
Check the fuel level. If it is not sufficient for the
total tillage time, additional fuel must be filled up.
Check the oil level. If there is a deficient,
additional oil must be filled up.
Yağ seviyesini kontrol edin, eksikse tamamlayın.
Yakıt seviyesini kontrol edin. Yapılacak işlem için
Sürme işlemi için, mümkün olan en büyük salınım
mesafesini bırakınız.
Swinging distance must be largest in tillage
position.
position control (ST) point.
Hitch the lower link arms and secure the
Şekil / Figure - 6
(ST) getirin.
Yan kolları, eksantriğe takın ve pimle güvenliğe
alın. (Şekil-7) connection with a linchpin. (Figure-7)
Salınımı önlemek amacıyla gergi zincirlerini (4)
gerdirin. (Şekil-5)
In order to prevent swinging, tighten the slackness
of lower link arms (4). (Figure-5)
Hidrolik hortumlarını bağlayanız. Hortumlar ve
bağlantı yerleri temiz olmalıdır. Her kullanımdan
sonra, hortum uçlarını plastik kapakları ile
kapatınız. Hidrolik hattındaki yağ basıncını
düşürmek için, hidrolik kontrol kolunu birkaç kez
ileri geri hareket ettiriniz. (Şekil-8)
Connect the hydraulic hoses. The hoses and the
quick couplings must be clean. After every tillage
process, all nozzles must be recapped for further
protection. In order to decrease the oil pressure in
hydraulic lines, hydraulically control levers must
be switched up or down several times. (Figure-8)
Pulluğun üst bağlantı noktası (P1) ile traktörün
orta kolu (1) bağlandığında; (P1) noktası (P2)
noktasına göre daha yüksekte olmalıdır. (Şekil-9)
The top hitching point of the plough (P1) must be
placed higher than the (P2) when the top hitching
point (P1) and the central connection arm of
tractor (1) is hitched. (Figure-9)
Şekil / Figure - 9
Şekil / Figure - 7 Şekil / Figure - 8
Sürme işlemi, iki operasyondan birisiyle gerçekleşir;
çekiş kontrolü veya mix kontrol.
kontrol kolları pozisyon kontrolü (ST)
konumunda olmalıdır. (Şekil-6)
www.unluziraat.com.tr
www.unluagriculture.com
Hydraulically control levers must be on the
position control (ST) point, while lifting and
lowering the plough. (Figure-6)

3.3. Pulluğun Traktörden Ayrılması
Hidrolik kumanda kolu ile pulluğu düz ve sağlam
bir düzlem üzerine indiriniz.
Motoru durdurunuz. Hidrolik hattındaki yağ
basıncını düşürmek için hidrolik kumanda kolunu
(ST) birkaç defa ileri geri hareket ettiriniz.
3.4. Sürüm Öncesi Yapılacak Ayarlar
Etkili bir sürüm ve yakıt tasarrufu için tarlaya
gitmeden önce uygun ayarları yapmalısınız.
Pulluğu kaldırdıktan sonra traktör lastik havalarını
3.3. Removing Plough
While the plough is removing, it must be lowered
on the flat and solid ground with the help of
hydraulically control levers.
Switch of the tractor’s engine. In order to decrease
the oil pressure in hydraulic lines, hydraulically
control levers (ST) must be switched up or down
several times.
Disconnect all hydraulically connections.
The support stand must be set down.
Unhitch upper and lower links of the plough.
3.4. Adjustments Before Till
In order to perform efficient tillage and also to
lower the fuel consumption, all adjustments must
be done properly.
Hidrolik hortum bağlantılarını traktörden çıkarınız.
Pulluk destek ayağını aşağıya indiriniz.
Pulluğu üst ve alt bağlantılarından ayırınız.
Hidrolik kumanda kolunu kontrol pozisyonuna
getiriniz. (Şekil-6)
Hydraulically control levers must be on the
position control (ST) point. (Figure-6)
Şekil / Figure - 10
kontrol edin, gerekli ise hava basınçlarını
ayarlayınız. (Şekil-10)
After lifting of plough, tyres pressure of tractors
must be checked. (Figure-10)
Traktörün bir tarafındaki lastikleri 20 cm.
yükseltiniz. Bu durumda iken, pulluğu aşağıya
indirin ve düzlemle olan paralelliğini orta kol ve yan
kollarla ayarlayınız. (Şekil-11)
Any tyres at the one side of the tractor must be
heightened 20 cm. While staying at the position set
down the plough on the ground and check the
perpendicularity of plough with respect to the
ground. (Figure-11)
Şekil / Figure - 11
www.unluziraat.com.tr
www.unluagriculture.com
20 cm
Gövde şasesi yere paralel olmalı (Şekil / Figure-10)
Horizontality of the frame to the ground (Şekil / Figure-10)

Arka ve ön gövdelerin sürme derinlikleri farklı ise,
orta kolu kısaltınız veya uzatınız. Eğer orta kol
doğru ayarlanırsa, ökçe demiri, çizi tabanında hafif
bir iz bırakır.
Doğru sürme derinliği ayarlandığında, hidrolik
kumanda kolunu, ayarlı pim ile güvenli konuma
alınız.
Switch the hydraulically control levers on traction
control position.
After the first furrow’s tillage, the depth and the
width of the furrow must be checked before
starting the tillage of second furrow. In order to
have enough slackness, lower link arms must be
checked one more time.
If there is a depth difference in the front and rear
furrows of the plough, the central adjustment arm
of the tractor should be shortened or lengthened.
If the central arm is adjusted properly, the landside
is marked slightly in the bottom of the furrow.
The hydraulically adjustment lever must be
secured with the adjustment pin when the depth of
the tillage is proper.
During tillage process, if the plough forces to
3.5. Sürüm Esnasında Yapılan Ayarlar 3.5. Adjustments During Tillage
Şekil / Figure - 12 Şekil / Figure - 13
Pulluğun batış ayarı, diklik ayar civatası ile
yapılır. Bıçakların aşınmasıyla, şekilde gösterilen
mesafede artacaktır. (Şekil-12)
The depth adjustment of the plough is adjusted by
abruptness adjustment screw. The distance
illustrated on the figure-12 is going to be
increased by wear of the share.
Eğer pulluk, sürülmemiş tarafa doğru çekiyorsa;
yan ayar kolunu uzatınız; sürülmüş tarafa doğru
çekiyorsa, kolu kısaltınız. (Şekil-13)
change the direction of the tractor, the
adjustments must be done with the help of the
side adjusting lever of the plough. (Figure-13)
Şekil / Figure - 15
Şekil / Figure - 14
İstenildiği takdirde, farklı iş genişliklerinde sürüm
yapmak mümkündür. Şekil-14 e bakarak ayar
kasalarından, gerekli ayarlamaları yapabilirsiniz.
Working width can be adjusted manually by user.
For further information, look at the figure-14.
Ön gövde ayarı, kızak ayar vidası ile yapılır. Eğer
yer alma fazla ise vidalı mili sağa,az ise sola
doğru çeviriniz. (Şekil-15)
The width of front groove is adjusted by front
groove width adjustment screw illustrated on
figure-15. If the width of front groove is wide, the
adjustment screw should be turned to right; if the
width is narrow, the screw should be turned left.
Hidrolik kollarını çeki kontrol konumuna getiriniz.
Pullukla ilk çiziyi açıp, ikinci çiziye girmeden önce,
çizi derinliğini ve genişliğini kontrol ediniz. Yeterli
gevşeklik için yan kol gergi zincirlerini bir kere
daha kontrol ediniz.
www.unluziraat.com.tr
www.unluagriculture.com

Sürme derinlik ayarı, traktörün hidrolik kolları ile
Pulluğu tamamen kaldırın.
Hidrolik kumanda kolunu, H pozisyonuna getirin.
Pulluk 180° dönecektir.
Döndürme işleminden sonra, hidrolik kumanda
kolunu O pozisyona getirin. İkinci bir döndürme
işleminden önce 5-10 saniye beklenmelidir.
Rotating mechanism consists of double acting
position. The plough will be rotated 180°.
After the rotation is completed, switch the lever to
O position. Before the second rotation attempt, 5 -
10 seconds must be waited.
4. TILLAGE DEPTH
4.SÜRME DERİNLİK AYARI
5. PULLUĞUN DÖNDÜRÜLMESİ 5. ROTATING PLOUGH
yapılır. Bunun dışında, düzgün bir sürme derinliği elde
etmek için; bütün pulluklara 1 ve 2 numaraları civatalar ile
ayarlanabilen, derinlik ayar tekerleği takılabilir. (Şekil-16)
Şekil / Figure - 17 Şekil / Figure - 18
Döndürme mekanizması, çift etkili silindir ve kilitleme
valfinden ibarettir. (Şekil-17)
Döndürme işlemi için;
Hidrolik kumanda kolu S pozisyonunda iken, ikinci
döndürme işlemi başlayabilir. (Şekil-18)
When the lever is on S position, the second
rotation can be attempted. (Figure-18)
Şekil / Figure - 16
hydraulic cylinder and locking valve. (Figure-17)
Rotating process;
Lift the plough completely up.
Switch the hydraulically control levers to H
The tillage depth is adjusted through the hydraulical
control levers of the tractor. Also, additional depth control
can be adjusted by a depth control wheel which has
depth adjustment by bolt 1 and bolt 2. (Figure-16)
www.unluziraat.com.tr
www.unluagriculture.com

A
3 ve daha fazla soklu pulluklarda, taşıma işleminden
önce orta kolu çıkartınız.
Pulluğu taşıma işlemine başlamadan önce, çok
In order to carry the plough easier, the multi -
The central link arm (top hitching point) must be
removed before carriage position.
6. TAŞIMA ve PARK ETME 6. CARRIAGE and PARKING POSITION
Kolay ve güvenli taşıma yöntemi için, her zaman çok
amaçlı lastik tekerleği kullanınız. 3 ve daha fazla soklu
olan pulluklarımız, çok amaçlı lastik tekerlek ile
donatılmıştır. (Şekil-16)
purpose rubber wheels always must be used. Our
ploughs, which have 3 and more furrows, have been
equipped with multi - purpose rubber wheels. (Figure-
16)
Pulluk park halindeyken, D destek ayağı sağlam bir
şekilde zemine oturmalıdır. Sürme işlemi esnasında ise,
D1 pozisyonunda olmalıdır. (Şekil-19)
The support stand (D) must be set down on the
ground in the parking position. But during the tillage or
carriage position, it must be lifted (D1). (Figure-19)
amaçlı lastik tekerleği, taşıma durumuna getiriniz. Bunun
için; A ve B pimlerini çıkartınız. Tekerleği döndürerek A
pimini 1 nolu deliğe takınız. (Şekil-20)
Before beginning carriage, remove A and B pins in
order to switch on the multi - purpose rubber wheel to
carriage position. Then, turn the wheel and put A pin into
hole 1. (Figure-20)
Şekil / Figure - 20
Şekil / Figure - 21
Before begining the transport process, make sure to
position the lock pin fixing. (Figure-21)
Taşıma işlemine başlamadan önce, sabitleme pimininkilit
pozisyonunda olmasına dikkat edin. (Şekil-21)
Şekil / Figure - 19
www.unluziraat.com.tr
www.unluagriculture.com
'
$
'
%

İlk 10 saatlik çalışma sonucunda, pulluğunuzun tüm
gösterilen gresörlüklerine, gres yağı basınız.
Sezonluk çalışma işleminizi bitirdiğinizde, pulluğunuzu
temizleyiniz ve kulakları paslanmaya karşı gres yağı ile
yağlayarak muhafaza ediniz.
After the first 10 hours tillage, all bolts and nuts of the
plough must be tightened again. Especially, the tightness
of the bolts and the nuts on the moulboards, shares, and
landsides must be checked often. After the first
maintenance, the same process must be performed in
every 100 hours working periods.
civata ve somun sıkılıklarını kontrol ediniz. Özellikle kulak
ve uç demirleri kontrol edilmelidir. İlk bakımdan sonra, bu
işlemi her 100 saatlik çalışma dönemlerinde tekrarlayınız.
7. BAKIM 7. MAINTENANCE
At the end of the tillage season, the plough must be
cleaned and the moulboards must be lubricated with
grease in order to prevent the corrosion.
Her kullanımdan önce, pulluğunuzun Şekil-22’de
Before every tillage process, all lubricators must be
filled up with grease. (Figure-22)
Şekil / Figure - 22
www.unluziraat.com.tr
www.unluagriculture.com
Table of contents