Uraku S-200C User manual

1
U
UU
URAKU S
RAKU SRAKU S
RAKU S-
--
-200
200200
200C
CC
C HD DVR
HD DVR HD DVR
HD DVR
User’s Manual
User’s ManualUser’s Manual
User’s Manual

Table of Contents
1. Introduction -----------------------------------------------------------------------------------------------------4
1.1 Preface ................................................................................................................................4
1.2 Packing List........................................................................................................................4
1.3 Cautions..............................................................................................................................5
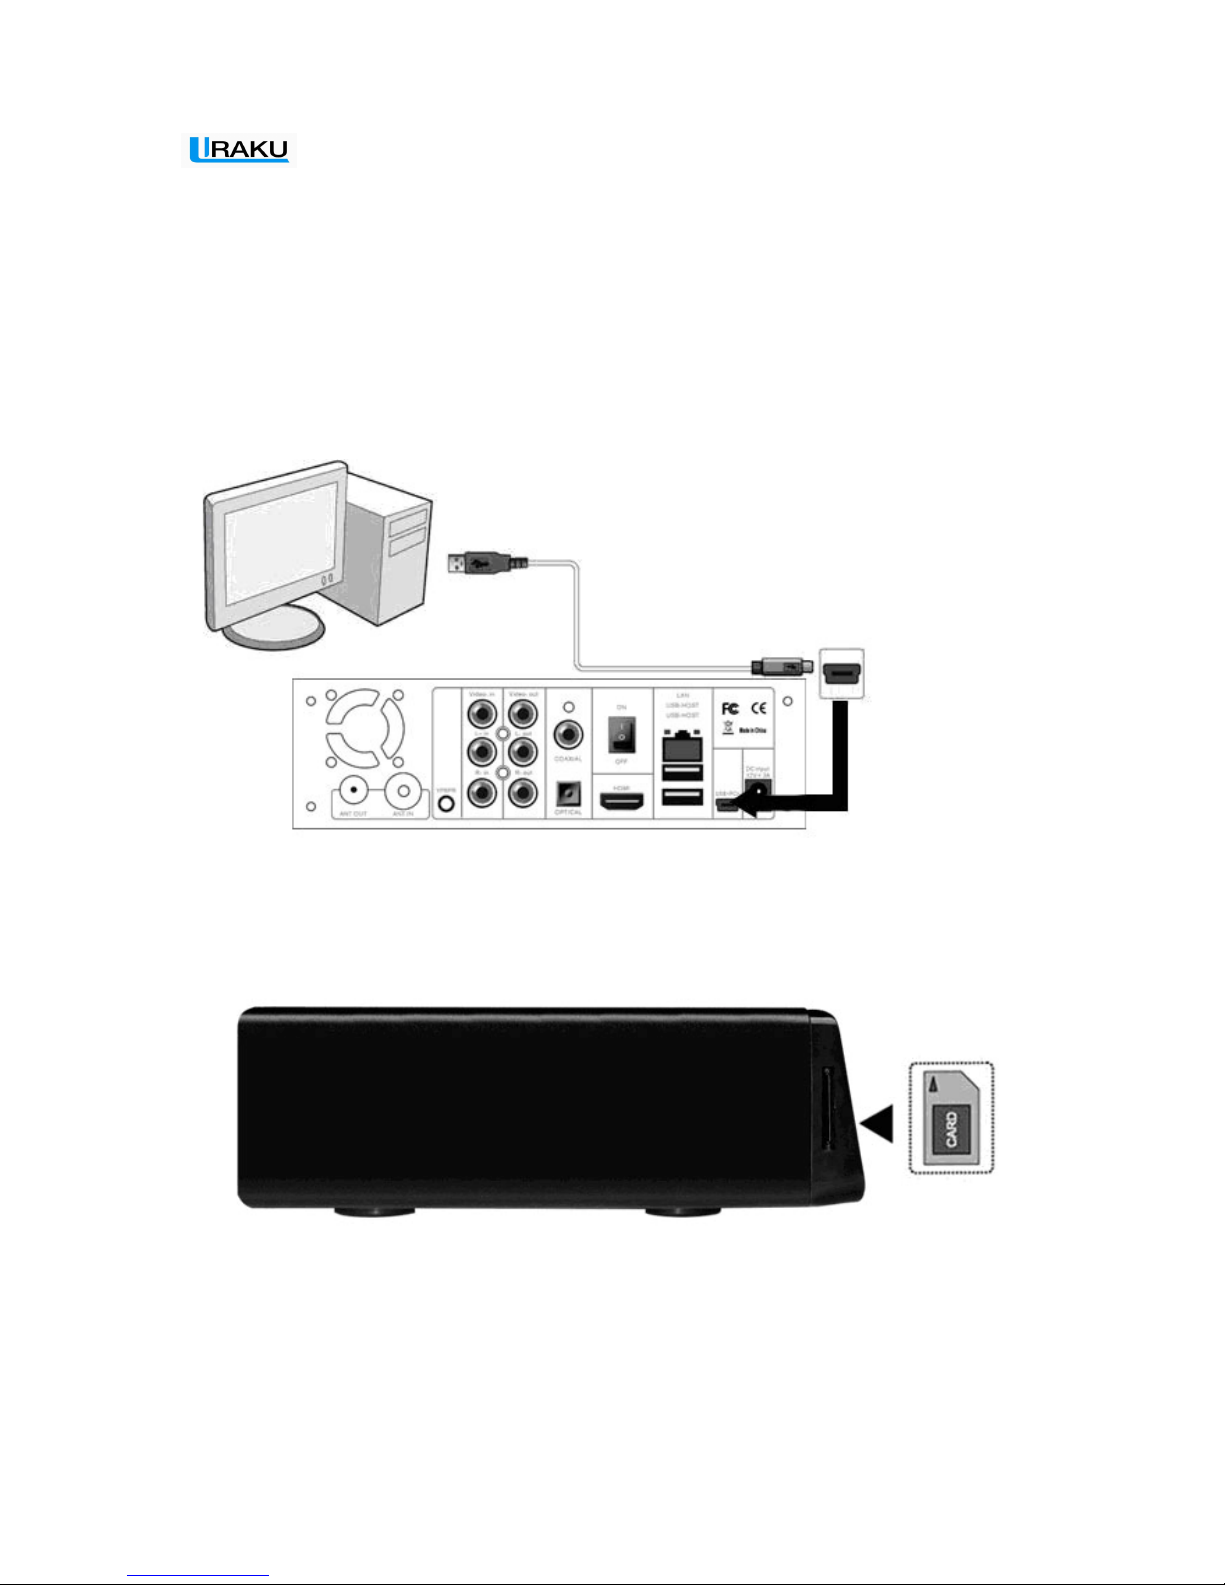
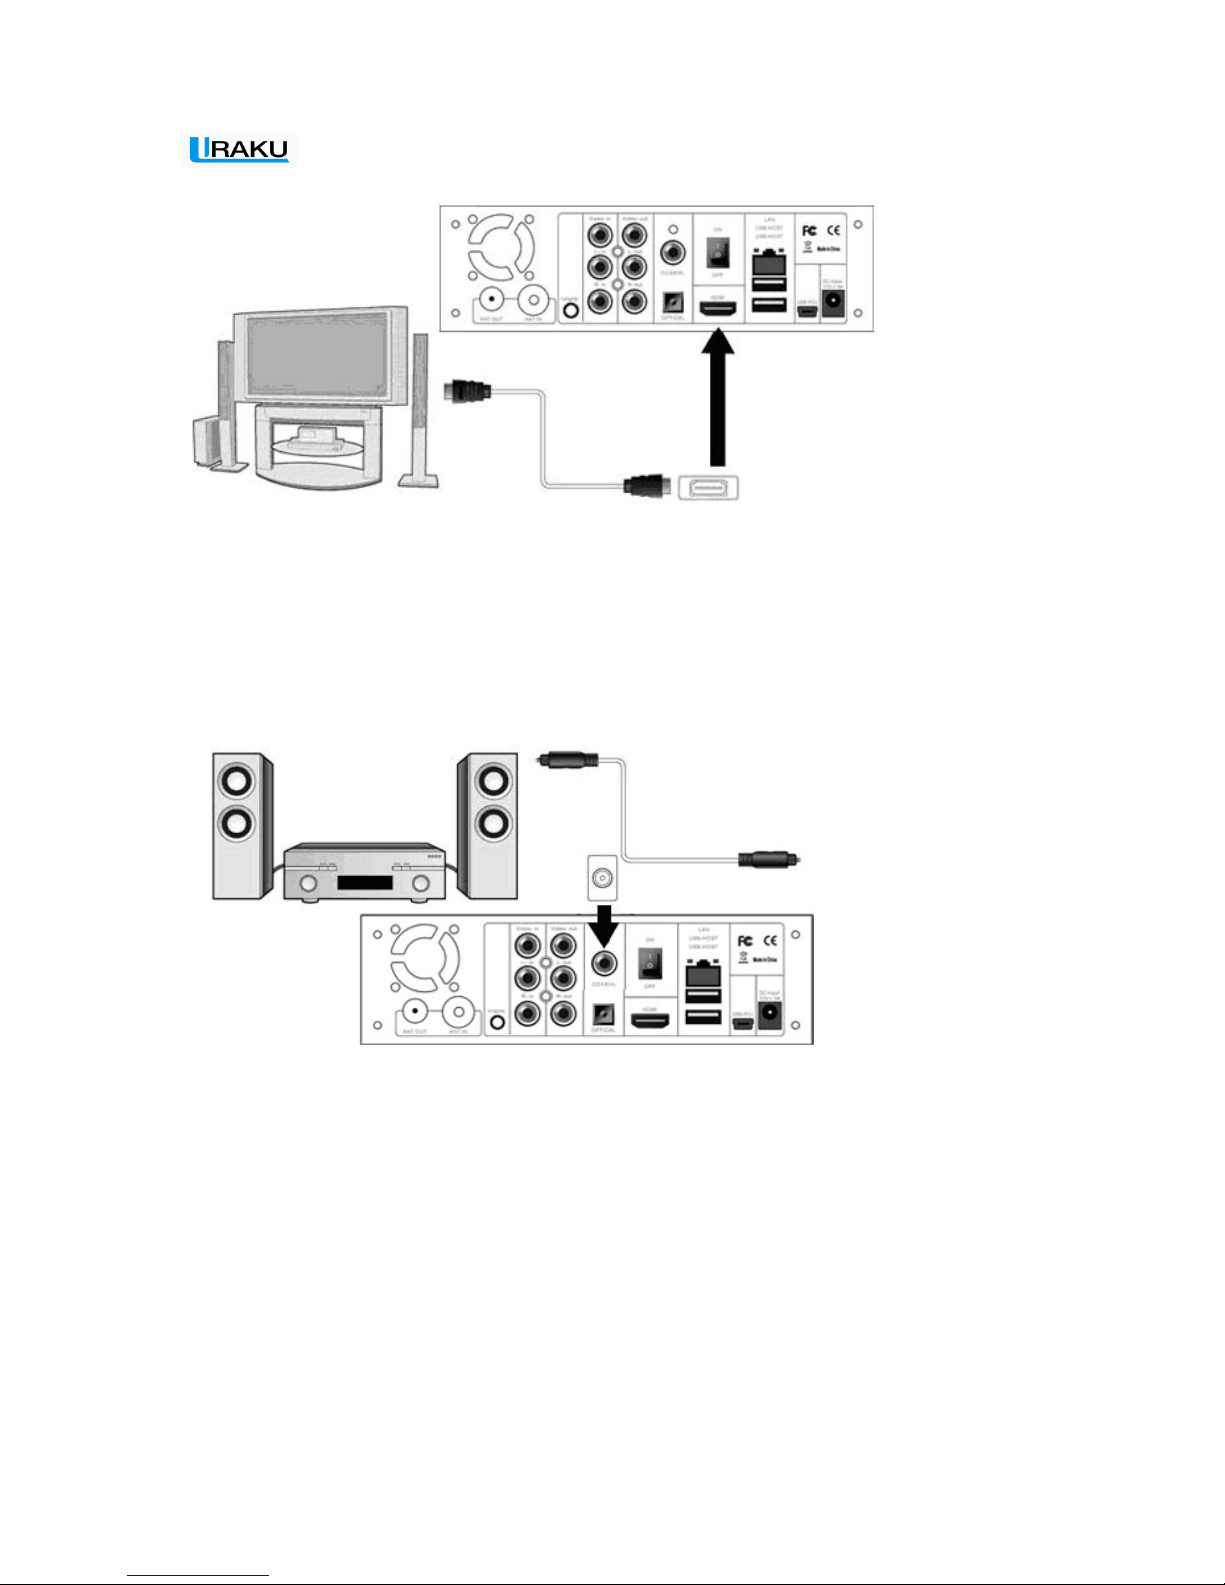
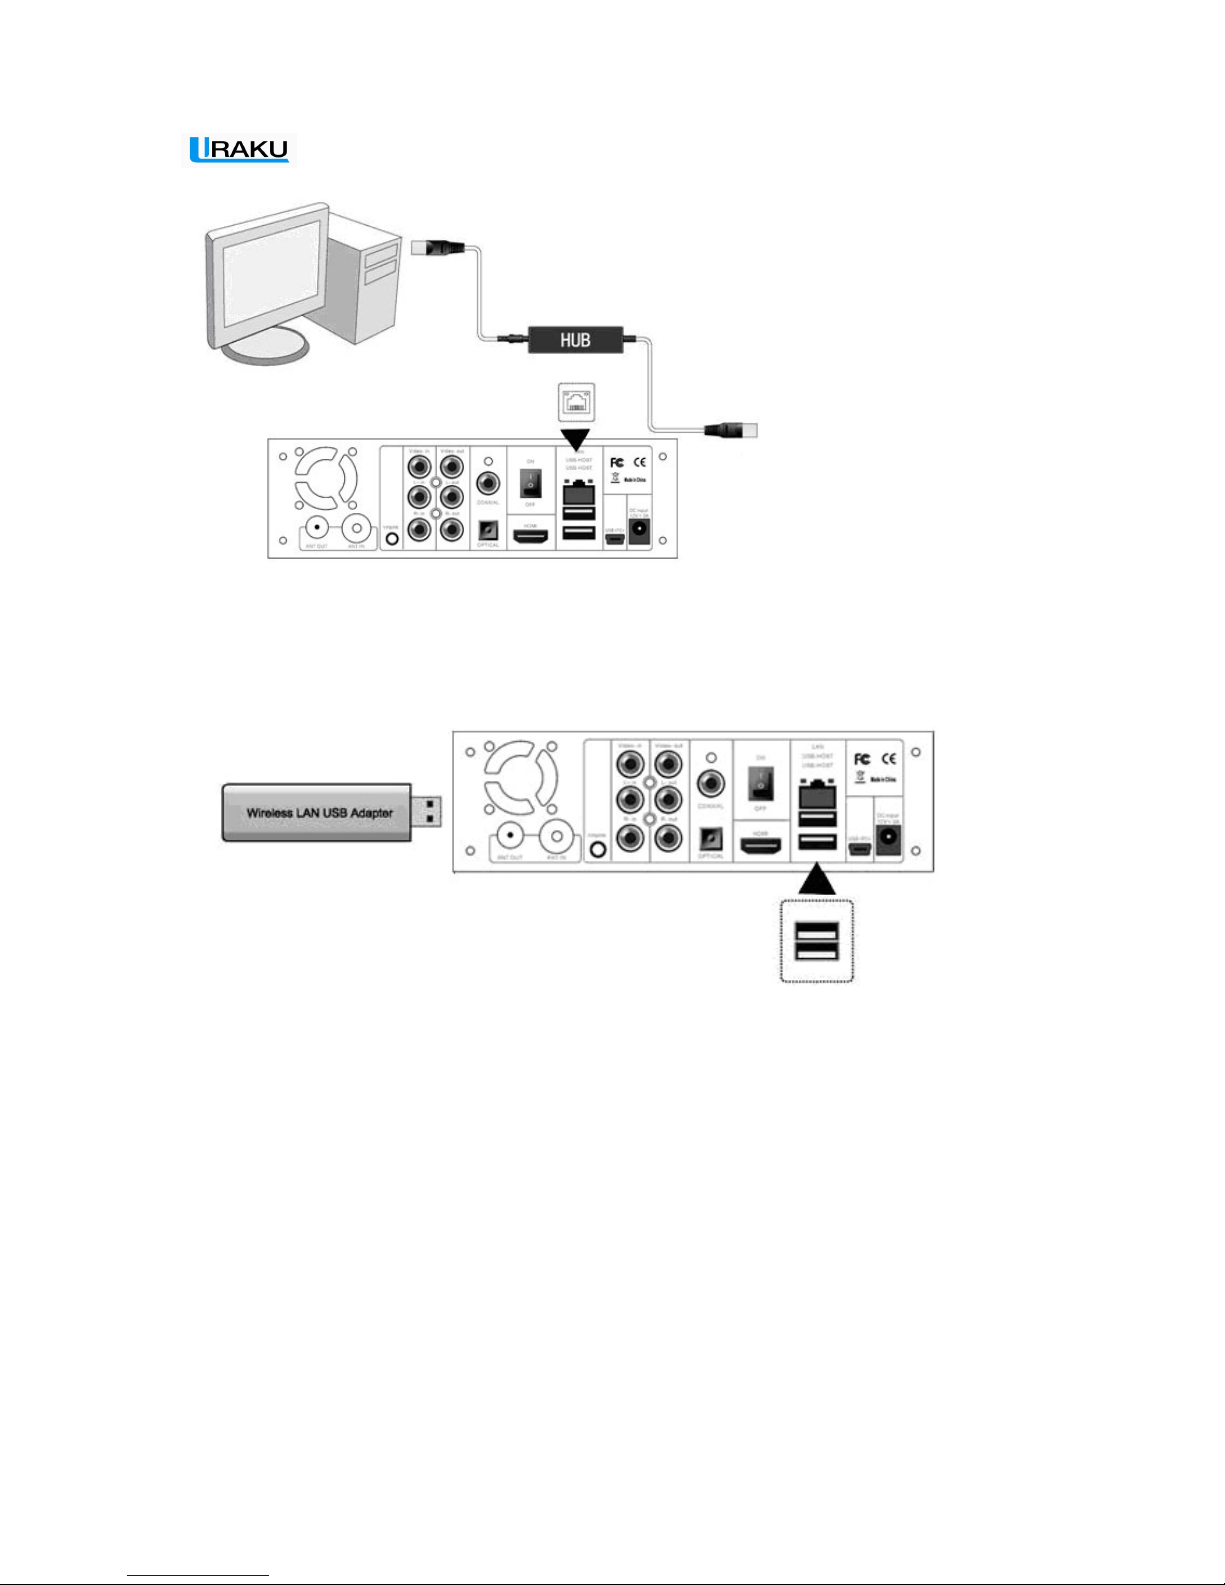
1.4 Connection..........................................................................................................................6
1.5 Power On / Off ...................................................................................................................
9
1.6 Menu Language................................................................................................................10
2. About the Player.............................................................................................................11
2.1 Remote Control ................................................................................................................11
2.2 Front Panel .......................................................................................................................14
2.
3
Rear
Panel ........................................................................................................................14
3. Setup Menu ................................................................................................................... 14
3.
1
Changing
T
V Settings......................................................................................................18
3.
2
Changing
Audio
Settings..................................................................................................
18
3.3 Changing Video Settings ..................................................................................................18
3.4 Changing Record Settings ................................................................................................19
3.5Changing Network Settings...............................................................................................21
3.6Changing System Settings.................................................................................................23
3.7Miscellaneous....................................................................................................................26
4. Browser Menu ............................................................................................................... 28
4.1 Browsing All.....................................................................................................................28
4.2 Browsing Music ...............................................................................................................29
4.3 Browsing Photos...............................................................................................................29
4.4 Browsing Movies .............................................................................................................30
4.5 A/V Streaming via Network .............................................................................................31
4.6 A/V Streaming via UPnP-server.......................................................................................33
4.7 Renaming / Deleting Files................................................................................................36
4.8 Managing the Playlist.......................................................................................................36
5. File Copy Menu.............................................................................................................. 38
6.Selecting Time REC ....................................................................................................... 39
6.1 Watching TV.....................................................................................................................39
7.Timer Record Menu........................................................................................................ 43
7.1 Creating a New Schedule .................................................................................................43
7.2 Editing Schedules .............................................................................................................44
7.3 Deleting Schedules ...........................................................................................................45
7.4 Viewing Schedule Status ..................................................................................................46
7.5 Viewing Recording History..............................................................................................46
7.6 The REC List....................................................................................................................47
8. Web Server & BitTorrent ............................................................................................... 48
8.1 Web Server (unicgi)..........................................................................................................48
8.2 Account Management.......................................................................................................49
8.3 Visit Neighbor (samba).....................................................................................................49
8.4 BitTorrent Download (btpd) .............................................................................................49
9. Upgrading the Firmware ............................................................................................... 53
10. Appendixes.................................................................................................................. 54

10.1 Specifications .................................................................................................................54
VIDEO RECORDING MODE ..............................................................................................56
10.2 Frequently Asked Questions...........................................................................................56
10.3 Copyrights and Trademarks............................................................................................58
10.4 Warranty .........................................................................................................................58
10.5 GPL Statement................................................................................................................59

1. Introduction
1.1 Preface
Thank you very much for purchasing URAKU HD DVR. We hope you will enjoy using it as a great home
entertainment partner. This player has the following functionality.
A/V Output
•HDMI V1.3 for high-definition video and digital audio
•Composite & component video and stereo audio for analog audio-visual connection
•S/PDIF coaxial & optical interface for high-fidelity digital audio
•Adjustable video output resolution (NTSC, PAL, 480p, 576p, 720p, 1080i, 1080p)
Multimedia Playback
•Supports major audio, video and image file formats (1080p HD video decoding)
•Movie format: AVI/MKV/TS/TP/TRP/M2TS/MTS/MPG/MP4/M4V/MOV/VOB/ISO/IFO/DAT/
WMV/ASF/RM/RMVB/FLV
•Music format: MP3/OGG/WMA/WAV/AAC/FLAC
•Photo format: HD JPEG/BMP/GIF/TIF/PNG
•Photo slide show with background music
Network Feature
•A/V streaming/transmission via Ethernet (10M/100M) & Wi-Fi (802.11b/g/n, optional)
•File sharing via Samba server
•A/V streaming via UPnP Media Server
•BitTorrent download (controlled and managed via web server)
File Copy
•Supports copying & moving files among Card, USB, HDD, and Network
USB 2.0 Support
•USB DEVICE port (for computer connection)
•USB HOST port x 2 (for USB storage devices)
Note: All the information contained in this manual was correct at the time of publication. However, as our
engineers are always updating and improving the product, your device’s software may have a slightly
different appearance or modified functionality than presented in this manual.
1.2 Packing List
Part Quantity
Player 1
A/V cable 1
Y/Pb/Pr cable 1
USB cable 1

Remote Control 1
Remote Control Battery 2
AC/DC adaptor 1
AC/DC adaptor Power Cord 1
Quick Installation Guide 1
User Manual (printed) 1
Driver CD (with User Manual) 1
Warranty card 1
HDMI cable 1 (optional)
802.11b/g/n Wireless LAN USB adapter 1 (optional)
Note:
The actual contents in the package might be different from the packing list in this manual.
1.3 Cautions
This player’s design and manufacture has your safety in mind. In order to safely and effectively use this
player, please read the following before usage.
1.3.1 Usage Cautions
User should not modify this player. If commercial hard disk is being used, the environmental temperature
should be within +5
℃
~ +35
℃
.
1.3.2 Power
The player’s power voltage: DC 12V 3A.
When using this player, please connect the supplied AC adapter or AC adapter cable to the player’s power
jack. When placing the adapter cable, make sure it can not get damaged or be subject to pressure. To
reduce the risk of electric shock, unplug the adapter first before cleaning it. Never connect the adapter to
the player in a humid or dusty area. Do not replace the adapter or cable’s wire or connector.
1.3.3 Radio Interference
- If not properly shielded, almost all electronic devices will get radio interference. Under some conditions,
your player might get interference.
- The design of this player has followed the FCC/CE standard, and has followed the following rules:
(1) This player may not cause harmful interference;
(2) This player could accept some interference received including interference that may cause
undesired operation.
1.3.4 Repair
If the player has a problem, you should take it to an appointed repair center and let the specialists do the
repair, never repair the player yourself, you might damage the player or endanger yourself or your data.
1.3.5 Disposing of the Player
When you dispose of the player, be sure to dispose it appropriately. Some countries may regulate disposal
of electrical device, please consult with your local authority.

1.3.6 Hard Disk Cautions
The player uses an internal hard disk for data storage, in normal case, format or repair is not required.
You should carefully read the < Frequently Asked Questions > chapter, and check our website for latest
information before formatting the hard disk.
- Physical impact may create bad sector in the hard disk, you can use CHKDSK to fix the problem.
- All data stored in the player may be lost due to physical impact, electrical shock, power lost, HDD format
etc. Please backup your data.
- It is suggested to do defragment after a long period of usage.
- Regularly backup the data in the hard disk so that it can be recovered in the event of data corruption or
loss. Our company takes no responsibility for loss of data stored on the hard disk.
1.3.7 Others
When using this player, please do not let the player come into contact with water or other liquid, if water is
accidentally spilled on the player, please use a dry cloth to absorb the spillage.
Electronic products are vulnerable, when using please avoid shaking or hitting the player, and do not press
the buttons too hard.
Do not let the player come into contact with water or other liquid.
Do not disassemble the player, repair the player or change the design of the player, any damage done
will not be included in the repair policy.
Do not press the buttons of the player too hard.
Avoid hitting the player with hard object, avoid shaking the player, and stay away from magnetic fields.
During electrostatic discharge and the strong electromagnetic field, the product will malfunction, then
unplug the power cable and the product will return to normal performance next time it is powered on.
1.4 Connection
1.4.1 Connecting the Power Supply
(1) Follow the picture and connect the AC adaptor to the player’s DC IN jack;
(2) Follow the picture and plug in the AC adaptor to the power outlet.

1.4.2 Connecting to a PC
(1) Make sure the player is powered on;
(2) Plug in the squarish connector of the USB cable to this player’s USB DEVICE port;
(3) Plug in the rectangular connector of the USB cable to computer.
In this way, you can manage content on the built-in HDD of the player on your local PC.
1.4.3 Connecting a USB Device
(1) Make sure the player is powered on;
(2) Plug in the USB stick or USB HDD etc. to the USB HOST port of this player.
In this way, you can browse contents on the USB device.
1.4.4 Connecting a Memory Card
Memory card can be used by inserting to the card slot
(1) Follow the picture to insert the memory card to the card slot properly;
(2) Insert the card by following the arrow pointer in the picture.
In this way, you can browse contents on the memory card.
1.4.5 Connecting to a TV
1.4.5.1 A/V OUT
(1) Follow the picture and plug in the 3 color connector to the player’s A/V OUT jack;

(2) Follow the picture and plug in the 3 color connector to the TV’s A/V IN jack.
In this way, you can enjoy the content in the player on TV or other display devices.
1.4.5.2 Y/Pb/Pr Component OUT
(1) Follow the picture and plug in the 3 color connector to the player’s Y/Pb/Pr jack;
(2) Follow the picture and plug in the 3 color connector to the TV’s Y/Pb/Pr jack.
Audio Connection while using Y/Pb/Pr Video out:
First method: use the audio output from the A/V OUT jack;
Second method: use the audio output from the S/PDIF Coaxial or Optical jack.
In this way, you can also enjoy videos, music, and photos in the player on TV.
1.4.5.3 HDMI OUT
(1) Follow the picture and plug one connector on your HDMI cable to the player’s HDMI jack;
(2) Follow the picture and plug the other connector on your HDMI cable to the TV’s HDMI jack. Note: The
HDMI cable is an optional accessory sold separately.

In this way, you can have the highest quality video and audio via a single cable.
1.4.6 Connecting to an Digital Amplifier
(1) Follow the picture and plug in the RCA connector on your coaxial cable to the player’s S/PDIF Coaxial
jack. Or if you use optical fiber, please plug in the Toslink connector on your optical fiber to the player’s
S/PDIF Optical jack;
(2) Follow the picture and plug in the other connector on your coaxial cable or optical fiber to the digital
audio device (digital amplifier or decoder).
Note: Optical fiber and coaxial cable are not supplied.
In this way, you can enjoy powerful Dolby Digital, DTS, or MPEG sound. (Please refer to ‘3.1 Changing
Audio Settings’ for configuration)
1.4.7 Connecting to a LAN
To connect to a LAN (Local Area Network) you require a cat5, cat5e or cat6 network cable (not supplied).
(1) Connect one of the crystal plugs on the cable to the player’s RJ45 LAN socket;
(2) Connect the other crystal plug on the cable to a RJ45 LAN port on your router, switch, or hub devices.

1.4.8 Connecting to a WLAN
(1) Make sure the player is powered on;
(2) Plug the Wireless LAN USB Adapter (i.e. Wi-Fi USB Dongle) to the USB HOST port of the player.
Note: The Wi-Fi Dongle is an optional accessory sold separately. (Please refer to ‘3.3 Changing Network
Settings’ for more details about wireless setup)
1.5 Power On / Off
Power On
After connecting the DC IN jack and press the power button on the front panel, the player will soon enter
the home screen, and the power indicator will turn blue.
Power Off
Press the power button on the front panel, the player will soon enter standby mode, and the power indicator
will turn red. Then unplug the power cord to cut off the power supply.
1.6 Menu Language
The system language of this player can be set to English or other languages. Change the language you
wish in the setup menu, the selected language will take effect immediately.

2. About the Player
2.1 Remote Control
All procedures in this manual can be carried out using the remote control buttons.
See the following for details on each button and its function:
Remark: EPG, TELETEXT, SOURCE button only available in DTV model
1.POWER 2.EPG
3. CONFIRM 4. TELETEXT
5. SELECT 6. TITLE
7. OPTION 8. EJECT
9. MENU 10. Numeric buttons
11. ZOOM 12. GOTO
13.DISPLAY 14. GUIDE
15. Navigational buttons
16.OK
17. REC 18. RETURN
19. VOL- 20. VOL+
21. FR 22. FF
23. STOP 24. PLAY
25. PREV 26. NEXT
27. SLOW 28. PAUSE/STEP
29.SOURCE 30. SUBTITLE
31.TIME SHIFT 32. REPEAT
33. SETUP 34.MUTE
35. TV SYSTEM 36.AUDIO

No.
Button Function
1 POWER
Press to POWER on or off the device
2 EPG
Press to enter the Electronic Program Guide which displays an on-screen
list of programs for the coming week when watching Digital Terrestrial TV.
3 CONFIRM Press to confirm and add the selects to the playlist.
4 TELETEXT
Press to open Teletext OSD if it is available in the broadcasted stream of
Digital Terrestrial TV.
5 SELECT Press to select files in browser and file copy menu.
6 TITLE
Press to show HDD or DVD Title List.
7 OPTION
Press to select option bar.
Press to add / delete scheduled recording in EPG menu
8 EJECT
Press to eject a DVD from the DVD-ROM drive.
9 MENU Press in the browser menu to rename and delete files.
Press in My_Shortcuts in NET of the browser menu to add
shortcuts for network access.
10
Numeric buttons Press to enter numeric input when changing settings.
11
ZOOM
Press to zoom in/out when playing back photos or Video programs.
Photo zoom levels:2X,4X,8X,16X;
12
GOTO Press to jump to a specific point on a title. Specify the point using
Title, Chapter and Time.
13
DISPLAY
Press to display current status.
Press during playback and an onscreen display appears, showing track
number and time elapsed/remaining.
Press during recording and an onscreen display appears, showing the
recording quality setting and time elapsed
.
14
GUIDE
Press to view the Guide menu. See
“The Guide Menu” on page 6
for
more details.
15
Navigational buttons
Press the arrow buttons to select menu options
16
OK Press the ENTER button to confirm.
17
REC
Press to begin recording or to resume when recording has been paused.
Press repeatedly to set OTR length (30 mins / 60 mins / 90
mins / 120 mins
/ 180 mins /240 mins/Off).
18
RETURN Press to return to the previous screen while navigating menus.
19
VOL- Press to decrease the volume.

20
VOL+ Press to increase the volume.
21
FR Press to fast rewind the current playback.
Press repeatedly to select
speeds.
22
FF Press to fast forward the current playback. Press repeatedly to
select speeds.
23
STOP Press to stop playback.
24
PLAY Press to begin playback.
25
PREV
Press to go the prev. on a HDD or USB file when playing music.
Press to page up the file list at Browser.
When play photo the button is enable. If play Movie and Mp3 file
the button
is disable.
26
NEXT
Press to go the next on a HDD or USB file when playing music.
Press to page down the file list at Browser.
When playing photo the button is enable. If play Movie and Mp3 file the
button is disable.
27
SLOW Press to play back in slow motion. Press the PLAY button
to resume
regular playback.
28
PAUSE/STEP Press to pause the current playback.
Press again to step to the next
frame. Press the PLAY button to resume playback.
29
SOURCE Select the signal source from Video, DTV and Analog TV
30
SUBTITLE Press to set subtitle options.
31
TIME SHIFT
Press to activate the time shift function, which allows you to pause live TV
and resume the program from the point you left it. While paused, the
program is recorded to the HDD, as long as space is available.
Press to activate TIME SHIFT function and wait for the
PLAY arrow to appear on the screen.
Press and the program is paused.
Press to resume viewing the program.
Time shift mode remains active until you press the button.
32
REPEAT Press to set repeat option: One, All, (and Shuffle).
33
SETUP Press to enter the setup menu.
34
MUTE Press to mute audio output, and press again to resume.
35
TV SYSTEM Press to switch between NTSC, PAL, 480P, 576P, 720P, 1080I, and

1080P.
36
AUDIO Press to select an audio track.
2.2 Front Panel
1. POWER & Standby LED 2. IR indicator
3. REC LED 4. Data LED
2.3 Rear Panel
1. FAN 2. A/V in jack
3. A/V OUT jack 4. COAXIAL jack
5. POWER SW 6. RJ45 LAN socket
7. ANT. OUT (Only available in DTV model) 8. ANT. IN (Only available in DTV model)
9. YPbPr jack 10. S/PDIF OPTICAL jack
11. HDMI Jack 12. USB HOST*2
13. USB DEVICE port (mini5p-Type) 14. DC IN jack
3. Setup Menu
The Setup menu allows you to personalize and configure the preferences for your player.
To select a Setup option:
- Select the Setup icon on the home screen, or press the SETUP button on the remote control.

- Use the LEFT/RIGHT navigational buttons to select an option, and then press ENTER.
There are five Setup options, including TV,Audio, Video,REC, Network, System, and MISC. Use the
UP/DOWN navigational buttons to select a menu. Press ENTER to confirm. Press RETURN to cancel and
display the previous menu screen.
3.1Changing TV Settings
Press and on the remote control to select the TV tab from the menu.

TV Region Select to set the region for TV.
Press and to select , Press to confirm.
Channel Scan
Select to scan for available TV channels.
Press
and to
select AUTO SCAN , and press the ENTER button
to
confirm.
AUTO SCAN
In AUTO SCAN mode, the system will automatically scan for available DVB-T
TV channels.
MANUAL SCAN

In MANUAL SCAN mode, you can select the CH name, Bandwidth, and Input
Frequency. Use the Navigational and Numeric buttons on the remote control
to select or input. Press the ENTER button to confirm.
Select to edit channel information.
Press
and to
select DVB-T or cancel, and press the ENTER button
to confirm.
Channel Set
In this menu, you can edit the Name, and sequence for the DVB-
T TV channels.
Use the Navigational buttons to select and modify the settings, and press the
ENTER button to confirm. You can also press the RED
button to select Default,
and press the BLUE button to select Sort.

3.2 Changing Audio Settings
Use this menu to configure audio settings.
Night Mode
- Choose between Off / On / Comfort. If the option is turned on, the audio output volume will be
decreased to make you more comfortable.
Digital Output
- Choose between HDMI LPCM / HDMI RAW / SPDIF LPCM / SPDIF RAW. In raw mode, Dolby Digital,
DTS, or MPEG sound can be bypassed to the HDMI TV or Digital amplifier.
3.3 Changing Video Settings
Use this menu to configure video settings.

Aspect Ratio
- Pan Scan 4:3: Display a wide picture on the entire screen and cuts off the redundant portions. Select
when a standard 4:3 TV is connected.
- Letter Box 4:3: Display a wide picture with two black borders on the top and bottom of 4:3 screen.
Select when a standard 4:3 TV is connected.
- 16:9: Compress the image to convert the whole image. Select when a 16:9 TV is connected.
Brightness
- Adjust the level of brightness.
Contrast
- Adjust the level of contrast.
TV SYSTEM
- Select to adjust video output resolution: NTSC / PAL / 480P / 576P / 720P 50HZ / 720P 60HZ / 1080I
50HZ / 1080I 60HZ / 1080P 50HZ / 1080P 60HZ.
-
3.4 Changing Record Settings
Press and on the remote control to select the Record tab from the menu bar.

Quality
Select to set the default recording quality setting.
Press and to select the quality setting you require.
The highest quality setting is HQ which requires the most storage space. The
other settings reduce recording quality sequentially but also require less
storage space. Press to confirm.
Permanent time
shift
Select to set the Permanent timeshift on or off.
Press and to select. Press to confirm.
Record Device
Select to choose the device to which to record .
Press and to select from HDD and USB.
Press to confirm.
Table of contents
Other Uraku DVR manuals