Urban Cultivator Residential User manual

The Urban Cultivator Residential
User Manual
®

2Urban Cultivator | 1-877-352-0490 | www.urbancultivator.net
Please read the information inside this Instruction Booklet
carefully and keep it as a reference manual.
These symbols are used to highlight important information:
Warnings
Information and best practices
Environmental information
If you are unclear about any aspect of information in this manual please contact
Urban Cultivator using support@urbancultivator.net or telephone our toll free number
1-877-352-0490, available Monday–Friday, 08:00–16:00 PST.

3Urban Cultivator | 1-877-352-0490 | www.urbancultivator.net
Contents
Safety Precautions
Child safety
Safety precautions in daily use
Disposal
Built-in specications
Unpacking Your Cultivator
Hardware and accessories
Before You Install
Your environment
Electrical connection
Securing grow lights
Set Mode Options
Stand-alone option
City mains option
Stand-alone Installation Instructions
Installing castor wheels (optional)
Installing counter top (optional)
Connecting the Power, Water, and Electricity
How Your Urban Cultivator Residential Works
The grow drawers
The control panel
Planting your rst herbs and microgreens
4
6
7
8
10
11
12
Planting, Growing, and Cultivation Guide
Frequently Asked Questions and Growing Tips
Maintenance Procedures and Tips
Cleaning the grow drawers
Additional cleaning every 3 months
Cleaning the counter top
Sanitation and Food Safety Recommendations
Enclosure Specications
Technical Specications
Service and Spare Parts
Customer Care
Standard Guarantee Condition
Connect With Us
15
16
18
19
20
21
22

4Urban Cultivator | 1-877-352-0490 | www.urbancultivator.net
Safety Precautions
Urban Cultivator cares about your plants and your safety. We want you to be familiar with the following
safety instructions.
It is important that this instruction manual remains with the Urban Cultivator Residential appliance so
that new owners can also learn about the product and relevant safety precautions.
You must carefully read through this instruction manual before installing and using the Urban Cultivator
Residential.
If you are unclear about any aspect of information within please contact Urban Cultivator using
support@urbancultivator.net or telephone our toll free number 1-877-352-0490, available
Monday–Friday, 08:00–16:00 PST.
Child safety
• This appliance is designed to be operated by adults.
• The water from your Urban Cultivator Residential is not for drinking.
• Keep your Seeds, Nutrients and Growing Mediums in a safe, dry storage area.
The Cultivator’s control panel has a child safety lock. Refer to the Control Panel Table for
more information.
Safety precautions in daily use
• Do not sit or stand on the open door.
• Contaminated items and/or garbage must not be present in the Urban Cultivator Residential.
• Do not remove the grow trays or lighting shelf when the machine is watering or providing light.
Refer to the control panel table for instructions on controlling the watering and lighting schedules.
• Only use products that have been designed to be used with the Urban Cultivator Residential.
• Ensure that the Urban Cultivator Residential door is always closed to avoid injury.
• Always unplug the power cord from the outlet and disconnect the water mains when not in use.
• The Urban Cultivator Residential must be serviced by a licensed professional.
• Only use genuine spare parts from Urban Cultivator or that have been CSA, UL, or CE approved.
Using unauthorized components voids your warranty.
• Any attempts to x the Urban Cultivator Residential without an authorised professional can be
dangerous and will void your warranty.
• Be careful when removing the drawers as they may be heavy and unevenly balanced. We
recommend putting them on your kitchen counter with the back of the drawer towards the sink
where they can be safely and easily accessed when you are working with your plants.

5Urban Cultivator | 1-877-352-0490 | www.urbancultivator.net
Safety Precautions Cont’d
Whenever you take a grow drawer out be careful of water that may not have drained
completely after a watering cycle. It can take up to ten minutes for the grow drawer to drain.
Disposal
• All packaging, cardboard or otherwise, can be recycled.
• The unit must be taken to a recycling centre for disposal should you cease to use your Urban
Cultivator Residential, as many of its components can be recycled.
Built-in specifications
The Urban Cultivator Residential has been designed to t under a North American kitchen counter top
or work surface as a single cupboard unit. It can slide between other cupboards and only requires one
opening at the front.
While no vent openings are required, you need to allow the water ll and drain hose, as well as the power
supply cable, to pass through from the rear of the unit. Be advised to keep electrical cord accesible for
maintainace purposes.
Ensure that your Urban Cultivator Residential is levelled. Refer to the external dimensions and installation
manual diagram.
The unit should be removable for service and mounted at oor level.
The Urban Cultivator Residential is available with lockable castor wheels or adjustable feet so
you can adjust its height.

6Urban Cultivator | 1-877-352-0490 | www.urbancultivator.net
Unpacking Your Cultivator
Carefully open the product packaging and remove the Urban Cultivator Residential. We recommend that
two people should remove the unit.
Hardware and accessories
Please check that all of the components for your Urban Cultivator Residential are accounted for, and that
none have been damaged in shipping. Please refer to the checklist below:
ϱ
ϭ
Ϯ
ϯ
ϵ
ϴ
ϳ
ϲ
ϰ
10
1Control Panel
2Door
3Top Drawer
4Humidity Domes
5Bottom Drawer
6Right Tray
7Left Tray
8Reservoir
9Utilty Connections
10 Accessories
Fragile Components
Grow Lights (x4)
Glass Panel & Thumb Screws (2)
*Refer to Securig Grow Lights section pg 7.
For Stand Alone
Optional Drain Hose With Valve
For City Water Hook Ups
Braided City Hose & City Drain Hose
Check the Urban Cultivator Residential for any shipping damage. Never connect or start growing
with a damaged machine. Please contact us on our toll free number 1-877-352-0490 or email
support@urbancultivator.net if your Urban Cultivator Residential is damaged.

7Urban Cultivator | 1-877-352-0490 | www.urbancultivator.net
Before You Install
Your environment
The Urban Cultivator Residential has been designed to work inside your home. Ideally, the ambient room
temperature should be 64 to 82°F (18 to 28°C), and relative humidity between 30% to 60%.
Electrical connection
The Urban Cultivator Residential must be grounded (earthed). Urban Cultivator does not accept any
responsibilty should this safety measure not be followed.
Electricity can be dangerous and an unsafe plug inserted into a power socket could result in a
serious safety hazard. Do not connect the Urban Cultivator Residential via an extension cable.
Ensure that the plug is still accessible after the Urban Cultivator Residential has been installed.
If you need to replace the electrical cable call us toll free on 1-877-352-0490 or email
support@urbancultivator.net.
Securing grow lights
1. Thumb screw: turn clockwise to tighten and anti-clockwise to loosen and release the glass light cover.
2. Twist and pull to release: turn bulb clockwise or anti-clockwise a 1/4 turn to release or lock grow light.
3. Grow lights can sometimes loosen during shipping.
DETAILB
SCALE2 : 1

8Urban Cultivator | 1-877-352-0490 | www.urbancultivator.net
Set Mode Options
Stand-alone option
This option is the choice of the buyer not to have the unit connected directly to the city’s water supply
and will therefore need to FILL and DRAIN resevoir manually. If you have chosen this option your unit
comes equipped with with a clear drain hose with a blue/red valve connected to the unit at the left
outside corner of the unit. Check that this blue/red valve is in the closed position unless actively draining
into a receptical. Failure to do so can cause ooding.
To check the SET MODE OPTION to select STANDALONE mode on your unit:
Unlock Screen for 3 seconds.
Press Menu to get to SET MODE.
Press Enter to select.
Press Down to NO PLUMBING STANDALONE.
Press Enter to select.
To DRAIN water manually:
When the button is ashing green, it’s time to change the water in your reservoir. In stand alone
mode, this is done manually.
To drain the reservoir manually:
• Place the clear drain hose from the back of the machine into a bucket or tub.
• Press from the menu on your machine until it reads Drain.
• Select Y and press Enter.
• Discard the water.
To FILL the reservoir manually
• Remove the bottom grow drawer to expose the water reservoir.
• Use a bucket, tub or hose to slowly ll resevoir with water until you see it full.
The factory default and recommended setting to recycle your unit is 7 days. The will ash
green to indicate 7 days have passed and its time to DRAIN and FILL.

9Urban Cultivator | 1-877-352-0490 | www.urbancultivator.net
City mains option
This option is the choice of the buyer and must be connected to your city water supply by a licensed
plumber. This option allows for automatic FILL and DRAIN of your unit.
The Urban Cultivator Residential should be connected to cold water from your city main’s supply located
within ve feet from the Cultivator.
The unit also needs to be connected to your city drain that should be no higher than two feet from
ground level. The unit is intended to be permanently connected to the city mains supply and not
connected by a hose-set.
The water hose is located in the accessories bag and comes with a 3/8” hose connection. Connect the
valve from your Urban Cultivator Residential to your city water line and vacuum breaker which should
supply a water pressure of around 60psi for the Urban Cultivator Residential to be able to ll and drain its
reservoir eectively. (Once everything is connected, switch to city mode under menu options.)
To check the SET MODE OPTION to select CITY Mode on your unit:
Unlock Screen for 3 seconds.
Press Menu to get to SET MODE.
Press Enter to select.
Press Up to CITY MAINS
Press Enter to select.
Pipes that have not been in regular use should be cleaned with running water before
connecting the Urban Cultivator Residential.
Make sure that the water inlet and drain hoses are free of debris or dirt and are not twisted,
crushed, entangled, or leaking in any way. Do not use connection hoses that have been used
previously by other appliances.

10Urban Cultivator | 1-877-352-0490 | www.urbancultivator.net
Stand-alone Intallation Instructions
Installing castor wheels (stand-alone model)
To install castor wheels:
1. Tip Cultivator on its back so you can access the feet and bolts.
2. Remove the four bolts and one rubber foot from each corner on the bottom of your Urban
Cultivator Residential.
3. Secure castor wheels to the unit using the same bolts.
x4 x1 X 4
Installing countertop (stand-alone model)
To install the countertop piece:
1. Remove the four black plastic ller pegs from the four holes in the top of the machine
2. Screw in the four stainless steel studs that were provided with your Urban Cultivator Residential
counter top.
3. Position the counter top piece onto the studs and slide towards the back of the machine to lock the
counter top into place.
X4

11Urban Cultivator | 1-877-352-0490 | www.urbancultivator.net
Connecting the Power, Water, and Electricity
Numbered Items
1. City Water In Connection (Min 30psi required)
Use the inline filter & braided City Hose to connect to your city water
connection. The hose comes with a standard ⅜” compression fitting.
2. City Drain Out Connection
Connect the City Drain Hose (1/2” to 3/4“ hose connection) to your city drain
which should be no further than 6’ from the Cultivator and 2’ up from the floor.
3. Power Connection
Connect the Cultivator to a standard 110/240V power outlet. The electricity plug
should be no further than 2’ away from the unit and should run out on the
same side as the water and drain hose. The wall receptacle is non-replaceable.
4. Hole Size For All Connections
Use a 4” hole saw and remove part of the bottom shelf of the cabinet adjacent
to the Cultivator where all the connections run from.
5. Adjustable Feet
Twist the Cultivators feet to adjust its overall height from 34¼” to 34 ½”
Ensure product is level.
Leave
1½”
clearance gap for the door swing and handle when installing
the Urban Cultivator Residential adjacent to a wall.
Water In, City Drain Out & Electricity connections run out from one side
only, the left. Please contact Urban Cultivator using
[email protected] or call us toll-free:
+1 877 352 0490 available Monday–Friday. 8:00–16:00 PST.
1
3
2
4
5
2’0” (610mm)
maximum from
floor to City
Drain.
6’0” (1829mm) maximum from
the Cultivator tothe City Drain
connection.
Connect the supplied drain hose to the
drain pipe of the kitchen sink either:
- above the P trap
- to the dishwasher connector of the
garbage disposal.
Add Inline Filter before
City Water In
DISCLAIMER: Please make sure that the length of the drain line does not exceed 6ft. In the event that a pump is used, make sure it has capacity exceeding 80GPH. Urban Cultivator will not be
responsible for any losses arising from usage or failure of any additional devices connected to the unit for facilitation of plumbing or drainage.Please refer to applicable local codes for electrical
and plumbing installation.

12Urban Cultivator | 1-877-352-0490 | www.urbancultivator.net
How Your Urban Cultivator Residential Works
The grow drawers
Your Urban Cultivator Residential comes with two growing levels referred to as the top and bottom
grow drawers. Both drawers are removable to provide easy access for cultivating crops, cleaning, and
maintenance.
To continue growing herbs and greens, the drawers must be returned into their original position.
Ensure that the top grow drawer is placed back into the top rails and the bottom grow drawer into the
bottom rails. You can do this by sliding the uppermost edge of the grow drawer in-between the drawer
guide rails.
Please be careful when removing the drawers as they could be unbalanced, heavy, and contain
some residual water.
The cultivator will water without
the drawer in place which will cause
ooding. Please ensure drawers are
aways in place when watering.
Disclaimer
Please make sure the top (T) grow drawer is installed when there
is a watering program set. Urban Cultivator will not be held responsible
for any losses arising from water pumping from the top level without the
drawer properly installed.
Call 1-877-352-0490 for Support
• Ensure your top grow drawer is installed when there is a watering program set. Failing to do so
there is a chance that water will pump onto the light shelf and possibly on the oor. This may lead to
ooding.
• If you remove a grow drawer for more than one day, turn o its watering schedule (refer to the
Control Panel table).
• The bottom grow drawer receives water an hour after the top grow drawer.
• Filters located at the back of the grow drawers catch sediment and should be rinsed out with clean
water every week.
• The Cultivator will continue to water according to the watering cycle. If the drawers are removed
when watering, ensure that the plants receive the water that they have missed.
DISCLAIMER: Please make sure the top “T” grow drawer is installed when there is a watering
program set. Urban Cultivator will not be responsible for any losses incurred from failure to
do so.
WARNING!

13Urban Cultivator | 1-877-352-0490 | www.urbancultivator.net
The control panel
The control panel controls the automated function of your Urban Cultivator Residential. You can
customize the program using the menu outlined below:
Set Date & Clock
Set Temp C/F
Set lights Time
Set Water On Time
Set Recycle Rate
Top Up Reservoir
Air Pump
On/O/Cycle
Set Mode
Urban Cultivator
Select Date & Clock.
Set Temp display and Fan Control.
(18 C is recommended).
Set the time for lights to turn on.
Control how long to water your plants
for. Factory default is 5 minutes
(recommended).
Control how often to drain and ll the
reservoir. 7 days is recommended.
*If connected to city water.
Turning o is not recommended
Select between standalone
& city mains.
This displays your program version
number.
Menu Headings
Pressing the menu button
scrolls through all the menu options
A city water connection fully automates
plant watering and reservoir water levels.
3
1
2
3
4
5
6
7
8
9
10
1On/O
Turns the Urban Cultiva-
tor Residential on and
o. Will turn o all
schedules and lights.
12 hours on, 12 hour o.
18 hours on 6 hours o
(8am is the recommended
start time)
Always on.
2Lighting Cycles
Scroll up the menu.
4
5Scroll down the menu.
6Press enter to conrm
your selection for all
available options.
01:46:29 PM 65ºF
17/08/2016 50% RH
01:46:29 PM 65ºF
17/08/2016 50% RH
7Display
Time Temperature
Date
/Reserve Level
Relative
Humidity
Top Watering Cycle
Select schedule.
Once in 2, 3 or 4 days.
(3 is recommended)
Manual Cycle immediately waters
your plants then sets your chosen
schedule.
Always o.
Twice per day.
Once per day.
8
9Bottom Watering Cycle
Select schedule.
NOTE:- After selecting watering schedule you
must select manual water to set day 1 of the
cycle.
Recycle Reservoir
Select when you
want to manually
drain and ll the
Reservoir.
Drain Reservoir -
Yes or No
Fill Reservoir -
Yes or No (City Mains Only)
10
Safety Lock
Hold both buttons together for 3 second to unlock the Control
Panel.
The Control Panel will lock after 60 seconds of inactivity.

14Urban Cultivator | 1-877-352-0490 | www.urbancultivator.net
Planting your first herbs and microgreens
Use the humidity domes and their adjustable air vents for germinating seeds. The domes
increase temperature and humidity levels inside to help germinate the seeds.
PUT SOIL IN TRAY AND SMOOTH
Soil-Free Grow Mat
Sunshine #4
or
Premier HP Soil
*
2
Ensure Vents Are Tightly Closed
PUT SOIL IN TRAY AND SMOOTH
Soil-Free Grow Mat
Sunshine #4
or
Premier HP Soil
*
2
Ensure Vents Are Tightly Closed
PUT SOIL IN TRAY AND SMOOTH
Soil-Free Grow Mat
Sunshine #4
or
Premier HP Soil
*
2
Ensure Vents Are Tightly Closed
PUT SOIL IN TRAY AND SMOOTH
Soil-Free Grow Mat
Sunshine #4
or
Premier HP Soil
*
2
Ensure Vents Are Tightly Closed
PUT SOIL IN TRAY AND SMOOTH
Soil-Free Grow Mat
Sunshine #4
or
Premier HP Soil
*
2
Ensure Vents Are Tightly Closed
PUT SOIL IN TRAY AND SMOOTH
Soil-Free Grow Mat
Sunshine #4
or
Premier HP Soil
*
2
Ensure Vents Are Tightly Closed
PUT SOIL IN TRAY AND SMOOTH
Soil-Free Grow Mat
Sunshine #4
or
Premier HP Soil
*
2
Ensure Vents Are Tightly Closed
*Screen not needed for Residential OR
soil free grow mat
Amount of seed
1 tsp
1 tsp
½ cup
1 tbsp
2 tbsp
2 tbsp
¼ cup
1 tbsp
1 tbsp
1 tbsp
2 tsp
21
35
14
7
14
14
21
21
14
14
14
30
7
14
7
14
30
14
14
7
7
7
2 tsp
½ cup
1 tbsp
½ cup
2 tbsp
1 tbsp
2 cups
2 tbsp
2 tbsp
1 cup
2 cups
Cabbage
Dill
Flax
Komatsuna
Lemon Balm
Lentils
Mustard
Nasturtium
Onion
Parsley
Pea Shoots
Peppercress
Radish
Sunflower
Wheat Grass
Optimal pH level is 5.0 - 7.0
PUT THE HUMIDITY DOME
BACK ON (if necessary)
TWO WAYS TO HARVEST
Thin out greens and use
as they grow
Harvest all greens
TWO WAYS TO HARVEST
Thin out greens and use
as they grow
Harvest all greens
TOP WATER SCHED:
MANUAL WATER
Set watering schedule and press ‘Enter.’ Then
choose ‘Manual Water’ and press ‘Enter.’
Use the empty seed container or a mesuring cup to
spread seeds evenly over growing medium.
Add light dusting of sifted soil.
Leave dome on tray according to the Planting
Guide (page 15) or until seeds germinate

15Urban Cultivator | 1-877-352-0490 | www.urbancultivator.net
Seed Planting
Amounts
Dome On
Length Grow Time Watering
Schedule
Weight
Per Flat
Malt Amaranth 2 tsp 2-3days 2 weeks 1 every 4 days 95g
Pepper Arugula 1 tsp 2-3 days 3 weeks 1 every 4 days 145g
Bright Basil 1 tsp 2-3 days 4-5 weeks 1 every 5 days 235g
Crimson Beet Tops ½ cup 2-3 days 2 weeks 1 every 4 days 135g
Mighty Broccoli 1½ tbsp 2-3 days 1 week 1 every 4 days 260g
Rustic Buckwheat*½ cup 2-3 days 1 week 1 every 3 days 415g
Crunchy Cabbage 1½ tbsp 2-3 days 2 weeks 1 every 4 days 160g
Delicate Chervil 2 tbsp 8-10 days 3 weeks 1 every 4 days 140g
Mild Chives 2 tbsp 4-7 days 2 weeks 1 every 4 days 80g
Fragrant Cilantro ¼ cup 8-10 days 3 weeks 1 every 4 days 135g
Citrus Dill 1 tbsp 4-7 days 3 weeks 1 every 4 days 110g
Maple Fenugreek*¼ cup 2-3 days 2 weeks 1 every 4 days 200g
Nutty Flax 1 tbsp 2-3 days 2 weeks 1 every 4 days 85g
Power Kale 1 tbsp 2-3 days 2 weeks 1 every 4 days 200g
Earthy Komatsuna 2 tsp 2-3 days 2 weeks 1 every 4 days 200g
Tangy Lemon Balm ½ tsp 8-10 days 4 weeks 1 every 4 days 95g
Robust Lentils*½ cup 2-3 days 1 week 1 every 4 days 180g
Crisp Lettuce ½ tbsp 4-7 days 3 weeks 1 every 4 days 65g
Aromatic Marjoram 1 tsp 4-7 days 4 weeks 1 every 4 days 40g
Piquant Mizuna 1 tbsp 2-3 days 2 weeks 1 every 4 days 124g
Sharp Mustard 1 tbsp 2-3 days 2 weeks 1 every 4 days 200g
Wasabi Nasturtium*½ cup 4-7 days 1-2 weeks 1 every 4 days 290g
Wild Oregano 1 tsp 4-7 days 4 weeks 1 every 5 days 30g
Fresh Parsley 1 tbsp 4-7 days 3 weeks 1 every 4 days 168g
Sugar Pea 1 cup 2-3 days 2 weeks 1 every 4 days 300g
Amber Pea*1 cup 2-3 days 2 weeks 1 every 4 days 300g
Zesty Peppercress 1 tbsp 2-days 2 weeks 1 every 4 days 140g
Indigo Radish*3 tbsp 2-3 days 1 week 1 every 4 days 340g
Spicy Radish*2 tbsp 2-3 days 1 weeks 1 every 4 days 300g
Woodsy Sage 2 tbsp 2-3 days 2 weeks 1 every 4 days 85g
Umami Savory 1 tbsp 2-3 days 2 weeks 1 every 5 days 35g
Licorice Shiso 2 tsp 2-3 days 2-3 weeks 1 every 4 days 128g
Tart Sorrel 2 tsp 2-3 days 2 weeks 1 every 4 days 92g
Ruby Veined Sorrel 1 tsp 4-7 days 2-3 weeks 1 every 4 days 165g
Hearty Sunflower*1 cup 2-3 days 1 week 1 every 4 days 380g
Bold Swiss Chard ½ cup 4-7 days 3 weeks 1 every 4 days 134g
Bangkok Basil 1 tsp 2-3 days 4-5 weeks 1 every 5 days 235g
Minty Thyme 2 tsp 4-7 days 4 weeks 1 every 5 days 50g
Sweet Wheatgrass*1 cup 2-3 days 1 week 1 every 4 days 258g
Planting, Growing, and Cultivation Guide
*Hydroponic Option: When using hydroponic grow mat change watering schedule as per
predirections on the package
Compressed Peat Sheets Option: Must water twice to expand then watering schedule
should be 1 per 4 days.

16Urban Cultivator | 1-877-352-0490 | www.urbancultivator.net
Frequently Asked Questions and Growing Tips
What kind of soil should I use?
Sunshine #4 or Premier HP or similar soil containing;
Ingredients: 65-75% Sphagnum Peat Moss, Perlite, Dolomitic Lime, Wetting Agent…NO BARK OR
SLOW RELEASE FERTILIZER
Can I use it more than once?
No, it is a onetime planting.
How much soil should I put in my trays?
Fill each tray 1/2 to 3/4 with the above recommended soil type. 1/2 for short term micros and 3/4 for
longer term herbs & micros. See our Planting, Growing and Cultivation Guide on pg 15.
Do I mix in my seeds or cover them with soil?
We have found great results by covering the newly sown seeds with a light dusting of soil that has been
sifted through a kitchen strainer. The ner soil spreads nicely and makes a protective blanket during
germination.
What other types of grow mediums can I use?
Peat: Urban Cultivator supplies a compressed peat sheet from the online store cut to t the Residential
model (www.urbancultivator.net) It requires a dierent watering schedule and procedure indicated on
the package. A light dusting of soil is also recommended to assist germination.
Can I grow hydroponically?
Yes, you can grow specic microgreens using our Fabric Sheets available from our online store. It
requires dierent nutrients, watering schedule and procedure indicated on the package. See our
Planting, Growing and Cultivation Guide for specic seeds suited for hydroponic growing.
How many trays will I get out of one of my seed containers?
You will get approximately 4 trays out of every Urban Cultivator seed container. You can sow heavier
and thin out young plants and use or sow thinner and let them grow until harvest. Try using the shaker
to sow seeds evenly.
Where do I purchase seeds?
We have an easy online seed ordering system that carries a great variety of seeds tested for success
in our units. All our seeds are untreated and most are organic and non-gmo, they are also packaged in
quantities designed for microgreen density growing. You can purchase seeds from your local garden
center but we do not guarantee their success in our units.
How long do I keep the Humidity Domes on?
See our Planting, Growing and Cultivation Guide for information specic to the seed.
Is my Cultivator heated or cooled?
No, the cultivator is equipped with fans that provide air circulation of ambient room temperature
that aids in maintaining the set temperature.
Is my Cultivator pre-programmed?
Yes, it comes pre-programmed for an average growing environment and an average for all plant
needs.

17Urban Cultivator | 1-877-352-0490 | www.urbancultivator.net
Frequently Asked Questions Cont’d
How often should I do maintenance on my cultivator?
Please refer to the Maintenance Procedures and Tips pg 18.
What should I use to clean my cultivator?
We recommend using 29%-35% Food Grade Hydrogen Peroxide (available through UC in Canada or at
your local health food store) Follow dilution ratio recommended on bottle.
What do I do when I see mold? Can I still eat my microgreens/herbs?
Carefully remove the moldy seeds and compost, then use the Food Grade Hydrogen Peroxide dilution
in a spray bottle and spray daily for 3-4 days directly on soil, trying to avoid the leaves. Yes, you can still
safely harvest and eat the micros/herbs. Harvest them by cutting them in 1/2” above the soil and rinse
with fresh water.
Does my reservoir keep itself lled?
Yes, if you chose the CITY MAINS MODE and your cultivator is plumbed into your main water supply.
If you chose the STANDALONE MODE, no it will not keep itself lled, you will need to do this manually.
See pg 7 for instructions.
Do I need to add nutrients?
If you are planting with soil, nutrients are not required during germination as there are enough nutrients
already in the soil. Nutrients should be added by week two for greens that last longer than two weeks.
If you are planting with a soil-less medium or peat, nutrients should be added at the onset of planting.
How do I shut down the unit for the holidays?
Simply follow the cleaning and maintenance procedures and esnure the cultivator is emptied of all
greens and water. Unplug the unit until you are ready to start growing again.
WATCH OUR VIDEOS FOR MORE INFORMATION:
https://vimeo.com/album/3469454/video/157535407 - Setting up Your Appliance
https://vimeo.com/album/3469454/video/157539692 - Navigating Your Menu
https://vimeo.com/album/3469454/video/157692367 - Planting Your First Crop

18Urban Cultivator | 1-877-352-0490 | www.urbancultivator.net
A
B
C
D
1. Drain reservoir.
*Note: 10-15% water will remain in the reservoir.
2. Remove remaining water with wet/dry vac or
soft cloth.
3. Use food grade Hydrogen Peroxide solution in
spray bottle to spray interior of reservoir.
4. Wipe down with soft cloth until debris is clear.
A-B: Inside the reservoir
A. DRAIN AND CLEAN RESERVOIR
B. CHECK WATER AIR STONE/AERATOR
1. Locate the water mover/aerator (it is six
inches long and located at the front of the
reservoir).
2. Check to see if it is clear of debris.
C-D: Inside the grow levels
D. CLEAN DRAWER FILTERS
(every month)
C. CLEAN DRAWERS
1. Remove lter from the drawer.
2. Soak for 10 mins in Hydrogen Peroxide
solution.
1. Remove trays and drawers from cultivator.
2. Wash with hot soapy water and rinse thoroughly.
(NOT DISHWASHER SAFE)
(every month)
(every month)
(every month)
Additional cleaning every 3 months.
Clean out the pipes and tubes inside the unit every 3 months. The best time to do this is immediately
after you have cleaned your reservoir. Once the reservoir has been lled with fresh water, follow the
below steps:
1. Add 2 Tbsp of 29% - 35% food grade hydrogen peroxide to your reservoir and wait approximately
15 minutes for it to disperse evenly.
2. Run a complete manual water cycle on each level, and allow time for all of the water from each
level to drain back into the reservoir.
3. Once that’s complete, press recycle to drain and ll the reservoir with fresh new water.
Maintenance Procedures and Tips
Cleaning the countertop
Use soapy water or commonly available kitchen counter top cleaners. Do not let moisture stand on
the surface.

19Urban Cultivator | 1-877-352-0490 | www.urbancultivator.net
At Urban Cultivator your health and safety is our number one
concern. We want to ensure that a healthy lifestyle is available
for everyone. Please read the information below regarding
sanitation, growing, and food safety.
People have been concerned about food safety—and
naturally so, considering recent reports of food poisoning in
Europe. Many people are hesitant to eat uncooked sprouts as
they seem to have been the source of the outbreak. You will
be happy to know that microgreens are a safe alternative to
sprouts.
Microgreens are not sprouts, but rather, baby plants that
are intensely avorful and loaded with nutrients. There are
dierences in growing and harvesting microgreens that make
them much safer than sprouts.
Starting with Seeds
Make sure that all seeds you buy have been handled as a
food crop and not a farm planting seed crop. Seeds that
have been in contact with animals or animal waste could be
contaminated with salmonella or E. coli O157 H7, leading to
food poisoning. Reputable sprouting seed suppliers test all
lots of seed for contamination.
At Urban Cultivator, we follow the steps for all of our seed,
as recommended by the CFIA’s Code of Practice for the
Hygienic Production of Sprouted Seeds1:
“We insist that our seed producers adopt GAP (Good
Agricultural Practice) and provide evidence that the
product was grown according to section 3 of this Code.”
We have obtained certicates of analysis for microbial
pathogens of concern from our seed producers or distributors
for each incoming lot.
We maintain a documented history of our seed suppliers’
adherence to specications (e.g. analytical results, GAP
records, etc.)
Each bag of seed is labelled with the name of the seed
producer or distributor, the lot number, and the country of
origin.
Records are kept to facilitate trace-back and recall
procedures.
Sanitation
Always use clean seed (as stated above) and soil, tested for
salmonella and E. coli contamination.
Sanitize equipment; regularly clean and sanitize all trays,
machine and reservoir with the hydrogen peroxide rate
recommended below. We recommend a thorough cleaning/
disinfecting weekly, or when new trays are planted.
Don’t let sprouts or seed come in contact with manure, etc.
that may have bacterial contamination.
Hands and equipment must be clean at all times for handling
microgreens.
Water in your reservoir should be clean, potable water, tested
for bacterial contamination.
The small black lter at rear of the grow drawer must be
soaked in Hydrogen Peroxide solution once a month.
CFIA has approved 2% chlorine from Calcium Hypochlorite
as a seed sanitation method before sprouting; this is not
necessary for microgreens, but can be done as an extra
precaution. Ensure that there are no residual remains on
nished sprouts or greens.
Rate: 85 mL Calcium Hypochlorite in 3.75 L of warm water.
Mix thoroughly, and soak the seed for 20 minutes. Rinse seed
thoroughly in clean water, then nish soaking time in clean
water. Avoid breathing the fumes of chlorine. Masks should
be worn to lter out the fumes if you choose this method.
This method is extensive for the home owner growing
microgreens and not necessary; it is instead recommended
for sprout growers.
Alternative to using Calcium Hypochlorite:
Soak seeds in hydrogen peroxide. Add 140 mL of 5%
hydrogen peroxide (20 mL if using 35% peroxide) and 20
mL of vinegar to 1L of room temperature water. Pour the
solution over the seed, and let stand for 5 minutes. Make
sure all of the seed is in contact with the solution. Drain and
rinse the seeds several times to ensure that all of the solution
has been removed. Next, plant seed as usual. This again is
recommended for sanitizing seed before sprouting, and not
necessary for microgreens.
Growing Conditions
The environment in which the E. coli and salmonella
pathogens thrive is warm and moist. Most commercial
sprouts are grown in large tanks of water, which tumble the
seeds much like a washing machine tumbles clothes. In these
conditions, if one sprout becomes contaminated, it will be
spread to all the other sprouts in the water bath.
Microgreens are not grown in water. We recommend growing
them in sterile soil or another sterile media. While a sprout
bath spreads pathogens from one sprout to another, soil acts
like a lter, actually removing the source of contamination.
Harvesting
While a sprout is consumed with the whole root system, seed
and all, microgreens are new, small plants, just like you would
nd in your garden very early after seed germination. All
microgreens should be harvested with clean hands, clipped
at least 4 cm away from the root system and away from soil
using clean, disinfected scissors (a simple wipe with hydrogen
peroxide will disinfect them). Ensure all visible debris is
removed from microgreens and cleaned thoroughly before
consumption.
Refrigerate cut microgreens. Treat microgreens and foods
containing them as you would any nutritious food.
If you love sprouts, consider microgreens. Their bright and
intense avor proles will be much more enjoyable now that
you have condence over the fact that they are also safe to
enjoy.
Sanitation and Food Safety Recommendations

20Urban Cultivator | 1-877-352-0490 | www.urbancultivator.net
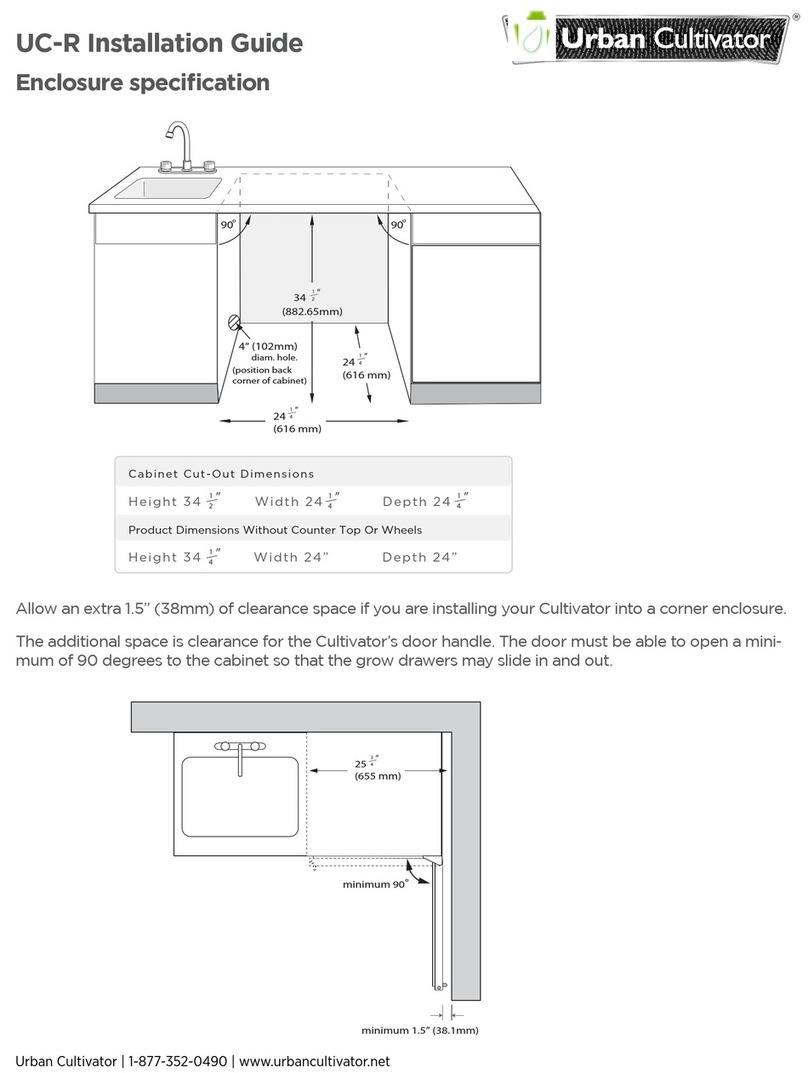
Enclosure Specification
90°
90°
(882.65mm)
34
1
2
”
24
(616 mm)
1
4
”
24
(616 mm)
1
4
”
4” (102mm)
diam. hole.
(position back
corner of cabinet)
Cabinet Cut- Out Dimensions
Height 34 Width 24 Depth 24
Product Dimensions Without Counter Top Or Wheels
Height 34 Width 24” De p t h 24”
1
2
”
1
4
”
1
4
”
1
4
”
Allow an extra 1.5” (38mm) of clearance space if you are installing your Cultivator into a corner enclosure.
The additional space is clearance for the Cultivator’s door handle. The door must be able to open a mini-
mum of 90 degrees to the cabinet so that the grow drawers may slide in and out.
minimum 90°
25
(655 mm)
3
4
”
minimum 1.5” (38.1mm)
DISCLAIMER: Please make sure to regularly follow the maintenance procedures. Urban Culti-
vator will not be responsible for any damage or failures arising from improper care or lack of
maintenace to the unit.
Table of contents
Other Urban Cultivator Lawn And Garden Equipment manuals