Urbarn Panel Garden Series 2.0 User manual

616.947.4888 urbarn.com
© 1.22
3529 3 Mile Road NW, Grand Rapids, MI 49534
URBARN™ Garden Series 2.0 Panel™
(Red Grow/Bloom)
User Guide
GS4P-8L5H-GG0A-080 Grow/Bloom


Table of contents:
Warranty
Safety & Precautions
System Hardware & Accessories
Assembly & Mounting Instructions
Technical Specications
Warnings
Care & Maintenance
URBARN™ aligns with the spirit
and drive of a farmer:
Relentless focus on operational
efciency and productivity
backed by a community of
like-minded business owners.
A BREED APART

Warranty
Every URBARN™ horticultural light
is designed, engineered, and built by
Abundant Lighting, LLC, in Grand Rapids,
Michigan, USA. We use the nest materials
from around the world to ensure you have
the most advanced technology available. All
URBARN™ lighting products are guaranteed
against manufacturing defects for ve (5)
years from date of purchase. For detailed
warranty information, visit URBARN.com

Safety & Precautions
Please read this manual thoroughly before attempting
to install or operate your URBARN™ horticultural light,
and keep it in a safe place for future reference. This
fixture must be installed by a qualified electrician.
It is important that you read, fully understand, and
observe the subsequent safety precautions.
This fixture is suitable and rated for damp and dry
locations. Care should be taken that it is used in a
manner that does not exceed its rated ampacity or the
maximum ambient temperature (30°C) of its installed
environment. For longevity and peak performance,
avoid exposure to direct sunlight as it may raise
ambient temperatures past the fixture rating.
The URBARN luminaire should not be concealed
or extended through a wall, floor, ceiling, or other
parts of a building. It should not be located above a
suspended ceiling or dropped ceiling, and should not
be permanently affixed to a building structure.
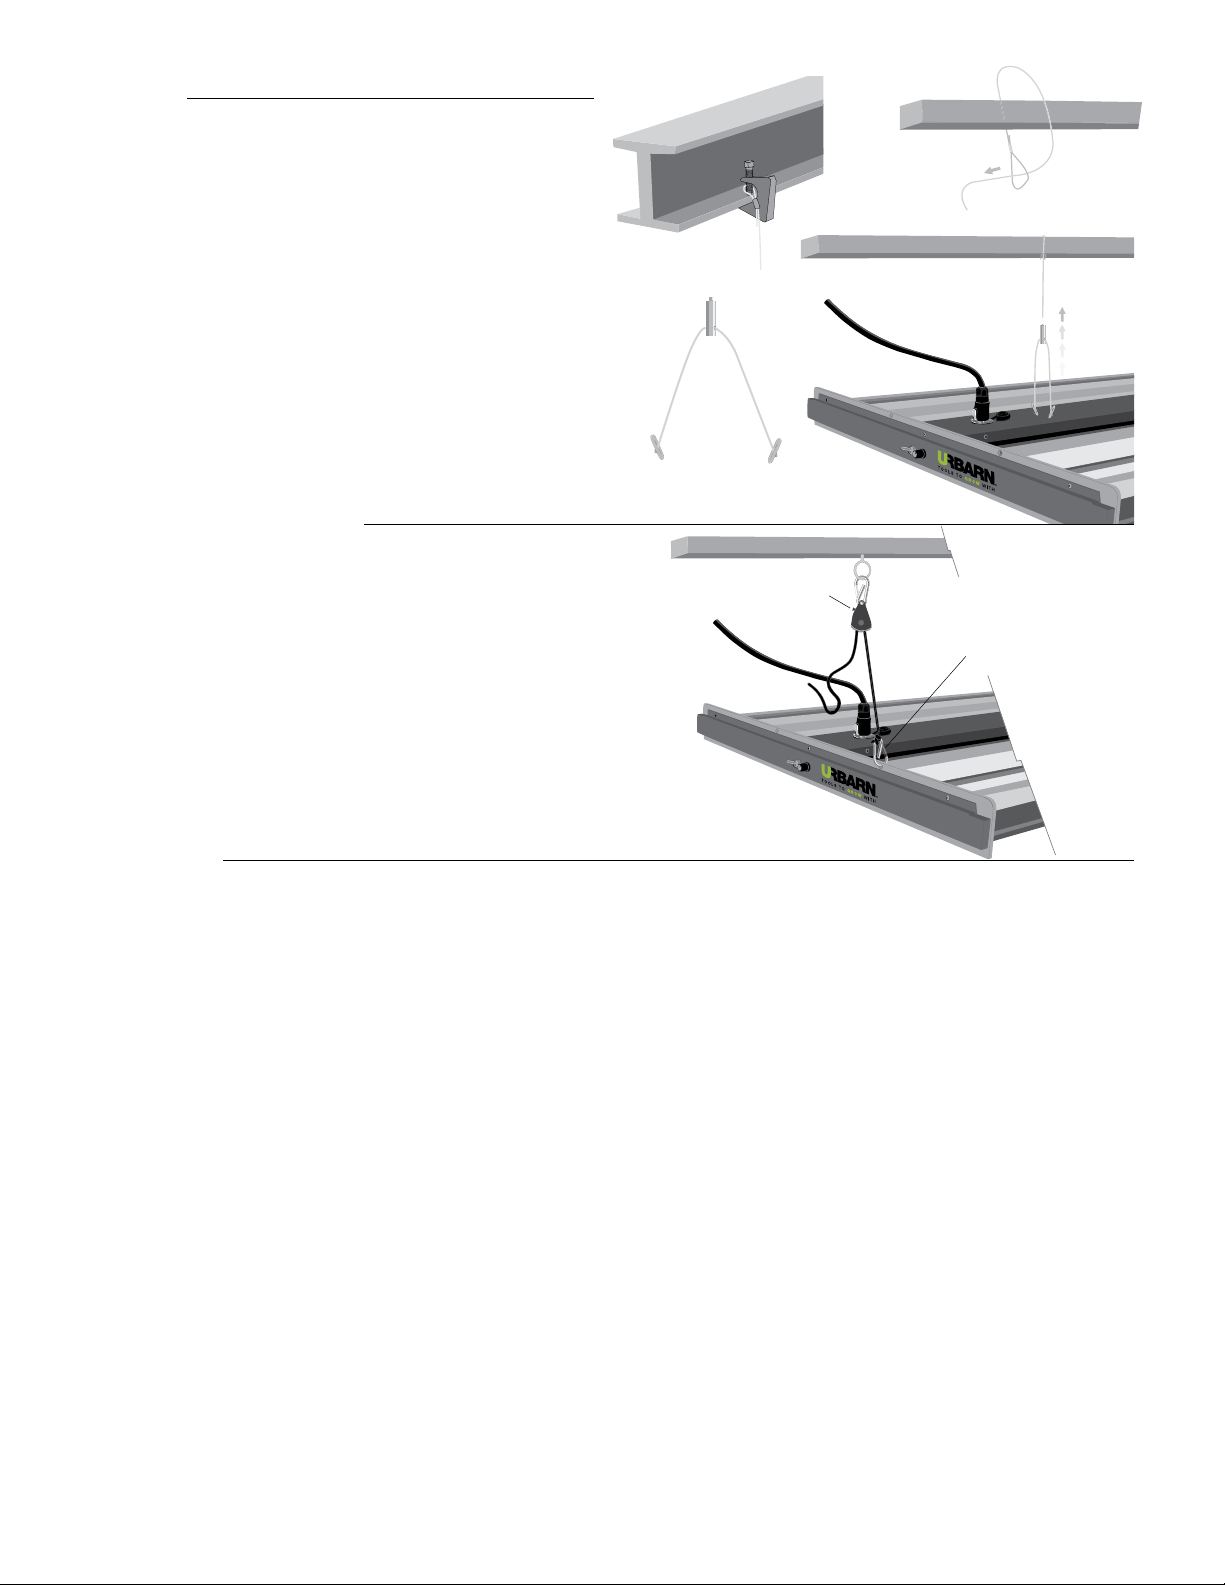
Care should be taken that the luminaire mounting
components and wiring are not subject to strain and
are protected from physical damage. When suspended,
each luminaire should be visible over its entire length.
While our URBARN fixture operates at a low
temperature, it is best not to touch while in operation.
Connect your URBARN light fixture to power sources
of the correct voltage. Protect power cables from
being pinched, walked on, or otherwise damaged.
Be especially careful where the power cable enters
the housing of the unit. Only connect the light to an
electrical outlet or extension cord of appropriate type
and rating.
DO NOT defeat the safety purpose of a grounding or
polarized plug by removing ground pins or using unsafe
adapters. A polarized plug has two blades—one wider
than the other. A grounding plug has a third ground
prong in addition to the two main conductors. The wide
blade or third grounding prong is provided for your
safety. If the provided plug does not fit your outlet,
consult an electrician to replace your obsolete outlet.
If you replace the power cord, only use one of similar
type and equal or greater current rating.
The URBARN light fixture should only be cleaned as
directed in the manual. You should seek service for
your system by qualified factory support if any of the
following occur:
• The power-supply cord or the plug has been
damaged.
• The unit has been exposed to rain.
• The unit exhibits a marked change in performance.
• The unit has been dropped, or its enclosure or chassis
is damaged.
The product must be installed in accordance with
the National Electrical Code and all applicable local
codes. Proper grounding is required for safety. The
fixture must be installed in accordance with the
applicable installation code by a person familiar with
the construction and operation of the product and any
hazards involved.

System Hardware & Accessories
System Hardware
A - URBARN™ Garden Series 2.0 Panel™
Fully assembled light fixture with mounting brackets
Accessories
B – AC Cables
• Cable only, 8’ (standard) or 12' (special order)
• 8 ', 12' (special order); preassembled
with 5P, 6P, or 7P plug per specification
C – Mounting Hardware
C1 - Galvanized Cable System - Paddle (standard)
C2 - Rope Ratchet (special order)
D - Reference
• User Guide
Remove light fixture and hardware from packaging. Be sure to place on a stable and flat surface with LEDs facing downward.
Adjust the cables or rope ratchets fixture connections to their desired position and secure. Be sure that the connection points to the lighting
fixture are spaced an equal distance from the endcaps to ensure fixture stability.
Maintain a minimum of 300mm (12 inches) mounting distance between lighting fixtures, walls, solid partitions and other permanent structures.
Maintain a minimum of 152mm (6 inches) distance from ceilings. Care should be taken to never mount any electrical lighting fixture near
highly combustible materials. Check local building codes for more specific instruction if required.
Attach male connector of power cord to corresponding female connector end of fixture. Ensure connection snaps into place.
Assembly & Mounting Instructions
A
B
D
C1C2
5P 6P 7P

WARNING: Carefully inspect the connections before hanging the cable system or rope ratchet.
DO NOT EXCEED LOAD LIMITS:
• CABLE KIT - 40 pounds per cable. Inspect each cable before using.
• ROPE RATCHET (special order) - 75 pounds per ratchet. Inspect each ratchet before using.
DO NOT USE IF DAMAGED. Avoid hot surfaces, sharp edges, abrasive surfaces and pinch points.
Cable System
Secure the hanger cable to an overhead supporting structure
using a minimum of two hanger points.
• Option 1: Secure the loop portion of the cable to a beam mount
or similar secure hanging point
• Option 2: Pass loop side of the cable over, around and under
structure capable of supporting 40 pounds or more. Then pass
straight end of cable through loop and pull tight.
• Repeat for both sides and ensure mounting position is equal
distance from ends to maintain balanced system.
• Raise fixture with “Y” toggle and grippers (already attached to
the fixture) to the loop cable secured to structure above. Pass
the straight end of loop cable through the toggle. The plunger
on top of the toggle catches and holds the cable securely.
• Level the fixture plumb with the building lines to the desired height
over the plant canopy (to let out cable, push the plunger down).
Adjustable Loop with Rope Ratchet
Fasten the adjustable rope clip hangers (provided) to light’s mounting
brackets. Repeat for both sides to ensure mounting position is equal
distance from ends to maintain a balanced system.
• Attach the carabiner clip on the ratchet to a secure overhead
hanging location such as a threaded hook or anchor.
• Secure the carabiner clip on the end of the looped rope to the
fixture. Make sure not to exceed 75 pounds per ratchet.
• Tighten the ratchet by pulling the loose end of the rope to raise the
fixture to the desired height.
• To loosen or lower the attached light, depress the small lever
recessed within the rope ratchet. Replace rope when worn.
Final Adjustments
Hang the fixture in the desired location and adjust the mounting
height to six inches from canopy.
• To prevent the overheating of lighting equipment or combustible
materials within the installation environment, please maintain at
least 6 inches of open air space above the unit and 12 inches from
each end to allow adequate airflow and cooling of the fixture.
• Once the fixture is in place, plug the AC cable into the wall or
ceiling outlet. Make sure no one is looking directly at LEDs when
power is connected.
• Note: This URBARN™ light fixture is suitable for dry or damp
location installation. The fixture is not for intra-canopy use.
Option 1
“Y” toggle and gripper
carabiner clip
pull rope
to raise
toggle
Option 2
depress lever
to lower
Initial Setup Instructions
Your Urbarn fixture has an On/Off power switch. It is a 2-channel luminaire with a fixed channel of white LEDs primarily controlled by the
power source into which the fixture is connected.
• If the power source is not controlled by a rheostat or other adjustable building control the fixtures will always operate at full output and power.
The second channel consists of LEDs with specific nanometer outputs. These LEDs are high-power and can be adjusted to supplement the
white lighting from 0% output to 100% by rotating the knob on the end of the fixture located near the On/Off switch.
• The purpose of the second channel is to augment the photonic output of the broad-spectrum white LEDs. It may be adjusted to increase
the ultimate PPF output and PPFD canopy requirements for an optimal grow cycle.
rope clip hanger

Family/Model
URBARN™ Garden Series 2.0 Panel™ (Red Grow/Bloom)
Spectrum
Grower adjusted
Input Voltage
120-277VAC
AC Power Cord
8’ (standard), 12’ (special order)
AC Plug
NEMA Rated 5-20P Plug
NEMA Rated 6-20P Plug
NEMA Rated L7-20P Plug
Mounting Hardware
Finished Galvanized Cable System (standard)
Stainless Steel Adjustable Loop with
Rope Ratchet (special order)
Packaging
Single Unit (1)
Frequency
50/60Hz
Max Ambient Temperature
86°F/30°C
Photosynthetic Photon Flux (PPF)
1597 µmol/sec
Energy Efficiency (PPE)
2.02 µmol/J
Technical Specifications
Nominal AC Input 120V 277V
AC Current (Amps) 6.8A 2.9A
AC Input Power (Watts) 812W 790W
CAUTION
LED and heatsink surfaces may be hot. Allow sufficient cooling time before handling.
To reduce the risk of overheating or fire, never place operating fixtures face down on a flush surface.
Always allow
for adequate ventilation
of fixtures and power supplies.
WARNING
Risk of electrical shock. To reduce the possibility of serious injury, always take the proper precautions and
unplug the fixture before moving or cleaning.
WARNING - POSSIBLE RISK OF INJURY TO EYES AND SKIN
Hazardous optical radiation may be emitted from the light source. Do not stare at operating lamp. May be
harmful to eyes.
UV may be emitted from the light source. Eye or skin irritation may result from exposure. Use appropriate
shielding.
IR may be emitted from the light source. Do not stare at operating lamp.

Family/Model
URBARN™ Garden Series 2.0 Panel™ (Red Grow/Bloom)
Spectrum
Grower adjusted
Input Voltage
120-277VAC
AC Power Cord
8’ (standard), 12’ (special order)
AC Plug
NEMA Rated 5-20P Plug
NEMA Rated 6-20P Plug
NEMA Rated L7-20P Plug
Mounting Hardware
Finished Galvanized Cable System (standard)
Stainless Steel Adjustable Loop with
Rope Ratchet (special order)
Packaging
Single Unit (1)
Care & Maintenance
• Your URBARN™ horticultural light combines both active and passive cooling. The light is designed for indoor use
and the unique conditions found in plant grow facilities. Some basic care will keep your light operating at peak
performance.
• For your light to properly cool itself, we recommend at least 152mm (6 inches) of space between the fixture and
the ceiling of your grow facility. Failure could result in shortened lifespan.
• To optimize lifespan and performance, we recommend checking for and removing excess dust, debris, and mineral
build up from the fixture and glass.
• Cleaning should always be done with the fixture unplugged from its power source. We recommend using low-
pressure compressed air or water to rinse away dust.
• Water should never be applied directly to the board surface on which the LEDs are mounted.
PLEASE NOTE:
The light source of this luminaire is not replaceable; when the light source reaches its end of life, the whole luminaire
shall be replaced.
Horticulture lighting is not suitable for household room illumination.

616.947.4888 urbarn.com
© 1.22
3529 3 Mile Road NW, Grand Rapids, MI 49534
LEARN MORE at urbarn.com
and let us know how we can help you grow
616.947.4888 | 3529 3 Mile Road NW, Grand Rapids, MI 49534

616.947.4888 urbarn.com
© 1.22
3529 3 Mile Road NW, Grand Rapids, MI 49534

616.947.4888 urbarn.com
© 1.22
3529 3 Mile Road NW, Grand Rapids, MI 49534
Table of contents
Other Urbarn Lawn And Garden Equipment manuals
Popular Lawn And Garden Equipment manuals by other brands

FRAME IT ALL
FRAME IT ALL 800001076 quick start guide

Dometic
Dometic DA20E installation instructions

greenhouse sensation
greenhouse sensation Hydropod Propagator Assembly and maintenance instructions

Yard force
Yard force GLS36L Original instructions

REPTILES-PLANET
REPTILES-PLANET REPTI CONTROL PRO manual

Gardeners
Gardeners 8586751 quick start guide