Urrea NL2 Dimensions and installation guide

ATENCIÓN: Lea, entienda y siga las instrucciones de seguridad contenidas en este
manual antes de operar esta herramienta.
WARNING: Read, understand and follow the safety rules in this manual, before operating this tool.
Nivel Láser Semiautomático de 2 Líneas
Semiautomatic 2 Lines Laser Level
NL2
Manual de Usuario y Garantía.
User’s Manual and Warranty.
NL2 manual.indd 1 07/03/17 12:11

2
NORMAS GENERALES DE SEGURIDAD
Todas las instrucciones deben de leerse y ob-
servarse con el objetivo de trabajar de mane-
ra segura con el aparato de medición. Nunca
haga señas de seguridad no reconocibles en
el aparato de medición. GUARDE ESTAS INS-
TRUCCIONES PARA FUTURAS REFERENCIAS Y
INCLÚYALAS CON LA HERRAMIENTA DE MEDI-
CIÓN CUANDO SE LO DE A UN TERCERO.
PRECAUCIÓN: El uso de otra operación o
ajustando el equipo o la aplicación de otro mé-
todo de procesamiento que no sean los men-
cionado aquí pueden conllevar exposición a
radiación peligrosa.
• La herramienta de medición viene con una
etiqueta de ADVERTENCIA.
• Si el texto de advertencia de la etiqueta no
está en su lenguaje nacional, pegue la etiqueta
provista en su lenguaje nacional antes de ope-
rar por primera vez.
No dirija el rayo láser a personas o ani-
males y no mire directamente o refleje
el rayo láser hacia usted, no inclusive a
distancia. Usted puede segar a alguien,
causar accidentes o dañar sus ojos.
• Si la radiación del láser alcanza sus ojos usted
debe deliberadamente cerrar sus ojos e inme-
diatamente girar su cabeza a otra dirección.
• No haga modificación alguna al equipo láser.
• No use el láser utilizando lentes de visión
láser como lentes de seguridad. Los lentes de
visión láser son usados para mejorar la visuali-
zación del rayo láser, pero no lo protegen de la
radiación láser.
• No use los lentes de visión láser como lentes
de sol o en el tráfico. Los lentes de visión láser
no le ofrecen una completa protección UV y re-
ducen su percepción de los colores.
• Tenga su herramienta de medición repara-
da únicamente por especialistas calificados
usando piezas originales. Esto asegura que la
seguridad de la herramienta de medición sea
mantenida.
• No permita que los niños utilicen la herra-
mienta de medición láser sin supervisión. Ellos
podrían accidentalmente cegar otras personas
o a si mismos.
• No opere la herramienta de medición en am-
bientes explosivos, tales como en la presencia
de liquidos flamables, gases o polvos. Se pue-
den crear chispas dentro de la herramienta de
medición que podría encender polvos o gases.
CARACTERÍSTICAS
USO INTENCIONADO
La herramienta de medición está destinada a
determinar y comprobar líneas horizontales y
verticales.
La herramienta de medición es adecuada ex-
clusivamente para el funcionamiento en luga-
res de trabajo cerrados.
CONOZCA SU HERRAMIENTA
El numerado de las características de producto
mostradas se refiere a las imágenes abajo.
1. Apertura de salida para el rayo láser.
2. Indicador automático de nivelación.
3. Interruptor On/Off.
4. Cierre de la batería.
5. Tapa de la batería.
6. Superficie de contacto.
7. Etiqueta ADVERTENCIA láser.
8. Montaje 1/4" para tripié.
1
2
3
6
4
5
8
7
NL2 manual.indd 2 07/03/17 12:11

3
ESPAÑOL•Manual de Usuario
9. Gafas de visión láser *.
10. Tripié*
11. Abrazadera.
*Los accesorios ilus-
trados o descritos no
están incluidos como
entrega estándar
INSTRUCCIONES DE OPERACIÓN
IMPORTANTE: El uso seguro de este pro-
ducto requiere la comprensión de la informa-
ción en la herramienta y en este manual de
instrucciones, así como conocimientos sobre
el proyecto a realizar. Antes de usar este pro-
ducto, familiarícese con todas las característi-
cas de funcionamiento y normas de seguridad.
ENSAMBLE
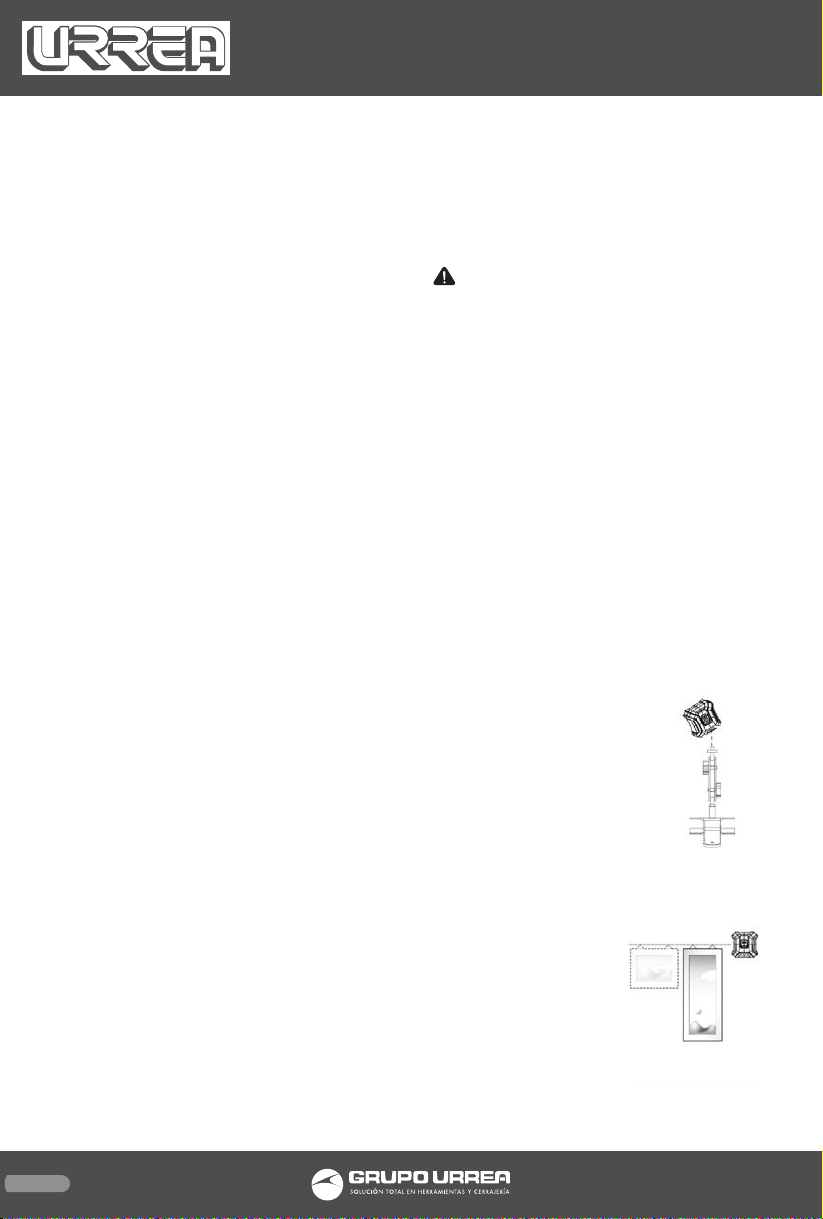
Insertando/Reemplazando las baterías.
El aparato necesita dos baterías "AAA" para
colocarlas:
1. Presione la palanca para abrir la cubierta.
2. Inserte dos nuevas pilas "AAA alcalinas,
según la polaridad (+/-) indicada en la etique-
ta de datos.
3. Cierre la tapa nuevamente.
NOTA:
• Apague siempre la herramienta antes de ins-
talar o reemplazar las baterías.
• Retire las baterías de la herramienta cuando
no se usa por períodos prolongados.
• Las pilas AAA deben coincidir entre sí en
marca y tipo.
• No mezcle pilas nuevas y viejas.
• Retire las pilas agotadas inmediatamente y
disponer de ellos según las leyes y reglamentos
de su comunidad.
OPERACIÓN INICIAL
Proteja el aparato de medición contra la hume-
dad y luz directa del sol.
• No exponga el aparato de medición a tempe-
raturas extremas o variaciones de temperatura.
Por ejemplo, no lo deje en vehículos por perío-
dos largos. En caso de grandes variaciones de
temperatura, permita que la herramienta de
medición se ajuste a la temperatura ambiente
antes de ponerlo en funcionamiento.
• Evitar impactos pesados o dejar caer la herra-
mienta de medición. Daños en el aparato de
medición pueden afectar su precisión.
• Apague la herramienta de medición durante
el transporte. Cuando se apaga, la unidad ni-
veladora se bloquea ya que puede dañarse en
algún movimiento fuerte.
ENCENDIDO Y APAGADO
Lleve el interruptor hacia arriba donde se ac-
tiva la función autonivelante y de líneas cru-
zadas y deslice el interruptor hacia abajo para
apagarla.
FUNCIONES DEL NIVEL LÁSER
Modo de AUTONIVELACIÓN
En este modo, la herramienta se nivelará si está
a ± 3° de la horizontal.
1. Coloque el nivel de láser de línea transversal
autonivelante sobre una superficie lisa y plana
que esté a ± 3° de la horizontal.
2. Encienda la herramienta deslizando el in-
terruptor de encendido hacia arriba. El nivel
de nivel de láser de nivelación automática se
nivelará automáticamente en 5 segundos. El
indicador LED brillará en verde.
3. Cuando el láser cruzado autonivelante no
esté nivelado, el LED cambiará a rojo y la línea
láser parpadeará.
4. Para apagar las líneas láser, deslice el inte-
rruptor hacia abajo.
ADVERTENCIA: Cuando se encienda el láser,
siempre tenga precaución de proteger sus ojos
y los ojos de quienes te rodean. Nunca apunte
la luz del láser en la cara de ninguna persona,
incluyendo a si mismo.
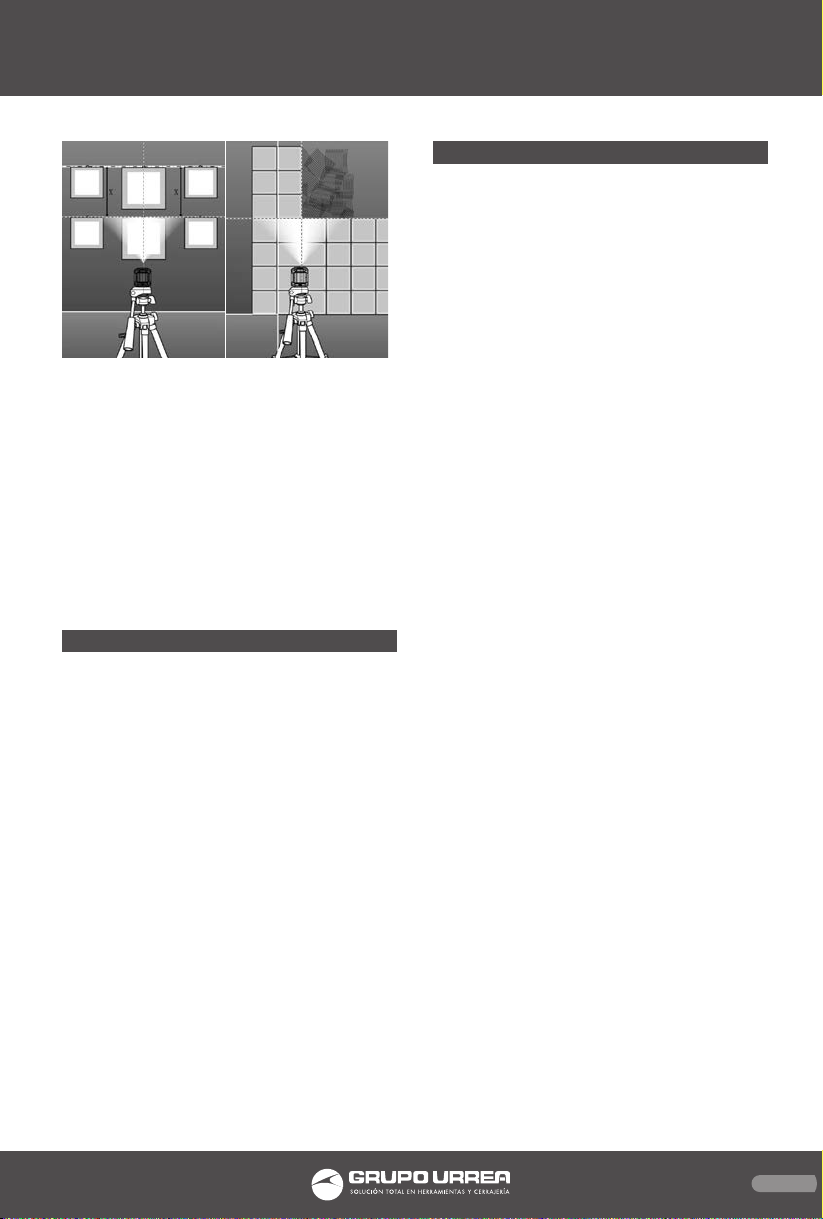
APLICACIONES
Su nivel láser autonivelante de línea cruzada
puede ser sujetado en mano para marcado en
punto y la alineación simple de vista. Es ideal
para las siguientes aplicaciones:
• Colgar cuadros, fotos o ilustraciones en pa-
redes.
• Empapelado y colocación de viniles.
• Enmarcar puertas y ventanas.
• Instalación cableado eléctrico y tuberías.
• Montaje de molduras, tomacorrientes, inte-
rruptores e iluminación.
11
NL2 manual.indd 3 07/03/17 12:11

4
• Instalación de lamparas colgantes.
• Pintura.
• Instalación de armarios.
• Colocación de losetas y pisos.
OPERACIÓN
Trabajar con el tripié (vea
figura A)
Un tripié ofrece un sopor-
te para ajustar una altura
adecuada para el nivel
láser. Coloque la herra-
mienta de medición en la
rosca macho del tripié y
atornille.
Sosteniendo lateralmente contra una pared u
objeto (Vea la figura B)
Para verificar de manera
rápida la altura, la herra-
mienta de medición pue-
de ser colocado en alguna
superficie lateralmente
contra una pared verti-
cal, armarios, etc. Tenga
cuidado de mantener la
herramienta de medición
recto y con calma.
Gafas de visión láser (accesorio)
Las gafas de visión láser filtran la luz ambien-
tal. Esto hace que la luz roja del láser parezca
más brillante para los ojos.
• No utilice estos lentes como gafas de seguri-
dad. Las gafas de visión láser se utilizan para la
visualización mejorada del rayo láser, pero no
protegen contra la radiación láser.
• No utilice las gafas de visión láser como gafas
de sol, como en el tráfico. Las gafas de visión
láser no protegen completamente los rayos UV
ya que pueden reducir la percepción del color.
MANTENIMIENTO
• Mantenga el aparato de medición limpio en
todo momento.
• No sumerja el aparato de medición en agua
u otros líquidos.
• Limpie la suciedad con un paño húmedo y
suave. No use cualquier producto de limpieza
o disolventes.
• Periódicamente Limpie las superficies en la
abertura de salida del láser en particular y pres-
tar atención a cualquier pelusa de fibras.
ELIMINACIÓN DE DESECHOS
Las herramientas de medición, los accesorios y
los envases deben clasificarse para un reciclaje
ecológico. ¡No deseche las herramientas de
medición en la basura doméstica!
PILAS Y BATERÍAS
No deseche las baterías en la basura doméstica,
el fuego o el agua. Los paquetes de baterías /
pilas deben recolectarse, reciclarse o desecharse
de manera respetuosa con el medio ambiente.
Fig. B
Fig. C Fig. D
Fig. A
RANGO DE TRABAJO
PRECISIÓN DEL LÁSER
TIPO DE LÁSER
BATERÍAS
TIEMPO DE TRABAJO
PESO
10 m
±0.5 mm/m
Clase 2, <1mW
2 x 1,5 V (AAA)
>15 h
162 g
ESPECIFICACIONES TÉCNICAS
NL2 manual.indd 4 07/03/17 12:11

5
ENGLISH•User’s manual
GENERAL SAFETY RULES
Working safely with the measuring tool is pos-
sible only when the operating and safety in-
formation are read completely and the instruc-
tions contained therein are strictly followed.
Never make warning labels on the measuring
tool unrecognizable. SAVE THESE INSTRUC-
TIONS.
CAUTION: The use of other operating or
adjusting equipment or the application of
other processing methods than those men-
tioned here, can lead to dangerous radiation
exposure.
Do not direct the laser beam at per-
sons or animals and do not stare into
the laser beam yourself. This measuring tool
produces laser class 2 laser radiation according
to IEC 60825-1. This can lead to persons being
blinded.
• Do not use the laser viewing glasses as safety
goggles. The laser viewing glasses are used for
improved visualization of the laser beam, but
they do not protect against laser radiation.
• Do not use the laser viewing glasses as sun
glasses or in traffic. The laser viewing glasses
do not afford complete UV protection and re-
duce color perception.
• Have the measuring tool repaired only
through qualified specialists using original
spare parts. This ensures that the safety of the
measuring tool is maintained.
• Do not allow children to use the laser mea-
suring tool with- out supervision. They could
unintentionally blind other persons or them-
selves.
• Do not operate the measuring tool in explo-
sive environments, such as in the presence of
flammable liquids, gases or dusts. Sparks can
be created in the measuring tool which may
ignite the dust or fumes.
+ Keep the measuring tool away from cardiac
pacemakers. The magnets 7 generate a field
that can impair the function of cardiac pace-
makers.
+ Keep the measuring tool away from mag-
netic data medium and magnetically-sensitive
equipment. The effect of the magnets 7 can
lead to irreversible data loss.
FEATURES
INTENDED USE
The tool is intended for determining and in-
dicating exact horizontal and vertical lines. It
is also suitable for checking plumb lines and
horizontal partitions or surfaces.
The tool is suitable exclusively for operation in
enclosed/ interior working sites.
KNOW YOUR TOOL
The numbering of the product features shown
refers to the illustration of the measuring tool
on the graphic page.
1. Exit opening for
laser beam.
2. Automatic lev-
elling indicator.
3. On/Off switch.
4. Latch of battery
lid.
5. Battery lid.
6. Contact surface.
7. Laser warning
label.
8. Tripod mount
1/4".
9. Laser viewing glasses*.
10. Tripod*.
11. Clamp*.
* The accessories illus-
trated or described are
not included as standard
delivery.
OPERATION INSTRUCTIONS
IMPORTANT: The safe use of this product
requires an understanding of the information
on the tool and in this instruction manual, as
well as knowledge of the project you are at-
tempting. Before use of this product, familiar-
ize yourself with all operating features and
safety rules.
11
1
2
3
6
4
5
8
7
NL2 manual.indd 5 07/03/17 12:11

6
ASSEMBLY
Inserting/Replacing the Battery
The battery compartment holds two “AAA”
batteries.
1. Push the latch to open the battery cover.
2. Insert two new“AAA” alkaline batteries,
following the polarity (+/-) as indicated on the
pole plate.
3. Securely close the cover.
NOTE:
• Always turn off the tool before installing or
replacing the batteries.
• Remove the batteries from the tool when not
using it for extended periods.
• The AAA batteries should match each other
in brand and type.
• Do not mix old and new batteries.
• Remove depleted batteries immediately, and
dispose of them according to the laws and
regulations governing your community.
INITIAL OPERATION
Protect the measuring tool against moisture
and direct sun light.
• Do not subject the measuring tool to extreme
temperatures or variations in temperature. As
an example, do not leave it in vehicles for lon-
ger periods. In case of large variations in tem-
perature, allow the measuring tool to adjust
to the ambient temperature before putting it
into operation.
• Avoid heavy impact to or falling down of
the measuring tool. Damage to the measuring
tool can impair its accuracy. After heavy impact
or falling down, check the angle accuracy be-
tween the 0° and 90° laser line with the angle
of a precision square.
SWITCHING ON AND OFF
Push the power switch up to turn the self-
levelling cross-line laser level on, and slide the
power switch down to turn the tool off
LEVELING FUNCTION
SELF-LEVELLING mode
In this mode, the tool will level itself if it is
within ±3° of horizontal.
1. Place the self-levelling cross-line laser level
on a flat, smooth surface that is within ±3° of
horizontal.
2. Turn the tool on by sliding the power switch
to the up position. The self-levelling cross-line
laser level will automatically level within 5 sec-
onds. The LED indicator will shine green.
3. When the self-levelling cross-laser out of
levelling the LED will turn to red and the laser
line will blink.
4. To turn off the laser lines, slide the switch to
down position.
WARNING: When turning the laser on, al-
ways be aware of protecting your eyes and the
eyes of those around you. Never point the laser
light at anyone’s face, including your own.
APPLICATIONS
Your self-levelling cross-line laser level can be
hand-held for point marking and simple align-
ment by sight . It is ideal for the following ap-
plications:
• Hanging pictures, photos, or artwork on
walls.
• Wallpapering and stencil work.
• Framing doors and windows.
• Installing electrical wiring and pipes.
• Mounting wall fixtures, electrical outlets,
switches and lighting.
• Installing a drop ceiling.
• Painting.
• Installing closets.
• Laying tile and flooring.
OPERATION
Working with the Tripod
(see figure A)
A tripod offers a stable,
height-adjustable mea-
suring support. Place the
measuring tool via the tri-
pod mount on to the 1/4"
male thread of the tripod
and screw the locking
screw of the tripod tight.
Holding Laterally against
a Wall or Object (see fig-
ure B)
For quick checking of
heights, the measuring
tool can be held by the
contact surfaces later-
ally against a vertical wall,
cabinets, etc. Take care to
hold the measuring tool
straightly and calmly.
Fig. B
Fig. A
NL2 manual.indd 6 07/03/17 12:11

7
ENGLISH•User’s manual
Laser Viewing Glasses (Accessory)
The laser viewing glasses filter out the ambient
light. This makes the red light of the laser ap-
pear brighter for the eyes.
• Do not use the laser viewing glasses as safety
goggles. The laser viewing glasses are used for
improved visualization of the laser beam, but
they do not protect against laser radiation.
• Do not use the laser viewing glasses as sun
glasses or in traffic. The laser viewing glasses
do not afford complete UV protection and re-
duce color perception.
MAINTENANCE
• Keep the measuring tool clean at all times.
• Do not immerse the measuring tool in water
or other fluids.
• Wipe off debris using a moist and soft cloth.
• Do not use any cleaning agents or solvents.
• Regularly clean the surfaces at the exit open-
ing of the laser in particular, and pay attention
to any fluff of fibres.
DISPOSAL
Measuring tools, accessories and packaging
should be sorted for environmental-friendly
recycling.
BATTERY PACKS/BATTERIES:
Do not dispose of battery packs/batteries into
household waste, fire or water. Battery packs/
batteries should be collected, recycled or dis-
posed of in an environmental-friendly manner.
TECHNICAL DATA
WORKING RANGE
LASER ACCURACY
LASER POWER
BATTERIES
WORKING OPERATION
WEIGHT
10 m
±0.5 mm/m
Class 2, <1mW
2 x 1,5 V (AAA)
>15 h
162 g
Fig. C Fig. D
NL2 manual.indd 7 07/03/17 12:11

8
NL2
ESPAÑOL
PÓLIZA DE GARANTÍA
ENGLISH
WARRANT POLICY
Urrea Herramientas Profesionales S.A. de C.V.
Warranties this product for a period of 1 year in
its parts, components and manual labour against
any manufacture defect from the purchasing date.
Purchase date: ____/____/____
Product:____________________
Brand:______________________
Model:______________________
______________________________
Distributor seal and signature
Sold and Imported by:
Urrea Herramientas Profesionales S.A. de C.V.
km 11,5 Carretera A El Castillo, El Salto, Jalis-
co, México. C. P. 45680, Tel. (33) 3208 7900,
RFC UHP900402Q29
Terms:
In order to make warranty effective you must pres-
ent the product along with the warranty properly
fillled and signed to an authorized distributor or
service center.
Urrea Herramientas Profesionales S.A. de C.V.
will cover the transportation cost related to the
warranty.
This warranty is not applicable in the follow-
ing cases:
· When the product has not been used according
to normal conditions or natural wear of its parts.
· When the product has not been used according
with this user’s manual instructions.
· When the product has been fixed or modified by
unauthorized or unqualified person.
Urrea Herramientas Profesionales S.A. de C.V.
garantiza este producto por el termino de 1 año
en sus piezas, componentes y mano de obra con-
tra cualquier defecto de fabricación a partir de la
fecha de entrega.
Fecha de venta: ____/____/____
Producto: ___________________
Marca: ______________________
Modelo: ____________________
______________________________
Sello y firma de distribuidor
Comercializado e Importado por:
Urrea Herramientas Profesionales S.A. de C.V.
km 11,5 Carretera A El Castillo, El Salto, Ja-
lisco, México. C. P. 45680, Tel. (33) 3208 7900,
RFC UHP900402Q29
Condiciones:
Para hacer efectiva la garantía deberá presentar
el producto junto con la póliza de garantía debi-
damente firmada y sellada por el establecimiento
donde la adquirió, en cualquiera de los centros de
servicio autorizados.
Los gastos de transportación que se deriven del
cumplimiento de la garantía serán cubiertos por:
Urrea Herramientas Profesionales S.A. de C.V.
Esta garantía no será valida en los siguientes
casos:
· Cuando el producto haya sido utilizado en condi-
ciones distintas a las normales o al desgaste natu-
ral de sus partes.
· Cuando el producto no haya sido operado de
acuerdo al instructivo de uso que lo acompaña.
· Cuando el producto haya sido alterado o repara-
do por personas no autorizadas.
NL2 manual.indd 8 07/03/17 12:11
Table of contents
Languages:
Other Urrea Laser Level manuals