US Cutter Blue Ox User manual

User Manual

1 2
• Intended usage of this Heat Press: This heat press is designed to
press heat transfer vinyl (HTV), sublimation and transfer papers
onto soft garments.
Do not attempt to set the temperature on this device at higher than
480 degrees Fahrenheit as it will burn out the heating element.
Also avoid use of this heat press for other activities such as food
preparation or extraction of oils from plant materials and other
alternative uses.
Use of this heat press in a manner other than intended will void the
warranty, will damage the machine, and may constitute a fire hazard.
• Preserve the shipping carton: Please do not discard or disassemble
the carton this heat press came in. It was designed to hold the
weight of this machine during shipping.
Should you need to return the equipment due to warranty or repair,
you will need it. Do not attempt to ship this equipment in a dierent
container.
• Follow manufacturer instructions on materials you press: Always
use recommended settings from the manufacturer for any material
used in this press. Those instructions are usually always available
on-line from the material maker.
Instructions on the most common and recommended materials are
enclosed within this documentation.
Thank you for purchasing this heat press from USCutter. The
following are important things you need to know before you begin:
• Test before you press: We encourage you to always do a test
of your fabric and HTV or transfer paper together using a small
sample of the materials before you do volume production.
If possible your test should include actually washing and drying a
pressed garment to assure that the media has properly adhered
to the garment using the heat and pressure setting you have
selected.
• Use extreme care during operation: Please also be careful as you
operate the heat press. During operation the platens will get hot
enough to do serious injury to you should you touch them, and
surrounding metal parts will also reach high temperatures.
Please educate children and others around this equipment that
it is not a toy and can cause severe burns and/or injury if the unit
is closed onto fingers or other body parts.
• Electrical Source: This heat press is designed for the North
American market and is designed to plug into a standard
household 3 prong outlet. (110-120V/60Hz.) Do not attempt to
use this press with a two prong electrical cord or otherwise use
it without proper grounding.
2
1
3
4
5
7
6
9
10
NEED HELP WITH YOUR NEW
HEAT PRESS? Blue Ox heat
presses are sold and supported
in the United States By USCutter.
For sales and support:
(425)481-3555
http://support.uscutter.com
6:15am - 4:45pm PST
This documentation is copyright 2016
USCutter. No duplication, republishing, or
reposting of this material in whole or i part is
authorized without express written consent.
Product design, logos, brand names for various
media, and product photos are owned by the
manufacturers.
Sales and Support Info.
Before You Begin
Heat Press Overview
Control Panel Overview
Basic Operation
Calibrating Pressure
How to Press Heat Transfer Vinyl
Heat Press Guide
Pressing Sublimation Paper
Troubleshooting

3 4
Control Panel Overview
OUT TIME
PV
SV
˚C
˚F
TEMP
TIME
THJ-XMTF-III
Heat Press Overview
Temperature Screen
Displays current platen
temperature
Time Screen
Displays current press time
Temperature Light
Is lit when press is heating up.
Shuts o when press is at
proper temperature
Temperature Control
Adjusts temperature setting
Time Control
Adjusts press time setting
Time Light
Is lit when press is shut and
Time screen is counting down.
Basic Operating Instructions
1. Connect the power cord to the press and a 110 volt outlet. Turn
the power switch on. The Temperature Screen , Timer Screen, and
Temperature Light should be on.
2. Press the TEMP button. The Temperature Screen will start
blinking and you are able to set the desired temperature with the
up and down arrows. Press the TEMP button again to set the
desired pressing temperature.
3. Press the TIME button. The Time Screen will start blinking and
you are able to set the desired press time with the up and down
arrows. Press the TIME button again to set the desired pressing
time.
4. When your heat press reaches the input temperature, the OUT
light (Temperature Light) will turn o.
Pressure Adjust Knob
Adjusts the amount of pressure
output from press
Power Switch
Turns Press on and o
Top Platen
Heats to desired temperature/
presses vinyl into garment
Caution HOT!
Open and Close Arm
Opens and closes top platen
Control Panel
Adjusts the temperature and
time settings of heat press
Power Cord Insert
Location where the female end
of your heat press power cord is
inserted to power machine from
wall outlet

5 6
Instructions from manufacturers of heat transfer vinyls and transfer papers will instruct you to
use Low, Medium, or High Pressure during the application process. Here’s how to calibrate your
machine and identify those settings. (Do this while the platens are cold.)
1. Turn the pressure knob counterclockwise a few times to lower pressure on the platens.
2. Place a piece of paper onto the bottom of the platen.
3. Close the clamshell press using the handle.
4. Pull on the paper.
5. If the paper moves at all, turn the knob clockwise and try again.
6. Try again and repeat until the paper doesn’t move at all. This is your “Medium”
pressure.
From the “Medium” setting, High pressure will be clockwise one to two turns. Low pressure will be
counterclockwise one to two turns. The number of turns will depend the thickness of the garment.
Note: Using Medium and High pressure will make it a bit dicult to close the heat press. During the
pressing process, the goal is to press the heated material into the fibers of the garment.
How to calibrate the pressure of your new Heat
Press:
1. Use a vinyl cutter to cut your heat transfer vinyl material. Remember, that unless otherwise instructed
by the manufacturer, you will want to Mirror the design so that when it cuts it appears backwards. Using
Sure Cuts A Lot, this option will appear on your Cut Setting menu as a click-box. With Vinyl Master, you
will find the selection for the “MIRROR” option in the Send To Be Cut pop-up window.
2. Weed your design, removing the excess material. Remember to remove any material inside the cavity
such as the inside of the letters O and A.
3. Find the appropriate heating instructions for the material you are using either online or in the chart
located on the Blue Ox heat press/ this manual, and set your time and temperature according to the
manufacturer’s recomended settings.
4. Use the Pressure Adjustment Knob on the top of the press to adjust the pressure as recommended.
5. When the heat press reaches it’s target temperature, place your garment on the bottom platen so that it is
flat and there are no wrinkles in the material. Warning: The Platens will be VERY HOT!
6. Pre-press the garment for 2 to 3 seconds to remove wrinkles and moisture.
7. Position the heat transfer vinyl on the shirt so that the colored vinyl on the liner is touching the shirt. Your
design should appear through the liner un-mirrored.
8. Lay a sheet of non-stick paper over the design to keep the top platen clean and avoid scorching the
surface of your heat transfer vinyl.
9. Press the material at the time/temperature recommended by the manufacturer.
10. Open the press and remove the non-stick paper. Set it aside as it can be re-used.
11. Peel the liner o the top of the garment based on manufactuerer instructions.
How to press Heat Transfer Vinyl (HTV):

Siser Reflect All
Polycotton blends and 100% Polyester
305°F
151°C Medium 10 Warm
Siser CADflex
Polycotton blends and 100% Polyester
305°F
151°C Medium 15 Cold
7 8
Your Guide To
Perfect Results Every Time.
TIPS FOR YOUR HEAT PRESS
CLEANLINESS & PROTECTION GARMENT SIZE
TIME TEMPERATURE PRESSURE COLD/HOT PEEL
TIPS FOR YOUR HEAT PRESS
CLEANLINESS & PROTECTION GARMENT SIZE
TIME TEMPERATURE PRESSURE COLD/HOT PEEL
TIPS FOR YOUR HEAT PRESS
CLEANLINESS & PROTECTION GARMENT SIZE
TIME TEMPERATURE PRESSURE COLD/HOT PEEL
TIPS FOR YOUR HEAT PRESS
CLEANLINESS & PROTECTION GARMENT SIZE
TIME TEMPERATURE PRESSURE COLD/HOT PEEL
Digital Printed
Graphics
Indoor Wall
Vinyl
Heat Press
Outdoor
Signage
Stencils &
Masks
You also need the right
media, blade, and
application tape to
ensure a professional job.
A good VINYL CUTTER
is just the start...
Main Tape
GFX-341
45°
Blade
45°
Blade
Oracal 3951 & 3651
HP Gloss & Matte
Glass Application
45°
Blade
Oracal 8300, 8500,
8510, & 8800
Main Tape
GXF-775 or
R-Tape AT65
Main Tape
GXP750 or
Oratape HT55
Oracal 631 or
GreenStar Wall Vinyl
30° Blade
(general)
60° Blade
(glitter/flock)
EasyWeed
(standard fabrics)
EasyWeed Extra
(nylons/water resistant)
R-Tape
4076RLA 60° Blade
Anchor BlastLite
Oramask
GreenStar
Layflat Classic or
Main Tape
GXF-775
45° Blade
(general)
60° Blade
(reflective)
Oracal 651 or GreenStar
Intermediate (calendered)
for short term
Oracal 751 or 951 (cast)
for long term
CUT & PLACE VINYL LIKE A PRO
45°
MEDIA
CARRIER
MEDIA
CARRIER
MEDIA
CARRIER
60
MEDIA
CARRIER
MEDIA
CARRIER
MEDIA
CARRIER
MEDIA
CARRIER
60
The “workhorse blade” good
for most vinyl materials.
30°
MEDIA
CARRIER
MEDIA
CARRIER
MEDIA
CARRIER
MEDIA
CARRIER
60
60°
MEDIA
MEDIA
CARRIER
MEDIA
CARRIER
MEDIA
CARRIER
60
For use on thicker materials
and for highly detailed cuts.
Use sparingly to preserve
sharpness.
Best for thin materials
such as heat press,
reflective, and
metallic vinyl.
Your blade depth should be set so
that the tip of the blade protrudes
about the distance of the width of
a credit card from the opening of
the blade holder. Test for the proper
depth setting by holding the blade
holder and manually trying to cut
through two sheets of paper. You
should only be able to cut
through the top sheet.
PRODUCT USED ON TEMP. PRESSURE TIME
(IN SECONDS)
PEEL
Siser Easyweed
Cotton, Polyester and Polycotton Blends
305°F
151°C Medium 10-15 Hot/
Cold
Siser Glitter
Cotton, Polyester and Polycotton blends
320°F
160°C Firm 10-15 Hot
Siser Glow-In-The-
Dark
Leather and Polycotton Blends
305°F
151°C Medium 10-15 Hot/
Cold
Siser Stretch
Lycra/Spandex & Cotton/Polycotton Blends
305°F
151°C Med./Firm 15 Hot/
Cold
Siser Electric
Cotton, Polyester and Polycotton Blends
305°F
151°C Medium 15 Hot/
Cold
Siser Extra
Leather, Siliconed Nylons, Polycotton Blends
320°F
160°C Light/Med. 10 Hot/
Cold
Siser Perf
Cotton, Polyester and Polycotton Blends
305°F
151°C Medium 10-15 Hot/
Cold
Siser Metallic
Cotton, Polyester and Polycotton Blends
305°F
151°C Medium 10-15 Cold
Siser Holographic
Cotton, Polyester and Polycotton Blends
320°F
160°C Firm 10-15 Cold
Siser StripFlock
Cotton, Polyester and Polycotton Blends
320°F
160°C Medium 15-20 Cold
Siser ColorPrint PU
Cotton, Polyester and Polycotton Blends
295°F
146°C Medium 15-20 Hot
Siser ColorPrint Soft
Cotton, Polyester and Polycotton Blends
311°F
155°C Medium 10-15 Warm
Siser Foil
Cotton, Polyester and Polycotton Blends
275°F
135°C Medium 15 Cold
Siser ColorPrint Easy
Cotton, Polyester and Polycotton Blends
300°F
149°C Medium 15 Warm
Siser ColorPrint Extra
Leather, Siliconed Nylons, Polycotton Blends
320°F
160°C Light 10-15 Hot
Siser ColorPrint Glitter
Leather and Polycotton Blends
320°F
160°C Medium 15 Hot
Chemica Fashion Prints
Cotton, Polyester and Polycotton Blends
310°F
154°C Medium 15-20 Cold
Chemica Camouflage
Cotton, Polyester and Polycotton Blends
310°F
154°C Medium 15-20 Cold
Chemica Animal Print
Cotton, Polyester and Polycotton Blends
310°F
154°C Medium 15-20 Cold
Chemica Sports 3D
Cotton, Polyester and Polycotton Blends
310°F
154°C Med./Firm 15-20 Cold
Color Theory Glitter
Cotton, Polyester, & Cotton Poly Blend
320°F
160°C Firm 10-15 Cold
Color Theory Metallic
Cotton, Polyester, & Cotton Poly Blend
320°F
160°C Firm 10-15 Cold
Color Theory Prism
Polycotton blends and 100% Polyester
305°F
151°C Medium 10 Warm
Color Theory Sequin
Polycotton blends and 100% Polyester
345°F
160°C Medium 10 Cold
Color Theory Primary
Cotton, Polyester and Polycotton Blends
295°F
146°C Medium 15-20 Hot

9 10
Using your Heat
Press to press
Transfer Paper:
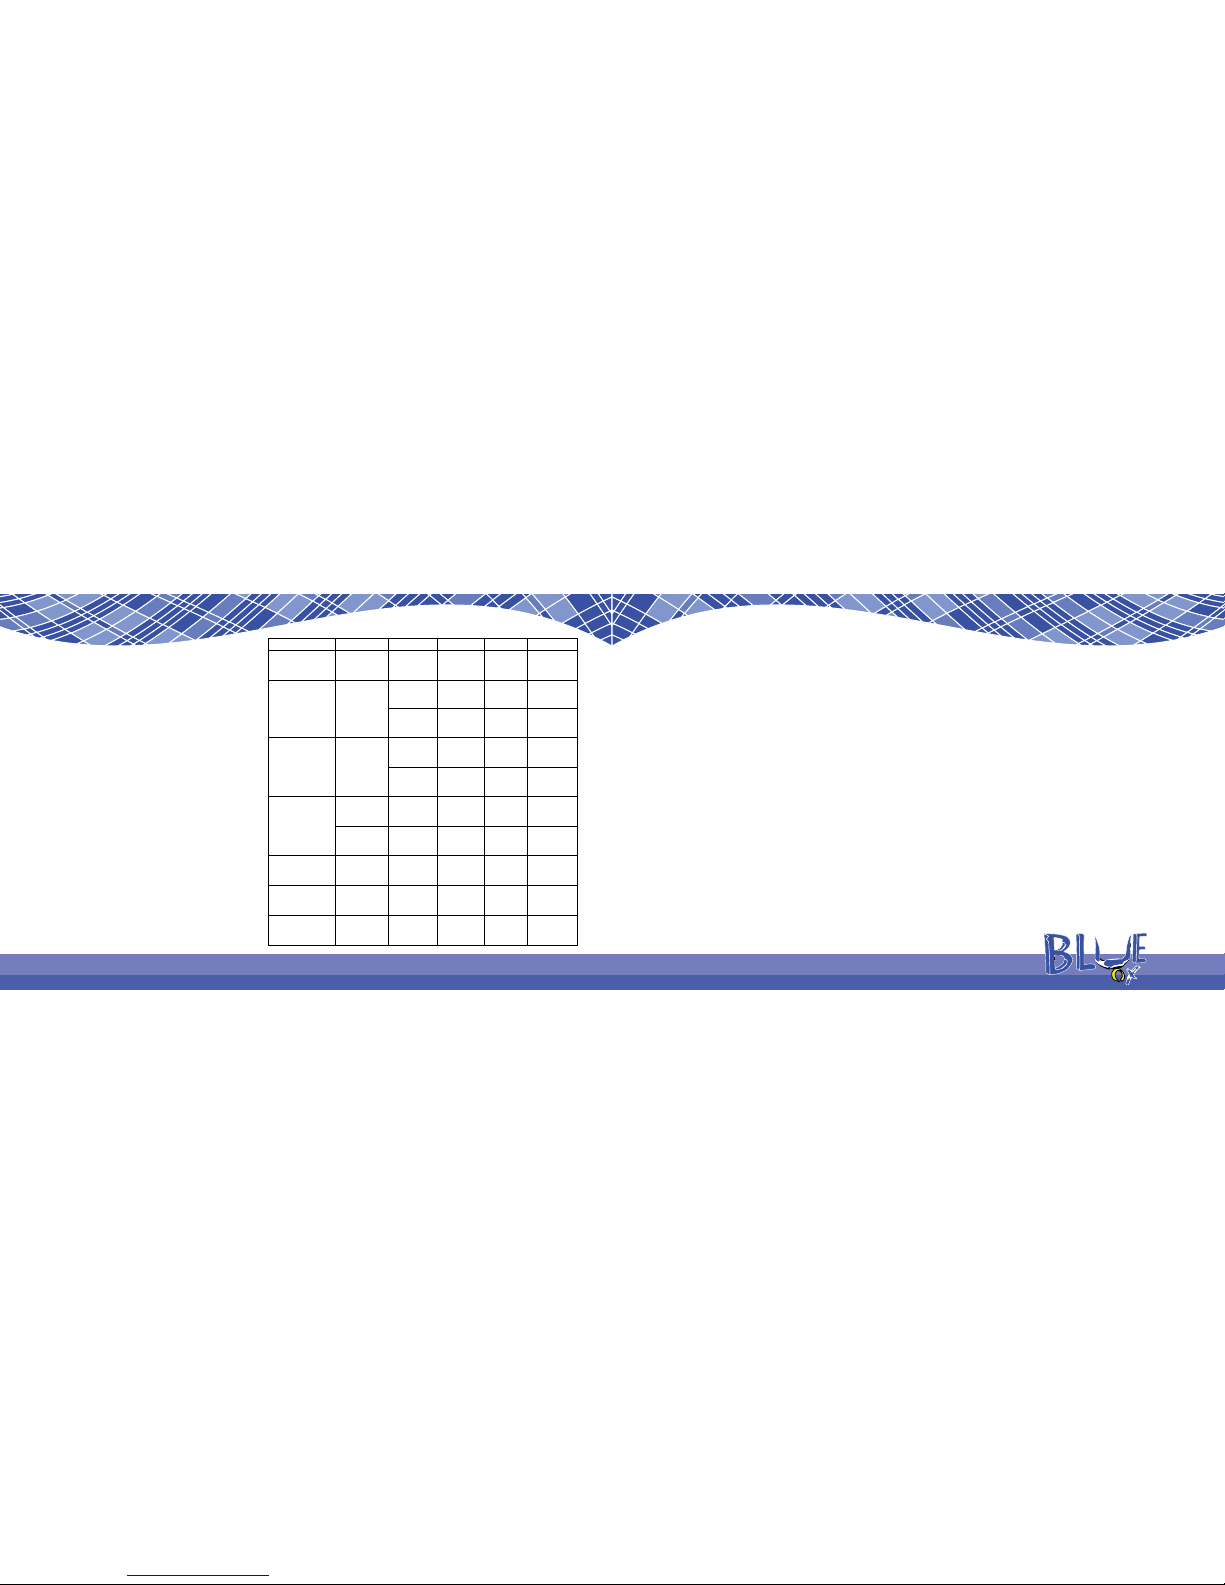
TRANSFERS PRINTER GARMENT TEMP. TIME PRESSURE
Sublimation
Paper
Ricoh,
Sawgrass Cotton 400°F 25~30sec. Medium
Ink Tran. Paper Ink jet Printer
Light Color 365°F 15sec. Medium
Dark Color 330°F 25sec. Medium
Laser Transfer
Paper Laser Printer
Light Color 365°F 15sec. Medium
Dark Color 330°F 25sec. Medium
Trim Free Laser
Transfer
Laser Printer Paper A 250°F 20sec. High
/Paper B 340°F 25sec. High
Transfer Vinyls Cutting
Plotter /300~320°F 8~10sec. Medium
Plastisol Transfer //390°F 15sec. High
Eco-solvent
Transfer Paper
Printing &
Plotter /330°F 15~25sec. High
As with all media you’ll use on
your heat press, we encourage
you to look for the pressing
recommendations from the
manufacturer of the transfer material
on-line if possible. If you can’t find
specific instructions, the following
are general guidelines for your
consideration.
When I pressed my HTV, the material would not stick to the garment and/or fell o during washing. How
do I fix this?
First double check manufacturer instructions – especially on heat and pressure settings. If you are following them to the letter, increase
your pressure. Remember: Pressing isn’t just about heating the vinyl – it’s about pushing the vinyl into the materials so that the adhesive
finds a grip. Increasing the pressure is often the solution.
You might also need to increase your temperature a bit, but try this after you’ve increased the pressure, and don’t up the temperature by
more than about 5% over manufacturer instructions.
When I peeled the carrier sheet from my HTV, the color vinyl came up o the garment but the adhesive
below it stayed in place. What happened?
You are most likely peeling the material to hot. HTV material like metallic, printed/fashion, and many others are usually recommended for
cold peel.
If that’s not it, double check the garment you are pressing and make sure it’s appropriate for the HTV you are using. If the material has a
coating of any kind, you might need to use a special HTV specifically designed for sticking to coated materials. A common example of this
is someone trying to heat press HTV onto a water resistant fabric. Using an HTV like Siser Extra will solve the problem.
My transfer paper is sticking to the heated platen. How do I fix this?
We really recommend the use of non-stick paper for most transfer pressings. In the case of the Flex-Soft N0-Cut Fel form Forever Paper
use the supplied non-stick paper – not Teflon – which can damage the flex material.
When I transfer, my colors look faded.
You need to increase the amount of time you’re pressing and/or increase the heat by 20 degrees.
My Heat Press won’t heat up.
Heat presses use a lot of energy while they are heating up. It’s possible that the energy drain has blown the fuse in the press. The Fuse is a
common household fuse available at any hardware store. The fuse housing is on the side of the press and can be accessed with a phillips
head screwdriver.
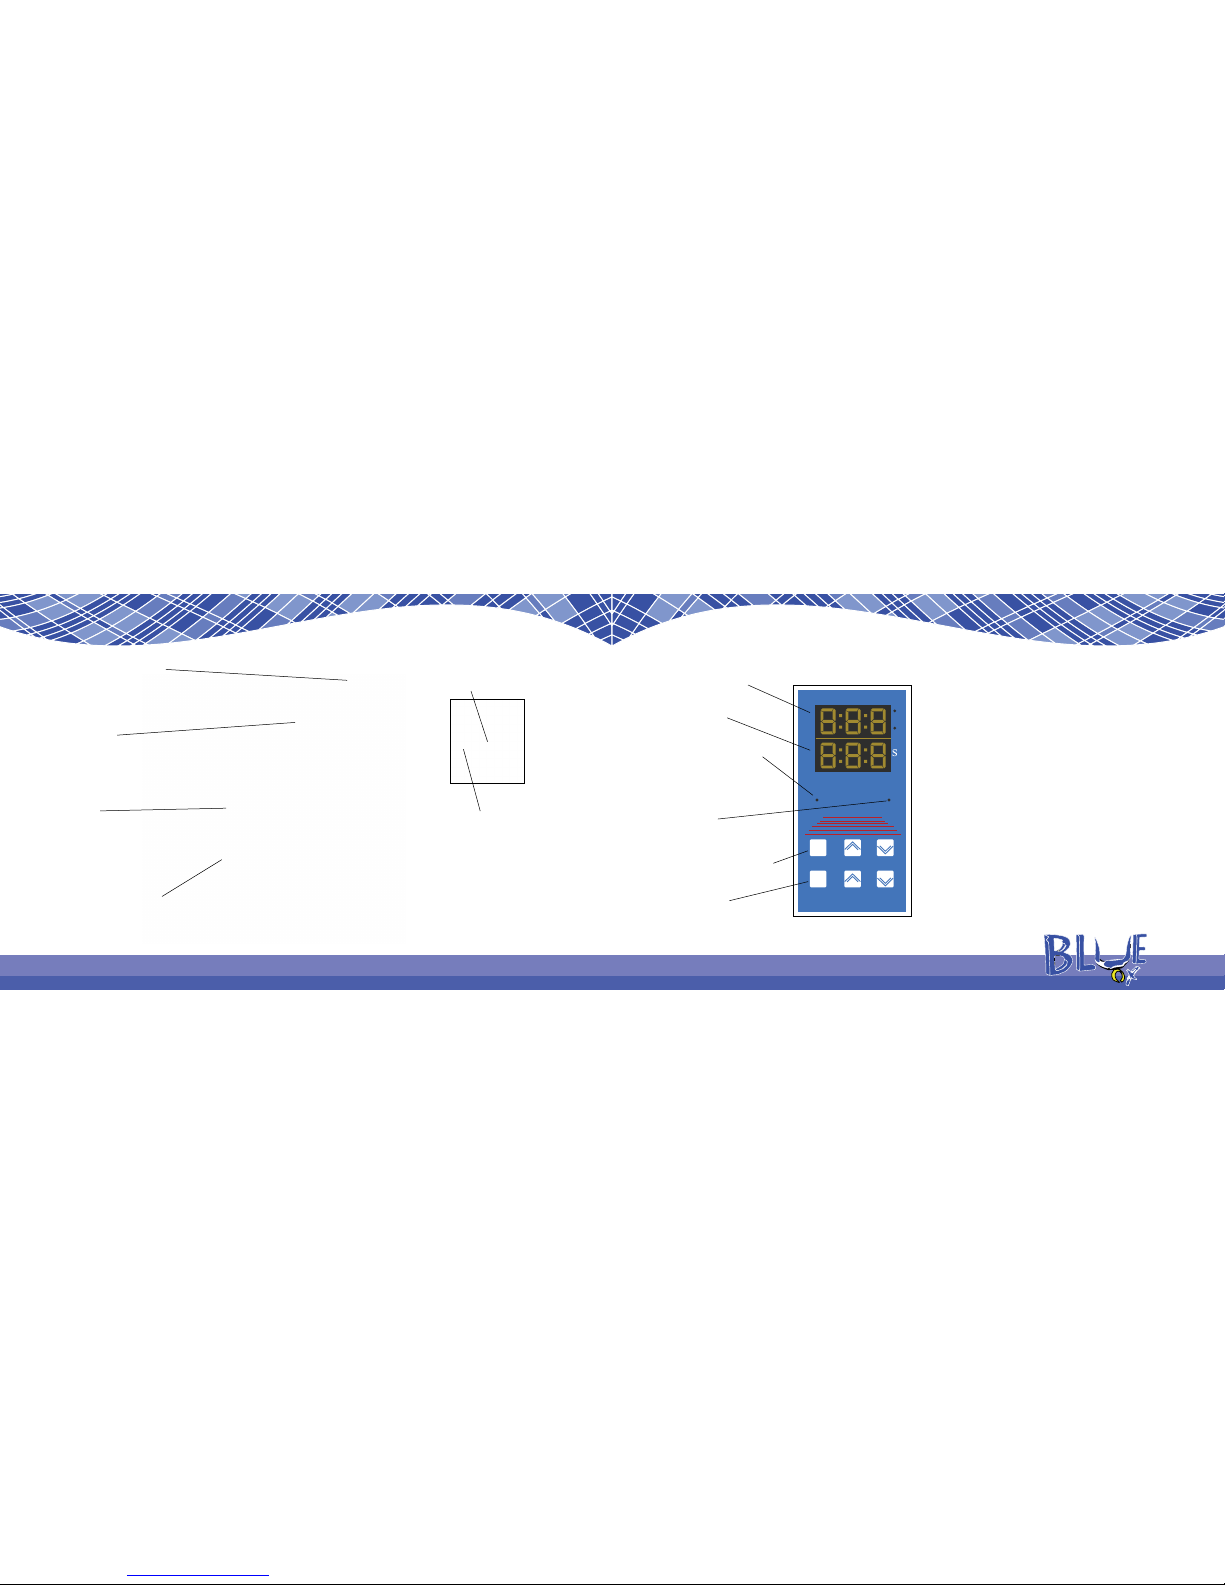
Time/Temperature control panel shows “000”
If you see this, turn the machine o and back on. If that doesn’t fix it, please contact our support
group as a replacement part might be necessary.
Care Instructions:
Wait 25 hours after pressing before
washing. Machine wash using mild
detergent. Do not use bleach or
other aggressive cleaning agents.
Turn garment inside out before
washing. Do not dry clean.

$9.99
$9.99
Easyweed
The industry standard.
Easy to cut, weed and
apply. Easyweed lives
up to it’s name.
Specially formulated for
use on stretchable fabrics
such as Lycra, Spandex
and cotton.
Stretch
H.T.V. with glitter to make
your designs sparkle.
Glitter
An unique H.T.V. with the
look of sequins and “faux
rhinestone designs.”
Sequin
A thin specialty H.T.V.
designed for summer
garments and other
light fabrics
Create a perfect layered
look in 1 pass with your
heat press.
DuoFlex
SAME DAY SHIPPING
Order by 4:30PM EST
Create amazing designs
using your desktop toner
printer. No cutting or
weeding required!
Forever Flex-Soft
Bedazzle with the look
of reflective diamond
textured H.T.V.
Prism
Get started with Color
Theory’s Primary color
line.
Primary
You’re just a click or phone call away from
expanding
your business!
This manual suits for next models
1
Table of contents
Other US Cutter Power Tools manuals