US endoscopy Ultramatrix USBOR User manual

00732536 Rev. B 1 of 17
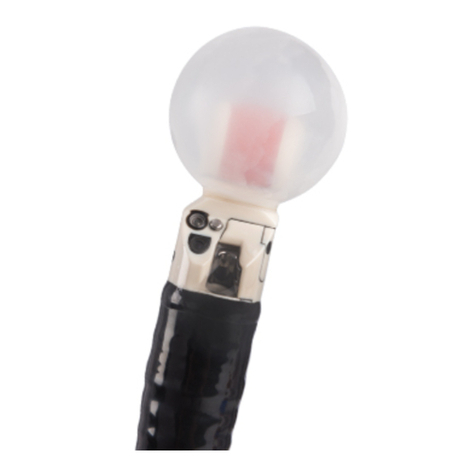
Ultramatrix™ EUS balloon - Olympus/Pentax radial Reorder No. USBOR
Ballonnet de distension EUS Ultramatrix™ - Olympus/Pentax radial Référence de réapprovisionnement USBOR
Ultramatrix™ EUS-Ballon –Olympus/Pentax radial Bestell-Nr. USBOR
Ultramatrix™ Palloncino EUS - Olympus/Pentax radiale N. di riordino USBOR
Balón de ecoendoscopia Ultramatrix™ - Olympus/Pentax radial N.º de pedido USBOR
Balão EUS Ultramatrix™ - Olympus/Pentax radial N.º de encomenda USBOR
Ultramatrix™ EUS-ballon –Olympus/Pentax radial Genbestillingsnr. USBOR
Ultramatrix™ EUS-ballon - Olympus/Pentax radiaal Nabestelnr. USBOR
Ultramatrix™ EUS balon - Olympus/Pentax radyal Yeniden Sipariş No. USBOR
Ultramatrix™EUS 벌룬 - Olympus/Pentax 방사형 주문 번호 USBOR
Баллон для ЭУИ Ultramatrix™ —радиальный Olympus/Pentax № для повторного заказа USBOR
Ultramatrix™EUS バルーン - Olympus/Pentax ラジアル 再注文番号 USBOR
INSTRUCTIONS FOR USE
MODE D’EMPLOI
GEBRAUCHSANWEISUNG
ISTRUZIONI PER L’USO
INSTRUCCIONES DE USO
INSTRUÇÕES DE UTILIZAÇÃO
BRUGSANVISNING
GEBRUIKSAANWIJZING
KULLANIM TALİMATLARI
사용 지침
ИНСТРУКЦИИ ПО ИСПОЛЬЗОВАНИЮ
使用説明書

00732536 Rev. B 2 of 17
Not made with natural rubber latex.
Intended Use:
The US Endoscopy Ultramatrix™ EUS balloon is intended to be used for endoscopic ultrasound applications using the balloon method in the upper or
lower gastrointestinal tract.
Warnings and Precautions:
•Consult the medical literature relative to techniques, complications and hazards prior to the performance of any EUS procedure.
•Inspect the balloon prior to use to ensure it has no holes, swelling, color changes or other irregularities. If an irregularity is detected, DO NOT USE
THE BALLOON. Obtain another balloon and contact your local Product Specialist.
•The balloon can easily tear, so beware of sharp objects.
•Do not apply excessive force to or bend the distal end of the echoendoscope. Instrument damage may occur.
•Do not feed water into the balloon when the water level in the water container is too low. The balloon may not inflate properly.
•Do not disconnect the water container from the endoscope just after removing air bubbles from the balloon. This may cause the air bubbles to re-
enter the balloon when attempting to inflate the balloon again.
•If using a thread to secure balloon, use caution to prevent occlusion of the balloon water supply/suctions ports of the echoendoscope.
•The EUS Balloon may burst or come unseated if inflated to a diameter greater than the recommended 20 mm.
•If balloon doesn’t deflate for echoendoscope extubation, and removal, please see directions below.
•Do not attempt to reuse, reprocess, refurbish, remanufacture or resterilize this device. US Endoscopy did not design this device nor is it intended to
be reused, reprocessed, refurbished, remanufactured, or resterilized. Performing such activities on this disposable medical device presents a safety
risk to patients (i.e. compromised device integrity, cross-contamination, infection).
•EUS procedures should only be performed by persons that have adequate training and familiarity with EUS techniques.
Contraindications:
•Contraindications include those specific to any endoscopic procedure, as well as those specific to endoscopic ultrasound procedures.
Directions for Use:
1. Prior to clinical use, familiarize yourself with the device and read all the Instructions for Use.
Section 1 - Attaching the balloon:
Applying balloon with Olympus balloon applicator (MAJ-864):
1. Prime balloon water supply channel by means recommended by echoendoscope manufacturer.
2. Stretch balloon three times by gently pulling the two ends of the balloon apart and allowing them to retract.
3. Insert front end of balloon into applicator and stretch the rear band of the balloon and insert it into the attachment groove.
4. Insert the distal tip of the echoendoscope into the balloon (and applicator) as far as possible.
5. Roll the rear band of balloon off the applicator groove and into the proximal balloon attachment groove of echoendoscope.
6. Gently attach the front band of the balloon to the scope’s distal attachment groove.
7. Tug on the balloon circumferentially between the front and rear bands to help them better seat within the attachment grooves.
8. If using a thread to secure balloon, tie it within the attachment grooves of the echoendoscope.
Applying the balloon without applicator:
1. Follow instructions one and two from section above discussing the use of the applicator for balloon attachment.
2. Stretch open the rear band of the balloon slightly to allow for placement onto transducer tip.
3. Insert the tip of the echoendoscope into the balloon by alternately stretching and pulling balloon proximally.
4. Roll the rear band into the proximal balloon attachment groove of the echoendoscope once tip is fully inserted.
5. Gently attach the front band of the balloon to the scope’s attachment groove.
6. Pull on the balloon circumferentially between the front and rear bands to help them better seat within the attachment grooves.
7. If using a thread to secure balloon, tie it within the attachment grooves of the echoendoscope.
Section 2 - Priming the balloon and expelling air:
1. With the end of the insertion tube pointed down, depress the air/water valve completely and fill the balloon with de-aerated water.
2. Inflate the balloon to approximately 20 mm, relax finger depressing air/water valve and make sure balloon is inflated.
3. Confirm that there is no evidence of any air bubbles within the balloon.
4. If no air bubbles are present, depress the suction valve completely, removing all the water from the balloon.
5. If air bubbles are present within the balloon, repeat steps 1 through 4 until all the air bubbles are completely aspirated.
6. Now the balloon is ready to use.
Section 3 - Removing balloon from echoendoscope:
1. While watching ultrasound image, deflate balloon by pressing down on the suction button completely and aspirating all the water.
a. If balloon doesn’t deflate proceed with the following steps:
i. Turn airflow/CO2 regulator off.
ii. Remove the air/water valve from the echoendoscope.
iii. Lower control head of echoendoscope below patient’s bed.
iv. Visualize balloon deflation on ultrasound screen.
v. Replace air/water valve.
2. Completely depress suction valve while removing echoendoscope from patient.
3. After removing echoendoscope from the patient, carefully detach balloon from transducer.
Product Disposal:
After use, this product may be a potential biohazard. Handle and dispose of in accordance with accepted medical practice and applicable local, state and federal laws and
regulations.
Issued Date: February 2018
Warning:
An issued or revision date for these instructions is included for the user’s information. In the event two years has elapsed between this date and product use, the user should contact
US Endoscopy to determine if additional information is available.
Listening…and delivering solutions®, the US Endoscopy listening…and delivering solutions design, and all marks denoted with ®or ™ are registered with the U.S. Patent and Trademark Office, or
trademarks owned by US Endoscopy
US Endoscopy, a wholly owned subsidiary of STERIS Corporation.
Olympus® is a registered trademark of Olympus Optical Co., Ltd.
Made in the U.S.A

00732536 Rev. B 3 of 17
Fabriqué sans latex en caoutchouc naturel
Utilisation prévue :
Le ballonnet de distension EUS Ultramatrix™ de US Endoscopy est prévu pour être utilisé dans les endoéchographies selon la méthode du ballonnet de
distension dans le tractus gastro-intestinal supérieur ou inférieur.
Mises en garde et précautions :
•Consulter la documentation médicale relative aux techniques, complications et dangers avant l’exécution de toute procédure EUS.
•Inspecter le ballonnet avant de l’utiliser pour s’assurer qu’il n’est pas troué, gonflé, décoloré, ni ne présente d’autres irrégularités. Si une irrégularité
est détectée, NE PAS UTILISER LE BALLONNET. Prendre un autre ballonnet et Contacter le spécialiste produit le plus proche.
•Le ballonnet se déchire facilement, attention aux objets tranchants.
•Ne pas appliquer de force excessive ni plier l’extrémité distale de l’écho-endoscope. Risque de dommages à l’instrument.
•Ne pas alimenter en eau le ballonnet si le niveau d’eau dans le réservoir est trop faible. Le ballonnet risque ne pas gonfler correctement.
•Ne pas débrancher le réservoir d’eau de l’endoscope juste après avoir retiré les bulles d’air du ballonnet. Ceci peut laisser des bulles d’air rentrer
dans le ballon lors de la tentative de regonflage du ballon.
•Si le ballonnet est fixé par un fil, attention de ne pas boucher les orifices d’alimentation en eau/d’aspiration de l’écho-endoscope.
•Le ballonnet EUS peut éclater ou sortir de son siège s’il est gonflé à un diamètre supérieur aux 20 mm recommandés.
•Si le ballonnet ne se dégonfle pas pour l’extubation de l’écho-endoscope et pour le retirer, veuillez lire les instructions ci-dessous.
•Ne pas essayer de réutiliser, récupérer, rénover, transformer ou restériliser ce dispositif. US Endoscopy n’a pas conçu ce dispositif pour qu’il soit
réutilisé, récupéré, remis à neuf, transformé ou restérilisé. Réaliser ce type de manipulation sur ce dispositif médical jetable présente un risque
pour la sécurité des patients (c.-à-d. intégrité de dispositif compromise, contamination croisée, infection).
•Les procédures EUS ne doivent être réalisées que par des personnes qui sont formées et connaissent bien les techniques EUS.
Contre-indications :
•Les contre-indications sont identiques à celles applicables à toute procédure endoscopique, et toute procédure d’échographie endoscopique.
Mode d’emploi :
1. Avant toute utilisation clinique, se familiariser avec l’appareil et lire toutes les instructions d’utilisation.
Section 1 - Fixation du ballonnet :
Pose du ballonnet avec l’applicateur de ballonnet Olympus (MAJ-864) :
1. Amorcer le canal principal d’approvisionnement en eau du ballonnet comme recommandé par le fabricant de l’écho-endoscope.
2. Étirer le ballonnet trois fois en tirant délicatement sur ses deux extrémités et en les laissant se rétracter.
3. Insérer l’extrémité avant du ballonnet dans l’applicateur et étirer la bande arrière du ballonnet et l’insérer dans la rainure de fixation.
4. Insérer l’extrémité distale de l’écho-endoscope dans le ballonnet (et l’applicateur) aussi loin que possible.
5. Enrouler la bande arrière du ballonnet sur la rainure de l’applicateur et dans la rainure de fixation du ballonnet de l’écho-endoscope.
6. Fixer délicatement la bande avant du ballonnet à la rainure de fixation distale de la lunette.
7. Tirer sur la circonférence du ballonnet entre les bandes avant et arrière pour les aider à se loger dans les rainures de fixation.
8. Si un fil sert à fixer le ballonnet, il doit être attaché dans la rainure de fixation de l’écho-endoscope.
Pose du ballonnet sans applicateur :
1. Suivre les instructions 1 et 2 de la section précédente qui concerne l’utilisation de l’applicateur pour fixer le ballonnet.
2. Ouvrir la bande arrière du ballonnet en l’étirant délicatement pour la placer sur l’extrémité du transducteur.
3. Insérer l’extrémité de l’écho-endoscope dans le ballonnet en étirant et en tirant le ballonnet sur le point d’attache.
4. Enrouler la bande arrière dans la rainure d’attache de l’écho-endoscope une fois que l’extrémité est complètement insérée.
5. Fixer délicatement la bande avant du ballonnet à la rainure de fixation de la lunette.
6. Tirer sur la circonférence du ballonnet entre les bandes avant et arrière pour les aider à se loger dans les rainures de fixation.
7. Si un fil sert à fixer le ballonnet, il doit être attaché dans la rainure de fixation de l’écho-endoscope.
Section 2 - Amorçage du ballonnet et expulsion de l’air :
1. Avec l’extrémité du tube d’insertion pointée vers le bas, enfoncer complètement la valve air/eau et remplir le ballonnet à l’eau désaérée.
2. Gonfler le ballonnet à environ 20 mm, détendre le doigt qui enfonce la valve air/eau et vérifier que le ballonnet est gonflé.
3. Vérifier qu’il n’y a aucune trace de bulles d’air dans le ballonnet.
4. Si aucune bulle d’air n’est présente, enfoncer complètement la valve d’aspiration, en éliminant toute l’eau du ballonnet.
5. Si des bulles d’air sont présentes dans le ballonnet, répéter les étapes 1 à 4 jusqu’à ce que toutes les bulles d’air soient complètement
aspirées.
6. Maintenant, le ballon est prêt à l’emploi.
Section 3 - Retrait du ballonnet de l’écho-endoscope :
1. Tout en observant l’image ultrasonore, dégonfler le ballonnet en enfonçant complètement le bouton d’aspiration et en aspirant toute l’eau.
a. Si le ballon ne se dégonfle pas, suivre les étapes ci-après :
i. Éteindre le régulateur de débit d’air/CO2.
ii. Retirer la valve air/eau de l’écho-endoscope.
iii. Abaisser la tête de commande inférieure de l’écho-endoscope sous le lit du patient.
iv. Visualiser la déflation du ballonnet sur l’écran d’échographie.
v. Remplacer la valve air/eau.
2. Enfoncer complètement la valve d’aspiration tout en retirant l’écho-endoscope du patient.
3. Après avoir retiré l’écho-endoscope du patient, détacher soigneusement le ballonnet du transducteur.
Mise au rebut du produit :
Après utilisation, ce produit peut représenter un risque biologique. Sa manipulation et sa mise au rebut doivent s’effectuer conformément à la pratique médicale et aux
réglementations en vigueur.
Date de publication : février 2018
Avertissement :
Une date de publication ou de révision de ces instructions est incluse dans les informations de l’utilisateur. Si deux années se sont écoulées entre cette date et l’utilisation du produit,
l’utilisateur doit contacter US endoscopy pour déterminer si des informations supplémentaires sont disponibles.
Listening…and delivering solutions®, le logo US Endoscopy listening…and delivering solutions, ainsi que toutes les marques portant le signe ® ou ™ sont des marques déposées auprès de l’U.S. Patent
and Trademark Office ou sont des marques commerciales détenues par US Endoscopy.
US Endoscopy, une filiale en propriété exclusive de STERIS Corporation.
Olympus® est une marque déposée d’Olympus Optical Co., Ltd.
Fabriqué aux États-Unis

00732536 Rev. B 4 of 17
Bei der Herstellung wurde kein Naturkautschuklatex verwendet.
Verwendungszweck:
Der US Endoscopy Ultramatrix™ EUS-Ballon ist für endoskopische Ultraschallanwendungen mit der Ballon-Methode im oberen oder unteren Magen-
Darm-Trakt vorgesehen.
Warn- und Vorsichtshinweise:
•Konsultieren Sie die medizinische Literatur in Bezug auf Techniken, Komplikationen und Gefahren bei der Durchführung eines EUS-Verfahrens.
•Inspizieren Sie den Ballon vor dem Gebrauch, um sicherzustellen, dass er keine Löcher, Verdickungen, Farbveränderungen oder andere
Unregelmäßigkeiten aufweist. Wenn eine Unregelmäßigkeit erkannt wird, VERWENDEN SIE DEN BALLON NICHT. Ersetzen Sie den Ballon durch
ein neues Exemplar und wenden Sie sich an Ihren lokalen Produktspezialisten.
•Der Ballon kann leicht reißen, weswegen der Kontakt mit scharfen oder spitzen Gegenständen unbedingt zu vermeiden ist.
•Wenden Sie auf das distale Ende des Echo-Endoskops keine übermäßige Kraft an und biegen Sie es nicht. Das Gerät könnte beschädigt werden.
•Speisen Sie kein Wasser in den Ballon ein, wenn der Wasserstand im Wasserbehälter zu niedrig ist. Unter Umständen bläst sich der Ballon dann
nicht richtig auf.
•Trennen Sie den Wasserbehälter nicht vom Endoskop, kurz nachdem Sie Luftblasen aus dem Ballon entfernt haben. Dies kann dazu führen, dass
erneut Luftblasen in den Ballon eindringen, wenn Sie versuchen, den Ballon wieder aufzublasen.
•Wenn Sie den Ballon mit einem Faden sichern, achten Sie darauf, dass die Wasserversorgung bzw. die Ansaugöffnungen des Echo-Endoskops
nicht verschlossen werden.
•Der EUS-Ballon kann platzen oder verrutschen, wenn er auf einen größeren Durchmesser als die empfohlenen 20 mm aufgeblasen wird.
•Wenn beim Herausziehen und Entfernen des Endoskops die Luft nicht aus dem Ballon entweicht, befolgen Sie die unten stehenden Anweisungen.
•Versuchen Sie nicht, dieses Gerät wiederzuverwenden, zu reparieren, instand zu setzen, wiederaufzuarbeiten oder erneut zu sterilisieren. Dieses
Gerät wurde nicht von US Endoscopy dafür entworfen und es ist nicht dafür vorgesehen, wiederverwendet, repariert, instandgesetzt,
wiederaufgearbeitet oder erneut sterilisiert zu werden. Die Durchführung solcher Aktivitäten an diesem Einweg-Medizinprodukt stellt ein
Sicherheitsrisiko für die Patienten dar (d. h. Beeinträchtigung der Produktintegrität, Kreuzkontamination, Infektion).
•EUS-Verfahren sollten nur von Personen durchgeführt werden, die über eine geeignete Ausbildung und Erfahrung im Umgang mit EUS-Techniken
verfügen.
Gegenanzeigen:
•Die Gegenanzeigen für die Verwendung dieses Produkts sind dieselben wie für allgemeine Endoskopieverfahren sowie für endoskopische
Ultraschallverfahren.
Bedienungsanleitung:
1. Vor der klinischen Verwendung sollten Sie sich mit dem Gerät vertraut machen und alle Gebrauchsanweisungen lesen.
Abschnitt 1 –Anbringen des Ballons:
Anbringen des Ballons mit Olympus Ballon-Applikator (MAJ-864):
1. Bereiten Sie die Wasserversorgung des Ballons wie vom Hersteller des Echo-Endoskops empfohlen vor.
2. Dehnen Sie den Ballon, indem Sie die beiden Enden dreimal sanft auseinanderziehen und sie sich wieder in ihre ursprüngliche Position
zurückbewegen lassen.
3. Setzen Sie das vordere Ende des Ballons in den Applikator ein, dehnen Sie das hintere Band des Ballons und bringen Sie es in der
Befestigungsrille an.
4. Führen Sie die distale Spitze des Echo-Endoskops so weit wie möglich in den Ballon (und in den Applikator) ein.
5. Rollen Sie das hintere Band des Ballons von der Applikatorrille ab und befestigen Sie es in der proximalen Befestigungsrille für den Ballon am
Echo-Endoskop.
6. Befestigen Sie das vordere Band des Ballons vorsichtig an der distalen Befestigungsrille des Endoskops.
7. Ziehen Sie zwischen dem vorderen und hinteren Band ringsum am Ballon, um einen besseren Sitz in den Befestigungsrillen zu ermöglichen.
8. Falls ein Faden zur Sicherung des Ballons verwendet wird, bringen Sie ihn in den Befestigungsrillen des Echo-Endoskops an.
Anbringen des Ballons ohne Applikator:
1. Befolgen Sie die Schritte 1 und 2 im oberen Abschnitt zur Verwendung des Applikators zum Anbringen des Ballons.
2. Dehnen Sie das hintere Band des Ballons leicht, um ihn auf der Schallkopfspitze zu platzieren.
3. Führen Sie die Endoskopspitze in den Ballon ein und dehnen bzw. ziehen Sie den Ballon dabei leicht.
4. Sobald die Endoskopspitze vollständig eingeführt wurde, bringen Sie das hintere Band des Ballons in der proximalen Befestigungsrille für den
Ballon am Endoskop an.
5. Befestigen Sie das vordere Band des Ballons sanft an der Befestigungsrille des Endoskops.
6. Ziehen Sie ringsum am Ballon zwischen dem vorderen und hinteren Band, um einen besseren Sitz in den Befestigungsrillen zu ermöglichen.
7. Falls ein Faden zur Sicherung des Ballons verwendet wird, bringen Sie ihn in den Befestigungsrillen des Echo-Endoskops an.
Abschnitt 2 –Vorbereiten des Ballons und Entfernen der Luft:
1. Richten Sie das Einführrohr nach unten und drücken Sie das Luft-/Wasserventil vollständig herunter, um den Ballon mit entlüftetem Wasser zu
füllen.
2. Füllen Sie den Ballon bis zu einer Größe von etwa 20 mm, reduzieren Sie den Druck auf das Luft-/Wasserventil und stellen Sie sicher, dass
der Ballon gefüllt ist.
3. Vergewissern Sie sich, dass sich keine Luftblasen mehr im Ballon befinden.
4. Sofern keine Luftblasen vorhanden sind, drücken Sie das Saugventil vollständig herunter und entfernen Sie das gesamte Wasser aus dem
Ballon.
5. Sollten sich noch Luftblasen im Ballon befinden, wiederholen Sie die Schritte 1 bis 4, bis alle Luftblasen herausgesaugt wurden.
6. Der Ballon kann nun verwendet werden.
Abschnitt 3 –Entfernen des Ballons vom Echo-Endoskop:
1. Entleeren Sie unter Beobachtung des Ultraschallbilds den Ballon, indem Sie den Saugknopf vollständig herunterdrücken und so das gesamte
Wasser aus dem Ballon heraussaugen.
a. Falls sich der Ballon nicht entleert, befolgen Sie die folgenden Schritte:
i. Schalten Sie den Luftstrom-/CO2-Regler aus.
ii. Entfernen Sie das Luft-/Wasser-Ventil vom Echo-Endoskop.
iii. Senken Sie den Steuerungskopf des Echo-Endoskops auf eine Höhe unterhalb des Patientenbettes.
iv. Überwachen Sie das Entleeren des Ballons auf dem Ultraschallbildschirm.
v. Bringen Sie das Luft-/Wasser-Ventil erneut an.
2. Drücken Sie das Saugventil vollständig herunter, während Sie das Echo-Endoskop aus dem Patienten herausführen.
3. Nachdem Sie das Echo-Endoskop entfernt haben, nehmen Sie den Ballon vorsichtig vom Schallkopf ab.

00732536 Rev. B 5 of 17
Produktentsorgung:
Nach Gebrauch kann dieses Produkt eine mögliche Biogefährdung darstellen. Handhaben und entsorgen Sie das Produkt entsprechend der gängigen medizinischen Verfahren
und den gültigen kommunalen und Bundesgesetzen und -verordnungen.
Ausgabedatum: Februar 2018
Warnhinweis:
Als Hinweis für den Benutzer wird ein Ausgabe- oder Revisionsdatum für diese Anweisungen genannt. Sollten zwischen diesem Datum und der Verwendung des Produkts zwei Jahre oder
mehr liegen, wird dem Benutzer geraten, US Endoscopy zwecks eventuell verfügbarer zusätzlicher Informationen zu kontaktieren.
Listening…and delivering solutions®, das „listening…and delivering solutions“-Design und alle mit ®oder ™ versehenen Marken sind beim United States Patent and Trademark Office (Patentamt der
Vereinigten Staaten) registriert oder befinden sich im Besitz von US Endoscopy
US Endoscopy, eine hundertprozentige Tochtergesellschaft der STERIS Corporation.
Olympus® ist ein eingetragenes Warenzeichen von Olympus Optical Co., Ltd.
Hergestellt in den USA
Table of contents
Languages:
Other US endoscopy Medical Equipment manuals
Popular Medical Equipment manuals by other brands

Getinge
Getinge Arjohuntleigh Nimbus 3 Professional Instructions for use

Mettler Electronics
Mettler Electronics Sonicator 730 Maintenance manual

Pressalit Care
Pressalit Care R1100 Mounting instruction

Denas MS
Denas MS DENAS-T operating manual

bort medical
bort medical ActiveColor quick guide

AccuVein
AccuVein AV400 user manual