USASPEC PA15-GM User manual

Your iPod through GM Car Stereo System!
PA15-GM is applicable to the following GM vehicles: (Note: Radio must have AUX or SOURCE button).
iPod, iPod nano, iPod classic, iTouch and iPhone are trade marks of Apple Computer, Inc.
XM is a trade mark of XM Satellite Radio Inc.
GM is a registered trade mark of General Motors Corporation.
LTI Enterprises, Inc. 167 Mason Way, Unit A2. City of Industry, CA91746
www.usaspec.com or www.usaspec.net Tel (626) 336-3836
PA15-GMPA15-GM
Email: [email protected]
Connect directly iPod’s audio output to GM vehicle audio system for optimal sound
quality playback.
Displays text information on XM ready radios.
Offers three ways to access your music on iPod: Direct Mode, Folder Mode and Playlist Mode.
Retains XM receiver, CD changer, CD player, and DVD system.
Charges iPod battery while playing, charging automatically ends. half hour after iPod is paused.
Connects Satellite radio, DVD player or other audio sources through AUX Audio Input jack.
This interface connects an iPod, iPhone, or iTouch directly to your GM audio system
with following benefits:
If a CORVETT has factory installed XM receiver, use model PA15-VETTE.
If a EQUINOX or UPLANDER does not have a factory installed XM receiver,
a separately sold cable adaptor is required. Contact @626-3363836
CADILLAC GMC
HUMMER
PONTIAC
CHEVY
CHEVY TRUCKS
03 - 06
03 - 06
00 - 05
00 - 05
IMPALA
05 - 10CORVETTE
MONTE CARLO
04 - 07
ESCALADE
EXT
CTS / RSX
05 - 07
03 - 06
05 - 07
04 - 06
03 - 07
07
H1
H2 / SUT
H3
03 - 06
07
05GRAND PRIX
03 - 06
CANYON
DENALI
ENVOY
SIERRA
SIERRA CLASSIC
YUKON
03 - 06AVALANCHE
03 - 07COLORADO
03 - 06EQUINOX (Equiped W/XM Tuner only)
03 - 06SILVERADO
07SILVERADO CLASSIC
03 - 07SUBURBAN
03 - 07TAHOE
04 - 07TRAIL BLAZER
05 - 06UPLANDER
04VENTURE
MAKE MODEL YEAR MAKE MODEL YEAR
factors, can not 100% guarantee every published application. These factors include variables such as,
anomalies within a factory radio, factory radio heretofore unknown to and partail model year changes.
verified the published radio and vehicle application to the best of our ability. Due to uncontrollble
8 4
24254 09022

and operation of PA15-GM iPod interface to GM radios. Please read this manual
before installing the interface adaptor in your vehicle.
It is strongly recommended that the adaptor is installed in an easily accessible
Eject ALL CDs from the built-in CD player or CD changer before removing the
radio from the dash board.
access for future upgrades, resets, dip switch setting, etc...
location. DO NOT permanently place deep behind radio. You may need to
!!!!!IMPORTANT!!!!!
Thank you for purchasing a product. This manual describes the functions
distributes products through authorized dealers so customers will
receive proper services and information from the dealers. reserve
the right to offer technical or warranty service only on products purchased
SAFETY NOTE: You should always give full attention to driving. Do NOT operate
the feature or function of PA15-VETTE in such a way that distracts you while driving.
KEEP MANUAL in vehicle. Place it with the owner’s manual for the car. You may
need to refer to it or if vehicle is sold, the next owner can enjoy it and know how to use it .
a) This interface connects an iPod, iTouch or iPhone directly to your GM car audio
d) This interface charges iPod while it is playing and charging stops automatically
half hour after iPod is paused.
system for optimal playback sound quality.
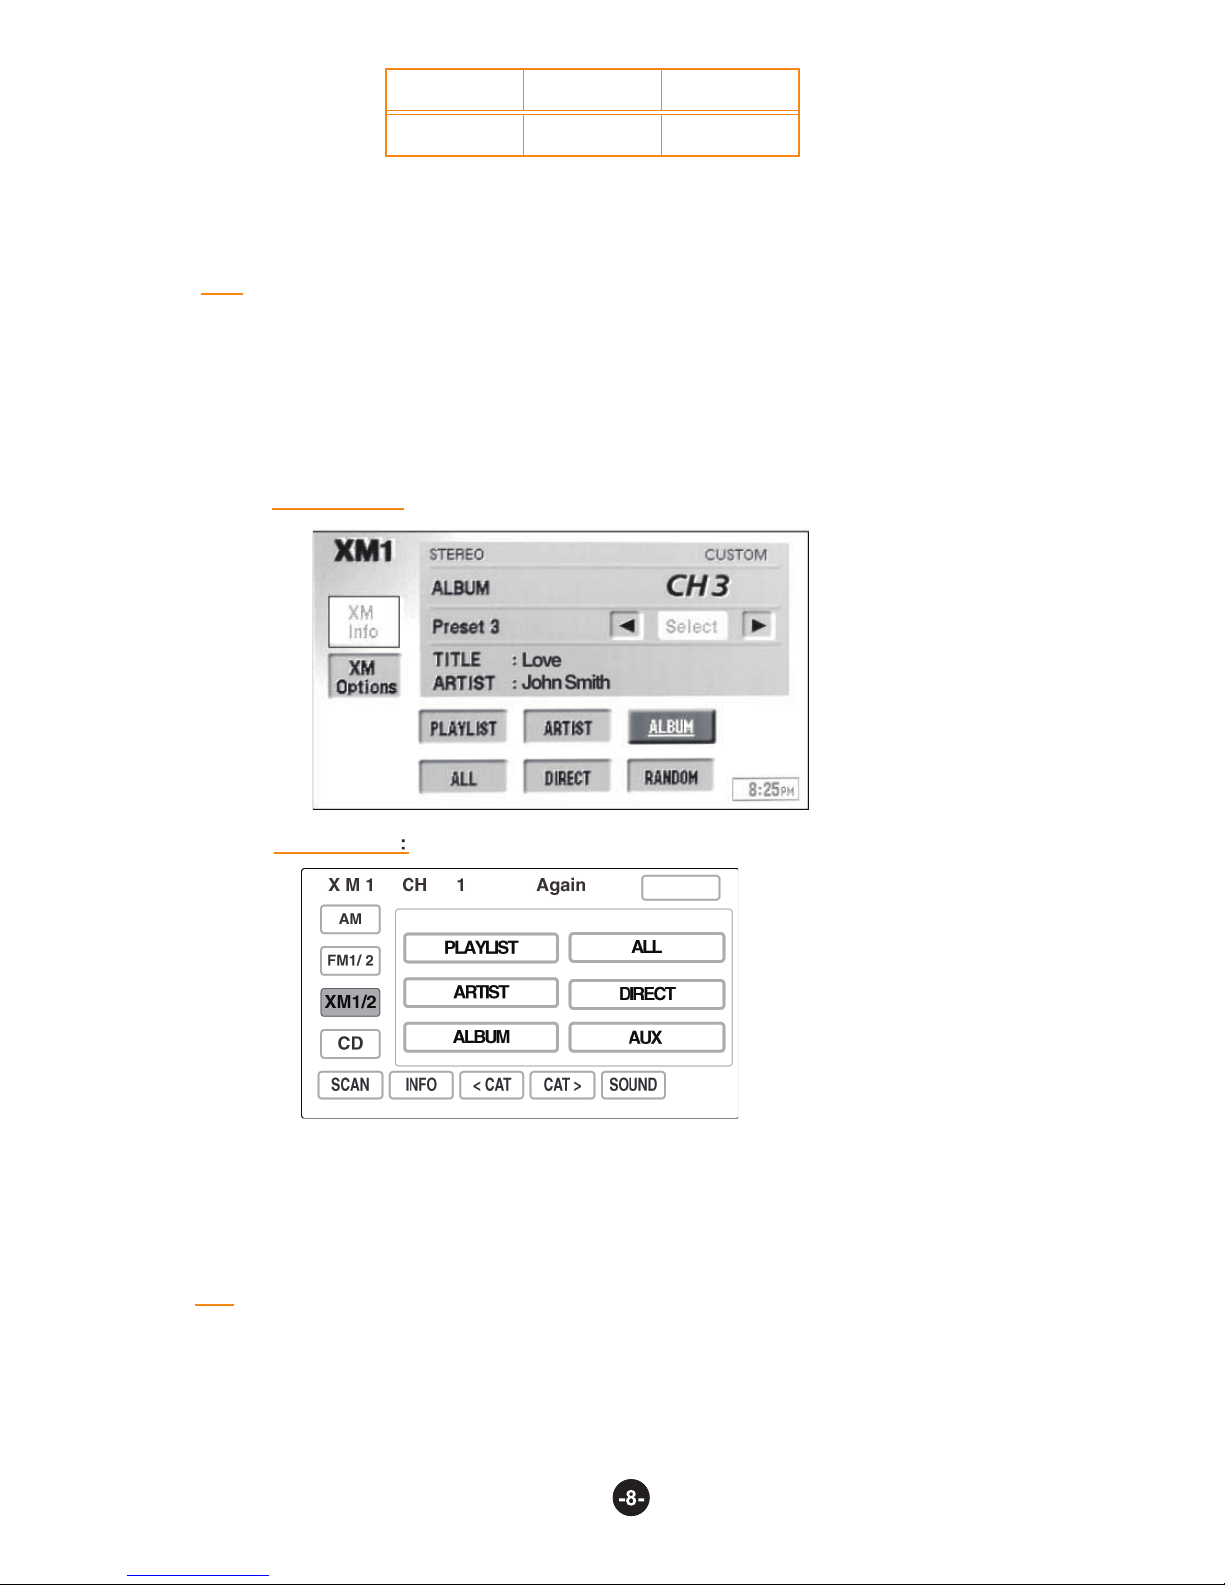
a) Artist name and song title can be displayed on radio by configuring PA15-GM
to work with radio’s XM band.
b) This interface allows iPod to co-exist with GM navigation system, CD changer,
XM radio receiver and DVD system, and controls iPod via both car radio and
steering wheel controls.
c) PA15-GM’s on board software translates commands from your CD changer
controls or XM Band controls into commands that the iPod understands.
i) You can either use the XM controls or CD changer controls on radio to work
with iPod, iTouch or iPhone. Use XM control if text display is desired. Radio
iii) If radio has a built-in CD changer, you must configure PA15-GM to radio’s
XM control with the DIP switches and radio must have BAND button.
must have a BAND button to use XM control.
ii) When using XM control, XM1 is for iPod and XM2 is retained for
broadcast reception.
through authorized accounts.
1-1 Introduction
1-2 Text Display of Song Information
Section 1. ABOUT INTERFACE PA15-GM
b) Only DISC number and track number are displayed on radio (Disc number =
Playlist number) when using PA15-GM with radio’s CD/AUX or DISC button.
20100520

1-4 Compatibility
1-5 Applications
Future iPod and iTune software updates may affect the features and functions
described in this owner’s manual and www.usaspec.com web site.
PA15-GM contains one PA15-GM interface adaptor and one each of following
cables: CAS-GM24, CAS-GM2ext5, CAS-GM2x and CB-PA105.
1-3 Package Content
(4)

application. These factors include variables such as, anomalies within a factory radio,
Due to uncontrollable factors, can not 100% guarantee every published
factory radio heretofore unknown to and partial model year changes.
verified the published radio and vehicle application to the best of our ability.
Note (1) To use XM control, radio must have a BAND button
and is XM ready.
model PA15-VETTE.
Note (2) Use interface model PA15-VETTE .
Note (3) If the car does not have XM receiver, order CAS-GNOX2
Note (4) If a CORVETT has factory installed XM receiver, use
cable from (626-336-3836)
PA15-GM provides two modes to control your iPod through car radio, namely
(Playlist Mode + Direct Mode) and (Folder Mode and Direct Mode.)
Section 2. Folder Mode, Direct Mode, Playlist Mode
and AUX Option
Search and select music on iPod just as you would in portable use. Use the track
up/down on radio and steering wheel to control.
When PA15-GM is configured to XM control, a preset button on radio is dedicated
to Direct Mode. See section 3-1 and section 4 of this manual for detail.
2-1 Direct Mode (control on iPod directly)
When PA15-GM is configured to CD changer control, one of the six DISCs is
dedicated to Direct Mode. See section 3-2 of this manual for detail.
In Direct Mode, screen and keypad on iPod is unlocked and functional. You have
control and access to everything on your iPod in Direct Mode. You also have Track
Up/Down controls from the radio. No text will be displayed on radio in the mode.

Access 4 Folders, namely Playlist, Artist, Songs and Album on iPod from radio.
See section 3-1 (for non-navigation radio) or section 4 (for navigation radio) of
Operates and controls the iPod like it is a CD changer. This mode allows you to
functional. See section 3-2 of this manual for more information.
Radio does not display artist name and song title in Playlist Mode.
Use the DISC or CD/AUX button on radio to access iPod.
If your iPod has more than 4 Playlists, see Playlist Naming in Section 6 of
this manual.
Playlist mode is for radio that does not have a BAND button but can control
an external CD changer.
access Playlists and Songs on iPod from radio. iPod screen always displays “ OK to
disconnect” or “Attached to accessory” and iPod’s keypad is locked and not
this manual for more information.
Folder Mode is applicable only when PA15-GM is configured to use radio’s XM
control. Hence, radio must have BAND button and is also XM ready.
iPod FOLDERs are accessed with radio’s preset buttons.
Direct Mode allows the playing of streaming music applications such as
Application Tip
R
Pandora.com and SIRIUS XM Online from your iPhone or iTouch
to car stereo.
2-2 Folder Mode (use with Band / XM Ready radios)
2-3 Playlist Mode (use with Non-Band / XM Ready radios)
In addition to the iPod, PA15-GM also can connect a second audio source to car radio.
adaptor. DIP switch #1 is only for the AUX INPUT and it is independent of other DIP
switches on the PA15-GM adaptor.
Connect the second audio source to the RCA jack labeled AUX INPUT. AUX input
is enabled by setting the DIP switch #1 to ON position at the side of the interface
2-4 AUX Input Option
DIP Switch # 1 Setting:
DIP # 1 = ON
DIP # 1 = OFF
RCA AUX Input is enabled
RCA AUX Input is disabled
(Note: this configuration supports text display but is applicable only to radio if it has
a BAND button and also it is XM ready.)
3-1 Folder Mode + Direct Mode Configuration
Section 3. Regular or non-navigation Radio’s Mode
Setting and Function Control

(Note: DIP switch #1 is only related to RCA AUX setting and it is independent of
switches #2, #3 and #4. See section 2-4 for DIP #1 setting instruction.)
Press BAND button on radio to access iPod at XM1
Press BAND button on radio to access XM channels at XM2
Use radio Preset buttons to access iPod Folders, Direct Mode and RCA AUX
as follow:
Note (a): x=folder’s number; y=track’s number
Note (b): FOLDER type abbreviations: PL = Playlist; AR = Artist;
AL = Album; ALL = Songs; Dir = iPod Direct
3-1-1 DIP Switches Setting
3-1-2 Functions and Radio Buttons
DIP # 2
OFF
DIP # 3
OFF ON
DIP # 4
Preset # 1
Preset # 2
Preset # 3
Preset # 4
Preset # 5
Preset # 6
PL x y & Title
AR x y & Title
AL x y & Title
ALL y & Title
iPod Direct
AUX
Playlist Folders
Artist Folders
Album Folders
All Songs Folder
iPod Playing
RCA AUX
see note (a) (b)
see note (a) (b)
see note (a) (b)
see note (a) (b)
IF DIP #1 = ON
RemarkRadio PlaysPush......
Radio
Displays......
Push DISPL or INFO or RCL button (usually it is the centre of the TUNING
knob) on radio to view text information of music. Text display on radio is as
follow: (Note: available on XM ready radio only.
DISPL NoteText from iPod
Button
no Push
1st Push
2nd Push
3rd Push
track number & Title
Artist Name
Album Name
Folder Name
Turn the TUNING knob or press SEEK button to change tracks.

while in Playlist folder; change to next Artist while in Artist folder).
Press-and-hold (until a beep sound is heard) preset button #6 to begin the
RANDOM track play and press-and-hold the preset #6 button 2 time to terminate
Turn P-TYPE knob to change sub-folder (example: change to next Playlist
button first and then turning the TYPE turn knob.
Note (2): If radio is equipped with a P-TYPE button, must press P-TYPE
button and then turning the push AUDIO knob.
Note (1): If radio is equipped with a TYPE turn knob, must press the TYPE
the RANDOM play. When in RANDOM mode, “r” is displayed on radio.
Pressing-and-hold the preset #3 or the preset #4 wil fast reverse or fast
forward the track about 40 seconds respectively.
Press-and-hold (until a beep sound is heard) preset #1 and preset #2 to
retreat or advance 10 tracks respectively.
Track change from steering wheel controls is supported.
When iPod is connected to PA15-GM and radio is at XM1 BAND, iPod plays
the track in the Folder which was played prior to the iPod being connected
to the PA15-GM. When the playing of the last track in the Folder is complete,
iPod will go to the first track in All Songs folder.
nd
3-1-3 iPod Connecting and Playing
3-2 Playlist Mode + Direct Mode Configuration
(Note: Radio without a BAND button must use this configuration for
PA15-GM. This configuration uses the radio’s CD changer controls)
3-2-1 Set DIP switches as follow:
DIP # 2
OFF
DIP # 3
ON ON
DIP # 4
(Note: DIP switch #1 is only related to RCA AUX setting and it is independent
of these DIP switches. See Section 2-4 for DIP #1 setting instruction.)
and RCA AUX as follow:
Press preset button #5 button on radio to access Playlists, Direct Mode
Press DISC or CD/AUX button on radio to access iPod.
3-2-2 Functions and Radio Buttons

Track up and down from steering wheel controls is supported.
4-1-A If the radio screen or graphic is the same as Example A
4-1-B If the radio screen or graphic is the same as Example B
below, set the DIPs as follows:
DIP # 2
OFF
DIP # 3
OFF OFF
DIP # 4
At....
Disc 1 Playlist # 1
Disc 2
Disc 3
Playlist # 2
Playlist # 3
Playlist # 4
All Songs
All Songs
RCA AUX
Direct Mode
Direct Mode
IF DIP #1= OFF
IF DIP #1= ON
IF DIP #1= OFF
IF DIP #1= ON
IF DIP #1= OFF
IF DIP #1= ON
Disc 4
Disc 5
Disc 6
Radio Plays Remark
3-2-3 iPod Connecting and Playing
When iPod is connected to interface adaptor and CD button is pressed, iPod will
automatically begin at DISC # 5 (if DIP #1 = ON) or DISC #6 (if DIP #1 = OFF).
And, the iPod will continue to play the track in the Folder which was played prior
to the iPod being connected to the PA15-GM. When the last track of the Folder
is played, iPod will go to the first track of the All Songs folder.
If iPod has more than 5 Playlists, see section 6 of this manual for the instruction
for Playlist Naming.
4-1 DIP switches Setting
Section 4. Navigation Radio’s Mode Setting and
Function Control

(Note: DIP switch #1 is only related to RCA AUX setting and it is independent
of switches #2, #3 and #4. See Section 2-4 for DIP #1 setting instruction.)
4-2 Program Function and Text to the Preset Buttons on
Touch Screen
Example A
its name to the preset buttons on navigatino touch screen.
Examples are shown belows:
PA15-GM allows you to program a “control function” and
DIP # 2
ON
DIP # 3
OFF OFF
DIP # 4
Example B
4-3 Procedure of Programming Preset Buttons’ Function and Text
Step 1- Complete PA15-GM wire connection steps described in Section 4
of this manual.
Step 2- Disconnect iPod from PA15-GM!!!!
In the above examples, the preset buttons are programmed to the function of
accessing Playlist folder, Artist folder, All Songs folder, Album folder, AUX
INPUT and DIRECT Mode respectively.

Step 3- Press XM button to find XM1 on radio.
Step 4- If your radio’s touch screen is the same as in the Example A above,
go to Step 5 of this section.
Step 8- Touch-and-hold anyone of the not-yet-programmed preset buttons until
Step 10- Ending this programming mode by either connect iPod to PA15-GM or
Step 11- Press the SCAN button and the letter PLAYLIST will show on the top
Step 12- Go to Step 6, 7, 8, .9 and 10 to complete the preset buttons programming.
Step 9- Repeat Step 7 and Step 8 to complete the programming of all
6 preset buttons.
Step 6- Touch-and-hold anyone of the 6 preset buttons until letter PLAYLIST
appears on the preset button.
the name of the function appears on the preset button.
long press the SCAN button (for Example A type radio) or touch the
of the screen.
SCAN button (for Example B type radio).
button is long pressed, letter “ iPod ” is shown on this text line.
go to Step 11 of this section first.
If your radio’s touch screen is the same as in the Example B above,
Step 5- Long press SEEK button until the letter PLAYLIST is shown on the text
Step 7- Short press the SEEK button and next function will appear on the text line
line where CH (channel number) is displayed. Note: before the SEEK
where CH is displayed. Note: PA15-GM may provide more than 6 function
and you can use only 6 of it due to radio has 6 preset button only.
be altered or modified with random or unwanted text when a preset buttons
be altered.
FUNCTION which had been grogrammed or assigned to the button would not
rename preset button’s text label when iPod is disconnected from PA15-GM.
is press-and-hold longer than 2 seconds. Re-do above steps to
(1) After the preset buttons are progammed, the text lablel on each buttons could
(2) When the text on preset button is altered as a result of being long pressed, the
Important!!!!!
4-4 Functions and Radio Buttons
Touch XM button on radio to access iPod at XM1
Touch XM button on radio to access XM channels at XM2.
Use radio Preset buttons to access iPod Folders, Direct Mode and RCA AUX.
A long-press-n-hold the SEEK+ or SEEK- will fast reverse or fast forward
the track about 40 seconds respectibely.
Press the SEEK button to change track.

4-5 iPod Connecting and Playing
change to next or previous Playlist while playing the Playlist Folder; change
to next or previous Artist while playing the Artist Folder.)
only applicable to Example B type radios.
Track change from steering wheel control is supported.
When iPod is connected to PA15-GM and radio is at XM1 BAND, iPod
plays the track in the Folder which was played prior to the iPod being connected
to the PA15-GM. When the playing of the last track of the Folder is complete,
the iPod will go to the first track of the All Songs folder.
Touch INFO button to display Text Information of the playing track. (This is
Touch the SELECT or CAT < > buttons to select a sub-folder. (Example:
Step 1- Decide which MODE to use and set DIP switches according to instructions
Step 2- Must remove or eject all CDs out from radio.
Step 3- Remove radio out from dash or locate the XM receiver in your car. (See
APPENDIX of this manual for the location of XM receiver in your car.)
Note: Between the CAS-GM24 and CAS-GM2x cable, only one if it is
required for installation. Use CAS-GM24 and connect it to radio if
and connect it to XM receiver if the car has a factory installed XM
receiver. Use CAS-GM24 cable if radio does not have BAND button.
in Section 3 or Section 4 of this manual.
If a factory cable has the same identical 12-pin male connector already
(3) Plug the 12-pin male connector on CAS-GM24 cable to radio.
connected to radio, unplug the factory cable from radio and connect it to the
12-pin female connector on CAS-GM24 cable first.
Step 4a- To connect the CAS-GM24 cable with radio: (see Fig. 1)
Section 5. CABLE CONNECTION
the car does not have factory installed XM receiver. Use CAS-GM2x
Step 6- Plug the 18-pin male connector on CAS-GM2ext5 to PA15-GM adaptor
where is labeled RADIO.
Unplug the factory 16-pin male connector from XM receiver and connect it to
the 16-pin female connector on CAS-GM2x cable. Connect
the 16-pin male connector on CAS-GM2x cable to XM receiver.
4b- To connect CAS-G2x cable with XM receiver: (see Fig. 2)
Step 5- Connect CAS-GM2ext5 to CAS-GM24 or CAS-GM2x
(depends on which cable is used at Step 4).

Step 10- Plug CB-PA105 cable to adaptor where is labeled iPod.
Step 11- Reinstall radio back to dash only after a successful test is completed.
Step 7- Connect the 2 audio source to the RCA jacks on adaptor if AUX option
nd
is selected by DIP switch #1 = ON.

Section 6. Playlist Naming
This Section ONLY relevant if using PLAYLIST MODE (or CD changer control mode).
If you are using FOLDER MODE (radio is BAND/XM ready), this section does NOT apply.
available Playlists and Folders on iPod and will automatically assign the first 4
6-1 When the iPod is connected to your radio via PA15-GM, the adaptor scans all
Playlists in alphabetical order. They must be Playlists you created in iTunes. The
Apple generated Playlists like “On The Go”, “90’s”, etc do not apply. If you want
to pick the 5 Playlists you want to have access to, you will either need to arrange
them to be in the top 5 OR you can name them as shown below:
Playlist #1: GM1
Playlist #2: GM2
Playlist #3: GM3
Playlist #4: GM4
The word GM must be in capital letters and there can be no spaces between the
You may append text to the designated GM Playlist names. Example: GM1-jazz,
GM3_Favorite3, GM4 podcast, etc.
word GM and numbers.
fill up the rest of Playlist numbers beginning with the first availble Playlist on
6-2 If less than 4 designated GM Playlists are created, PA15-GM will automatically
iPod. Example: if only 3 designated GM1, GM3 and GM5 Playlists are created,
the Playlist # will be:
Playlist #1: GM1....
Playlist #3: GM3....
Playlist #2: (the 1 available Playlist on iPod)
st
Playlist #4: (the 2 available Playlist on iPod)
nd

XM Receiver location for most GM Vehicles
PA15-GM design is subject to change without notice.
XM is a registered trade name of XM Satellite Radio Inc.
iPod, iTunes are the registered trade name of Apple Computer Inc.
GM is registered trade mark of General Motor Corporation.
APPENDIX
Table of contents
Other USASPEC Recording Equipment manuals