Utilitech PQS2504IN1UT User manual
1
ITEM/ARTICLE/ARTÍCULO #0320779
250-WATT 4-IN-1
WORK LIGHT
ENSEMBLE DE
BALADEUSE QUATRE
EN UN DE 250 W
LUZ DE TRABAJO
4 EN 1 DE 250 VATIOS
MODEL/MODÈLE/MODELO #PQS2504IN1UT
Questions/Questions/¿Preguntas?
Call customer service at 1-800-643-0067,
8 a.m.-6 p.m., EST, Monday-Thursday, or
8 a.m.-5 p.m., EST, Friday.
Appelez le service à la clientèle au
1 800 643 0067, entre 8 h et 18 h (HNE),
du lundi au jeudi, ou entre 8 h et 17 h le
vendredi (HNE).
Llame al Departamento de Servicio al Cliente
al 1-800-643-0067, de lunes a jueves de 8 a.m.
a 6 p.m., o los viernes de 8 a.m. a 5 p.m., hora
estándar del Este.
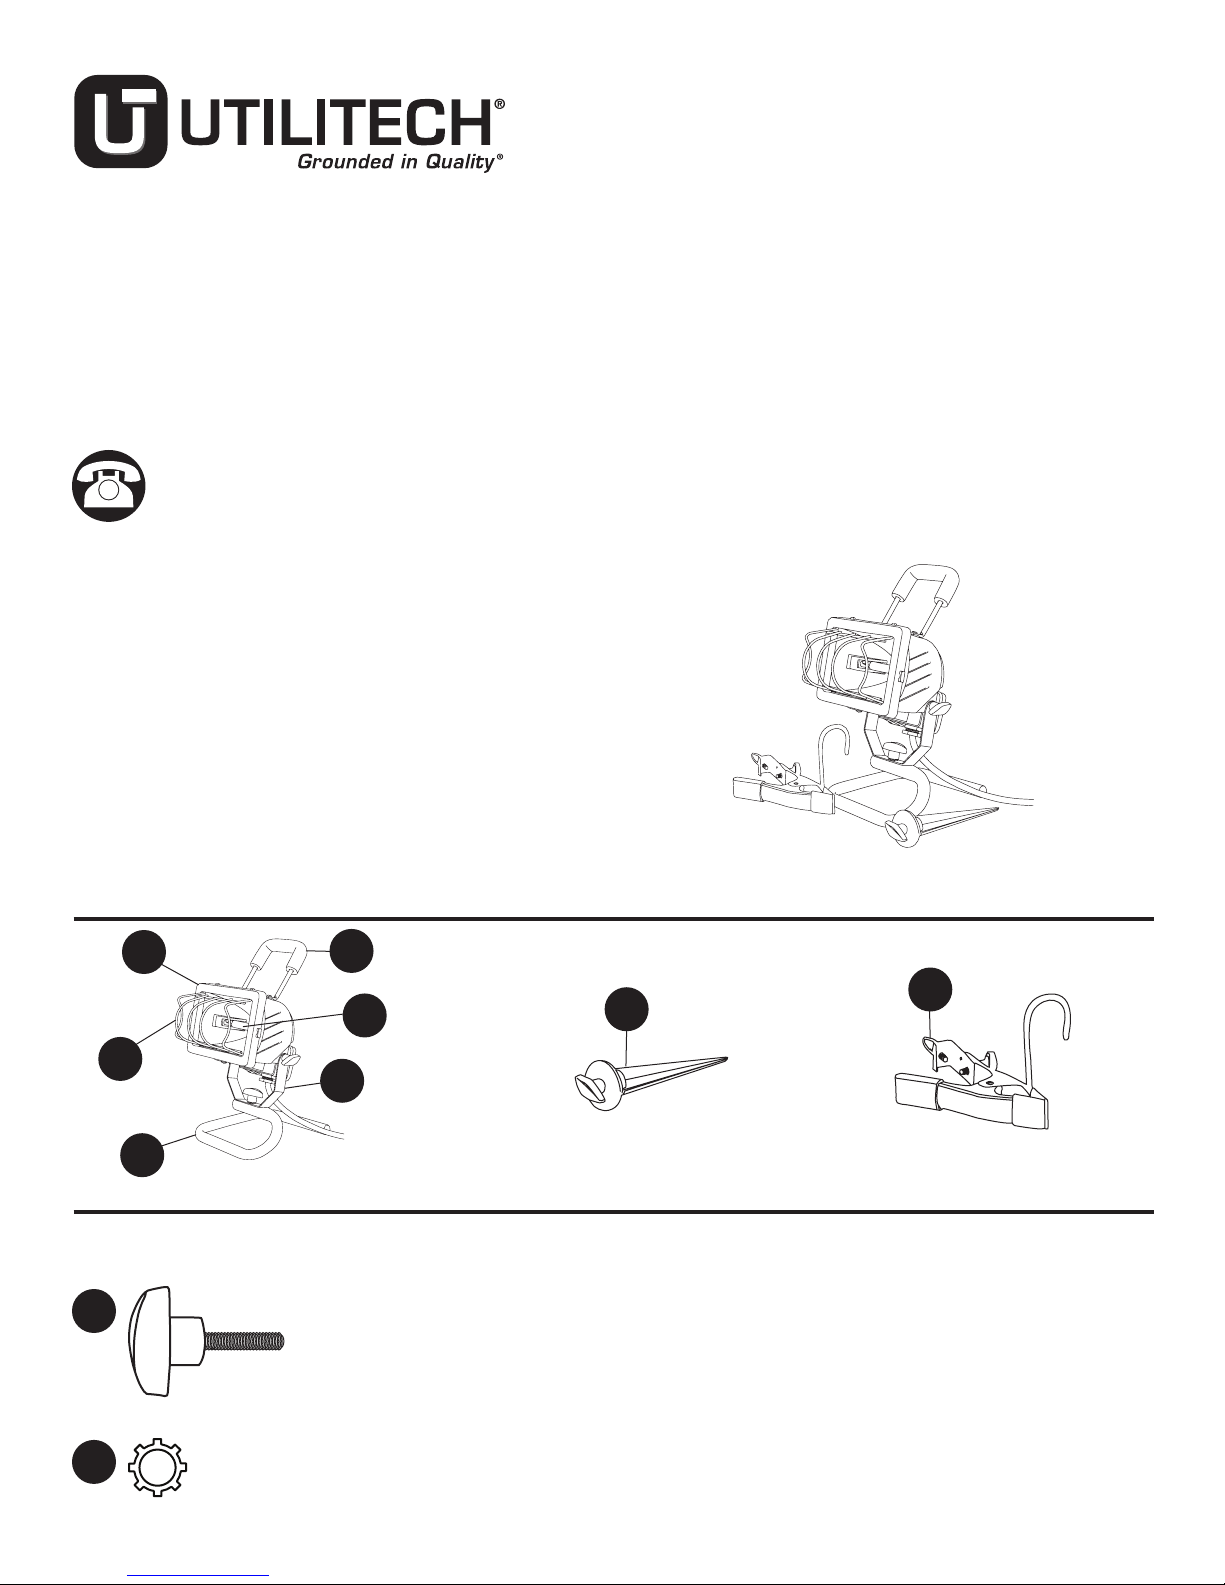
PACKAGE CONTENTS/CONTENU DE L’EMBALLAGE/CONTENIDO DEL PAQUETE
HARDWARE CONTENTS/CONTENU DE L’EMBALLAGE/CONTENIDO DEL PAQUETE
Note: Hardware shown actual size./Remarque : La quincaillerie est illustrée en grandeur réelle./
Nota: Los aditamentos se muestran en tamaño real.
AA
BB
AX1
BX1
DX1
GX1
FX1
EX1
CX1
Utilitech® is a registered trademark of LF, LLC.
All Righhts Reserved.
Utilitech® est une marque de commerce
déposée de LF, LLC. Tous droits réservés.
Utilitech® es una marca registrada de LF, LLC.
Todos los derechos reservados.
HX1
Lock washer
X6
Adjustment Knob with Built-in Bolt
(not to scale)
X6

2
SAFETY INFORMATION/CONSIGNES DE SÉCURITÉ/INFORMACIÓN DE SEGURIDAD
Please read and understand this entire manual before attempting to assemble, operate or install the product. If you
have any questions regarding the product, please call customer service at 1-800-643-0067, 8 a.m.-6 p.m., EST,
Monday-Thursday, or 8 a.m.-5 p.m., EST, Friday.
Veuillez vous assurer de lire et de comprendre l’intégralité du présent guide avant d’assembler, d’utiliser ou d’installer ce
produit. Si vous avez des questions concernant ce produit, veuillez communiquer avec notre service à la clientèle au
1 800 643 0067, entre 8 h et 18 h (HNE), du lundi au jeudi, ou entre 8 h et 17 h (HNE), le vendredi.
Lea y comprenda completamente este manual antes de intentar ensamblar, usar o instalar el producto. Si tiene preguntas
relacionadas con este producto, llame a Servicio al Cliente al 1-800-643-0067, de lunes a Jueves de 8 a.m. a 6 p.m., o
los viernes de 8 a.m. a 5 p.m., hora estándar del Este.
INSTRUCTIONS PERTAINING TO RISK OF FIRE, ELECTRIC SHOCK, EXPOSURE TO EXCESSIVE UV RADIATION
OR INJURY TO PERSONS:/INSTRUCTIONS RELATIVES AUX RISQUES D’INCENDIE, DE CHOC ÉLECTRIQUE,
DE BLESSURES OU D’EXPOSITION EXCESSIVE À DES RAYONS UV : /INSTRUCCIONES RELACIONADAS
CON EL RIESGO DE INCENDIO, DESCARGA ELÉCTRICA, EXPOSICIÓN A EXCESIVA RADIACIÓN UV O
LESIONES A PERSONAS:
IMPORTANT SAFETY INSTRUCTIONS/IMPORTANTES INSTRUCTIONS DE SÉCURITÉ/INSTRUCCIONES
IMPORTANTES DE SEGURIDAD
When using product, basic precautions should always be followed, including the following:/Des précautions de base
doivent être suivies lors de l’utilisation de ce produit, incluant :/Al utilizar el producto, siempre se deben seguir las
precauciones básicas, incluído lo siguiente:
• Read and follow these instructions./Lisez et suivez ces instructions./Lea y siga estas instrucciones.
• Heed all warnings, including below warnings AND those included on product./Respectez tous les avertissements,
y compris les avertissements ci-dessous ET ceux qui sont inscrits sur l’étiquette d’avertissement./Tenga en cuenta
todas las advertencias, incluyendo las advertencias a continuación Y aquellas incluidas en el producto.
• Save these instructions and warnings./Conservez ces instructions et ces avertissements./Guarde estas
instrucciones y advertencias.
• For indoor and outdoor use./Pour usage à l’intérieur et à l’extérieur./Para uso en interiores y exteriores.
• C-UL-US Listed for wet location use./Produit homologué C-UL US pour une utilisation dans les endroits humides./
Homologado por C-UL-US para utilizarse en lugares húmedos.
• Disassembling your xture will void the warranty./Le démontage de votre appareil annulera la garantie./
Desensamblar la lámpara anulará la garantía.
• The worklight should be located no further than 3 feet from the nearest outlet./La baladeuse ne doit pas être
placée à plus de 0,91 m de la prise la plus près./La luz de trabajo se debe ubicar a no más de 0,91 metros del
tomacorriente más cercano.
To reduce the risk of re, electric shock, exposure to excessive UV radiation or injury to persons:/Pour
réduire le risque D’INCENDIE, DE CHOC ÉLECTRIQUE, EXPOSITION EXCESSIVE À DES RAYONS UV OU DE
BLESSURES : /Para reducir el riesgo de INCENDIO, DESCARGA ELÉCTRICA, EXPOSICIÓN EXCESIVA A
RADIACIÓN UV O LESIONES A PERSONAS:
• Lighted lamp is HOT!/L’ampoule allumée est CHAUDE !/¡La lámpara encendida está CALIENTE!
• Turn off/unplug and allow to cool before replacing bulb./Éteignez ou débranchez le luminaire et laissez l’ampoule
refroidir avant de la remplacer./Apague/desenchufe y permita que se enfríe antes de reemplazar el foco.
• Bulb gets HOT quickly! Only contact switch/plug when turning on./Les ampoules deviennent CHAUDES rapidement!
Touchez à l’interrupteur ou à la che pour allumer le luminaire uniquement./¡El foco se CALIENTA rápidamente!
Al encenderla, toque sólo el interruptor o el enchufe.
• Do not touch hot lens, guard, or enclosure./Ne touchez pas à la lentille chaude, au protecteur ou au boîtier./
No toque las micas calientes, la protección o el compartimiento.
• Do not remain/stand in light if skin feels warm./Ne vous tenez/restez pas dans la lampe si votre peau se réchauffe./
No permanezca/se coloque en la luz si la piel se siente caliente.
• Do not look directly at lighted lamp./Évitez de regarder directement l’ampoule allumée./No mire directamente a la
lámpara encendida.
WARNING/AVERTISSEMENT/ADVERTENCIA

3
CAUTION/PRÉCAUTION/PRECAUCIÓN
• Connect xture to a 120-volt, 60 Hz power source. (Any other connection voids warranty.)/Raccorder l’appareil
d’éclairage à une alimentation 120 V, 60 Hz. (Toute autre connexion annule la garantie.)/Conecte el accesorio a una
fuente de energía de 120 voltios y 60 Hz. (Cualquier otro tipo de conexión anulará la garantía.)
• Keep away from materials that may burn./Gardez la lampe loin des matériaux qui pourraient brûler./Mantenga la
lámpara alejada de materiales inamables.
• Use only with a 250-watt or smaller bulb./Utilisez uniquement une ampoule de 250 watts ou moins./Use sólo con
un foco de 250 vatios o menos.
• Do not touch the bulb at any time. Use a soft cloth. Oil from skin may damage bulb./Ne touchez jamais à l’ampoule.
Utilisez un linge doux pour manipuler l’ampoule : le gras de la peau peut l’endommager./No toque el foco en
ningún momento. Utilice un paño suave. Los aceites de la piel pueden dañar el foco.
• Do not operate the portable luminaire with a missing or damaged guard, lamp containment barrier, or UV lter./
N’allumez pas un luminaire portable s’il manque un protecteur, une barrière ou un ltre UV, ou si l’un de ces
éléments est endommagé./No opere luminarias portátiles que tengan la protección, el compartimiento o el ltro
UV dañados o faltantes.
• If lens is replaced, use only a diffused tempered safety glass of equal thickness./Si vous remplacez la lentille,
utilisez uniquement un verre de sécurité trempé pour lumière diffuse d’épaisseur égale./Si reemplaza la mica, use
sólo un vidrio de seguridad templado difuso de igual grosor.
• Use of bulb(s) of higher wattage rating than what is listed in the safety instructions will void the warranty./
L’utilisation d’une ampoule d’une puissance nominale plus élevée que celle indiquée dans les consignes de
sécurité annulera la garantie./El uso de focos de mayor vataje que el mencionado en las instrucciones de
seguridad anulará la garantía.
• Use only three-wire outdoor extension cords that have three-prong grounding plugs and grounding receptacles that
accept the appliance’s plug, such as an extension cord of cord type:/Utilisez seulement des rallonges à trois ls
conçues pour l’extérieur, dotées d’une che de mise à la terre à trois broches, ainsi qu’une prise de mise à la terre
qui accepte la che de l’appareil telles que :/Use sólo extensiones eléctricas para exteriores de tres conductores,
que tengan enchufes con puesta a tierra de tres clavijas y tomacorrientes de puesta a tierra que acepten el enchufe
del electrodoméstico tal como: SW, SW-A, SOW, SOW-A,STW, STW-A, STOW, STOW-A, SJW, SJW-A, SJOW,
SJOW-A, SJTW, SJTW-A, SJTOW, SJTOW-A.
PREPARATION/PRÉPARATION/PREPARACIÓN
Before beginning assembly of product, make sure all parts are present. Compare parts with package contents list and
hardware contents above. If any part is missing or damaged, do not attempt to assemble the product.
Estimated Assembly Time: 10 minutes
Tools Required for Assembly (not included): Phillips Head Screwdriver
Avant de commencer l’assemblage du produit, assurez-vous d’avoir toutes les pièces. Comparez les pièces avec la liste
du contenu de l’emballage et celle de la quincaillerie ci-dessus. S’il y a des pièces manquantes ou endommagées, ne
tentez pas d’assembler le produit.
Temps d’assemblage approximatif : 10 minutes
Outil requis pour l’assemblage (non comprise) : Tournevis cruciforme
Antes de comenzar a ensamblar el producto, asegúrese de tener todas las piezas. Compare las piezas con la lista del
contenido del paquete y los aditamentos mencionados anteriormente. No intente ensamblar el producto si falta alguna
pieza o si éstas están dañadas.
Tiempo estimado de ensamblaje: 10 minutos
Herramientas necesarias para el ensamblaje (no se incluyen): Destornillador Phillips
4
marco y la lente. Apriete la
protección hasta que el otro
extremo se pueda colocar
entre el lado opuesto del
marco y la lente (Fig. 2).
ATTACHING FIXTURE TO STAND/FIXER LE
LUMINAIRE AU PIED/FIJACIÓN DE LA LÁMPARA
EN EL SOPORTE
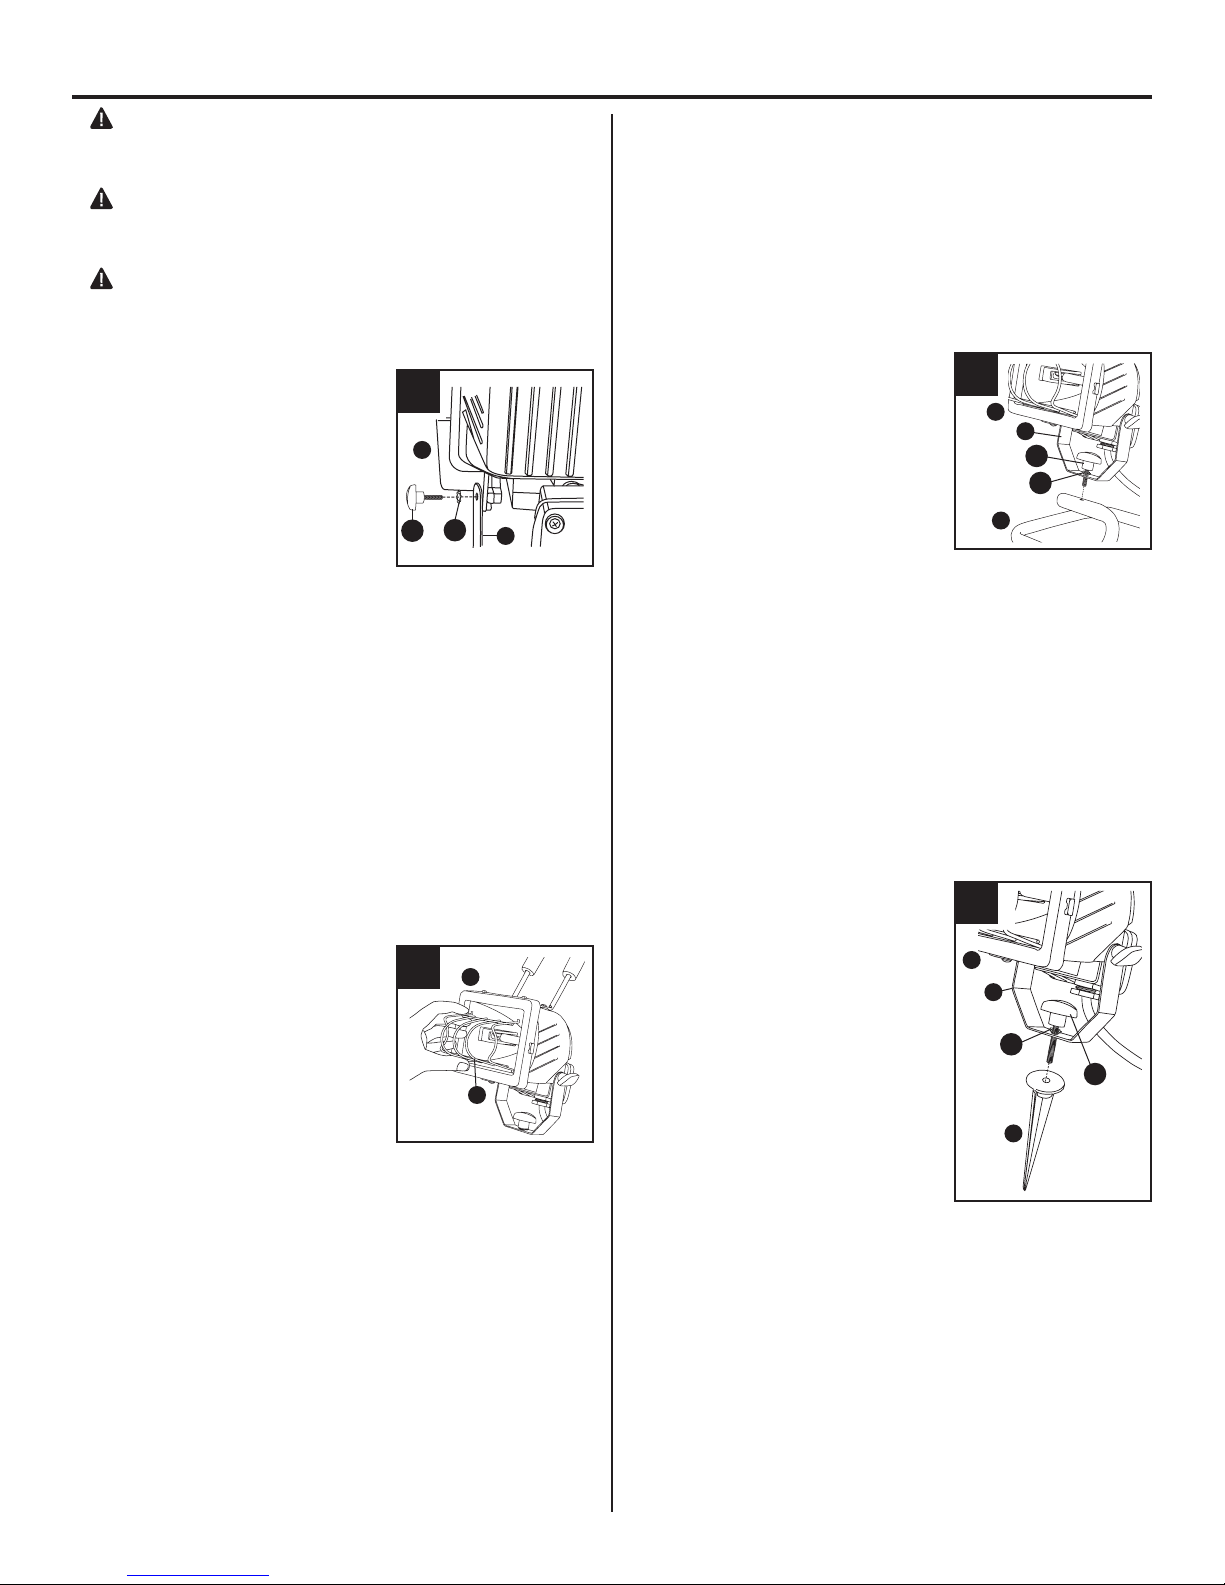
1. Attach the light bracket (E)
to the stand (C) using an
adjustment knob (AA) and a
lock washer (BB) (Fig. 3).
Fixez le support du
luminaire (E) au pied
(C) à l’aide d’un bouton
de réglage (AA) et
d’une rondelle de blocage
(BB) (Fig. 3).
Fije la abrazadera de la
lámpara (E) al soporte (C)
con una perilla de ajuste
(AA) y una arandela de
seguridad (BB) (Fig. 3).
ATTACHING FIXTURE TO SPIKE/FIXER LE
LUMINAIRE AU PIQUET/FIJACIÓN DE LA
LÁMPARA EN LA ESTACA
1. Attach the light bracket (E)
to the ground spike (G).
This step will require
using a lock washer (BB)
and an adjustment knob
(AA) (Fig. 4).
Fixez le support du
luminaire (E) au piquet
(G). Pour cette étape,
vous aurez besoin d’une
rondelle de blocage (BB)
et d’un bouton de réglage
(AA) (Fig. 4).
Fije la abrazadera de la
lámpara (E) a la estaca
para tierra (G). Este
paso requerirá usar una
arandela de seguridad (BB)
y una perilla de ajuste (AA)
(Fig. 4).
WARNING: Deviation from the assembly
instructions may result in a risk of re or
electric shock.
AVERTISSEMENT : Tout manquement relatif
aux instructions pour l’assemblage peut causer
un risque d’incendie ou de choc électrique.
ADVERTENCIA: No seguir las instrucciones de
ensamblaje puede producir un riesgo de incendio
o descarga eléctrica.
1. Attach light head (A) to
the light bracket (E). This
step will require using
(2) adjustment knobs with
built-in bolts (AA) and (2)
lock washers (BB) (Fig. 1).
Fixez la tête du luminaire (A)
au support du luminaire (E).
Pour cette étape, utilisez les
deux (2) boutons de réglage
avec boulon intégré (AA)
et deux (2) rondelles de
blocage (BB) (Fig. 1).
Fije el cabezal de la
lámpara (A) a la abrazadera
de la lámpara (E). Este
paso requerirá usar
las (2) ajuste la perilla
con el perno (AA) y (2)
arandela de seguridad
(BB) incorporado (Fig. 1).
2. Install the safety guard (B)
in the light xture (A) by
inserting one side of the
guard between the frame
and the lens. Squeeze the
guard until the other side
can be placed between the
opposite side of the frame
and lens (Fig. 2).
Installez l’écran protecteur
(B) au luminaire (A) en
insérant un côté de l’écran
entre l’armature et la lentille.
Serrez l’écran protecteur
jusqu’à ce que l’autre côté
puisse être inséré entre
l’autre côté de l’armature
et la lentille (Fig. 2).
Instale la protección de
seguridad (B) en la lámpara
(A) insertando un costado
de la protección entre el
ASSEMBLY INSTRUCTIONS/INSTRUCTIONS D’ASSEMBLAGE/INSTRUCCIONES PARA EL ENSAMBLAJE
1
BBAA E
A
2
B
A
BB
AA
E
3
C
A
AA
BB
4
E
A
G
5
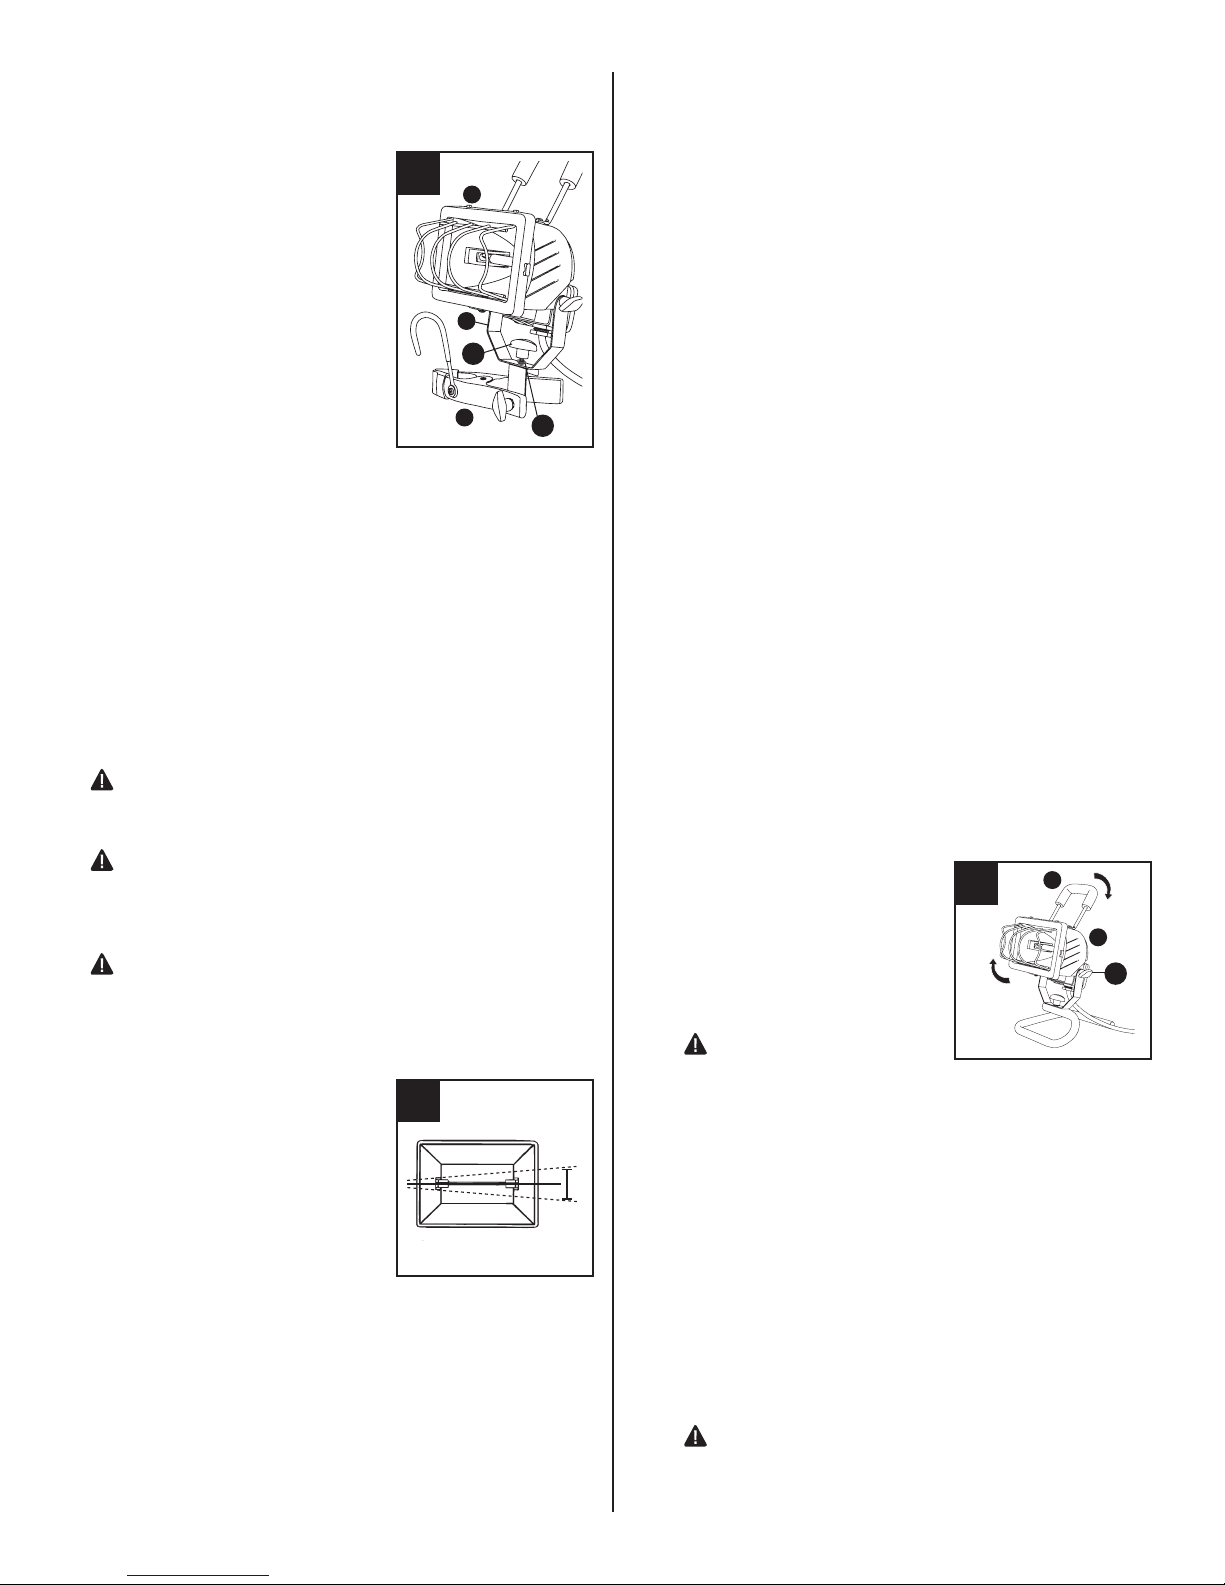
ATTACHING FIXTURE TO CLAMP/HOOK/FIXER
LE LUMINAIRE À LA PINCE/CROCHET/FIJACIÓN
DE LA LÁMPARA A LA ABRAZADERA/GANCHO
1. Attach the light bracket
(E) to the clamp/hook
(H). This step will require
using a lock washer (BB)
and an adjustment knob
(AA) (Fig. 5).
Fixez le support du
luminaire (E) à la pince/
crochet (H). Pour cette
étape, vous aurez besoin
d’une rondelle de blocage
(BB) et d’un bouton de
réglage (AA) (Fig. 5).
Fije la abrazadera de
la lámpara (E) a la
abrazadera/gancho (H).
Este paso requerirá usar
una arandela de seguridad
(BB) y una perilla de ajuste
(AA) (Fig. 5).
AIMING THE FIXTURE/ORIENTER L’APPAREIL/
DIRECCIÓN DE LA LÁMPARA
WARNING: Risk of burn. Disconnect power
and allow xture to cool before changing bulb or
handling xture.
AVERTISSEMENT : Risque de brûlure. Coupez
l’alimentation électrique et attendez que l’appareil
refroidisse avant de changer une ampoule ou de
manipuler l’appareil.
ADVERTENCIA: Riesgo de quemaduras.
Desconecte la electricidad y permita que la lámpara
se enfríe antes de cambiar el foco o manipular
la lámpara.
NOTE: For maximum bulb
life, position light so that
the quartz halogen bulb
remains within 4 degrees
of horizontal (Fig. 6).
REMARQUE : Pour prolonger
la durée de vie de l’ampoule,
orientez le luminaire de
façon à ce que l’ampoule
de quartz-halogène
demeure à un angle de
4 degrés par rapport à
la ligne horizontale (Fig. 6).
NOTA: Para obtener la
máxima vida útil del foco
coloque la lámpara de
manera que el foco halógena
de cuarzo quede a 4 grados
de estar completamente
horizontal (Fig. 6).
1. Plug light into a
standard household
120-volt receptacle.
Branchez le luminaire
dans une prise de ménage
ordinaire de 120 volts.
Enchufe la lámpara
en un hogar estándar
tomacorriente de 120 voltios.
2. To turn light on or off, push
ON/OFF switch on the back
of the xture (A).
Pour allumer ou éteindre le
luminaire, appuyez sur le
commutateur MARCHE/
ARRÊT situé au dos du
luminaire (A).
Para encender y apagar la
luz, presione el interruptor
ENCENDIDO/APAGADO
en la parte posterior de
cada lámpara (A).
3. To aim the light, loosen the
knobs (AA) on the side, and
use only the handle (D) to
aim the light in the desired
direction. Tighten
adjustment knobs to
maintain position (Fig. 7).
WARNING: To prevent
overheating and risk of
burns or re, do not aim
the xture down at an
angle of more than 10
degrees from horizontal.
Pour pouvoir diriger la
lampe, desserrer le
boutons (AA) latéral et
utiliser uniquement la
poignée pour diriger la
lampe à l’endroit désiré.
Serrer le bouton de
réglage pour immobiliser
la lampe (Fig. 7).
AVERTISSEMENT :
Pour prévenir la
surchauffe et les risques
5
H
AA
BB
E
A
4˚
6
7D
A
AA
6
la perilla de ajuste para
mantener la posición (Fig. 7).
ADVERTENCIA:
Para evitar el
sobrecalentamiento y
el riesgo de quemaduras
o incendio, no dirija la
lámpara hacia abajo en
un ángulo de más de
10 grados de estar
totalmente horizontal.
CARE AND MAINTENANCE/ENTRETIEN/CUIDADO Y MANTENIMIENTO
REPLACING THE BULB/REMPLACEMENT DE
L’AMPOULE/REEMPLAZO DEL FOCO
WARNING: Risk of burn. Disconnect power
and allow xture to cool before changing bulb or
handling xture.
AVERTISSEMENT : Risque de brûlure. Coupez
l’alimentation électrique et attendez que l’appareil
refroidisse avant de changer une ampoule ou de
manipuler l’appareil.
ADVERTENCIA: Riesgo de quemaduras.
Desconecte la electricidad y permita que la lámpara
se enfríe antes de cambiar el foco o manipular
la lámpara.
NOTE: Always handle halogen bulbs with gloves or
with a clean soft cloth. Oil from your skin can cause
premature failure of the bulb.
REMARQUE : Manipulez toujours les ampoules
halogènes à l’aide de gants ou d’un linge doux et
propre. Le gras de la peau pourrait endommager
l’ampoule.
NOTA: Siempre manipule los focos halógenos con
guantes o con un paño limpio y suave. El aceite de
la piel puede provocar la falla prematura del foco.
NOTE: Replace with only a 120- or 130-volt, 250-watt
(or lower wattage) T2.5 R7s base halogen bulb.
REMARQUE : Remplacez l’ampoule par une ampoule
halogène T2.5 R7 de 120 ou 130 volts et 250 watts
(ou d’une puissance nominale inférieure).
NOTA: Reemplace sólo con un foco halógeno
de 120 ó 130 voltios, 250 vatios (o menos vataje)
y base T2.5 R7s.
1. Make sure xture (A) is
turned OFF, unplugged
and cool.
Assurez-vous que le
luminaire (A) est éteint
et refroidi.
Asegúrese de que la
lámpara (A) esté APAGADA,
desenchufada y fría.
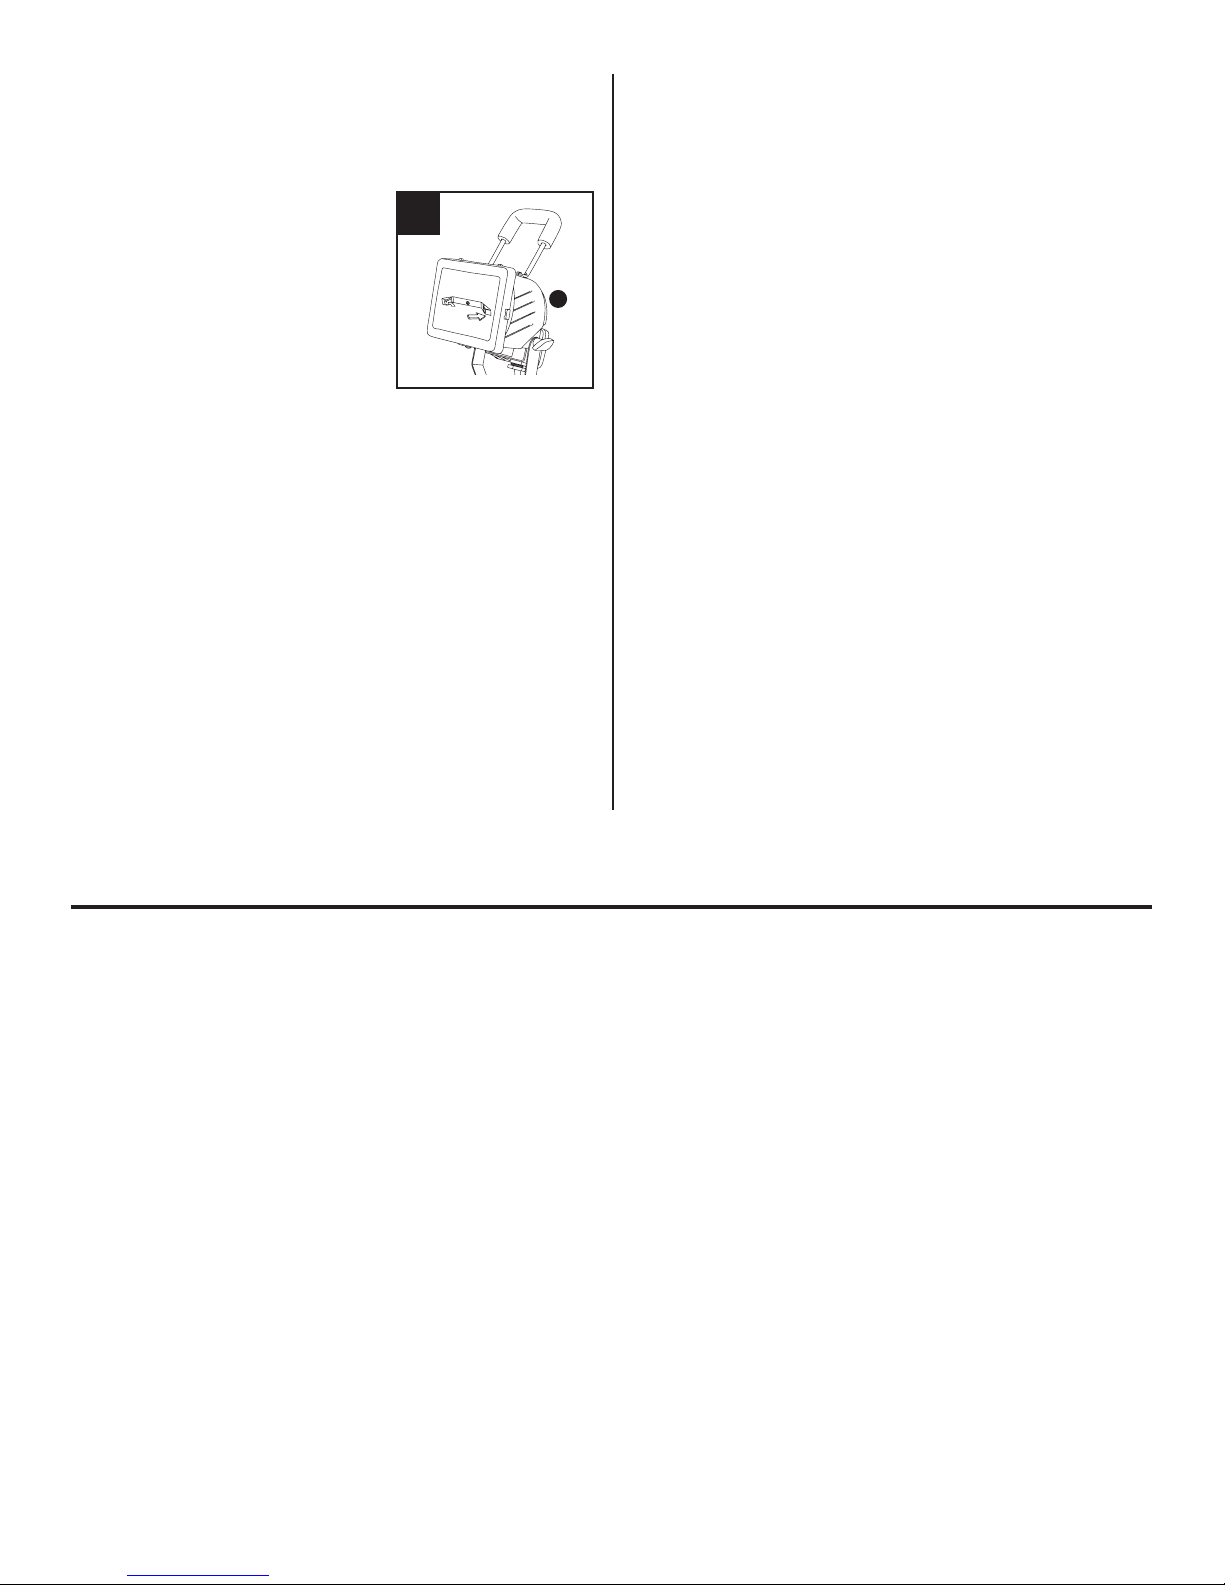
2. Using a Phillips head
screwdriver, turn screw on
bottom tab counterclockwise
until door frame tab clears
screw.
À l’aide d’un tournevis
cruciforme, tournez la vis
située au bas de la
languette vers la gauche,
jusqu’à ce que la languette
du cadre de la porte se
dégage de la vis.
Usando un destornillador
Phillips, gire el tornillo que
se encuentra en la parte
inferior de la pestaña hacia
la izquierda hasta que la
pestaña de la compuerta
sobrepase el tornillo.
3. Carefully lift the door frame
out and away to access
the bulb (F).
Soulevez soigneusement
L’ensemble du cadre de
porte se balancera loin
du boîtier pour permettre
l’accès à l’ampoule (F).
Levante con cuidado el el
marco de la puerta se abrirá
hacia afuera, permitiendo el
acceso al foco (F).
de brûlures et d’incendie,
n’orientez pas le luminaire
vers le bas, à plus de 10
degrés de l’axe horizontal.
Para apuntar a la luz,
también desajuste las
perillas (AA) y use
únicamente la manivela
para apuntar a la luz en la
dirección deseada. Ajuste
7
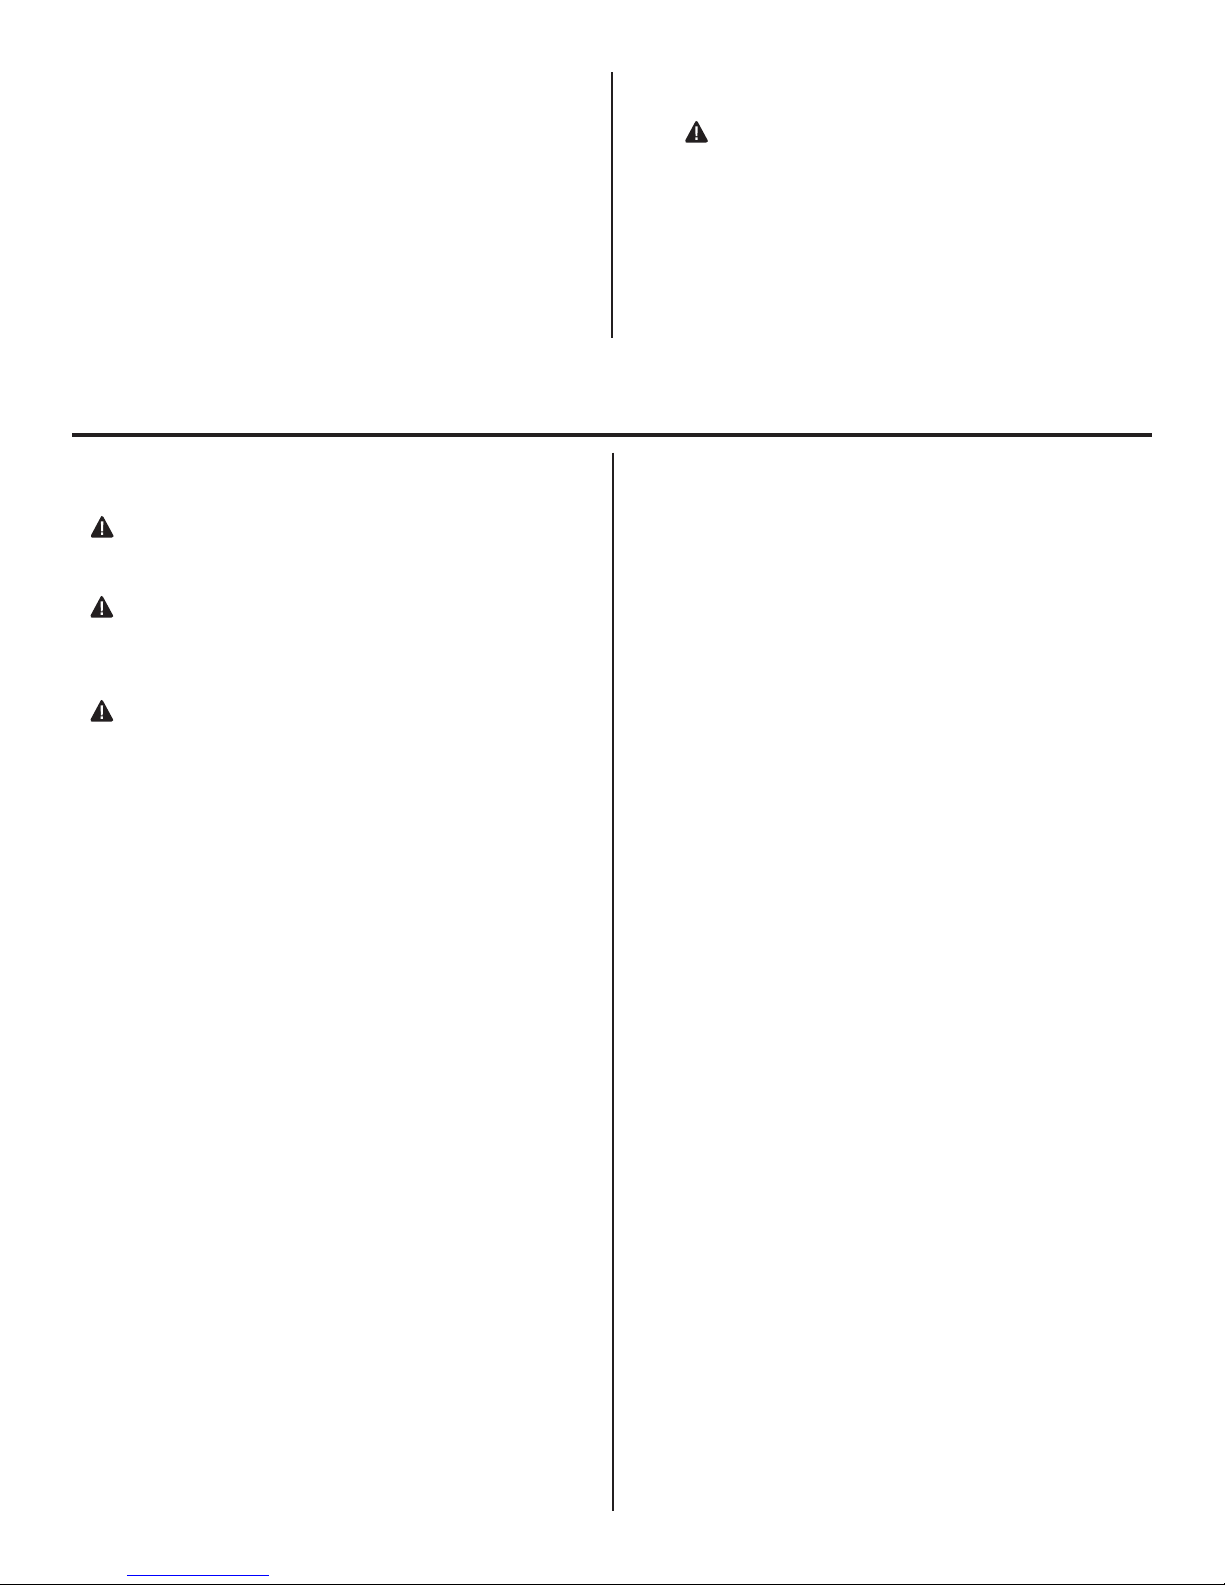
4. Using gloves or soft cloth,
press the old bulb to one
side of the spring loaded
socket as indicated on the
metal reector. Remove
opposite end of bulb from
the other side of the socket.
Remove the new bulb from
its package making sure
not to touch bulb with bare
hands. Reverse this
procedure to install a new
replacement bulb (Fig. 8).
À l’aide de gants ou d’un
linge doux, poussez la
vieille ampoule vers
un côté de la douille à
ressort, comme il est
indiqué sur le réecteur
de métal. Retirez le côté
opposé de l’ampoule, à
l’autre extrémité de la
douille. Retirez la nouvelle
ampoule de son emballage
en prenant soin de ne pas
y toucher à mains nues.
Suivez les étapes dans le
sens inverse pour installer
la nouvelle ampoule (Fig. 8).
Usando guantes o un
paño suave, presione el
foco antigua a un costado
del portalámpara accionado
por resortes como se indica
en el reector metálico.
Retire el extremo opuesto
del foco del otro extremo
del portalámpara. Retire
el nuevo foco del paquete
asegurándose de no
tocarla con las manos
descubiertas. Invierta
este procedimiento para
instalar el nuevo foco de
repuesto (Fig. 8).
5. Replace the door frame
and lens assembly and
secure it using a Phillips
screwdriver.
Replacez l’ensemble du
cadre de porte et de la
lentille et xez-le à l’aide
d’un tournevis cruciforme.
Retire el ensamble del
marco de la puerta y la
mica, y fíjelo con un
destornillador Phillips.
8
A
WARRANTY/GARANTIE/GARANTIA
THE FOLLOWING WARRANTY IS EXCLUSIVE AND IN LIEU OF ALL OTHER WARRANTIES, WHETHER EXPRESS,
IMPLIED OR STATUTORY INCLUDING, BUT NOT LIMITED TO, ANY WARRANTY OF MERCHANTABILITY OR
FITNESS FOR ANY PARTICULAR PURPOSE.
Cooper Lighting, LLC (“Cooper Lighting”) warrants to customers that, for a period of two years from the date of purchase,
Cooper Lighting’s products will be free from defects in materials and workmanship. The obligation of Cooper Lighting
under this warranty is expressly limited to the provision of replacement products. This warranty is extended only to the
original purchaser of the product. A purchaser’s receipt or other proof of date of original purchase acceptable to Cooper
Lighting. This is required before warranty performance shall be rendered.
This warranty does not apply to Cooper Lighting products that have been altered or repaired or that have been subjected
to neglect, abuse, misuse or accident (including shipping damages). This warranty does not apply to products not
manufactured by Cooper Lighting which have been supplied, installed, and/or used in conjunction with Cooper Lighting
products. Damage to the product caused by replacement bulbs or corrosion or discoloration of brass components are not
covered by this warranty.
LIMITATION OF LIABILITY:
IN NO EVENT SHALL COOPER LIGHTING BE LIABLE FOR SPECIAL, INDIRECT, INCIDENTAL, OR
CONSEQUENTIAL DAMAGES (REGARDLESS OF THE FORM OF ACTION, WHETHER IN CONTRACT, STRICT
LIABILITY, OR IN TORT INCLUDING NEGLIGENCE), NOR FOR LOST PROFITS; NOR SHALL THE LIABILITY OF
COOPER LIGHTING FOR ANY CLAIMS OR DAMAGE ARISING OUT OF OR CONNECTED WITH THESE TERMS OR
THE MANUFACTURE, SALE, DELIVERY, USE, MAINTENANCE, REPAIR OR MODIFICATION OF COOPER LIGHTING
PRODUCTS, OR SUPPLY OF ANY REPLACEMENT PARTS THEREFORE, EXCEED THE PURCHASE PRICE OF
COOPER LIGHTING PRODUCTS GIVING RISE TO A CLAIM. NO LABOR CHARGES WILL BE ACCEPTED TO
REMOVE OR INSTALL FIXTURES.
To obtain warranty service, please contact Customer Service at 1-800-643-0067, 8 a.m.-6 p.m., EST, Monday-Thursday,
or 8 a.m.-5 p.m., EST, Friday.

8
CETTE GARANTIE CONSTITUE LA SEULE GARANTIE OFFERTE POUR CE PRODUIT ET PRÉVAUT SUR TOUTE
AUTRE GARANTIE EXPLICITE, IMPLICITE OU LÉGALE, Y COMPRIS, SANS S’Y LIMITER, TOUTE GARANTIE DE
QUALITÉ MARCHANDE OU D’ADÉQUATION À UN USAGE PARTICULIER.
Cooper Lighting, LLC (« Cooper Lighting ») garantit à ses clients, pendant une période de deux ans à compter de la date
d’achat, que ses produits Cooper Lighting sont exempts de tout défaut de matériaux et de fabrication. En vertu de la
présente garantie, l’obligation de Cooper Lighting se limite expressément à fournir des produits de remplacement.
Cette garantie n’est offerte qu’à l’acheteur initial du produit. Cooper Lighting requiert un reçu ou autre preuve d’achat
qu’elle jugera acceptable sur lequel est indiquée la date de l’achat initial. Cette preuve d’achat est requise pour obtenir
l’exécution de la garantie.
La garantie ne s’applique pas aux produits Cooper Lighting qui ont été modiés ou réparés, ou qui ont fait l’objet d’une
négligence ou d’un usage abusif ou inapproprié, ou qui ont été endommagés en raison d’un accident (y compris durant
le transport). Cette garantie ne s’applique pas aux produits qui ne sont pas fabriqués par Cooper Lighting et qui ont été
fournis, installés et/ou utilisés avec des produits Cooper Lighting. Les dommages au produit causés par une ampoule de
rechange ou la corrosion, et la décoloration des pièces de laiton ne sont pas couverts par cette garantie.
LIMITATION DES RESPONSABILITÉS :
COOPER LIGHTING NE SERA EN AUCUN CAS TENU RESPONSABLE DES DOMMAGES SPÉCIAUX, INDIRECTS,
ACCESSOIRES ET CONSÉCUTIFS (QUELLE QUE SOIT LA RAISON, MÊME SI CETTE RESPONSABILITÉ REPOSE
SUR UN CONTRAT, LA RESPONSABILITÉ STRICTE, OU DES DÉLITS, Y COMPRIS LA NÉGLIGENCE), NI POUR LA
PERTE DE PROFITS, ET MÊME SI LA RESPONSABILITÉ DE COOPER LIGHTING POUR DES RÉCLAMATIONS OU
DES DOMMAGES FAIT SUITE À LA PRÉSENTE GARANTIE OU EST LIÉE AUX MODALITÉS DES PRÉSENTES, À
LA FABRICATION, À LA VENTE, À LA LIVRAISON, À L’UTILISATION, À L’ENTRETIEN, À LA RÉPARATION, OU À LA
MODIFICATION DE PRODUITS COOPER LIGHTING, OU À LA FOURNITURE DE TOUTE PIÈCE DE RECHANGE
CONNEXE, LE COÛT DES DOMMAGES NE PEUT DÉPASSER LE COÛT D’ACHAT DU PRODUIT COOPER
LIGHTING FAISANT L’OBJET DE LA RÉCLAMATION AU TITRE DE LA PRÉSENTE GARANTIE. AUCUN FRAIS
DE MAIN-D’OEUVRE NE SERA REMBOURSÉ POUR ENLEVER OU INSTALLER UN LUMINAIRE.
Pour faire une réclamation au titre de la garantie, veuillez appeler service à la clientèle au 1 800 643 0067, entre
8 h et 18 h (HNE), du lundi au jeudi, ou entre 8 h et 17 h (HNE), le vendredi.
LA SIGUIENTE GARANTÍA ES EXCLUSIVA Y REEMPLAZA A TODAS LAS DEMÁS GARANTÍAS, YA SEAN IMPLÍCITAS,
EXPLÍCITAS O ESTATUTARIAS, INCLUIDAS ENTRE OTRAS, LAS GARANTÍAS DE COMERCIABILIDAD E
IDONEIDAD PARA UN FIN PARTICULAR.
Cooper Lighting, LLC (“Cooper Lighting”) garantiza a sus clientes que los productos de Cooper Lighting no presentarán
defectos en los materiales y en la fabricación durante un período de dos años desde la fecha de compra. La obligación
de Cooper Lighting según esta garantía se limita expresamente al suministro de los productos de reemplazo. Esta
garantía se extiende sólo para el comprador original del producto. Un recibo del comprador u otra prueba de la fecha de
compra original aceptable para Cooper Lighting. Esto es necesario para la ejecución de la garantía.
Esta garantía no se aplica a los productos de Cooper Lighting que hayan sido alterados o reparados o que estuvieron
sujetos a negligencia, abuso, mal uso o accidente (incluso los daños durante el envío). Esta garantía no se aplica a los
productos Cooper Lighting no fabricados por Cooper Lighting que hayan sido sumvvinistrados, instalados o utilizados
junto con los productos Cooper Lighting. Los daños del producto causados por bombillas de reemplazo, corrosión o
decoloración de los componentes de latón no están cubiertos por esta garantía.
LIMITACIÓN DE RESPONSABILIDAD:
COOPER LIGHTING NO SERÁ RESPONSABLE LEGAL EN NINGÚN CASO DE DAÑOS INDIRECTOS, ACCIDENTALES
O RESULTANTES (SIN IMPORTAR LA ACCIÓN LEGAL, YA SEA POR CONTRATO, RESPONSABILIDAD ESTRICTA O
DE FORMA EXTRACONTRACTUAL INCLUYENDO LA NEGLIGENCIA) TAMPOCO DE LA PÉRDIDA DE GANANCIAS,
COOPER LIGHTING TAMPOCO SERÁ RESPONSABLE DE RECLAMOS O DAÑOS QUE SURJAN O ESTÉN
CONECTADOS CON ESTOS TÉRMINOS O CON LA FABRICACIÓN, VENTA, ENTREGA, USO, MANTENIMIENTOM,
REPARACIÓN O MODIFICACIÓN DE LOS PRODUCTOS DE COOPER LIGHTING O DEL SUMINISTRO DE
CUALQUIER PIEZA DE REPUESTO QUE EXCEDA EL PRECIO DE COMPRA DE LOS PRODUCTOS DE COOPER
LIGHTING ORIGINANDO UN RECLAMO. NO SE ACEPTARÁN CARGOS POR MANO DE OBRA PARA QUITAR O
INSTALAR LOS ACCESORIOS.
Para obtener el servicio de la garantía comuníquese con Servicio al Cliente al 1-800-643-0067, de lunes a Jueves de
8 a.m. a 6 p.m., o los viernes de 8 a.m. a 5 p.m., hora estándar del Este.
Printed in China/Imprimé en Chine/Impreso en China
825-0654
Table of contents
Other Utilitech Work Light manuals


Popular Work Light manuals by other brands


Cooper Crouse-Hinds
Cooper Crouse-Hinds eLLK 92 NIB Series operating instructions

Eaton
Eaton CEAG Style Variant 29011 Mounting and operating instructions

MIIDEX LIGHTING
MIIDEX LIGHTING Vision-EL 90304 instructions

brennenstuhl
brennenstuhl HL DA 41 MC operating instructions

Philips
Philips Lightolier IS-PTS7 instruction sheet

Conrad Electronic
Conrad Electronic goose-neck operating instructions

Pinegreen Lighting
Pinegreen Lighting CL-TWL20K Assembly instructions

Bosch
Bosch Heavy Duty Professional GLI 12V-80 Original instructions

Trilux
Trilux 970 Series Mounting instructions

Cooper Lighting
Cooper Lighting PHL300 instruction manual

Parkside
Parkside PAL 2200 A3 manual

XanLite
XanLite PR20W2T user manual