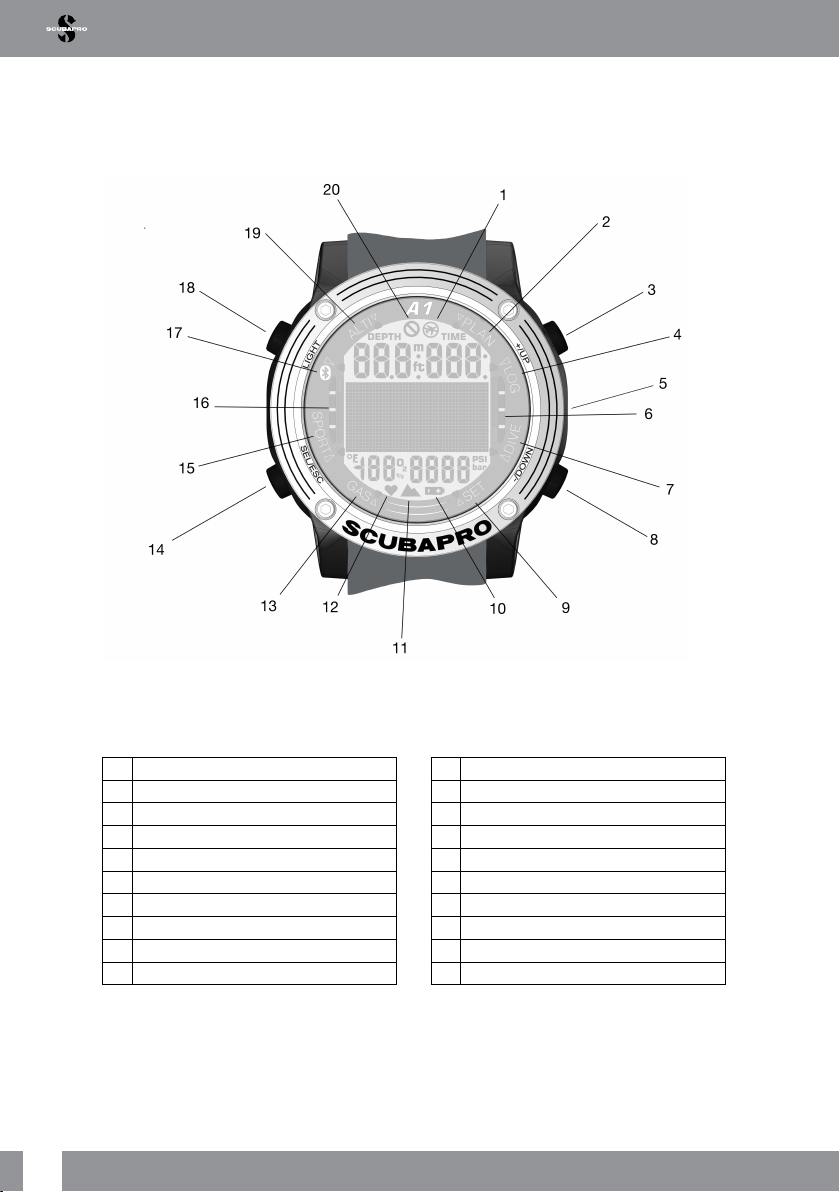
Uwatec Aladin A1 User manual

Aladin A1
User Manual
®

2A1 USER MANUAL

3
English
A1 USER MANUAL
ALADIN A1 USER MANUAL
The A1 diving computer watch – designed for everyday life and diving.
Welcome to SCUBAPRO dive computers and thank you for purchasing the A1. You are now
the owner of an extraordinary partner for your dives and everyday life. This manual provides
you with easy access to SCUBAPRO state-of-the-art technology and the A1’s key features
and functions. Should you wish to know more about SCUBAPRO diving equipment, please
visit our website www.scubapro.com
IMPORTANT
Before using your SCUBAPRO A1, please carefully read and understand the Read First booklet that
is included in the package.
WARNING
• The A1 has a depth rating of 120m/394ft.
• At depths between 115m/377ft and 120m/394ft in Dive mode the A1 provides alerts about the
maximum depth, and at depths over 120m/394ft the A1 automatically switches to Gauge mode and
cannot be used as a decompression computer for the remaining time of the dive.
• Diving at oxygen partial pressures higher than 1.6bar (corresponding to a depth of 67m/220ft when
breathing compressed air) is extremely dangerous and could lead to serious injury or death.
• Never risk your life on only one source of information. Eventually, every computer has the potential
to fail, so do not depend exclusively upon it and always have a plan for how to handle failures. Use
a redundant dive computer, carry backup tables and depth/time instrumentation.
WARNING
The A1 is delivered in deep sleep mode where the display is off. You must activate the A1 with a
press-and-hold of the SEL/ESC button before the rst dive.
The A1 dive instrument is compliant with the European Union directive 2014/30/EU.
Standard EN 13319: 2000
The A1 dive instrument is also compliant with the European standard EN 13319: 2000 (EN 13319: 2000 – Depth gauges
and combined depth and time measuring devices – Functional and safety requirements, tests methods).

4A1 USER MANUAL
TABLE OF CONTENTS
1. INTRODUCTION TO THE A1 ................................................................................... 8
1.1 Switching on the A1 ......................................................................................... 8
1.2 The watch screen ............................................................................................. 8
1.3 A1 buttons ....................................................................................................... 9
1.4 Button lock ....................................................................................................... 9
1.5 Bezel markings and symbols .......................................................................... 10
1.6 Battery ........................................................................................................... 11
1.7 Operation modes ........................................................................................... 11
1.8 Basic settings ................................................................................................. 13
1.8.1 Time and date settings ...................................................................... 13
1.8.2 User settings ..................................................................................... 14
2. A1 AS AN EVERYDAY WATCH .............................................................................. 14
2.1 Clock setting functions ................................................................................... 14
2.1.1 Setting the alarm clock ...................................................................... 15
2.1.2 Setting UTC 1 .................................................................................... 15
2.1.3 Setting UTC 2 .................................................................................... 15
2.1.4 Setting the time ................................................................................. 15
2.1.5 Setting the date ................................................................................. 16
2.1.6 Display design ................................................................................... 16
2.1.7 Time format ....................................................................................... 17
2.2 Sport mode .................................................................................................... 17
2.2.1 Stopwatch ......................................................................................... 18
2.2.2 Swim mode ....................................................................................... 18
2.2.3 Apnea mode ...................................................................................... 19
2.3 Reading the altitude, barometric and temperature values ............................... 19
3. A1 SETTINGS AND MENUS ON THE SURFACE ................................................. 20
3.1 General settings ............................................................................................. 20
3.1.1 User settings ..................................................................................... 20
3.1.1.1 Backlight ...............................................................................20
3.1.1.2 Contrast ................................................................................20
3.1.1.3 Units......................................................................................21
3.1.1.4 Owner information .................................................................21
3.1.1.5 Desaturation reset .................................................................21
3.1.1.6 Service Information................................................................22
3.1.2 Swim settings .................................................................................... 22
3.1.3 Sound settings .................................................................................. 23
3.1.3.1 Buzzer...................................................................................24
3.1.3.2 Button beeps ........................................................................24
3.1.3.3 Dive warnings........................................................................24
3.1.4 Checking the battery status ............................................................... 24
3.2 Dive settings on surface ................................................................................. 25
3.2.1 Dive mode selection .......................................................................... 25
3.2.2 Scuba mode settings ......................................................................... 25
3.2.2.1 Water type selection ..............................................................26
3.2.2.2 Microbubble level selection....................................................26
3.2.2.3 Dive display type ...................................................................26
3.2.3 Apnea mode settings ......................................................................... 27
3.2.3.1 Total Apnea exercise depth....................................................27
3.2.3.2 Surface interval factor............................................................27
3.2.3.3 Dual depth alarm ...................................................................28

5
English
A1 USER MANUAL
3.2.3.4 Dive depth incremental alarm.................................................29
3.2.3.5 Dive time interval alarm..........................................................29
3.2.3.6 Surface interval alarm ............................................................29
3.2.3.7 Ascent speed alarm...............................................................30
3.2.4 Warning settings ................................................................................ 30
3.2.4.1 Dive time warning ..................................................................30
3.2.4.2 Dive depth warning................................................................31
3.2.4.3 MOD alarm............................................................................31
3.3 Gas settings ................................................................................................... 31
3.3.1 Setting gas oxygen content ............................................................... 31
3.3.2 Nitrox reset time ................................................................................ 32
3.4 Planning a dive ............................................................................................... 32
3.4.1 No-stop plan ..................................................................................... 33
3.4.2 Decompression plan .......................................................................... 33
3.5 Reading the logbook ...................................................................................... 34
4. DIVING WITH THE A1 ............................................................................................ 35
4.1 Display information ......................................................................................... 35
4.1.1 Dive ready mode ............................................................................... 36
4.1.2 Display conguration during the dive .................................................. 36
4.1.2.1 SCUBA mode display selection .............................................36
4.1.2.1.1 Light version ........................................................37
4.1.2.1.2 Classic version.....................................................37
4.1.2.2 GAUGE mode display selection .............................................38
4.1.2.2.1 Light version ........................................................38
4.1.2.2.2 Classic version.....................................................39
4.1.2.3 APNEA mode ........................................................................39
4.2 Safety stop timer ............................................................................................ 40
4.3 Activating the backlight .................................................................................. 40
4.4 Alarms and warnings during diving ................................................................. 40
4.4.1 Maximum depth warning ................................................................... 40
4.4.2 MOD (ppO2) alarm ............................................................................. 41
4.4.3 Dive time warning .............................................................................. 41
4.4.4 Turning time ....................................................................................... 41
4.4.5 No-stop time = 2 minute warning ...................................................... 41
4.4.6 No-stop time warning ........................................................................ 41
4.4.7 CNS O2warning (over 75%) .............................................................. 41
4.4.8 CNS O2alarm (100%) ........................................................................ 42
4.4.9 L0 no-stop time = 2 minute warning .................................................. 42
4.4.10 Entering decompression warning ....................................................... 42
4.4.11 Missed decompression stop alarm .................................................... 42
4.4.12 MB level stop ignored ........................................................................ 42
4.4.13 MB level reduction warning ................................................................ 42
4.4.14 Ascent rate alarm .............................................................................. 43
4.4.15 SOS .................................................................................................. 43
4.4.16 Low battery alarm .............................................................................. 44
4.5 No-Dive warning ............................................................................................ 44
4.6 No-Fly time ..................................................................................................... 44
4.7 Diving with MB-levels ..................................................................................... 45
4.8 PDIS (Prole Dependent Intermediate Stop) .................................................... 46
4.8.1 Introduction to PDIS .......................................................................... 46
4.8.2 How does PDIS work? ...................................................................... 47
4.8.3 Diving with PDIS ................................................................................ 48

6A1 USER MANUAL
4.9 Altitude diving ................................................................................................. 48
4.9.1 Altitude warning after a dive ............................................................... 48
4.9.2 Altitude and the decompression algorithm ......................................... 49
4.9.3 Prohibited altitude .............................................................................. 49
4.9.4 Decompression dives in mountain lakes ............................................ 50
4.10 Diving with Nitrox ........................................................................................... 50
4.11 Diving in GAUGE mode .................................................................................. 51
4.12 Diving in APNEA mode ................................................................................... 52
5. INTERFACES FOR THE A1 AND AN INTRODUCTION TO LOGTRAK ............... 53
5.1 Establishing Bluetooth communication ........................................................... 53
5.2 LogTRAK ....................................................................................................... 54
5.2.1 Connecting the A1 with LogTRAK ..................................................... 54
5.2.2 Download dive proles ....................................................................... 54
5.2.3 Reading computer information ........................................................... 55
5.2.4 Writing owner information with LogTRAK ........................................... 55
5.2.5 Setting units in LogTRAK ................................................................... 55
5.2.6 Updating your A1 .............................................................................. 56
6. TAKING CARE OF YOUR A1 ................................................................................. 57
6.1 Changing the watch strap .............................................................................. 57
6.2 Display protection foil ..................................................................................... 58
6.3 Technical information ...................................................................................... 58
6.4 Maintenance .................................................................................................. 59
6.5 Warranty ........................................................................................................ 59
6.6 Compliance .................................................................................................... 60
6.6.1 EU Radio directive ............................................................................. 60
6.6.2 Diving ................................................................................................ 60
6.6.3 FCC & ISED regulatory notices .......................................................... 60
6.6.3.1 Modication Statement..........................................................60
6.6.3.2 Interference Statement ..........................................................60
6.6.3.3 Wireless Notice......................................................................60
6.6.3.4 FCC Class B Digital Device Notice.........................................60
6.6.3.5 CAN ICES-3 (B) / NMB-3 (B) .................................................60
6.7 Manufacturer .................................................................................................. 61
7. GLOSSARY ............................................................................................................. 62
8. INDEX ..................................................................................................................... 63

7
English
A1 USER MANUAL

8A1 USER MANUAL
1. INTRODUCTION TO
THE A1
Your A1 user manual is divided into the
following main chapters:
Introduction to the A1. This chapter
provides an overview of the A1 dive
computer and describes its operating
modes and main functions when on the
surface.
A1 as an everyday watch. This chapter
describes the A1’s operation when it is
used as a watch.
A1 settings and menus on the surface.
This section goes through the settings of
your A1.
Diving with the A1. This section takes you
underwater with the A1 and describes all
settings and functions of the A1 as a dive
computer. It outlines everything the A1
can—and will—do to enhance your safety
and fun underwater.
Interfaces for the A1 and an
introduction to LogTRAK. This section
describes how to download data, change
settings, and manage your logbook.
Taking care of your A1. This chapter
describes how you should take care of your
A1 after underwater adventures, and also
summarizes the main technical information
of this instrument.
The A1 is a technologically-advanced
instrument that can accompany you
during your underwater adventures while
providing you with accurate depth, time
and decompression information. On
the surface its size makes it your ideal
everyday companion. With features such
as wake-up alarm, dual time, stopwatch,
barometer, altimeter and swim mode, the
A1 can tackle almost every possible task.
The buttons allow you to initiate operating
functions, make setting changes and
access menus while on the surface. During
the dive they show additional information
on the computer screen and activate the
backlight.
Now it is time to dive into the details. We
hope you will enjoy getting to know your
new computer and we wish you many
happy dives with the A1.
1.1 Switching on the A1
The A1 is delivered to you in a deep sleep
mode. This is done to preserve battery life
and ensure your A1 arrives with a fresh
battery.
In order to switch on the A1 for the rst
time you need to press-and-hold the SEL/
ESC button (lower left). After this initial
activation, the A1 will never again return to
deep sleep mode.
1.2 The watch screen
When the A1 is switched on the rst time
the display screen shows the time and date
as follows:
The time and date values, along with the
format, can be changed to your liking. This
is described in chapters 2.1.6 Display
design and 2.1.7 Time format.

9
English
A1 USER MANUAL
1.3 A1 buttons
The functions of the buttons on the
surface are summarized in the table below
and explained in detail in the following
sections.
“LIGHT”
button,
Top Left:
Press = backlight
“SEL/ESC”
button,
Bottom
Left:
Press = select (access main
menu and submenus or
conrm selection/setting)
Press-and-hold = escape
(return to previous menu or
cancel the setting); from the
main time and date display
shows the current gas
settings
“+/UP”
button,
Top Right:
Press = adds numerical
values, toggles up to the
previous menu
Press-and-hold = from the
main time and date display
shows the selected dive
mode; from the selected dive
mode display activates the
swim mode
“-/DOWN”
button,
Bottom
Right:
Press = subtracts numerical
values, toggles down to the
next menu
Press-and-hold = from the
main time and date display:
shortcut to dive ready mode
which shows the main dive
settings
1.4 Button lock
A simultaneous press-and-hold of the SEL/
ESC and -/DOWN buttons will lock the
main time and date display. Once locked,
by pressing just the SEL/ESC button the
following screen will be displayed:
Unlock the display by simultaneously
pressing-and-holding the SEL/ESC and
-/DOWN buttons again.

10 A1 USER MANUAL
1.5 Bezel markings and symbols
In this section the markings and symbols on the A1’s outer and inner bezel as well as on its
display are explained in detail.
1 No Fly symbol
2 Planner menu indicator
3 +/UP button
4 Logbook menu indicator
5 Water contact
6 Not used in the A1
7 Dive menu indicator
8 -/DOWN button
9 Settings menu indicator
10 Low battery symbol
11 Altitude symbol
12 Not used in the A1
13 Gas menu indicator
14 SEL/ESC button
15 Sport menu indicator
16 Ascent speed / N2 bar
17 Bluetooth menu indicator
18 Light button
19 Altimeter menu indicator
20 No-dive symbol

11
English
A1 USER MANUAL
1.6 Battery
The A1 uses a CR2450 battery type.
The A1 will alert you when the battery is
approaching a critical discharge level by
displaying the battery symbol.
A steady symbol means that the battery is
low, with some reserve left. At this point the
backlight cannot be activated. If the symbol
blinks, the battery level is dangerously low
and the backlight and alarm tones cannot
be activated; diving is not recommended
before replacing the battery.
WARNING
Starting a dive when the battery symbol is
blinking can cause the computer to fail during
the dive! Replace the battery before any diving
activity if the blinking battery symbol appears.
When the ‘do not dive’ symbol appears with
the battery symbol, the A1 cannot be used for
diving until a fresh battery is installed.
Please refer to chapter 3.1.4 Checking
the battery status for details on how to
manually trigger the battery level check.
WARNING
The A1 will not start a dive if the battery has
reached the critical level indicated by the
battery symbol. In this state the A1 cannot be
used for diving.
WARNING
When your A1’s battery reaches the end of its
lifetime, it is recommended that it be replaced
by an authorized SCUBAPRO service center.
1.7 Operation modes
The A1’s different modes are shown on the
dial ring of the computer and the current
function mode is indicated with an arrow.
Each mode may have sub functions and
menus. By pressing the SEL/ESC button
you activate the mode and as an indication
the arrow starts blinking.
The modes are grouped and described in
this manual in four chapters:
1. A1 as an everyday watch.
2. A1 settings and menus.
3. A1 as a dive computer.
4. Bluetooth interface of the A1 and an
introduction to LogTRAK.
The A1 has two main operation modes:
1. Watch mode. The display is on and
shows the time and date (in various
formats). From this mode other surface
operation modes can be selected:
a. Sport mode
b. Bluetooth communication mode
c. Altimeter
d. Planner
e. Logbook
As well as settings can be changed:
a. Dive settings
b. Custom settings
c. Gas settings
2. Dive mode. This mode is activated
when the computer reaches a depth of
0.8m/3ft or more. In this mode the A1
monitors depth, time, temperature and
decompression.

12 A1 USER MANUAL
The following chart describes the main menu structure:
TIME & DATE
DIVE
LOGBOOK
PLANNER
ALTIMETER
BLUETOOTH
SPORT
GAS
RETURN
SETTINGS
Logbook
pages
DOWN
DOWN
DOWN
UP
UP
UP
UP
DOWN
DOWN
DOWN
DOWN
DOWN
UP
UP
UP
UP
SEL Planner
pages
Altitude
information
Bluetooth
connection
Sport settings
Dive settings
& menus
User settings
Gas settings
SEL
SEL
SEL
SEL
SEL
SEL
SEL
ESC
ESC
ESC
ESC
ESC
ESC
ESC
ESC
SEL
ESC
ESC
DOWN
UP
TIME & DATE
User Settings
Gas Settings
Sport Settings
Bluetooth
connection
Altitude
information
Planner pages
Logbook pages

13
English
A1 USER MANUAL
1.8 Basic settings
The initial activation of your A1 requires
some basic set-up (setting time and date,
units, etc.).
1.8.1 Time and date settings
Starting from the
main time and date
display, pressing the
SEL/ESC button
takes you to the
main menu.
From the main
menu toggle down
to Settings with
the -/DOWN button
then press SEL/
ESC.
From the Settings
menu toggle down
to Watch then
press SEL/ESC.
From the Watch
menu toggle down
to Set Time then
press SEL/ESC.
By pressing +/UP
or -/DOWN you can
select the hours
and conrm them
by pressing SEL/
ESC. The minutes
can be set the
same way.
After the minutes
are conrmed
the date can be
adjusted the same
way.
There are additional watch settings that
you can adjust to your liking. These are
described in chapter 2.1 Clock setting
functions.

14 A1 USER MANUAL
1.8.2 User settings
The user-related settings (backlight
duration, display contrast, units, etc.) can
be selected with a press-and-hold of the
SEL/ESC button which returns you to the
previous submenu.
For example, from
the Settings menu,
toggle down to
User, then press
SEL/ESC.
From the User
menu, toggle down
to Units, then press
SEL/ESC.
Now the various
units can be
selected. These
selections are
effective in all
operating modes;
for example, during
diving your depth
can be shown in
meters or in feet.
2. A1 AS AN EVERYDAY
WATCH
The A1 is more than just a watch. It features:
• Stopwatch with lap time and 72 hours
of run time.
• Swim stroke and distance counter.
• Altimeter for tracking your excursions to
the mountains.
• Thermometer and barometer for current
weather conditions.
• Wake-up alarm function.
• Dual time.
2.1 Clock setting functions
Starting from the main time and date
display, press the SEL/ESC button to enter
the main menu.
From the main menu, toggle down to
Settings with the -/DOWN button, then
press SEL/ESC. From the Settings menu
select Watch to enter the clock settings.
WATCH
ALARM
SET UTC 1
SET UTC 2
SET TIME
SET DATE
DESIGN
FORMAT
RETURN
DOWN
UP
DOWN
UP
UP
UP
UP
UP
UP
DOWN
DOWN
DOWN
DOWN
DOWN
SEL
ESC
ESC
DOWN
UP

15
English
A1 USER MANUAL
2.1.1 Setting the alarm clock
From the Watch menu press the SEL/
ESC button to enter the Alarm submenu.
Here you can activate or deactivate the
alarm clock by pressing the +/UP or -/
DOWN buttons. Selecting ALARM ON will
allow you to set the time of the alarm. You
can scroll the hours by pressing +/UP or
-/DOWN buttons. Pressing the SEL/
ESC button will conrm the hour setting
and switch to minutes. You can scroll the
minutes by pressing +/UP or -/DOWN
buttons. Pressing the SEL/ESC button will
conrm the minutes setting and activate
the alarm.
2.1.2 Setting UTC 1
The UTC setting will change the displayed
time compared to Greenwich 0-Meridian.
This feature is practical when traveling
through different time zones. By pressing
SEL/ESC you may edit the hours with +/
UP or -/DOWN buttons in a range of +14h
to -13h. By pressing SEL/ESC the minutes
will be highlighted and you may edit them
with +/UP or -/DOWN buttons in 15-minute
increments. The UTC 1 setting will be
conrmed by pressing the SEL/ESC button.
2.1.3 Setting UTC 2
Dual time uses the same “base time” as
the main clock. Therefore, adjusting the
time as described in section ‘Setting the
time’ will also inuence the dual time. The
dual time zone selection will dene the
difference to the main clock time. When the
time zone selection is OFF, then the dual
time is disabled. When pressing the SEL/
ESC button the UTC 2 time hours will be
highlighted. You may change the setting
by pressing the +/UP or -/DOWN buttons
in a range of +14h to -13h or by selecting
OFF. By pressing the SEL/ESC button,
the minutes will be highlighted and you
may edit them using the +/UP or -/DOWN
buttons in 15-minute increments. The UTC
2 setting will be conrmed by pressing the
SEL/ESC button.
2.1.4 Setting the time
By pressing the SEL/ESC button in the
Set Time submenu the time setting will be
activated. You may change the hours with
+/UP or -/DOWN buttons. By pressing the
SEL/ESC button the selection will change
to minutes and can be edited. The new
time setting will be conrmed by pressing
the SEL/ESC button.

16 A1 USER MANUAL
F
NOTE: seconds cannot be edited;
they always start counting from 0.
2.1.5 Setting the date
By pressing the SEL/ESC button in the
Set Date submenu the rst two digits will
be highlighted. You may change them by
pressing the +/ UP or -/DOWN buttons.
Change the selection to the next two digits
by pressing the SEL/ESC button. Finally,
set the year by pressing +/ UP or -/DOWN
and conrm the date with the SEL/ESC
button. In 24h time format the rst digits in
the date are days, in AM/PM time format
the month is rst. You can toggle between
24h and AM/PM in the Format submenu.
2.1.6 Display design
In this menu you may select the design of
the main time and date display to suit your
personal preferences by scrolling through
the options with the +/ UP or -/DOWN
buttons. Conrm your selection by pressing
the SEL/ESC button. In the following
screens the display design selection is
shown next to how the layout is presented
on the main watch display screen.

17
English
A1 USER MANUAL
2.1.7 Time format
Choose your preferred time format by
scrolling with the +/ UP or -/DOWN
buttons, press the SEL/ESC button to save
your settings. You can choose between
AM/PM or 24h format.
F
NOTE: Time format will also change
the date format: MM/DD/YY in AM/
PM mode and DD/MM/YY in 24h
mode. This change will take place, for
example, in watch mode, logbook, etc.
2.2 Sport mode
Starting from the main time and date
display, press the SEL/ESC button to enter
the main menu, then toggle down to Sport
and press the SEL/ESC button again to
enter the Sport menu. In this menu sport-
related functions like swim stroke counter
and stopwatch can be activated.
SPORT
S-WATCH
SWIM
APNEA
RETURN
SEL
ESC
ESC
DOWN
UP
DOWN
DOWN
UP
UP
DOWN
UP
The functions of the buttons in Sport
mode are summarized in the table below
and explained in detail in the following
sections.
“LIGHT”
Press = backlight
Press-and-hold in
Stopwatch mode = returns
to the main time and
date display (stopwatch
will still be running in the
background)
“SEL/ESC”
Press in Swim mode =
stops/restarts timer
Press-and-hold in Swim
mode = ends swim exercise
Press in Stopwatch mode =
returns to Sport menu
Press-and-hold in
Stopwatch mode = returns
to Sport menu
“+/UP”
Press in Swim mode
= scrolls through the
alternative displays
Press-and-hold in Swim
mode = ends swim exercise
Press in Stopwatch mode =
manually start/stop timer
Press-and-hold in Stopwatch
mode when timer stopped =
reset timer to zero
“-/DOWN”
Press in Swim mode
= scrolls through the
alternative displays
Press in Stopwatch mode
when timer stopped = scrolls
through laps

18 A1 USER MANUAL
2.2.1 Stopwatch
From the Sport menu press SEL/ESC to
enter the Stopwatch submenu.
The stopwatch will start measuring the time
by pressing the +/UP button.
To pause the time on the stopwatch press
the +/UP button once again. To reset the
time to 0 press-and-hold the +/UP button
while the stopwatch display shows the
status STOPPED.
In addition to time, laps can be marked
by pressing the -/DOWN button while the
stopwatch is running. By doing so the lower
part of the screen will show the number of
the lap while the lap time will be displayed
in the upper part of the screen. While the
stopwatch is stopped you can review your
lap times from the memory by repeatedly
pressing the -/DOWN button.
By pressing-and-holding the SEL/ESC
button you can exit the stopwatch and
return to the Sport menu.
F
NOTE: You can leave the stopwatch
actively counting or you can leave
the stopped time on the display.
The status will be stored in memory,
allowing you to continue from the
same display at a future time.
2.2.2 Swim mode
Swim mode combines a stopwatch with
a stroke and distance counter. For proper
counter operation the user’s pending values
can be adjusted. These are described in
chapter 3.1.2 Swim settings.
When the swim mode is activated, the
duration of your swim will be shown on
the second screen. The distance will be
displayed on the third screen and the
last screen will show the number of swim
strokes. The water temperature is shown
in the bottom left of the display. Switch
between displays by pressing the +/UP or
-/DOWN buttons. A press of the SEL/ESC
returns you to the Sport menu.

19
English
A1 USER MANUAL
F
NOTE: Swim mode stays active in
shallow water down to 3 meters. This
allows ip turns in pool and horizontal
dives. An immersion deeper than 3
meters will start a dive in the mode
which is selected in the A1 (SCUBA,
APNEA or GAUGE).
2.2.3 Apnea mode
Apnea exercise mode can be activated
from this next menu. The session starts
with a surface interval.
Apnea mode settings are described in
chapter 3.2.3 Apnea mode settings.
Display information and diving with this
mode is described in chapter 4.1.2.3
APNEA mode.
2.3 Reading the altitude,
barometric and
temperature values
From the main menu toggle to the
Altimeter (Altimtr) menu, and press the
SEL/ESC button to enter. In the Altimtr
menu, on the rst display the current
altitude (in meter or feet) is calculated from
the barometric pressure and shown in the
middle of the screen. The temperature (in
Celcius or Fahrenheit) and air pressure (in
mbar) at your current altitude are displayed
in the bottom left and bottom right of the
screen, respectively.
F
NOTE: barometric pressure is a
variable, changing with weather and
atmospheric pressure at a particular
elevation. The Dive algorithm uses
Altitude Classes which are directly
derived from the barometric pressure.
Altitude is counted from the current
barometric pressure and is therefore a
relative value.
By pressing the +/UP or -/DOWN buttons
you can switch to an additional display
where the atmospheric pressure at sea
level is shown.
The altitude can be adjusted when current
elevation is known by pressing the SEL/
ESC button. The new altitude value will
be highlighted in the center of the screen.
By pressing +/UP or -/DOWN buttons
the value can be adjusted in 10m/50ft
increments.
This Barometer feature allows you to
foresee approaching weather in the
upcoming hours if your altitude remains the
same.

20 A1 USER MANUAL
3. A1 SETTINGS AND
MENUS ON THE
SURFACE
In this chapter the settings that can be
completed on the surface are described.
These settings will allow you to personalize
your A1 as desired.
3.1 General settings
In the Settings menu the following
functions can be set:
• Watch settings – please refer to chapter
2.1 Clock setting functions.
• User settings – backlight, display
contrast, units, owner info, desaturation
reset, service check, current software
version.
• Swim settings – swim stroke depth and
length.
• Sound settings – enable or disable
button beeps, dive warnings.
• Battery – check battery status.
WATCH
USER
SWIM
SOUND
BATTERY
RETURN
SETTINGS
DOWN
UP
SEL
ESC
ESC
UP
UP
UP
UP
UP
DOWN
DOWN
DOWN
DOWN
DOWN
3.1.1 User settings
This section allows you to customize your
A1 to your liking. Settings like backlight
duration, display contrast and units can be
changed here.
USER LIGHT
CONTRAST
UNITS
OWNER
DESATURATION
RETURN
DOWN
UP
UP
UP
UP
UP
UP
SEL
ESC
DOWN
DOWN
DOWN
DOWN
DOWN
ESC
DESATURATION
SERVICE
UP
DOWN
3.1.1.1 Backlight
In the User submenu press SEL/ESC to
access the backlight settings. The duration
of the backlight can be set from 5 up to 30
seconds using +/UP or -/DOWN buttons
and saved with another press of the SEL/
ESC button.
3.1.1.2 Contrast
In the User submenu toggle down to
Contrast and press SEL/ESC to access
display contrast settings. Contrast can be
set from 0 up to 15 using +/UP or -/DOWN
buttons and saved with another press of
the SEL/ESC button.
Other manuals for Aladin A1
1
Table of contents
Other Uwatec Watch manuals