V-Count 3D Alpha+ User manual

3D Alpha+ User’s Manual
1
V-Count 3D Alpha+ User’s Manual v2.2
April 2019

3D Alpha+ User’s Manual
2
Contents
1Introduction............................................................................................................... 4
2Technical Specifications ............................................................................................. 5
3General System Description: ...................................................................................... 6
4Installation: ............................................................................................................... 8
4.1 Network and Electrical Architecture .................................................................. 11
4.2 Mounting.......................................................................................................... 13
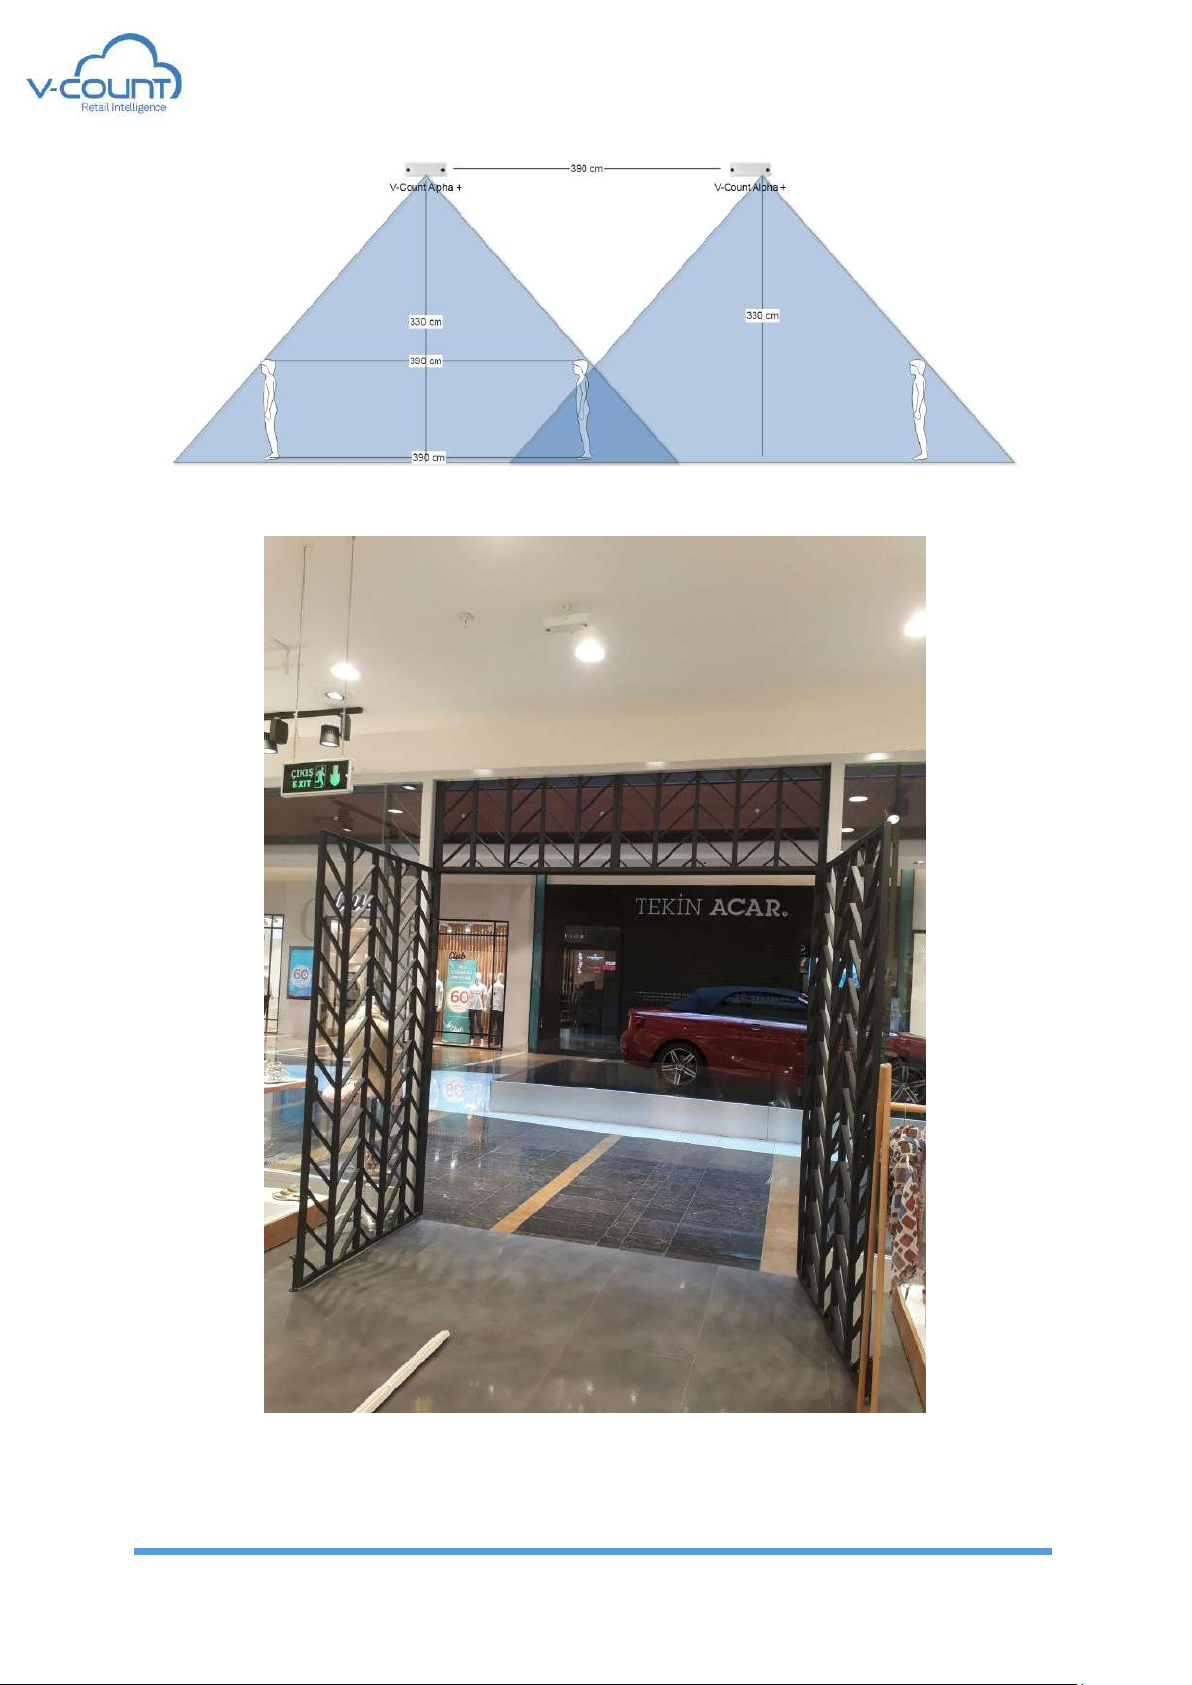
4.3 Field Installations of Wi-Fi/BLE Projects............................................................. 14
5Calibration and Settings of People Counter: ............................................................. 17
5.1 Logging In.......................................................................................................... 17
5.2 Setup Wizard .................................................................................................... 18
5.2.1 Welcome to the Setup Wizard Screen –Step 1 ................................................. 18
5.2.2 Network Settings –Step 2 .................................................................................. 20
5.2.3 Time Zone –Step 3............................................................................................. 21
5.2.4 Mounting Height –Step 4 .................................................................................. 22
5.2.5 Counting Region –Step 5 ................................................................................... 22
5.2.6 Floor Selection –Step 6...................................................................................... 23
5.2.7 Incoming –Outgoing Wires –Step 7.................................................................. 24
5.2.8 Live Stream –Step 8........................................................................................... 24
5.2.9 Working Interval –Step 9................................................................................... 25
5.3 System Settings................................................................................................. 26
5.3.1 Network Settings................................................................................................ 26
5.3.2 Time Zone........................................................................................................... 26
5.3.3 Web Server......................................................................................................... 26
5.3.4 Remote Server.................................................................................................... 27
5.3.5 Working Interval................................................................................................. 29
5.4 Counting Settings .............................................................................................. 29
5.4.1 Incoming –Outgoing Wires................................................................................ 29
5.4.2 Counting Region ................................................................................................. 29
5.4.3 Live Stream......................................................................................................... 29
5.5 System Commands............................................................................................ 30
5.6 Advanced Settings............................................................................................. 31
5.6.1 Logs..................................................................................................................... 31
5.6.2 Video Record ...................................................................................................... 32
5.6.3 Result Synchronization....................................................................................... 33
6Calibration and Settings of Wi-Fi/BLE Projects: ......................................................... 34
6.1 Wi-Fi/BLE Master Device: .................................................................................. 34
6.1.1 Logging In ........................................................................................................... 34
6.1.2 Setup Wizard ...................................................................................................... 35

3D Alpha+ User’s Manual
3
6.1.3System Settings
44
6.1.4 Counting Settings ............................................................................................... 45
6.1.5 System Commands............................................................................................. 45
6.1.6 Advanced Settings .............................................................................................. 46
6.2 Wi-Fi/BLE Slave Device: ..................................................................................... 48
6.2.1 Logging In ........................................................................................................... 48
6.2.2 Setup Wizard ...................................................................................................... 49
6.2.3 System Settings .................................................................................................. 55
6.2.4 Counting Settings ............................................................................................... 56
6.2.5 System Commands............................................................................................. 56
6.2.6 Advanced Settings .............................................................................................. 57
7LEDs and Reset Button: ............................................................................................ 60
7.1 LED Status......................................................................................................... 60
7.2 Reset Procedure and Factory Settings................................................................ 60
8FAQ ......................................................................................................................... 62
Appendix 1 –Accuracy Verification ................................................................................. 64
Appendix 2 –Changing PC IP address and accessing device.............................................. 65
Setting IP Address of MacOS............................................................................................. 66
Setting IP Address of Windows 10.................................................................................... 68
Appendix 3 –Network Communication Ports .................................................................. 70
Appendix 4 –Recommended POE Injector and Switch Models......................................... 71

3D Alpha+ User’s Manual
4
1Introduction
Thank you very much for choosing our product. You have purchased a state-of-the-art People
Counter, one of the most technologically advanced yet easy to use products available in the
marketplace today. V-Count is designed to make your visitor traffic analysis easy and to
provide you with comprehensive business analytics.
This guide will explain you to the deployment of V-Count devices in the field, determining
the number of units to be used, selection of software and network protocol.
V-Count People Counting System is composed of embedded counting devices and the
reporting web interface.
V-Count reporting interface resides at cloud.v-count.com global web page. V-Count counting
reports shall be accessed from this web page.
Each device is assigned to a unique Serial ID. These IDs are assigned by cloud.v-count.com,
with using “admin” account. Please contact with V-Count technical support team for
assignment operations.
The devices generate the counting results in predefined periods and report the counting
result to the global server at cloud.v-count.com. V-Count reporting page generates store, gate,
and door-based results over hourly, daily, weekly, monthly, and yearly reports.
The communication between devices and the server is made through TCP/IP protocol.
Therefore, if there is any firewall or any blocking architecture on the network, the device ports
must be allowed to communicate with these servers.
Both V-Count 3D Alpha+ and V-Count 3D Mini+ devices have the same software features. The
purpose of having 2 versions of stereo device is to extend the range of counting height of V-
Count solutions.
Detailed information related to reporting pages can be found at www.v-count.com

3D Alpha+ User’s Manual
5
2Technical Specifications
Device Dimensions
3D Alpha+: (Rectangular Cover): 225 x 70 x 40 mm
3D Mini+: (Rectangular Cover): 127 x 127 x 38 mm
Packing Dimensions (WxDxH)
3D Alpha+: 257 x 224 x 91 mm
3D Mini+: 250 x 167 x 82 mm
Device Weight
3D Alpha+: 382g
3D Mini+: 236g
Package Weight
3D Alpha+: 1404g
3D Mini+: 1186g
Installation Height
3D Alpha+: Min. Height 2.8m, Max Height 9m
3D Mini+: Min. Height 2.2m, Max Height 2.8m
Data Transfer
PoE: IEEE802.3af (48 V DC)
Adaptor
5V 3A
Power Consumption
15W
Monthly Data Usage(Avg**)
20MB
Peak Usage at Calibration Process
Max 2GB/month
Interface
HTTP / HTTPS
Operating System
Linux based V-Count OS
Time
NTP, Adjustable Time zone, Automatic Daylight-Saving
Adjustments
Ethernet Connection
10/100 MBPS
Data Storage
20 Years offline storage with auto synchronization
Minimum Lux
30
User Levels
3 Levels: Admin, Standard, Guest User
Cabling
Cat5 - Cat6
Environmental Specs
Operating Env: Temperature: -15 °C to 40 °C, Humidity: 10% to
90%
Storage Env: Temperature: -40 °C to 70 °C, Humidity: 10% to 95%
Max Ethernet Cable Length
90m –Cat6
Table 1 Technical Specifications
** These data transfer rates apply after the calibration is finalized.

3D Alpha+ User’s Manual
6
3General System Description:
V-Count 3D Alpha+ People Counting device gathers images from its internal stereo cameras
and calculates depth map of the scene with V-Count’s very own developed stereo vision
algorithms.
From depth map target people are tracked and counted according to user defined Incoming
–Outgoing Trip Wires. The tracked people that cross these lines are counted as incoming or
outgoing. If one person that continuously walks in camera view and crosses lines multiple
times, this person is counted as 1 unless he leaves from the camera view.
The counting results are summed up for a certain period and after period ends, the counter
value is packed and send to remote servers that will report the counting results to users. Also,
these results are stored in devices’ local database. After these processes, the counter is reset,
and a new counting is started.
Beside periodic reporting, V-Count 3D Alpha+ device can also send real time results to
servers. These results are sent in very small periods like 5-10 seconds intervals. Another result
type is that V-Count 3D Alpha+ device can log each of the incoming –outgoing people’s
timestamp and sends results to remoter servers.
V-Count 3D Alpha+ device has their own webservers that is used for user interaction. From
this webserver user can set and change system configuration, read system logs, start video
recording and uploading to V-Count’s Web Services.
The system has 3 LEDs that are programmed to indicate system status to users. In case of
camera or network errors, LEDs show the status visually.
There is a Reset button that can reset device user interface connection settings to Factory
defaults.
In case of network problems, V-Count 3D Alpha+ continues to save counting results to its
local database. After reestablishment of connection to remote servers, the stored, unsent
data is being sent to remote servers.
Local stored results can be queried by API calls to device.
V-Count 3D Alpha+ can also act as a standard iBeacon. It can be used in various advertisement
mobile projects.
V-Count 3D Alpha+ device can also be used as Wi-Fi/Bluetooth Analysis projects component.
2 separate engines can work inside a V-Count 3D Alpha+ device. One is for camera counting
and the other one is for Wi-Fi/Bluetooth signal analysis. Camera counting engine is the main
engine that always runs on device that cannot be stopped by user. Wi-Fi/Bluetooth engine can
be started from main engine and stopped from its own user interface.
V-Count 3D Alpha+ devices can be configured to gather Wi-Fi and Bluetooth signals.
Additionally, Wi-Fi/Bluetooth engines can be master or slave engines according to role set for
the device by user.

3D Alpha+ User’s Manual
7
Devices can be set as master and slave for Wi-Fi Analytics and BLE Hilal (Crescent) project.
For Bluetooth Analytics devices, only master role shall be set.
Wi-Fi Analytics devices help to gather hashed MAC Addresses of smart devices to generate
Retention Rate, Dwell Time, Draw-in Rate, Cross shopper, etc. analysis. BLE Analytics and BLE
Hilal projects are used for Staff Exclusion solutions. They detect and track the location of the
V-Count BLE tags to count the entrances of staff to the store. Again, they are gathering the
MAC Address of the V-Count BLE Tags.
Master and Slave engine controls both the Wi-Fi and BLE projects. In other words, there is
only one master engine to be configured regardless the project is Wi-Fi or BLE based projects.
Additionally, there is only one slave engine to be configured regardless the project is Wi-Fi or
BLE based projects. In the corresponding chapters, configuration shall be explained mutually
for both projects.

3D Alpha+ User’s Manual
8
4Installation:
In this section; installation and coverage of device, accessing the device, network and
electrical architecture and mounting processes are going to be described. In the table below,
it is seen that with different lens options Alpha People Counter can count between 2.8m and
9m height.
LENS(mm)
3D Mini+
3D Alpha+
HEIGHT (CM)
2.1
2.1
3.6
6.0
8.0
220
130
-
-
-
-
250
225
-
-
-
-
260
240
-
-
-
-
280
285
285
-
-
-
300
-
330
-
-
-
330
-
390
-
-
-
360
-
420
220
-
-
390
-
480
260
-
-
420
-
-
270
-
-
450
-
-
330
-
-
500
-
-
390
220
-
520
-
-
-
240
-
550
-
-
-
255
-
600
-
-
-
285
-
650
-
-
-
310
225
700
-
-
-
335
240
750
-
-
-
355
255
800
-
-
-
-
280
900
-
-
-
-
335
Table 2 People Counter Coverage
The measurements shown in the table are from head to head measurements. Figure 1 Head
to Head Measurement, it is displayed that the actual Field of View (FOV) is larger than the
counting FOV listed in the above table. The target person to be counted must be observed full
body in the camera vision to be counted. Figure 2 FOV Violation, red filled person will not be
detected and tracked by the counting system. While determining the number of devices to be
used in a site, the measurements will be made according to head to head principle. If the
width/height ratio of the counting area is larger than a V-Count device; multiple devices will
be used, as shown in Figure 3 FOV Multiple Devices. Sample installation can be seen in

3D Alpha+ User’s Manual
10
Figure 3 FOV Multiple Devices
Figure 4 Sample Installation of People Counter at the store entrance

3D Alpha+ User’s Manual
11
Note: The installation process shall take place according to only device camera view. Wi-Fi
Analytics coverage can be ignored while installing. Placing devices at doors at correct
positions for camera view also guarantees the correct position for Wi-Fi Analytics.
4.1 Network and Electrical Architecture
Simple network and electrical architecture for sample stores will be demonstrated in this
topic. Currently 2 possible architecture exists to install V-Count devices:
1Electricity adapter and data cable connection
2POE connection (please see Appendix 4 for recommended POE models)
Note: Electricity adapter and POE switch/injector is not supplied within the product package.
User shall supply their own adapter or POE switch/injector according to V-Count’s qualified
vendor list.
In all these possible connection types, power backup with uninterruptable power supplies
(UPS) is critical. In both adapter and POE connection, the power must be supplied from a UPS.
Please keep in mind that DC side of the adaptor must not be extended.
Figure 5 Connection Architectures

3D Alpha+ User’s Manual
12
Figure 6 Store diagram with adaptor and data cable connection
Figure 7 Store diagram with POE connection

3D Alpha+ User’s Manual
13
4.2 Mounting
All V-Count devices use the same/similar mounting methods as described in this topic.
1. Select the suitable mounting bracket according to the site. If a catwalk floor is
available to place the cables, use V-Count backside cover. If cable conduit will be
used, apply V-Count bracket.
Screw the mounting apparatuses into the ceiling as the cameras must face the floor.
Figure 8 Mounting Apparatuses
2. Plug in the cables for the installation
Figure 9 Cable Connections

3D Alpha+ User’s Manual
14
3. Mount the V-Count device to ceiling
Figure 10 Mounting Procedure
4.3 Field Installations of Wi-Fi/BLE Projects
Wi-Fi Analytics projects are released within V-Count Alpha 3D+ devices. Field installations do
not differ than standard people counting system. With the new updates to the Wi-Fi Systems,
slave device usages are omitted from projects. Although this document and system allow set
to Wi-Fi Slave devices, they do not take place in V-Count Projects.
In staff exclusion projects there are 2 different methods. Standard installation where V-Count
Alpha 3D+ devices are not used and Crescent method where V-Count Alpha 3D+ devices can
be used as master or slave BLE devices. Standard and Crescent methods are selected according
to store size and architecture to cover the whole store or only the entrance area.

3D Alpha+ User’s Manual
15
Standard Installation
For small-sized and middle-sized stores (up to 1000 m2) standard installation shall be
implemented. Trackers shall be placed inside store to cover the whole store with the signal
ranges of the tracker devices. There are some triticale points to be considered while installing
the devices:
•Device signal range must cover the whole store, even the storage rest area that is
inside the store.
•In the standard version installation, the BLE range of the device that closest to the door
in the store should not exceed the store limits.
Hilal (Crescent) Method
Hilal (crescent) method installation can be performed for large stores. This type of installation
is being performed with a maximum of 4 devices. If there is an architecture suitable for
standard installation with 4 devices in large stores, standard installation is still preferable.
According to store layout and position of the shelves, 2, 3 or 4 devices can be used for this
method.
Figure 11 Crescent Method with 1 master and 2 slaves
2 Tracker devices shall be positioned inside the store to cover the whole entrance points that
the staff can pass.
If 2 Tracker devices’ signal range cannot cover the whole place, then 3rd device shall be places.

3D Alpha+ User’s Manual
16
Figure 12 Crescent installation with 1 master and 3 slaves
Master and Slave devices shall be configured from the Setup Wizard pages. In stores having
more than one entrance, one crescent model shall be installed to each entrance and only one
master device shall be set. (The tracker devices that are placed at the other entrances also be
set as slave)
Crescent method and its master & slave devices set shall be set up for each of the doors. If a
store has 2 doors, then each set must be set up to each door. In this setup again only 1 master
device shall be set, and all the other devices shall be set up as slave devices. The device that
is at the center of the crescent which is at the second door also be set as slave. But it will be
marked in the master device. Please refer to 6.1.2.6.

3D Alpha+ User’s Manual
17
5Calibration and Settings of People Counter
5.1 Logging In
System settings can be made by means of the server accommodated within V-Count. The
system interface can be viewed from “https://V-Count_IP_Address:12102” using a web
browser (Mozilla Firefox or Google Chrome shall be used) (For example
https://192.168.1.28:12102). Internet Explorer is not suitable for setup process!
Credentials for logging in the system are:
username:admin
password: qw34qw34
Figure 13 Login Page

3D Alpha+ User’s Manual
18
5.2 Setup Wizard
This is the main screen that forward us to 9 step procedures of making the calibration and
settings of the device.
5.2.1 Welcome to the Setup Wizard Screen –Step 1
In this page, Street Counting, Push Notification, Language and Wi-Fi/Bluetooth Analytics type
should be selected.
Language options are “Türkçe” and “English”.
The Street Counting and Push notifications are selectable fields that enable or disable these
features:
Street Device is a device that reports the incoming and outgoing counts by adding to a single
value. If this option is activated only one counting value is sent to remote server.
Push Notification enables the device to transmit iBeacon signals for mobile apps for
advertisements. This feature can be enabled only if the following steps are fulfilled:
•Device must be connected to cloud.v-count.com over MQTT connection
•Device must be defined as push notification enabled device on reporting tool.
If the device is an element of a Wi-Fi/Bluetooth Analytics or Wi-Fi/Bluetooth Heatmap
system, then the questions must be answered accordingly. The answers determine the type
of engines that will run within the device.
Note: Push notification and Bluetooth systems do not run and cannot be selected/activated
on the same device.
From this page only, the engines of the Wi-Fi projects are activated. Configuration of these
properties are done on their own calibration interfaces. Please refer to corresponding User’s
Manuals for Wi-Fi devices.
The network status indicator is located at the system tools bar which is the upper bar of the
page.
Figure 14 Connection Status Indicator
These indicators show the connection status to the Remote Server. Please refer to Remote
Server topic.
On the bottom bar; information shown are:
•Firmware version: first 2 digits of the version is firmware version
•Hardware version: last 3 digits of the version is the hardware version

3D Alpha+ User’s Manual
19
•Date: Power on date the V-Count device.
Figure 15 Setup Wizard
The system shall be calibrated through setup wizard for correct counting results. All the
configuration pages are accessible from the menu connections on the upper bar of the page.
Auto calibration process takes place only and if only the “Setup Wizard” which is accessible
from first page of the system is used. Interrupting the wizard from random setups will damage
the calibration process and will cause the faulty counting. Using the successive calibration
steps lead by Setup Wizard is highly recommended.
By clicking “Start” button Setup Wizard shall continue with the next step.

3D Alpha+ User’s Manual
20
5.2.2 Network Settings –Step 2
In this page Network connection settings are set for device to connect to LAN.
For “Wired” connection static IP or DHCP can be used.
MAC Address of the device is listed below the corresponding menu.
Figure 16 LAN Settings
This manual suits for next models
1
Table of contents
Other V-Count Cash Counter manuals