manuals.online logo
Brands
  1. Home
  2. •
  3. Brands
  4. •
  5. V-Go
  6. •
  7. Personal Care Product
  8. •
  9. V-Go Insulin Delivery Device User manual

V-Go Insulin Delivery Device User manual

Using the V-Go™Disposable Insulin Delivery Device
Quick Reference Guide
The Quick Reference Guide does not replace the Instructions for Patient Use or training on the V-Go.
Training on the V-Go is important. If you have not been previously trained, speak to a
Valeritas Customer Care Representative 24/7 at 1-866-881-1209 before using the V-Go.
Customer Care
1-866-881-1209
2
V-Go™Product Overview
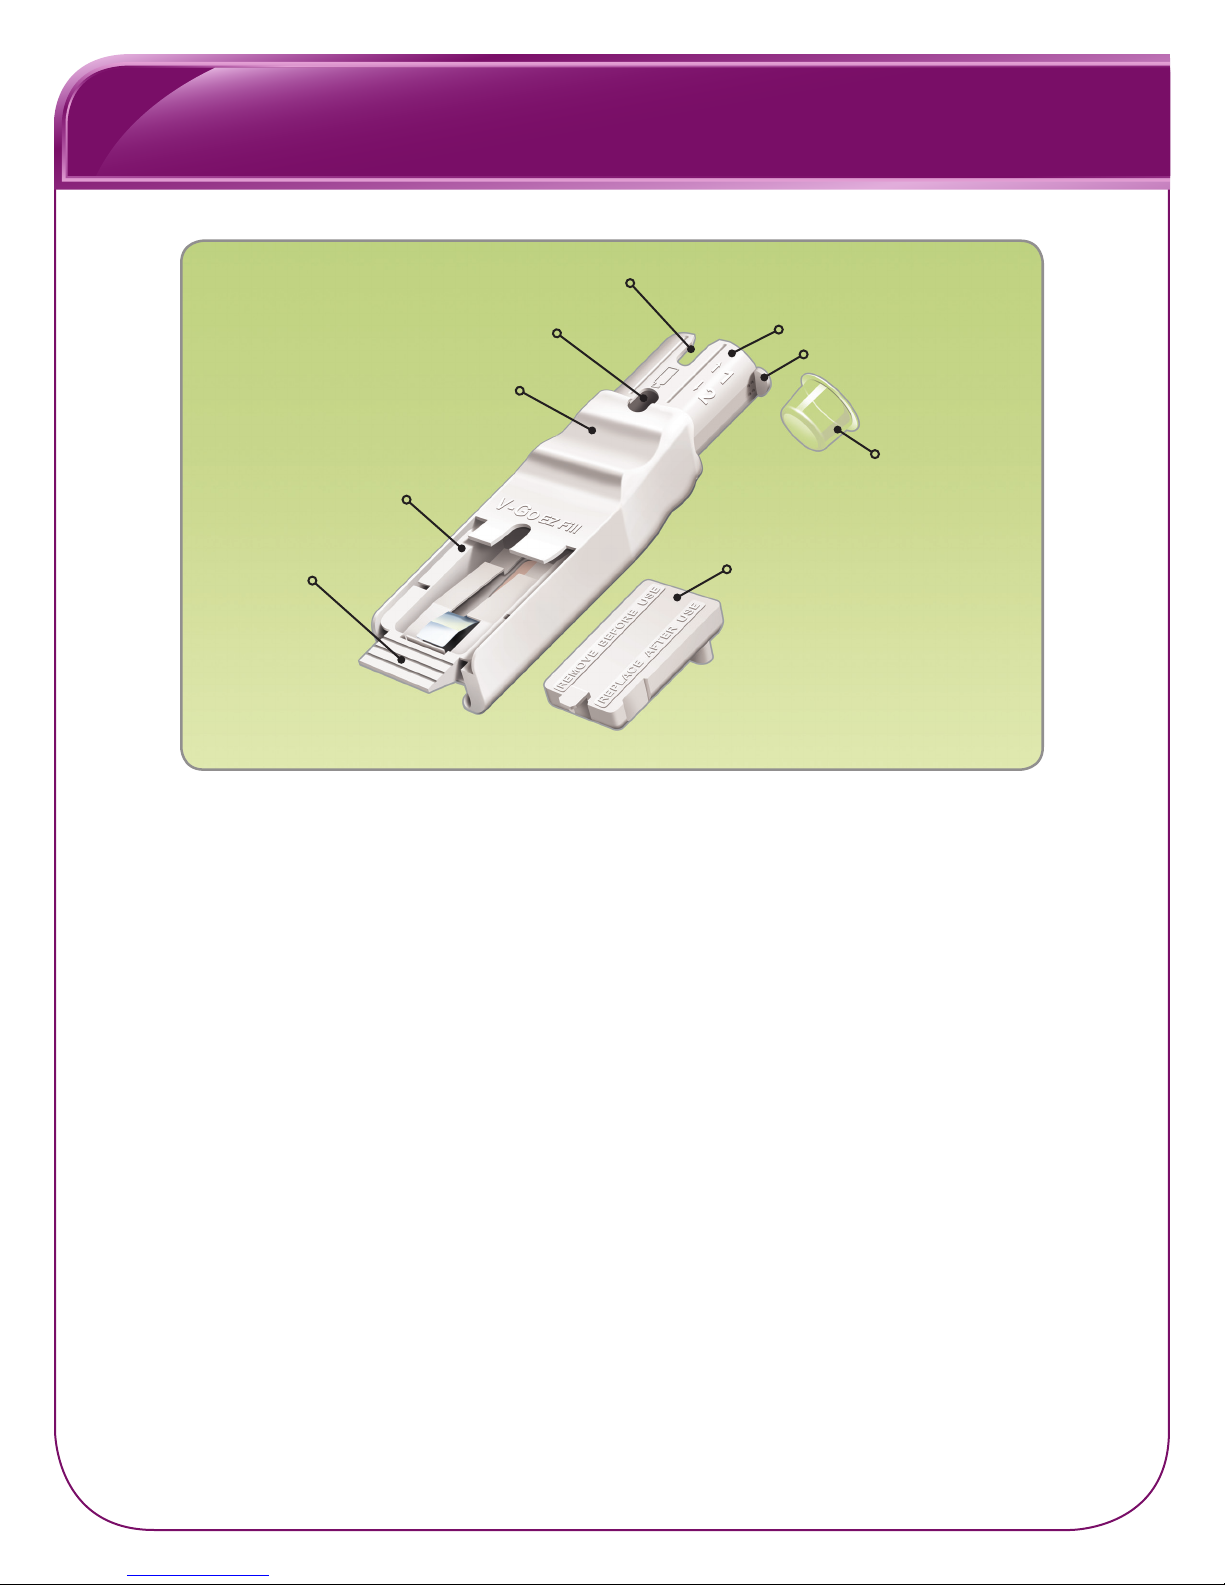
Understanding the button names and locations is important for the successful use
of the V-Go and EZ Fill.
• Button Cover: Covers the needle button. Prevents the
needle button from being pushed in. Cover must be
removed for V-Go to operate.
• Insulin Port: Location where insulin enters the V-Go
through the EZ Fill.
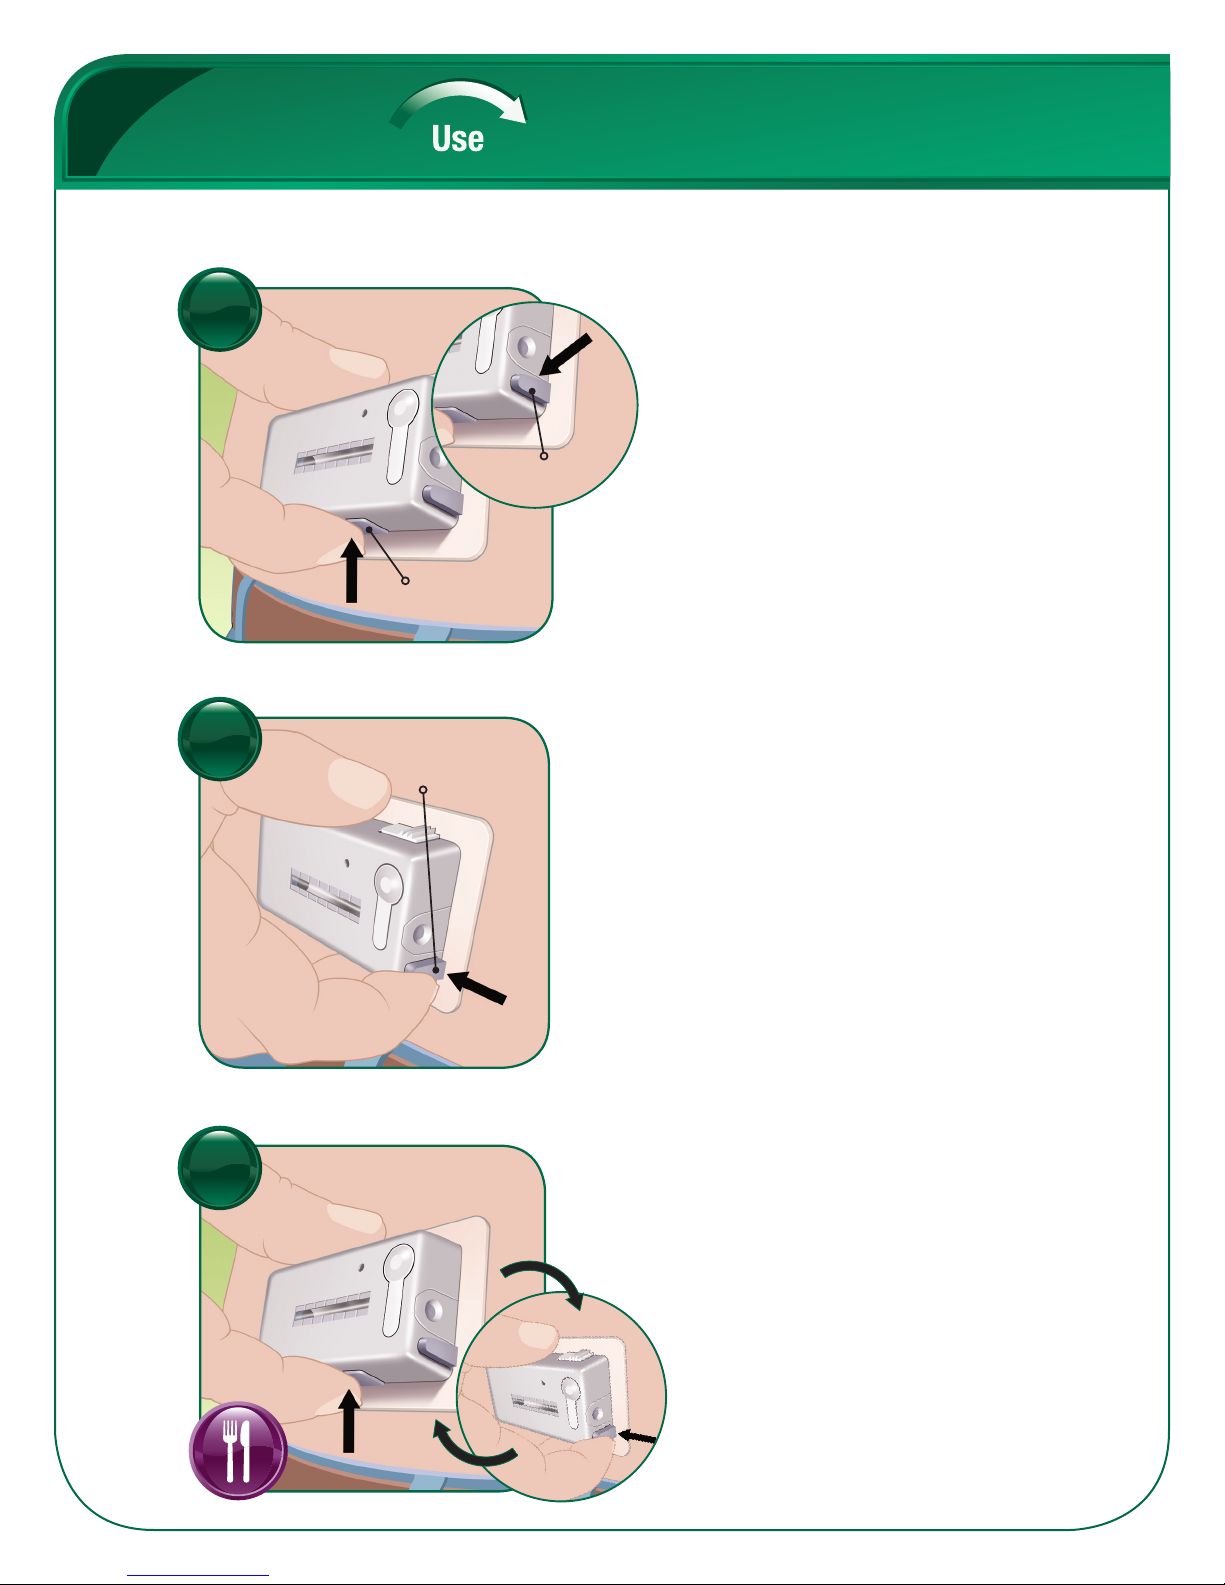
• Bolus Ready Button: A grey button that lies flat on one
of the long edges of the V-Go. When activated, it releases
the bolus delivery button. This allows for bolus dosing of
insulin.
• Bolus Delivery Button: A grey button next to the insulin
port on one of the short edges of the V-Go. When pressed
after the bolus ready button activates this button, the
V-Go delivers a bolus dose of 2 Units of insulin
(1 push = 2 Units).
• Viewing Window: Shows a view of the insulin reservoir.
A grey indicator in the window demonstrates that
insulin is flowing from the device.
• Needle Button: When pressed, it inserts the needle into
your skin and begins the flow of insulin into your body.
• Needle Release Button: A wide white button with
3 ridges on one of the long edges of the V-Go. An
activated needle release button removes the needle from
your body and stops the V-Go from delivering insulin.
• Adhesive Pad and Liner: Once the protective adhesive
liner is removed, the adhesive pad affixes the V-Go to
your skin.
Needle
Button
Needle Release Button
Adhesive Pad
and Liner
Button Cover
Bolus
Ready
Button Insulin Port
Bolus Delivery Button
Viewing Window
Grey Indicator
3
EZ Fill Product Overview
• Cap: Protects the needle inside the EZ Fill (bottom of insulin vial holder).
• Finger Groove: Opening to allow for easy removal of the insulin vial.
• Insulin Vial Holder: Opening in the EZ Fill where the insulin vial is placed
upside down.
• Insulin Supply Window: Shows a view of the insulin remaining in the insulin vial.
• Plunger: When you pull this handle slowly up (about 5 seconds) and then push
it down (about 25 seconds), insulin transfers from the vial into the V-Go.
• Grip: The left thumb occupies this groove throughout most of the filling process.
• Drawer: The V-Go is placed in this drawer for filling. The plug sits in the drawer
when the EZ Fill is not in use.
• Ribbed Drawer Handle: A grooved piece at the bottom end of the EZ Fill that
helps with opening and closing the drawer.
• Plug: When placed in the drawer, the plug protects the EZ Fill components
between each fill.
Ribbed Drawer Handle
Grip
Plug
Drawer
Insulin Vial Holder
Finger Groove
Insulin Supply Window
EZ Fill Top
Plunger
Cap
EZ Fill Bottom
4
Insulin Vial
toEasy
•SlideV-GointoEZFilldrawerwithbutton
coverdown,adhesivesideup,and
plastictabatbottom
•HoldV-Godownwiththumb
•Pushdrawerallthewayclosed
V-Go
Tab
Button Cover
Step
2
Insert V-Go™
•Onday1,plugwillbeseparatefrom
EZFill;therefore,skipthisstep
•Placeyourthumboverplugtabwhile
grippinghandletopulldrawerout
•LiftplugoutofEZFill
•Setplugaside
Drawer
EZ Fill
Plug
Handle
Remove plug
Step
1
•Popprotectivecapoffinsulinvial
anddiscard
•PullcapoutofEZFillinsulinvialholder
anddiscard
•KeepingEZFillupright,turninsulinvial
upsidedownandpushrmlyalltheway
downintoinsulinvialholder
Insert vial
Protective
Cap
EZ Fill
Cap
Step
3
5
toEasy
•Makesureviewingwindowisateyelevel
soyoucanwatchV-Gollwithinsulin
•V-Goshouldbelledwithinsulinina
continuousowofdroplets,nota
steadystream
•Slowlypushplungerallthewaydown.
Thisshouldtakeabout25seconds
•Slowlypullupplungerasfarasitcango
•Wait5seconds
Fill V-Go™ with insulin
Viewing
Window
Minimum of
25 seconds
Step
5
Check V-Go
Step
6•CheckthatV-Goisfullofinsulin.In
viewingwindow,youshouldseeonly
uidandnoairspace.Havingafew
smallbubblesisnormalandharmless
•IfV-Goisnotfull:
–Pushinsulinvialrmlyallthewayinto
insulinvialholder
–Replaceinsulinvialifempty
–PushEZFilldrawerallthewayclosed
•RepeatSteps4and5tollV-Go
Plunger
Slowly
Draw insulin into EZ Fill
Step
4
6
toEasy
•Wipecircularopeningontopofplugwith
analcoholswab
•PlaceplugbackintoEZFill
•Whileholdingplugtabdown,shutdrawer
•StoreEZFillwithinsulinvialandplug
attachedinaclean,dryareaofrefrigerator
•After30-lluseperiod,discardEZFillwith
insulinvialattached,evenifnotempty
Clean and replace plug
Step
8
•Pulldrawerallthewayout
•LiftV-GooutofEZFill
•Leaveplungerindownposition
•AfterremovingV-Go,lookatviewing
window.RotateV-Gotomakesureitis
completelylledwithinsulinwithnoair
bubbleslargerthanagrainofrice
Step
7
Remove V-Go™ and final check
7
toEasy
•ItisrecommendedyouattachV-Go
horizontallytoyourabdomen
•YoucanalsoattachV-Goinanupand
downpositiontobacksideofarm
•SelectareawhereyouwillattachV-Go
•PracticeholdingV-Goonselectedsite
tomakesureyoucanreachallbuttons
andcanmonitorthemovementofthe
greyindicator
•DonotapplyV-Gooverafoldofskin,
muscle,orbone
•Avoidareaswithexcessivehair
orshaveareatohelpV-Goattach
Select site for V-Go™
Step
9
8
toEasy
•Pullbuttoncoverstraightup
•Checktoseeifcoverpincameoff
withbuttoncover
•Ifcoverpinisnotattachedtobutton
cover,trytoremovepinmanually.
Ifunsuccessful,discardV-Go™
andstartoverwithanewV-Go
•Liftadhesivetabandcompletely
peeloffadhesiveliner
•Donottouchadhesivesurface
•Beforeremovingadhesiveliner,
holdV-Goinhandthatyouwilluse
toattachittoyourskin
•Cleanareawithalcoholswab
•Letareadry
Button Cover
Cover Pin
Remove button cover
Step
11
Adhesive Liner
Remove adhesive liner
Step
12
Prepare infusion site
Step
10
9
toEasy
•PressV-Goagainstskinfor
5-10seconds
•Runyourngeraroundadhesivepad
tomakesureitisattached
•WhileattachingV-Go,makesureyou
donotpressanyofthebuttons
Start 24-hour preset basal rate of insulin
Adhesive Pad
Attach V-Go™
Step
13
Locked
Needle Button
Grey
Indicator
•HoldV-Goagainstskin
•Inonermquickmotion,press
roundedtopofneedlebuttoncompletely
intoV-Gountilyouhearaclickorbutton
locksinplace
•Needlebuttonmustlockinplaceto
beginowofinsulin
•Checkgreyindicatorandyourblood
glucoseatregularintervals
Needle Button
Insert needle
Step
14
10
to
Easy
•Slideyourngerwithpressuretolocate
andpressbolusreadybutton
•Bolusdeliverybuttonwillpopout
andyouwillhearaclick
•Makesureyoudonotpressneedle
releasebutton
Bolus
Ready Button
Bolus
Delivery Button
Activate bolus ready button
Step
15
Bolus dose at mealtimes (1 push = 2 Units)
•PushbolusdeliverybuttonintoV-Go™
untilitstops
•Youwillhearanotherclick
•Youhavejustdelivered2Unitsofinsulin
(1push=2Units)
•Repeatsteps15and16untilyoureachnumber
ofbolusdosesprescribedbyyourdoctor
•Makesuretokeeptrackofthenumberofbolus
dosesyougiveyourself
–Ifyoulosecount,STOPbolusdosing,monitor
yourbloodglucose,andfollowtheplan
agreeduponwithyourdoctororhealthcare
professional
Bolus
Delivery Button
Push
Deliver insulin
Step
16
Repeat as necessary
Step
17
11
to
Easy
•Placethumbonridgedsectionofneedle
releasebutton
•Inonemotion,rmlyslideandpress
needlereleasebutton
•Needlebuttonwillpopoutandyouwill
bereadytoremoveV-Go™
To remove after 24 hours
•PresslightlyonskinadjacenttoV-Go
withonehand
•PeelV-Goawayfromyourskinwith
otherhand
•Ifadhesiveresidueisleftbehind,use
soapywaterormedicaladhesiveremovers
•Checktomakesureneedleisretracted.
Ifitisnot,repeatStep18
•DiscardusedV-Goaccordingtolocal
disposalrequirements
Peel
Remove V-Go
Step
19
Discard V-Go
Step
20
24
Needle Button
Release needle
Slide
Step
18
Press
Needle
Release Button
Valeritas Customer Care
If you have not been previously trained or if you
have any questions about using V-Go or EZ Fill,
speak to a Valeritas Customer Care Representative
24/7 at 1-866-881-1209.
12
Tips for Safety and Success with V-Go™
V-Gocanbewornanyplacewhereinsulincanbeinjectedandthat
remainsatwhenyousit,stand,orliedown.Forbestresults,choose
asuitablesiteandprepareitappropriately.
24
Afterafull24hoursofuse,replaceusedV-GowithanewlledV-Go.
IfV-Gofallsofforstopsworking,replaceitwithanewlledV-Go
immediately.
DonottakeanyotherinsulinshotswithV-Go.
Basalrate:V-Godeliversacontinuouspresetbasalrateofinsulin
over24hoursthatbeginswhenyoupressandlocktheneedlebutton.
Makesuretopressneedlebuttontobegintheowofinsulin.Ifyou
wereonlong-actinginsulinbeforeV-Go,donotadministerorpushin
thenumberofbasalUnitsyouweretakingusingthebolusreadyand
deliverybuttons.
Bolusdose:Bolusdosingisa2-stepprocess.Eachpushofbolus
deliverybuttondelivers2Unitsofinsulin(1push=2Units).There
isamaximumof18pushes(36Units)ineach24-hourperiod.
Checkyourbloodglucoseandmovementofgreyindicatoratregular
intervals(≈3timesaday)tomakesureV-Goisworkingproperly.
Theindicatormovesveryslowlyoverthe24-hourperiod.
13
PLEASE CALL 1-866-881-1209 to register
Valeritas is committed to your success with the V-Go™ and wants to ensure the best
possible experience for you and your healthcare professional. When you tell us your
doctor has started you on the V-Go, we can call you after 24 hours to make sure you
are using the device correctly, ensure you were previously trained, and answer any
questions you may have.
Time to apply a new V-Go each day: ____________
At mealtimes, use the amount of insulin prescribed by your doctor (1 push = 2 Units)
How many times I will push
the bolus delivery button
How many Units of insulin
Breakfast =
Lunch =
Dinner =
Make sure to keep track of the number of bolus doses you give yourself at each meal.
•If you lose count, STOP bolus dosing, monitor your blood glucose, and follow the
plan agreed upon with your doctor or healthcare professional.
Notes:
Patient Worksheet
For more detailed instructions, please see V-Go Instructions for Patient Use.
ART-152Rev:B  11/2011  ©2011Valeritas,Inc.
The only simple insulin delivery device that
works the way your body is supposed to
UseApplyFill
Valeritas does not give medical advice about insulin therapy. Discuss all medical therapies with your healthcare professional.
If you have any questions regarding the operation of the V-Go or EZ Fill,
speak to a Valeritas Customer Care Representative 24/7 at 1-866-881-1209.
If you have a medical emergency while using the V-Go, call 911, your doctor, or go directly to the hospital.
www.valeritas.com

Popular Personal Care Product manuals by other brands

My Beauty Beam Rejuvene user manual

My Beauty Beam

My Beauty Beam Rejuvene user manual

Orliman THERMOMED SMART 4204 Use and maintenance instructions

Orliman

Orliman THERMOMED SMART 4204 Use and maintenance instructions

HoMedics MIR-100-EU instruction manual

HoMedics

HoMedics MIR-100-EU instruction manual

BostonSight PROSE Use and care guide

BostonSight

BostonSight PROSE Use and care guide

Cefndy B48 User instructions

Cefndy

Cefndy B48 User instructions

ConvaTec INVISICLOSE How to use

ConvaTec

ConvaTec INVISICLOSE How to use

Olive Healthcare FITTO user manual

Olive Healthcare

Olive Healthcare FITTO user manual

medi CIRCAID MEASURE-UP quick start guide

medi

medi CIRCAID MEASURE-UP quick start guide

Better Bathrooms DIV1400 user manual

Better Bathrooms

Better Bathrooms DIV1400 user manual

VANITY PLANET Spin for Perfect Skin manual

VANITY PLANET

VANITY PLANET Spin for Perfect Skin manual

Breg ASCEND SI 621 Instructions for use

Breg

Breg ASCEND SI 621 Instructions for use

BIOMOL BM H320 user manual

BIOMOL

BIOMOL BM H320 user manual

Juzo JuzoFlex Malleo Xtra Instructions for use

Juzo

Juzo JuzoFlex Malleo Xtra Instructions for use

Progress Lifeline Reach IP SELF-INSTALLATION INSTRUCTIONS

Progress Lifeline

Progress Lifeline Reach IP SELF-INSTALLATION INSTRUCTIONS

Dr.Prepare DEM-10W-0GY-US manual

Dr.Prepare

Dr.Prepare DEM-10W-0GY-US manual

Doro Sara Service manual / technical handbook

Doro

Doro Sara Service manual / technical handbook

MEDintim Caya instruction manual

MEDintim

MEDintim Caya instruction manual

Happyhot HEATED SOCKS user manual

Happyhot

Happyhot HEATED SOCKS user manual

manuals.online logo
manuals.online logoBrands
  • About & Mission
  • Contact us
  • Privacy Policy
  • Terms and Conditions

Copyright 2025 Manuals.Online. All Rights Reserved.