V-TAC VT-5557 User manual

INSTRUCTION MANUAL
AUTO CHARGING LASER ROBOTIC
VACUUM CLEANER (VT-5557)
INTRODUCTION
Thank you for selecting and buying V-TAC product. V-TAC
will serve you the best. Please read these instructions
carefully before starting the installation and keep this manual
handy for future reference. If you have any another query
please contact our dealer or local vendor from whom you
have purchased the product. They are trained and ready to
serve you at the best.
MULTI-LANGUAGE MANUAL
QR CODE
Please scan the QR code to access
the manual in multiple languages.
1
Ok Google
works with

Table of Contents
Installation
Main Unit
Product Composition / Part Name
APP Installation
Usage Instruction
Routine Maintenance
Troubleshooting
Product Parameters
Common Problems
Package Contents 7
8
9
11
15
22
26
29
30
32
Important Safety Instructions 3
2

Important Safety Instructions
• To reduce the risk of injury or damage, read these safety
instructions carefully and keep them at hand when setting
up, using, and maintaining this device.
• Any operation not conforming to this manual may cause
damage to this product.
This is the safety alert symbol. This symbol
alerts you to potential hazards that could
result in property damage and/or serious
bodily harm or death.
WARNING SYMBOLS USED
3
• This device is only to be used with the power supply
unit provided.
• For the purposes of recharging the battery, only use the
detachable power supply unit provided with this device.
• The used battery should be placed in a sealed plastic
bag and disposed of safely according to local
environmental regulations.
• The external flexible cable or cord of the power supply
unit cannot be replaced; if the cord is damaged, the
power supply unit shall be disposed of.
• This device is for indoor use only.
• This device is not a toy. Do not sit or stand on this
device. Small children and pets should be supervised
when this device is operating.
• Store and operate this device in room temperature
environments only.
• Do not use this device to pick up spills of bleach, paint,
chemicals, or anything wet.
• Before using this device, pick up objects like clothing
and loose paper. Lift up cords for blinds or curtains, and
move power cords and fragile objects out of the way. If
this device passes over a power cord and drags it, an
object could be pulled off a table or shelf.
• This device can be used by children aged from 8 years
and above and persons with reduced physical, sensory or
mental capabilities or lack of experience and knowledge if
they have been given supervision or instruction concerning
use of this device in a safe way and understand the
hazards involved.
• Children should be supervised to ensure they do not play
with this device.
• Cleaning and maintenance shall not be performed by
children without adult supervision.

• Ensure that the robot laser vacuum is not connected
to the mains supply before cleaning.
• Remove the plug from the socket outlet before
cleaning or maintaining the appliance.
• Only authorized technicians can disassemble this
product. Users are not recommended to disassemble
this product by themselves.
• Do not touch wires, sockets or power adapter when
your hands are wet.
• Clean the product after charging.
• Do not use the product in a humid environment.
• Do not place the product where it is easy to fall
off(such as tables, chairs etc)
• Check carefully that the power adapter is connected
with the socket before use. Otherwise it may result in
damaging the battery.
• When the dust box is full, empty the dust box before
using the product.
• Use only the original rechargeable battery and dock-
ing station provided in the package. Do not use
non-rechargeable batteries. For battery specifications,
see “Product Specifications”.
• Do not use the product in an extremely hot (above
40°C) or extremely cold (below 0°C) environment.
4
• If the room to be cleaned has a balcony, a physical barrier
should be used to prevent access to the balcony and to
ensure safe operation.
• Do not place anything on top of this device.
• Be aware that this device moves around on its own. Take
care when walking in the area where this device is operating
to avoid stepping on it.
• Do not operate this device in areas with exposed electrical
outlets on the floor.
• Do not expose the electronics of this device, its battery, or
the integrated Charging Base. There are no user-serviceable
parts inside.
• Do not use this device on an unfinished, unsealed, waxed or
rough floor. It may result in damage to the floor and this
device. Use only on hard floor surfaces or lowpile carpet.
• This device has been designed to be used on floors without
scratching them. We still recommend that you test this device
on a small area of the room to be cleaned to ensure no
scratches are made before cleaning the whole room.
• Do not place any articles at the suction port. Do not use the
product when the suction port is blocked. Remove the dust,
cotton wool and hair from the suction port to ensure smooth
air circulation at the suction port.
• Do not use a damaged docking station.

• Do not place any objects (including children and pets)
on the stationary or moving machine.
• Do not use the machine to clean long-haired carpets.
Some dark carpets might not be cleaned normally.
• Do not use the machine to vacuum hard or sharp
objects, such as decoration waste, glass, nails, etc.
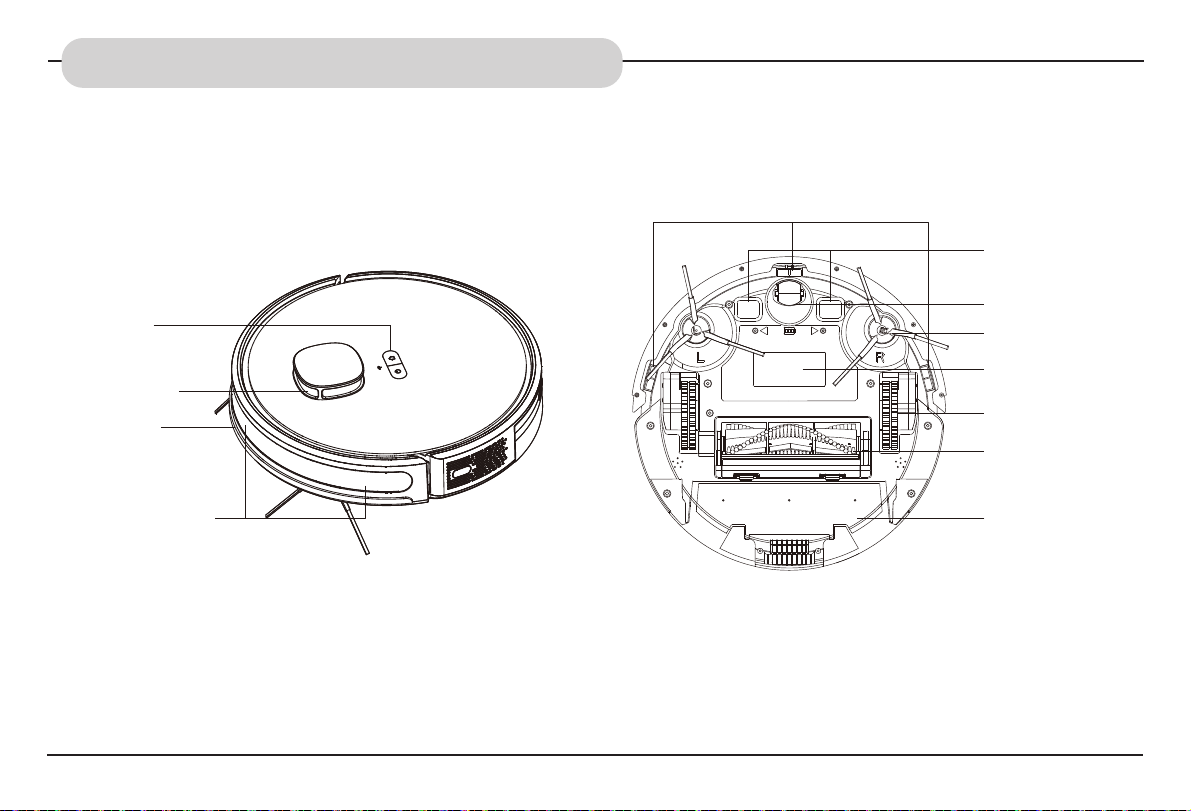
• Do not use the protective cover of the laser ranging
sensor or bumper as a handle to carry the machine.
• Please clean or maintain the machine and charging
base when the machine is shut down or powered off.
• Do not use a damp cloth or any liquid to wipe any part
of the machine.
• Do not use the mopping function on the carpet or the
top of furniture.
• Remove the water tank when charging the machine.
• Do not use any third-party batteries, charging bases
or chargers.
• Do not disassemble, repair or modify the battery or
charging base without permission.
• Do not place the charging base near heat sources
such as heating radiators.
• Do not use a damp cloth or wet hands to wipe or
clean the charging base shrapnel.
5
• Keep the hair, clothes, fingers and other parts of the human
body away from the opening or operating parts of the product.
• Do not use the product to vacuum any items that may block
the product, such as stones and waste paper.
• Do not use the product to vacuum any flammable materials,
such as gasoline and toner used in printers or copying
machines. Do not use the product in clean areas with
flammable materials.
• Do not use the product to vacuum any burning items, such
as cigarettes, matches, ashes and other items that may cause
fire.
• This product can only be used for floor cleaning at home.
Please do not use it in outdoor (such as an open balcony),
non-ground (such as a sofa), commercial or industrial environ-
ment.
• Do not use the machine in the suspended environments
without protective fences (such as duplex floor, open balcony,
and top of furniture).
• Please hang up the ground wires at home before use to
avoid dragging the wires when the main unit is running.
• Please put away the fragile articles and sundries (such as
vases, plastic bags, etc.) on the ground; otherwise, the
machine may be blocked or a slight collision may cause
damage to valuables at home.

This symbol on the device or its
packaging indicates: Do not dispose of
electrical appliances as unsorted
municipal waste; use separate collection
facilities. Contact your local authority for
information regarding the collection
systems available. If electrical appliances
are disposed of in landfills or dumps,
hazardous substances can leak into the
groundwater and get into the food chain,
damaging your health and well-being.
When replacing old appliances with new
ones, the retailer is legally obliged to
take back your old appliance for disposal
at least free of charge.
Notice
• Dispose of used batteries properly and send them to profes-
sional recycling agencies.
• If the power line is damaged or broken, stop using it immedi-
ately and buy a new one through official channels.
• When transporting the product, ensure that the machine is
shut down, and it is recommended to use the original packag-
ing box for packaging.
• If you do not use the machine for a long time, fully charge it,
power if off and put it in a cool and dry place. The machine
shall be charged at least once every three months to avoid
damage to the battery due to over-discharge.
6

Side Brush (2 sets)
Docking Station
High Efficiency Filter + Sponge Mop Holder
Power Adapter
Mop Pad
2in1 Dustbin & Water TankRobot
Instruction manual
Cleaning Brush
Package Contents
7

MAIN UNIT
8
Reset
WIFI status light
• Off: Wi-Fi not networked
• Flash: Being networked
• Normally on: Wi-Fi
networked
Recharge/Pause
Press it to recharge/pause
System reset button
Use a needle to press this
button to reset
the device
Power / Clean/Pause
• Press and hold the
button for 3 seconds
to power on/off
• Press the button to
start cleaning/pause

Front side Back side
Sensor and Structure
Product Composition / Part Name
9
Infrared receiver
sensor
Bumper
Button
Laser radar
Charging contact
Universal wheel
Side brush
Battery cover
Drive wheel
Rolling brush
Cliff sensor
Dust bin

Dust bin Assembly Docking Station
Product Composition / Part Name
10
Power status light
Charging
shrapnel
Infrared signal
emitter
Power socket
HEPA lter
Sponge lter
Primary lter
Water tank plasticplug
Dustbin button
High-eciency lter cover

1. Before starting the vacuum cleaner, clean up wires and sundries scattered on the ground, and remove easy-to-fall,
fragile, valuable and potentially dangerous items. Avoid being entangled, stuck, dragged or knocked down by the main unit;
otherwise, personal injury or property damage may be caused.
2. Do not use the robot to clean liquid 3. When used in a suspended circumstance, it shall be
protected by rails to avoid accidental falling or pushing
other articles from falling; otherwise, personal or property
Precautions
Installation
11

1. Remove the protection material from both sides of the
robot
2. Install side brushes
Put the left side brush (L) and right side brush (R) against
the letters L and R on the bottom shell respectively, press
down, you will hear a “click” sound, and it means that the
side brushes are installed in place.
3. After connecting the power adapter to the power supply,
connect it to the charging base and tidy up the redundant
wires.
4. Place the charging base on a flat ground against the wall
and connect to the power supply.
Note: Ensure a space more than 0.5m from the left and right of
the charging base and 1.5m in front of the charging base.
The power line perpendicular to the ground may be dragged by
the main unit, and the charging base may be powered off.
The charging indicator light is normally on when the main unit
is powered on.
12
>1.5m
>0.5m
>0.5m
Installation

5. Do not move the charging base at will; avoid direct sunlight on
the charging base
6. Power on and charge
Press and hold the “ ” button to power on. When the indicator
light is normally on, put the main unit against the charging base
for charging; when you hear the voice of “Start charging”, it
means that the robot is being charged successfully.
Note: The sunlight may interfere the recharging signal, which may
cause the robot vacuum cleaner to fail to return to the charging
base.
Note: If the battery is at low level, the robot cannot be powered
on. Please put the robot vacuum cleaner on the charging base
and the device will be powered on automatically
13
Installation

1. Open the water injection cover, add appropriate amount
of water and then cover tightly, please do not add any
detergent.
2. Put the water tank back into the robot
3. Install the mop on the mop support
4. Install the mop support
14
Installation

Start the robot vacuum cleaner, press and
hold “ ” the “ ” and keys on the main unit
at the same time for 3 seconds, and when
you hear the voice prompt of “In the progress
of networking”, release the keys, then press
and hold “ ” the “ ” and keys on the main
unit at the same time for 3 seconds again,
and if the WiFi indicator light flashes slowly, it
means that the machine has entered the
hotspot Networking mode
Step 1: Turn the power button ON of the device. Then follow the below instruction for the device.
Step 2: Scan the given QR code, or download “V-TAC Smart Light’ from the App Store (iOS) or the Google Play Store (Android).
Step 3: Open the V-TAC Smart Light app and tap on register for creating a new account. If you already have an existing account, please
proceed to please proceed to logging in.(Ref Fig 1)
Fig 1
APP INSTALLATION INSTRUCTIONS
15
IOS QR CODE
ANDROID QR CODE

Step 5: Enter the verification code which will be sent to your mobile number/emai id, then assign a new password to
your account and tap on “Confirm” to complete the registration process. (Ref Fig 3). Once done you will be redirected to V-TAC
Smart Light Home page.
Step 6: Tap on ‘Add Device’ or the + sign. Make sure the device is switched on.(Ref Fig 4)
Step 4:
A) Mobile Number: Select the country, then enter your mobile number. Once done, tap ‘Next’. (Ref Fig 2)
B) E-Mail: Enter your email id and tap on ‘Next’. (Ref Fig 2)
Fig 2 Fig 3
Fig 4
16

Step 7: To select the device, tap on “Small Home Appliances”, and then choose ‘Robot Vacuum’ to start Pairing process of the device to the
app.(Ref Fig 5)
Step 8: V-TAC Smart Light APP offers two modes to pair the smart device with the APP.
Pairing Mode 1 (Smart Mode): Power ON the Robot and then press and hold “Wi-Fi” button for 3 seconds, the robot will notify with a beep
sound and enters EZ Mode(Smart Mode). The Wi-Fi icon will start flashing rapidly indicating the device is now ready for pairing with the V-TAC
Smart Light App.
Tap on “Confirm indicator rapidly blink” (Fig 6) and enter the Wi-Fi name and password and tap on “Confirm” (Fig 7)
Fig 6
Fig 5 Fig 7
17

Pairing Mode 2 (AP Mode): Power ON the Robot and then press and hold “Wi-Fi” button for 6 seconds, the robot will notify with a beep
every 3 seconds indicating the device has entered AP Mode. The Wi-Fi icon will start flashing slowly indicating the device is now ready
for pairing with the V-TAC Smart Light App.
1. Tap on Other Mode (Fig 8)
2. Tap on AP Mode (Fig 9)
3. Ensure the Wi-Fi light is blinking slowly and tap on “Confirm indicator slowly blink” (Fig 10)
Fig 9
Fig 8 Fig 10
18

4. Enter your Wi-Fi name and password (Fig 11)
5. Tap on “Go to Connect” (Fig 12)
6. Select the Wi-Fi name SmartLife-XXXX hotspot. (No Password required).
7. Upon successful connection of the Hotspot Smartlife-XXX. Return to the APP.
Fig 11 Fig 12 Fig 13
19

Step 9: Once you have successfully completed step 8, you will be redirected to “Connecting Now” page, where the App searches, registers
and initializes the device (ref Fig 14). Once it is completed your device will be successfully paired.
Step 10: Once your device is successfully paired, rename the device to your preference. And then tap on completed. (Ref Fig 15)
Step 11: You can now start controlling your device with the App. Tap the device name on the home page to enter the controls and
features of the device. (Ref Fig 16)
Fig 15
Fig 14 Fig 16
20
This manual suits for next models
1
Table of contents
Other V-TAC Vacuum Cleaner manuals