V-tech 900i User manual

UEal
VTECH COMMUNICATIONSLTD.
Distributed in the U.S.A. by VTECH Communications, 8770 SW Nimbus Avenue
/
Beaverton,Oregon, 97008
Distributed in Canada by VTECH Electronics Canada Ltd., 200-7671 Alderbridge Way,
Richmond.B.C.
Copyright1996for VTECH COMMUNICATIONS LTD.
91-4010-13-00
ISSUE
0
I
DlGlTAL900MHz
CORDLESSPHONE
WithIntegratedTelephone
Answering Device
MODEL VTECH9001'
VTECH COMMUNICATIONS
LTD.

TABLE"
INTRODUCTION
..............................
2
Parts Check List:
.............................
3
IMPORTANT SAFETY INSTRUCTIONS
...
4
HANDSET BATTERIES
...................
6
Charging the Handset Batteries
......
6
Replacing The Handset Batteries
...
7
GETTING STARTED
........................
8
...........
Setting Up Your VTech
900i
8
...........................
WALLMOUNTING 10
..........
QUICKREFERENCEGUIDE
11
INITIAL POWER-UP
......................
11
VTech
900i
Cordless Telephone
...
11
VTech 900i Integrated Telephone
Answering Device (ITAD)
..............
12
CORDLESS PHONEOPERATION
...
13
...................................
Making Calls 13
..................................
Disconnecting 13
To Put A Call On Hold
..................
13
...........................
The Mute Feature 13
........................
Changing Channels 14
Temporary Tone
.............................
14
Programming the Ringer Type
......
I4
..................
Turning
Off
The Ringer 15
.......................
Checking the Ringer 15
Memory Dialing
..............................
15
To Store a Number into Memory..l5
To Dial a Number From Memory..l6
To Changeor ReplaceaStoredNumber.16
Storing Pauses in Memory
............
16
Using Redial
...................................
I6
StoringaRedialNumberinMemoryDial.I7
The Page Feature
..........................
17
Tone Definitions
.............................
17
INTEGRATED TELEPHONE ANSWERING
................
DEVICE (ITAD) OPERATION 18
................................
LCD DISPLAY 18
..........................
LCD Display Icons 18
.........................
LCD Display Digits 19
BASE KEYPAD FUNCTIONS
......
19
........................
Main Function Keys 19
...............
Message Playback Keys 22
............................
INITIAL SET-UP 23
...................
Ring Type Programmi 23
..........
Security Code Programming 23
Time and Day Setup
...................
24
..................
Mailbox Programming 24
........
Selecting the Announcement 25
Recording the Announcement
......
25
Leaving a Message
.....................
26
......................
Recording a Memo 26
...................
Listening to Messages 27
REMOTE OPERATION OF ITAD
......
29
ACTIVATING REMOTEOPERATION..29
Toactivateremoteoperationfromyour
...........................
cordless handset 29
To activate remote operation from a
.................
different telephone line 29
........................
VOICE PROMPTS 30
.................
Listening to Messages 31
Changing the Announcement
......
31
....................
Recording a Memo 31
................
REMOTE COMMANDS 32
MAINTENANCE
...............................
35
OUT OF RANGE INDICATION
.......
36
..............
IN CASE OF DIFFICULTY 37
WARRANTY STATEMENT
..............
39
........
FCC AND IC REGULATIONS 40
.....
TECHNICAL SPECIFICATIONS 43

Congratulations! You have purchased
one of the most sophisticated cordless
telephones on the market! The
VTech
900ihas beendesigned to offer a new
standard in cordless telephone
technology.
Unlikemostother cordlessphones,the
VTech
900idigitizesyour voice to give
the minimumamountof noise. In most
conditions you will not be able to tell
you are usingacordless phone. Gone
are the annoyances of static,
interferenceandhavingtolistentoother
people'sconversationsonyourcordless
phone.
The
VTech
900i scrambles your
voice before it transmits it. This allows
you the security of knowing that no
one can tune in and eavesdrop on
your conversations. The phone will
also alert you when you are "Out of
Range"evenwhenyou'renot usingthe
phone! In this way you will not miss
an incomingcalljust becauseyouwere
not close enough to the base unit.
Cordless Telephone Features:
10 Number Speed Dial Memory
10 Channels of Operation
Automatic Channel Selection
65,000 security code combinations
Page
HOLD, REDIAL, MUTE and FLASH
features
Programmable RingerTypes
Digital Volume Adjust
Temporary Tone Dialing
The
VTech
900ibase unit includes an
Integrated Telephone Answering
Device (ITAD). It uses digital memory
to record messages, eliminating the
needfor cassette tapes.
You can access your messages from
the base unit, the handset or from a
remote location.
ITADFeatures:
30 or 15 minutes standard record
time option
BaseLCDdisplayfor ease and clarity
of operation.
Time and day stamp for incoming
messages.
Digital message counter indicates
number
of
messages received.
Auto disconnect stops ITAD from
answering call when an extension is
picked up.
Skip messages, scan forwards or
backwards through your messages
instantly.
Selective messagedelete allowsyou
to keep important messages.
Message length control; stops
recordingafter
5
secondsof silencein
recorded message.
Memory backup to protect against
power failure.
Ringpick-upselection;unit can beset
to pick-upand recordmessagesafter
2
rings,
4
ringsor playannouncement
only with no message recorded.
Toll saver for remote operation.
Memo record capability.
Programmable security code for
remote operation.
Volume control with
4
levels for the
ITAD speaker.
04
individual mailboxes for
personalized message storage and
retrieval.
This manualisdesigned tofamiliarize
youwith the
VTech
900i.
To get the
most useout of your
VTech
900i,
we
strongly recommend you read the
manual before usingyour phone.
Parts Check List:
1. Handset
2.
Base unit and AC adapter
3. Telephone line cord
4.
Molded Battery pack
5. Wall mounting screws and caps
6. Wall mounting bracket
BASE UNIT
and
AC ADAPTER
TELEPHONE
LINE CORD
HANDSET
MOULDED WALL MOUNTING WALL MOUNTING
BAlTERY PACK SCREWS
and
CAPS BRACKET

Whenusingyourtelephoneequipment,
basicsafetyprecautionsshouldalways
be followed to reduce the risk of fire,
electric shock and injury to persons,
includingthe following:
1. Read and understand all
instructions.
2. Followallwarningsandinstructions
marked on the product.
3.
Unplug this product from the wall
outletbeforecleaning. Do not use
liquidcleanersor aerosolcleaners.
Usea damp cloth for cleaning.
4. Donot usethis product nearwater
(for example, near a bath tub,
kitchensink, or swimmingpool).
5.
Do not place this product on an
unstable cart, stand, or table. The
product may fall, causing serious
damageto the product.
6.
Slots and openings in the cabinet
andthebackorbottomareprovided
for ventilation. To protect it from
overheating, these openings must
not be blocked by placing the
product on the bed, sofa, rug, or
othersimilarsurface. This product
should never be placed near or
over a radiator or heat register.
This product should not be placed
inabuilt-ininstallationwhereproper
ventilationis not provided.
7.
This product should be operated
only from the typeof powersource
indicated on the marking label. If
you are not sure of the type of
powersupplytoyourhome,consult
yourdealerorlocalpowercompany.
8.
Donot allow anythingto restonthe
power cord. Do not locate this
product where the cord will be
abused by personswalkingon it.
9.
Neverpushobjectsof any kindinto
this product through cabinet slots
as they may touch dangerous
voltage points or short out parts
that could result in a risk of fire or
electric shock. Never spill liquidof
any kind on the product.
10.
Toreducethe riskof electricshock,
do not disassemble this product,
buttake ittoaqualifiedserviceman
whensomeserviceorrepairworkis
required. Opening or removing
cabinet parts other than specified
access doors may expose you to
dangerousvoltages or other risks.
Incorrectreassemblingcan cause
electric shock when the appliance
is subsequently used. In addition,
attempting to service the unit
yourself may void your warranty.
11.Do not overload wall outlets and
extensioncordsasthiscanresultin
the risk of fire or electric shock.
IMPORTANT SAFETY.INSTRUCTIONS
-
-
*
.
.,
-.
.
-
12.Unplug this product from the wall
outletandreferservicingtoqualified
service personnel under the
followingconditions:
A. When the power supply cord or
plug is damagedor frayed.
6.
If liquid has been spilled into the
product.
C.
If
the producthasbeenexposedto
rainor water.
D. If the product does not operate
normallybyfollowingthe operating
instructions. Adjust only those
controls that are covered by the
operating instructions because
improper adjustment of other
controlsmay resultin damage and
will oftenrequireextensivework by
aqualifiedtechnicianto restorethe
productto normaloperation.
E.
If the product has been dropped
andthecabinethasbeendamaged.
F. If the product exhibits a distinct
change in performance.
13.
Avoidusingatelephone(otherthan
acordlesstype)duringanelectrical
storm. Theremaybearemoterisk
of electricshock from lighting.
14.Do not use the telephoneto report
1
agas leakinthevicinityof the leak.
I
j
SAVE
THESE
INSTRUCTIONS

Chargingthe Handset Batteries
The handset of your
VTech
900i
cordless telephone is powered by
rechargeablebatteries. They charge
automaticallywhenever the handsetis
in the base. You should charge the
batteriesfor
24
hours when you first
receiveyour phone. You'll know the
batteriesneedchargingwhen:
Thephonebeepswhenyoupressthe
PHONE key.
-The LOW BAT
I
MUTE LED is
flashing.
Thehandsetseems completelydead
and does not beep when you press
the keys.
To ChargeThe Batteries
Placethe handsetinthe baseunit. The
CHARGE indicator will light to show
the handsetisseatedproperlyandthe
batteriesare charging. The CHARGE
indicatorwillflashifthehandsetbattery
is not chargedenoughfor the handset
to operate. Oncethe battery reaches
the minimum levelneededto operate,
the CHARGE indicator will illuminate
steadilyandthe batterywill continueto
charge up to itsfull potential.
It is recommendedthat the battery be
charged for
24
hours. You can use
your telephone before that with
diminishedcapacity,butitis bestto let
them charge fully. To maximize the
charge capacity of the NiCad battery
pack, recharge the batteryfor several
cycles. Once you have properly
conditioned the rechargeable battery,
the maximum battery life should be
6
hoursof continuoustalktimeor5days
of standby.
I
IT IS IMPOSSIBLE TO OVER-
CHARGETHE BATTERIES
I
If the Batteries Don't Recharge
The battery pack can be recharged
manytimes,butifyou getalow-battery
signalevenafter
24
hoursof charging,
the batterypack shouldbe replaced.
Optional Accessory Battery and
Charger
Your 900i uses a moldedbattery pack
whichmayneedtobereplacedatsome
point in the future. VTech offers an
accessorybattery,as well as a battery
and charger (model#TBC-900) which
is compatible with your 900i. Please
contactyourlocalVTechdealer, or call
VTech directly.
Topurchasereplacementbatterypacks
and other accessories:
Inthe UScall:
VTECH Communicationsat
1-800-624-5688
InCanadacall:
VTECH Electronics at
ReplacingThe Handset Batteries
1. Remove the old molded batterv
pack by pressing on the battery
releasebuttonandslidethebattery
downward.
DOWNWARD
2.
Discardtheold batterypack. Don't
put the old battery pack in a trash
compactoror a fire
-
it could burst.
3.
Slidethe new moldedbattery pack
on itstrack, untilitisfirmly inplace.
4. Thenewmoldedbatterypackmust
be charged before using your
telephone. Place the handset in
the cradleof the base unit to allow
it to chargefor
24
hours.
PUT
BATTERY
PACK
SLIDE
FORWARD
CAUTION:
To Reducethe Risk of Fireor Injuryto
Persons, Read and Follow the
Instructions
1. UseonlyVtechbattery,partnumber:
80-4016-00-00.
2.
Donotopenormutilatethe battery.
Released electrolyte is corrosive
andmaycausedamagetotheeyes
orskin. Itmaybetoxicifswallowed.
3.
Exercisecare in handlingbatteries
inordernottoshortthebatterywith
conductingmaterialssuchas rings,
bracelets,andkeys. Thebatteryor
conductormayoverheatandcause
burns.
4.
Do not dispose of the battery in a
fire. The cell may explode.
IMPORTANT: Do not dispose of this
battery into household garbage. For
information on recycling
or
proper
disposal, consultyour localsolidwaste

Setting Up
Your
VTech
900i
1.
Choose an area near an electrical
outlet and a telephonewall jack.
AC TELEPHONE
ELECTRICAL WALL
OUTLET JACK
2.
Install optional 9V back-upbattery
in compartment located on
underside of
900i
base unit. This
batteryretainsmemoryintheevent
of a power outage. VTech
recommendsthe useof analkaline
4.
Plugthe AC power adapterintoan
electricaloutlet. TheONlOFF
LED
will flash during initialization for
about
20
seconds.Afterinitialization
of the ITAD, the LCDclock display
will flash until it is set.
NOTE: Connectpowertothe baseunit
beforeplacingthehandsetinthecradle.
4.
Set the TONUPULSE switch on
the base unit. If you have touch
toneserviceonyour phoneline,set
the switch to TONE. If you have
rotary service, set the switch to
PULSE.
I
battery.
5.
Fill in the telephone number card
3.
Connect the telephone line cord.
Insertoneendof thetelephoneline
cord intothe jack at the rear of the
baseunit. Plugthe otherendintoa
telephonewalljack. Makesurethe
plugs snap securely intoplace.
6.
CHARGE THE HANDSET CAUTION:
BATTERIES BEFORE USE.
1.
Neverinstalltelephonewiringduring
The batteries recharge a lightningstorm.
automaticallywheneverthehandset
is in the base unit cradle. The
2.
Neverinstalltelephonejacks inwet
batteries must be charged for
24
locations unless the jack is
hours
beforeusingyour phonefor specifically designed for wet
the first time. The CHARGE LED locations.
willflash untilthe handset is
laced
inthe base cradleandthe batteries
3.
Nevertouchuninsulatedtelephone
are charged. wires or terminals unless the
telephone line has been
7.
CHECK FOR A DIAL TONE. disconnected at the network
Afterthebatteriesarecharged,pick interface.
up the handset and press the
PHONEkey. ThePHONEindicator
4.
Use caution when installing or
should light up, and you should modifyingtelephone lines.
hear a dial tone. If not, see IN
CASE OF DIFFICULTY.
CHECK
FOR
A
DlAL
TONE
on the base unit.

WallInstallationUsingMountingScrews
Provided
Tools You Will Need:
Ahammer, a nail,a pencilor ball-point
pen, a Phillips head
(+)
screwdriver,
and the Wall Mounting Template
included inthe back of this booklet.
1.
Choosea spot near an electrical
outlet and a telephone jack.
Your phone requires a modular
telephone jack and a standard
electrical outlet (120v AC). The
power cord is six feet long; make
sure there is an electrical outlet
withinreachof thebase. Theoutlet
should not be controlled by a wall
switch. If the switch is ever turned
off, the phonewill not operate.
2.
Choose and mark the mounting
position.
Themountingscrewsshouldscrew
intoawoodenstudwithinthewall
-
they will not hold securely in
wallboardalone. Locate
a
wallstud
intheareawhereyouwanttoinstall
your telephone. Use the Wall
MountingTemplate and a pencilto
mark the screw positions on the
walloverthestud. Putthetemplate
aside.
3.
Installthe mountingsleevesand
screws.
Start the screw holes by lightly
tapping a nail into the marks you
madeonthe wall. Removethenail
fromthewall. Nowslipthemounting
sleevesontothescrewsas shown,
with the smaller end of the sleeve
towardthe screw head. lnsertthe
screws into the holes you started.
Tighten the screws until the large
end of the mounting sleeve is flat
against the wall.
4.
Positionthe wall mount adapter
on the base.
Lineupthe tabs onthe wall mount
adapterwiththeholesonthebottom
of the base. Snap the wall mount
adapterfirmly in place.
5.
Mount the base on the wall.
Positionthe base so the mounting
studs will fit into the holes on the
bottom of the base. Position the
powercordto extenddownthewall
the phone is to be mounted on.
Slide the base down on the
mounting studs until it locks into
place.
6.
Connect the telephone cord.
The telephone line cord has a
snap-in plug at each end. lnsert
oneof the plugs intothejack onthe
bottomof thebase. lnserttheother
end of the pluginto the wall jack.
7.
PlugtheAC adapteronthepower
cord into an electrical outlet.
8.
Set the dial mode switch on the
base unit.
If you have touch tone service on
your phone line, set the switch to
TONE. If you have rotary service,
set the switch to PULSE.
Here'sa briefguidetothefeatures and
functions of your VTech900icordless
telephone and Integrated Telephone
Answering Device (ITAD):
INITIAL POWER-UP
Connecttelephone line cordto base
unit andtelephone jack.
Plug AC adapter into a standard
electrical outlet. The ONIOFF LED
will flash during initializationand the
LCD clock display will flash on
completion (approx.20 seconds).
Set Dial Mode switch to PULSE or
TONE.
*The CHARGE LED will flash until
handset is placed in base and the
batteries are charged (charge
batteries
24
hours before first use).
VTech 900iCordless Telephone
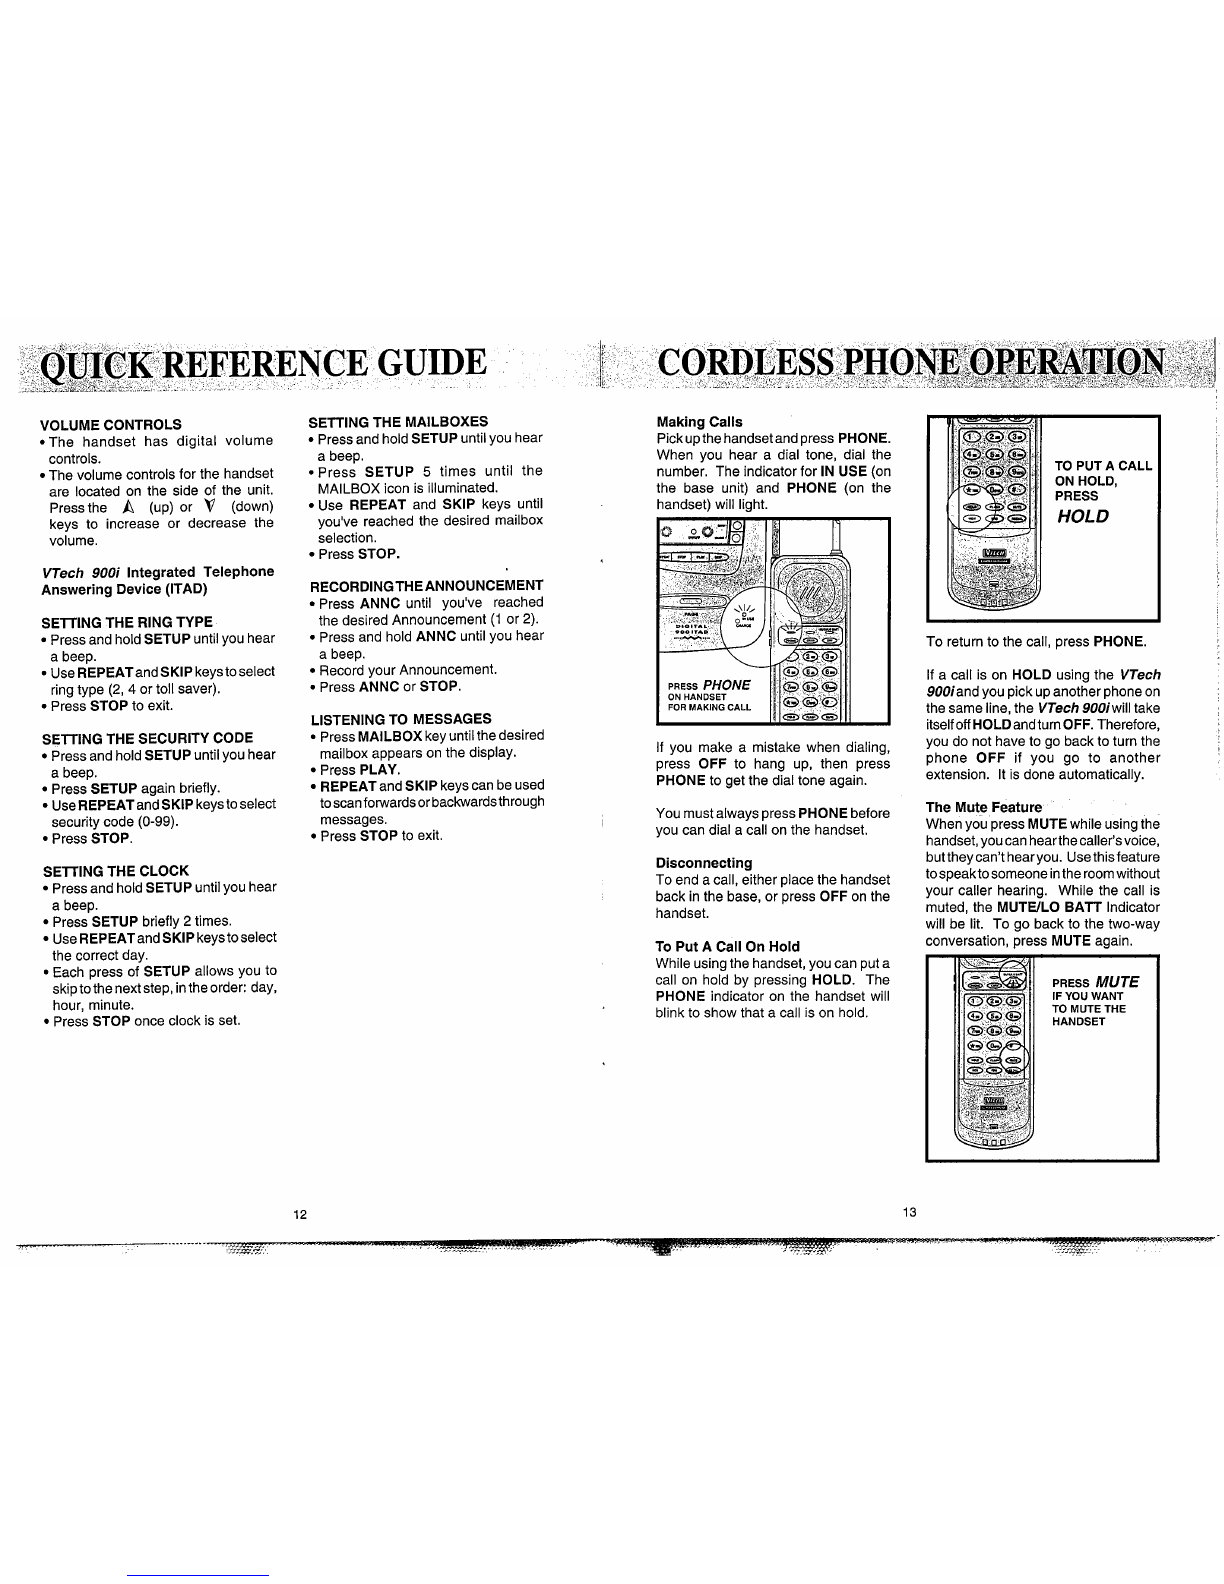
MAKING CALLS
Press PHONE key on the handset.
WhenthePHONEindicatorlightsand
you hearadial tone, dial the number.
ANSWERING CALLS
If the handset is in the base unit
cradle,just pick up the handset.
If the handset is away from the base
unit,pressany keyotherthanOFFon
the handset.
HANGING UP
PresstheOFFkeyonthe handset,or
placethe handsetinthe basecradle.
MEMORY DIALING
Numbers can be stored in memory
usingthe handset unit.
Enterthe phone number you wish to
store (up to
16
digits).
Press MEM. The phone number is
now stored.
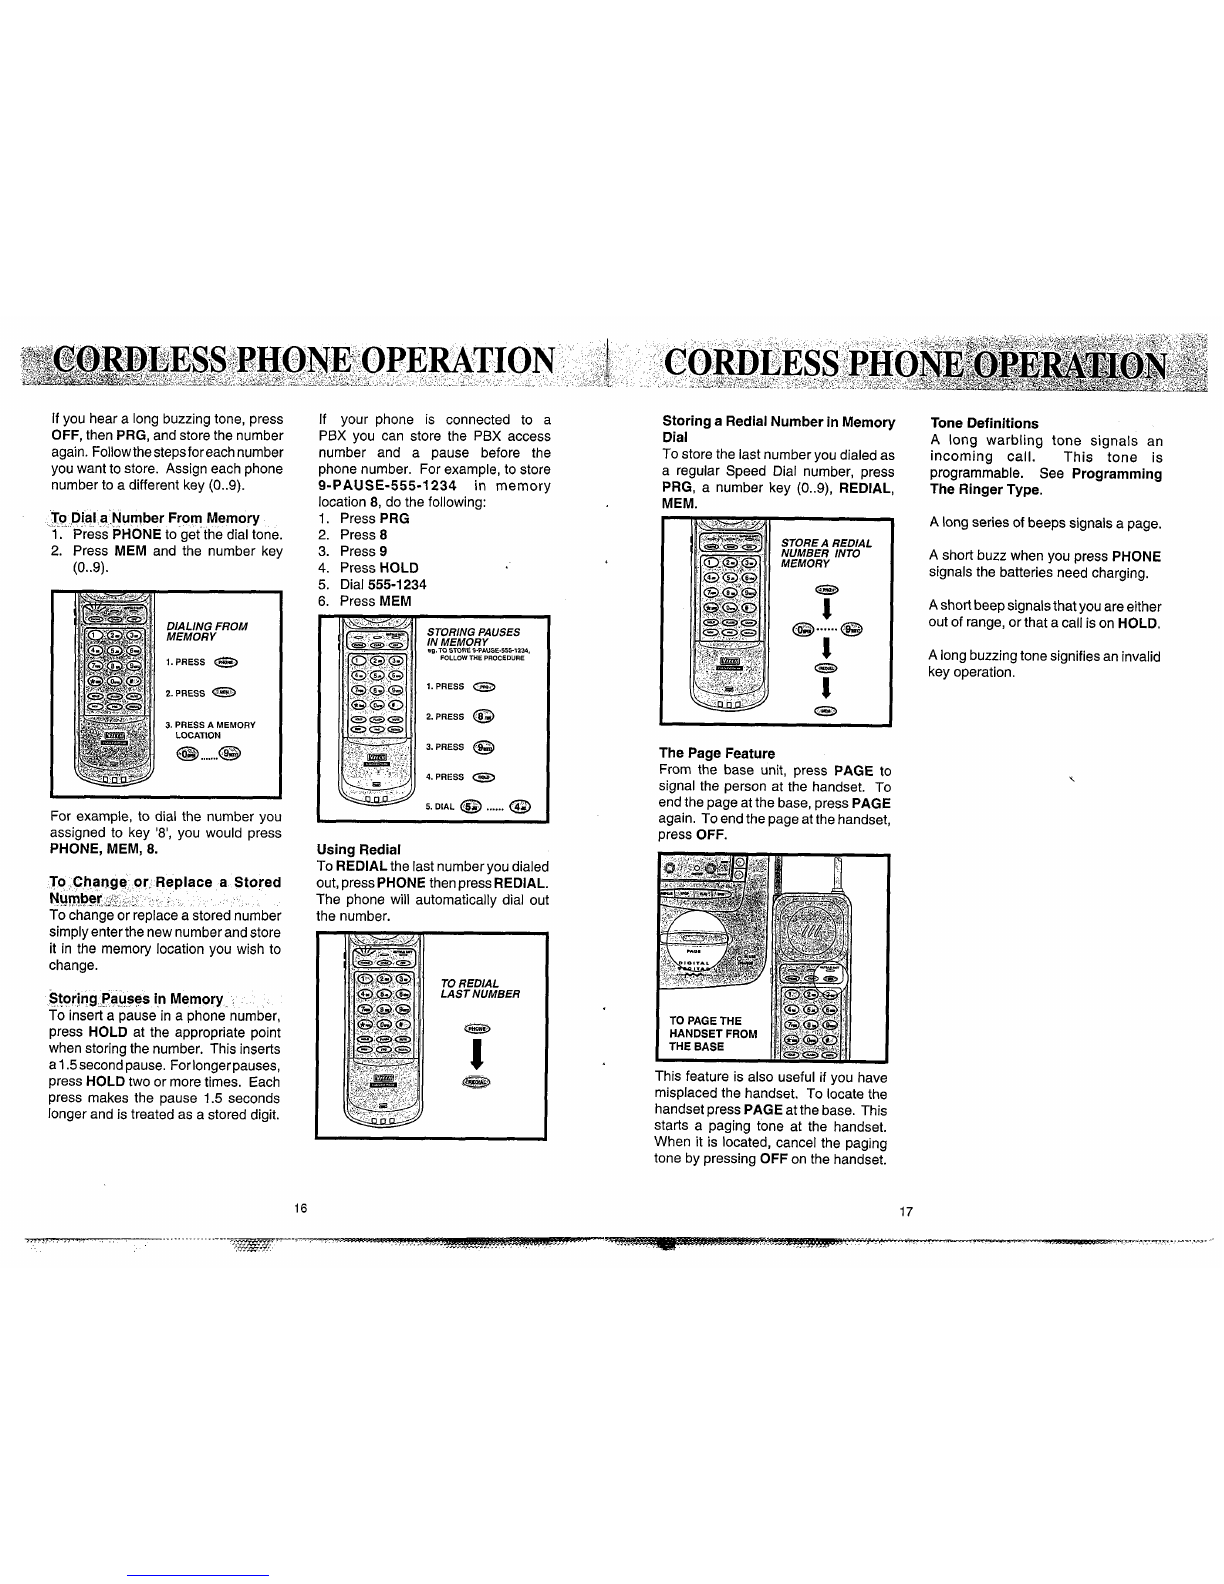
To dial a number from memory using
the handset unit:
Press PHONE.
Press MEM and the number key you
assigned
(0..9).
USING REDIAL
*Press PHONE, then REDIAL to
automatically redial the last number
you dialed.
HOLD
WhenusingthehandsetpressHOLD
to put a call on hold.
To returnto the call, press PHONE.
CHANGING CHANNELS
Ifyouexperiencenoiseorinterference
during a conversation, press CHAN
to switch to a clear channel.
FLASH
Youcanuseyour VTech900icordless
telephonewith services such as Call
WaitingandCallForwarding. Instead
of pressing the switch-hook, press
FLASH on the handset.
PAGE
From the base unit, press PAGE to
signal the person at the handset.
MUTE
Whenusingthehandset,pressMUTE
totemporarilyturnoffthemicrophone.
Toreturntotwo-wayoperation,press
MUTE again.
To store a number in memory:
Press PRG.
Enterthe memory location(0..9).

QUICK
,
,
REFERENCE GUIDE CORDLESS PHONE
\
OPERATION
.
-
__
.
a,
_L
-,
..-
.
-
..
.
-
-....
..
VOLUME CONTROLS
The handset has digital volume
controls.
The volume controlsfor the handset
are located on the side of the unit.
Pressthe
&l
(up) or
v
(down)
keys to increase or decrease the
volume.
VTech
900i
Integrated Telephone
Answering Device (ITAD)
SETTINGTHE RINGTYPE
Pressandhold
SETUP
untilyou hear
a beep.
Use
REPEATandSKlP
keystoselect
ringtype (2,
4
or toll saver).
Press
STOP
to exit.
SETTINGTHE SECURITY CODE
Pressandhold
SETUP
untilyouhear
a beep.
Press
SETUP
again briefly.
Use
REPEATandSKlP
keystoselect
security code (0-99).
Press
STOP.
SElTlNGTHE CLOCK
Pressandhold
SETUP
untilyou hear
a beep.
Press
SETUP
briefly2 times.
Use
REPEATandSKlP
keystoselect
the correct day.
Each press of
SETUP
allows you to
skiptothenextstep,intheorder: day,
hour, minute.
Press
STOP
once clock is set.
SETTINGTHE MAILBOXES
Pressandhold
SETUP
untilyou hear
a beep.
*Press
SETUP
5
times until the
MAILBOX icon is illuminated.
MakingCalls
Pickupthehandsetandpress
PHONE.
When you hear a dial tone, dial the
number. The indicator for
IN USE
(on
the base unit) and
PHONE
(on the
Use
REPEAT
and
SKIP
keys until handset)will light.
you've reached the desired mailbox
selection.
Press
STOP.
RECORDINGTHEANNOUNCEMENT
Press
ANNC
until you've reached
the desired Announcement
(1
or 2).
Pressand hold
ANNC
untilyou hear
a beep.
Recordyour Announcement.
Press
ANNC
or
STOP.
LISTENINGTO MESSAGES
J
Press
MAILBOX
keyuntilthedesired
mailbox appears on the display. If you make a mistake when dialing,
Press
PLAY.
press
OFF
to hang up, then press
REPEAT
and
SKIP
keyscanbeused
PHONE
to get the dialtone again.
toscanforwardsorbackwardsthrough
messages. Youmustalwayspress
PHONE
before
Press
STOP
to exit. you can dial a call on the handset.
Disconnecting
To end acall, either placethe handset
back inthe base, or press
OFF
on the
handset.
To Put A Call On Hold
Whileusingthehandset,you canputa
call on hold by pressing
HOLD.
The
PHONE
indicator on the handset will
blink to show that a call is on hold.
TO PUTA CALL
ON HOLD,
PRESS
HOLD
To returnto the call, press
PHONE.
If a call is on
HOLD
using the
VTech
9OOiandyou pick upanotherphoneon
thesame line,the
VTech
900iwilltake
itselfoff
HOLD
andturn
OFF.
Therefore,
you do not haveto go back to turn the
phone
OFF
if you go to another
extension. It is done automatically.
The Mute Feature
Whenyoupress
MUTE
whileusingthe
handset,youcanhearthecaller'svoice,
buttheycan't hearyou. Usethisfeature
tospeaktosomeoneintheroomwithout
your caller hearing. While the call is
muted, the
MUTULO BATT
Indicator
will be lit. To go back to the two-way
conversation, press
MUTE
again.
PRESS MUTE
IF
YOU
WANT
TO
MUTE THE
HANDSET

ChangingChannels
In the unlikely event you notice
interferencewhen usingyour handset,
press CHAN to switch to a clear
channel. Using this key to change
channels is only available when you
areonacall. WhenthecallisonHOLD
or if you are in STANDBY mode, the
CHAN
key is inactive.
PRESS
CHAN
IF
YOU
HEARD
NOISE IN A
CONVERSATION
Temporary,Tone
If
you have rotary(dial-pulse)telephone
service,(TONUPULSEswitchissetto
PULSE),thisfeatureallowsyoutoenter
special codes and tones to operate
answering machines, use electronic
bankingservices,callingcards,orother
specialservices.
First, dial the call normally. Then
activate the Temporary Tone feature
bypressingTONE(the key). Youcan
thenpressthenumbersorsymbolsyou
need, and your phone will send the
propersignals.
TEMPORARY TONE
OPERATION
1.
DlALYOUR CALL
eg.
@
@
......
2.
PRESS
@
3.
PRESSTHE NUMBERS
or
SYMBOLS YOU
NEED
To endthecall,pressOFFor placethe
handset back inthe base. The phone
willautomaticallygobacktorotary(dial-
pulse) service.
Ifyouhavetouch-toneservice,(TONE1
PULSEswitchsettoTONE),just enter
thecodesnormally.Thisfeatureisonly
for rotaryservice telephone lines.
Programmingthe RingerType
The handset ringer is capable of four
different types of ringing tones. The
followingsectionsdetailhowtochange
the different tones and to turn off the
ringeron the handset.
Toprogram,thehandsetmustbeOFF.
To select adifferent ringer type do the
following:
Press PR G
Pressthe
#
key.
*Press a key 1..4 to select a
ringertype.
Press OFF to exit.
Turning Off The Ringer
To turn off the ringer on the handset,
do the following:
Press PRG
Pressthe
#
key
Press
5
to turn off the ringer
Press OFF to exit
To turn ringer on again, see
Programmingthe Ringer Type.
PROGRAMMING THE
RINGER TYPE
1.PRESS
2.
PRESS
3.
SELECT RINGER TYPE
@@
4.
PRESS TO EXIT
TURNING OFF
THERINGER
4. PRESS TO EXlT
Checkingthe Ringer
To check the ringer which is currently
programmed, do the following:
Press PRG
Pressthe
#
key
Press 0
Press OFF to exit
The phonewill ring once to show the
ringer selected.
CHECKING THE
RINGER TYPE
1.PRESS
2.
PRESS
3.PRESS
@
4.
PRESS TO EXlT
Memory Dialing
The VTech
900i
can store up to
10
different phone numbersthatyou can
dialjust by pressingMEM and one of
the number keys.
To Storea Number intoMemory
The handset must be OFF.
1.
Press PRG
2.
Press the number of the memory
location you wish to store the
number in (0..9).
3.
Usingthedialpad,dialthe number
youwant to store. Thenumbercan
be upto
16
digitslong.
4.
PressMEM.Thatassignsthephone
numberto the key you selected.
STORE NUMBER
INTO MEMORY
THE
HANDSETMUST
BE OFF
2.
PRESS
@
.....
@
3.
DlAL YOUR NUMBER
.......
.
.

If
you hear a long buzzingtone, press
OFF,then PRG,andstore the number
again. Followthestepsforeachnumber
youwant to store. Assign each phone
numberto a different key
(0..9).
To Dial
a
Number From Memory
1.
Press PHONEto get the dial tone.
2.
Press MEM and the number key
DIALING FROM
MEMORY
3.
PRESS
A MEMORY
LOCATION
For example, to dial the number you
assigned to key
'8',
you would press
PHONE,MEM,
8.
To Change or, Replace a Stored
Number
.
.
To changeor replacea storednumber
simplyenterthe newnumberandstore
it in the memory locationyou wish to
change.
Storing Pauses in Memory
To insert a pause in a phone number,
press HOLD at the appropriate point
when storingthe number. This inserts
a
1.5
secondpause. Forlongerpauses,
press HOLDtwo or moretimes. Each
press makes the pause
1.5
seconds
longer and is treatedas a storeddigit.
If your phone is connected to a
PBX you can store the PBX access
number and a pause before the
phone number. For example, to store
9-PAUSE-555-1234 in memory
location
8,
do the following:
1.
Press PRG
2.
Press
8
3.
Press9
4.
Press HOLD
5.
Dial555-1234
6.
Press MEM
--
STORING PAUSES
i!T!E%fgLSE-555-1236,
FOLLOW THE PROCEDURE
1.PRESS
a
2.PRESS
@
3.PRESS
@
4.PRESS
a
5.
DIAL
a
......
@
UsingRedial
To REDIALthe last numberyou dialed
out,pressPHONEthenpressREDIAL.
The phone will automatically dial out
the number.
TOREDIAL
LAST NUMBER
@!9
I
e
Storinga RedialNumberinMemory Tone Definitions
Dial
A
long warbling tone signals an
To store the last number you dialed as incoming call. This tone is
a regular Speed Dial number, press programmable. See Programming
PRG, a number key
(0..9),
REDIAL, The Ringer Type.
MEM.
STOREA REDIAL
NUMBER INTO
MEMORY
The Page Feature
From the base unit, press PAGE to
signal the person at the handset. To
endthepageat thebase, pressPAGE
again. Toendthepageatthehandset,
pressOFF.
This feature is also useful if you have
misplacedthe handset. To locate the
handsetpressPAGEatthebase. This
starts a paging tone at the handset.
When it is located, cancel the paging
tone by pressingOFFon the handset.
A
longseriesof beeps signals a page.
A
short buzz when you press PHONE
signals the batteries needcharging.
Ashortbeepsignalsthatyouareeither
outof range, orthat a callis on HOLD.
Alongbuzzingtonesignifiesaninvalid
key operation.

LCD DISPLAY
LCD DisplayIcons
MAILBOX
The MAILBOXicon and the Mailbox
Number icons remain on steadily if
the ITAD is set-up for
1
or more
mailboxes. Otherwisetheyremainoff
for zero mailboxes. See
Mailbox
programming.
The MailboxNumber iconsflash (in
conjunction with MESG'S icon) to
indicate new messages designated
forspecificmailboxes. Newmessages
for the Genericmailboxdo not cause
the MAILBOXiconsto flash.
MESG'S
MESGIS(theMessagesicon)flashes
to indicate new messages and/or
memos.
MESG'S will always flash if a new
message/memo is present,
independent of the current mailbox
selection.
MESG'Sremains on steadily if there
aremessagesinmemory,butnonew
messages.
REC
REC(theRecordicon)flasheswhen
either of the two outgoing
announcements(Announcement
1
or
2), or a memo is being recorded.
MEMO
The MEMOicon remains on steadily
during memo playback.
MEMOalsoremainsonsteadilyduring
recordingof a memo.
ANNC
The Announcement icon, ANNC,
illuminatessteadilyinconjunctionwith
one of the Announcement Number
icons(1,2or
OGM)
to indicatewhich
outgoing announcement has been
selected.
ANNC and the corresponding
Announcement Number icon also
illuminate steadily when the
announcement is being recorded.
DAY
The Dayicons (SUN-SAT) indicates
thecurrentdaybysteadilyilluminating
the correspondingday iconwhen the
ITADisnotinuse. Ifthe clockhas not
beenset the SUNday iconwill flash.
The Dayiconalso indicatesthe day a
message/memo was recorded by
steadilyilluminatingthecorresponding
day icon for the duration of the
message/memo playback.
AlloftheDayiconsflashwhen memory
isfull.
BATTERY
The Batteryicon will flash when the
back-up battery is in need of
replacement.
This will only function when power is
appliedto the unit; it will not function
when the back-up battery is in use.
INTEGRATEDTELEPHONE
ANSWERING
DE@ (ITAD)-OPERATION
.
-.
-
-
-
.
-
*.-
.
2
*__^
-
^*-
.-
.
.
-
^
I
LCD Display Digits
CLOCWTIME STAMP DISPLAY
Thefourdigitsontheleftofthedisplay,
including the colon and the amlpm
icons,displaycurrenttimeof daywhen
the ITADis not in use.
If the clock has not been set it will
remainflashing until it is properlyset
(See
Time and Day Setup).
Duringmessage/memoplayback,the
clock will steadily display the time
stamp for that message/memo.
Duringthe recordingof eithermemos
oroutgoingannouncements,theclock
will display the elapsed time in
minutes:seconds.
MESSAGECOUNTER
w
The two digits on the right hand side
of the display form the message
counter.Theydisplaythetotalnumber
of messages (old and new) in the
currentmailbox selection(thedefault
selection is All Mailboxes).
In
the Volume Setting mode, the
messagecounterwilldisplayan 'L'in
thefirst digit, followedbya
1,2,3,
or
4
inthe seconddigit corresponding to
the current volume levelsetting.
BASE KEYPAD FUNCTIONS
lTA
D
FUNCTIONS
ON
1
OFF
Main Function Keys
ONIOFF
This key is usedto turn
ON
and
OFF
the ITAD. While inthe
OFF
state,the
cordless phone will still operate
normally.
Whenthe ITADis
ON,
thepowerLED
besidethe
ONIOFF
keyisilluminated.

Regardlessof whetherthe ITADison
or off, the message counter, and
current timeldayare still displayed.
*When OFF, the ITAD can be
reactivatedremotelyby10successive
ringson an incoming call.
The ITAD is activated whenever the
cordless handset is used to access
the 900i by pressing PHONE,
*,
#
(seeActivatingRemoteOperation).
MAILBOX
MAILBOX
OPERATION
PRESS BRIEFLY
TOSELECT
DESIRED
MAILBOX
differentmailboxesforretrievalbythe
corresponding mailbox user. For
example, mailbox 1 is for John,
mailbox
2
isfor Jane, etc.
Use the MAILBOX key to select the
current mailbox, either for message1
memo playback or for memo
recording.
MAlLBOXandMailboxNumbericons
on the LCD indicate the current
mailboxselection. Eachpressof the
MAILBOX key selects the next
mailboxoptioninthe following order:
AII>Generic>l>2>3>4>All>
...
If
nokeysare pressedfor
5
seconds,
the ITAD will return to standard
operation mode, and the default
selectionisAll Mailboxes.
MEMO
MEMO
RECORDING
TO RECORD
:
PRESS
and
HOLD
TO
STOP
:PRESS
*The MEMO key is used to record
memosatthebaseunitintothecurrent
mailbox selection.
Pressand holdthe keyfor
2
seconds
to begin recording.
Stop recording by either: pressing
the MEMO key again, pressing the
STOP key or automatically after
5
seconds of silence.
ANNC
ANNOUNCEMENT
0
TO SELECT ANNC.
OPTION, PRESS
0
TO RECORD ANNC
:
The Announcement key, ANNC, is
usedtoselectandrecordtheoutgoing
announcementoroutgoingmessage.
PressANNC brieflyto selectthe next
announcementoptioninthefollowing
order:Announcementl
,
Announcement
2,
OutGoing Message
(seeSelecting the
Announcement).
20
Pressand holdANNC for
2
seconds
to begin announcement recording
(see Recording the Announce-
ment).
MEMORY
MEMORY
CHECK
TO CHECK
MEMORY
AVAILABLE,
PRESS
The MEMORY key is usedto check
the amount of memory still available
for new messages/memos.
After pressingthe MEMORY key, a
voice messagewill informyou of the
number of available minutes
remainingin memory.
To make more available Memory,
delete old messages and/or record
shorter outgoing message(s).
SETUP
SETUP
MANU
TO ENTER
:
m
TheSETUPkeyisusedtoaccessthe
set-up menuby pressingandholding
it for more than
2
seconds (until a
beep is heard).
,..
To see the different set-up options,
keep pressing SETUP key briefly
(1 pressper option).
To terminate Set-up mode, either
pressSTOPoritisdoneautomatically
by not pressing any keys for a
5
second period.
VOLUME
VOLUME
SElTING
The VOLUME key is used to select
the volume level of the base unit
speaker.
4
volume levels are available.
The volume levelsettingis displayed
on the LCD Message Counter for
2
seconds after this key is pressed
(LI, L2, L3, or L4
-
L1 is the lowest
volume level; L4 isthe highest).
Each press of the VOLUME key
selects the nextvolume level.
Note that the first press of this key
doesn't change the volume level but
just displaysthe current volume.
The volume level always decreases
towards the lowest level before
increasing.
Youcanadjustthevolumekeyduring
messageplaybackandcallscreening.
Call screening is when you wait for
the callerto start leavinga message
beforeyou decide if you will takethe
call.
The volume key is not active while in
set-up mode.

Message Playback Keys
ERASE
PRESS ONCETO
ERASECURRENT
PLAYING MESSAGE
PRESS
and
HOLD
TO ERASE ALL
REVIEWED
MESSAGES
ERASE
The ERASEkey is usedto deleteold
messages(previouslyreviewed)from
the ITAD.
Pressing ERASE during message
playbackdeletesthat message.
Ifthiskeyispressedandheldformore
than
2
seconds, all old (previously
reviewed) messages in the current
mailboxselectionwillbedeleted(This
feature works only when the
answeringmachineisidle;itdoes not
work duringmessage playback).
To preventaccidentaldeletionof new
messages,you are not ableto delete
amessageunlessithasbeenlistened
to first!
I
ERASE
TO REPLAY
CURRENT PLAYING
MESSAGE
:
PRESS
rn
TO REPEAT
PREVIOUS
MESSAGE
PRESS
REPEAT
The REPEATkey is usedto returnto
the beginning of a message during
message playback.
If this key is pressed prior to a
message,the previous message will
begin.
Thepreviousmessagewillalsobegin
if this key is pressed twice quickly
during message playback.
STOP
TO STOP MESSAGE
PLAYBACK
TO STOP MEMO
RECORDING
TO STOP ANNC.
RECORDING
TO EXIT SET-UP
MODE
PRESS
STOP
*The STOP key is used to exit the
currentmodeof operationand return
tothe ITADStandardoperationmode.
UseSTOPtostopmessageplayback,
stop memo or announcement
recording,or exit the set-up mode.
PLAY
TO PLAYBACK ALL
MESS
PRESS ONCE
TO PLAYBACK
ANNC. MESSAGES
PRESS
%.
PLAY
*The PLAY key is used to begin
playback of all messages/memos
(new and old) inthe current mailbox
selection (the default mailbox
selection is
All).
This key is also used to play the
current announcement message by
pressingand holdingit for more than
2
seconds.
-
SKlP
TO
PLAY NEXT
MESSAGE
:
PRESS
SKlP
*The SKlP key advances to the
beginningofthenextmessageduring
message playback.
INITIAL SET-UP
Pressthe SETUP key for more than
2
seconds to enter the set-up mode or
until it beeps once. Here you can set
the ring type, security code, timelday
and mailboxprogrammingas follows.
iftherearenewmessages/
memos present in
memory; otherwise,
answerscall after
4
rings.
Thus,ifTollSaverisactive
and your ITAD rings
3
times when you call, you
can hang-upto avoid any
longdistancecharges.
RingType Programming
The ITAD has
3
ringtype settings:
To change ringtype setting:
1.
Pressand holdthe SETUP key for
2
seconds. The ITADwillbeepand
the LCDwill display "rt"(ringtype)
and the current ringtype setting.
2.
UsetheREPEATandSKlPkeysto
scroll to the desired ring type.
Forwardselectionisinthefollowing
order
2
rings,
4
rings, Toll saver.
3.
Press the SETUP key to exit ring
2
rings The incoming call is
answeredafter
2
rings.
4
rings The incoming call is
answeredafter
4
rings.
Toll Saver The incoming call is
answeredafter
2
ringsonly
type programming mode, and
advance to security code
programming,or press the STOP
key to exit the set-up mode, and
RINGTYPE
PROGRAMMING
K%
I
I
or
I
or
Security Code Programming
The security code programmed into
the ITADis usedto gain access to the
functionsfrom remote locations.
The security codedefaultsettingis
99.

To change securitycode:
1.
Press and hold SETUP until it
beeps.
2.
PressSETUPbriefly. The LCDwill
display "SC" (Security Code) and
the current security code setting.
3.
UseREPEATand SKlPtoscrollto
desiredcode, between
00
and
99.
4.
PressSETUPto exit securitycode
programming mode, and advance
to timelday programming, or press
-.
-
-.
STOP to exit.
SECURITY
CODE
SElTlNG
g#j
xi:
1
Bl
%4
1
a
or
I
Note:
,
When accessing the ITAD
remotely,thesecuritycodeispreceded
bythe
*
key.
I
TochangethetimedisplayontheLCD:
1.
Press and hold SETUP for
2
seconds or until it beeps.
2.
PressSETUP
2
times untilclock is
displayed and the DAY icon is
flashing.
3.
Use REPEAT and SKlP keys to
select correct day.
4.
Press SETUP to advance to hour
programming. Use REPEAT and
SKlP keys to select correct hour
and amlpm.
5.
PressSETUPto advanceto minute
programming. Use REPEAT and
SKlP keysagain.
Time and
Day
Setup
TheTimeandDaydefaultissetto SUN
12:OO
pm. This will flash to indicate
clock has not been set.
6.
Press SETUP to exit timelday
programmingmode, and advance
to mailbox programming,or press
STOP to exit.
Mailbox programming
The ITAD has the ability to be
programmed for up to
4
individual
mailboxes. Inaddition, there is also a
Genericmailboxforgeneralmessages
storage. On initial power-up,only the
Genericmailboxis enabled.
To changethe numberof mailboxes:
1.
Press and hold SETUP for
2
seconds or until it beeps.
2.
Press SETUP
5
times until
MAILBOX icon is illuminated.
3.
Use REPEAT and SKlP keys to
scroll through selections (the
Mailbox Number icons indicate
which mailboxesare enabled).
4.
Press SETUP to exit mailbox
programmingmode, and return to
ring type programming, or press
STOP
to exit.
-
MAILBOX
PROGRAMMING
:%
4
~s
1
or
1
Selecting theAnnouncement
The ANNC key is used to select the
currentoutgoingannouncement.There
are
3
choices of Announcements as
follows: 1,
2
&
OGM.
Announcement 1
1
YOUcan record your own personal
announcementand thecallerisableto
leave a message.
If you do not record your own
announcement, the factory default
announcement:
Please record message after the
tone.
will be used (see Recording the
Announcement).
Announcement
2
You can record your own
announcementbutthecallerisnotable
to leave a message.
If you do not record your own
announcement, the factory default
announcement:
No one can answer the phone at the
moment,please call again.
will be used (see Recording the
Announcement
).
After you record your own
announcement, you can return to
the default announcement by record
an OGM less than
1
second.
OGM (OutGoing Message)
You are not able to record an
announcement,it is programmedinto
ITADmemory. Thecallerisnotableto
leavea message.
Programmed OGM Announcement:
No one can answer the phone at the
moment,please callagain.
Note: The ITAD will default to
OGM
Announcement if the current
selection is Announcement 1 and
the memory is full.
Recording the Announcement
1.
Press ANNC key until the
desired announcement icon is
displayed on the screen (1 or
2).
2.
Press and hold ANNC key for
2
seconds until a beep is heard.
The clock will display
0:00
and
will start incrementing for the
length of the announcement.

3.
Speak into the microphone on
the base. Announcement can be
no more than
2
minutes in length.
More than
5
seconds of silence
will automatically stop
recording.
4.
Press ANNC key or STOP to
stop the recording.
5.To review a recorded
announcement,pressandholdthe
PLAY key for
2
or more
seconds.
ANNOUNCEMENT
Example Announcements:
ExampleforAnnouncement
1
withzero
mailboxes(actsasstandardanswering
machine):
Hello. You've reached 555-1234,
1
can't come to the phone right now.
Pleaseleaveamessageafterthebeep.
Thankyou
Examplefor Announcement
1
(withall
mailboxes on):
Hi! Wecan't come to the phone right
now. If you have a message for John
press 1,if youhaveamessageforJane
press
2,
ifyouhaveamessageforJack
press 3, if you have a message for Jill
press 4. If you have a message for
any one of us press
0
or just stay
on the line and record after the
beep. Thank you.
Example for Announcement 2:
Hi. You've reached Jack and Jill.
We will be back after 1pm. Please
call us back then. Thank you.
Leaving a Message
The ITADwillanswerthecall(according
to the current ring selection), play the
current announcement followed by a
beep tone to signify the start of
recording.
Messages can be a maximum of 5
minutesinlength;anythinglongerwill
becut-off.The ITADwillautomatically
stop recordingif there is morethan5
seconds of silence.
*To select a specific destination
mailbox for the message, press the
numbercorrespondingto the desired
mailbox. For the Generic mailbox
press
0
or just wait for the beep.
beforethey can be used(seeMailbox
Recording
a
Memo
To recorda memo at the base unit:
1.
Press MAILBOX key to select the
mailbox where you want to record
thememo. Ifcurrentmailboxsetting
is
All,
thememowillbestoredinthe
GenericMailbox.
2.
Pressandholdthe MEMOkeyfor 2
seconds until a beep is heard.
The
MEMO, MAILBOX
and
corresponding
Mailbox Number
iconswill illuminate,the
REC
icon
will flash, and the clock display
will start incrementing from
0:oo.
3.
Speak into the base microphone
to record the memo.
4.
PresstheMEMOkeyagainor press
theSTOPkeytostoptherecording.
LEAVING MEMO
INTO MAILBOX
I
SPEAK
I
Listening to Messages
When new messages and/or memos
are in the ITAD,
MESG'S
(messages
icon) will flash. If the messages or
memos have been sent to a specific
mailbox, the corresponding
Mailbox
number
icon will also flash.
To playbackmessages:
PressMAILBOXtoreachthemailbox
from which messageswill be played.
Themessagecounterwillindicatethe
total number of messages (new and
old) present in the current mailbox
selection.
A
voice prompt will
indicate the -number of new
messages present in the current
mailbox selection.
PressPLAY(forlessthan
2
seconds)
to begin playback of messages and/
ormemosincurrentmailboxselection.
Theclockwilldisplaythetimeandday
that the current message was
recorded.
REPEATandSKIPkeyscanbeused
to scan forward and backwards
through messages during playback.
*Press STOP at any time during
messageplaybackto exit.
LISTENING
MESSAGES
1
m
a
a
or
I
rn
To delete messages:
Press ERASEbutton at any time
duringmessageorcorrespondingtime
and day stamp to delete current
message.
Whenallmessageshavebeenheard,
all messageswithinthat mailboxcan
be deleted by pressing the ERASE
key for more than
2
seconds. New
messagesthatstillexistinthatmailbox
will be saved,onlythe oldmessages
will be deleted.

ERASE
MESSAGES
TO ERASECURRENT
PLAYINGMESSAGE
@
;&E;s
TO ERASEALL
PLAYED MESSAGES
@
6"o'L"DS21&
Messagelmemoplaybackbeginswith
a voice prompt indicating the total
number of messages present in the
current mailbox selection. It then
proceeds to play the messages; the
most recentlyrecordedmessages are
heard first. New messages are
preceededwiththevoiceprompt "New
messageUandmemosare preceeded
with the voice prompt "Memo" (new
memos are preceeded by "New
memo
")
.
Thetimeandday stamp is announced
after each message is played.
After all messages and memos have
beenplayed,the finalvoicepromptwill
be
"End
ofmessages
".
playing messages at the ITAD base,
you can stop message playback by
Remote operation allows you control
the functions of the VTech900iwhen
you are away from the base unit.
Therefore remote operation can be
accessed from the handset of your
900i cordless phone or at a phone
connectedtoadifferenttelephoneline.
The ITAD cannot be accessed from
anothertelephoneonthe same lineas
your VTech900i.
You can access many of the ITAD
functionsfrom a remote location such
as listening to messages, changing
recordedannouncement,andrecording
a memo.
To access the ITAD from a remote
location you must use a phone with
TouchToneService. Remoteoperation
can only be accessed from a touch
tonephone. If the remotephoneisset
topulsedialing,switchittotone. Iftone
dialing is not available you will not be
able to accessthe ITAD.
ACTIVATING REMOTE OPERATION
To activate remote operation from
your cordless handset
1.
PickuphandsetandpressPHONE
to get a line, you will hear a dial
tone.
2.
If your phone is set on pulse dial,
pressthe key to enter touch tone
dialing mode. Otherwiseomit this
step.
3.
Press the key followed by the
#
keywithin
1
Oseconds.Thisenables
youtoreleasetheconnectiontothe
phone line and allows you to
communicatedirectlywiththeITAD.
If a mistake is made press the
PHONEkeyagainand re-enterthe
*
followed by
$.
4.
You did it! You are now in remote
operationmode. Nowyouwill hear
aseriesof voiceprompts. You will
usethe numberkeystocontrolany
of the available ITADfunctions.
ENTER
REMOT
OPERATION
FROM
YOUR
9001
HANDSET
am
I
GD
I
GD
Note: Wheneveryouaccessthe ITAD
from the
900i
handset by pressing
PHONE,
*,
#,
the ITAD will be
automaticallyturned ON.
To activate remote operationfroma
differenttelephone line
1.
Dial the telephone number of your
VTech900iandwaitfortheITADto
answer. If the ITAD is OFF when
youcall,simplyletthe ITADring
10
times, and itwill automaticallyturn
itself on and answer your call.
2.
OncetheITADanswers,itwillbegin
playing the currently selected
announcement (as with any
incomingcall).
3.
Enter the
*
key followed by the
2
digit security code during the
announcement.

4. Oncethesecuritycodeisreceived,
you are in remoteoperation mode.
You will hear a series of voice
prompts and you can control the
ITADfunctions with the numbered
keypad.
Inaddition,thevoiceprompt "Memory
Full"will be added if the ITAD has no
morespacefornewmessages,andthe
voice prompt "Low Battery" will be
added if the back-up battery in the
ITADis low on charge.
The moreyou use the ITADin remote
operation, the more familiar you will
become with the various functions on
the numberedkeypad. Soonyou may
beableto accessallfunctionswith little
or no helpfrom the voice prompts!
ENTER
REMOTE
OPERATION
FROM
OTHER
TELEPHONESYSTEM
NOTE:
If you want to hang up the
phone while you are in the middle of
playingmessages,youmustpress
4
to
STOPmessageplayback. Ifyoudonot
presJsrthiskeythe ITADwill continueto
playmessage(s)andtie upyourphone
line after vou have huna
UDI
If no command is entered for
approximately 20 seconds (the ITAD
will repeat the voice prompts at the
currentleveltwice during thistime) the
ITAD will automatically terminate
remote access mode from a different
telephone line.
VOICE PROMPTS
Uponenteringtheremoteaccessmode
you will be greeted with a series of
voice prompts. The first voice prompt
will be either
"X
new messages", or
"No new messages", indicating the
total
numberof newmessagespresent
in
All
mailboxes.
There are 3 different levels of voice
prompts.
The 1st or top levelvoice promptsare:
"Press
1
toplay messages
"
"Press
6
toselect mailbox"
"Press
*
for other functions
"
If the
*
key is pressed,the 2nd levelof
voice prompts are:
"Press
7
toplay announcement"
"Press
8
to select announcement"
"Press
9
to record announcement"
"Press0 to record memo
"
"Press
#
toturnansweringmachine
off"
"Press
*
for other functions
"
If the
*
keyispressedat level2,the 3rd
levelof voice prompts are:
"Duringmessage playback"
"Press
2
to repeat message"
"Press
3
to skip message"
"Press
4
to stop playback"
"Press
5
to delete message
"
"Press*for other functions
"
Ifthe
*
keyispressedatthislevel,voice
promptingreturnsto level
1
(toplevel).
Note that this 3 level menu structure
does not
restrict you to operating the
ITADfunctions inthe aboveorder. For
example,pressing
7
willplaythecurrent
announcementat
any time.
Listeningto Messages
1. Press
6
to enter mailbox selection.
2.
Press 1-4 for the corresponding
mailbox or 0 for
Generic
mailbox.
You could also press
5
for
All
mailboxesorskipsteps
1
&
2
(as
All
mailboxes is the default).
3.
Press
1
to play messagesfrom the
chosen mailbox.
4. Usethekeys2(repeat)
&
3
(skip)to
scan forwards and backwards
through messages.
5.
Press
5
at any time during or
immediately following a message
to delete.
LISTENTO
MESSAGES
WmlN
AEUOTEOPWnON
UOOQ
-9
REPEAT
Or
a
SKIP
I
Changingthe Announcement
1. Press
7
to check the current
announcement.
2.
Press
8
until the desired
Announcement is reached (1,2 or
OGM).
3. If Announcement 1or
2
ischosen,
press
9
torecord. If
OGM
ischosen
skip steps 3-5.
4. Record Announcement after the
beep.
5. Press
4
to stop recording.
Recording
a
Memo
1.
Press
6
for mailboxselection.
2. Choose mailbox 1-4,0 for Generic
mailbox,or5forAll mailboxes. You
can also skip steps
1
&
2 if you
choose All mailboxes
-
the memo
willbestoredintheGenericmailbox
(thisis the default).
3. Press
0
to record a memo to the
currently selectedmailbox.
4. Recordmemo after the tone.
5.
Press
4
to stop recording.

LEAVING
MEMOS
rnrmlH
REY~
OPERITIDH
UODU
e
g
:%&
am-
I
1
SPEAK AFTER TONE
1
8
urn
REMOTECOMMANDS
You can access almost all of the ITAD
functionsinremotemode. By pressing
keysonthe numbered keypadyou can
access these functions. Below is a
diagramof the numbered keypadwith
the related commands labeled. A
descriptionof each key follows.
ITAD REMOTE CONTROL
KEY SUMMERY
1
MESSAGE PLAYBACK
Press
1
toplaybackallthe messages
and memos inthe currentlyselected
mailbox.
Ifyouwantto listento messagesfrom
aparticularmailbox,press6for Select
Mailbox. Otherwise you will hear
messagesfrom AllMailboxes(thisis
the default in remote operation).
Before message playback, you will
hear either:
"Message playback mailbox
X",
where
X
is
1-4,
"Message playback generic
mailbox", or
"Messageplaybackallmailboxes",
depending on the current mailbox
selection. IftheITADisset upforzero
mailboxes,
thevoicepromptwillsimply
say:
"Messageplayback".
If the current mailbox selection is All
Mailboxes, there will be NO further
voice prompts indicating which
mailboxa message came from.
A voice prompt indicating the total
number of messages (new and old)
thatarepresentinthecurrentmailbox
selection is heardnext.
Message playback begins with new
messages with the most recent
messagesheardfirst.Eachmessage
is preceded by
"New message"
or
"Newmemo".
Message playback continues in the
same fashion with old messages.
Memosarepreceededwith
"Memo".
Thetimeanddaystampisannounced
aftereachmessage. You canbypass
the timetday informationand skip to
the next message by pressing
3,
the
Skipkey.
Atone isplayedafterthetimeandday
stamp to separatethe messages.
After all messages and memos have
been played, you will hear the final
voice prompt
"Endof messages".
2
REPEAT
Press
2
while listeningto messageto
repeat the current message.
*To repeat the previous message,
press
2
while listening to message
introduction or press
2
twice quickly
during messageplayback.
This keyhasnofunctionifITADisnot
in Playbackmode.
3
SKIP
Whilelisteningtomessages(Playback
mode), press
3
to terminate the
presentmessageandskiptothenext
message.
SKIP can also be used to bypass
voice prompts (e.g. before recording
a memo).
4
STOP
While in Playback mode, press
4
to
stop playbackof the message.
If noother keysarepressedwithin
20
seconds,remoteoperationmodewill
be terminated, and the base unit will
hang-upthe line (This only occurs if
you are inremoteaccessmode on a
different telephone line).
During memo or announcement
recording, press
4
to stop the
recording.
5
DELETE
*Press
5
at any time during, or
immediately following message
(during
timetdaystamp);thiswilldelete
the message.
*The voice prompt,
"Press
5
to
confirm deletion",
gives you one
more chanceto decide.
Press
5
again to delete.
You will hear
"Messagedeleted".
6 SELECT MAILBOX
Press6to selectthe currentmailbox.
AllMailboxesisthe default setting.
Youwillhearthevoiceprompt
"Enter
mailbox number".
If you have set
the ITADfor zero mailboxes,this key
willhavenofunction. Thevoiceprompt
inthis case will be
"No
mailboxes".
Valid mailbox numbers are
1-4
for
mailboxes
1-4
(onlymailboxnumbers
which were defined inthe set-upwill
be accepted),
0
for Genericmailbox,
and
5
for Allmailboxes.
*After a valid mailbox number is
entered,youwillheareither
"Mailbox
X",
where
X
is
1-4,"Generic
mailbox",
or
"All mailboxes
",
dependingon the selection made.
Afterthevoicemessageindicatesthe
current mailbox selection, an
additional voice prompt of either
"X
new messages",
or
"No new
messages"
will occur, indicatingthe
totalnumberof newmessagespresent
inthe new mailboxselection.
7
PLAYANNOUNCEMENT
Press
7
to play back the current
announcement,thiswill be preceded
by a voice prompt of either
"Announcement
1
",
"Announcement 2",
or
"Outgoingmessage
",
depending on the current
announcement selection.

8
SELECT ANNOUNCEMENT
Press
8
to toggle between available
announcements.
*After each press, you hear
"Announcement
1
",
"Announcement2':
or
"Outgoingmessage
".
The first time the key is pressed,the
voice promptwill indicatethe current
selection.
9
RECORD ANNOUNCEMENT
*Press
9
to record a new
announcement.
*You will hear
"Record
announcement
X
after tone,press
4
to end recording",
where
X
is
either
1
or2,dependingonthecurrent
announcementselection.
If your current selection is
Outgoing
Message,
you will hear
"Cannot
record outgoingmessage".
Press
4
to complete announcement
recording.
0
RECORD MEMO
Press
0
to recorda new memoto the
currently selected mailbox. If the
current mailbox selection is
All
Mailboxes,
then the message is
recordedintothe
Generic
mailbox.
You will hear either
"Recordmemo
for mailbox
X
aftertone,press
4
to
end recording",
where
X
is
1-4,
or
"Recordmemoforgenericmailbox
after tone, press
4
to end
recording
".
If you have set the ITAD for zero
mailboxes, you will hear
"Record
memo after tone, press
4
to end
recording".
Press
4
to STOP recording
You canpress
3
(skip)to bypassthe
voiceprompt,andyouillhearthebeep
to start recording.
#
OFF
Press
#
to switch the ITADoff.
You will hear
"Answeringmachine
off
".
Nowthe ITADwillonlybe reactivated
toansweranincomingcallifthecaller
lets it ring
10
times.
TAKING CARE OF YOUR
TELEPHONE.
Your
VTech900i
cordlesstelephone
contains sophisticated electronic
parts so it must be treatedwith care.
Avoid roughtreatment
Placethe handsetdown gently. Save
theoriginalpackingmaterialstoprotect
yourtelephoneif you everneedto ship
it.
Avoid water
Your telephone can be damaged if it
gets wet. Do not use the handset
outdoors in the rain, or handle it with
wet hands. Donotinstallyourbaseunit
near a sink, bathtub or shower.
Remember that electrical appliances
can causeserious injuryif usedwhen
youarewetorstandinginwater. Ifyour
base unit should fall into water,
DO
NOT RETRIEVE IT UNTIL YOU
UNPLUG THE POWER CORD AND
TELEPHONE LINE CORDS FROM
THE WALL.
Then pullthe unit out by
the unpluggedcords.
Electrical storms
Electricalstormscansometimescause
power surges harmful to electronic
equipment.
Foryour ownsafety, usecautionwhen
usingelectricappliancesduringstorms.
Cleaningyour telephone
Your telephone has a durable plastic
casing that should retain its luster for
many years. Clean it only with a soft
clothslightlydampenedwithwateror a
mildsoap. Do not useexcesswateror
cleaning solvents of any kind.

NOISE OR INTERFERENCE
Your VTech 900icordless telephone
has auto-channel scan circuitry which
will detect excess noise and change
the channel of the phone to reduce it.
This is done automatically.
Since the VTech 900iis a fully digital
phone it does not suffer from noise
associated with regular cordless
phones. At timesyou mayexperience
occasional"dropouts"especiallyatthe
extreme edges of the phone's range.
Simply move closer to the base unit
and thiswill disappear.
AUTOMATIC SECURITY CODING
Everytimeyouplacethehandsetinthe
base,your VTechgOOiphonerandomly
picks one of 65,000 possible security
codes. This allows your handset and
base to recognize each other, and
minimizes the possibility of another
cordlessphone usingsyourtelephone
line.
OUT OF RANGE INDICATION
Ifthehandsetismovedtoapointwhere
the base and handset can no longer
communicate,the handsetwill makea
quick series of beepsto signal "Out of
Range." It will continue to make the
beepsat 10-30second intervals.
OUT OF RANGE WHEN PHONE IS
ON,
Ifyouarepresentlyengagedinaphone
conversationmovecloserto the base.
Ifthe base unit does not communicate
with the handset within 30 seconds of
losingcontactitwillautomaticallyhang
UP.
OUT OF RANGE WHEN PHONE IS
OFF
If the phone is
OFF,
the handset and
base still monitor each other to make
surethattheycancommunicate. Ifthe
handset is moved out of range, the
handsetwillmakeaseries of beepsat
10-30second intervals. This tells you
that the handset may not ring for
incomingcalls.
If you wish to stop the "Outof Range"
tones, simply press and hold any
number key on the handset until the
handset beeps an acknowledgment.
The handset will not work until the
handset is broughtcloserto the base.
The base unit will continueto function
during this time.
When the base unit is unplugged
from the power supply, the handset
will begin to give the "Out of Range"
warningbeeps. Thiswill continueuntil
the base is powered again and the
handsetisplacedintothe basecradle
for re-initialization. If you wish to turn
off the "Outof Range"beeping,simply
press any key on the handset and
hold until the handset beeps an
acknowledgment.
If you have difficulty operating your
phone, the suggestions below should
solve the problem. If you still have
difficultyaftertryingthesesuggestions,
Inthe UScall:
VTECH Communications
at 1-800-624-5688.
In Canada call:
VTECH Electronics
at 1-800-267-7377
THE PHONE DOESN'T WORK AT
ALL.
Makesurethe powercordisplugged
in.
Make sure the telephone line cord is
pluggedfirmly intothe base unit and
the telephone wall jack.
Make sure the batteries are properly
charged. If the
MUTEILOW BAT
indicator is on, the battery needs
charging. If the
IN USE
and
PHONE
indicators do
not
light when you
press
PHONE,
you must charge the
batteries.
If you recentlyinstalleda newbattery
pack,makesureitisinstalledcorrectly.
Followthe procedure:
1.
Removebattery from handset.
2.
Disconnectpowersupplyfrombase
unit.
3.
Wait a few minutes.
4.
Re-connect power supply to base
unit.
5.
Replacebattery in handset.
6. Place the handset in the charge
cradle. Wait 60 seconds.
Pick up the handset and press
PHONE.
NO DIALTONE.
Firstcheckallthesuggestionsabove.
If you still don't hear a dial tone,
disconnect the base unit from the
telephonejackandconnectadifferent
phone. Ifthere isnodialtoneonthat
phone either, the problem is in your
wiringor localservice. Callyour local
telephone company.
YOU GET NOISE, STATIC, OR A
WEAK SIGNAL EVEN WHEN
YOU'RE NEARTHE BASE UNIT.
-Place the handset in the base
momentarily to re-set the security
code. Then press
PHONE
to get a
line.
Householdappliancespluggedintothe
same circuit as the base unit can
sometimes cause interference. Try
movingthe appliance or the base unit
to another outlet.
YOU GET NOISE, STATIC, OR A
WEAK SIGNAL WHEN YOU'RE
AWAY FROMTHE BASE UNIT.
Youmaybeoutof range. Eithermove
closetothebase,orrelocatethebase
unit.
-The layout of your home may be
limiting the range. Try moving the
baseunitto the second or thirdfloor.
Other manuals for 900i
1
Table of contents
Other V-tech Cordless Telephone manuals

V-tech
V-tech gz2335 User manual

V-tech
V-tech CS6328-2 User manual

V-tech
V-tech 2101 User manual

V-tech
V-tech CS5211 User manual

V-tech
V-tech i6768 Setup guide

V-tech
V-tech ia5870 User manual

V-tech
V-tech vt9118 User manual

V-tech
V-tech 6042 User manual

V-tech
V-tech DS6670-6C User manual

V-tech
V-tech DS6221 User manual

V-tech
V-tech DS6511 User manual

V-tech
V-tech 6043 - DECT 6.0 Cordless Phone User manual

V-tech
V-tech IS6110 Quick start guide

V-tech
V-tech CS6948-3 User manual

V-tech
V-tech t2415 User manual

V-tech
V-tech vt20-2480 User manual

V-tech
V-tech t 2435 User guide

V-tech
V-tech LS6117 User manual

V-tech
V-tech mi 6823 User manual

V-tech
V-tech PHONES PACKAGE I6720 User manual