Vaco Hiti 350 User manual

User Instructions
Instrukcja obsługi dla użytkownika
Infrared panel heater.
IR panel grzewczy. Promiennik podczerwieni.
VHE-CC-0350-W24R
VHE-CC-0600-W24R
Vaco Hiti 350
Vaco Hiti 600


CONTENTS
IMPORTANT SAFEGUARDS....................................................................................................................................................4
TECHNICAL DATA .......................................................................................................................................................................5
GENERAL SAFETY INSTRUCTIONS.....................................................................................................................................5
DESCRIPTION, COMPOSITION AND INSTALLATION...............................................................................................8
USE AND WORKING ................................................................................................................................................................13
OPERATION USING THE CONTROL PANEL ON THE HEATER..........................................................................14
OPERATION USING THE REMOTE CONTROL...........................................................................................................16
WI-FI AND APP OPERATION...............................................................................................................................................22
CONNECTING THE APPLIANCE TO WIFI .....................................................................................................................22
SAFETY FEATURE.......................................................................................................................................................................30
CLEANING AND MAINTENANCE .....................................................................................................................................30
REMOVAL ......................................................................................................................................................................................30
SPIS TREŚCI
BEZPIECZEŃSTWO...................................................................................................................................................................31
DANE TECHNICZNE.................................................................................................................................................................32
OGÓLNE WSKAZÓWKI DOTYCZĄCE BEZPIECZEŃSTWA .................................................................................32
OPIS, BUDOWA I INSTALACJA..........................................................................................................................................35
UŻYTKOWANIE I DZIAŁANIE..............................................................................................................................................40
OBSŁUGA Z WYKORZYSTANIEM PANELU OPERACYJNEGO GRZEJNIKA................................................41
OBSŁUGA ZA POMOCĄ PILOTA ZDALNEGO STEROWANIA..........................................................................43
OBSŁUGA WI-FI I APLIKACJI ...............................................................................................................................................50
PODŁĄCZANIE URZĄDZENIA DO SIECI WI-FI..........................................................................................................50
ZABEZPIECZENIE.......................................................................................................................................................................58
CZYSZCZENIE I KONSERWACJA.......................................................................................................................................59
UTYLIZACJA.................................................................................................................................................................................59

4
IMPORTANT SAFEGUARDS
1. This appliance can be used by children aged from 8 years and above and persons with
reduced physical, sensory or mental capabilities or lack of experience and knowledge
if they have been given supervision or instruction concerning use of the appliance in a
safe way and understand the hazards involved. Children shall not play with the
appliance. Cleaning and user maintenance shall not be made by children without
supervision.
2. Children of less than 3 years should be kept away unless continuously supervised.
Children aged from 3 years and less than 8 years shall only switch on/off the appliance
provided that it has been placed or installed in its intended normal operating position
and they have been given supervision or instruction concerning use of the appliance
in a safe way and understand the hazards involved. Children aged from 3 years and
less than 8 years shall not plug in, regulate and clean the appliance or perform user
maintenance.
3. CAUTION — Some parts of this product can become very hot and cause burns.
Particular attention has to be given where children and vulnerable people are present.
4. If the supply cord is damaged, it must be replaced by the manufacturer, its service
agent or similarly qualified persons in order to avoid a hazard.
5. WARNING: In order to avoid overheating, do not cover the heater.
6. The heater must not be located immediately below a socket-outlet.
7. WARNING: The heater must not be used if the glass panels are damaged.
EN This symbol on your device means: do notcover!

5
TECHNICAL DATA
Type VHE-CC-0350-W24R VHE-CC-0600-W24R
Supply Voltage 230V~50-60Hz 230V~50-60Hz
Power 350W 600W
Protection Class IP24 IP24
Dimensions 60X60CM 60X100CM
GENERAL SAFETY INSTRUCTIONS
1. Before using the machine, carefully read this entire instruction manual.
2. Before using your new heater, check it, including cord and plug, for anyvisible
damage. Do not use a damaged heater, but send it back to your dealerfor
replacement.
3. Do not use the heater until it is been fully installed in accordance with the instructions
under the heading ‘Description, Composition and Installation’.
4. This heater is strictly intended for normal domestic use. Only use it forthe (additional)
heating of your home.
5. This heater is in principle suitable for use in wet or damp rooms such asbathrooms,
washrooms, etc. (IP24).and indoor use only! If the heater used in bathroom or
washroom (wet or damp room), please make sure the IPX0 plug cannot be used in
Zone 0 (IPX7), Zone 1(IPX4) and Zone 2(IPX4) according to HD 60364-7-701: 2007
unless the plug and the socket outlet are protected by an enclosure with at least IPX4
protection degree. Keep it at least 60 cm. away from water points andmake sure that
it can never fall into water and that no water can enter the stove. Shouldthis ever
happen, take out the plug from the socket first! Do not use an internally wet stove
again but offer it for repair. Never immerse the heater, cord or plug in wateror other
liquids and never touch the heater with wet hands.
6. The supply voltage and utility frequency, specified on the machine, need tomatch
those of the socket that is used. Only use an undamaged, earthed socket thatis
secured with a 30 mA earth leakage circuit breaker. The electrical socket thatyou
are using must be to hand at all times in order to be able to remove the plug fromthe
socket in the event of an emergency

6
7. Fully extend the cord before plugging in the heater. Make sure it does not comeinto
contact with any part of the heater and prevent it from heating up any other way.Do
not run the cord underneath carpeting; do not cover it with mats, carpet stripsor
similar and make sure it is not placed in any passageways. Make sure the cord cannot
be stepped on and that no furniture is placed on top of it. Do not lead the cord
around sharp corners and do not roll it up too tightly after use!
8. If possible, do not use an extension cord, as this poses the risk of overheatingand fire.
If the use of an extension cord is unavoidable, then make sure it isan undamaged,
approved extension cord with a minimum diameter of 2 x 1.5 mm² anda minimum
permissible power of 1000 Watt. To prevent overheating, always fully extend the cord!
9. During use the plug can feel a little warm, that's normal. Is it really warm, thenthere is
probably something wrong with the socket. Contact your electrician.
10. Do not use the heater outdoors and do not use it in spaces, smaller than 7m³.
11. A heater contains hot and/or glowing and sparking components. Do not,therefore,
use it in areas where fuels, paint, flammable liquids and/or gasses etc. arestored.
12. Do not place the heater near, under, or directly opposite a socket and do not placeit
near an open fire or other heat source.
13. Do not use the heater near or directly opposite furniture, animals, curtains,paper,
clothes, bedding or other inflammable objects. Keep them at least 1 metre awayfrom
the heater!
14. Never cover a heater! Never use the heater to dry clothes and do not placeanything
on top of the heater. Do not let anything lean against the heater.
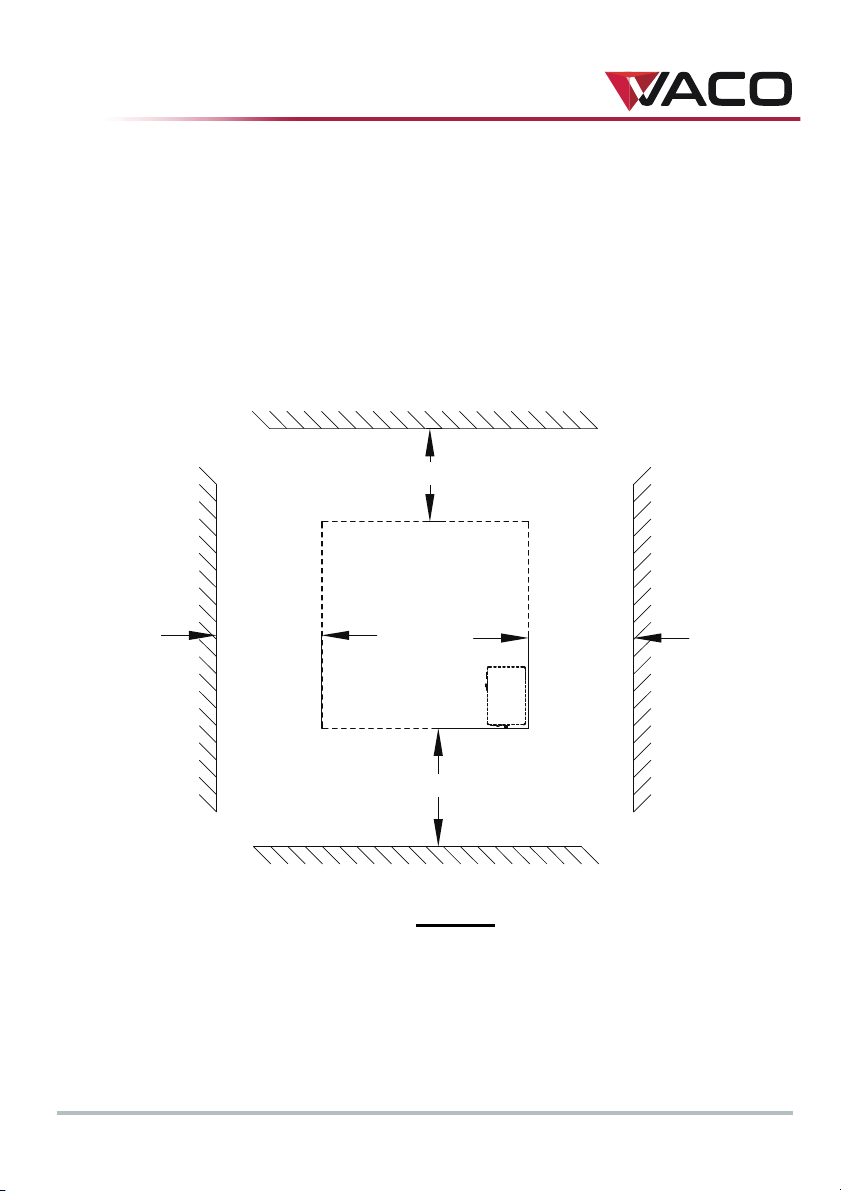
15. Make sure that the air around the heater can circulate freely. Do not place theheater
too close to walls or large objects and do not place it under shelves, cupboardsor
similar: take at all sides at least 30 cm free space and at least 20 cm from thefloor. For
hanging installation: don’t block the space between stove and wall.
16. Always switch the heater off, unplug it and leave to cool downbefore:
- cleaning the heater
- carrying out maintenance on the heater
- touching or moving the heater.

7
17. This machine gets hot when in use (± 95°C). To prevent burns, do not let bareskin
come into contact with hot surfaces.
18. Carefully supervise when this appliance is used in the presence ofchildren,
incapacitated persons or pets. Let persons who are not able to leave theroom
independently, leave behind a working stove. The surface becomes hot (up to95°C),
so keep children and people with disabilities out of the neighborhood. Keepthe
packaging material away from children.
19. This heater can also be controlled with a timer or an app as well asmanually. However
you operate it, always ensure that all safety regulations havebeen observed!
20. Keep the heater clean. Dust, dirt and/or a build up of deposits in or behind theheater
are a common cause of overheating. Make sure these deposits areremoved regularly.
21. Do not turn on the appliance if you have discovered damage to the applianceitself,
the cord or the plug, if the appliance is malfunctioning, if it has been dropped orif
there are any other signs of a defect. Return the complete product to the vendor orto
a certified electrician for inspection and/or repair. Always ask for the original parts.
22. Do not use attachments and/or accessories that have not been recommendedor
supplied by the manufacturer.
23. The appliance (incl. cord and plug) may only be opened and/or repaired byproperly
authorised and qualified persons.
24. Only use this heater for its intended purpose and as described in thisinstruction
manual.
Not abiding by the instructions may lead to damage, fire and/or personal injuries. A failure to
adhere to these rules also immediately nullifies the guarantee and vendor, importer and/or
manufacturer do not take responsibility for any of theconsequences!

8
DESCRIPTION, COMPOSITION AND INSTALLATION
1
2
3
56
4
7
Heating panel
1. Main switch
2. Electric cable with plug
3. Temperature sensor
4. Control box
5. Wall mounting bracket
6. Display
7. Bracket for keeping space from heater
to the wall
Remove all packaging material and keep out of reach of children.
After removing packaging, check the appliance for damage or other signs thatcould
indicate a fault/defect/malfunction. In case of doubt, do not use the appliance,but contact
your vendor for inspection orreplacement.
The fixing materials supplied are intended for a brick wall. If you are using adifferent type of
surface, you should supply appropriate fixing materialsyourself.

9
This heater has been designed to hang securely from thewall.
Do not use it until it has been properly installed, as described in these instructions for
use and never, for example, in a standing position orwhen leaning against
something!
WALL MOUNTING:
The heater must be at least 30 cm removed from all objects, walls, etc.; the distanceto the
floor must be at least 20 cm and there must be at least 30 cm above theheater.
Pay attention: The wall-suspension system on the rear side of the heating panel ispre-
mounted in order to hang the heating panel vertically. Viewed from the front, themain
switch is at the bottom side and the control panel is at the right-hand side.
Minimum 30 cm
Minimum 30 cm
Minimum 20 cm
Minimum 30 cm

10
A. Suspension frame including
suspension knobs
B. Wall spacer
Choose a firm, even, vertical wall made of heat-resistant material on which tohang the
heater.
Define the position of the suspension frame: the frame should be mountedhorizontal
to the wall. Position the suspension frame in such a manner that theminimum
distances stated in the drawing above are guaranteed when installing theheating
panel in the suspension frame. Mount the suspension frame with the correctside
upwards (see the ‘This side up’ label on the suspension frame).
Mark where the 4 holes need to be drilled: do this at the correct distanceand perfectly
level with respect to each other.

11
Drill 10mm holes in the marked places and insert the cotter bolts into the holes.
Screw the suspension frame immovably against the wall.
Hang the heating panel in the suspension frame: the panel’s suspensionknobs
through the eyes in the suspension frame.
Slide the panel as far as possible to the right side and lower it as far aspossible. Now
the panel is suspended securely.
To remove the panel from the wall, you must slide in the opposite direction andlift, until the
knobs are in front of the eyes again. Now you can take the paneloff.
Holes
Expansion bolt
T
he wall bracket

12
Note: Guide the electric cable and the thermostat cable(if applicable) immediately
downwards and make surethat they do not come into contact with the panel. Donot
conceal any surplus cable behind the heater!

13
USE AND WORKING
Control panel:
1. Main switch & pilot light
2. Temperature sensor
3. Display
4. Up/down key
5. ON/OFF switch
6. button M
Display (3)
a. Temperature/Data
b. Heating symbol
c. Open-window detection symbol
d. WiFi symbol
e. Capacity indication symbol

14
Remote control:
1. ON/OFF button
2. C (Cancel) button
3. Open-window detection button
4. SET button
5. OK button
6. EDIT button
7. ECO button
8. TEMP (temperature) button
9. Time on/Time off button
10. Higher (+)button
11. Lower (–)button
12. WEEK button
1
3
4
5
7
9
11
12
2
6
8
9
10
OPERATION USING THE CONTROL PANEL ON THE
HEATER
Make sure the heater is firmly attached to the wall. Turn the main switch ON.
The symbol indicating the capacity lights up and the WiFi symbol flashes on thedisplay of
the heater. When the WiFi symbol flashes, you can make aconnection.
1. Press the ON/OFF button on the control panel.
First the heater’s display shows the set temperature for 3 seconds and subsequently,
the ambient temperature. (The set temperature is the mostrecently set temperature
or 20 °C in case of first use.)
If the set temperature is higher than the ambient temperature, the heater will startto
heat and the heating symbol will appear.

15
2. Using the + and – buttons, the set temperature can be adjusted from 0 °C to 37 °C). If
the set temperature is higher than the ambient temperature, the heater will start to
heat and the heating symbol will appear.
When the set temperature is reached, the heater will automatically switch OFF and will
switch ON again when the room coolsdown.
The heating symbol will disappear and re-appearaccordingly.
If no button is pressed during two (2) minutes, the ambient temperature willdisappear from
the display. Pressing any button will make the ambient temperaturere-appear.
SETTING THE TIME AND DAY ON THE HEATER USING THE CONTROL
PANEL
Using the M button, the time and day of the week can be entered so that you canuse the
timer function.
The heating panel should be ON, but should NOT heat and therefore, there is no heating
symbol visible on the display. (Do this by setting the temperature lower than the ambient
temperature, for example.)
Step Press button: The display shows: Explanation:
1 M HH flashes
2 + or – 1 to 7 Select day of the: 1 = Monday,
2 = Tuesday, etc.
3 M H1 flashes
4 + or – 1 to 24 Select the correct hour
5 M H2 flashes
6 + or – 1 to 60 Select the correct minute
7 M Ambient temperature
8 Day and time are set.
CHECKING THE DAY/TIME DATA ON THE HEATER USING THE CONTROL
PANEL
The heating panel should be ON and should heat. Therefore, the heating symbolis visible on
the heater’s display. (Do this by setting the temperature higher thanthe ambient
temperature, for example.)

16
Briefly and consecutively press the M button on the heater’s control panel in orderto check
the day and time: HH = day of the week, H1 = hour and H2 =minute
Attention: If the infrared panel is switched OFF using the main switch o
r
by removing the
plug from the socket, the day will be set to 1 and the time to 00.00the next
time you switch the heater ON again.
OPERATION USING THE REMOTE CONTROL
The remote control should be directed towards the display in orderto operate the heating
panel using the remote control. Theillustration shows the position (IR) of the reception point
of the remote control.
1. Turn the main switch on the heater ON.
The symbol indicating the capacity lights up and the WiFi symbol flashes on the
heater’s display. When the WiFi symbolflashes, you can make a connection (please
refer to the end of this instruction booklet).
2. Press the red ON/OFF button on the remote control.
First the heater’s display shows the set temperature for 3 seconds and subsequently,
the ambient temperature. (Theset temperature is the most recently set temperature
or 20 °C in case of first use.) If the set temperature is higher thanthe ambient
temperature, the heater will start to heat and the heating symbolwill appear.
3. Using the + and – buttons, the set temperature can be adjusted from 0 °C to 37 °C). If
the set temperature is higher than the ambient temperature, the heater will start to
heat and the heating symbol will appear.
When the set temperature is reached, the heater will automatically switch OFFand will
switch ON again when the room coolsdown.
The heating symbol will disappear and re-appearaccordingly.
If no button is pressed during two (2) minutes, the ambient temperature willdisappear from
the display. Pressing any button will make the ambient temperaturere-appear.
SETTING THE TIME AND DAY ON THE HEATER USING THE REMOTE
CONTROL
First, the day of the week and time should be entered in order to be able to use the timer
function.

17
The heating panel should be ON, but should NOT heat and therefore, there is no heating
symbol visible on the heater’s display. (Do this by setting the temperature lower than the
ambient temperature, for example.)
Step Press button: The display shows: Explanation:
1 SET (3 sec.) HH flashes
2 + or – 1 to 7 Select day of the: 1 = Monday,
2 = Tuesday, etc.
3 SET H1 flashes
4 + or – 1 to 24 Select the correct hour
5 SET H2 flashes
6 + or – 1 to 60 Select the correct minute
7 SET Ambient temperature
8 Day and time are set.
CHECKING THE DAY OF THE WEEK AND TIME USING THE REMOTE
CONTROL
The heater should be ON and should heat. Therefore, the heating symbol is visibleon the
heater’s display. (Do this by setting the temperature higher than theambient temperature,
for example.)
Briefly and consecutively press the SET button on the remote control in order tocheck the
day and time: HH = day of the week, H1 = hour and H2 =minute
SETTING THE WEEK TIMER USING THE REMOTE CONTROL
In advance: Setting the week timer can be done using remote the control, but it is easier
using the APP. As soon as the heater has a WiFi connection,you can no longer use the timer
function on the remote control. Thefunction buttons concerned will automatically switch
off.
Attention: Timer setting made with the remote control are not visible in the APP and timer
settings made with the APP are not visible on the heater’s display.As soon as
there is a WiFi connection, you can no longer make a newtimer setting using
the remote control. Therefore, never mix the twomethods for setting the
times!

18
Attention: If the infrared panel is switched OFF using the main switch o
r
by removing the
plug from the socket, the day will be set to 1 and the time to 00.00the next time
you switch the heater ON again.
However, the timer data that were entered previously (ON and OFFtimes of the
week timer) are stored. To avoid misunderstandings, the weektimer is
automatically set to OFF in case of turning the heater off using themain switch
or removing the plug from the socket. Otherwise, the panelwould switch on
and off at the wrong times.
Switching the week times on again is describedbelow.
Please note that the abovementioned does not apply when usingthe APP. The
APP updates the time automatically andtherefore, you do not have to enter the
timemanually.
Attention: If in the time setting mode no button is pressed for five (5) seconds, the timer-
setting mode will stop and you will have to start all overagain.
Attention: All timer settings – maximum 28 settings: seven (7) days multiplied by
maximum four (4) settings per day – are processed consecutively. herefore,
make sure that they do NOT contain contradictions.
Step Press button: The display shows: Explanation:
1 WEEK (3 sec.) UU flashes
2 SET ON/OFF flashes
3 + or – Select:
+ = ON: Timer on (on the set times, the
heater will automatically switch on/off)
– = OFF: Timer off (on the set times, the
heater will not automatically switch
on/off)
4 OK UU
5 SET 01 or 99 flashes Select:
+ = 01: All timer settings are executed
only once
– = 99: All timer settings are executed
endlessly [see Attention (1)].
6 OK UU
7 SET U1 flashes

19
Step Press button: The display shows: Explanation:
8 + or – U1 to U7 flashes Select the day of the week
(1 = Monday, 2 = Tuesday, etc.) for
which you want to make a timer setting.
9 OK The selected day
10 EDIT 01 flashes
11 + or – You should give a number (1 to 4) to
this day, because you can only make
four (4) timer settings per day. The
sequence of the numbering isnot
important [see Attention (2)].
12 OK The selected number
13 TEMP HP flashes
14 + or – Set the desired temperature (0 °C to
37 °C). The default setting is 20 °C.
15 OK The selected
temperature
16 TIME ON HE flashes
17 + or – Set the desired start time from 00.00 to
23.00 [see Attention (3)].
18 OK The selected start time
19 TIME OFF HF flashes
20 + or – Set the desired stop time from00.00 to
23.00 [see Attention (3)].
21 OK The selected stop time
Timer setting(s) is/are entered; the ambient temperature will appear on the displayafter
three (3) seconds.
ATTENTION (1):
The timer setting(s), which you make under ‘once only (01)’, should be made forthe current
week. On Sunday (day 7) at 24.00, all ‘once only’ setting(s) are set to‘non- active’. Therefore, a
timer setting for Saturday that you made on Tuesday will work,but a timer setting for
Tuesday that you make on Saturday will notwork!

20
ATTENTION (2):
If a timer setting with number 01 was made for this day, you must manually set thenext
timer setting for this day to 02 using the + button, otherwise the timer setting 01 willbe
overwritten.
ATTENTION (3):
Start & stop times can only be entered in whole hours (not inminutes).
REMOVAL OF TIMER SETTINGS USING THE REMOTE CONTROL
REMOVING ALL TIMER SETTINGS
1. Press the WEEK button for three (3) seconds, until the display shows theflashing UU.
2. Pressing the C (Cancel) button will erase all timer settings.
REMOVING ALL TIMER SETTINGS OF A SPECIFIC DAY
1. Press the WEEK button for three (3) seconds, until the display shows theflashing UU.
2. Press the SET button and the display will show your flashing selection ofON/OFF
(timer on or off).
3. Press the SET button again and the display will show your flashing selectionof 01/99
(only once or endlessly).
4. Press the SET button again and the display will show the flashing U1 (day1).
5. Using the + and/or – buttons, select the day for which you want to remove thetimer
settings.
6. Pressing the C (Cancel) button will erase all timer settings of the day concerned.
REMOVING A SPECIFIC TIMER SETTING
1. Press the WEEK button for three (3) seconds, until the display shows theflashing UU.
2. Press the SET button and the display will show your flashing selection of ON/OFF
(timer on or off).
3. Press the SET button again and the display will show your flashing selectionof 01/99
(only once or endlessly).
4. Press the SET button again and the display will show the flashing U1 (day1).
This manual suits for next models
3
Table of contents
Languages:
Other Vaco Heater manuals