Vakaros Atlas 1 User manual

Atlas 1 User Manual
This document is distributed for Atlas 1 users that want the original user
manual. We suggest that you also look at the Atlas 2 documentation. While
some of the hardware capabilities are different, the Atlas 1 will receive many
of the same software features via continuing updates.
Welcome to the future of sailing. The Atlas is the culmination of years of work
and the cornerstone of a growing ecosystems of sensors and displays. This
guide covers the last version of the Atlas 1 firmware prior to the release of the
Atlas 2. New versions are released regularly with new features and
improvements—see Vakaros Connect, below, for more details.

Power:
Press and hold the Power/Menu button to turn the Atlas on or off.
To charge the Atlas, connect the USB end of the included charging cable a
USB charger. Then attach the magnetic end to the charging port on the Atlas.
It is recommended to charge your Atlas to full capacity at least once every 3
months.
If the Atlas was previously used in salt water, wipe down the charging port
with a damp cloth prior to charging, see care instructions below.
Display & Buttons:
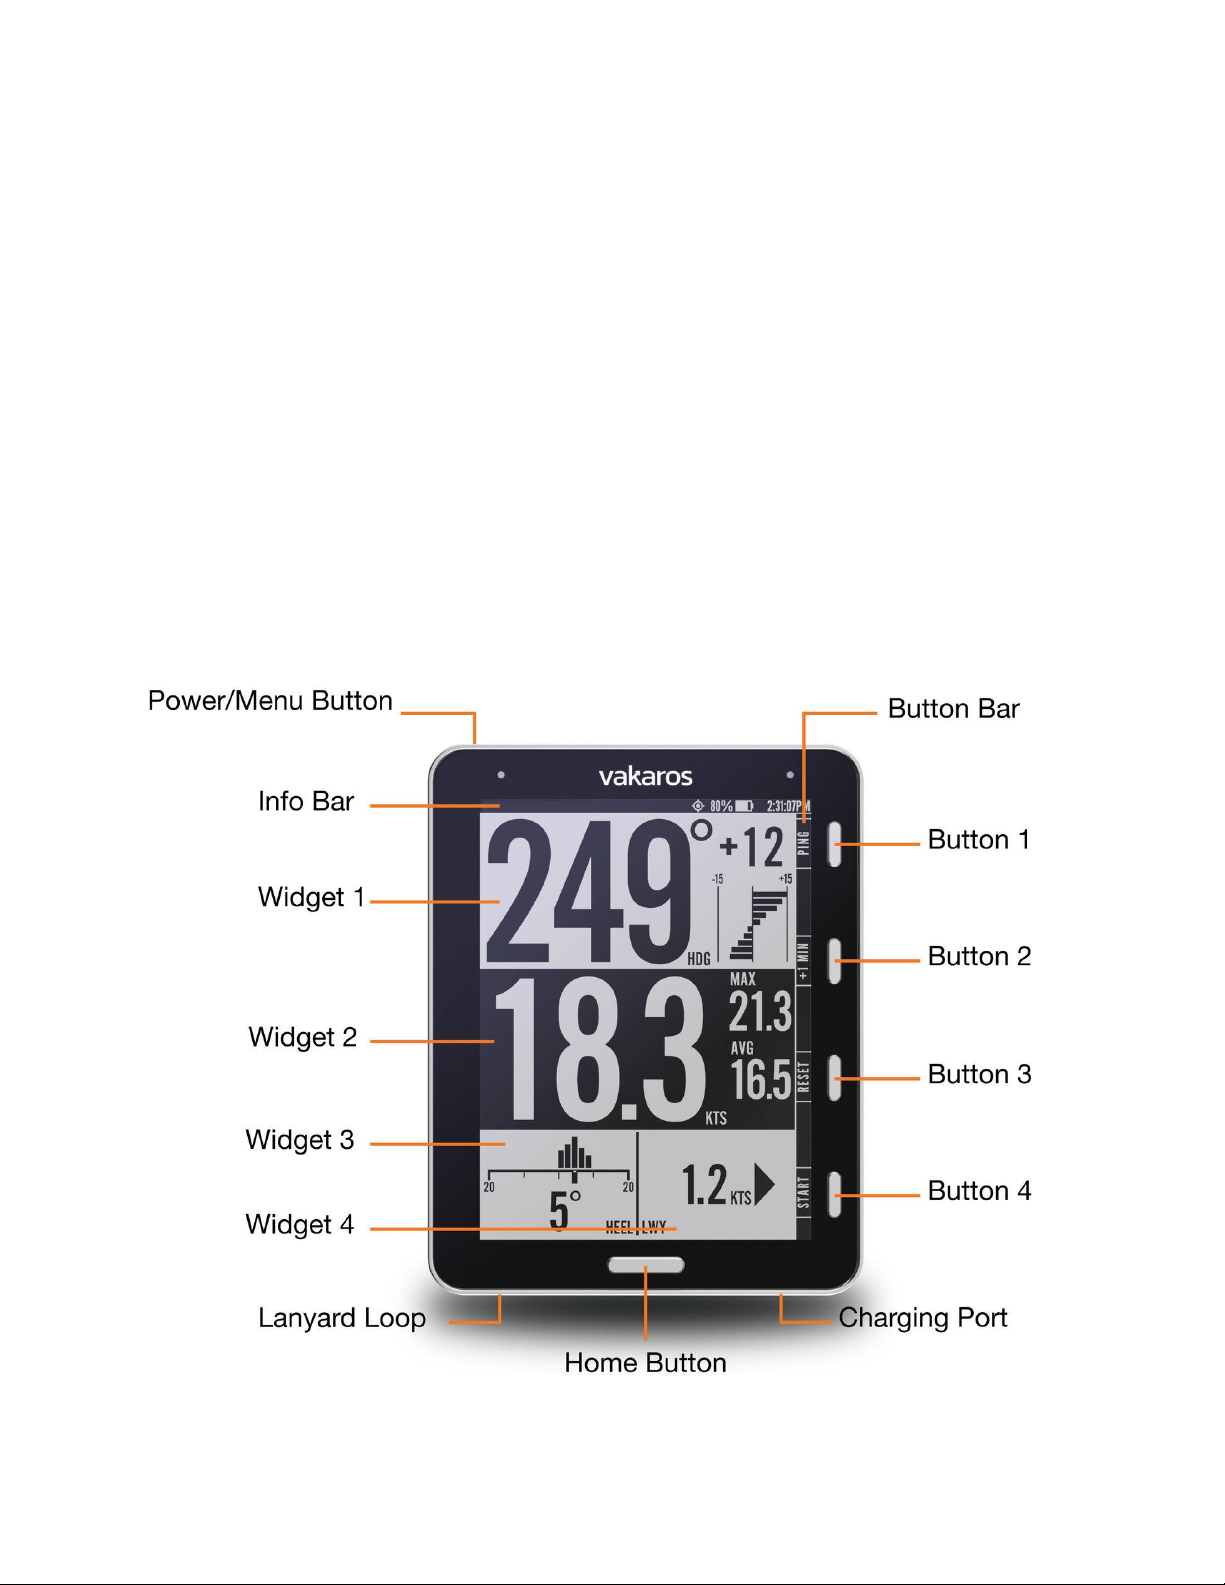
The info bar displays device information like Battery Level and Current Time.
Buttons 1 - 4 are contextual and can change function based on what is being
displayed. The button bar displays the current functions of each of the 4
buttons. The default and most common functions are: LINE, ANGLE, RESET,
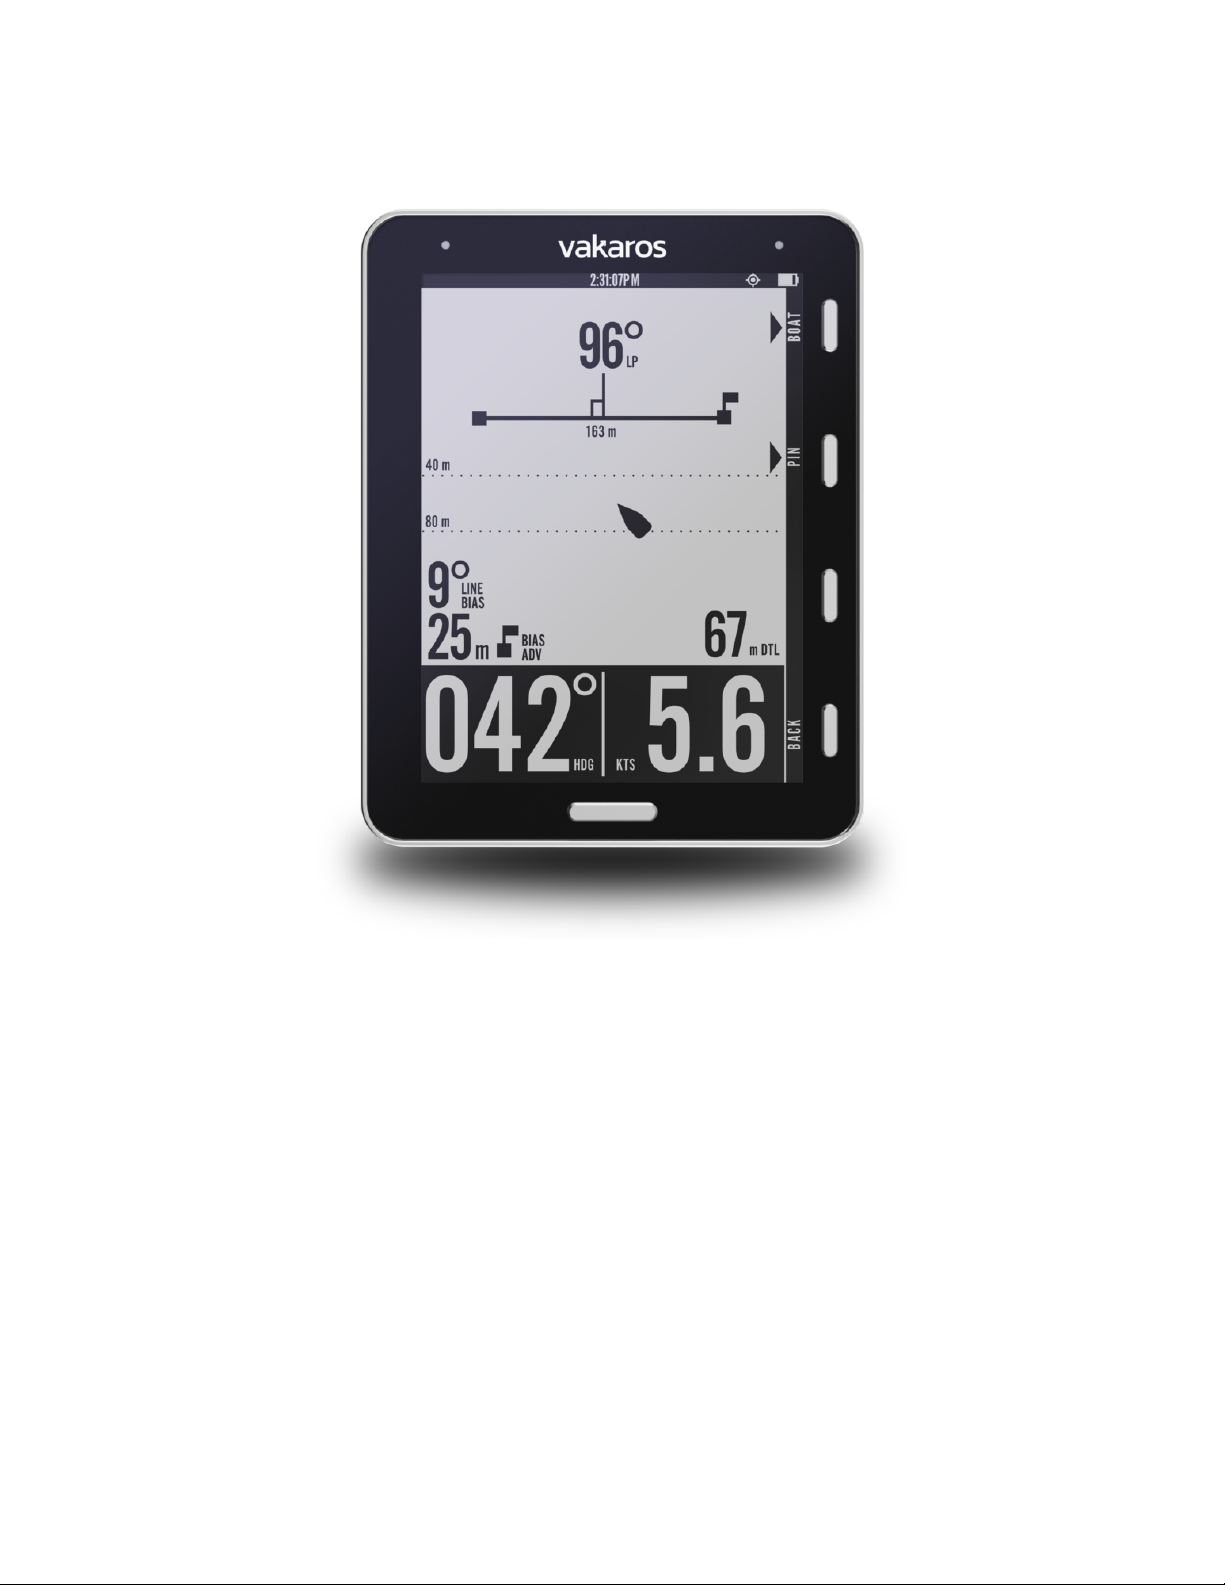
and START. LINE is used to set the starting marks (see Line Menu, below).
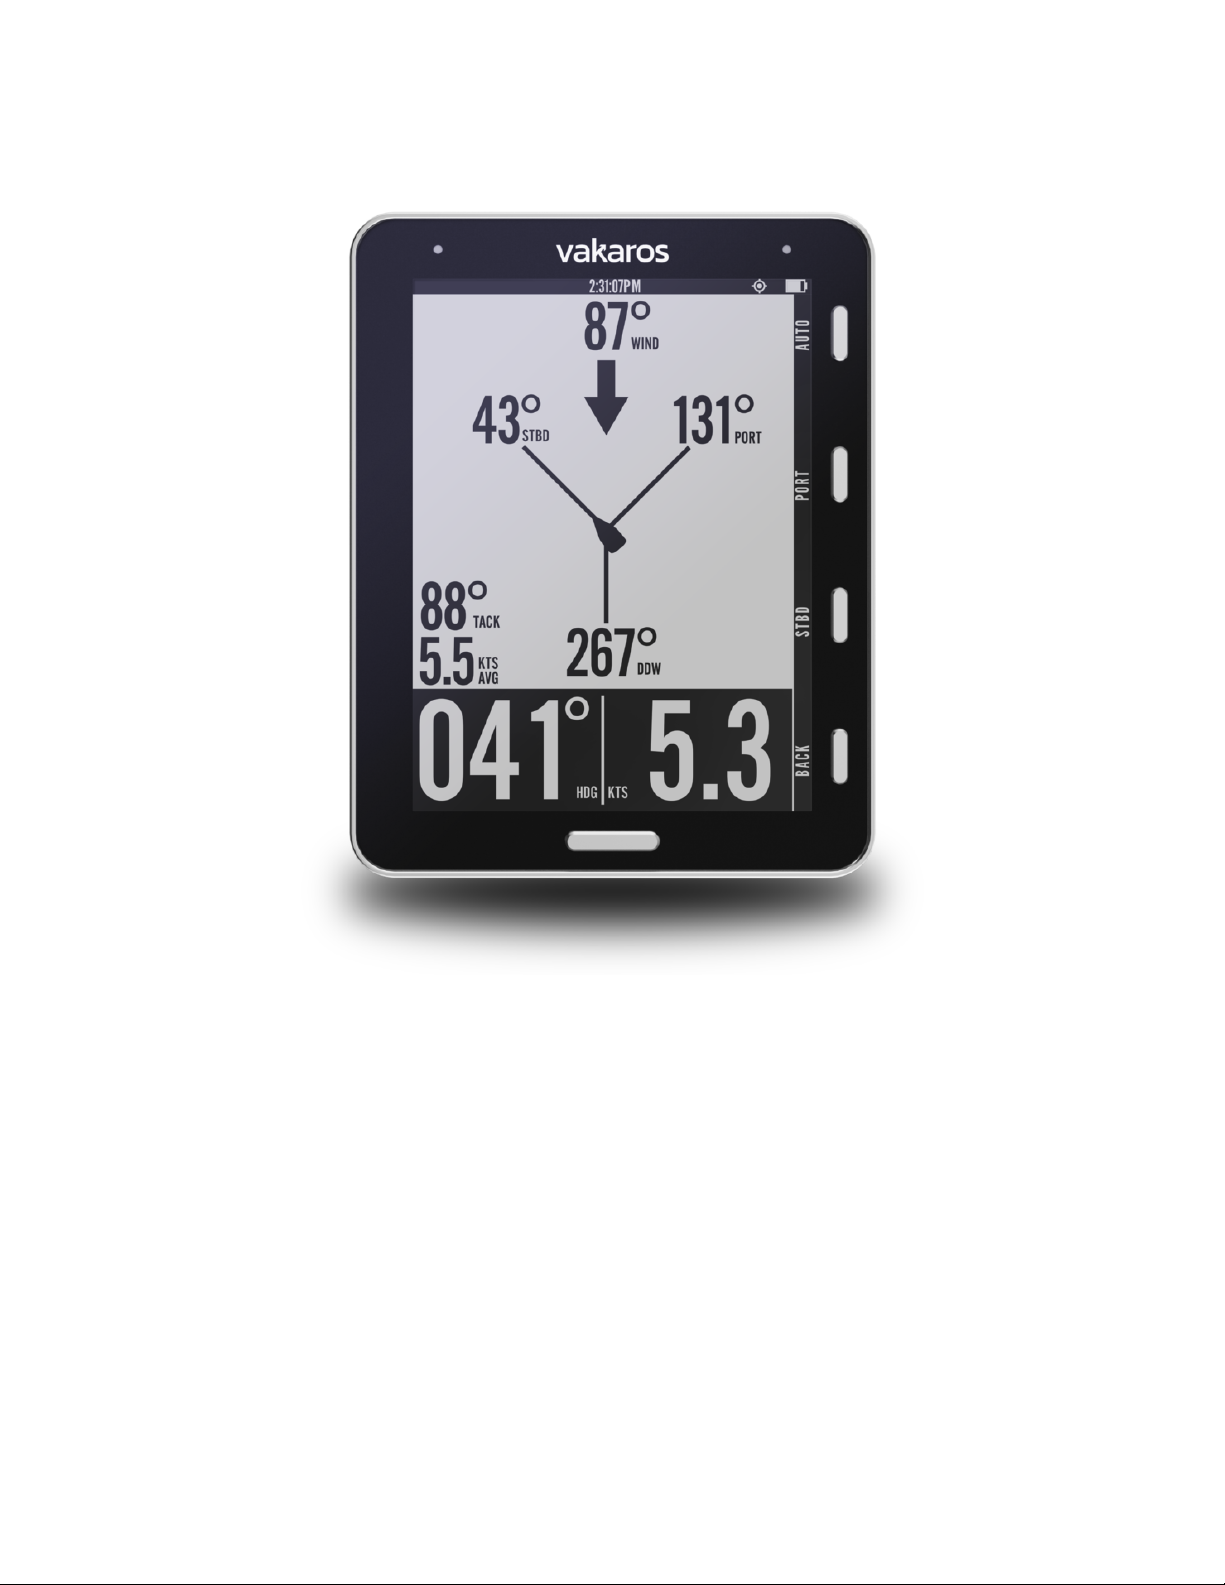
ANGLE is used to set and view reference angles for tracking shifts, RESET
and START control the start timer.
The Home button allows you to return to the home screen from any menu and
is used to cycle through your configured layouts.
Screens:
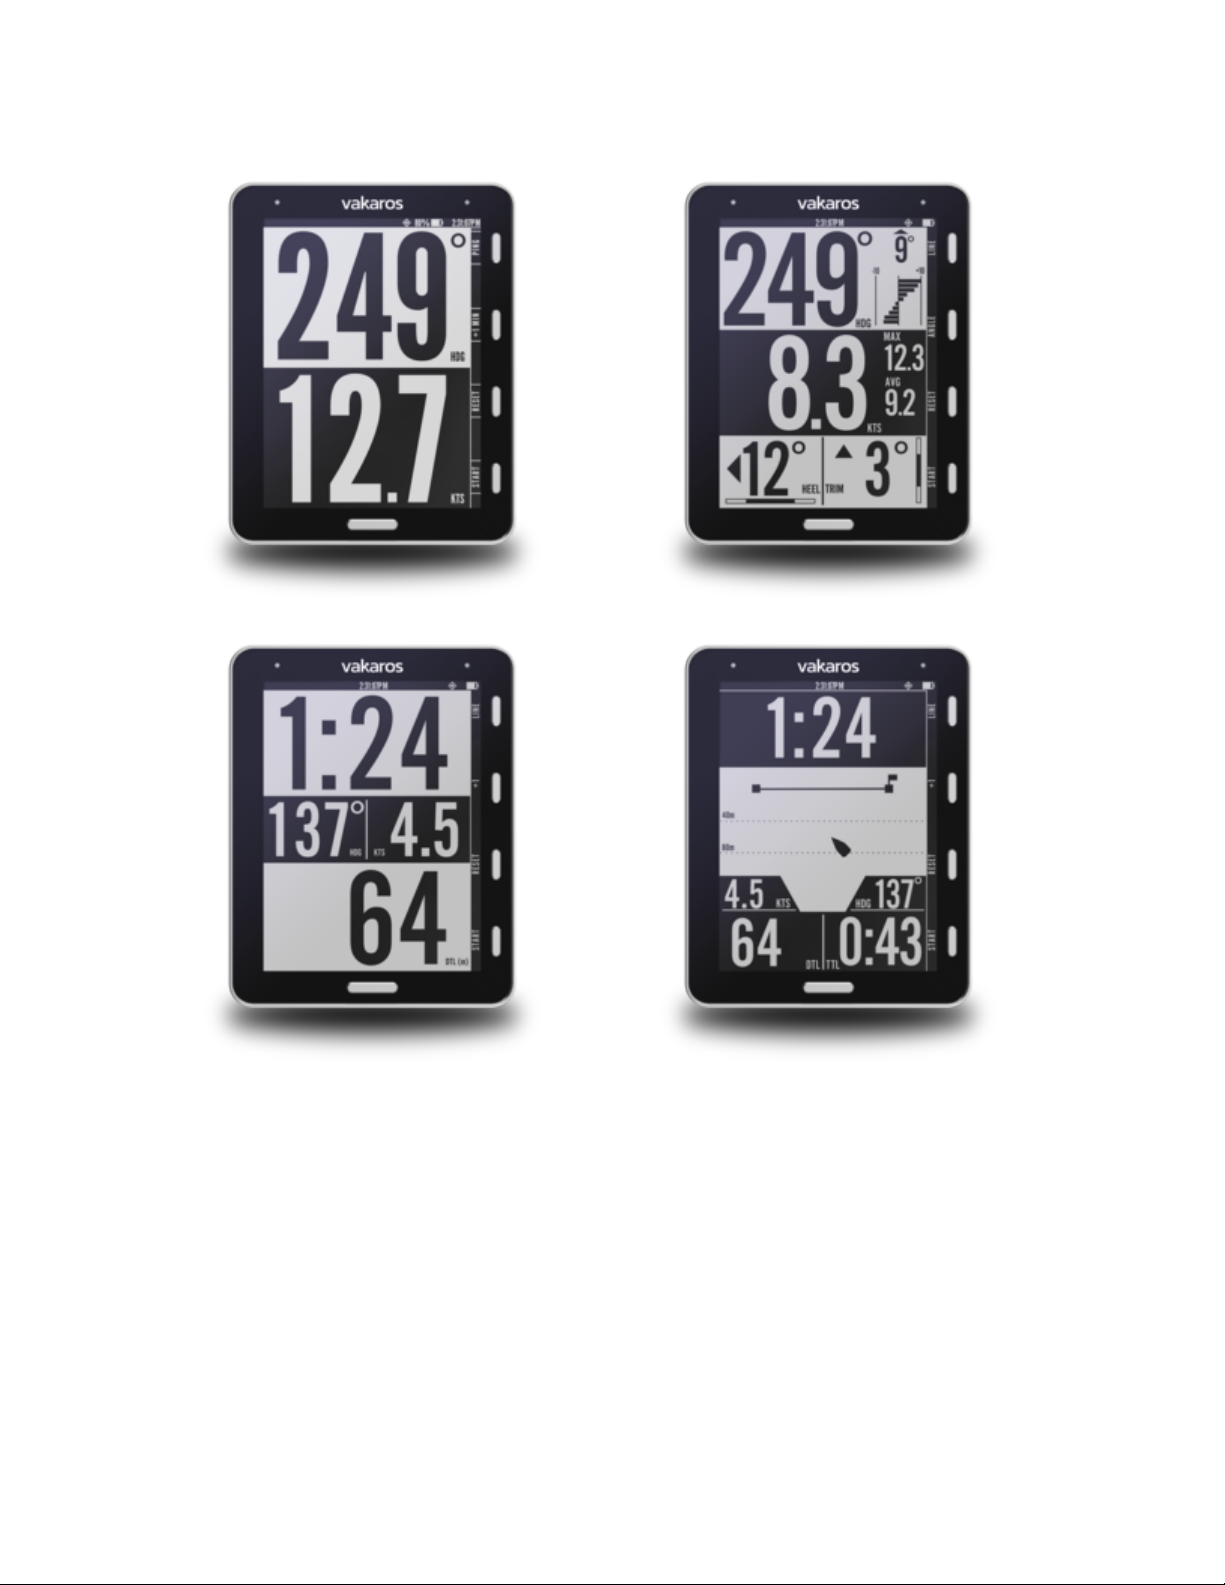
Pressing the home button at the bottom of the Atlas will cycle through all of
the different screens currently set up on your Atlas. Each screen is populated
by widgets, which display different kinds of data.
The main screen, at right, has 4 widgets: Heading, Speed, Heel, and Trim.
The heading widget includes a shift tracking display, with a lift/header indicator
in degrees and a trend graph, both determined relative to the current
reference angles, see Angle menu, below. The speed widget shows current
speed in knots, as well as the max and 10 second average. The heel and trim

displays show the current value in degrees and consistency bars, measuring
how steady the boat has been in heel and trim.
Other layouts are shown at right, including the starting screen, with the start
timer and distance to line, as well as a graphical starting screen, which shows
the position of the boat relative to the line.
40 mm heading + speed


Line Menu — Start line setup
The Atlas is designed to help you get a great start to any race, showing a
highly accurate measure of distance to line (DTL), as well as a start timer. To
measure DTL, begin by pressing the LINE button to record the locations of the
marks which define the starting line. This brings up the Line Menu, and
dedicates buttons 1 and 2 to recording the locations of the Boat and Pin.Each
time the BOAT or PIN button is pressed, the Atlas will save the current GPS
coordinates as the location of that mark, replacing any previous pings. Once
both marks have been recorded, the Line Menu will show additional
information about the starting line, including line length and perpendicular
heading. Line bias and advantage information is displayed if shift tracking
reference angles are set, see below. Exit the Line Menu by pressing the Back
button or the Home button.
Once the starting marks have been recorded, the Atlas automatically displays
DTL on the starting screen, measured in meters. DTL is currently calculated
without any bow offset, this feature will be available in a future release. To
start the 5 minute countdown timer, press Start. Minutes can be added to the
timer using the +1 button. The Start button becomes Sync while the timer is
running. Pressing Reset will stop the countdown timer and reset it to 5
minutes.
After the countdown timer reaches zero, the Atlas will automatically change to
the main screen. The timer will continue counting up in the background, until
the End button is pressed.
Time-to-line is now available as a beta feature!

Angle Menu — Shift tracking and reference angles
To set up shift tracking on the Atlas, press the ANGLE button to bring up the
ANGLE Menu. There are two options for setting port and starboard reference
angles, an automatic method and a manual method:
1. Automatic method
Start automatic reference angle capture by pressing the AUTO button on the
ANGLE menu. The Atlas will walk you through sailing a short upwind leg,
recording data while you sail and determining your reference angles
automatically. Follow the on-screen prompts, and in about a minute, you’ll be
all set to track shifts. In most conditions, this method will provide the best
results, as it minimizes the impact of small oscillations and waves, while

allowing the crew to sail the boat normally, without needing to interact with the
Atlas once the process is started.
2. Manual method
You can also set the Port and Starboard reference angles by pressing the
corresponding PORT and STBD buttons on the ANGLE screen to record the
current heading. Keep in mind that an instantaneous snapshot can introduce
some error in the reference angles.
We recommend checking your reference angles before every race and
resetting them if necessary. The ANGLE screen also shows some additional
useful information, including an estimate of the wind direction (the midpoint
between the Port and Starboard reference angle), the dead downwind angle,
the tacking angle and average upwind speed.

Mounting:
In order to mount the Atlas to your boat, you will need to attach the included
Atlas Mount to the boat. The mount can be attached directly to a mast track,
bulkhead, or any flat surface using the two provided 6-32 screws or by running
a velcro strap through the hole in the side. The mount can be installed in
either orientation, with the release tab facing up or down. Be sure that the
release tab will be accessible with the Atlas installed—pulling this tab is the
only way to remove the Atlas from the mount.
To attach the Atlas to the mount, first hook the solid end of the mount into one
of the slots on the back of the Atlas, then push the Atlas towards the

quick-release end of the mount until it clicks securely into place. To remove
the Atlas, press the Atlas gently towards the mount, pull on the quick-release
tab, tilt the Atlas away from the mount to remove it.
For maximum mounting security, tie a safety line to the lanyard loop on the
bottom left corner of the Atlas.
In order to use the magnetic compass, heel, and trim, the Atlas must be
mounted to a fixed location on the boat (i.e. not on a boom or rotating mast).

Care Instructions:
Store the Atlas in its case to avoid scratching the anti-reflective & hydrophobic
coating on the glass.
Wipe away salt & salty water when finished sailing.
After using the Atlas in salt water, clean the charging port with a damp cloth or
soft brush prior to charging. Important: Do not charge the Atlas with salt
present on the connector. The charging port should be clean and dry
prior to charging.
To clean the Atlas, use a soft cloth. Dampen cloth with water if necessary.
Don't leave the Atlas outdoors when not in use.
Don't leave the Atlas submerged in water for extended periods.
Vakaros Connect App:
Vakaros Connect is available in the iOS and Android app stores. Vakaros
Connect links wirelessly with your Atlas to provide firmware updates and a live
data view. Upcoming releases will add support for customizing settings and
displays on the Atlas, as well as downloading your sailing data.
The Atlas is designed to get better over time, with new features and
improvements being added regularly—make sure to install Vakaros Connect
and set up your account to stay up to date!

Table of contents