Valeda Light Delivery System User manual

User Manual
Light Delivery System

The indicated use is for treatment of ocular damage and disease using photobiomodulation,
including inhibition of inflammatory mediators, oedema or drusen deposition, improvement of wound
healing following ocular trauma or surgery, and increase in visual acuity and contrast sensitivity in
patients with degenerative diseases such as dry age-related macular degeneration.
Indications for Use
Introduction .................................................................................................................................................................................................
Valeda Light Delivery System Description ...............................................................................................................................
Valeda Light Delivery System Operation .................................................................................................................................
Labelling Symbols ....................................................................................................................................................................................
Indications for Use .................................................................................................................................................................................
Contraindications for Use .................................................................................................................................................................
Important Safety Instructions .........................................................................................................................................................
Installation ...................................................................................................................................................................................................
Operating Instructions .........................................................................................................................................................................
Valeda Treatment Credits ...............................................................................................................................................................
Valeda Settings ......................................................................................................................................................................................
Cleaning .....................................................................................................................................................................................................
Disposal ......................................................................................................................................................................................................
Maintenance ...........................................................................................................................................................................................
Troubleshooting .....................................................................................................................................................................................
Technical Specifications .................................................................................................................................................................
Glossary ......................................................................................................................................................................................................
Guidance and Manufacturer’s Declarations .....................................................................................................................
1. Introduction
This manual provides the indications, contraindications, instructions for use, warnings, cautions
and precautions for the Valeda® Light Delivery System. Carefully read this manual in its entirety
before using the Valeda Light Delivery System. Failure to follow these instructions may result in
improper use of the system.
Terminology – within this User Manual, the words “Valeda” and “System” are used to identify
collectively all components (and accessories) of the Valeda Light Delivery System. For questions
regarding Valeda, please contact LumiThera®.
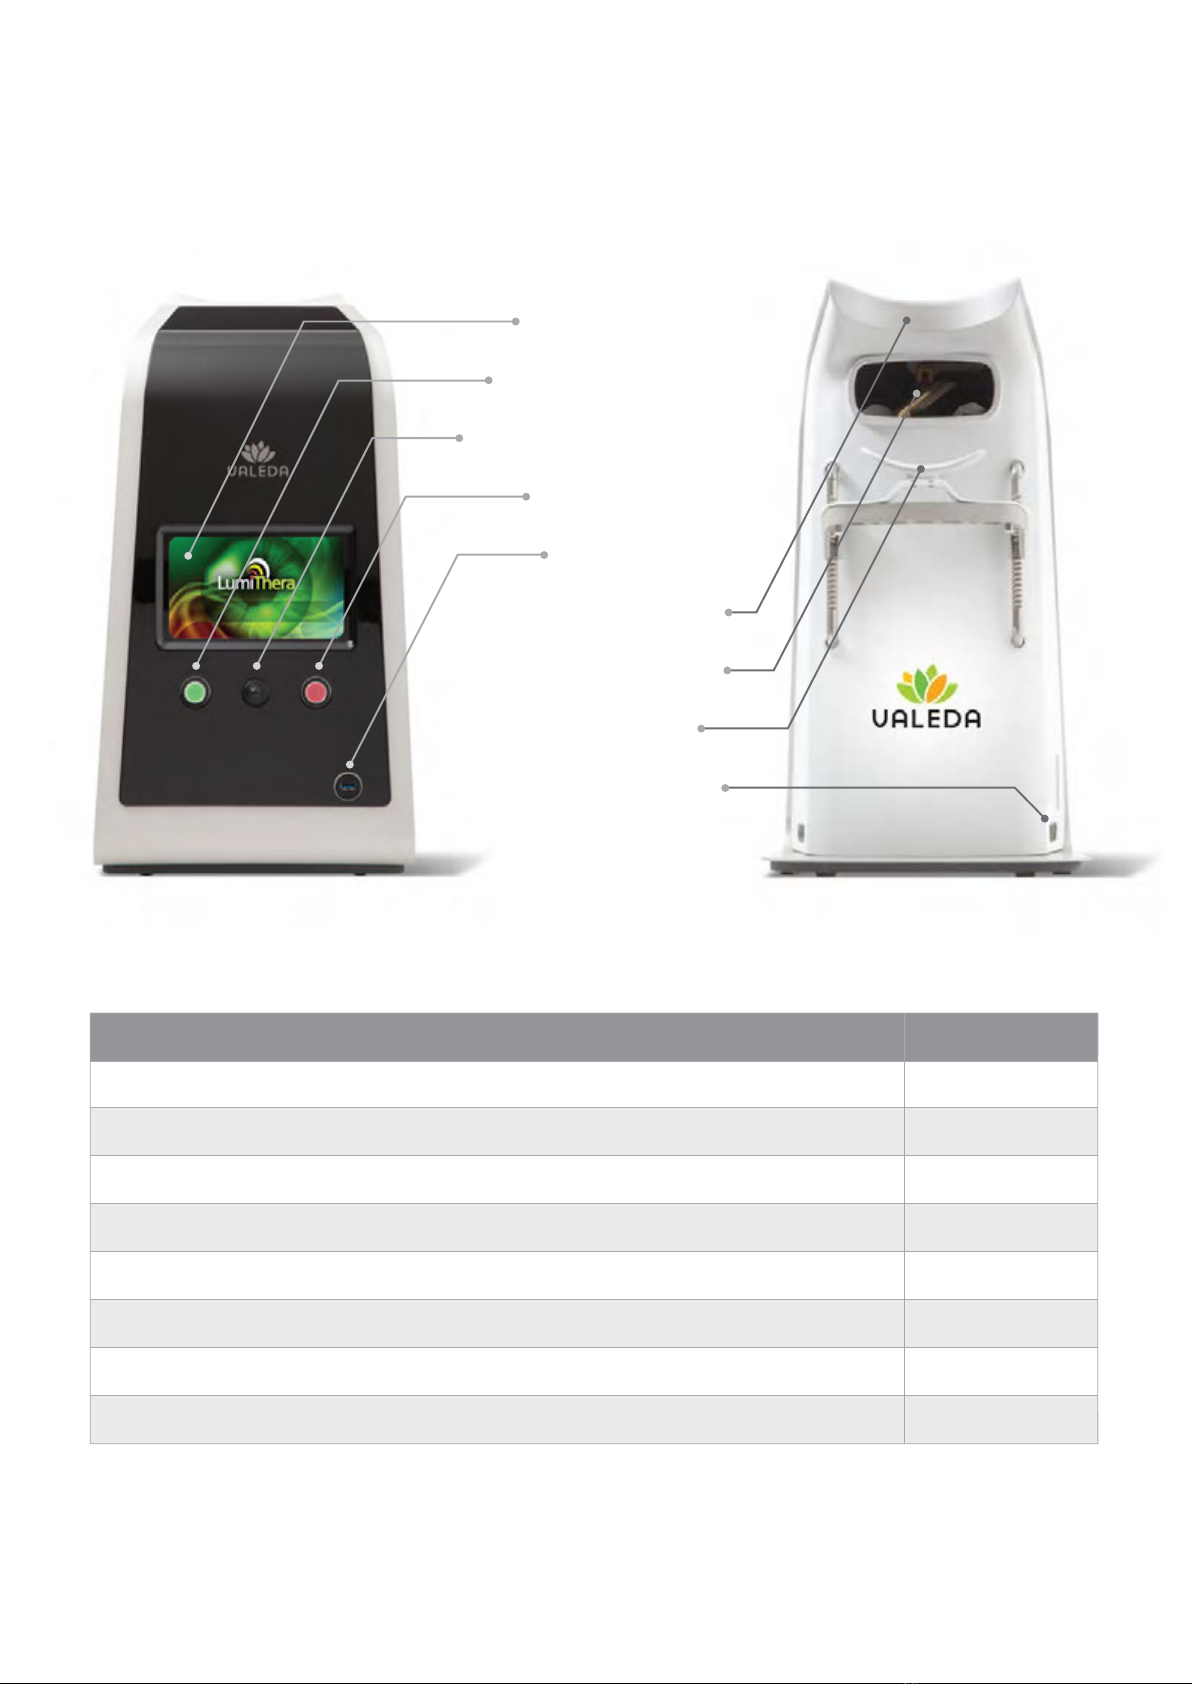
2. Valeda Light Delivery System Description
Overview
Valeda is a multi-wavelength light emitting diode (LED) system designed for eye care professionals
to use in the treatment of the eye with photobiomodulation (PBM). Valeda will provide a pre-set
treatment of PBM to the patient’s eye and retinal tissue through the open and closed eyelid.
Valeda uses three LEDs to generate 590, 660 and 850 nm light, which is conditioned through a series
of optics to produce a uniform, noncoherent beam of 30 mm diameter at the plane of treatment.
The beam is directed by adjustable mirrors to allow treatment of either eye without repositioning
the patient.
The operator inteace (Figure 1) consists of a touchscreen, start and stop push buttons, and a
joystick to centre the beam on the patient’s eye. A USB port is used to load Valeda Treatment
Credits into the system.
Contents
1
1
3
4
5
5
6
7
7
17
19
20
20
20
21
23
24
25
1
English (UK)
1.
2.
3.
4.
5.
6.
7.
8.
9.
10.
1 1.
12.
13.
14.
15.
16.
17.
18.

Touchscreen
Start/Pause Button
Beam Alignment Joystick
Stop Button
USB Port
Patient Forehead Rest
Patient Light Aperture
Patient Chin Rest
Power/On-O Switch
The patient inteace (Figure 2) consists of a fixed forehead rest, the light aperture and an adjustable
chin rest. The adjustment range of the chin rest is designed to accommodate the full range of the
intended patient population. Single-use disposable protective barriers mitigate contamination
between patients.
Replacement components may be purchased by contacting your LumiThera representative or
through the LumiThera e-commerce store at www.lumithera.com.
Components
Valeda Light Delivery System
Valeda User Manual
Valeda Chin Rest Protective Barriers
Valeda Forehead Rest Protective Barriers
Valeda LumiKey
Valeda Dust Cover
Valeda Power Cord(s)
Valeda Treatment Credits
200001
LBL-0001
300001
300002
300003
300004
300005
300006
Description Reference Reference
FIGURE 1 OPERATOR’S PERSPECTIVE FIGURE 2 PATIENT’S PERSPECTIVE
2

There are 2 types of disposable protective barriers: one for the forehead rest and one for the chin
rest (Figure 3).
Valeda LumiKey
A Valeda LumiKey is a standard USB storage drive used to transfer Valeda Treatment Credits as
electronic files (LumiFiles) generated by LumiThera to Valeda. Encrypted electronic files ensure
that Valeda will process only files prepared by LumiThera.
Valeda Dust Cover
A dust cover is provided to protect Valeda from dust and mild abrasions. Remove before and
replace aer use of Valeda.
3. Valeda Light Delivery System Operation
1. The patient is seated in front of Valeda and disposable protective barriers are placed over
the forehead and chin rests between Valeda and the patient.
2. The patient rests against Valeda forehead rest for stabilisation.
3. The operator adjusts the chin rest to best maintain the patient’s eye position relative to
Valeda, prompts the patient to open or close their eyes as necessary, peorms final
alignment of the light source to the patient’s eye, activates the light source, and monitors
the treatment progress.
4. During treatment, the patient positions their head against Valeda, maintains that position
during treatment (35-90 seconds for each delivery interval), and opens or closes their
eyelids as instructed by the operator.
5. The patient does not have to fixate their eye position or focus during light delivery.
6. Valeda will indicate when the LEDs are on and automatically turn o the light source
aer the defined treatment time.
7. The patient then pulls away from Valeda, the protective barriers are discarded and
Valeda is turned o.
8. The system does not require cleaning between treatments, but may be cleaned as
described in this manual. The dust cover may be placed over the system when appropriate.
Disposables
FIGURE 3 DISPOSABLE PROTECTIVE BARRIERS
3

4. Labelling Symbols
Consult instructions for use. Indicates the need for the user to consult the
instructions for use.
Refer to instruction manual/booklet. Signifies that the instruction manual/booklet
must be read.
Manufacturer. Indicates the medical device manufacturer.
Date of manufacture. Indicates the date when the medical device was
manufactured.
Authorised Representative. Indicates the authorised representative in the
European Community.
Catalogue number. Indicates the manufacturer’s catalogue number so that the
device can be identified.
Batch code. Indicates the manufacturer’s batch code so that the batch or lot
can be identified.
Serial number. Indicates the manufacturer’s serial number so that the device
can be identified.
Applied Part, Type BF.
Do not reuse. Indicates a medical device that is intended for one use, or for use
on a single patient during a single procedure.
Temperature limit. Indicates the temperature limits to which the medical device
can be safely exposed.
Humidity limitation. Indicates the range of humidity to which the medical device
can be safely exposed.
WEEE Directive. Waste Electrical and Electronic Equipment Directive.
Fragile, handle with care. Indicates a medical device that can be broken or
damaged if not handled carefully.
Keep dry.
Do not stack.
This way up.
4

Recycle.
Atmospheric pressure limitation. Indicates the range of atmospheric pressure to
which the medical device can be safely exposed.
Packaging unit. Indicates the number of pieces in the package.
Alternating current. Indicates on the rating plate that the equipment is suitable
for alternating current only.
Fuse. Identifies fuse boxes or their location.
Valeda Treatment Credits.
Back. Display navigation button to return to the prior screen.
Continue. Display navigation button to proceed to the next screen.
Confirmation. Display button to confirm displayed information.
Settings. Display navigation button to proceed to the system settings.
Home. Display navigation button to return to the home screen.
Information. Display navigation button to proceed to the system information
screen.
5. Indications for Use
The Valeda Light Delivery System is indicated for the treatment of ocular damage and disease
using photobiomodulation, including inhibition of inflammatory mediators, oedema or drusen
deposition, improvement of wound healing following ocular trauma or surgery, and increase in
visual acuity and contrast sensitivity in patients with degenerative diseases such as dry age-related
macular degeneration.
6. Contraindications for Use
As a precaution, patients have not been tested and should not be treated with Valeda if they have
any known photosensitivity to yellow light, red light or near infrared radiation (NIR), or if they have a
history of light activated central nervous system disorders (e.g., epilepsy, migraine). In addition,
patients should not receive treatment within 30 days of using any photosensitising agent (e.g.,
topicals, injectables) before consulting with their physician.
5

7. Important Safety Instructions
Valeda is a medical device and should be operated only by qualified medical professionals in
accordance with this manual and any applicable country or local laws and regulations. Prior to
using Valeda, be sure to review all described warnings and entire instructions for use. Failure to
follow the warnings may result in injury to the patient or operator or cause property damage.
It is the responsibility of the operator and the institution or organisation where Valeda will be
operated to comply with their safety standards concerning the use of this system.
Warnings
Warnings are information relating to potential dangers when using Valeda.
• Do not use the system if damage is observed or if the system is not operating as expected.
• Do not modify the system.
• Use only the power cord provided with the system or supplied by LumiThera.
• Do not use the power cord if it has been damaged. Use of a damaged power cord may result in a
fire or electrical shock hazard.
• To avoid the risk of electrical shock, the system must be connected only to supply mains with
protective earth.
• Do not treat patients with open sores that may come into contact with the system.
• Do not use this system on any part of the body other than designated treatment sites.
• Disconnect power to the system before cleaning.
• Patients should remove their glasses and contact lenses prior to treatment.
Cautions
Cautions are important information to prevent possible harm when using Valeda.
• Use only the accessories specified for use with this system. Use of accessories not
specified for use with this system may impair peormance.
• Only connect a Valeda LumiKey to the system USB port. Connection to other equipment
could result in previously unidentified risks to patients, operators or third parties. The
manufacturer has implemented measures to control risks related to USB port connections.
Changes to the USB port connection can introduce new risks.
• In the event of an emergency in which power to the system must be shut o, either turn
o the power switch or unplug the system from the electrical source.
• Do not attempt to disassemble Valeda.
Precautions
Precautions are important information for alerting the operator to exercise special care necessary
for the safe and eective use of Valeda or a measure taken in advance to avert possible harm or
misfortune.
• This device has not been tested for use on pregnant women.
• Do not spray or pour cleaning agents directly on Valeda.
• Do not use abrasive agents to clean Valeda.
Information
The following useful information is related to the operation of Valeda.
• There are light emitting diodes (LEDs) in Valeda emitting at 590, 660 and 850 nm from the light
aperture. Valeda has been designed to limit LED output to be within acceptable industry
standards (IEC 62471) for eye safety.
Clinical Data
Information related to the clinical safety and eicacy of Valeda can be found in the LumiThera
Report of Prior Investigations and is available upon request.
6

8. Installation
Overview
Valeda is intended for use in a controlled room environment at ambient temperature and
humidity. See Technical Specifications on page 23.
Before unpacking Valeda, inspect the shipping box for damage. If damage is present, notify the
freight carrier and ask for an agent to be present while the system is unpacked. Retain all packing
materials in their original condition and contact LumiThera.
Box Contents
The shipping box contains the following:
• Valeda Light Delivery System
• Valeda LumiKey
• Package of Valeda Forehead Rest Protective Barriers
• Package of Valeda Chin Rest Protective Barriers
• Valeda Dust Cover
• Valeda Power Cord(s)
• Valeda Light Delivery System User Manual
• Quick Reference Guide
Valeda Setup
• Valeda should be used with chairs for the patient and operator and a height-adjustable table to
accommodate variations in patient height.
• Remove the system from the shipping box and place on the adjustable table.
• Position Valeda so that the operator can access both the patient and operator sides of the
system. The patient must be able to be comfortably seated at the patient side of the system.
• Ensure that Valeda is on a flat, hard suace and that the side vent slots are not blocked.
• Multiple power cords may be in the box. Select the appropriate power cord for your location.
Attach the power cord to the unit and connect to a grounded outlet.
• Ensure the power cord is not a tripping hazard.
• Following hot or cold storage (below 15 or above 30°C), allow one hour for the system to reach
ambient temperature and humidity before using.
9. Operating Instructions
Operation of Valeda consists of the following steps:
• System setup
• Patient preparation
• Beam alignment procedure
• Treatment procedure
• Cleaning and storage
Valeda Setup
• Remove the dust cover.
• Verify the system has no obvious damage.
• Confirm the system is plugged into an appropriate electrical outlet and all connections are
secure. See Technical Specifications on page 23.
• Turn on the system by moving the power switch to the on position.
• Wait for the system to power on and run through the self-test. When the self-test is complete, the
home screen will appear on the touchscreen.
7

To initiate a treatment for a patient, tap the large “+” button (Figure 4).
The next screen shows the instruction for applying the disposable patient protective
barriers, one to the forehead rest and one to the chin rest (Figure 5).
Apply the disposable protective barriers to the chin and forehead rest and tap the “Continue”
button.
FIGURE 4
FIGURE 5
8

The next screen shows the number of Valeda Treatment Credits remaining. Touch the “Continue”
button (Figure 6).
Refer to the Treatment Credit Section if credits are needed.
Select whether one eye or both eyes will be treated (Figure 7).
If one eye was selected for treatment, select on the touchscreen which eye is the one to be
treated (Figure 8). If both eyes were selected for treatment, this screen is not presented to the
operator. The right (OD) eye will always be treated first, followed by the le (OS).
FIGURE 6
FIGURE 7
9

The camera will move to the chosen treatment eye and will turn on to allow viewing and positioning
of the beam on the patient’s eye.
Patient Preparation
1. Verify that the patient has removed glasses and contact lenses.
2. Position the patient’s forehead against the forehead rest. If the patient’s forehead is not
detected, the system will display “No patient detected.”
3. Adjust the chin rest elevation to position the patient’s eyes vertically in the centre of the light
aperture (Figure 9).
4. Adjust the patient’s chin position on the chin rest as shown below (Figure 9).
5. Confirm the patient’s hair is outside the light aperture.
6. Monitor the patient throughout treatment to ensure proper patient alignment with the system is
maintained.
FIGURE 8
FIGURE 9
10

Beam Alignment Procedure
While watching the camera view on the touchscreen, use the beam alignment joystick on the
operator side of Valeda to move the targeting beam (yellow circle) le/right and up/down until the
beam fills the eye socket. The picture on the touch screen illustrates the correct position of the
beam and the patient’s eye to be viewed (Figure 10).
Once the beam is aligned, instruct the patient to remain in position until instructed to move.
Press the “Confirmation” button on the touchscreen (Figure 10).
Treatment Procedure
The treatment will consist of 4 phases:
1. The treatment initiates with 35 seconds of pulsed yellow and near-infrared (NIR) wavelengths,
eyes open.
2. This is followed by 90 seconds of continuous red light wavelength, eyes closed.
3. The treatment will repeat with another 35 seconds of pulsed yellow and NIR wavelengths, eyes
open.
4. The treatment will finish with another 90 seconds of continuous red light wavelength, eyes closed.
The operator will instruct the patient to keep their eyes open during phases 1 and 3 and then to
keep their eyes closed for phases 2 and 4.
FIGURE 10
11

FIGURE 11
FIGURE 12
Verify that all the information on this screen is correct, then touch the “Confirmation” button
(Figure 11).
The patient is instructed to keep the eye open for phase 1 (Figure 12).
The touchscreen will show the Treatment Ready screen.
12

FIGURE 13
FIGURE 14
Press the green activation button on the system to initiate treatment. A progress screen will be
shown. A countdown timer is displayed while the progress bar fills from le to right (Figure 13).
Valeda will pause aer completion of each phase. For example, aer the first wavelength
treatment phase is complete, the screen will provide instructions for the patient’s eyelid position
(open or closed) and display a live video for confirmation of the eyelid position (Figure 14).
13

The patient is instructed to keep their eyes closed for phase 2.
To proceed with the next phase, press the green activation button on the system. A countdown
timer is displayed while the progress bar fills from le to right (Figure 15).
The next steps to complete phases 3 and 4 are identical to the steps detailed for phases 1 and 2.
If the patient’s second eye is to be treated, the system will display the following screen aer the
4 phases of treatment for the first eye are completed (Figure 16).
Touching the “Confirmation” button will return to the Beam Alignment Procedure for treatment
of the second eye.
FIGURE 15
FIGURE 16
14

Upon completion of the treatment session, the finished screen will be displayed (Figure 17).
Instruct the patient to pull away from the system.
Remove and dispose of the forehead and chin rest protective barriers.
To continue patient treatments, touch the “Home” button.
If all patients have been treated for the day, switch o the power to Valeda.
Treatment Pause
A treatment phase may be paused at any time by pressing the green activation button on the
system, or by the patient pulling back from the system (Figure 18).
FIGURE 17
FIGURE 18
15

To resume treatment, press the green activation button on the system.
Check the alignment and state of the eyelid on the video screen (Figure 19).
Press the green activation button to restart the treatment at the time it was paused.
Treatment Cancelation
While the treatment is paused, the treatment can be cancelled by pressing the red button on the
system; the message below will be displayed (Figure 20). If a treatment is cancelled, the patient has
not completed a full treatment. The physician and patient can determine whether the treatment
may need to be rescheduled.
FIGURE 19
FIGURE 20
16

Clean and Store System
Remove and dispose of the disposable protective barriers on the forehead rest and chin rest.
If needed, clean the system per cleaning instructions provided in this User Manual (page 20).
Confirm the system is o and place the dust cover over the system.
10. Valeda Treatment Credits
Valeda Will Not Operate Without Treatment Credits
• Treatment credits are purchased on the LumiThera e-commerce store at www.lumithera.com.
• LumiThera will provide an electronic LumiFile.
• Copy the provided electronic file to your LumiKey.
• Insert the LumiKey into the USB port on the front of Valeda.
• Valeda will automatically read the LumiKey and add the appropriate number of credits to your
system.
Grace Period Treatment Credits
Grace credits are to be used in the event that online purchasing is unsuccessful. Contact LumiThera
customer care to purchase grace credits.
To enable grace period treatment credits:
• From the main menu, press the “Information” button.
• At the top right corner of the information screen, press the “+” button.
• LumiThera will provide an alphanumeric code that is specific to your system. Grace period codes
must be loaded onto the system within 24 hours.
• Enter the code into Valeda and press the “Continue” button to proceed (Figure 21).
FIGURE 21
17

FIGURE 22
FIGURE 23
If the grace period code was accepted, a confirmation screen will be displayed with the total
credits available (Figure 22).
If the grace period code was rejected, the following screen will appear (Figure 23).
18

11. Valeda Settings
Press the “Home” button. The Settings Menu may be reached by pressing the “Settings”
button on the display (Figure 24).
Selecting the “Language” button provides a listing of languages available on your system (Figure 25).
Not all systems will include multiple language options.
FIGURE 24
FIGURE 25
19
Table of contents
Languages:
Popular Medical Equipment manuals by other brands

Johnson & Johnson
Johnson & Johnson DePuy Synthes INSIGHT Lateral Access System manual

Allied Healthcare
Allied Healthcare L190 Operation & service manual

Johnson & Johnson
Johnson & Johnson DePuy Mitek LUPINE manual

Olympic Medical
Olympic Medical BILI-LITE 80 instruction manual

MX HEALTH
MX HEALTH NEB04 user manual

SKILLQUBE
SKILLQUBE qubeAVpro user guide