Valex M-CB 22 User manual

Caricabatteria M-CB 22
ISTRUZIONI D’USO
Istruzioni originali
Battery charger M-CB 22
INSTRUCTION MANUAL
Translation of the original instructions
S060106a
11.10.2019
ATTENZIONE! Prima di usare il prodotto, leggete e comprendete le istruzioni di sicurezza e le istruzioni d’uso fornite.
CAUTION! Before using the product, read and understand the supplied safety instructions and operating instructions.

VALEX-36015 SCHIO (VI) - ITALY
MADE IN P.R.C.
NL
DATI TECNICI - TECHNICAL DATA
Codice Code 1060106
Nome Name M-CB 22
Tensione e frequenza nominale Voltage and rated frequency 200-240V~50/60Hz
Tensione in uscita Output voltage 21,5V
Corrente media in uscita Average output current 2400mA
Classe di isolamento Insulation class II
A B
C
E
3
2
1
1
3
10
2
Led rosso
In carica
4 5
54
Led verde
Carica completa
3
6
Led rosso
Da ricaricare
17
Led verde
Carico
Test

i
Vi ringraziamo per averci preferito nella scelta di questo apparec-
chio elettrico, di seguito chiamato “batteria ricaricabile”.
!ATTENZIONE! Il caricabatteria è idoneo alla ricarica di batterie
specifiche. Non ricaricare altro tipo di batterie.
Queste istruzioni riportano le informazioni e quanto ritenuto ne-
cessario per il buon uso, la conoscenza e la normale manutenzio-
ne. Osservate però anche le istruzioni relative all’elettroutensile
che utilizzate (trapano, tagliasiepi ecc.) nella sezione specifica
al caricabatteria, nel loro utilizzo e nelle avvertenze di sicurezza.
SIMBOLOGIA
Osservate con attenzione la simbologia della Fig. B e memo-
rizzate il rispettivo significato. Una corretta interpretazione dei
simboli consente un uso più sicuro dell’ apparecchio.
1 Modello macchina.
2 Dati tecnici.
3 Attenzione!
10 Numero di lotto.
V Volt
Hz Hertz
~ Corrente alternata
Corrente continua
A Ampere
W Watt
Li-ion Ioni di Litio
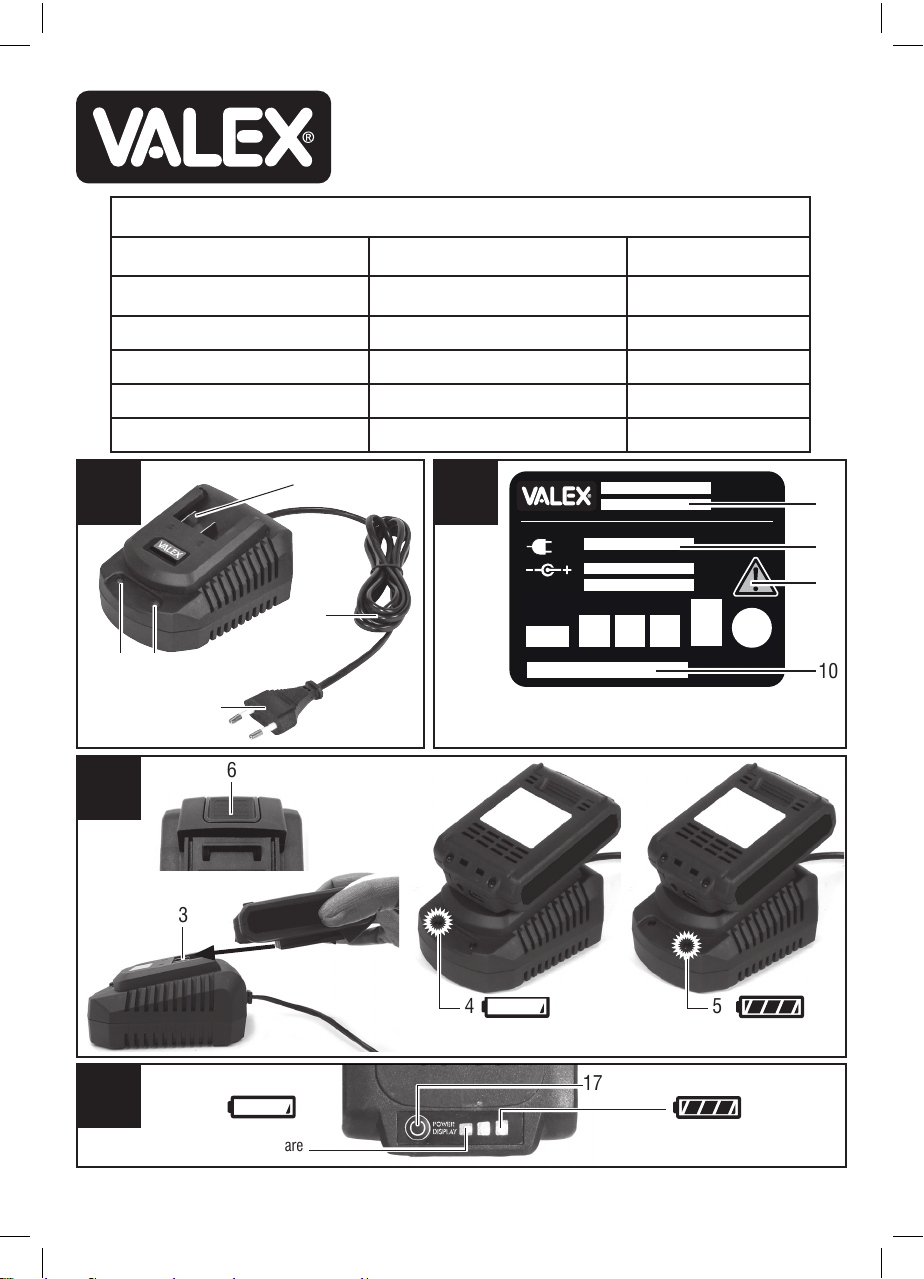
COMPONENTI
Fare riferimento alla Fig. A, allegata alle presenti istruzioni.
1 Spina del caricabatterie.
2 Cavo.
3 Contatti del caricabatterie
4 Spia di carica in corso
5 Spia di carica completa e presenza rete
INSTALLAZIONE
!ATTENZIONE! La Ditta costruttrice declina ogni responsa-
bilità per gli eventuali danni diretti e/o indiretti causati da un
errato allacciamento del caricabatterie o una inversione di
polarità dei contatti.
!ATTENZIONE! Prima di effettuare le seguenti operazioni
assicuratevi che la spina sia scollegata dalla rete elettrica.
TRASPORTO
Per trasportare l’apparecchio elettrico utilizzate sempre il suo
imballo; questo lo preserverà da urti, polvere e umidità che ne
possono compromettere il regolare funzionamento.
Durante il trasporto sganciate la batteria dal caricabatterie.
MESSA IN SERVIZIO
Nel luogo che utilizzerete l’apparecchio elettrico è opportuno
considerare:
- che la zona non sia umida e sia al riparo dagli agenti atmo-
sferici.
- che attorno sia prevista un’ampia zona operativa libera da
impedimenti.
- che bambini ed estranei siano tenuti a distanza.
- che vi sia una buona illuminazione.
- che sia utilizzata in vicinanza dell’interruttore generale con
differenziale.
- che l’impianto di alimentazione sia dotato di messa a terra
conforme alle norme (solo se l’apparecchio elettrico è di
classe I, cioè dotato di spina con cavo di terra).
- che la temperatura ambiente sia compresa tra 10° e 35° C.
- che l’ambiente non sia in atmosfera infiammabile/esplosiva.
A carica ultimata staccate la spina del caricabatterie e sganciate
la batteria.
Se osservate delle anomalie di funzionamento staccate l’ali-
mentazione elettrica e consultate il capitolo “Problemi, cause
e rimedi”.
Quando non utilizzate il caricabatterie staccate la spina dalla
presa e riponetelo nel suo imballo.
CARICA DELLA BATTERIA (Fig.E)
!ATTENZIONE! Prima di utilizzare l’apparecchio è necessa-
rio effettuare una carica completa della batteria.
!ATTENZIONE! Ricaricare soltanto batterie compatibili,
indicate dal costruttore.
1) Estraete la batteria dalla sede dell’utensile agendo sui di-
spositivi di bloccaggio (pos.6) e inseritela a fondo nel vano
contatti del caricabatteria (pos.3).
2) Inserite la spina del caricabatterie in una presa di corrente.
3) L’accensione della luce verde di carica (pos.4), segnala
l’inizio della carica della batteria. La durata della carica per
una batteria completamente scarica dipende dalla capacità
(mA/h) della batteria.( circa 30 min. per ogni 1000mA/h di
capacità della batteria)
4) Alla fine della ricarica la sipa rossa (pos.4) si spegne e si
illumina la spia verde (pos.5) di carica completa.
5) A carica ultimata staccate la spina del caricabatterie e sgan-
ciate la batteria.
Quando il caricabatterie è collegato alla rete elettrica ma la
batteria non è inserita, si accende la luce verde ( pos.5) per
segnalare la presenza della rete.
TEST DI LETTURA DI CARICA DELLA BATTERIA (fig.E)
Premere il tasto (pos.17)
Tutti i led accesi batteria carica.
Un led acceso batteria da ricaricare.
CONSIGLI D’USO
Dopo aver letto attentamente i capitoli precedenti, seguite scru-
polosamente questi consigli che vi permetteranno di ottenere il
massimo delle prestazioni.
Procedete con calma in modo da prendere familiarità con tutti
i comandi; solo dopo aver acquisito una buona esperienza riu-
scirete a sfruttarne a fondo tutte le potenzialità.

MANUTENZIONE
!ATTENZIONE! Prima di ogni controllo staccate l’alimen-
tazione elettrica del caricabatterie scollegando la spina e
sganciate la batteria.
!ATTENZIONE! Non manomettete o tentate di riparare il
caricabatterie o la batteria.
La durata e il costo d’esercizio dipendono anche da una costante
e scrupolosa manutenzione.
Pulite regolarmente ed abbiate cura del vostro apparecchio
elettrico, vi garantirete una perfetta efficienza ed una lunga durata
dello stesso. Verificate inoltre che non siano presenti rotture o
parti danneggiate.
- Rimuovete la polvere con uno straccio o un pennello a setole
morbide.
- Non spruzzate e bagnate d’acqua le apparecchiature elettriche,
pericolo di infiltrazioni interne.
- Non usate infiammabili, detergenti o solventi vari. Le parti in
plastica sono aggredibili da agenti chimici.
PROBLEMI, CAUSE E RIMEDI
PROBLEMA CAUSE RIMEDI
La batte-
ria non si
ricarica
Spinotto di ali-
mentazione non
inserito corret-
tamente nella
batteria.
Togliere e reinse-
rire lo spinotto di
alimentazione di
alimentazione nella
batteria.
Caricabatteria
o batteria non
pronti per la
ricarica.
Batteria surri-
scaldata.
Attendere che la
batteria si raffreddi
Caricabatterie o
batteria guasti.
Sostituite la batteria
o/e rivolgetevi a un
centro di assistenza
autorizzato.
!ATTENZIONE! Se dopo aver eseguito gli interventi sopra
descritti l’apparecchio elettrico non funziona correttamente
o in caso di anomalie diverse da quelle indicate, portatelo
presso un centro di assistenza autorizzato esibendo la prova
di acquisto e richiedendo ricambi originali. Fate sempre rife-
rimento alle informazioni riportate sull’etichetta dati tecnici.
IMMAGAZZINAMENTO
Effettuate una accurata pulizia dell’apparecchio elettrico (vedi
paragrafo Manutenzione). Utilizzate l’imballo originale o la
valigetta (se presente) per proteggerlo; in particolare i terminali
elettrici della batteria non devono venire a contatto con elementi
metalli od essere cortocircuitati.
Se prevedete di non utilizzare la batteria per un lungo periodo
effettuate una ricarica completa.
Riponete l’apparecchio elettrico lontano dalla portata dei bam-
bini, in posizione stabile e sicura. Il luogo dovrà essere asciutto,
privo da polveri, temperato e protetto dai raggi solari diretti.
Al
locale
di rimessaggio non devono avere accesso i bambini e gli
estranei.
SMALTIMENTO
Per la salvaguardia ambientale procedete secondo le leggi vigenti
del Paese in cui vi trovate. Rivolgetevi alle autorità competenti
per maggiori notizie in merito.
Quando l’apparecchio elettrico non è più utilizzabile né ripara-
bile, consegnatelo con l’imballo ad un punto di raccolta per il
riciclaggio.
Smaltimento caricabatterie. I rifiuti elettrici ed elettronici possono
contenere sostanze pericolose per l’ambiente e la salute umana; non
devono pertanto essere smaltiti con quelli domestici ma mediante
una raccolta separata negli appositi centri di raccolta o riconsegnati
al venditore nel caso di acquisto di una apparecchiatura nuova
analoga. Lo smaltimento abusivo dei rifiuti comporta l’applicazione
di sanzioni amministrative.
GARANZIA
Il prodotto è tutelato a norma di legge contro non conformità
rispetto alle caratteristiche dichiarate purché sia stato utilizzato
esclusivamente nel modo descritto dalle istruzioni, non sia stato
manomesso in alcun modo, sia stato conservato correttamente,
sia stato riparato da tecnici autorizzati e, ove previsto, siano stati
utilizzati solo ricambi originali.
In caso di utilizzo industriale o professionale oppure in caso di
impiego simile la garanzia ha validità di 12 mesi.
Per emettere una richiesta di intervento in garanzia è necessario
presentare la prova di acquisto al rivenditore o ad centro assi-
stenza autorizzato.
DICHIARAZIONE DI CONFORMITA’
La ditta indicata in etichetta dichiara sotto la propria responsa-
bilità che il prodotto ivi citato è conforme ai requisiti essenziali
di sicurezza e salute contenuti nelle seguenti direttive europee:
2014/35/CE, 2014/30/CE, 2011/65/CE
Persona autorizzata a costituire il fascicolo tecnico presso
Valex SpA - Via Lago Maggiore 24
36015 Schio (VI) - Italy
Schio, 10-2018
Un procuratore
SMIDERLE STEFANO

g
We thank you for purchasing this power tool, which will hereafter
be referred to as “rechargeable battery”.
!WARNING! The battery charger is suitable for charging specific
batteries. Do not charge any other type of battery.
These instructions contain information deemed necessary for
correct use, knowledge and standard maintenance. However,
follow the instructions for the power tool you will use as well
(drill, hedge trimmers, etc.) in the special section on the battery
charger, its use and safety warnings.
SYMBOLS
Carefully observe the symbols in Fig. B and memorise their
respective meanings. Correct interpretation of the symbols
allows safer use of the tool.
1 Machine model.
2 Technical data.
3 Warning!
10 Batch number.
V Volt
Hz Hertz
~ Alternating current
Direct current
A Ampere
W Watt
Li-ion Lithium ions
COMPONENTS
Refer to Fig. A, attached to these instructions.
1 Battery charger plug.
2 Cable.
3 Battery charger contacts
4 Charging in progress warning light
5 Charging complete and power on warning light
INSTALLATION
!WARNING! The manufacturer is not liable for any direct
and/or indirect damage caused by incorrect connection of
the battery charger or an inversion of polarity of the contacts.
!WARNING! Before carrying out the following operations,
make sure that the plug is disconnected from the mains.
TRANSPORT
Always use the packaging when transporting the electrical
device; this will protect it from impact, dust and humidity which
can compromise its normal operation.
Remove the battery when transporting the battery charger.
SWITCHING ON
When choosing where to use the electrical device, the following
should be considered:
- that the place is not damp and is protected from the weather.
- that there is a large working area free from obstacles.
- that children and unauthorised personnel are kept at a distance.
- that there is good lighting.
- that it is used close to the main switch with residual current
device.
- that the power supply system is earthed and conforms to
the standards (only if the electrical device is class I, i.e. it is
equipped with a plug with earth cable).
- that the room temperature is between 10° and 35°C.
- that the environment is not in a flammable/explosive atmo-
sphere.
After charging, unplug the battery charger and take out the
battery.
If you notice any working defects, unplug from the power supply
and consult the chapter “Problems, causes and solutions”.
When not using the battery charger, unplug it from the socket
and store it in its packaging.
BATTERY CHARGING (Fig.E)
!WARNING! Before using the tool it is necessary to fully
charge the battery.
!WARNING! Only charge compatible batteries, recommen-
ded by the manufacturer.
1) Take the battery out of the housing in the tool by operating the
locking devices (pos.6) and push it fully into the compartment
with the contacts in the battery charger (pos.3).
2) Insert the plug of the battery charger into a socket.
3) The green charging light (pos.4) comes on when the battery
begins charging. The charging time for a completely flat
battery depends on the battery’s capacity (mA/h).(approx.
30 min. for every 1000 mA/h of battery capacity)
4) Once charging is complete, the red warning light (pos.4)
switches off and the green warning light (pos.5) comes on
indicating full charge.
5) After charging, unplug the battery charger and take out the
battery.
When the battery charger is connected to the mains but the
battery is not inserted, the green light (pos.5) comes on indi-
cating that power is on.
BATTERY CHARGE READ TEST (fig. E)
Press the button (pos.17)
All LEDs on: battery is charged.
One LED on: battery needs recharging.
OPERATIONAL TIPS
After reading the previous chapters carefully, apply these tips
scrupulously to obtain maximum performance.
Proceed calmly so as to become familiar with all the controls;
after having gained sufficient experience, you will be able to
make full use of its capacities.

MAINTENANCE
!WARNING! Before any checks, unplug the battery charger
from the mains, and take out the battery.
!WARNING! Do not tamper with or attempt to repair the
battery charger or the battery.
The working life and costs also depend on constant and meti-
culous maintenance.
Take good care of your electrical device and clean it regularly. In
this way its efficiency will be ensured and its lifespan extended.
Additionally, check that there are no breaks or damaged parts.
- Remove dust with a cloth or a brush with soft bristles.
- Do not wet or spray water over the electrical device - risk of
internal infiltrations.
- Do not use any flammables, detergents or solvents. The plastic
parts can easily be damaged by chemical agents.
PROBLEMS, CAUSES AND SOLUTIONS
PROBLEM CAUSES SOLUTIONS
The battery
does not
charge
Power plug not
inserted cor-
rectly into the
battery.
Remove and rein-
sert the power plug
into the battery.
Battery charger
or battery not
ready for char-
ging.
Battery is
overheated.
Wait for the
battery
to cool down
Battery charger
or battery faulty.
Replace the battery
and/or contact an
authorised service
centre.
!WARNING! If the power tool still fails to operate correctly
after you have carried out the above operations, or in the
event of anomalies other than those described above, take it
to an authorised service centre with proof of purchase and
ask for original spare parts. Always refer to the information
shown on the technical data label.
STORAGE
Clean the machine and all its accessories thoroughly (see Maintenance
section). Protect the unpainted parts with protective oil and use the
original packaging or case (where fitted) to protect it.
Store the machine in a stable and safe position out of the reach of
children. The place must be dry, free from dust, temperate and protected
from direct sunlight.
Keep children and unauthorised personnel out of the storage room.
DISPOSAL
In order to protect the environment, proceed according to the
local laws in force. Contact the relevant authorities for more
information.
When the machine is no longer usable or repairable, take the
machine and its packaging to a recycling centre.
Electric and electronic waste may contain substances hazar-
dous to the environment and human health. It should therefore
not be disposed of with household waste, but by means of
separate collection at special collection centres or returned to
the vendor in the event of purchasing a new similar tool. Illegal
disposal of waste will result in administrative sanctions.
Battery disposal: The batteries included in the equipment can
be disposed of along with it.
Do not dispose of used batteries in fire and do not dispose
of them in the environment, but take them to special disposal
centres. Do not dispose of them with domestic waste.
WARRANTY
The product is protected by law against all non-conformities with
regard to its stated characteristics, provided that it has been used
solely in the way described in these user’s instructions, it has not
been tampered with in any way, it has been stored correctly, it
has been repaired by authorised personnel and, where necessary,
only original spare parts have been used.
In the event of industrial or professional use or similar, the warranty
is valid for 12 months.
To issue a request for intervention covered by warranty, proof
of purchase must be shown to the retailer or authorised service
centre.
AMENDMENTS
The text, figures and data correspond to the standards in place
on the date of printing the instructions contained herein. The
manufacturer reserves the right to update the documentation
if changes are made to the power tool, without being bound by
any obligations.
© No part of this publication and the documentation enclosed
with the machine may be reproduced without written permission
from the manufacturer.
DECLARATION OF CONFORMITY
The firm indicated on the label declares, under its own respon-
sibility, that the product cited there complies with the essential
health and safety requirements contained in the following
European directives:2014/35/CE, 2014/30/CE, 2011/65/CE
The person authorized to compile the technical file is in
Valex SpA - Via Lago Maggiore 24
36015 Schio (VI) - Italy
Schio, 10-2018
Attorney
SMIDERLE STEFANO
This manual suits for next models
1
Table of contents
Languages:
Popular Batteries Charger manuals by other brands

nedis
nedis NBARF9019FBK quick start guide

GYS
GYS GYSflash 7A manual

ULTIMATE SPEED
ULTIMATE SPEED ULG 17 A1 Operation and safety notes translation of the original instructions

WilTec
WilTec Class 430 Operation instructions

CSB
CSB GP Installation and operating instructions

Morningstar
Morningstar TRISTAR TS-MPPT-60 Installation and operation manual