Valex TPER180 User manual

ATTENZIONE! Prima di usare la macchina, leggete attentamente le istruzioni per l’uso
CAUTION! Before starting the machine, read the operating instructions carefully
ATTENTION! Avant la mise en service de la machine, lire scrupuleusement le mode d’emploi
ATENCIÓN! Antes de usar la máqiuna, leer atentamente las instrucciones de empleo
ÐÑÏÓÏ×Ç! Ðñéí ÷ñçóìïðïéÞóåôå ôï ìç÷Üíçìá äéáâÜóôå ðñïóåêôéêÜ ôéò ïäçãßåò ÷ñÞóçò
1432600
18 01 2016
ISTRUZIONI D’USO E MANUTENZIONE
USER INSTRUCTIONS AND MAINTENANCE
INSTRUCTIONS D’UTILISATION ET ENTRETIEN
INSTRUCCIONES DE USO Y MANTENIMIENTO
ÏÄÇÃÉÅÓ ×ÑÇÓÇÓ ÊÁÉ ÓÕÍÔÇÑÇÓÇÓ
SCHIO (VI) ITALY
TPER180
Tagliapiastrelle radiale elettrico
Electrical radial tile cutter
Coupe-carrelage radial électrique
Cortador de azulejos radial eléctrico
Çëåêôñéêü êïðôéêü ðëáêéäßùí


- Lancio di materiale e polvere verso gli occhi ed il corpo dell’operatore.
Indossate occhiali di protezione e maschera antipolvere.
- Material and dust flying towards the operator’s eyes and body. Use
eye protection and an anti-dust mask.
- Projection de matériel et de poussières vers les yeux et le corps de
l’opérateur. Mettez des lunettes de protection et un masque anti-
poussière.
- Lanzamiento de material y polvo hacia los ojos y el cuerpo del operador.
Lleve puestas gafas de protección y una careta antipolvo.
- Åêôüîåõóç õëéêïý êáé óêüíçò ðñïò ôá ìÜôéá êáé ôïõ óþìá ôïõ
÷åéñéóôÞ. Íá öïñÜôå ðñïóôáôåõôéêÜ ãõáëéÜ êáé ìÜóêá.
- Acqua a contatto con dispositivi elettrici. Rischio di scossa elettrica con
pericolo di morte. Non toccate la macchina, mantenete una distanza di si-
curezza e togliete l'elettricità azionando l'interruttore principale dell'edificio.
- Water in contact with electrical devices. Risk of electric shock and danger
of death. Do not touch the machine, keep a safe distance and switch off
the electrical supply by using the mains switch in the building.
- Eau en contact avec les dispositifs électriques. Risque d’électrocution
et danger de mort. Ne touchez pas la machine, gardez une distance
de sécurité et coupez le courant à l’aide de l’interrupteur général de
l’installation électrique.
- Agua en contacto con los dispositivos eléctricos. Riesgo de electro-
cución con peligro de muerte. No toque la máquina, manténgase a
una distancia de seguridad y desconéctela de la alimentación eléctrica
accionando el interruptor principal del edificio.
- Íåñü óå åðáöÞ ìå çëåêôñéêÝò äéáôÜîåéò. Êßíäõíïò
çëåêôñïðëçîßáò ìå êßíäõíï èáíÜôïõ. Ìçí áããßæåôå ôç
ìç÷áíÞ, äéáôçñåßôå áðüóôáóç áóöáëåßáò êáé äéáêüðôåôå ôï
çëåêôñéêü åíåñãþíôáò óôïí ãåíéêü äéáêüðôç ôïõ êôéñßïõ.
- Lama e spigoli taglienti che provocano ferite alle mani. Indossate guanti
protettivi e mantenete una distanza di sicurezza dalla zona di taglio.
- Sharp blade and edges which could cut hands. Wear protective gloves
and keep a safe distance from the cutting area.
- Lame et angles coupants qui peuvent provoquer des blessures aux mains.
Mettez des gants de sécurité et maintenez une distance de sécurité de la
zone de coupe.
- La cuchilla y las puntas cortantes pueden provocar heridas en las manos.
Lleve guantes protectores y mantenga una distancia de seguridad con
respecto a la zona de corte.
- Ëåðßäá êáé áé÷ìçñÝò ðñïåîï÷Ýò ðïõ ðñïêáëïýí ôñáýìáôá óôá
÷Ýñéá. Íá öïñÜôå ðñïóôáôåõôéêÜ ãÜíôéá êáé íá êñáôÜôå ìéá
áðüóôáóç áóöáëåßáò áðü ôçí ðåñéï÷Þ êïðÞò.
- Dispositivi elettricidanneggiati. Rischiodi scossaelettrica conpericolo dimorte.
Non toccate le parti in tensione elettrica e mantenete una distanza di sicurezza.
Prima di ogni manutenzione scollegate la spina dalla presa di alimentazione.
- Electrical devices damaged.Risk of electric shock and danger of death.
Do not touch the electrically live parts and keep a safe distance. Before any
maintenance operations, unplug the machine from the power supply.
- Dispositifs électriques endommagés. Risque d’électrocution et de
danger de mort. Ne touchez pas les composants sous tension élec-
trique et maintenez une distance de sécurité. Avant chaque utilisation,
débranchez la fiche de la prise d’alimentation.
- Dispositivos eléctricos dañados.Riesgo de electrocución con peligro
de muerte. No toque las partes que se encuentran bajo tensión eléctrica y
mantengauna distanciade seguridad.Antes deefectuar cualquieroperación
de mantenimiento desconecte el enchufe de la toma de alimentación.
- ÇëåêôñéêÝò äéáôÜîåéò ÷áëáóìÝíåò. Êßíäõíïò çëåêôñïðëçîßáò ìå
êßíäõíï èáíÜôïõ. Ìçí áããßæåôå ôá ìÝñç õðü çëåêôñéêÞ ôÜóç êáé
äéáôçñåßôå ìéá áðüóôáóç áóöáëåßáò. Ðñéí áðü êÜèå óõíôÞñçóç
íá âãÜæåôå ôï âýóìá áðü ôçí ðñßæá ôñïöïäïóßáò.
RISCHI PRINCIPALI DELLA MACCHINA
MAIN RISKS OF THE MACHINE
PRINCIPAUX RISQUES DE LA MACHINE
RIESGOS PRINCIPALES DE LA MÁQUINA
ÊÕÑÉÏÔÅÑÏÉ ÊÉÍÄÕÍÏÉ ÌÇ×ÁÍÇÓ
Queste illustrazioni mostrano i rischi principali nell’uso della macchina. Leggete attentamente il libretto istruzioni della macchina.
These illustrations show the main risks involved with using the machine. Read the machine instruction manual carefully.
Ces illustrations montrent les principaux risques quand on utilise la machine. Lisez attentivement le manuel d’instructions de la machine.
Estas ilustraciones muestran los principales riesgos que comporta el uso de la máquina. Lea atentamente el manual de instrucciones.
Ïé áðåéêïíßóåéò áõôÝò äåß÷íïõí ôïõò êõñéüôåñïõò êéíäýíïõò óôç ÷ñÞóç ôçò ìç÷áíÞò. ÄéáâÜóôå ðñïóåêôéêÜ ôï ã÷åéñßäéï ïäçãéþí ôçò ìç÷áíÞò.

5
i
Ci congratuliamo con Voi per l’ottima scelta. Il Vostro nuovo appa-
recchio, prodotto secondo elevati standard di qualità, Vi garantirà
rendimento e sicurezza nel tempo.
Questo istruzioni riportano le informazioni e quanto ritenuto neces-
sario per il buon uso, la conoscenza e la normale manutenzione
della macchina. Esse non riportano le informazioni sulle tecniche
delle lavorazioni delle piastrelle né trattano l’argomento sulle loro
tipologie e grado di lavorabilità; l’utilizzatore troverà maggiori
notizie su libri e pubblicazioni specifiche o partecipando a corsi
di specializzazione.
Le avvertenze d’uso e le norme di manutenzione si riferiscono a
necessità normali di esercizio. Dalla loro osservanza e dall’adem-
pimento di quanto prescritto, dipende il regolare funzionamento,
la durata e l’economia di esercizio della macchina.
Queste istruzioni sono parte integrante della macchina e devono
accompagnarla in caso di riparazione o di rivendita. Conservate
con cura ed a portata di mano la documentazione fornita in modo
da poterla consultare in caso di necessità.
Per eventuali riparazioni o revisioni che comportino operazioni di
una certa complessità è necessario rivolgersi ai Centri di Assistenza
autorizzati che dispongono di personale specializzato.
La Ditta costruttrice declina qualsiasi responsabilità per danni
dovuti a negligenza, alla mancata osservanza di quanto descritto
nel presente manuale e a danni diretti e/o indiretti causati da un
uso improprio della macchina.
La negligenza a quanto indicato, un cattivo ed inadeguato uso della
macchina e l’esecuzione di modifiche non autorizzate, possono
essere causa di annullamento della garanzia. La prevenzione di
qualsiasi inconveniente è quindi vincolata alla scrupolosa osser-
vanza di quanto prescritto.
Verificate, all’atto dell’acquisto, che la macchina sia integra e completa.
ATTENZIONE! Prima di usare la macchina, per eseguire corret-
tamente il trasporto, la messa in servizio, l’avviamento, l’uso,
l’arresto e la manutenzione, leggete ed applicate attentamente le
istruzioni di seguito riportate che fanno riferimento alle figure ed ai
dati tecnici. Prima di iniziare il lavoro prendete familiarità con i co-
mandi e con il corretto uso della macchina assicurandovi di saper
arrestarla in caso di emergenza. L’uso improprio della macchina
può provocare gravi ferite e danni alle cose. Pensate sempre alla
vostra e altrui sicurezza e comportatevi di conseguenza.
ATTENZIONE! La macchina è destinata esclusivamente per
uso hobbystico ed è idonea ad eseguire tagli perpendicolari ed
inclinati di piastrelle in monocottura, bicottura, gres, klinker.
Non è consentita la lavorazione di metalli, legno, materiali plastici,
materiali infiammabili e materiali che generano polveri e nebbie
pericolose o nocive alla salute. Ogni altro impiego, diverso da
quello indicato in queste istruzioni, può recare danno alla macchina
e costituire serio pericolo per le persone e le cose.
DESCRIZIONE MACCHINA (FIG. A,H,M)
1 Interruttore acceso/spento
2 Lama di taglio
3 Protezione lama
4 Paraspruzzi posteriore
5 Freccia senso di rotazione lama
6 Piano di appoggio pezzo
7 Guidapezzo e scala graduata
8 Goniometro per taglio obliquo
9 Maniglia per movimentazione di taglio
10 Motore e ventola di raffreddamento
11 Trave di sostegno della testa di taglio e scala graduata
12 Indicatore di spostamento
13 Fermi di fine corsa
14 Vite per bloccaggio testa di taglio
15 Volantini per inclinazione testa di taglio
16 Gambe
17 Telaio
18 Vasca dell’acqua e base per macchina
19 Staffe e viti fissaggio vasca
20 Pompa di mandata acqua
21 Supporto fissaggio pompa (se presente)
22 Regolatore di portata pompa (se presente)
23 Filtro
24 Cavo di alimentazione pompa
25 Tubo di mandata
26 Interruttore a corrente differenziale mobile con spina di
alimentazione
27 Pulsante di prova e di ripristino
29 Cavo di alimentazione macchina
30 Dado blocca lama
31 Flange blocca lama
DESCRIZIONE MARCATURE E SIMBOLI (FIG. B)
1 Modello macchina e dati tecnici.
2 Codice macchina, numero di matricola o numero lotto, anno di
fabbricazione, marchi di certificazione (se presenti).
3 ATTENZIONE!
4 Leggete attentamente le istruzioni prima dell’uso.
5 Attenzione! Pericolo taglio mani. E’ obbligatorio indossare
guanti di protezione.
6 Attenzione! Pericolo lancio materiale e polveri dannose.
E’ obbligatorio indossare occhiali di protezione e una
maschera a protezione delle vie respiratorie.
7 Attenzione! Pericolo rumore elevato. E’ obbligatorio indos-
sare cuffie a protezione dell’udito.
8 Attenzione! Pericolo di scossa elettrica. Alcune parti
della macchina sono in tensione elettrica, non toccatele e
mantenete una distanza di sicurezza. Ad eccezione della
pompa, tutte le altri parti elettriche non devono venire a
contatto con l’acqua.
9 Attenzione! Pericolo lama in movimento. Mantenete le mani
lontano dalla lama.
10 Attenzione! Prima di ogni controllo, regolazione o manu-
tenzione, staccate l’alimentazione elettrica scollegando la
spina della macchina. In caso di cavo di alimentazione
danneggiato, estraete la spina dalla presa della rete di ali-
mentazione prima di procedere ad un controllo. Se l’acqua
entra in contatto con dispositivi elettrici togliete l’elettricità
azionando l’interruttore principale dell’edificio.
11 Utilizzare solo lame a corona continua o tipo turbo. Non
utilizzare lame di taglio a corona segmentata.
12 Utilizzare l’acqua durante il taglio. Non eseguire tagli a
secco.
13 I rifiuti elettrici ed elettronici possono contenere sostanze
pericolose per l’ambiente e la salute umana; non devono
pertanto essere smaltiti con quelli domestici ma mediante
una raccolta separata negli appositi centri di raccolta o
riconsegnati al venditore nel caso di una apparecchiatura
nuova analoga. Lo smaltimento abusivo dei rifiuti comporta
l’applicazione di sanzioni amministrative.

6
DATI TECNICI
Tensione di alimentazione e frequenza nom. 230V~50Hz
Potenza nominale motore 600W
Velocità di rotazione a vuoto 2990min
-1
Altezza max di taglio 30mm a 90° - 27mm a 45°
Corsa max testa di taglio 450mm
Inclinazione testa di taglio 0°-45° verso sinistra
Pressione acustica LpA al posto operatore 65,6dB(A)*
Vibrazioni sull’impugnatura <2,5m/s
2
**
Classe isolamento macchina I
Dimensioni totali macchina (b x l x h) 860x580x930mm
Peso macchina (a secco) 26,2kg
Lama circolare sinterizzata a corona corrugata turbo, tipo 1A1R ***
Diametro est./int. 180/25,4mm
Spessore lama (zona di taglio) 2,7mm
Pompa a sommersione
Tensione di alimentazione e frequenza nom. 230V ~50Hz
Potenza nominale 8,5W
Temperatura max acqua 35°C
Grado di protezione IPX8
* Sec. EN3744, ** Sec. ENV25349, *** Sec. EN13236
NORME DI SICUREZZA GENERALI
1) I SACCHI DI NYLON NON SONO DEI GIOCATTOLI
ATTENZIONE! Pericolo di soffocamento. I sacchi di nylon presenti
nell’imballaggio possono provocare soffocamento se infilati sul
capo e devono essere tenuti lontani dai bambini; se non più
riutilizzabili devono essere tagliati e smaltiti nei rifiuti.
2) PERSONE ABILITATE ALL’USO DELLA MACCHINA
L’uso della macchina è vietato ai bambini e ai ragazzi, alle persone
inesperte non perfettamente a conoscenza delle istruzioni d’uso
contenute nel presente manuale ed agli estranei. Leggi e rego-
lamenti locali possono prevedere una età minima per l’uso della
macchina. L’operatore deve essere adeguatamente addestrato
all’utilizzo, alla regolazione e al funzionamento in sicurezza della
macchina.
3) RESPONSABILITA’ DELL’OPERATORE
L’operatore è responsabile verso terzi di eventuali incidenti o danni
a persone e cose causati dall’uso della macchina.
4) MANTENETE UNA POSIZIONE DI LAVORO STABILE E SICURA
Quando lavorate mantenete una posizione di lavoro stabile e
sicura.
5) FATE ATTENZIONE ALLA ZONA DI LAVORO
Fate attenzione alle mani, al pezzo in lavorazione, all’utensile di
taglio e in generale a tutte le parti in movimento.
6) OPERATE CON ATTENZIONE
Non distraetevi e controllate sempre quello che state facendo:
usate il buon senso. Non usate mai la macchina in condizioni di
stanchezza, malessere, sotto l’effetto di alcool, droghe o farmaci
che riducono la vigilanza.
7) MANTENETE UNA DISTANZA DI SICUREZZA
Mantenete le persone e gli animali lontano dalla vostra zona di
lavoro e dalla macchina. Non toccate le parti che sono in tensione
elettrica.
8) PROTEGGETE IL VOSTRO CORPO
L’uso della macchina genera rumore, calore, polveri, fumi,
vibrazioni, il lancio di liquido e schegge. Operate sempre con dei
dispositivi di protezione individuale a norma per evitare lesioni
al corpo, alle mani, agli occhi, all’udito, alle vie respiratorie.
Indossate abbigliamento robusto con maniche e polsini stretti,
occhiali di protezione, guanti da lavoro, cuffie antirumore,
maschera antipolvere e calzature antinfortunistiche antiscivolo.
Non indossate abbigliamento largo, sciarpe, nastri di tessuto e
gioielli perché potrebbero impigliarsi nelle parti in movimento
della macchina. Indossare copricapi di protezione per raccogliere
i capelli lunghi. Gli occhiali da vista non sono adatti a proteggere
gli occhi.
9) EFFICIENZA DELLA MACCHINA
Controllate sempre l’efficienza e l’integrità della macchina; se
in cattivo stato può provocare gravi incidenti. Non utilizzate la
macchina se l’interruttore non consente di accendere o spegnere
la macchina.
10) INTEGRITA’ DELLA MACCHINA
Non togliete alcun componente dalla macchina se non espressa-
mente indicato nelle presenti istruzioni e non modificate in alcun
modo la configurazione originale.
11) NON SMONTATE LA MACCHINA
Non smontate per alcun motivo la macchina. Non utilizzate la
macchina senza le protezioni.
12) NON MANOMETTETE ALCUN COMPONENTE DELLA MAC-
CHINA
Non manomettete, non modificate, non togliete alcun componente
della macchina.
13) VERIFICATE LA SOLIDITA’ DELLA MACCHINA
Verificate periodicamente il serraggio della viteria e il fissaggio
della lama.
14) UTILIZZATE LA MACCHINA IN UN LUOGO BEN AERATO E
VENTILATO
La macchina deve essere utilizzata in un luogo ben aerato e
ventilato in modo assicurare un sufficiente raffreddamento e un
ricambio d’aria del locale.
15) NON UTILIZZATE LA MACCHINA IN AMBIENTI PERICOLOSI
Non utilizzate la macchina in un ambiente con pericolo di
esplosione e/o incendio, in locali poco ventilati, in presenza di
liquidi, umidità, gas, vapori, acidi ed elementi infiammabili e/o
esplosivi.
16) TRASPORTO DELLA MACCHINA
Le operazioni di trasporto della macchina devono essere eseguite
con attenzione. Non trasportate la macchina tirandola per il cavo
di alimentazione o altre sue parti.
17) POSIZIONAMENTO DELLA MACCHINA
Posizionate su un pavimento con superficie piana e solida
che dovrà supportare il peso totale e le sollecitazioni derivate
dall’uso.
18) LAVORATE CON LUMINOSITA’ ADEGUATA
Lavorate solo durante le ore di buona luminosità o con una
illuminazione artificiale corrispondente.
19) NON ESPONETE LA MACCHINA AGLI AGENTI ATMOSFERICI
Non lasciate la macchina esposta agli agenti atmosferici quali
pioggia, nebbia, sole, alte o basse temperature.
20) NON TOCCATE LA MACCHINA SE SIETE BAGNATI
Non usare la macchina a piedi nudi o bagnati. Non toccare la
macchina con le mani bagnate.
21) CONTROLLO PRIMA DI AVVIARE LA MACCHINA
Prima di inserire la spina alla rete elettrica verificare che l’inter-
ruttore sia su OFF “O” (spento) e che le chiavi di servizio siano
state tolte.
22) VERIFICHE CORRETTO MONTAGGIO
Utilizzate la macchina solo se la pompa è correttamente installata
e se la vasca dell’acqua è riempita d’acqua fino al livello max.
23) VERIFICHE FUNZIONALI
Controllate che la testa di taglio possa scorrere liberamente e
che i cavi elettrici e il tubo di mandata siano posizionati a lato in

7
oggetti sulla macchina che potrebbero cadere accidentalmente.
Eliminate frequentemente i residui di taglio dalla macchina e dal
pavimento, se necessario asciugate la macchina e il pavimento;
effettuate queste operazioni solo a macchina ferma e con cavo
di alimentazione scollegato.
36) L’ACQUA NON DEVE ANDARE A CONTATTO CON PARTI
ELETTRICHE
ATTENZIONE! L’acqua a contatto con parti elettriche provoca
gravi incidenti che possono essere anche mortali. Solo la pompa
deve essere immersa nell’acqua.
37) LE RIPARAZIONI DEVONO ESSERE EFFETTUATE DA PERSO-
NALE AUTORIZZATO
Non tentate di riparare la macchina o di accedere a organi interni,
rivolgetevi sempre presso i centri assistenza autorizzati. Interventi
effettuati da personale non autorizzato fa decadere immediatamente
la garanzia e potrebbe generare pericolo.
38) RICHIEDETE E FATE INSTALLARE SOLO RICAMBI ORIGINALI
Richiedete e fate installare solo ricambi originali, rivolgetevi al
vostro rivenditore di fiducia. L’utilizzo di ricambi non originali fa
decadere la garanzia e potrebbe generare un serio pericolo.
39) RIPONETE LA MACCHINA IN UN LUOGO SICURO
Quando non la usate, riponete la macchina in un luogo asciutto
e lontano dalla portata dei bambini.
40) RISCHI RESIDUI
ATTENZIONE! La scrupolosa osservanza di queste istruzioni con
l’utilizzo dei mezzi di protezione individuale minimizzano i rischi
di incidente ma non li eliminano completamente.
41) ATTENETEVI SEMPRE A QUESTE ISTRUZIONI
Utilizzate la macchina solo nei modi descritti in queste istruzioni.
Non utilizzatela per scopi a cui non è destinata.
NORME DI SICUREZZA ELETTRICHE
1)NON TOCCATE LE PARTI IN TENSIONE ELETTRICA
ATTENZIONE! Pericolo di scossa elettrica. Alcune parti della
macchina sono in tensione elettrica.
2) OBBLIGO DI UTILIZZARE UN APPARECCHIO SALVAVITA
ATTENZIONE! Pericolo di scossa elettrica. L’utilizzo dell’acqua
con la macchina azionata dall’energia elettrica aumenta il
pericolo di scossa elettrica che può provocare anche la morte.
Per la vostra sicurezza è obbligatorio che sia installato un
apparecchio salvavita (chiamato anche interruttore a corrente
differenziale o RCD) sulla linea di alimentazione elettrica per un
campo di intervento secondo le normative vigenti nel Paese di
utilizzo; consultate il vostro elettricista di fiducia. L’interruttore
a corrente differenziale in dotazione alla macchina, non esula
dall’obbligo all’installazione di un apparecchio salvavita sulla
linea dell’edificio che fornisce l’alimentazione elettrica in cui
si usa la macchina.
3) MANTENETE I BAMBINI E GLI ANIMALI LONTANI DAGLI APPA-
RECCHI ELETTRICI
I bambini e gli animali devono essere tenuti lontani dagli appa-
recchi collegati alla rete elettrica.
4) VERIFICATE LA TENSIONE DI ALIMENTAZIONE
La tensione di alimentazione deve corrispondere a quella
dichiarata sulla targhetta dati tecnici. Non utilizzate altro tipo di
alimentazione.
5) COLLEGAMENTO ALLA RETE ELETTRICA
Prima di collegare o scollegare la macchina dalla rete di alimentazione,
assicuratevi che l’interruttore si trovi nella posizione OFF “O” (spento).
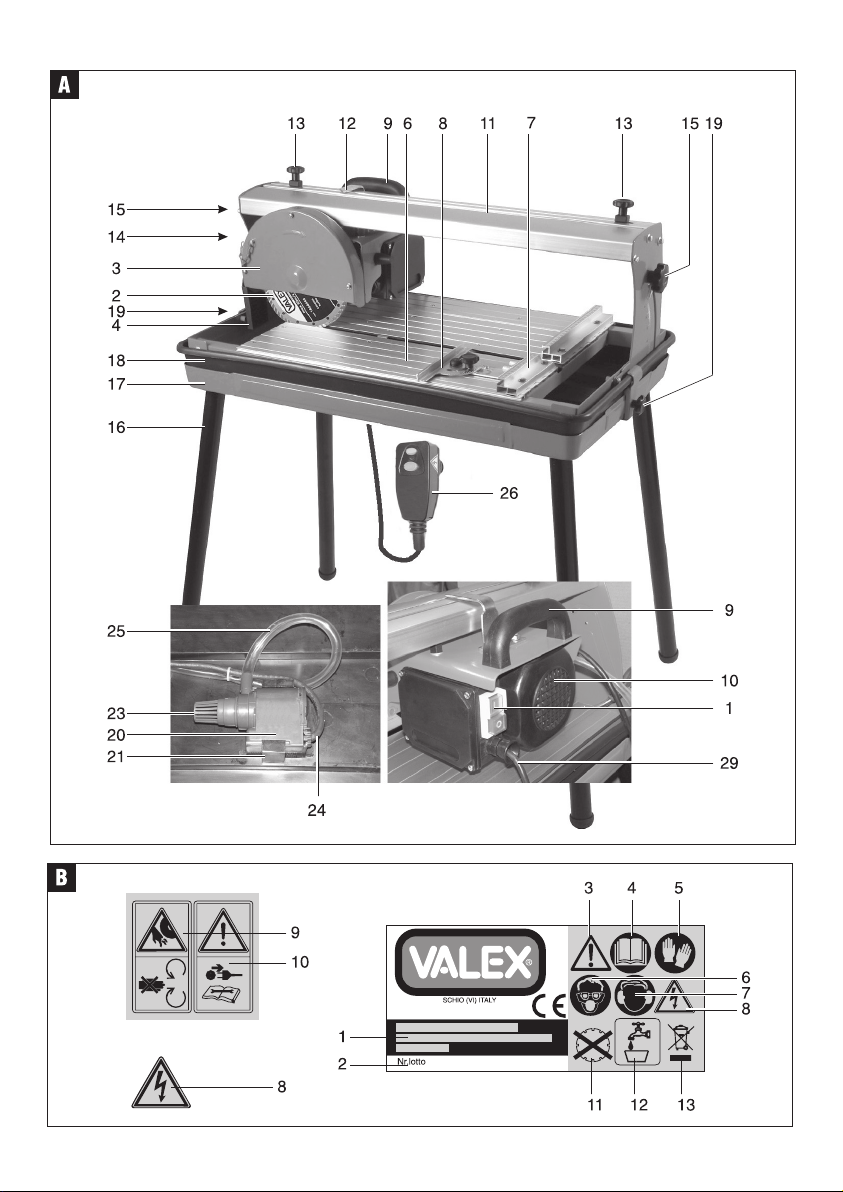
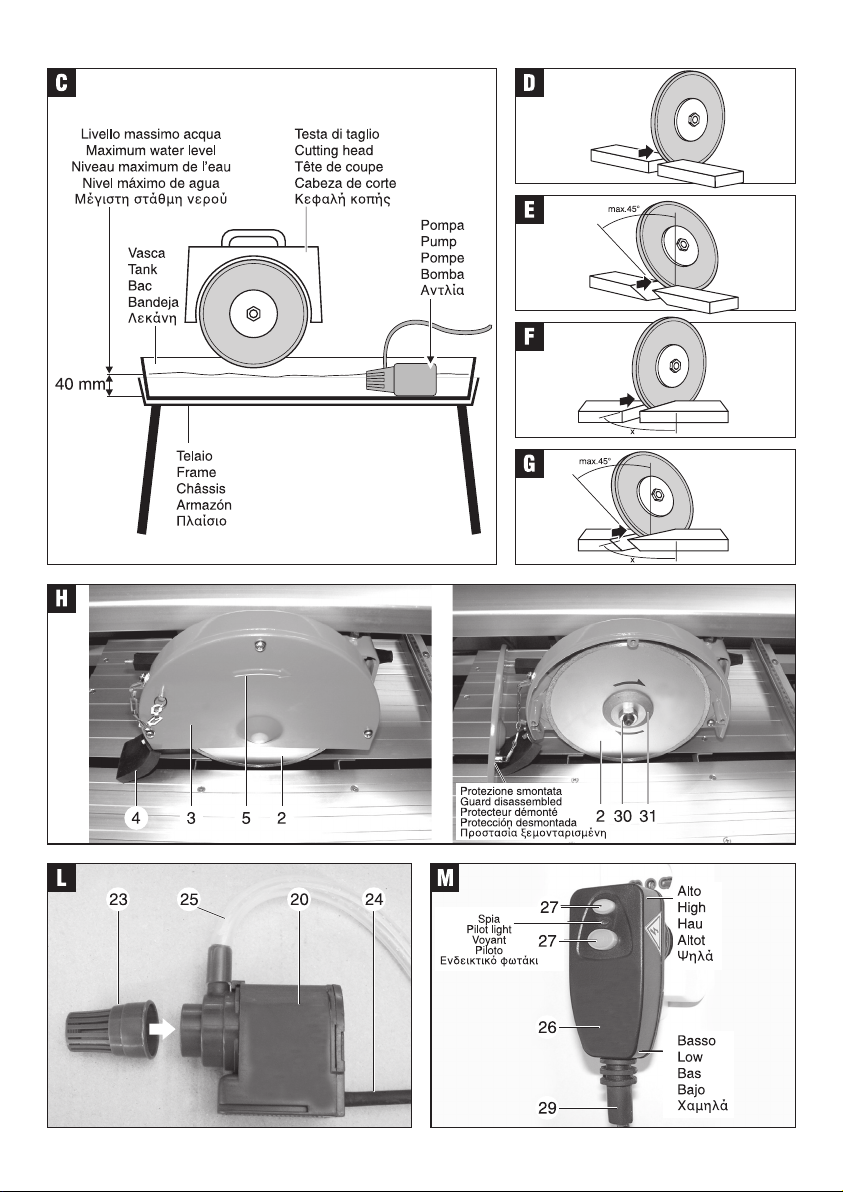
La spina deve essere posizionata in verticale sec. fig.M.
6) NON MANOMETTETE LA SPINA E IL CAVO DI ALIMENTAZIONE
E’ assolutamente vietato manomettere la spina e il cavo di
modo da non provocare impedimenti.
24) PEZZO IN LAVORAZIONE
E’ importante che il pezzo in lavorazione sia ben posizionato
contro il guidapezzo. Non tagliate pezzi con spessore altre al
consentito (vedi dati tecnici). Non appoggiate pezzi con dimen-
sioni eccessive che possono provocare il ribaltamento della
macchina.
25) MATERIALI NON CONSENTITI
Non è consentita la lavorazione di metalli, legno, materiali pla-
stici, materiali infiammabili ed esplodenti, materiali che
generano polveri e nebbie pericolose o nocive alla salute.
26) PREVENITE POSSIBILI INCIDENTI
Effettuate sempre una prova di funzionamento a vuoto prima di
iniziare il lavoro; durante questa operazione fate in modo che
nessuno si avvicini alla macchina e mantenete una distanza di
sicurezza. Utilizzate sempre occhiali, guanti, maschera e cuffie
di protezione. A macchina in funzione non toccate la lama,
pericolo di lesioni gravi! Dopo aver sostituito dei componenti
effettuate sempre un controllo generale prima di accingervi alla
lavorazione.
27) UTILIZZATE SOLO LAME ADATTE A QUESTA MACCHINA
Questa macchina è stata progettata per utilizzare lame specifiche
per il taglio di piastrelle; è vietato utilizzare lame adatte ad altri
materiali, dischi abrasivi, lame a corona segmentata. La velocità
max stampigliata sulla lama deve essere sempre maggiore a
quella indicata nei dati tecnici della macchina. Utilizzate lame
conformi alle normative in vigore nel paese in cui vi trovate.
28) MANEGGIATE LA LAMA CON ATTENZIONE
La lama ha parti molto taglienti: maneggiatela con attenzione e
indossate sempre guanti protettivi, pericolo di lesioni gravi!
29) UTILIZZATE SOLO LAME IN PERFETTE CONDIZIONI
Per la vostra sicurezza non utilizzate lame danneggiate, deformate
o fessurate; se usurata sostituitela con una nuova.
30) NON SOLLECITATE LA LAMA
Non sottoponete la lama a sollecitazioni quali: urti, flessioni,
pressioni eccessive, tensioni termiche, variazioni irregolari di
velocità, vibrazioni. In queste condizioni l’utensile ha una durata
limitata e può rompersi senza preavviso con pericoloso lancio
di frammenti.
31) A MACCHINA IN FUNZIONE NON TOCCATE LE PARTI IN
MOVIMENTO
ATTENZIONE! Pericolo di ferite gravi! Durante il funzionamento
non toccate la lama e tutte le parti in movimento. Fate attenzione
al movimento delle braccia e delle mani.
32) MACCHINA NON OPERATIVA
Posizionare l’interruttore su OFF “O” (spento), staccate l’alimen-
tazione elettrica scollegando la spina della macchina quando: non
la usate, la lasciate incustodita, la trasportate, il cavo di alimen-
tazione è danneggiato, inserite l’acqua nella vasca, effettuate le
regolazioni, la manutenzione e la pulizia.
33) ATTENDETE L’ARRESTO COMPLETO DELLA MACCHINA
Il motore, le parti meccaniche rotanti e la lama girano ancora per
diversi secondi dopo aver spento la macchina. Durante la fase
di arresto queste parti non devono essere toccate, pericolo di
lesioni gravi!
34) NON ABBANDONATE LA MACCHINA FINCHE’ E IN FUNZIO-
NE
Non abbandonate la macchina finché è in funzione e nella
fermata rimanete accanto fino al completo arresto delle parti in
movimento.
35) MANTENETE PULITO E IN ORDINE IL POSTO DI LAVORO
Il disordine e la mancanza di pulizia sono fonti di pericolo. Fate in
modo che attorno alla macchina non ci siano attrezzi od oggetti
che potrebbero essere danneggiati. Non posizionate attrezzi od

8
alimentazione.
7) CONTROLLATE IL CAVO DI ALIMENTAZIONE
Il cavo di alimentazione e il cavo di prolunga (se presente) devono
essere controllati periodicamente e prima di ogni uso per vedere
se presentano segni di danneggiamento o di invecchiamento. Se
non risultassero in buone condizioni scollegate immediatamente il
cavo e non usate la macchina ma fatela riparare presso un centro
di assistenza autorizzato.
8) MANTENETE IL CAVO DI ALIMENTAZIONE IN POSIZIONE
SICURA
Tenete il cavo di alimentazione e il cavo di prolunga (se presente)
lontani dalla zona di lavoro e dall’utensile di taglio, da superfici
umide, bagnate, oliate, da bordi taglienti, da fonti di calore, da
combustibili e da zone di transito veicolare e pedonale.
9) NON CALPESTATE O SCHIACCIATE IL CAVO DI ALIMENTA-
ZIONE
Non passate mai sopra il cavo di alimentazione. Siate coscienti
della sua posizione in ogni momento.
10) NON USATE LA MACCHINA IN PRESENZA DI LIQUIDI
Ad esclusione della vasca, della pompa e del piano di appoggio,
non bagnate la macchina con liquidi e non esponetela ad ambienti
umidi. Non lasciatela all’aperto.
11) UTILIZZATE UN CAVO DI PROLUNGA IDONEO ALLA MACCHINA
Utilizzate solamente cavo per prolunga omologato idoneo alla
potenza della macchina che utilizzate, con cavo di terra e dimen-
sionato in base alla sua lunghezza; consultate il vostro elettricista
di fiducia.
12) SCOLLEGATE LA MACCHINA IMPUGNANDO SOLO LA SPINA
Per estrarre la spina dalla presa impugnate solo la spina ; non
tirare il cavo di alimentazione!
13) EVITATE IL CONTATTO DEL CORPO CON SUPERFICI MESSE
A MASSA O A TERRA
Evitate il contatto del corpo con superfici messe a massa o a
terra, come frigoriferi, termosifoni, tubi e serramenti metallici
ecc. Utilizzate una pedana che isoli elettricamente l’utilizzatore
dal pavimento.
TERMINOLOGIA ADOTTATA
MACCHINA
Assieme di tutti i componenti elettrici e meccanici.
TAGLIAPIASTRELLE RADIALE
Macchina destinata al taglio di piastrelle; la testa di taglio si muove
manualmente lungo una guida rispetto al pezzo che è fermo.
TESTA DI TAGLIO
Assieme composto dal motore, lama di taglio, impugnatura,
interruttore e protezioni mobili/fisse.
UTENSILE - LAMA
Attrezzo circolare destinato ad asportare materiale dal pezzo.
INTERRUTTORE
Componente elettrico il cui azionamento ha funzione di avviare e
spegnere la macchina.
POMPA
Componente elettrico che ha la funzione di aspirare l’acqua dalla
vasca e pomparla verso la lama attraverso una tubazione.
INTERRUTTORE A CORRENTE DIFFERENZIALE MOBILE (PRCD)
Componente elettrico di sicurezza addizionale che interrompe
l’alimentazione elettrica in caso di dispersione verso terra; non
sostituisce i componenti di sicurezza elettrica posti sulla linea di
alimentazione, obbligatori sec. le leggi e le direttive in vigore.
OPERATORE - UTILIZZATORE
E’ la persona responsabile di installare, far funzionare, regolare,
manutenzionare, pulire la macchina.
TRASPORTO E SOLLEVAMENTO (FIG. A)
ATTENZIONE! La Ditta Costruttrice declina ogni responsabilità
per gli eventuali danni diretti e/o indiretti causati da errati
trasporti o sollevamenti.
ATTENZIONE! Prima effettuare le seguenti operazioni assicu-
ratevi che la spina della macchina sia scollegata dalla rete
elettrica.
Le operazioni di trasporto e sollevamento della macchina devono
essere eseguite con attenzione per evitare incidenti e danni; ese-
guitele con l’aiuto di una seconda persona in quanto la macchina è
pesante. Utilizzate dei dispositivi di sollevamento e trasporto idonei
al peso e alle dimensioni.
1) Bloccate la testa di taglio mediante la vite di arresto (pos.14).
2) Sollevate la macchina dalla vasca e depositatela a terra facendo
attenzione a staccare prima la pompa (pos.20) dal supporto
alla vasca.
3) Eliminate completamente l’acqua dalla vasca.
4) Trasportate le due parti in modo separato.
Non trasportate la macchina appoggiata sulla vasca, pericolo
di ribaltamento!
Sollevare la macchina con estrema cautela e trasferitela lentamente,
senza scosse o movimenti bruschi. Non trasportate la macchina
tirandola per il cavo di alimentazione o altre sue parti.
MESSA IN SERVIZIO (FIG. A)
ATTENZIONE! La Ditta Costruttrice declina ogni responsabilità
per gli eventuali danni diretti e/o indiretti causati da errate
installazioni e allacciamenti.
ATTENZIONE! Prima effettuare le seguenti operazioni assicu-
ratevi che la spina della macchina sia scollegata dalla rete
elettrica.
La macchina è fornita con alcuni componenti smontati e prima di
usarla deve essere pulita ed installata.
Nella scelta della posizione della macchina è opportuno considerare:
- che la posizione prevista non sia umida e sia al riparo dagli
agenti atmosferici.
- che la zona di appoggio risulti perfettamente in piano, su di un
pavimento antisdrucciolo e con una capacità di carico adeguata
al peso della macchina.
- che attorno alla macchina sia prevista un’ampia zona operativa
libera da impedimenti.
- che sul lato posteriore non siano presenti apparecchiature elettri-
che o cose che si potrebbero danneggiare dagli spruzzi d’acqua
prodotti dalla macchina.
- che il locale sia custodito e chiuso per impedire il libero ac-
cesso.
- che vi sia una buona illuminazione.
- che sia posizionata in vicinanza dell’interruttore generale con
differenziale.
- che l’impianto di alimentazione sia dotato di messa a terra
conforme alle norme.
- che la temperatura ambiente sia compresa tra 10° e 35° C.
- che l’ambiente di lavoro non sia in atmosfera esplosiva.
1) Estraete la macchina ed i componenti e verificate visivamente
la loro perfetta integrità; a questo punto procedete ad una
accurata pulizia per togliere gli eventuali oli protettivi utilizzati

9
per il trasporto.
2) Procedete al montaggio dei componenti come illustrato in
figura; in caso di dubbio rivolgetevi al vostro rivenditore. Alcuni
componenti devono essere montati/utilizzati solo se necessari
alla lavorazione che vi accingete ad effettuare.
3) Montate le 4 gambe (pos.16) al telaio (pos.17) mediante le viti
con rondelle e le piastrine sagomate.
4) Inserite la vasca (pos.18) nel telaio e fissatela mediante le 2
staffe (pos.19).
5) Avvitate i 2 volantini (pos.15) in modo da bloccare il movimento
della trave e della testa di taglio. Svitare la viteria usata per il
trasporto e avvitare i 2 volantini.
6) Fissate la pompa (pos.20) sulla vasca come illustrato in figura,
(se presente mediante il supporto pos.21); regolate la portata sul
massimo mediante il regolatore (se presente pos.22).
7) Inserite la macchina nella vasca facendo attenzione a non
schiacciare i cavi elettrici (pos.24-29) e il tubo di mandata
(pos.25). Verificate che la maniglia e la pompa si trovino a destra
della trave (pos.11).
8) Togliete la vite di bloccaggio testa (pos.14) e le eventuali prote-
zioni in cartone e polistirolo utilizzate per il trasporto.
9) Sulla trave di sostegno (pos.11) avvitate i 2 fermi di fine corsa
(pos.13).
10) Se necessario montate il goniometro (pos.8).
11) Verificate che lama (pos.2) sia ben fissata e che possa ruotare
liberamente (vedasi cap. “Sostituzione lama”).
12) Verificate che il tubo (pos.25) e il cavo di alimentazione pompa
(pos.24) siano ben tesi senza attorcigliamenti o piegature; muovete
la testa di taglio con alcune corse a vuoto.
13) Assicuratevi di avere montato correttamente tutte le parti, verifi-
cate la solidità dell’assemblaggio e la stabilità della macchina.
14) Versate 8 litri d’acqua fredda e pulita nella vasca (pos.18) in
modo da coprire il filtro di aspirazione pompa. Il livello max è
a 40mm dal fondo della vasca, non oltrepassate questo limite
(sezione schematica in fig.C).
AVVIAMENTO E ARRESTO
Prima di mettere in funzione la macchina, verificate l’integrità dei
componenti e controllate che le viteria sia serrata.
ATTENZIONE! Prima di avviare la macchina è obbligatorio in-
dossare occhiali, guanti, cuffie e maschera di protezione (non
in dotazione alla macchina).
ATTENZIONE! Durante l’avviamento e l’arresto della macchina fate in
modo che nessuno si avvicini alla macchina. Mantenete una distanza
di sicurezza da tutte le parti in movimento e dalla zona di taglio.
ATTENZIONE! Il motore, le parti meccaniche rotanti e la lama
girano ancora per diversi secondi dopo aver spento la macchi-
na. Durante la fase di arresto queste parti non devono essere
toccate, pericolo di lesioni gravi!
AVVIAMENTO
1) Verificate che le chiavi di servizio siano state riposte.
2) Verificate che la protezione lama (pos.3) sia fissata e copra
la lama.
3) Inserite la spina del cavo di alimentazione alla presa.
4) Per abilitare la macchina all’avviamento premete il tasto RESET
(pos.27) (spia rossa accesa), premete il tasto TEST (pos.27) (la
spia deve spegnersi) e poi nuovamente il tasto RESET (spia rossa
accesa); in caso di anomalie leggete il cap. “Ricerca guasti”.
5) Posizionatevi di fronte alla macchina vicino all’interruttore ed
assicuratevi che persone ed animali siano lontani.
6) Per avviare premete l’interruttore (pos.1) in posizione ON “I”
(acceso).
Fate funzionare la macchina solo se la vasca contiene l’acqua,
non avviatela a secco!
Se osservate delle anomalie di funzionamento spegnete la macchina
e consultate il capitolo “Ricerca guasti ed interventi ammessi”.
ARRESTO
1) Per arrestare premete l’interruttore (pos.1) in posizione OFF
“O” (spento).
Quando non lavorate spegnete la macchina e staccate la spina
dalla presa.
AVVERTENZE E CONSIGLI D’USO
ATTENZIONE! Prima di ogni controllo o regolazione posizionate
l’interruttore su OFF”O” (spento) e staccate l’alimentazione
elettrica scollegando la spina della macchina.
Dopo aver letto attentamente i capitoli precedenti, seguite scru-
polosamente queste avvertenze e consigli che vi permetteranno
di ottenere il massimo delle prestazioni dalla vostra macchina.
Procedete con calma, solo dopo aver acquisito una buona espe-
rienza riuscirete a sfruttarne a fondo le potenzialità. Per prendere
familiarità con tutti i comandi, fate delle prove di utilizzo a vuoto
senza montare pezzi in lavorazione.
OPERATORE
La posizione normale dell’operatore è quella davanti la macchina,
con la mano sinistra a bloccare il pezzo e la mano destra che
impugna saldamente la maniglia (pos.9) della testa di taglio; solo
in questa posizione è possibile eseguire il taglio.
Attenzione! Mantenete le mani lontano dalla lama e dalla zona
di taglio, pericolo di lesioni gravi!
UTENSILE
Verificate prima di ogni utilizzo la sua perfetta integrità, l’assenza di
rotture e deformazioni. Periodicamente controllatene l’usura.
Quando è necessario sostituirlo seguite le indicazioni dei capitoli
seguenti.
Attenzione! L’efficienza e la perfetta integrità della lama produco-
no un miglior risultato e minimizzano il rischio di incidenti.
PEZZO IN LAVORAZIONE
Il pezzo che taglierete dovrà avere forma, dimensioni e peso
compatibili con la macchina.
Sul pezzo segnate con una riga la linea di taglio; posizionatelo
sopra il piano di appoggio (pos.6) ben appoggiato al guidapezzo
(pos.7), facendo attenzione a non toccare la lama ed allineate la
linea precedentemente tracciata con la lama.
Attenzione! Per la vostra sicurezza è importante che il pezzo sia
correttamente serrato. Rammentate sempre che un contraccolpo
provoca il rifiuto del pezzo spingendolo verso di voi.
LAVORAZIONE, TAGLI E MOVIMENTI
Principio di funzionamento
Il pezzo in lavorazione è fermo sulla macchina, mentre l’utensile si
muove manualmente rispetto al pezzo per asportare il materiale. Il
motore fornisce l’energia per il movimento rotatorio dell’utensile.
Esecuzione del taglio
Per effettuare la pulizia si consiglia di avere a portata di mano una
spugna, uno straccio e un pennello a manico lungo.
Spingete la testa di taglio in fondo in modo che si trovi sulla parte
posteriore della macchina.
Appoggiate il pezzo sul piano e, mantenendolo ben saldo, spingetelo
verso di voi fino al guidapezzo.

10
Avviate la macchina e verificate che la pompa mandi acqua sulla
lama attraverso il tubo di mandata.
Impugnate la maniglia e tirate la testa di taglio verso di voi, con mo-
vimento regolare senza sforzi eccessivi fino a taglio ultimato. Senza
spegnere la macchina spingete la testa di taglio in fondo in modo
che il pezzo sia libero, a questo punto spegnete la macchina.
ATTENZIONE! Mantenete le mani lontano dalla zona di taglio.
L’acqua ha le funzione di raffreddare la lama e trattenere ed evacuare
la polvere prodotta. Eliminate l’acqua sporca evitando che ristagni
sulla macchina e pulite il fondo della vaschetta.
Durante il lavoro l’acqua si depositerà sul piano di appoggio e sul
pezzo per poi scaricarsi nella vasca attraverso le aperture di scolo.
Se le altre parti della macchina vengono a contatto con l’acqua,
provvedete ad asciugarle con un panno morbido, solo dopo aver
scollegato il cavo di alimentazione dalla presa elettrica. Il pavimento
deve sempre rimanere asciutto.
Provvedete a ripristinare il livello dell’acqua se questo dovesse
calare a causa dell’evaporazione.
Seguite le seguenti avvertenze che sono valide per tutti i tipi
di taglio:
- verificate che le viti siano avvitate
- mantenete ben saldo il pezzo in lavorazione
- il pezzo deve appoggiarsi contro il guidapezzo
- mantenete una distanza di sicurezza dalla zona di taglio
- avvicinate con gradualità ed attenzione la lama verso il pezzo
- il taglio deve avvenire in un’unica passata
- non tirate troppo velocemente la testa di taglio per non solle-
citare la lama e il motore
- sollecitazioni eccessive provocano la rottura della lama e del pezzo
- non sollecitate lateralmente la lama
- la lama ferma non deve toccare il pezzo
- non avviare la macchina se la lama è a contatto del pezzo
- non avviare la macchina se la lama è senza protezione
- per pulire utilizzate un pennello con manico lungo
La macchina permette di eseguire vari tipi di tagli, inclinando la testa
di taglio o/e utilizzando il goniometro, di seguito elencati:
- Taglio perpendicolare al pezzo (fig.D)
Posizionate la testa di taglio a 0° (la scala graduata è posta a lato di
uno dei 2 montanti) e fissatela mediante i 2 volantini (pos.15).
Posizionate il pezzo ben appoggiato al guidapezzo (pos.7) riferen-
dovi alla scala graduata.
- Taglio inclinato (da 0° a 45°) (fig.E)
Attenzione! L’esecuzione di questo taglio espone maggiormente
la lama e il pericolo di gravi ferite è maggiore: prestate attenzio-
ne alle vostre mani e mantenete una distanza di sicurezza.
Posizionate la testa di taglio in modo da formare un angolo compre-
so tra 0° e 45° e fissatela mediante i 2 volantini (pos.15).
Posizionate il pezzo ben appoggiato al guidapezzo (pos.7) riferen-
dovi alla scala graduata.
- Taglio obliquo (a 45°) (fig.F)
Posizionate la testa di taglio a 0° e fissatela mediante i 2 volantini
(pos.15).
Montate il goniometro (pos.8) sul guidapezzo e ruotatelo per un
angolo compreso tra 0° e 90°. Posizionate il pezzo ben appoggiato
al guidapezzo (pos.7) e al goniometro.
- Taglio combinato inclinato/obliquo (fig.G)
Attenzione! L’esecuzione di questo taglio espone maggiormente
la lama e il pericolo di gravi ferite è maggiore: prestate attenzio-
ne alle vostre mani e mantenete una distanza di sicurezza.
Posizionate la testa di taglio in modo da formare un angolo compre-
so tra 0° e 45° e fissatela mediante i 2 volantini (pos.15).
Montate il goniometro (pos.8) sul guidapezzo e ruotatelo per un
angolo compreso tra 0° e 90°.
Posizionate il pezzo ben appoggiato al guidapezzo (pos.7) e al
goniometro.
LAMA
ATTENZIONE! La parte tagliente può provocare gravi ferite,
utilizzate guanti di protezione e maneggiatela con attenzione!
1) Utilizzate lame di qualità con caratteristiche idonee alla macchina
in base ai dati tecnici della stessa; il vostro rivenditore di fiducia
potrà aiutarvi nella scelta più idonea. Osservate anche le eventuali
istruzioni fornite a corredo.
2) Non utilizzate lame di dubbia provenienza e prive dei dati tecnici.
Esse devono riportare le dimensioni nominali, il numero di giri
massimo (o velocità), la freccia che indica il senso di rotazione.
3) Il numero di giri e le dimensioni sono elementi basilari per la
scelta. Il suo numero di giri deve essere sempre maggiore a quello
riportato sulla macchina. Le dimensioni devono essere uguali a
quelle riportate sui dati della macchina.
4) Utilizzate lame conformi alle normative in vigore nel paese in
cui vi trovate.
5) E’ vietato utilizzare lame adatte ad altri materiali, dischi abrasivi,
lame a corona segmentata.
6) Eseguire sempre un controllo visivo: non deve presentare
deformazioni, rotture o danni.
La nostra azienda fornisce una serie completa di lame adatte alla
vostra macchina, che possono essere acquistate presso il vostro
rivenditore di fiducia.
SOSTITUZIONE DELLA LAMA (FIG.H)
ATTENZIONE! Prima di ogni sostituzione posizionate l’interruttore
su OFF”O” (spento) e staccate l’alimentazione elettrica scolle-
gando la spina della macchina.
ATTENZIONE! A fine taglio la lama raggiunge temperature eleva-
te: attendete il suo raffreddamento prima di sostituirla.
ATTENZIONE! Anche se al lama è ferma è comunque molto
tagliente: per evitare ferite gravi utilizzate i guanti.
ATTENZIONE! Il montaggio della lama deve essere eseguito a perfetta
regola d’arte. Un montaggio errato genera pericoli molto gravi.
Per eseguire la sostituzione procedete come di seguito indicato.
L’operazione deve essere fatta da una persona esperta; in caso di
dubbio rivolgetevi ad un centro assistenza autorizzato.
1) Staccate la spina dalla presa elettrica.
2) Per eseguire correttamente il successivo rimontaggio, osservate
attentamente i vari componenti prima di procedere.
3) Con un cacciavite smontate la protezione laterale della lama (pos.3);
non smontate la catenella che ha il compito di trattenere la protezione
ed impedire l’avviamento se la protezione è smontata.
4) Svitate completamente il dado (pos.30) utilizzando le chiavi in
dotazione, da inserire una sul dado e una sull’albero. Attenzione:
la vite ha filetto sinistro e per svitarla girare in senso orario!
5) Togliete la flangia esterna (pos.31) e la lama (pos.2). La flangia
interna deve rimanere montata sull’albero motore.
6) Pulite i componenti, la nuova lama e l’interno della protezione.
7) Montate la nuova lama prestando attenzione a rispettare il senso

11
di rotazione: la freccia della lama deve corrispondere a quella
stampigliata sulla macchina.
8) Rimontate la flangia esterna; il foro sagomato della stessa dovrà
essere infilato sull’albero sagomato del motore.
9) Avvitate bene il dado senza colpire le chiavi con un martello
o altro.
10) Rimontate la protezione laterale.
11) Verificate che la lama giri liberamente senza irregolarità.
12) Effettuate una prova di funzionamento a vuoto.
POMPA (FIG.L)
ATTENZIONE! Prima di ogni manutenzione posizionate l’inter-
ruttore su OFF”O” (spento), staccate l’alimentazione elettrica
scollegando la spina della macchina e svuotate l’acqua dalla
vasca.
ATTENZIONE! Non tentate di riparare o aprire la pompa; in caso
di guasto è necessario sostituirla completamente.
La pompa ha la funzione di mandare l’acqua sulla lama in modo da
raffreddarla e trattenere la polvere prodotta dal taglio.
La pompa non ha un interruttore proprio e l’avviamento è tramite
l’interruttore (pos.1) della macchina.
Per il suo buon funzionamento è importante:
- che la pompa funzioni solo in presenza di acqua, mai a secco
- che l’acqua sia pulita e che sia sostituita frequentemente
- che il livello dell’acqua sia costantemente mantenuto (vedasi
capitolo “Installazione”)
- che i residui del taglio, che si depositano sul fondo della vasca,
vengano rimossi regolarmente
- che il cavo di alimentazione e il tubo di mandata non siano
schiacciati o piegati
- che il filtro sia sempre pulito (vedasi capitolo “Manutenzione”)
- che il regolatore di portata (se presente) sia posizionato sul livello
massimo “MAX”.
INTERRUTTORE A CORRENTE DIFFERENZIALE
MOBILE (FIG.M)
ATTENZIONE! Prima di ogni avviamento della macchina effettua-
re una prova di funzionamento azionando il tasto “TEST”.
ATTENZIONE! Non tentate di riparare o aprire l’interruttore; in
caso di guasto è necessario sostituirlo completamente assieme
al cavo di alimentazione.
ATTENZIONE! Questo dispositivo non sostituisce i componenti di
sicurezza elettrica della linea di alimentazione, obbligatori sec.
le leggi e le direttive in vigore; consultate il vostro elettricista
di fiducia.
E’ un componente di sicurezza addizionale che interrompe
automaticamente l’alimentazione in caso di dispersione elettrica
verso terra.
Per il suo buon funzionamento è importante:
- che sia sempre in posizione verticale (fig.M)
- che sia sempre pulito e privo di polvere o acqua
- che la linea elettrica di terra a cui è collegato sia in perfetta
efficienza
- che sia verificato il suo funzionamento prima di avviare la mac-
china (vedi di seguito).
Inserite la spina nella presa di alimentazione. Sull’interruttore sono
presenti due tasti da premere in sequenza e una spia:
- tasto di "RESET" per abilitare la macchina all’avvio; la spia
diventa rossa.
- tasto di "TEST" oppure "T" per provare il funzionamento dell’inter-
ruttore; la spia diventa nera e l’interruttore interrompe l’alimenta-
zione elettrica, pertanto non è possibile avviare la macchina se
non dopo aver premuto nuovamente “RESET”.
Nel caso in cui la spia rimanga rossa dopo aver premuto “TEST”
o nel caso in cui il dispositivo intervenga durante l’uso della
macchina, non utilizzatela ma portatela ad un centro autorizzato
per la riparazione.
MANUTENZIONE
ATTENZIONE! Prima di ogni controllo o manutenzione posizionate
l’interruttore su OFF”O” (spento) e staccate l’alimentazione
elettrica scollegando la spina della macchina.
ATTENZIONE! Non manomettete o tentate di riparare parti del
motore o parti elettriche.
La durata e il costo d’esercizio della macchina dipendono anche
da una costante e scrupolosa manutenzione, osservate sempre le
seguenti istruzioni.
Pulite regolarmente ed abbiate cura della vostra macchina, vi garan-
tirete una perfetta efficienza ed una lunga durata della stessa.
PULIZIA DOPO OGNI UTILIZZO
- Svuotate l’acqua dalla vasca.
- Rimuovete la polvere e le schegge utilizzando una pennello a
setole morbide e una spugna.
- Riempite con acqua pulita la vasca e fate funzionare a vuoto la
macchina per 1 minuto circa, in modo che la pompa e la tuba-
zione si pulisca, poi svuotate la vasca dall’acqua. Se necessario
rimuovete il filtro della pompa (pos.23) e lavatelo in acqua
corrente (fig.L).
- Asciugate completamente la macchina dall’acqua con uno straccio.
- Lubrificate con grasso di qualità i cuscinetti della testa di taglio
che scorrono sulla trave di sostegno.
- Non spruzzate o bagnate d’acqua la macchina (pericolo di
infiltrazioni interne sui componenti elettrici).
- Non usate infiammabili, detergenti o solventi vari, potreste ro-
vinare irrimediabilmente la macchina. Le parti in plastica sono
aggredibili da agenti chimici.
- Non utilizzate un getto d’aria compressa per la pulizia: pericolo
lancio liquido e schegge!
- Prestate particolare attenzione alla pulizia dell’interruttore, al piano
di appoggio, alle feritoie di ventilazione del motore, alla lama, alla
protezione della lama, alla vasca, alla pompa.
Per la vostra sicurezza verificate periodicamente lo stato dei seg.
componenti, se danneggiati o usurati fateli sostituire:
- interruttore (pos.1)
- lama (pos.2)
- protezione lama (pos.3)
- pompa, cavo e tubo (pos.20, 24, 25)
- interruttore a corrente differenziale mobile con spina
(pos.26)
- cavo elettrico (pos.29)
RICERCA GUASTI E INTERVENTI AMMESSI
LA MACCHINA NON SI AVVIA OPPURE SI ARRESTA E NON RIPARTE:
Mancanza di energia elettrica:
- Controllate che il cavo elettrico e la prolunga (se presente) non

12
siano danneggiati.
- Controllate l’interruttore generale dell’impianto di alimentazione.
L’interruttore di corrente differenziale mobile non è stato
ripristinato:
- Premete il tasto “RESET” (la spia cambia colore da nero a
rosso).
Per sicurezza è intervenuto l’interruttore di corrente differen-
ziale mobile:
- Rivolgetevi ad un centro assistenza autorizzato e, nel caso la
macchina non presenti dei guasti, fate verificare da un elettricista
l’impianto di alimentazione elettrica dell’edificio.
Guasto elettrico:
- Rivolgetevi ad un centro assistenza autorizzato.
LA MACCHINA VIBRA ECCESSIVAMENTE O FA FATICA A TAGLIARE:
Lama senza tagliente o danneggiata:
- Sostituite la lama.
Lama montata in modo errato:
- Smontate la lama e rimontatela correttamente seguendo le
istruzioni.
L’ACQUA NON ARRIVA ALLA LAMA:
Livello dell’acqua insufficiente:
- Versate acqua nella vasca fino al livello prestabilito.
Tubo di mandata schiacciato o piegato:
- Verificate tutto il tubo e posizionatelo senza piegamenti.
Regolatore di portata della pompa impostato sul minimo (se
presente):
- Ruotate il regolatore verso il “max”.
Acqua e filtro della pompa sporchi:
- Sostituite completamente l’acqua e pulite il filtro in acqua pulita.
Guasto alla pompa:
- Rivolgetevi ad un centro assistenza autorizzato.
LA TESTA DI TAGLIO NON SCORRE:
Vite di bloccaggio avvitata:
- Svitate la vite in modo da sbloccare la testa di taglio.
Cavo e/o tubo impediscono il movimento:
- Disponete il cavo e il tubo in modo da non creare impedimenti.
Cuscinetti di scorrimento usurati o da regolare:
- Rivolgetevi ad un centro assistenza autorizzato.
ATTENZIONE! Se dopo aver eseguito gli interventi sopra descritti
la macchina non funziona correttamente o in caso di anomalie
diverse da quelle indicate, spegnetela e portatela presso un
centro di assistenza autorizzato o fate intervenire un tecnico
autorizzato richiedendo ricambi originali. Fate sempre riferi-
mento al modello macchina e numero di matricola riportati
sull’etichetta dati tecnici.
RIMESSAGGIO
- Scollegate la macchina dalla rete elettrica.
- Effettuate una accurata pulizia di tutta la macchina e sue parti
accessorie (vedi paragrafo “Manutenzione”).
- Riponete la macchina lontano dalla portata dei bambini, in
posizione stabile e sicura e in luogo asciutto, temperato e libero
da polveri. Al locale di rimessaggio non devono avere accesso i
bambini e gli estranei.
- Proteggete la macchina dalla luce diretta, tenetela possibilmente
al buio.
- Utilizzate l’imballo originale per proteggere la macchina; non
chiudetela in un sacco di nylon, potrebbe formarsi dell’umidità
e danneggiarla.
DEMOLIZIONE
Per la salvaguardia dell’ambiente procedete secondo le leggi vigenti
del Paese in cui vi trovate.
Quando la macchina non è più utilizzabile nè riparabile, procedete
allo smontaggio delle parti per lo smaltimento differenziato dei
rifiuti.
I componenti plastici riportano una sigla identificatrice del materiale
di cui sono composti, questa servirà in futuro per il riciclaggio
dello stesso.
Consegnate la macchina e l’imballo ad un punto di raccolta per
il riciclaggio.
Modifiche: testi, figure e dati corrispondono allo standard aggior-
nato all’epoca della stampa del presente manuale. Il costruttore si
riserva la facoltà di aggiornare la documentazione qualora venissero
apportate delle variazioni alla macchina, senza incorrere per questo
in alcun obbligo.
Nessuna parte di questa pubblicazione e della documentazione
allegata alla macchina può essere riprodotta senza un permesso
scritto del costruttore.
DICHIARAZIONE DI CONFORMITÀ
La ditta: Valex S.p.A.
via Lago Maggiore, 24 36015 SCHIO (VI) ITALY
Dichiara sotto la propria responsabilità che la macchina:
PRODOTTO: Tagliapiastrelle radiale elettrico
MODELLO TIPO: TPER 180
COD. PRODOTTO: 1432600
è conforme ai requisiti di sicurezza e salute delle direttive
2006/42/CE, 2014/30/CE, 2014/35/CE, 2011/65/CE
SCHIO, 01 2016
ARRIGO ZANELLA
GARANZIA
Il prodotto è tutelato a norma di legge contro ogni non con-
formità rispetto alle caratteristiche dichiarate purché sia stato
utilizzato esclusivamente nel modo descritto nel presente
manuale d’uso, non sia stato manomesso in alcun modo, non
sia stato riparato da personale non autorizzato e, ove previsto,
siano utilizzati solamente ricambi originali. Sono comunque
esclusi materiali di consumo e/o componenti soggetti a par-
ticolare usura come ad esempio cinghie, batterie, lampadine,
elementi di taglio e finitura etc.
Consegnate il prodotto al rivenditore o ad un centro di assi-
stenza autorizzato, esibendo la prova di acquisto.

13
g
Congratulations on your excellent choice. Your new tool has
been manufactured according to the highest quality standards,
guaranteeing you long term service and safety.
This manual contains information deemed necessary for proper
use, knowledge and standard machine maintenance. It does
not show the information on the processing techniques for the
tiles nor does it consider their types and processing characte-
ristics; the user will find further information in specific books
and publications or by attending specialization classes.
Warnings on use and maintenance regulations refer to normal
operating needs. Normal machine operations, working life and
economy depend on their observance.
These instructions are an integral part of the machine and
must accompany it in the case of repair or resale. Carefully
keep the documentation supplied with the machine close at
hand for consultation in case of need.
For any repairs or revisions that require complex operations,
please contact authorised service centres which have spe-
cialised personnel.
The manufacturer is not liable for damages due to negligence,
failure to observe the instructions in this manual and direct
and/or indirect damages caused by improper use of the
machine.
Failure to observe the indications, poor and inadequate ma-
chine use and unauthorised tampering may void the warranty.
Accident prevention therefore depends on the strict observance
of what is established in this manual.
Upon purchase, make sure the machine is integral and
complete.
WARNING! Before using the machine, in order to ensure
that handling, initial start-up, starting, use, stopping, and
maintenance are carried out properly, read the instructions
below that refer to the drawings and technical data and apply
them carefully. Before starting work you should be familiar
with the controls and the correct use of this machine. Make
sure you know how to stop it in case of emergency. Incorrect
use of this machine may result in serious injury and damage
to property. Always consider your safety and the safety of
others and act accordingly.
WARNING! The machine is exclusively intended for DIY
use and it is suitable for making perpendicular and slanted
cuts on single-fired tiles, double-fired tiles, stoneware tiles
and klinker tiles.
Cutting metal, wood, plastic, flammable materials and materials
that generate harmful or toxic dust and vapours is prohibited.
Any use other than that indicated in these instructions may
damage the machine and constitute a serious risk to both
people and property.
MACHINE DESCRIPTION (FIG. A, H, M)
1 On/off switch.
2 Cutting blade
3 Blade guard
4 Rear splash guard
5 Blade rotation direction arrow
6 Piece support surface
7 Piece guide and graduated scale
8 Goniometer for slanted cuts
9 Handle for cutting movement
10 Motor and cooling fan
11 Support beam for the cutting head and graduated scale
12 Movement indicator
13 End stroke retainers
14 Screw for blocking cutting head
15 Handwheels for cutting head inclination
16 Legs
17 Frame
18 Water tank and base for machine
19 Brackets and screws for fixing tank
20 Water delivery pump
21 Pump fixing support (where fitted)
22 Pump flow rate regulator (where fitted)
23 Filter
24 Pump power supply cable
25 Delivery pipe
26 Portable differential current device with power supply plug
27 Test and reset button
29 Machine power supply cable
30 Bade locking nut
31 Blade locking flange
DESCRIPTION OF MARKS AND SYMBOLS (FIG. B)
1 Machine model and technical specifications.
2 Machine code, serial number or lot number, year of
manufacture, certification symbols (where applicable).
3 WARNING!
4 Read the instructions carefully before use.
5 Warning! Risk of cutting hands. It is compulsory to wear
protection gloves.
6 Warning! Risk of material ejection and dangerous dust
emission. It is compulsory to wear eye protection and a
mask to protect your respiratory tracts.
7 Warning! Risk of loud noise. It is compulsory to use ear
protection.
8 Warning! Risk of electric shocks. Some parts of the
machine are electrically-powered. Do not touch them and
keep a safe distance. Except for the pump, all the other
electrical parts must not come into contact with water.
9 Warning! Risk of moving blade. Keep your hands away
from the blade.
10 Warning! Before any control, adjustment or maintenance,
always disconnect the machine from the power supply
by unplugging it. Should the power supply cable be
damaged, remove the plug from the power supply socket
before inspecting it. If the water comes into contact with
electrical devices, remove the electricity supply by using
the mains switch in the building.
11 Only use continual crown or turbo blades. Do not use
segmented crown cutting blades.
12 Use water during cutting. Do not make dry cuts.
13 Electric and electronic waste may contain potentially
hazardous substances for the environment and human
health. It should therefore not be disposed of with do-
mestic waste, but by means of differentiated collection
at specific centres or returned to the vendor in the event
of purchasing a new identical tool. The illegal disposal
of such equipment may result in prosecution to the full
extent of the law.

14
TECHNICAL DATA
Nominal power supply voltage and frequency 230 V~50 Hz
Nominal engine power 600W
Idle rotation speed 2990min-1
Max. cutting height 30mm at 90° - 27mm at 45°
Max. stroke cutting head 450mm
Cutting head inclination 0° -45° towards the left
Acoustic pressure LpA in operator position 65.6dB(A)*
Hand grip vibrations <2.5m/s2 **
Machine insulation class I
Total machine dimensions (b x l x h) 860x580x930mm
Machine weight (without water) 26.2kg
Corrugated turbo sintered circular blade, type 1A1R ***
Ext./int. diameter 180/25.4mm
Blade width (cutting area) 2.7mm
Submersion pump
Nominal power supply voltage and frequency230V ~50Hz
Rated power 8.5W
Max. water temperature 35°C
Protection degree IPX8
* Sec. EN3744, ** Sec. ENV25349, *** Sec. EN13236
GENERAL SAFETY REGULATIONS
1) NYLON BAGS ARE NOT TOYS
WARNING! Suffocation hazard. Nylon packaging bags
can cause suffocation if placed on the head and must
be kept out of the reach of children. If they cannot be
reused they must be cut up and thrown in the garbage.
2) PEOPLE AUTHORIZED TO USE THE MACHINE
This machine must not be used by children, teens or
any persons not fully aware of the instructions for use
contained in this manual. Local laws and regulations may
establish a minimum age for use of the machine. The
operator must be adequately trained to use, adjust and
safely operate the machine.
3) OPERATOR’S RESPONSIBILITY
The operator is responsible for other people as far as
accidents or damage to people or property caused by
the use of the machine is concerned.
4) MAINTAIN A STABLE AND SAFE WORKING POSITION
When working maintain a stable, safe position.
5) PAY ATTENTION IN THE WORK AREA
Pay attention to hands, the piece being machined, the
cutting tool and in general all the moving parts.
6) USE CAUTION WHILE WORKING
Do not allow yourself to be distracted and always pay
attention to what you are doing. Use your common sense.
Never use the machine when tired, ill or under the influence
of alcohol, drugs or medicines that reduce alertness.
7) KEEP A SAFE DISTANCE FROM THE MACHINE
Keep people and animals away from the machine and your
work area. Do not touch electrically-powered parts.
8) PROTECT YOUR BODY
The use of the machine generates noise, heat, dust,
smoke, vibrations, flying liquid and splinters. Always use
personal protective equipment in accordance with the
law to prevent injury to the body, hands, eyes, hearing
and respiratory tracts. Wear strong clothing, with tight
sleeves and cuffs, eye protection, working gloves, safety
earmuffs, dust masks and anti-slipping footwear. Do not
wear loose clothing, scarves, ribbons and jewellery that
could be caught in moving parts of the machine. Wear a
protective hairnet to gather long hair. Normal glasses are
not suitable for protecting your eyes.
9) EFFICIENCY OF THE MACHINE
Always make sure the machine is in good working order
and integral; it could cause serious accidents if in poor
conditions. Do not use the machine if the switch does not
allow you to switch the machine on or off.
10) INTEGRITY OF THE MACHINE
Do not remove any components from the machine unless
expressly indicated in these instructions and do not modify
the original configuration in any way.
11) DO NOT DISASSEMBLE THE MACHINE
Do not disassemble the machine for any reason. Do not
use the machine without the guards installed.
12) DO NOT TAMPER WITH ANY OF THE MACHINE’S COM-
PONENTS
Do not tamper, modify or remove any component from
the machine.
13) VERIFY THE SOLIDITY OF THE MACHINE
Periodically check screw and blade tightness.
14) USE THE MACHINE IN A WELL-VENTILATED ROOM
The machine must be used in a well-ventilated area in
order to ensure sufficient cooling and air circulation.
15) DO NOT USE THE MACHINE IN DANGEROUS ENVIRON-
MENTS
Do not use the machine in areas with a risk of explosion
and/or fire, in poorly ventilated spaces or in the presence
of inflammable and/or explosive materials, dampness,
gases, vapours, and acids.
16) MOVING OF THE MACHINE
The machine should be moved with caution. Do not
attempt to move the machine by pulling on the power
cable or other machine parts.
17) POSITIONING OF THE MACHINE
Position the machine on the ground on a flat and solid
surface that must support its whole weight and the strain
resulting from its use.
18) WORK WITH ADEQUATE LIGHTING
Only work when there is sufficient daylight or suitable
artificial lighting.
19) DO NOT EXPOSE THE MACHINE TO ATMOSPHERIC
AGENTS
Do not expose the machine to the elements such as rain,
fog, sun, high, and low temperatures.
20) DO NOT TOUCH THE MACHINE IF YOU ARE WET
Never use this machine with bare or wet feet. Do not touch
the machine with wet hands.
21) CHECK BEFORE STARTING UP THE MACHINE
Before plugging the machine in, make sure the switch is
OFF “O” and that the service keys are removed.
22) CHECK CORRECT ASSEMBLY
Only use the machine if the pump is correctly installed and
if the water tank is filled with water up to the max. level.
23) FUNCTIONAL TESTS
Check that the cutting head can slide freely and that the
electrical cables and the delivery pipe are positioned to
the side in order to prevent obstructions.
24) PIECE BEING PROCESSED
It is important for the piece being processed to be well
positioned against the piece guide. Do not cut pieces with
thicknesses other than those permitted (see technical

15
data). Do not rest pieces with excessive dimensions that
could cause the machine to topple over.
25) PROHIBITED MATERIALS
Cutting metal, wood, plastic, flammable and explosive
materials, and materials that generate harmful or toxic
dust and vapours is prohibited.
26) PREVENT POSSIBLE ACCIDENTS
Always test operations without a work piece before
beginning work; during this operation, make sure no one
gets close to the machine and keep safety distances.
Always use protective goggles, gloves, masks and ear
protection. When the machine is running, do not touch the
blade. Serious injury hazard! After replacing components,
always run a general check before starting work.
27) ONLY USE BLADES SUITED FOR THIS MACHINE
This machine has been designed for using specific blades
for cutting tiles; it is prohibited to use blades suitable
for other materials, abrasive discs or segmented crown
blades. The maximum speed stamped on the blade must
always be higher than that indicated on the machine’s
technical specifications. Use blades which conform to
the regulations in force in the country of use.
28) HANDLE THE BLADE WITH CAUTION
The blade has very sharp edges: handle it with caution and
always wear protective gloves. Serious injury hazard!
29) ONLY USE BLADES IN PERFECT WORKING CONDITIONS
For your safety, do not use damaged, deformed or fissured
blades; if the blade is worn, replace it with a new one.
30) DO NOT FORCE THE BLADE
Do not subject the blade to: collision, bending, excessive
pressure, heat, irregular speed changes, vibrations. In the-
se conditions, the tool has a limited working life and may
break without warning with the risk of flying fragments.
31) DO NOT TOUCH MOVING PARTS WHILE THE MACHINE
IS RUNNING
WARNING! Serious injury hazard! Do not touch the bla-
de or any part in motion while the machine is running.
Pay attention to arm and hand movements.
32) MACHINE MALFUNCTION
Turn the switch to OFF “O” (switched off), disconnect the
power supply to the machine by removing the plug from
the socket when: not in use, left unattended, moved, the
power cable is damaged, when you are filling the water
tank, during adjustments, maintenance and cleaning.
33) WAIT FOR THE MACHINE TO STOP COMPLETELY
The motor, the moving parts and the blade continue to run for a
short while after the machine is switched off. During this time,
these parts must not be touched. Serious injury hazard!
34) DO NOT LEAVE THE MACHINE UNATTENDED WHILE RUNNING
Do not leave the machine unattended while running and
wait until all moving parts fully stop before leaving the
machine after turning it off.
35) KEEP THE WORKPLACE CLEAN AND TIDY
Mess and dirt are sources of danger. Make sure there
are no tools or objects around the machine that could be
damaged. Do not place tools or objects on the machine
that could accidentally fall. Frequently eliminate the
cutting residuals from the machine and the floor and if
necessary dry the machine and the floor; only carry out
these operations when the machine is stopped and the
power supply cable is disconnected.
36) THE WATER MUST NOT COME INTO CONTACT WITH
THE ELECTRICAL PARTS
WARNING! Water in contact with electrical parts causes
serious accidents that could be fatal. Only the pump
must be immersed in the water.
37) REPAIRS MUST BE CARRIED OUT BY AUTHORISED
PERSONNEL
Do not attempt to repair this machine or to gain access to its
internal parts. Always contact an authorised assistance cen-
tre. Service by unauthorised personnel will cause the warranty
to be annulled and could create a dangerous situation.
38) REQUEST AND HAVE ORIGINAL SPARE PARTS ONLY
INSTALLED
Request and use only original spare parts. Please contact
your dealer. The use of non-original spare parts will cause the
warranty to be annulled and could create serious danger.
39) STORE THE MACHINE IN A SAFE PLACE
When not in use, keep the machine in a dry place out of
reach of children.
40) RESIDUAL RISKS
WARNING! Strict observance of the instructions with the
use of individual means of protection minimalists risks
of accidents but does not completely rule them out.
41) ALWAYS FOLLOW THESE INSTRUCTIONS
Only use this machine as described in these instructions.
Do not use it for purposes for which it was not intended.
ELECTRICAL SAFETY REGULATIONS
1) DO NOT TOUCH ELECTRICALLY-POWERED PARTS
WARNING! Risk of electric shocks. Some parts of the
machine are electrically-powered.
2) OBLIGATION TO USE A CIRCUIT BREAKER
WARNING! Risk of electric shocks. The use of water
with an electrically powered machine increases the
risk of electric shocks which could cause death. For
your safety, it is compulsory to install a circuit breaker
(also called a RCD - residual current device) on the
electric power line for an intervention field according
to the standards in force in the country of use – please
consult your electrician. The RCD provided with the
machine does not provide for exemption from installing
a circuit breaker on the line of the building that supplies
the electrical power in which the machine is used.
3) KEEP CHILDREN AND ANIMALS AWAY FROM ELECTRICAL
DEVICES
Keep children and animals away from the devices con-
nected to the power supply.
4) CHECK THE POWER SUPPLY VOLTAGE
The power supply voltage must correspond to that indi-
cated on the technical data plate. Do not use any other
type of power supply.
5) CONNECTION TO THE POWER SUPPLY
Before connecting or disconnecting the machine to or from
the power supply, make sure that the switch is in the OFF “O”
position. The plug must be positioned vertically sec. fig M.
6) DO NOT TAMPER WITH THE PLUG OR THE POWER
SUPPLY CABLE
It is absolutely forbidden to tamper with the plug and the
power supply cable.
7) CHECK THE POWER SUPPLY CABLE
The power cable and extension cable (where applicable)
must be checked periodically and must be checked for
signs of damage and wear every time they are used. If
they are not found to be in good condition disconnect
them immediately and do not use the machine until an
authorised assistance centre has repaired them.

16
8) KEEP THE POWER SUPPLY CABLE IN A SAFE POSITION
Keep the power cable and extension cable (where ap-
plicable) away from the working area, damp, wet or oily
surfaces, or surfaces with sharp edges, heat sources,
fuel and transit areas for vehicles or pedestrians.
9) DO NOT STEP ON OR SQUASH THE POWER SUPPLY
CABLE
Never step on the power cable. Be aware of its position
at all times.
10) DO NOT USE THE MACHINE IN THE PRESENCE OF
LIQUIDS
Except for the tank, the pump and the support surface,
do not wet the machine with liquids and do not expose it
to damp environments. Do not leave it out in the open.
11) USE AN EXTENSION CABLE SUITABLE FOR THE MA-
CHINE
Only use an extension cable that is suitable for the power
of the machine you are using, with an earth cable, and
sized according to its length; consult your local electri-
cian.
12) DISCONNECT THE MACHINE BY PULLING THE PLUG
ONLY
To remove the plug from the socket, pull on the plug only
and not on the power cable!
13) AVOID TOUCHING SURFACES THAT ARE EARTHED
Avoid body contact with earthed surfaces such as refri-
gerators, radiators, pipes and metallic fixtures, etc. Use
a platform to electrically insulate the user from the floor.
TERMINOLOGY USED
MACHINE
Assembly of all electrical and mechanical units.
RADIAL TILE CUTTER
Machine destined for cutting tiles; the cutting head is moved
manually along a guide in relation to the piece which is still.
CUTTING HEAD
Assembly made up of the motor, cutting blade, handle, switch
and mobile/fixed guards.
BLADE TOOL
Circular tool designed to remove material from the piece.
SWITCH
Electrical component whose action is used for switching the
machine on and off.
PUMP
Electrical component which has the job of sucking water from
the tank and pumping it towards the blade through a pipe.
PORTABLE RESIDUAL CURRENT DEVICE (PRCD)
Additional electrical safety component that interrupts the elec-
trical power supply should there be dispersion towards earth;
it does not replace the electrical safety components located
on the power supply line, which are compulsory according to
the laws and directives in force.
OPERATOR - USER
The person responsible for installing, operating, adjusting,
maintaining and cleaning the machine.
TRANSPORT AND LIFTING (FIG. A)
WARNING! The manufacturer is not liable for any direct and/or
indirect damage caused by incorrect transport or lifting.
WARNING! Before carrying out the following operations, make
sure that the machine’s plug is disconnected from the mains.
The machine transport and lifting operations must be carried
out paying attention in order to prevent accidents and damage;
perform them with the help of another person as the machine
is heavy. Use lifting and transport devices that are suitable for
the weight and dimensions.
1) Lock the cutting head using the stopping screw (pos.14).
2) Lift the machine from the tank and place it on the ground taking
care to detach the pump first (pos.20) from the tank support.
3) Completely eliminate the water from the tank.
4) Transport the two parts separately.
Do not transport the machine resting on the tank, risk of tipping!
Lift the machine with extreme care and move it slowly, without
jerks or sudden movements. Do not attempt to move the machi-
ne by pulling on the power cable or other machine parts.
STARTING UP (FIG. A)
WARNING! The manufacturer is not liable for any direct
and/or indirect damage caused by incorrect installation or
connections.
WARNING! Before carrying out the following operations, make
sure that the machine’s plug is disconnected from the mains.
The machine is supplied with some disassembled components
and before using it, it must be cleaned and installed.
When choosing where to put the machine, the following should
be considered:
- that the planned position is not damp and is protected from
the elements.
- that the area where it will be placed is completely flat, on a
non-slip floor and with appropriate load capacity.
- that there should be a large operational area around the
machine free from obstacles.
- that on the rear side, there is no electrical apparatus or
things that could get damaged due to water spray produced
by the machine.
- that the room should be attended and closed in order to
prevent free access.
- that there is good lighting.
- that it needs to be positioned close to the general differential switch.
- that the power supply system is earthed and conforms to
the standards.
- that the room temperature should be between 10° and 35° C.
- that the work environment is not in an explosive atmosphere.
1) Take out the machine and components and visually check
that they are perfectly intact; then proceed to thoroughly
clean them in order to remove any protective oils used for
transport.
2) Proceed to assemble the components as illustrated in the
figure. If in any doubt, please contact your retailer. Some
components must be assembled/used only if they are
necessary for the process that you plan to carry out.
3) Assemble the 4 legs (pos.16) on the frame (pos.17) using
the screws with washers and the shaped discs.
4) Insert the tank (pos.18) in the frame and fix it using the 2
brackets (pos.19).
5) Screw the 2 flywheels (pos.15) in order to block the move-
ment of the beam and the cutting head. Unscrew the screws
used for transport and screw the 2 flywheels.
6) Fix the pump (pos.20) onto the tank as illustrated in the figure
(where fitted using the support pos.21); adjust the flow rate

17
on the maximum using the regulator (if present pos.22).
7) Insert the machine in the tank taking care not to squash the
electrical cables (pos.24-29) and the delivery pipe (pos.25).
Check that the handle and the pump are located to the right
of the beam (pos.11).
8) Remove the head locking screw (pos.14) and any cardboard
and polystyrene protection used during transport.
9) On the support beam (pos.11) screw the 2 end stroke
retainers (pos.13).
10) If necessary, assemble the goniometer (pos.8).
11) Check that the blade (pos.2) is well fixed and that it can
turn freely (see chap. “Blade Replacement”).
12) Check that the pipe (pos.25) and the pump power cable
(pos.24) are taut without twists or bends; move the cutting
head for some idle strokes.
13) Make sure that all the parts have been properly and
securely assembled and that the machine is stable before
starting it.
14) Pour 8 litres of clean, cold water into the tank (pos.18) in
order to cover the pump suction filter. The max. level is 40
mm from the bottom of the tank – do not exceed this limit
(schematic section in fig.C).
STARTING AND STOPPING
Before starting the machine check the integrity of all the com-
ponents and that all the bolts and couplings are tight.
WARNING! Before starting the machine it is compulsory
to put on goggles, gloves, headphones and dust mask (not
provided with the machine).
WARNING! Whilst starting and stopping, make sure that
nobody approaches the machine. Keep safety distance from
all moving parts and from the cutting area.
WARNING! The motor, the moving parts and the blade con-
tinue to run for a short while after the machine is switched
off. During this time, these parts must not be touched.
Serious injury hazard!
STARTING UP
1) Make sure service keys are inserted.
2) Check that the blade guard (pos.3) is fixed and covers
the blade.
3) Insert the power cable plug into the socket.
4) To prepare the machine for start-up press the RESET button
(pos.27) (red pilot light on), press the TEST button (pos.27)
(the pilot light must turn off) and then the RESET button again
(red pilot light on); in case of malfunctioning read the chap.
“Troubleshooting”.
5) Position yourselves opposite the machine near to the switch
and ensure that people and animals are far away.
6) To start the machine put the switch (pos.1) in the ON “I”
position (switched on).
Only operate the machine if the tank contains water, do not
start it when dry!
If you notice any working defects, switch off the machine
and consult the chapter “troubleshooting and permitted
operations”.
STOPPING
1) To stop the machine press the switch (pos.1) in the OFF
“O” position (switched off).
When not using the machine, turn it off and disconnect the
plug from the socket.
WARNINGS AND ADVICE
WARNING! Before conducting checks and adjustments, turn
the switch to the OFF “O” and unplug the machine from the
electric power supply.
After having read the previous chapters carefully, apply these
tips scrupulously to obtain maximum performance from your
machine. Proceed calmly. You will only be able to make full
use of the machine’s potential after gaining sufficient expe-
rience. Acquaint yourself with all controls. Run tests without
work pieces.
OPERATOR
The operator’s normal position is in front of the machine, with
the left hand used to hold the piece in position and the right
hand holding firmly onto the handle (pos.9) of the cutting head;
cutting can only be carried out in this position.
Warning! Keep hands far from the blade and the cutting
area, risk of serious injury!
TOOL
Make sure the blade is integral, without cracks or deformations
before use. Periodically check for wear.
When necessary, replace it following the instructions in the
following chapters.
Warning! Blade efficiency and perfect integrity provide
better results and minimize accident risks.
WORK PIECE
The shape, size and weight of the piece to be cut must be
compatible with the machine.
Mark the cutting line on the piece with a ruler; position it on
the support surface (pos.6) resting well on the piece guide
(pos.7), taking care not to touch the blade and line up the
previously marked line with the blade.
Warning! For your safety, it is important that the piece is
correctly locked. Always remember that a recoil causes the
piece to be refused and pushed towards you.
OPERATIONS, CUTTING AND MOVEMENTS
Operating principle
The work piece remains still on the machine while the tool
moves manually in relation to the piece to remove material.
The motor provides the energy for the rotary movement of
the tool.
Making a cut
For cleaning operations, it is recommended to keep a sponge,
a cloth and a long-handled brush close to hand.
Push the cutting head right back so that it is on the rear part
of the machine.
Rest the piece on the surface and, keeping it firm, push it
towards you up to the piece guide.
Start up the machine and check that the pump delivers water
onto the blade through the delivery pipe.
Grasp the handle and pull the cutting head towards you, with
regular movements without excessive pressure until the cut is
finished. Without switching off the machine, push the cutting
head right back so that the piece is free, and then switch off
the machine.
WARNING! Keep hands away from the cutting area.
The water has the role of cooling down the blade and retaining
and evacuating the dust produced. Remove the dirty water

18
preventing it stagnating on the machine and clean the bottom
of the tank.
Whilst working the water will become deposited on the sup-
port surface and on the piece, then run into the tank via the
drainage openings. If the other parts of the machine come into
contact with the water, dry them with a soft cloth, only after
disconnecting the power cable from the electrical socket. The
floor must always remain dry.
See to restoring the water level should it drop due to eva-
poration.
Observe the following warnings that apply to all types of cuts:
- check that the screws are screwed tight
- keep the work piece firmly
- the piece must be resting against the piece guide
- keep a safety distance from the cutting area
- gradually and cautiously move the piece against the blade
- cut in a single stroke
- do not pull the cutting head too quickly in order not to
cause strain for the blade and the motor
- excessive strains cause the blade and/or piece to sud-
denly break
- do not strain the blade laterally
- the idle blade should not touch the piece
- do not start the machine if the blade is in contact with
the piece
- do not start the machine if the blade has no guard
- to clean use a long-handled brush
The machine allows various types of cut to be made, by put-
ting the cutting head on a slant and/or using the goniometer,
listed as follows:
- Cut perpendicular to the piece (fig.D)
Position the cutting head to 0° (the graduated scale is placed
to the side of one of the 2 rods) and fix it using the 2 flywheels
(pos.15).
Position the piece resting well on the piece guide (pos.7) using
the graduated scale as a reference.
- Tilted cut (from 0° to 45°) (fig.E)
Warning! This cut requires the blade to be more exposed,
increasing the risk of serious injuries: take care of your
hands and keep a safe distance.
Position the cutting head in order to form an angle between 0°
and 45° and fix it using the two flywheels (pos.15).
Position the piece resting well on the piece guide (pos.7) using
the graduated scale as a reference.
- Slanted cut (at 45°) (fig.F)
Position the cutting head at 0° and fix it using the 2 flywheels
(pos.15).
Assemble the goniometer (pos.8) on the piece guide and turn
it through an angle of 0° to 90°. Position the piece resting well
on the piece guide (pos.7) and on the goniometer.
- Combined tilted/slanted cut (fig.G)
Warning! This cut requires the blade to be more exposed,
increasing the risk of serious injuries: take care of your
hands and keep a safe distance.
Position the cutting head in order to form an angle between 0°
and 45° and fix it using the two flywheels (pos.15).
Assemble the goniometer (pos.8) on the piece guide and turn
it through an angle of 0° to 90°.
Position the piece resting well on the piece guide (pos.7) and
on the goniometer.
BLADE
WARNING! The cutting part can cause serious injuries, use
protection gloves and handle it with care!
1) Use good quality blades with the same characteristics as
the machine based on its technical data – your retailer will
be able to help you make the correct choice. Also observe
any instructions provided with the equipment.
2) Do not use blades if you do not know where they are from
or without technical specifications. They must show the
nominal dimensions, the maximum number of revolutions (or
speed) and the arrow that indicates the rotation direction.
3) The number of revolutions and the dimensions are the
basic elements for making your choice. The number of
revolutions must always be higher than that shown on the
machine. The dimensions must be equal to those shown
on the machine.
4) Use blades which conform to the regulations in force in
the country of use.
5) It is forbidden to use blades suitable for other materials,
abrasive discs or segmented crown blades.
6) Always carry out a visual check: there must be no defor-
mations, breakages or damages.
Our company provides a complete series of blades suitable for
your machine, which you can buy from your retailer.
BLADE REPLACEMENT (FIG. H)
WARNING! Before replacing parts, turn the switch to the
OFF “O” and unplug the machine from the electric power
supply.
WARNING! After cutting the blade reaches high temperatu-
res: Wait for it to cool down before replacing it.
WARNING! Even if the blade has stopped, it is still very
sharp: Use gloves to prevent serious injuries.
WARNING! The assembly of the blade must be carried out
with absolute precision. Incorrect assembly causes very
serious danger.
When replacing the blade, proceed as follows. The operation
must be carried out by an expert; if in doubt please contact
an authorised service centre.
1) Unplug the machine from the electric power supply.
2) For correct reassembly, observe carefully the various
components before proceeding.
3) Using a screwdriver, disassemble the side blade guard
(pos.3); do not disassemble the chain which has the job
of holding the guard in place and preventing start up if the
guard is disassembled.
4) Completely unscrew the nut (pos.30) using the spanners
provided, one to be inserted on the nut and one on the
shaft. Caution! the screw has a left thread, you must turn it
clockwise to unscrew it!
5) Remove the external flange (pos.31) and the blade (pos.2). The
internal flange must remain assembled on the motor shaft.
6) Clean the components, the new blade and the inside of
the guard.
7) Install the new blade observing the rotation direction: the bla-

19
de arrow must match the one impressed on the machine.
8) Remove the external flange; the shaped hole must be
threaded onto the shaped motor shaft.
9) Screw the nut well without hitting the spanners with a
hammer or other.
10) Reassemble the side guard.
11) Make sure the blade turns freely without jerks.
12) Carry out a test with the machine running idle.
PUMP (FIG.L)
WARNING! Before carrying out any maintenance, position
the switch in the OFF “O” position (switched off), unplug
the electrical power supply, disconnecting the machine plug
and remove the water from the tank.
WARNING! Do not attempt to repair or open the pump; in case
of breakdown, it is necessary to completely replace it.
The pump has the job of delivering water to the blade in order
to cool it down and retain the dust produced by cutting.
The pump does not have an actual switch and start up is
carried out using the machine switch (pos.1).
For it to operate correctly, it is important:
- that the pump only operates in the presence of water, never
dry
- that the water is clean and is replaced frequently
- that the water level is constantly maintained (see chapter
“Installation”)
- that the cutting residuals, that are deposited on the bottom
of the tank, are removed regularly
- that the power cable and the delivery pipe are not squashed
or bent
- that the filter is always clean (see chapter “Maintenance”)
- that the delivery regulator (where fitted) is positioned on the
maximum level “MAX”.
PORTABLE RESIDUAL CURRENT DEVICE (FIG.M)
WARNING! Before starting up the machine, carry out an
operating test by pressing the “TEST” button.
WARNING! Do not attempt to repair or open the device; in
case of breakdown it is necessary to replace it completely
along with the power cable.
WARNING! This device does not replace the electrical safety
components on the power line, compulsory according to the
laws and directives in force; consult your electrician.
It is an additional safety component that automatically
interrupts the power supply in case of electrical dispersion
towards earth.
For it to operate correctly, it is important:
- that it is always in a vertical position (fig.M)
- that it is always clean and free from dust or water
- that the electrical earth line to which it is connected is
perfectly efficient
- that its operation is tested before starting up the machine
(see below).
Plug the machine into the power supply. There are two but-
tons to press in sequence and a pilot light on the switch:
- “RESET” button to enable the machine at start up; the pilot
light turns red.
- “TEST” button or “T” to test the operation of the switch; the
pilot light turns black and the switch interrupts the electric
power supply, hence it is not possible to start up the machine
without pressing “RESET” again.
Should the pilot light remain red after pressing “TEST” or
should the device intervene during use of the machine, do
not use it but take it to an authorised centre for repair.
MAINTENANCE
WARNING! Before conducting checks or maintenance, turn
the switch to OFF “O” and unplug the machine from the
electric power supply.
WARNING! Do not tamper with or attempt to repair motor
or electrical parts.
Machine working life and costs also depend on constant
and meticulous maintenance. Always observe the following
instructions.
Clean and maintain your machine regularly, to ensure that it
remains perfectly efficient and has a long working life.
CLEANING AFTER USE
- Empty the water out of the tank.
- Remove the dust and chips using a brush with soft bristles
and a sponge.
- Fill the tank with clean water and operate the machine idle for
about 1 minute, so that the pump and the piping are cleaned,
then empty the water out of the tank. If necessary, remove the
pump filter (pos.23) and wash it in running water (fig.L).
- Completely dry the machine using a cloth.
- Lubricate the bearings of the cutting head that run along the
support beam with good quality grease.
- Do not spray or wet the machine with water (risk of internal
infiltrations on the electrical components).
- Do not use any inflammables, detergents or solvents as these
may damage the machine beyond repair. The plastic parts
can easily be damaged by chemical agents.
- Do not use compressed air for cleaning: risk of splashes
and flying chips!
- Pay particular attention to cleaning the switch, the support
surface, the motor ventilation slits, the blade, the blade guard,
the tank and the pump.
For your safety, periodically check the conditions of the
following components. Replace them if damaged or worn:
- switch (pos. 1)
- blade (pos.2)
- blade guard (pos.3)
- pump, cable and pipe (pos.20, 24, 25)
- portable RCD with plug (pos.26)
- electrical cable (pos.29)
TROUBLESHOOTING AND PERMITTED OPERATIONS
THE MACHINE DOES NOT START OR IT STOPS AND DOES
NOT RESTART:
No power:
- Make sure the power cable and extension (if applicable) are
not damaged.
- Check the power supply system’s main switch.

20
The portable RCD has not been reset:
- Press the “RESET” button (the pilot light changes colour
from black to red).
For safety reasons the RCD has intervened:
- Contact an authorised assistance centre and, should the
machine not be faulty, have the electrical power supply
system of the building checked by an electrician.
Electrical fault:
- Contact an authorised assistance centre.
THE MACHINE VIBRATES EXCESSIVELY OR HAS TROUBLE
CUTTING:
Dull or damaged blade:
- Replace the blade.
Incorrectly assembled blade:
- Remove the blade and reassemble it correctly following the
instructions.
THE WATER DOES NOT REACH THE BLADE:
Insufficient water level:
- Pour water into the tank up to the pre-set level.
Delivery pipe squashed or bent:
- Check the whole pipe and position it without bends.
Pump delivery regulator set to the minimum setting (where
fitted):
- Turn the regulator to “max” position.
Water and pump filter dirty:
- Completely replace the water and clean the filter in clean
water.
Pump fault:
- Contact an authorised assistance centre.
THE CUTTING HEAD DOES NOT SLIDE:
The locking screw is tightened:
- Unscrew the screw in order to unlock the cutting head.
Cable and/or pipe prevent movement:
- Lay out the cable and pipe in order to prevent obstructions.
Sliding bearings worn or to be adjusted:
- Contact an authorised assistance centre.
WARNING! If the machine still fails to function correctly
after you have carried out the above operations, or in the
event of anomalies other than those described above, turn
the machine off and take it to an authorised service centre
or have an authorised technician repair it with original spare
parts. Always provide the machine model and serial number
shown on the technical data label.
STORAGE
- Disconnect the machine from the power supply.
- Clean the machine and all its accessories thoroughly (see
“Maintenance” section).
- Keep the machine out of reach of children, in a stable safe
position, in a dry place not subject to extreme temperatures
and free of dust. Keep children and unauthorised personnel
out of the storage room.
- Protect the machine from direct light and if possible keep it
in the dark.
- Use the original packaging to protect the machine; do not
close it in a nylon sack as damp could be created which
could damage it.
DEMOLITION
In order to protect the environment, proceed according to the
local laws in force.
When the machine is no longer usable or reparable, dismantle
the various parts for differentiated refuse collection.
The plastic components bear an acronym identifying the
materials they are made of. This can be used when recycling
them in the future.
Deliver the machine and packaging to a recycling centre.
Amendments: The texts, figures and data correspond to the
standard in place on the date of printing of this manual. The
manufacturer reserves the right to update the documentation
if changes are made to the appliance, without being bound
by any obligations.
No part of this publication or the documentation enclosed with
the appliance may be reproduced without written permission
by the manufacturer.
DECLARATION OF CONFORMITY
The company:
Valex - via Lago Maggiore, 24 36015 SCHIO (VI) ITALY
Declares, under its own responsibility, that the machine:
PRODUCT: TPER 180
PRODUCT CODE: 1432600
complies with health and safety directives
2006/42/EC, 2014/30/EC, 2014/35/EC, 2011/65/EC
SCHIO, 01 2016
ARRIGO ZANELLA
WARRANTY
The product is protected by law against all non-conformities
with regard to its stated characteristics, provided that it has
been used solely in the way described in this user’s manual,
it has not been tampered with in any way or repaired by
unauthorised personnel and, where necessary, only original
spare parts have been used. However, consumer materials
or parts subject to wear such as batteries, light bulbs, cutting
and finishing elements etc. are excluded from the warrantee.
Take the product to the retailer or an authorised service centre,
showing proof of purchase.
Table of contents
Languages: