Van Der Valk ValkPro+ L10 East-West User manual


Van der Valk Solar Systems BV
Installation manual – ValkPro+ L10 [East-West] v1.2.0
1
Disclaimer
This installation manuals needs to be used in conjunction with a project specific “Project report”. This
project report is the result of the use of the online calculation tool of Van der Valk Solar Systems B.V., called
the “ValkPVplanner”, which project report shows you specific information about your project such as,
amongst other, a project drawing and ballast plan for flat roofs (the “Project Report”). This ValkPVplanner
and the Project Report(s) derived from this ValkPVplanner are composed with the greatest possible care.
Nonetheless, it is possible that some information might not be entirely correct as the results for each Project
Report can be based on default values entered into this ValkPVplanner by you, which values always need to
be checked and validated by you. The instructions provided in this Project Report must be strictly observed
at all times, in addition to and in conjunction with the installation manual provided by us (the “Installation
Manual”), and vice versa.
At all times all currently applicable structural, safety and building regulations must be observed when using
the ValkPVplanner and/or Installation Manual. The building in question will be subject to a load as a result
of the solar mounting system installed/mounted. Solar mounting systems installed on roofs will be exposed
to wind and snow. Therefore, you are at all times responsible to obtain and use a design calculation to
establish whether or not the building will be able to withstand the (extra) load at all times. Where
necessary, modifications need to be made by you. Van der Valk will not accept any form of liability upon
you not having obtained and used such a required design calculation.
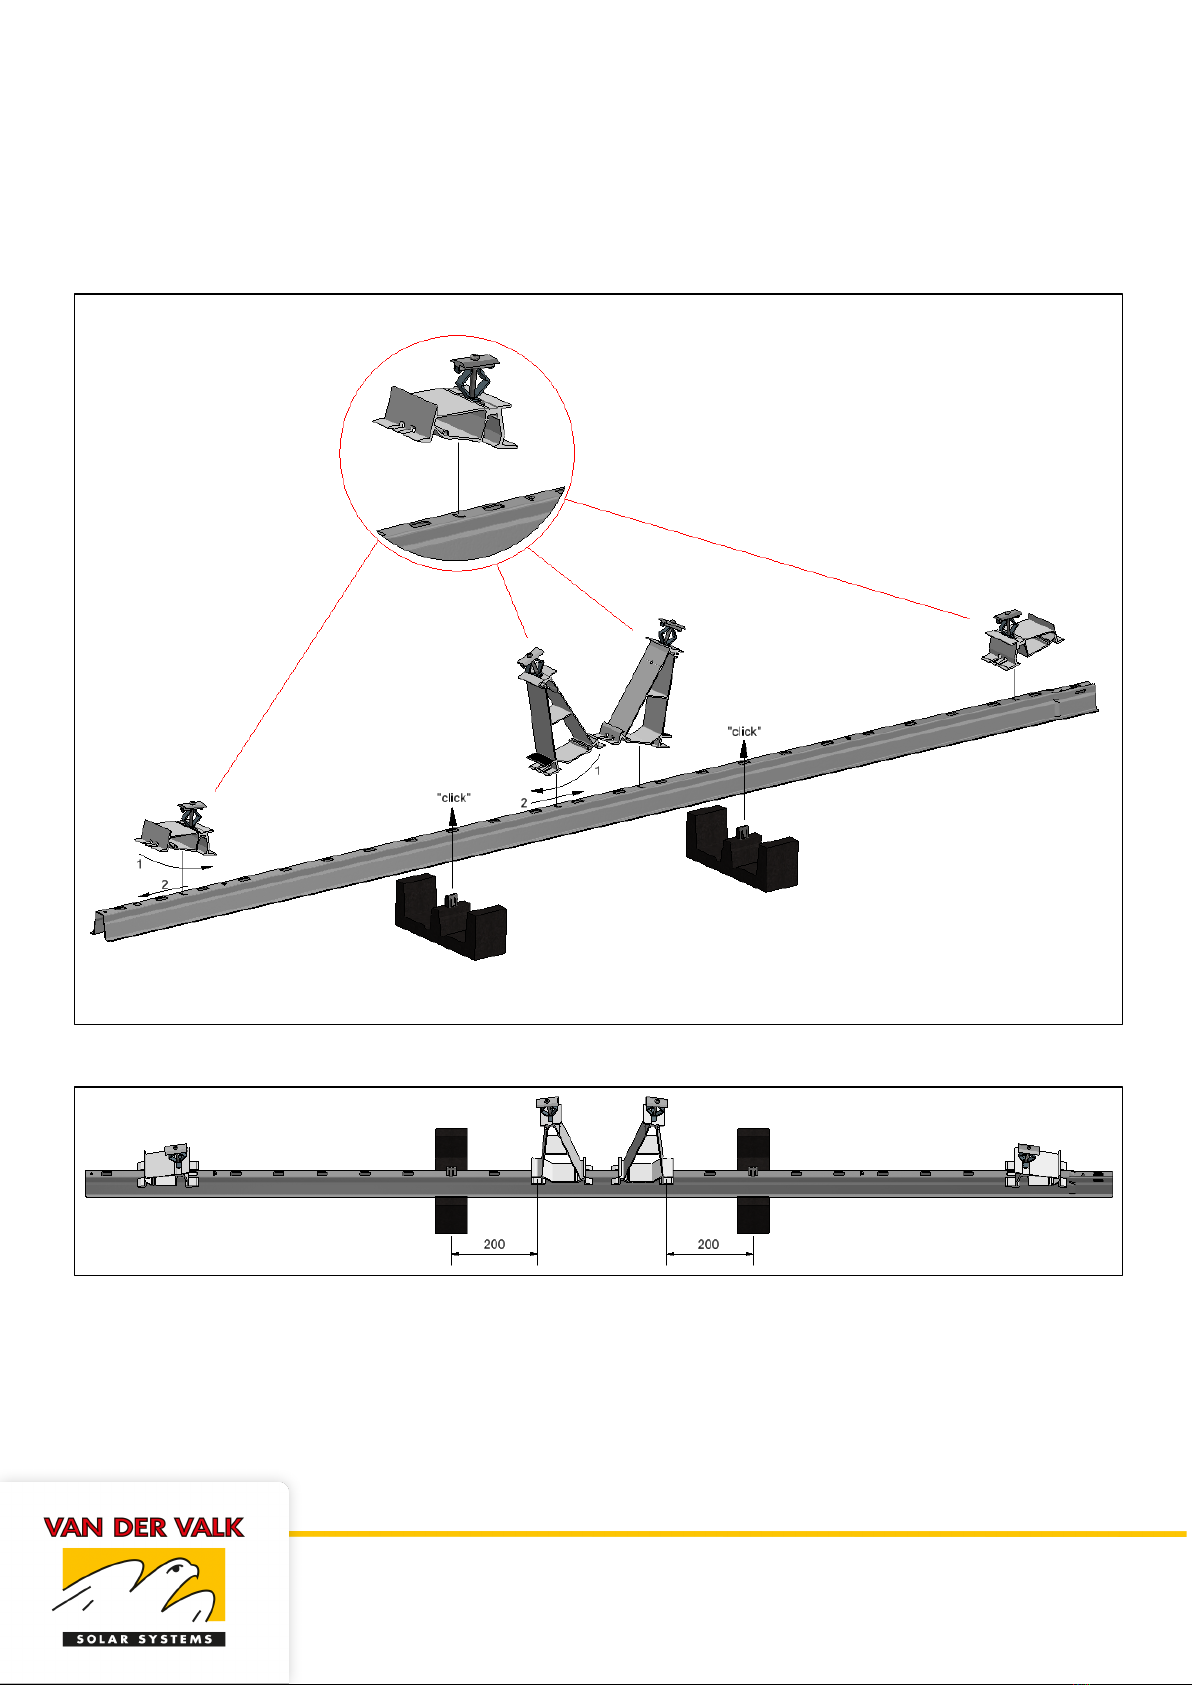
Mounting systems for PV-panels on flat roofs should either be mechanically attached to the roof or need to
be supported by ballast, to make sure that the solar mounting system is unable to be lifted, tipped over or
slide. For each project, the required ballast weight per panel needs to be calculated using the ValkPVplanner
software. The ballast specified in the Project Report is vital to ensure that the mounting system can be
installed and used safely. In case the inclination of the roofs is 5 degrees or more, the PV-mounting system
must always be mechanically fixed to the construction of the roof.
The calculations in the ValkPVplanner do not take into account obstacles in the near surrounding such as,
for example, high buildings, cliffs and mountains. Restrictions also apply for the position of the solar
mounting system on a roof. The solar panels must be installed at a certain distance from the edge of the
roof as shown in the respective Project Report and the Installation Manual.
The standard warranty for pitched roof, flat roof and ground mount systems is 10 years, which can be
extended under certain conditions. The guarantee provided is subject to the guarantee conditions stated in
the general terms and conditions stipulated by Van der Valk Solar Systems B.V. Our terms and conditions
shall apply to all our products at all times and can be found on our website:
http://www.valksolarsystems.com
Van der Valk Solar Systems B.V. does not accept any liability for any direct and/or indirect consequences of
any act (or omission) ensuing from the information in or failure to observe the instructions provided in the
Project Report and/or the Installation Manual and for possible incorrect results resulting from the use of this
ValkPVplanner which was made available to you. The use of the ValkPVplanner, the derived Project Report
and the Installation Manual will at all times be subject to Dutch law.

Van der Valk Solar Systems BV
Installation manual – ValkPro+ L10 [East-West] v1.2.0
2
Important
•This general installation manual does not contain project specific recommendations.
•This installation manual is not legally binding.
•No rights can be derived from this manual.
•Use this manual in combination with the ValkPVplanner project report.
•For additional information regarding cable management solutions, please refer to the
ValkCableCare datasheets.
•The ValkPro+ system can be placed in the middle zone as well as the edge / corner zones of
the roof.
•Side plates are optional when the system is placed in the middle zone of the roof. Side
plates are mandatory when the sytem is placed in the edge / corner zones of the roof.
•The need for mass carriers depends on the amount of ballast needed to be placed under the
panel or if side plates are used.
Table of contents:
Disclaimer Page 1
Table of contents Page 2
System details
Placement conditions Page 3
Recommended tools for installing ValkPro+ Page 4
Required materials for ValkPro+ L10 [East-West] Page 5-7
Installing ValkPro+ L10 [East-West] (standard)
Pre-assembly of roof carriers sets Page 8
Placing roof carrier rows Page 9-10
Placing ballast Page 11-15
Mounting side plates Page 16
Placing solar panels Page 17-18
Mounting micro invertor clamps Page 19
Dilatations Page 20
Cable management Page 21-23
Installing ValkPro+ L10 [east-West] (optional)
Gravel roofs Page 24
Sedum/Green roofs Page 25
ValkPro+ as a field system Page 26
Console fixation (ValkSolarFix) Page 27
Ballast wing Page 28
Extra panel support Page 29-31

Van der Valk Solar Systems BV
Installation manual – ValkPro+ L10 [East-West] v1.2.0
3
Placement conditions
In order to ensure a safe installation and use of the The ValkPro+ system, the following conditions
must be respected:
- The inclination of the roof must be less than 5°.
- The roof can have a maximum height of 25 meters, in case the project has been calculated using
the ValkPVplanner and is corresponding with the roof height in the project report. For installations
on roofs higher than 25 meters, please contact Van der Valk Solar Systems.
- Check prior to installation if the roof membrane and/or insulation is suitable for the loads and
thermal expansion of the PV-system. For example: make sure the maximum point loads of the
system as shown in the ValkPVplanner project report are compatible.
- In case the mounting system is to be placed on a roof with mechanically fixed roof membrane,
the risk of the membrane bulging due to wind suction needs to be mitigated. The bulging can
cause unwanted lifting of the mounting system or disposition of the ballast under extreme wind
suction situations. It is the responsibility of the installer to prevent bulging of the roof membrane.
This can be done by adding fixation points or placing additional weight (for example tiles) on the
membrane in the edge zones of the roof and around the PV-system.
- After the ValkPro+ mounting system has been placed, it is of greatest importance to check if the
ballast has been placed according to the ballast plan in the project report. Ballast tiles need to be
neatly stacked in order to ensure the weight is properly supported by the tile carriers, mass
carriers and/or ballast wings.
- The coupled ValkPro+ system shall not be placed over a ridge or gutter. In these positions a
diltation is mandatory.
- Side plates are mandatory when the system is placed in the edge / corner zones of the roof.
- In coastal areas the mounting system must be placed at a distance of at least 500 meters from
open water, to prevent corrosion due to salt water spray. In case there is a building in between the
open water and the roof, a distance of 250 meters can be applied.
Suitable panel dimensions:
•Length 1520 - 2320 mm
•Width 977 - 1032 mm suitable for pitch 2150 mm
977 - 1070 mm suitable for pitch 2300 mm
1071 - 1120 mm suitable for pitch 2400 mm
1121 - 1200 mm suitable for pitch 2500 mm
•Frame height 28 - 50 mm

Van der Valk Solar Systems BV
Installation manual – ValkPro+ L10 [East-West] v1.2.0
4
Required tools for installing ValkPro+
Cordless drill
Socket 13 mm
Wrench 13 mm
Torx bit T-30
(789530)
Measuring tape
Alignment key for roof carriers
739010
Disassembly key for feet
743000
Adjustable alignment set for
roof carriers
743220

Van der Valk Solar Systems BV
Installation manual – ValkPro+ L10 [East-West] v1.2.0
5
Basic materials for installing ValkPro+ L10 [East-West]
For the ‘optional’ materials, see next page.
Roof carrier profile
741802300
741802400
741802500
Back foot middle
724650
Back foot side
724651
Front foot middle
724660
Front foot side
724661
Tile carrier
729622 - for bitumen / TPO / EPDM roof
729623 - for PVC roof
Coupling set
774221
Thread forming bolt M6x10 mm
for fixation of side and back
plates
773310
Concrete tile 9 kg (300 x 300 x 45
mm)
7506303045
Concrete tile 4,5 kg (300 x 150 x 45
mm)
7506301545

Van der Valk Solar Systems BV
Installation manual – ValkPro+ L10 [East-West] v1.2.0
6
Optional materials:
The optional materials can be used to optimize the system to specific situations and wishes.
Side plate (can be used for left
and right side of the system)
742540
Mass carrier
742550 - [for panel length 1520-1720 mm]
742553 - [for panel length 1720-1920 mm]
742555 - [for panel length 1920-2120 mm]
742556 - [for panel length 2120-2320 mm]
Elevation block for gravel roofs
729627
Dilatation wire
732020
Cable clamp for fixation to panel
frame
732001
Cable clamp for feet
732011
Cable basket 50 x 60 mm, length
3000 mm
(76010050603000)
Mass block (750520)
+
Stainless steel bolt M8 x 65
mm (774065)
Roof carrier for half-peak
(741801200)
Ballast tray
742610 [for panel length 1520-1720 mm]
742612 [for panel length 1720-1920 mm]
742615 [for panel length 1920-2120 mm]
742618 [for panel length 2120-2320 mm]
Multi-wire / connector clip for
roof carrier
732012
Ballast wing
725150

Van der Valk Solar Systems BV
Installation manual – ValkPro+ L10 [East-West] v1.2.0
7
Panel support - Front foot
724710
Panel support - Base plate small
724720
Panel support - Upright
724730

Van der Valk Solar Systems BV
Installation manual – ValkPro+ L10 [East-West] v1.2.0
8
Pre-assembly of roof carriers sets
A fast and convenient way of working can be best achieved by mounting the feet and tile carriers
on the roof carriers prior to placing them on the roof. This method can save a lot of time. The
aluminium feet should be placed in the position where the letter “L” is visible on top of the roof
carrier. The rubber tile carriers are placed in the second rectangular hole in front of the
aluminium back foot.
Side view

Van der Valk Solar Systems BV
Installation manual – ValkPro+ L10 [East-West] v1.2.0
9
Alignment of roof carriers
Place the roof carriers on the roof in the desired layout or starting point. Connect the roof carriers
by placing the end of the first roof carrier over the reduced end of the next roof carrier. The roof
carriers are then fastened with the coupling set. (see 1.3)
The center-to-center distance between the roof carrier rows depends on the panel size. The
following formula must be applied: panel size + 10 mm. For fast and easy alignment of the roof
carriers, we advise to use the adjustable alignment tool (art. 743220).
In the first and last oblong-hole of the roof carrier row (incl. reduced part) an extra rubber tile
carrier must always be placed.
Dilatations
The coupled system has to be dilatated after certain measurements, this needs to be done because
of the thermal expansion/contraction. For the South-North direction this is 60 meters, for the
East-West direction this is 30 meters.

Van der Valk Solar Systems BV
Installation manual – ValkPro+ L10 [East-West] v1.2.0
10
Tools for alignment of roof carriers
Aligning the roof carriers can be done quick and easy using the following tools:
Alignment lip roof carrier
The smooth side of each roof carrier is provided with a lip which can be used when aligning /
coupling the roof carriers. The swaged end of the roof carrier can be placed against the lip, this
makes sure the roof carriers are always aligned properly.
Alignment key ValkPro+ (art. 739010)
The alignment key can be used to align the overlapping oblong hole of the roof carriers.
Alignment set ValkPro+ (art. 743220)
The alignment set can be used to make sure the roof carrier rows are placed at the correct pitch
beside each other.

Van der Valk Solar Systems BV
Installation manual – ValkPro+ L10 [East-West] v1.2.0
11
Placing ballast
The ballast can be placed on the rubber tile carriers or on the mass carriers (only when necessary).
Check the ValkPVplanner project report for the required ballast weight per panel.
Max. no. of tiles on rubber tile
carriers: 2,5 tiles (22,5 kg)

Van der Valk Solar Systems BV
Installation manual – ValkPro+ L10 [East-West] v1.2.0
12
Mass carriers
In case the required ballast is more than 4,5 tiles or if the ballast cannot be placed due to side
plates, mass carriers are required. The mass carriers are placed on both sides of the rubber tile
carrier. The mass carriers provide the support for the tiles (see image 2.2).
Max. no. of tiles on mass carriers: 10 tiles
(90 kg)

Van der Valk Solar Systems BV
Installation manual – ValkPro+ L10 [East-West] v1.2.0
13
Ballast trays
In case gravel (coming from the roof on which the system is placed) or pavers are used for ballast,
ballast trays can be applied. The ballast trays are placed over the roof carriers. The slots in the
ballast trays on one side will fit the rubber tile carriers so that the ballast trays cannot move. The
other side of the ballast tray can be placed in the next ballast tray.
The max load per tray in case it is filled to the maximum with gravel:
Art. 742610 (1780 mm) – Max. 36,6 kg
Art. 742612 (1980 mm) – Max. 40,9 kg
Art. 742615 (2180 mm) – Max. 46,4 kg
Art. 742618 (2380 mm) – Max. 50,7 kg
In the calculation above a gravel density of 1500 kg/m3 is used.

Van der Valk Solar Systems BV
Installation manual – ValkPro+ L10 [East-West] v1.2.0
14
Distributing ballast
The ballast is placed according to the ballast plan in the project report. The project report
indicates the required ballast per panel for a South system and per peak for East-West system.
Without mass carriers the ballast is to be divided over the ballast points under the individual
panel. The next image shows how the ballast should be divided over the different ballast points.
PLEASE NOTE! Image below is an example.
The required number of tiles is indicated per panel or peak (same as the project report). The
ballast is always placed starting from the outside toward the centre of the system. Therefore the
middle row of the system doesn’t have any ballast (see red line). If possible there may be ballast
placed on those foundation points as well.

Van der Valk Solar Systems BV
Installation manual – ValkPro+ L10 [East-West] v1.2.0
15
When using the rubber pressure dividers, it is important that these are placed in the correct
positions. The numbers in the image below represent the order of the pressure dividers when
using 1, 2 or 3 pieces. For more information, please refer to the datasheet.

Van der Valk Solar Systems BV
Installation manual – ValkPro+ L10 [East-West] v1.2.0
16
Mounting side plates
The use of side plates is optional, in case the mounting system is placed in the middle zone of the
roof. Side plates are mandatory in case the following is applicable:
- The mounting system is partially placed in the edge / corner zones of the roof.
- Roof height is 25m or higher
Each side plate is fixed to the sides of the aluminium feet using three thread forming bolts M6 x 10
mm. (see image 3.1)

Van der Valk Solar Systems BV
Installation manual – ValkPro+ L10 [East-West] v1.2.0
17
Placing PV-panels
Place the PV-panels under the clamps and make sure ALL the panel clamps are securely fastened.
Make sure the end clamps are placed in the correct height slot, corresponding with the panel
frame thickness, before they are fastened. The clamps must have an overlap of at least 6,3 mm
with each panel frame, in order to ensure full clamping force.

Van der Valk Solar Systems BV
Installation manual – ValkPro+ L10 [East-West] v1.2.0
18
The front foot is designed with an upstanding edge, which makes it easy to align the PV-panels,
when the frames are placed against this edge. This is not mandatory however. In case it is not
possible to place the panels against the edge, it is ok as long as the side of the frame is still
positioned in range X. The ValkPro+ system will then still apply enough clamping force on the
panels.

Van der Valk Solar Systems BV
Installation manual – ValkPro+ L10 [East-West] v1.2.0
19
Mounting micro-invertors
Micro-invertors can be mounted on the roof carrier using a coupling set (Art. 774221).
Table of contents
Other Van Der Valk Solar Panel manuals

Van Der Valk
Van Der Valk ValkField User manual

Van Der Valk
Van Der Valk ValkDouble User manual

Van Der Valk
Van Der Valk ValkQuattro User manual

Van Der Valk
Van Der Valk ValkDouble User manual

Van Der Valk
Van Der Valk ValkTriple User manual

Van Der Valk
Van Der Valk ValkBox3 User manual

Van Der Valk
Van Der Valk ValkBox3 User manual

Van Der Valk
Van Der Valk ValkBox3 User manual
Popular Solar Panel manuals by other brands

Autarco
Autarco MA-series Installation and operation manual

Lippert
Lippert Furrion FSFP37MW-BL user manual

A+ life
A+ life i-solar CP325 instruction manual

NEO TOOLS
NEO TOOLS 90-143 Original manual

BougeRV
BougeRV ISE179 user manual

Maxeon
Maxeon SunPower SPR-MAX5-415-E3-AC Safety and installation instructions