Van Rysel E-EDR AF User manual

1
VAN RYSEL
VAN RYSEL
EN - USER MANUAL
E-EDR AF
Date of la update :
31/05/2023

2

3
Dear Cuomers,
Thank you for purchasing a DECATHLON electrically-assied bike.
We invite you to read the inruction manual to get the mo out of your E-EDR AF bike.
Never forget that an electrically-assied bike is not a moped. It needs your help to go further,
faer and longer.
We sugge that you learn how to use your electrically-assied bike in an open area in order
to get used to the feel of the motor kicking in and thus ensure optimum control of your bicycle.
An electrically-assied bike is heavier than a conventional bike. Without power assiance,
pedalling can be more dicult.
You mu always make sure you are capable of riding the entire journey without assiance,
in case your battery runs at.
Here is what you need to do to get the mo out of your power-assied bike.
Important, this inruction manual only applies to the electrical characteriics of
your bicycle.
You should refer to the user manuals common to all our bicycles that accompany
this document and are also available on our website www.decathlon.com or on re-
que in our DECATHLON ores.

4
How to get the mo from your power-assied bike
3.5 - 5.5 bar
1. The bike will operate better and more eciently with
tyres inated between 3.5 and 5.5 bar
< 3,5 bar
2. Under-inated tyres are more prone to punctures
< 3 months
3. The battery mu be fully charged at lea once every
3 months
A
B
A
B
+/- 20° +/- 5°
4. Cold weather reduces battery life
A
B
A
B
5. Overloading the bicycle will reduce the battery life
A
B
A
B
6. Battery life will drop when cycling uphill
> mode 1 < mode 1
7. It is advisable to reduce the power assiance mode
when the battery charge is low

5
TABLE OF CONTENTS
PRODUCT DESCRIPTION ............................................................................... 6
Electrically-assied bike technical features ..................................................................... 6
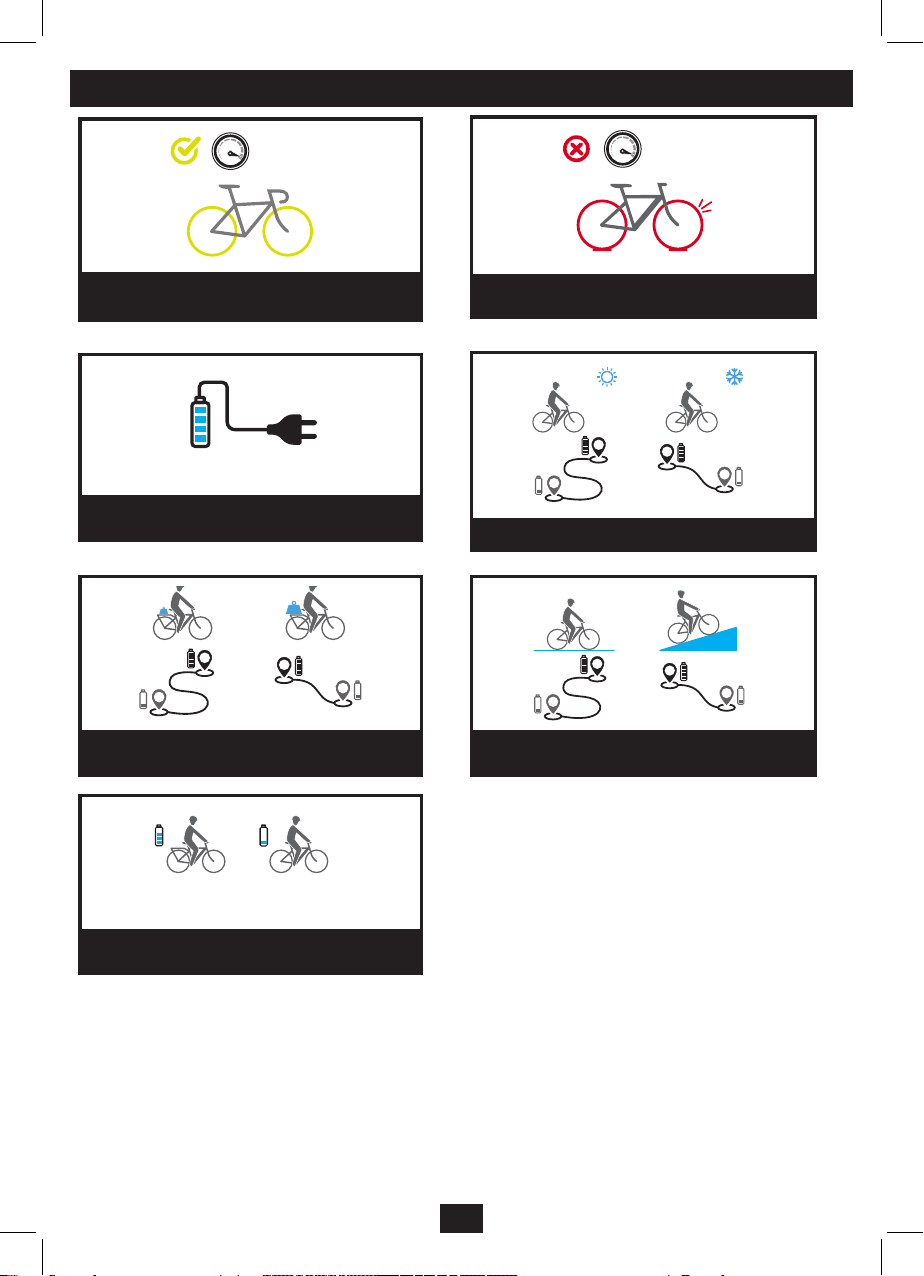
General operation of the electrical assiance .................................................................. 6
MOTOR ............................................................................................................. 7
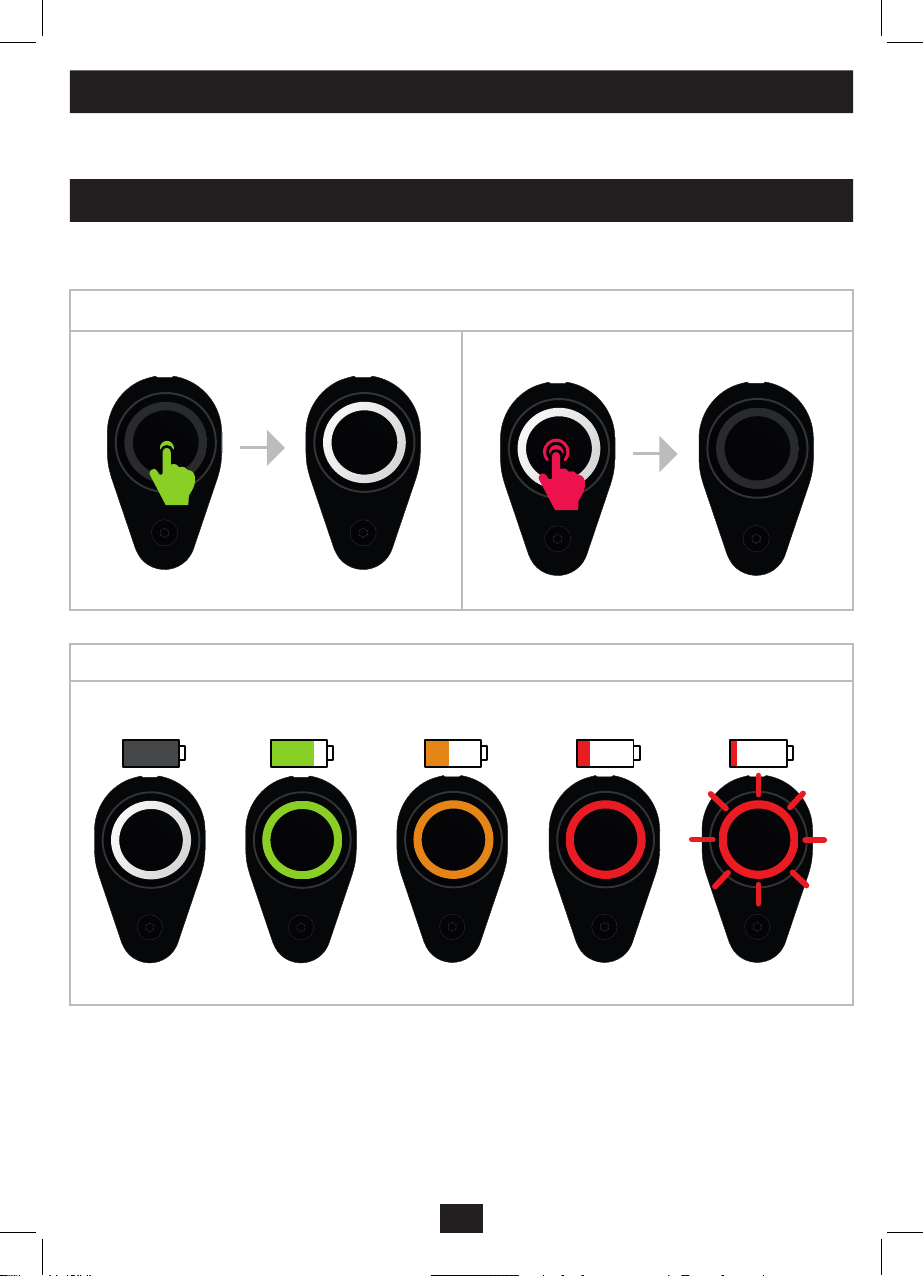
COMMAND BUTTON ....................................................................................... 7
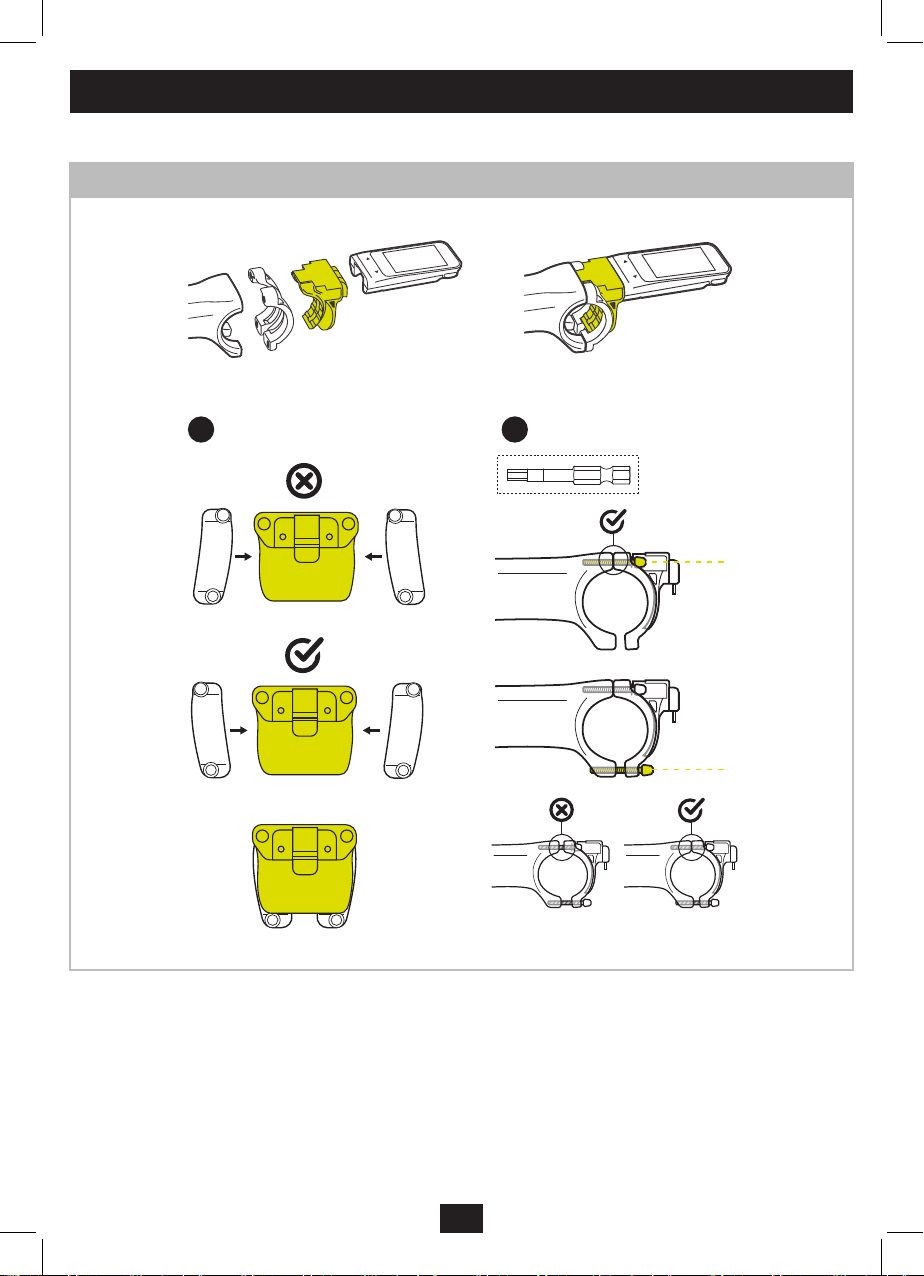
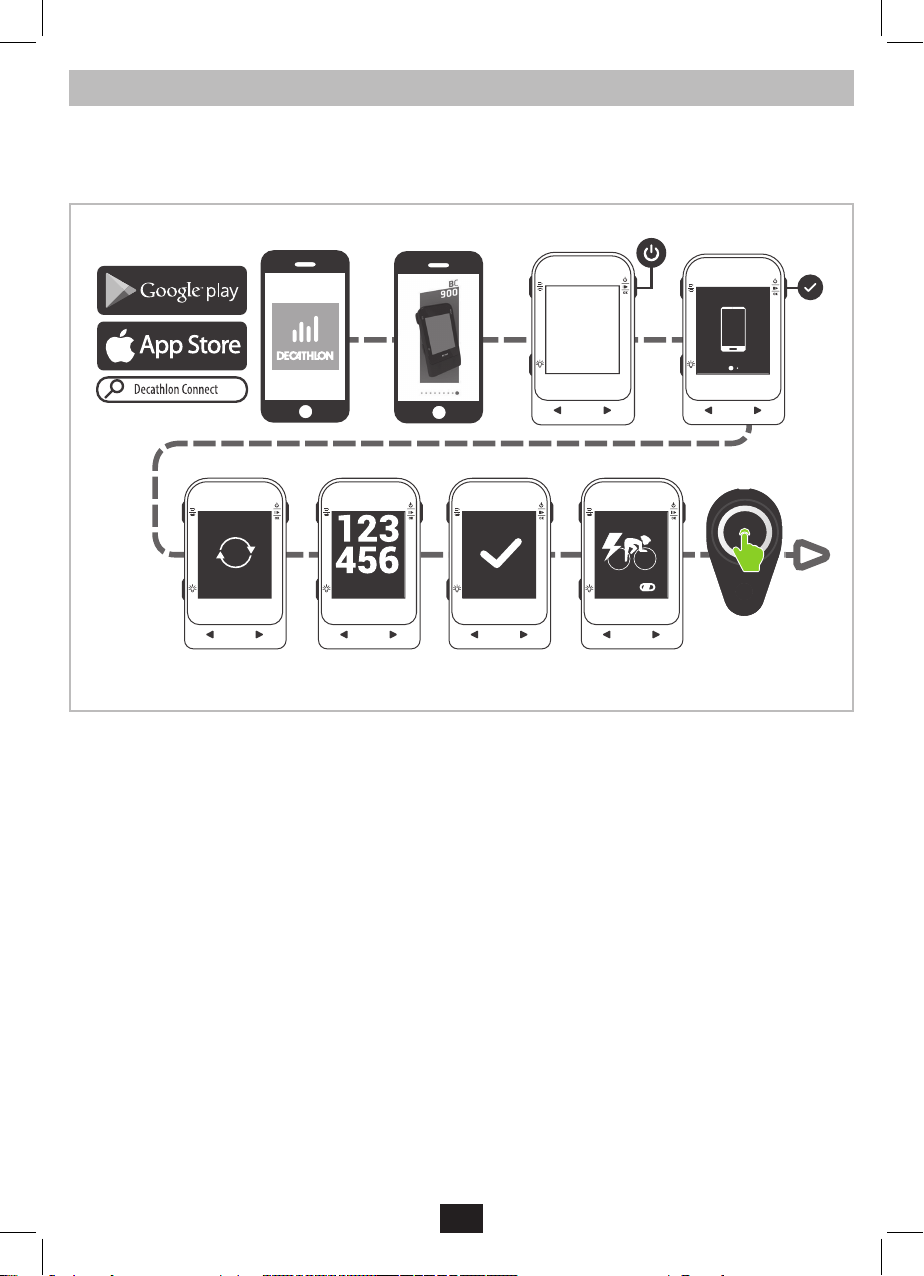
BC900 BIKE COMPUTER ................................................................................ 9
Inallation ............................................................................................................................. 9
Fir settings ....................................................................................................................... 10
Using your BC900 bike computer ..................................................................................... 11
Cuomising your activity screens. .................................................................................. 12
Charging the BC900 bike computer.................................................................................. 12
Detailed inructions on the BC900 bike computer. ....................................................... 12
BATTERY AND CHARGER ............................................................................ 13
Battery and charger properties ......................................................................................... 13
Battery charging level ........................................................................................................14
Battery and charger precaution ........................................................................................ 14
Bike safety information ................................................................................. 15
Maintenance ................................................................................................... 16
Error code ...................................................................................................... 17
Appendix 1: Component tightening torque ................................................ 19
Contents of the commercial warranty for your electrically-assied bike20

6
PRODUCT DESCRIPTION
Electrically-assied bike technical features
A
Battery
B
Motor hub
C
COMMAND BUTTON
D
BC900 BIKE COMPUTER
E
Charging port
General operation of the electrical assiance
The power assied bike can be used with or without assiance by pressing the Command button «C» and altering the modes 0-1-2-3. The selec-
table 0-1-2-3 assiance modes selectable on the «C» Command button allow you to choose a power assi level in addition to the eort provided.
Power assiance will only work if you are pedalling, with a selected mode other than 0. Assiance cuts o when the speed is above 25km/h. In
case of intensive use and in exceptional climatic conditions, assiance may be cut o to safeguard the whole syem.
The power supplied is calculated by the controller «C» based on your pedalling and the assiance mode selected.
The motor hub «B» will provide more or less power depending on the mode selected and the force applied
Power assiance does not kick in or shuts down in the following situations:
- The speed is above 25km/h
- You’re not pedalling
- The battery «A» remaining charge is not sucient
- «0» is the power assiance mode selected
- When the control button is switched o
B
D
C
E
A

7
MOTOR
Motor «B» of your power-assied bike is a brushless-type motor with mechanical reduction, allowing you to have high torque and less resiance
(quieter motor).
So motor noise in use does not exceed 55db. The power of the motor is limited to 250W maximum.
COMMAND BUTTON
Electric assiance is controlled by the command button on the frame.
Informations are reported by a specic color code.
Turn on & turn o the bike
TURN ON THE BIKE
Short press
TURN OFF THE BIKE
Long press
By default the button shows the battery charging level.
Battery charging level
>75% <15%50%-75% 25%-50% 15%-25%
To know in which assi mode you ride, press once the button.
To change the assiance level, press the button twice. You can only up the assiance:
MODE 0 > MODE 1 > MODE 2 > MODE 3 > MODE 0
Reduced assiance

8
Assiance level
Short press Active assiance level
(example: mode2)
Press again when blinking
to up the assi level Assi level 3
is now active
Mode 0
No assiance
Mode
1
Mode
2
Mode
3
Your bike is equipped with a bluetooth syem.You can can pair a phone and use your smartphone to have more possibilities and receive phone
notication warning. Please check the Q&A support web site for more informations.
There is a syem error if the button color is purple (xed or blinking light). Please refer to the ERROR CODE page on the user manual to know
more about this error.
Bluetooth & Notication Syem error code
Bluetooth active Phone notication receive Error syem Error syem

9
BC900 BIKE COMPUTER
The E-EDR AF eBike comes with our BC900 GPS bike computer. This display will show you information about your ride (speed, diance, time, …)
and about your e-bike (battery level, battery range, assiance level,...).
Inallation
1 2
5 - 6 Nm
5 - 6 Nm

10
Fir settings
IMPORTANT! When you power on your BC900 display for the r time, you will need to go through the r settings and pair the bike computer to
your ebike syem. Please follow the next eps.
Download the “Decathlon Connect” app on your smartphone, open it and follow the inructions on the screen.
Switch on the BC900 bike computer, by pressing the power button for 2 seconds. When the “connect” screen appears, press once again on the OK
button to conrm and launch the connection process with your smartphone.
Settings
Records Sessions
Start
Settings
General
Targets
Sensors
E-bike
Off Off
Sensor A
Sensor B
Done
Password Done Done
turn on
e-bike
pairing...
2’’
ON
Once these r settings are done, the bike computer will art the pairing process with your e-bike.
Please make sure the e-bike is switched on during this process. If the pairing was not successful, the pairing process will be relaunched at every
activity art.

11
Using your BC900 bike computer
Start a ride by pressing the OK button.
0
.
0
Km/h
20
.2
31
.4
Avg Km/h
MaxKm/h
26
.
9
Km/h
20
.2
31
.4
Km/h
Km/h
Quit & save?
YES
YEAR MONTH WEEK DAY
TODAYMONDAYJUNE 23RD
00:00 00:0006:00 18:0012:00
124
KM
12.9
KM/H
AVG SPEED
468
KCAL
CALORIES
9:41AM
Cadence
Speed
Cardio
Power
General
Sensors
Targets
Screens
Cardio
Cadence
Power
Speed
Pause or op a ride by pressing the OK button. You can see your GPS trace and the details of your ride on the Decathlon Connect app. Leave
your bike computer powered on and next to your smartphone during synchronization.
0
.
0
Km/h
20
.2
31
.4
Avg Km/h
MaxKm/h
26
.
9
Km/h
20
.2
31
.4
Km/h
Km/h
Quit & save?
YES
YEAR MONTH WEEK DAY
TODAYMONDAYJUNE 23RD
00:00 00:0006:00 18:0012:00
124
KM
12.9
KM/H
AVG SPEED
468
KCAL
CALORIES
9:41AM
Cadence
Speed
Cardio
Power
General
Sensors
Targets
Screens
Cardio
Cadence
Power
Speed
You can pair external sensors such as heart rate monitors, cadence sensors or power sensors in the settings menu > sensors.
All ANT+ or Bluetooth Smart sensors are compatible, independent of the brand of the sensor.
0
.
0
Km/h
20
.2
31
.4
Avg Km/h
MaxKm/h
26
.
9
Km/h
20
.2
31
.4
Km/h
Km/h
Quit & save?
YES
YEAR MONTH WEEK DAY
TODAYMONDAYJUNE 23RD
00:00 00:0006:00 18:0012:00
124
KM
12.9
KM/H
AVG SPEED
468
KCAL
CALORIES
9:41AM
Cadence
Speed
Cardio
Power
General
Sensors
Targets
Screens
Cardio
Cadence
Power
Speed

12
Cuomising your activity screens.
You can cuomise each activity screen (the pages on the cyclometer that you see when riding). For each page, you can choose:
- the number of elds (values): between 1 and 5 (the size adjus automatically so if you want bigger numbers, don’t have too many
values per page)
km/h
0.0 km/h
0.0
Avg km/h
20.2
AVG
km/h
0.0
MAX
Avg km/h
20.2
AVG
Max km/h
31.4
km/h
0.0
Avg km/h
20.2
AVG
Max km/h
31.4
Kcal
124
km/h
0.0
Avg km/h
20.2
Max km/h
31.4
Kcal
124 12:45
- the type of value for each eld
- the number of pages (up to 9 pages)
These settings can be adjued on the cyclometer or even more easily on the Decathlon Connect app.
To congure screens using the Decathlon Connect app:
- Turn on your BC900 bike computer
- Go to the Settings menu in the Decathlon Connect app, select the BC900, then Conguration.
- Wait for the verication of the current screen conguration to appear.
- You can now add or remove screens, choose the number of functions to be displayed on each screen, and choose the information to be
displayed in each eld.
- Press Save to send the new conguration to the bike computer (bike computer mu be on).
- Wait for the conguration to take eect.
Charging the BC900 bike computer.
LOW
BATTERY 2H30
100%
Detailed inructions on the BC900 bike computer.
To get the mo out of your BC900 bike computer, it is highly recommended to read the detailed inructions on our supportdecathlon.com website.

13
BATTERY AND CHARGER
Battery and charger properties
All batteries in our electric bikes use Lithium-Ion cell technology and have no memory eect. The battery can be recharged at any time. There’s no
need to wait until it’s completely discharged.
Recharging the battery after each use is recommended.
You should recharge your battery at lea every 3 months even if you do not use it.
Battery Charger
36 V / 6.8 Ah
250Wh
Input: 100-240 V
Output: 42 V 4A
Your battery is guaranteed for 2 years or 500 charging and discharging cycles (1 cycle = 1 charge from 0% to 100% + 1 discharge from 100% to
0% or 1 cycle = 2 charges to 50%) subject to compliance with the proper conditions of use and orage.
Battery & E-bike range
The range of your ebike tour is determined by several factors: tyres pressure, external temperature, riding mode, eort on the pedals, total weight,
terrain, wind conditions... Refer to page 4 to know how to optimize your range.
Recharging the battery
100%
5H
1 2

14
Battery charging level
During the recharging phase, the bike button indicates the battery
level.
- Red: charge level less than 25%
- Orange: charge level between 25% and 50%
- Green: charge level between 50% and 75%
- White: charge level more than 75%
>75% <15%50%-75% 25%-50% 15%-25%
Battery and charger precaution
Never remove the battery from the bike!
This manipulation could be dangerous and is reserved for trained Decathlon technicians.
<25%
Do not ore the bike with discharged battery (red light) to avoid deep discharge, which may cause it to
malfunction.
100%
In cases of extended orage, recharge the battery at lea every 3 months.
=
V / Hz
Always make sure that the battery and charger are compatible.
Do not use a dierent charger than the one supplied by DECATHLON for this bike model.
Using another charger may damage the battery or cause serious incidents (sparks or re).
=
+100 V / 240 V
Always ensure the charger is compatible with the local electric grid:
voltage 100V, 240V maximum.
Do not use or ore your bike with charging port open. Open the charging port cap only for charging.
Charge your battery indoors, in a dry environment at a temperature between +10°C and +40°C.
Under certain conditions, the charger may reach high temperatures.
Other mechanicals parts as disc brakes could reach high temperatures too.

15
Do not dispose of the battery in non-suitable containers. Return the used battery to your Decath-
lon ore for recycling.
The battery of your bike is a dangerous good. Risks of electrocution and re.
The bike should be handled with care (product is sensitive to impacts).
Never short-circuit the battery by connecting the positive and negative terminals or putting some
external object on the charging port. Risk of re and electrocution!
Transport by aeroplane of your electric bike with its battery is prohibited.
Do not expose the bike to temperature above 50°C. Outside this range, battery life will be
aected.

16
BIKE SAFETY INFORMATION
This bike is designed for road use only.
Others practices are inappropriate and prohibated
(Risk of accident and cancellation of the bike guarantee if you do not comply with this condition)
Never modify the bike’s components or electrical syem! Any change is dangerous and prohibited
by law. If a modied bike breaks down or is damaged, Decathlon will in no case take care of
repairs (warranty cancelled). You will also be legally responsible for any accident that arises with
the bike.
!
Before each use you mu make sure that your brakes and electric syem are working properly
!
Always wear a helmet when riding your bike.
14+
These electric bikes are designed for persons aged 14 and over.
Maximum permissible weight: 120kg in total (including accessories, user and bike - 14kg for the
E-EDR AF)
!
Caution: in rain, fro, or snow, you may have less tyre traction.
It is essential to ore the bike in a dry, cool place (between +10°C and 25°C), out of sunlight,
even for a short break.
All electric components are designed to withand rain.
Do not immerse the bike or electric components in water.

17
MAINTENANCE
All maintenance of electrical components requires special skills and are dangerous. You are not
allowed to remove a electrical component by yourself.
!
All cleaning work mu be done when bike is turned o, not plug to the charger and with charger
cap correctly close.
Prohibited: cleaning using a high-pressure jet.
Not recommended: cleaning under running water.
Recommended: cleaning using a damp sponge.
If the bike suers a fall, check the electric components.
If cable, button or frame is physically damaged, go to a DECATHLON workshop for an electric
te.
If the chain comes o, switch o the power before carrying out any repairs.
To remove the rear wheel, you have to disconnect the motor cable. Be careful to respect the
connector plugging way (follow the arrow mark) and do not bend the motor cable.
We advise you to bring your electrically-assied bike back to your DECATHLON ore for its
6-month service.
www.supportdecathlon.com
For more information on use, maintenance, after-sales services or in case of queions, visit
DECATHLON’s support website: www.supportdecathlon.com or visit a DECATHLON ore.

18
ERROR CODE
Error
24
An error code is the visible reaction to an electric issue.
Error code does not mean there is a defective component!
Mo of the time it is ju a warning to signal an empty battery or a disconnected
cable.
Each syem error have a specic number.
The error code appears on the BC900 display.
Number Designation Resolution
4
LOW VOLTAGE PROTECTION Battery Pack voltage too low. Please charge the battery Pack.
5
OVER VOLTAGE PROTECTION The Battery Pack voltage is not correct for this syem. Please inall the speci-
c Battery Pack for your eBike Syem.
6
HALL SENSORS FAULT Check the motor wire connection. Reart the eBike Syem. If the problem
persis, contact your Decathlon workshop.
7
OVER TEMPERATURE PROTECTION The eBike is outside of the permissible temperature range. Switch o the eBike
and allow the drive unit to either cool down or heat up to the permissible tem-
perature. Reart the syem. If the problem persis, contact your Decathlon
workshop.
8
TEMPERATURE SENSOR FAULT Temperature sensor damaged. Contact your Decathlon workshop.
9
CURRENT SENSOR FAULT Current sensor damaged. Contact your Decathlon workshop.
10/11
BMS COMMUNICATION FAULT Error in the communication with the Battery Pack. If the problem persis,
contact your Decathlon workshop.
12
DRIVER ERROR UNDERVOLTAGE Battery Pack voltage too low. Please charge the battery Pack.
13
DRIVER ERROR OVERTEMPERATURE The eBike is outside of the permissible temperature range. Switch o the eBike
and allow the drive unit to either cool down or heat up to the permissible tem-
perature. Reart the syem. If the problem persis, contact your Decathlon
workshop.
14
DRIVER ERROR OVERCURRENT Current supplied by the Battery Pack is too high. Please reduce the demand
and reart the eBike Syem. If the problem persis, contact your Decathlon
workshop.
15
DRIVER ERROR UNDERVOLTAGE Battery Pack voltage too low. Please charge the battery Pack.
16/17
18/19
20/21
MOTOR PHASE ERROR Check the condition of the motor connector.
Check that the motor connector is correctly connected and the arrows are
correctly aligned.
Check the condition of the motor cable.
Check that the connector pins are not damaged or misaligned.
Reart the eBike Syem. If the problem persis, contact your Decathlon
workshop.
22/23
24
MOTOR CONNNECTOR ERROR
25
COMPONENT PROTECTION New component detected not associated to this eBike syem. Please contact
your Decathlon workshop to activate it.
26
DEFAULT SYSTEM PARAMETER Default Syem Parameters eablished.
27/28
DATA BASE ERROR Error in the Error Database Syem. Reart the eBike Syem. If the problem
persis, contact your Decathlon workshop.
29
BATTERY VOLTAGE SENSOR FAULT Battery Pack sensor damaged. Reart the eBike Syem. If the problem per-
sis, contact your Decathlon workshop.

19
Number Designation Resolution
30/31
OVER CURRENT PROTECTION Current supplied by the Battery Pack is too high. Please reduce the demand.
If the syem locks, please reart the eBike Syem. If the problem persis,
contact your Decathlon workshop.
32
COMM FATAL ERROR Fatal Error. reart the eBike syem. If the problem persis, contact your
Decathlon workshop.
33/35
SPEED SENSOR ISSUE Speed Sensor error - Motor consumes but Speed not received from sensor.
Check sensor speed. If the problem persis, contact your Decathlon workshop.
34
ACC VOLTAGE ERROR Contact your Decathlon workshop.
129
DEMO MODE Contact your Decathlon workshop.
193
195
CELL OVER VOLTAGE Discharge the battery and then recharge it.
Leave the battery connected to the charger for 2 hours after the charge ends to
balance the cells.
194
196
CELL UNDER VOLTAGE Charge the battery and leave it connected to the charger for 1-2 hours after
the charge ends to balance the cells. If the problem persis, contact your
Decathlon workshop.
197
CHARGE OVER CURRENT Check that the charger is in good condition.
Let the battery re for 2 hours. If the problem persis, contact your Decathlon
workshop.
199
SHORT CUT Check the charging port. If the problem persis, contact your Decathlon
workshop.
201
BATTERY IM BALANCE Allow to charge until the error disappears (around 3 hours).
202
SHORT CUT LOCK Connect the charger.
203
REVERSE CONNECTION Check the charging port and the charger. If the problem persis, contact your
Decathlon workshop.
204
CHARGE OVER TEMPERATURE
- Stop charging.
- Allow the syem to re for 30 minutes, with the bicycle turned o.
- Continue charging.
205
CHARGE UNDER TEMPERATURE
- Stop charging.
- Protect the bicycle from the cold and wait until the temperature of the
cells increases.
- Continue charging.
206
DISCHARGE OVER TEMPERATURE
- Reduce the discharge speed or op for a few minutes.
- Wait until the temperature drops.
207
DISCHARGE UNDER TEMPERATURE
- Avoid large power demands while this error is active to prevent deterio-
ration.
- Charge the battery within the appropriate temperature ranges.
208
FET OVER TEMPERATURE
- Avoid large power demands while this error is active to prevent deterio-
ration.
- Try not to use the syem in extreme temperatures (less than 10°C or
more than 40°C).
213
UNBALANCE CELL
- Allow to charge until the error disappears (around 3,5 hours).
- If the error persis, perform several discharge - full charge cycles (from
100% to 50% battery load).
- If after a maximum of 5 cycles, the error is ill present at the battery,
contact your bicycle manufacturer.

20
APPENDIX 1: COMPONENT TIGHTENING TORQUE
Component Tightening torque
Seat clamp 6 N.m +/- 1N.m
Head tube No play/No hard spots
Fork/Stem 6 N.m +/- 1N.m
Crankset arm cap 1.5 N.m +/- 0.5N.m
Handlebar/Stem 6 N.m +/- 1N.m
Saddle 17 N.m +/- 1N.m
Disc brake screw 5 N.m +/- 1N.m
Brake adapter 7 N.m +/- 1N.m
Brake caliper 7 N.m +/- 1N.m
Brake lever 7 N.m +/- 1N.m
Bottom bracket 45 N.m +/- 5N.m
Derailleur cable hanger screw 2 N.m +/- 0.5N.m
Rear derailleur 9 N.m +/- 1N.m
Cassette 40 N.m +/- 5N.m
Gear shifter 7 N.m +/- 1N.m
Rear derailleur cable 6.5 N.m +/- 0.5N
Front wheel axle 10 N.m +/- 1N.m
Rear wheel axle 26 N.m +/- 2N.m
Magnet ( cassette lock ) 40 N.m +/- 1N.m
Speed sensor 1 N.m +/- 0.5N.m
Bottle holder screw 2.5 N.m +/- 0.5N.m
Motor nut 35 N.m +/- 1N.m
Motor disc nut 4 N.m +/- 1N.m
Table of contents
Languages: