VanGaa Lighting VG-LPI1818H User manual

VG-LPI1818H LED Indoor Par Light User Manual VG-LPI1818H LED Indoor Par Light User Manual
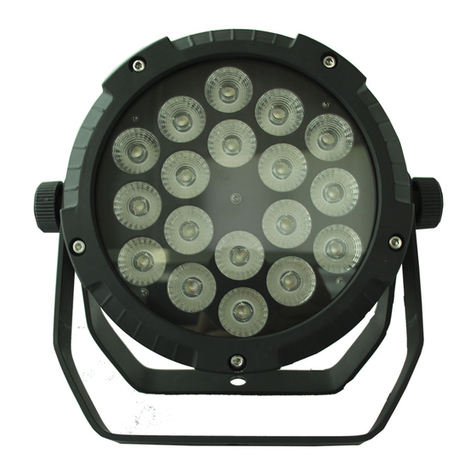
RGBWAUV Indoor 6in1 LED Par Light
VG-LPI1818H
CE RoHS
User Manual
Please read this user manual before using this product!
Keep it for further reference!
http://www.vangaa.com

VG-LPI1818H LED Indoor Par Light User Manual VG-LPI1818H LED Indoor Par Light User Manual
Ⅰ. GENERAL
Thank you for using our products. This product is designed for indoor use. It is suitable for disco,
stage, building etc. As the Indoor LED Par lighting, this product can be operated as a single unit
or in multiple units for large applications. Direct input of DMX512 signal to unit to allow it can be
controlled by any DMX512 controller. Powerful internal programs and friendly and convenient
operation interface allow customers to program freely to any different lighting project
requirements for installation or shows.
The operation is very simple, user-friendly design, dimming without flicker, jitter phenomena.
Can be adapted to photography, television and other strict demanding situations for lighting
This product complies with the following standards:
IEC60598-1:2003
IEC60598-2-17:1984+A2:1990
On receiving products, please carefully check that there has been no damage caused in
transportation and that the following parts are enclosed:
Power Cable ------- 1pc
User Manual ------- 1pc
Signal Output Cable ------- 1pc
Signal Input Cable --------- 1pc
Ⅱ. SAFETY WARNING
Every person involved with the installation, operation and maintenance of this device has to
know:
1). This product must be installed by a qualified professional;
2). This product left the place of manufacture in perfect condition. In order to maintain this
condition and for safe operation, the user must always follow the instructions and safety
warnings described in this user manual;
3). Manufacturer will not with responsibility for those operations not according to this
Instruction.
Ⅲ. OPERATION ATTENTION
·Do not connect power cable of other electric products with this unit;
·Do not connect DMX512 Signal cable of other electric products with this unit;
·Always make sure that you are connecting to the proper voltage, and that the line voltage
you are connecting to is not higher than that stated on the decal or rear panel of the fixture;
·Always ground (earth) the fixture electrically;
·During long periods of non-use, disconnect the unit’s main power;
·Do not attempt to operate this unit if the power cord has been frayed or broken;
·There are no user serviceable parts inside the unit. Do not open the housing or attempt any
repairs yourself;
·Maximum ambient temperature (Ta) is 35°C. Do not operate fixture at temperatures higher
than this;
·The surface temperature of the light can reach to 65° C, cool down at least before you
operate the light;
·The minimum distance between light-output and the illuminated surface must be more than
1 meters. Keep all combustible materials (for example fabric, wood, paper) at least 0.5 meters
away from the fixture;
·Avoid looking directly into the light source (especially those who suffer from epileptic fits);
·Always mount this unit in safe and stable matter;
·When suspending the fixture above ground level, verify that the structure can hold at least 10
times the weight of all installed devices;
·Verify that all external covers and rigging hardware are securely fastened and use an
01
02

VG-LPI1818H LED Indoor Par Light User Manual VG-LPI1818H LED Indoor Par Light User Manual
approved means of secondary attachment such as a safety cable;
·Block access below the work area whenever installing or removing the fixture.
·Avoiding hit the Light when you are move or install the light;
·If the exterior cord of the fixture is damaged, it must be replaced by manufactory, agent or a
qualified technician.
ⅣINSTALLATION INSTRUCTION
Before plug-in the power, please make sure the voltage, frequency of the light are
correspond to the power. And ensure the grounding line of the light working reliable.
You can distinguish the different power cords as below:
Color of the Power Cord
Connection
Brown
Live line
Blue
Neutral/Null line
Yellow green
Earth line
1. Signal Connection
This light provide 3 pins cannon seats, Pin1 for signal ground, Pin2 for signal-, Pin3 for signal+.
DMX-IN DMX-OUT
The controller, light and light will be connected by 3 pins signal cables one by one.
You can connect the output of the controller with input of the first light, and connect the output
of the first light with the input of the second light in the DMX control mode, and so on one by
one. And please connect the output of the last light with the terminal seat. You can don’t need
the controller and circuit terminal seat in the master/slave controller mode.
You can use one 120Ω& 0.25W resistance to insert into and weld the pin2 & pin3 of one male
cannon plug to make the circuit terminal seat. The circuit terminal seat can avoid DMX-512
signal reflex and interference effectively.
If the output of your controller is using 5 pins cannon seat, please use 5pins into 3pins signal
change cable.
2. Installation Method
The light can be placed on the solid plane places, then loosen the screw on both sides of the
handles to adjust the right project angle. Please pay attention the places are
non-flammable.
Install the clamp into the hole of the handle, and hang it on the truss then. You can
adjust the right project angle through the screw of the both sides of the light. It’s
-6-
-6-
DMX IN DMX OUT DMX IN DMX OUT DMX IN DMX OUT
DMX Controller Circuit Terminal Seat
-04
03

VG-LPI1818H LED Indoor Par Light User Manual VG-LPI1818H LED Indoor Par Light User Manual
important that you have to use one or more protection measures to prevent the light will
fall, such as the safety rope. You can buy the clamps and safety ropes from our
company.
ⅤOPERATION OF THE CONTROL PANEL
☆Basic using
MENU: Main menu change
UP: Scroll up the menu items or browse increasing parameters
DOWN: Scroll down the menu items or browse diminishing parameters
ENTER: Confirm/Save/Access submenu
Instructions: Press the MENU key will cycle out of eight different functional effects, digital tube
in which the first two digits represent the current function (see menu). After two digits to
represent the kinds of functions which Address yards. Or speed parameters. Press the UP or
DOWN button to modify its parameter values. Press ENTER to confirm.
ⅥFUNCTION MENU
All menus according to the selected and then press the D key to confirm
No
LED Display
Function
1
A001
10Channels address code(001—512)
Press UP/DOWN keys to choice address code
1
D001
6Channels address code(001—512)
Press UP/DOWN keys to choice address code
2
CC 00
Colors jump(01—99)
Press UP/DOWN keys to modify the jump speed
3
EE 00
Colors ramp(01—99)
Press UP/DOWN keys to modify the ramp speed
4
FF 00
colors pulse(01—99)
Press UP/DOWN keys to modify the speed of the composite
5
BEBF
colors voice control change
6
R220
Red(000—255)
Press UP/DOWN keys to modify color
7
G220
Green(000—255)
Press UP/DOWN keys to modify color
8
B220
Blue(000—255)
Press UP/DOWN keys to modify color
9
W220
White(000—255)
Press UP/DOWN keys to modify color
10
Y220
Amber(000—255)
Press UP/DOWN keys to modify color
11
P220
UV(000—255)
Press UP/DOWN keys to modify color
-05-
-06-

VG-LPI1818H LED Indoor Par Light User Manual VG-LPI1818H LED Indoor Par Light User Manual
Ⅶ. COMMON OPERATION
6 Channel Mode
CH
Function
Description
CH1
R dimmer
Linear dimmer (from dark to bright)
CH2
G dimmer
Linear dimmer (from dark to bright)
CH3
B dimmer
Linear dimmer (from dark to bright)
CH4
W dimmer
Linear dimmer (from dark to bright)
CH5
Y dimmer
Linear dimmer (from dark to bright)
CH6
P dimmer
Linear dimmer (from dark to bright)
10 Channel Mode
CH
Function
Description
CH1
dimmer
R,G,B,W,Y,P dimmer, linear dimmer, from dark to bright
CH2
R dimmer
Linear dimmer (from dark to bright)
CH3
G dimmer
Linear dimmer (from dark to bright)
CH4
B dimmer
Linear dimmer (from dark to bright)
CH5
W dimmer
Linear dimmer (from dark to bright)
CH6
Y dimmer
Linear dimmer (from dark to bright)
CH7
P dimmer
Linear dimmer (from dark to bright)
CH8
Strobe
R,G,B,W,Y,P strobe, from slow to fast
CH9
Function
selection
0-50:DMX 9 Channels control;
51-100:Jump;101-150:Ramp;151-200:Pulse;
201-255:Voice control
CH10
speed
Purple Dimmer, Linear dimmer (from dark to bright)
Ⅷ. TECHNICAL SPECIFICATION
·Input voltage: AC90~240V, 50/60Hz
·Power consumption: 200W
·Light source: 18pcs 15W 6in1 RGBWAUV LEDs
·LED lifespan: 100,000hours
·Beam angle: 25degree(8degree/15degree/45degree are optional)
·Housing material: aluminum alloy
·IP rating: IP20
·Grey scale: 4096degree
·Working temperature: -25centigrade~+35centigrade
·Effect: 0~100% dimmer, strobe, color change, color fade
·Control mode: DMX mode, Auto mode, Master/slave mode
·DMX Channel: 6CH/10CH
·Carton box package size: 260*260*380mm(1pc/carton)
·N.W/G.W:4.2kg/5.2kg
-07-
-08-
Table of contents
Other VanGaa Lighting Dj Equipment manuals

VanGaa Lighting
VanGaa Lighting VG-4HS432D User manual

VanGaa Lighting
VanGaa Lighting VG-LFL350C User manual

VanGaa Lighting
VanGaa Lighting VG-PB200W User manual

VanGaa Lighting
VanGaa Lighting VG-LVF150A User manual

VanGaa Lighting
VanGaa Lighting Swift Aura 1925Z User manual

VanGaa Lighting
VanGaa Lighting VG-LP1818HS User manual

VanGaa Lighting
VanGaa Lighting PAR-MPI1820D User manual

VanGaa Lighting
VanGaa Lighting Swift 1915Z User manual

VanGaa Lighting
VanGaa Lighting VG-LB1083 User manual