Vanraam easy go User manual

Van Raam BV
Aaltenseweg 56
7051 CM Varsseveld
The Netherlands
User manual
Easy Go
Version 16.05

1
User manual
Easy Go 16.05
Table of contents
Contact details manufacturer....................................................................................... 1
Conformity................................................................................................................... 1
Introduction.................................................................................................................. 2
Delivery ....................................................................................................................... 2
Intended usage............................................................................................................ 2
Safety measures ......................................................................................................... 3
Adjustments of the bike............................................................................................... 6
Before first use............................................................................................................ 9
Operation................................................................................................................... 13
Electro system Silent................................................................................................. 14
Accessories............................................................................................................... 20
Technical details........................................................................................................ 22
Standardisation and CE-marking............................................................................... 22
Maintenance and adjustments by owner................................................................... 23
Repairs and maintenance to be done by dealer........................................................ 24
Adjustments to be done by dealer............................................................................. 24
Disposal..................................................................................................................... 26
Handover/sale to a new owner.................................................................................. 26
Guarantee ................................................................................................................. 26
Frame number........................................................................................................... 27
Form service, maintenance, modifications and warranty claims................................ 28
Contact details manufacturer
Van Raam BV
Aaltenseweg 56
7051 CM Varsseveld
The Netherlands
Tel. : +31 (0)315 257370
Internet : www.vanraam.com
Conformity
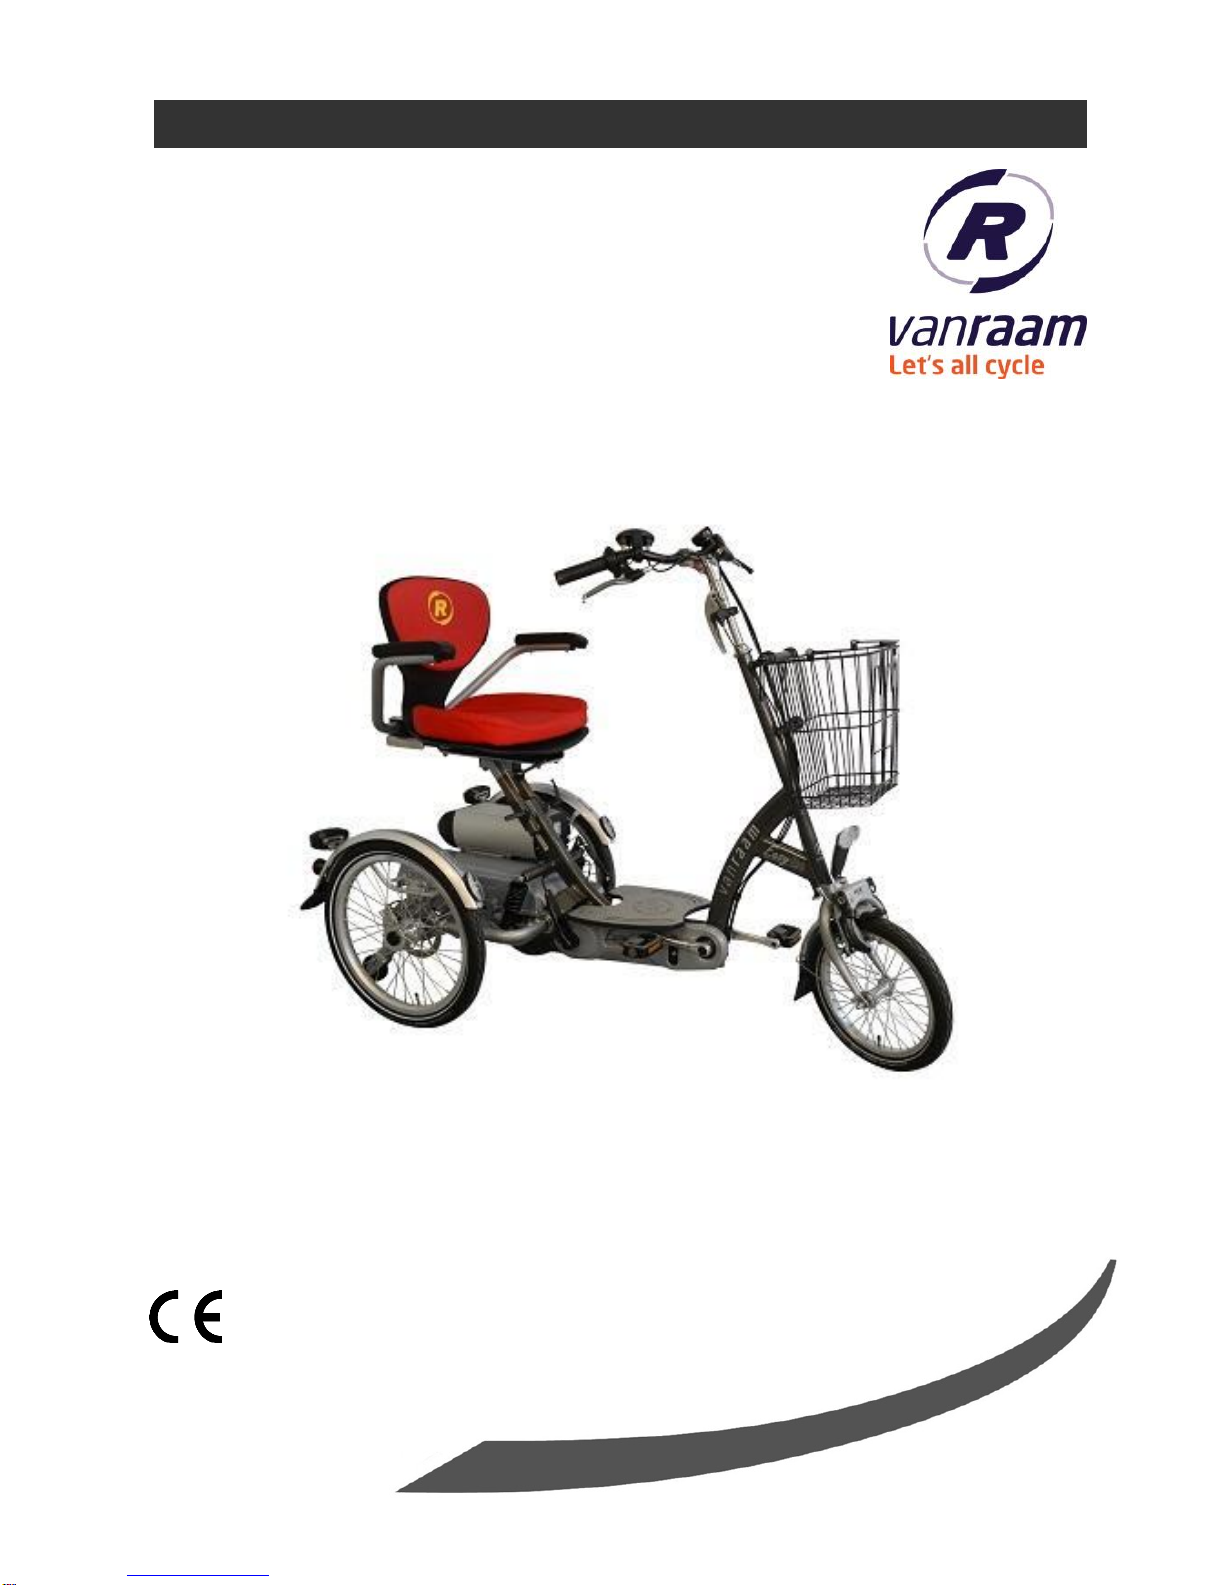
Van Raam declares as manufacturer that the Easy Go, as described in this manual,
has been produced in accordance with the 93/42/EEG guidelines, risk category 1. All
products have been produced in accordance with the 2006/42/EG guidelines. The
declaration of conformity can be found on the Van Raam website.

2
User manual
Easy Go 16.05
Introduction
This user manual provides important and necessary
information about the use of your scooter bike. We ask you
to read this manual thoroughly before using the scooter
bike. Always follow all the instructions given in this manual.
All safety and user aspects have to be made clear to
children and to people with limited powers of perception by
a responsible and supervising person.
Delivery
- Scooter bike with packing
- User manual(s)
- Charger
- Battery (quantity depends on options)
- Spare key
Check the delivery immediately after receiving it. In case of damage or incomplete
delivery we ask you to contact your dealer immediately. Upon delivery you should fill
out the form “Form service, maintenance, modifications an warranty claims” in the
back of this manual.
Intended usage
The Easy Go scooter bike (intended use: outdoors class B) is designed for normal
use on a flat, solid surface. The Easy Go may be used at ambient temperatures
ranging from -25 degree Celsius to +50 degree Celsius. The usual tricycle and
scooter bikes caution should always be taken into consideration. At the same time all
safety instructions as described in this manual should be complied with explicitly. Also
the local traffic rules should always be complied with.
The Easy Go is meant for adults with a fluctuating health status, who want to pedal
but would also like to have the option of completely switching to electric engine if they
cannot cycle (anymore). To ride the Easy Go a minimum age of 16 years is required.
Besides this, the driver should be independently mobile and he/ she may not have
any serious visual or other impairments, which could adversely affect the controlling
of the scooter bike.
All other use, including damage or physical injuries due to this, are not the
manufacturer's responsibility.
READ
CAREFULLY!

3
User manual
Easy Go 16.05
Safety measures
Important: Please read the safety measures before using the scooter bike!
Ensure the scooterbike is in good condition each time before using it. Check
before each ride that the brakes are in order. Check the lighting and make
sure there is enough tyre pressure (recommended: 3 bar).
Always get a punctured tyre repaired before using the scooter bike. To avoid
damage to the wheels or other parts.
Regularly check if the wheels, the handlebars and the seat are properly fixed
and also that all the screw connections are tight enough.
Only use the scooter bike on a solid and flat surface.
Soft, slippery or uneven terrain increases the risk of dangerous situations.
Make sure that wide trousers or lose hanging clothing don’t get caught in the
chain, spokes or pedals.
Take care that fingers and limbs do not get trapped while folding up or down
the foot rest and armrests.
Be aware of the protruding parts on the scooter bike. These could cause
damage to the surroundings and the scooter bike.
Do not use a pressure washer or a steam cleaner for the cleaning of the
scooter bike.
Use the parking brake when you park (and leave) the scooter bike. Use the
parking brake, even while getting on or off the bike to prevent its accidental
movement.
Always switch off and lock the scooter bike when leaving it unattended. This
prevents the unwanted use and / or theft.
This scooter bike is suitable for transporting a single person.
Only use original Van Raam parts and accessories.
Ride carefully on roads that are slippery due to rain, ice or snow.

4
User manual
Easy Go 16.05
< 5 cm
10°
Watch out for overturning
when riding up a slope.
The scooter bike is equipped
with ascent limiters to
limit the risk of overturning.
Avoid slopes steeper than 6º.
Riding this scooter bike (forward
or in reverse) on steep slopes
can be dangerous.
Please note that the stopping distance could be greater on a slope as
compared to a horizontal surface.
Make sure that no dangerous speed develops when driving downhill and
entering tunnels. Brake on time and don’t ride faster than 25 kilometres per
hour.
Ride carefully along (pavement) edges. An uneven surface increases the
risk of overturning.
Turn around carefully on a steep slope to avoid the risk of overturning.
Always get on and off a pavement in a forward straight
line, using a curb cut. Do this at an appropriate speed.
The maximum bump height that you can
get on and off is 5 cm.
In case of pregnancy, extra care is required owing to a higher risk of injury.
Do not put the scooter bike in direct sunlight: the temperature of some parts
could reach above 41ºC resulting in possible hypersensitivity of the skin.
When transporting the scooter bike in a motor vehicle,
always make sure you are seated in a fixed seat
of the motor vehicle. Scooter bikes may never be
used as seating support in a motor vehicle, not even
when the scooter bike is secured with a taxi restraint
system.
Never lift the scooter bike holding the batteries
or the plastic parts at the back.
6º

5
User manual
Easy Go 16.05
Practise the reversing and acceleration functions of the electric motor.
Always pay attention when you turn on the electric motor and do not be
surprised by the sudden behavior of the electric motor.
Please be careful not to switch on the reverse function of the electric motor
inadvertently.
Road safety
If you are under the influence of medicines that may affect your ability to
drive, you are not allowed to drive a scooter bike.
Your vision must be adequate to drive the scooter bike safely in any situation
that may occur during use.
Please follow the relevant traffic rules that apply.
Make sure that you are always noticed by the other road users. As a user of
a scooter bike you are very vulnerable in traffic.
Switch off the electrical system if you are using your mobile phone.
You need to be at least 16 years of age to ride a scooter bike.
Only enter the sidewalk or a pedestrian area in the scooter mode when the
engine is active at level 1.
Load
The maximum load should not be exceeded. See information in the index of technical
details on page 22. By permitted load we mean the total load, including the load in the
basket or on the luggage rack.
Make sure that the permitted basket weight is not exceeded (maximum 20 kg). You
may not carry passengers in the basket and you may not place luggage anywhere
else on the bike. Do not allow anyone to stand on the rear side of your scooter bike.
Note that a basket full of luggage can considerably influence the driving. No luggage
may be carried on the handlebars of the bike, as it limits the manoeuvrability of the
scooter bike.
Damaged or worn out parts
The replacement and repair of parts (frame, forks, light, brakes, drive mechanism and
the handlebars) should always be performed by an authorised dealer. If not, the
guarantee ceases to be valid and you will be personally responsible in the event of
possible damage.
Specific safety parts should always be replaced by new parts!

6
User manual
Easy Go 16.05
Adjustments of the bike
Before using the scooter bike, adjust it to the measurements of the driver. This is of
great importance, especially the seat and the handlebars.
If an optimal adjustment of the scooter bike, as defined in the instructions, is
not possible, you can contact your dealer for a fitting solution.
The brakes are correctly adjusted and should only be adjusted by the dealer during
periodic maintenance.
Take care that fingers and limbs do not get trapped while adjusting the
scooter bike.
Seat
When the cyclist is sitting on the scooter bike
and can put a foot on the pedal in the lowest
position, the seat height is correct. Adjust
the seat height in such a way that the leg is
stretched but relaxed in that position.
Seat height
To adjust the height:
1. Loosen the two clamping levers.
2. Move the seat to the desired height and
tighten the clamping levers.
3. Pull out the clamping lever and set it in
such a position that it does not protrude.
Make sure clothing cannot get
caught in the clamping levers!
Ensure that the clamping levers are
always firmly tightened, even with the
seat in the lowermost position!
1.
3.
2.

7
User manual
Easy Go 16.05
MIN INSERT
Seat depth
To adjust the depth:
1. Pull the lever up.
2. Move the seat to the correct position and
release the lever again.
Handlebars height
The height of the handlebars affects the
comfort of the ride. It determines the pressure
on the hands and the position of the back.
Determine your own most comfortable height
by using the bike.
To adjust the handlebars:
1. Slightly loosen the screw by using an Allen
key.
2. Move the handlebars to the correct height
and tighten the screw very firmly again.
Do not pull out the handlebars further than the
mark. Otherwise the tube will not be deep enough
in the shaft and will risk coming off, which can lead
to serious injuries.
1.
2.
1.
2.

8
User manual
Easy Go 16.05
Position handlebars
You can tilt the handlebars. This influences
the distance from the handlebars to the upper
body. Determine your own most comfortable
position by using the bike.
To tilt the handlebars:
1. Slightly loosen the screws [A] and [B] with
an Allen key.
2. Put the handlebars in the desired position
and then tighten the screws considerably.
3. Slightly loosen screw [C] with an Allen key,
put the handlebars in the correct
(horizontal) position and then tighten the
screw again.
2.
3.
1.
[A]
[B]
[C]

9
User manual
Easy Go 16.05
Before first use
Parking brake
Always use the parking brake when
you park and leave the scooter bike,
by squeezing the left brake lever [A]
and fixing the brake with the small
lever [B].
Secondary brake
The secondary brake should be used during a
standstill so that the bike does not roll away.
Note that the secondary brake force is not
strong enough on a slope. For safety’s sake
always use the parking brake on a slope!
Lighting
The scooter bike is fitted with a headlight and
two rear lights. By turning on/off the system
the lighting will automatically go on/off. To
manually turn on/off the lighting you have to
push the on/off button for a short time. If the
on/off button is hold longer (two seconds) the
whole system will turn on/off.
When you will cycle in the dark, make sure the battery is on the scooter
bike. The lightning uses the power of the battery. As soon as the battery is
almost empty the electronic support will shut off but the lightning will keep
on working.
Adjusting headlight
Adjust the angle of the headlight in a way that
the center of the lightbeam is placed around
ten meter before the bike.
The USB port, which is located on the
headlight, has no function.
[A]
[B]
On/off button

10
User manual
Easy Go 16.05
Handle basket
The scooter bike is equipped with a handle basket. Hang the basket at the handle’s
bracket.
Ensure that the permissible basket weight is not exceeded
(maximum 20 kg). Note that a basket full of luggage can considerably
influence the driving.
Gears
The scooter bike has eight gears. The gear is
operated by turning the grip.
Do not use the pedals when turning the grip.
Check before every ride:
The brakes (including the parking brake)
The tyre pressure (recommended: 3 bar)
The lights
That all the parts are fitted properly
That the battery is adequately charged
Contact your dealer and stop using your scooter bike as soon as you observe
irregularities during the check!
As with all mechanical parts, the scooter bike is subject to wear and tear and high
loading. If a component fails, it can lead to very dangerous situations. This can lead to
damage or injuries to the user of the scooter bike. Any form of cracks, scratches or
change in colour in load heavily loaded parts of a component indicates that the
component must be replaced.

11
User manual
Easy Go 16.05
Points to remember while cycling
You can use the scooter bike once you have adjusted the scooter bike according to
the measurements of the driver.
The tricycle gives a very different ride experience than a bicycle.
Practice, in particular, with bends and braking, because a tricycle may react contrary
to your expectations. It may happen that the back wheel comes off the ground
on the inside when going round a sharp bend. To avoid this the rider leans towards
the inside of the bend with his body.
One of the brake levers (usually the right) operates the brake on the front wheel. This
deserves special caution, as a forceful braking could block the front wheel, which
could result in a fall. The driver should be familiar with controlled braking of the front
wheel!
As the scooter bike is equipped with an electric motor: make sure that
you practise with the acceleration and reversing functions. Be careful that
the acceleration mode or reverse mode are not unintentionally started
while using the scooter bike. For example: If you wait for the traffic light
and you play with the pedals by moving them backwards the reverse
function is activated and the scooter bike goes backwards.
High speeds in corners, on uneven terrain and extreme steering angles
could lead to the overturning of the tricycle!
Extra attention is needed when a child or an adult with limited powers
of perception uses the scooter bike! (The minimum age for riding the
Scooter bike in traffic is 16 years.)
Before a child or an adult with limited powers of perception rides the scooter bike
independently for the first time, they should practice first under your supervision (or
under the supervision of others).
Pay special attention to the turning because it could lead to dangerous situations.
Also explain to the driver that the widest part of the scooter bike lies behind him / her.
Let him/ her practise by riding over a few obstacles to get an idea of how wide the
scooter bike is!

12
User manual
Easy Go 16.05
Children or adults with limited powers of perception should always be reminded
about the possible dangers/ risks involved in using the scooter bike.
Important safety points for the rider
Be very careful during the first ride.
When riding the scooter bike hold both hands firmly on the handlebars and
feet on the pedals or the feet plate.
Test the riding style of the scooterbike on rough ground at moderate speed.
This way the cyclist learns how to react to unexpected movements of the
scooterbike and the handlebars during use.
Explore how the tilting movements of the scooter bike react to body posture.
Tilt to the inside of the bend.
Small obstacles should be cycled over with appropriate speed.
Obstacles higher than five centimetre should be avoided.
Ensure that no dangerous speed develops while driving downhill and
entering tunnels. Brake on time.

13
User manual
Easy Go 16.05
Operation
The scooter bike can be used in two different ways, as a cycle and as a scooter.
These two modes can be interchanged simply by folding the footplate (with the hand
or foot). When you have folded down the footplate, the bike works as a scooter and
when you fold it up, you can pedal along. In the cycling mode, you can even use the
throttle as an extra support, if required.
When getting on, first take your place on the seat, and then you can lift
your legs safely across the frame or the footplate. This way you can avoid
being stuck or slipping on the footplate, which can be slippery when it
is wet.
Brakes
The handbrakes should be used for coming to a standstill, in the cycle mode as well
as the scooter mode. The parking brake should be used to avoid the scooter from
rolling away on its own when left unattended.
1. Scooter mode:
Footplate down.
Ride forward and
backward with the thumb
throttle.
Pedals are disengaged.
2.Cycling mode:
Footplate up.
Driving activated by
pedaling.
Power assistance
depending upon pedaling
power and speed.
Extra assistance with the
help of the thumb throttle.
Reverse riding by reverse
pedaling.

14
User manual
Easy Go 16.05
Electro system Silent
The Silent Electric motor system is a special developed support system by Van
Raam for the rehabilitation market. The system is characterized by:
1. A simplicity of operation
2. The powerful electric motors
3. Modern and efficient electronics
4. Extremely high quality and safe batteries
5. Individually adjustable support for cycling
The Silent system comes standard with a basic support mode individually
programmed for your scooter bike. In most cases, it gives precise and smooth cycling
characteristics with a good compromise between support and radius of action.
In special cases, an individually tailor-made cycling program is necessary. You can
obtain information from the dealer about the possibilities of a customised cycling
program.
Functions:
The electric system has the following functions:
- Pedal support while cycling
- Start support
- Backwards pedalling with support
- Full electric drive
1. On/off button
Using the on/off button, the electrical system
can be switched on or off.
Switching on: Push the button briefly.
Switching off: Push the button for
two seconds.
After the system is turned on, the electric motor is active in level 1.
When the system is not used, it will automatically turn off after a certain time.
With the option “integrated lighting”, the lights will automatically switch on when you
turn on the electric motor system. You can switch the lights on and off by briefly
pressing the on/off button in this mode.
Always turn off the electrical system when you are getting off the scooter
bike. Turn the electrical system on after you have taken up your riding
position.
1. On/off button
3. Start assist
2. Degree of support
(1,2,3)
4. Battery indication lights

15
User manual
Easy Go 16.05
2. Degree of support 1, 2 and 3
The desired support can be set by using one of the support levels 1, 2 or 3.
1. Light support, maximum range.
2. Average support, average range.
3. Maximum support, low range.
You can change the level while cycling.
3. Start assist
The start assist is not available with the Easy Go scooter bike.
4. Battery indication lights
The level of charge in the battery is given by five LED lights: four of these are green,
the one on the left can show either green or red, if charge is low.
The battery is almost empty if only the last red LED light is on. The battery needs to
be recharged or replaced by a (new) fully charged battery.
When the last red LED light flashes, the battery is empty and the motor will no longer
support while cycling. The integrated lighting continues to work.
Never leave the scooter bike with an empty battery!
Note: charge the battery within one day.
When the motor is not used for several days, the battery switches into the
sleeping mode. This is to protect the batteries. To activate it, you can press
the on/off button [A] on the battery and the indication lights will light up. You
also can connect the battery to the charger for a few seconds or cycle the
bike forwards (around 10 km/h) and push the on/off button to activate the
system.
If you push the bicycle, turn off the motor.
If your battery is equipped with a button and indicator lights, the charge-level in the
battery can be checked by pressing the button briefly. The five green lights indicate
the level of charge in your battery, the left one of these, if flashing, given the lowest
level. While charging the battery, these lights will also indicate how far the charging
has progressed.
[A]

16
User manual
Easy Go 16.05
Reverse mode
The reverse mode is activated by pedalling backwards from a standing position.
Within a few seconds the motor is activated and the scooter bike cycles at a speed of
about 2 km/h backwards (when you start to pedal backwards).
Do not be startled by an unexpected reaction from the electrical
system. If you e.g. wait for the traffic light and you play with the pedals
by moving them backwards the reverse mode is activated and the
scooter bike cycles backwards.
Full electric drive
In the scooter mode, the electric motor
operates with a thumb throttle. Using the
support levels 1, 2 and 3, you can attain
higher or lower speed.
Do not use support level 2 and 3
on the sidewalk or in a pedestrian
area.
With the forward / reverse switch you can
control direction.
O = forward
- = reverse
There is no option to change the maximum speed in the reverse mode. The LED
lights of the support levels 1,2 and 3 burn to indicate that the reverse mode is
activated.
Bike application
The smart display is equipped with a Bluetooth connection. The Van Raam
application can connect with the bike and track your bike data. In addition, settings
can be changed while cycling. Once the smart display is ready to connect to the
smartphone, the on/off button briefly turns blue. More information about the Van
Raam application can be found on the Van Raam website.
Other functions
The smart display has an automatic dimming function. With an inbuilt light sensor the
lights of the display will automatically creating less distraction for the cyclist in darker
or more shadowy conditions.

17
User manual
Easy Go 16.05
Charging the Battery
For the best performance and to prolong the
life of the battery, we recommend that you
charge the battery at home at room
temperature.
To charge the battery:
1. Unlock the battery by turning the key a
quarter.
2. Push down the lock while pulling the
battery with your other hand.
3. Take the battery pack inside. First
connect the charger to the plug-ensure
contact of the battery. The magnetic plug
of the charger directly connected properly
to the battery.
4. Then connect the charger plug into the
mains socket. Turn the switch [A] on. A
green LED light on the charger will start to
blink fast. Now the battery will recharge.
Beware! If the battery is not
connected properly, the green LED
light blinks slowly. In case of a poor
contact, the connector of the
charger needs to be cleaned.
5. Depending on the battery level, the
charging time is about 2,5 hours for a
battery of 11,2 Ah and 6 hours for a
battery of 24,8 Ah.
6. Once the battery is fully charged, the
green LED light stays on. First pull the
plug from the mains socket or turn the
switch [A] off.
7. Then pull the connector from the battery.
8. Put the battery back in the holder of the
cycle and close the lock.
If necessary, the battery can also be charged
directly on the cycle.
Do not wait until the battery is completely empty. It is better to top-up the
battery regularly.
1.
2.
4.
[A]
3.

18
User manual
Easy Go 16.05
Ensure that the battery is always pushed straight into the holder.
Backup battery: (optional)
The bike can be supplied with a second
battery. When the first connected battery
is empty, switch over to the second
battery.
One of the battery holders is connected
to the system, you can recognize this
one because of the cables.
Switchable battery pack: (optional)
The bicycle may be fitted with a switchable
battery pack. Once the connected battery is
empty, you can swap the battery using a
switch. This switch is located either under the
seat, below the luggage rack or below one of
the two batteries.
One of the battery holders is connected to the system, you can recognize this one
because of the cables.
If desired, you can leave the second battery to charge when you are using the other.
Keep in mind that your bike provides less support when it’s cold (0ºC and
less) and the battery will discharge faster. Charging also takes more time at
lower temperatures.
The action radius depends on a lot of different factors and is strongly
influenced by: capacity and voltage of the battery, degree of support that is
used, temperature, wind speed, tyre pressure, cycling speed, weight of the
user and the luggage, use of gearing etcetera.

19
User manual
Easy Go 16.05
Charging and maintenance tips for the battery
Every battery discharges automatically over time. This process is called self-
discharge. A battery that is empty and not charged, will self-discharge and
will be deep discharged. The battery can be permanently damaged during
this process. In case of deep discharge, the warranty will be void.
Beware:
Never leave the bike with an empty battery! We advise you charge the battery as
soon as possible before it’s totally empty.
The best storage-charge of the battery is when three to five LED lights burn.
Check the battery every month in the winter. If fewer than three LED lights burn,
recharge the battery.
Make sure that the battery is not charged at a temperature lower than -5ºC. We
advise you charge the battery at room temperature.
Only use the charger indoors and in non-humid environments, the charger may
not get wet.
Only use the Van Raam supplied battery.
Only charge the battery with the supplied charger!
The battery housing ánd charger housing may never be opened! When there is a
problem, contact your dealer.
Don’t charge the battery in full sunshine.
Don’t drop the battery, this can cause external and internal damage.
If your bicycle has a fault, the battery should be disconnected for the bicycle.
Problem solving
The system does not turn on:
1. Make sure that the battery is properly attached.
2. Check the status of the battery. If it is empty, recharge the battery.
3. Make sure the battery is active. If the battery is not used for several days it
will shut itself down. The battery can be reactivated by recharging it briefly,
pushing and holding down the on/off button while cycling (less than 10km/h),
or on certain batteries by pushing the indicator button on the battery until the
indicator appears.
4. If the above action does not help, contact your dealer.
If the battery indicator LED lights on the display are flashing:
The motor may be overheated by continuous high load. For protection, the system
will reduce the support.
1. The system is in temperature-protection. You can continue cycling with
reduced support.
2. After cooling down, the normal support and indication will restore
automatically.
If the support LED lights on the display are flashing:
This indicates motor failure. You will need to contact your dealer.
If a red LED light on the charger starts flashing, remove the plug form the mains
outlet and do not longer use the charger. In this case, contact your dealer.
Table of contents