Vantec CB-ESATAU3-6 User manual

Installation Guide Guía de instalación Guide d'installation Installationsanleitung
Guida all’installazione 取り付けガイド安裝指南 安装指南
Verify the package contents. Prepare your eSATA device
1. 2.
Carefully connect eSATA device to the adapter.
3.
Compruebe el contenido del paquete.
Vérifiez le contenu du paquet d’emballage.
Überprüfen Sie den Inhalt des Produktkartons.
Verificare i contenuti della confezione.
梱包物を確認してください。
檢查包裝內容。
检查包装内物品。
Preparar su dispositivo eSATA
Préparez votre périphérique eSATA
Bereiten Sie Ihr eSATA Gerät
Preparare il dispositivo eSATA
eSATAデバイスを用意します。
準備好您的eSATA裝置
準备好您的eSATA装置
Once securely connected, you may switch ON the eSATA device.
4.
Cuando está firmemente conectado, puede encender el
dispositivo eSATA.
Lorsque correctement connecté, vous pouvez allumez le
périphérique eSATA.
Einmal richtig angeschlossen, können Sie auf das eSATA-Gerät
einschalten.
Quando collegato, è possibile accendere il dispositivo eSATA.
一度注意して接続されたら、eSATAデバイスのスイッチを入れてよい。
當妥善的連結之後,您也許需要開啟eSATA裝置電源。
当妥善的连结之後,您也许需要开启eSATA装置电源。
Con cuidado, conecte la unidad de disco duro eSATA al adaptador.
Branchez précautionneusement le disque dur eSATA à
l’adaptateur.
Schließen Sie die eSATA-Festplatte sorgfältig an den Adapter an.
Collegare con cautela il disco rigido eSATA all’adattatore.
アダプタにeSATAハードドライブをゆっくりと接続します。
小心將 eSATA 硬碟與配接器連接。
将eSATA硬盘小心地连接到适配器

Copyright © 2013 Vantec Thermal Technologies. All Right Reserved. | All Registered Trademarks Belong To Their Respective Companies.
Model: CB-ESATAU3-6
Information in this document is subject to change without notice.
Reproduction of these materials in any manner whatsoever without written permission is strictly forbidden.
Printed in China
Printed on Recycled Paper.
NOTE:
NOTE: If it does not
automatically detect, you may
need to initialize or format the
hard drive. This can be done
through ‘Disk Management’ or
‘Disk Utility.’ Please refer to
your hard drive manual for
further instructions on how to
initialize or format a hard drive.
Nota: Si el equipo no detecta
automáticamente la unidad de
disco duro, es posible que deba
inicializarla o formatearla. Puede
hacerlo con ayuda de las
herramientas ‘Disk Management’
(Administración de discos) o ‘Disk
Utility’ (Utilidad de disco).
Consulte el manual de la unidad
de disco duro si desea obtener
más información acerca de cómo
inicializar o formatear una unidad
de disco duro.
Remarque : S’il n’est pas détecté
automatiquement, il vous faudra
peut-être initialiser ou formater le
disque dur. Pour ce faire, allez
dans «Disk Management»
(Gestion du disque)ou «Disk
Utility»(Utilitaire de disque).
Veuillez consulter le mode
d’emploi de votre disque dur pour
plus d’informations sur la manière
d’initialiser ou de formater le
disque dur.
Hinweis: Wird sie nicht automatisch
erkannt, muss die Festplatte
eventuell initialisiert oder formatiert
werden. Dies geschieht mithilfe der
Dienstprogramme „Disk
Management“
(Datenträgerverwaltung) oder „Disk
Utility“ (Datenträgerüberprüfung).
Weitere Anweisungen zur
Initialisierung oder Formatierung der
Festplatte sind im Handbuch Ihrer
Festplatte angegeben.
Nota: Se cià non avvenisse, è
necessario inizializzare o
formattare il disco rigido. Tale
operazione può essere
effettuata mediante ‘Disk
Management’ (Gestione disco)
o ‘Disk Utility’ (Utilità disco).
Fare riferimento al manuale del
proprio disco rigido per ulteriori
informazioni su come
inizializzare o formattare il
disco rigido.
注:新しいハードドライブを
Windows Explorerまたは
Macデスクトップに表示する
には、まずドライブを初期化
しパ ー ティションで 区 切る 必
要があります。マニュアルの「
新しい パ ー ティション を 作 成
する」を参照してください。
備註:若未自動偵測硬碟,
可能需要初始化或格式化硬
碟;您可利用「Disk
Management」(磁碟管理)或
「Disk Utility」(磁碟公用程
式)進行此操作。有關初始化
或格式化硬碟的詳細資訊,
請參閱硬碟的使用手冊。
注意:如果不能自动检测
,您可能需要通过“Disk
Management”(磁盘管
理)或“Disk Utility”(磁
盘工具)初始化或格式化硬
盘。请参阅您的硬盘说明
书,进一步了解如何初始
化或格式化硬盘。
NOTE:
NOTE: CB-ESATAU3-6
provides no power through the
eSATA cable. Your eSATA
product might require dditional
power to work.
Nota: CB-ESATAU3-6 no
proporciona alimentación a través
del cable eSATA. Su producto
eSATA requiere fuente de
alimentación adicional para
encender.
Remarque : CB-ESATAU3-6 ne
fournit l'alimentation par le câble
eSATA. Votre produit eSATA
nécessitent une alimentation
supplémentaire pour l'allumer.
Hinweis: CB-ESATAU3-6 non fornire
alimentazione tramite il cavo eSATA.
Il prodotto eSATA necessita di
un'alimentazione separata per
accendere.
Nota: CB-ESATAU3-6 nicht
bietet Stromversorgung über
das eSATA-Kabel. Ihr
eSATA-Produkt benötigen,
zusätzliche Stromversorgung
eingeschaltet wird.
注:CB-ESATAU3-6はeSATAケ
ーブルを通じて電源を提供し
ません。接続されたeSATAデ
バイスは追加の電力が必要
な場合があります。
備註:CB-ESATAU3-6 並
不透過eSATA線提供電源,
請額外連接電源使eSATA裝
置正常運作。
注意:CB-ESATAU3-6 并
不透过eSATA线提供电源
,请额外连接电源使
eSATA装置正常运作。
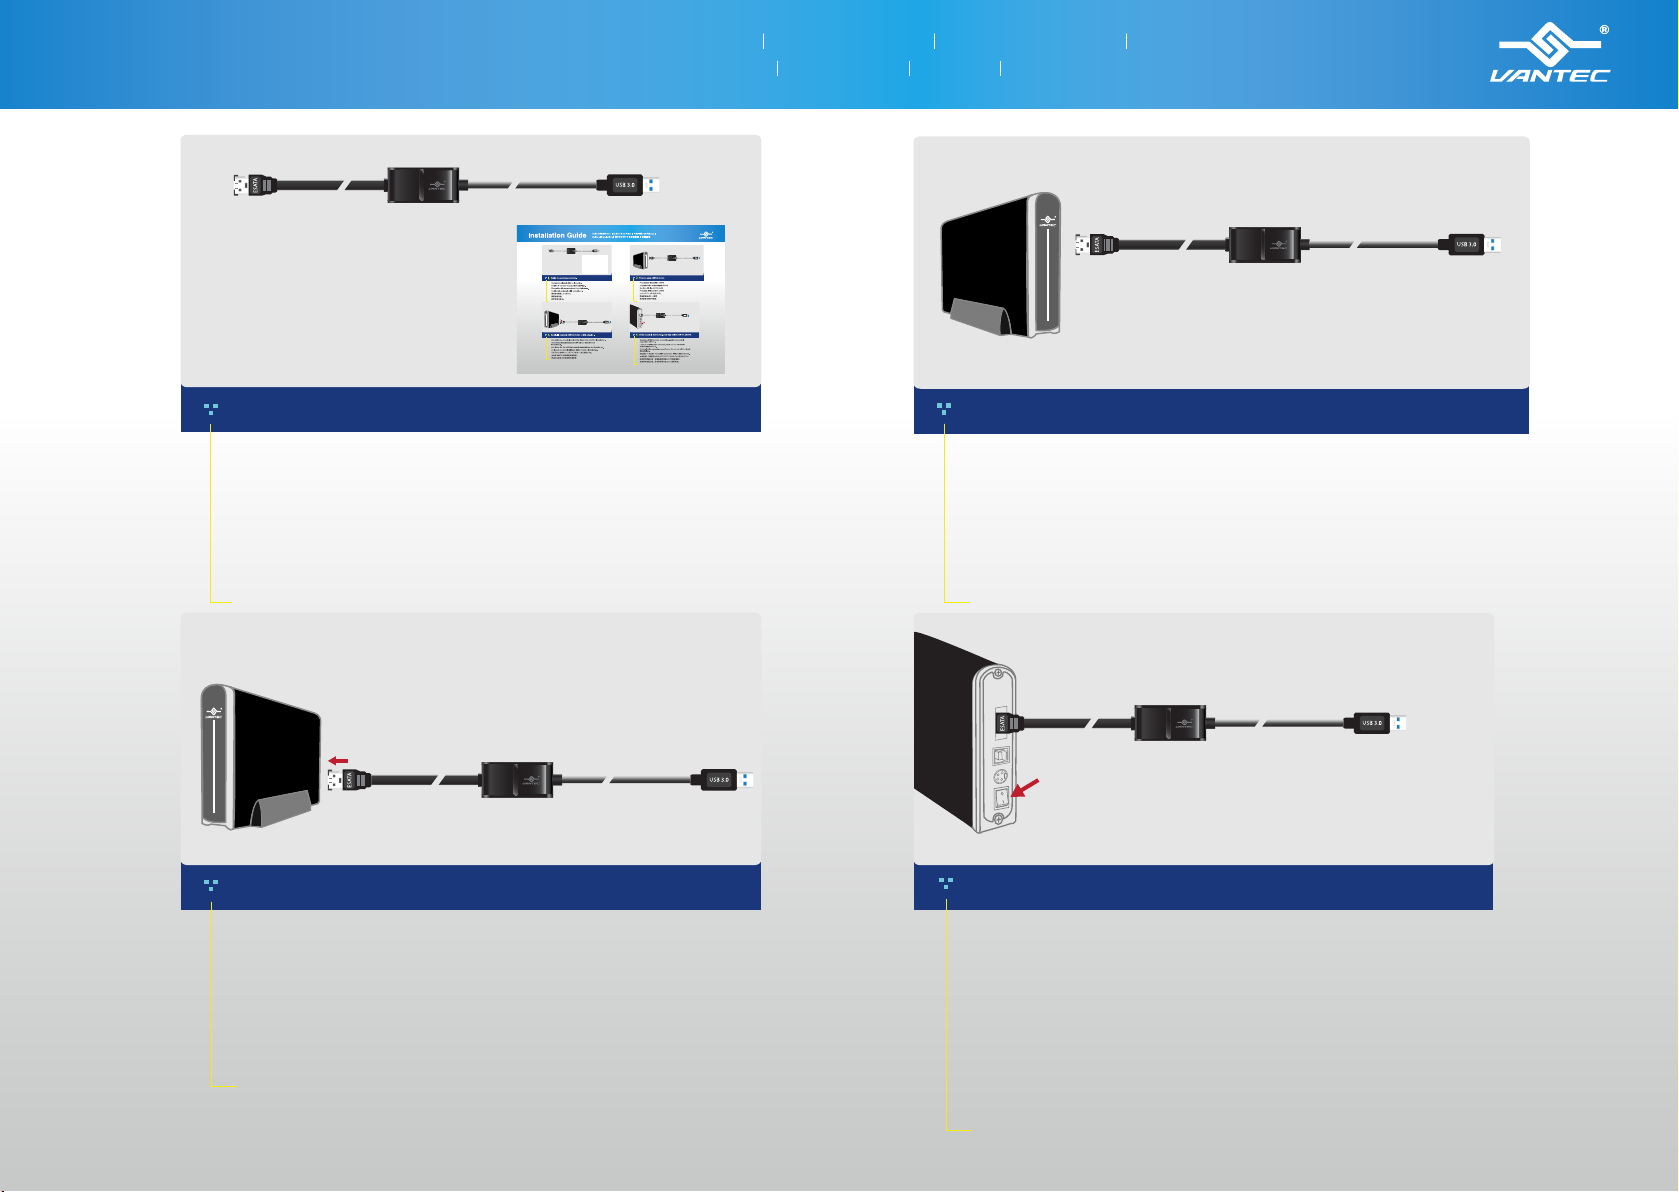
Proceed to connect the NexStar Adapter’s USB to a free USB port. (For
USB 3.0 speeds, the adapter must be connected to a USB 3.0 port.) When connected properly, the device should automatically
be detected by your computer.
5. 6.
Conecte el puerto USB del adaptador NexStar a un puerto USB disponible. (Si
desea disfrutar de la velocidad de la interfaz USB 3.0, deberá conectar el
adaptador a un puerto USB 3.0).
Reliez la prise USB de l’adaptateur NexStar à un port USB disponible (pour une
vitesse USB 3.0, l'adaptateur doit être connecté à un port USB 3.0).
Anschließend verbinden Sie den USB-Anschluss des NexStar-Adapters mit
einem freien USB-Anschluss. (Um USB 3.0-Geschwindigkeiten zu erzielen,
muss der Adapter mit einem USB 3.0-Anschluss verbunden sein.)
Procedere connettendo il cavo USB dell’adattatore NexStar a una porta USB
libera. (per le velocità USB 3.0, l’adattatore deve essere connesso a una porta
USB 3.0).
続いて、NexStarAdapterのUSBを、空いているUSBポートに接続します。(USB3.0速度向け
には、アダプタはUSB3.0ポートに接続する必要があります)
接下來,將 NexStar Adapter 的 USB 接頭連接至未使用的 USB 連接埠 (若為 USB
3.0 的速度,配接器必須連接至 USB 3.0 連接埠)。
将NextStar的USB接头插入计算机的USB接口 (为确保USB 3.0的速度,适配器必须连接
到USB 3.0端口)
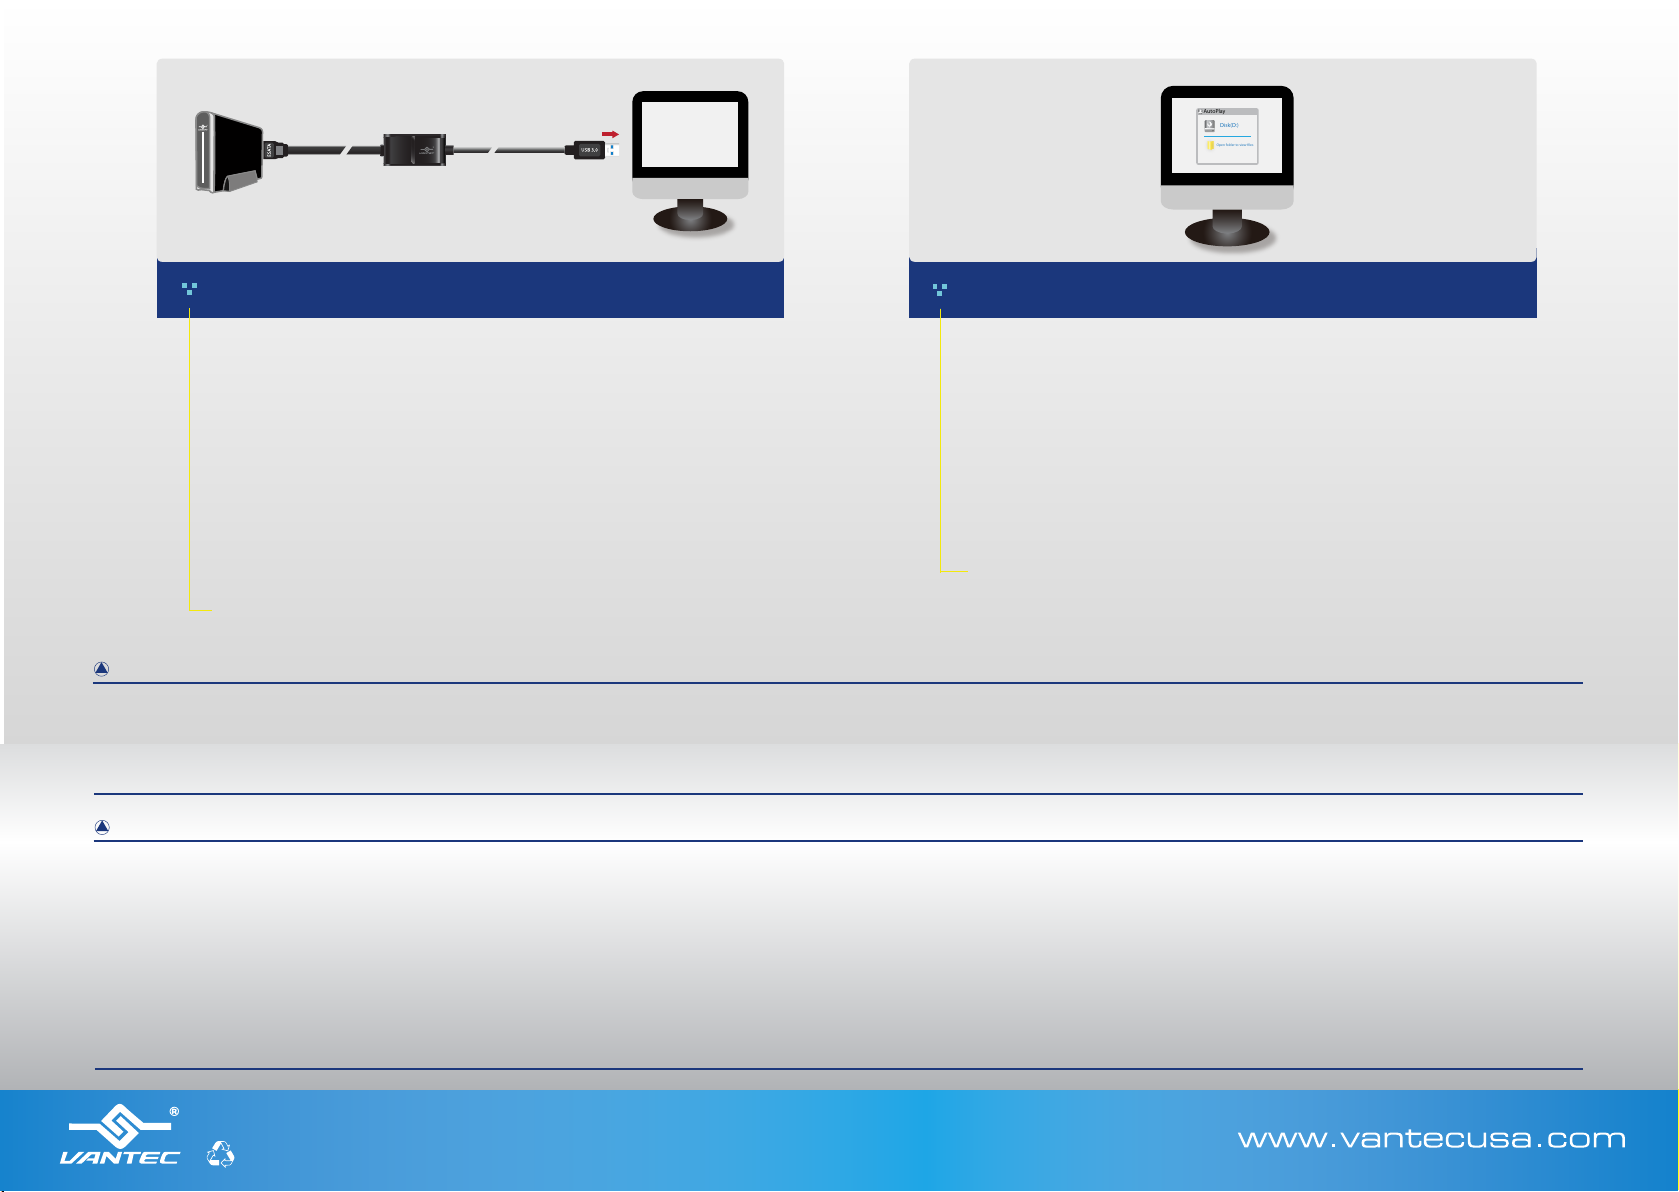
Si la conexión se ha llevado a cabo correctamente, el equipo detectará
automáticamente la unidad de disco duro y ejecutará la función
‘AutoPlay’ (Reproducción automática).
Une fois la connexion effectuée, le disque dur devrait être détecté
automatiquement et la «AutoPlay »(lecture automatique)devrait
débuter.
Ist die Festplatte fehlerfrei angeschlossen, sollte sie automatisch
erkannt werden und „AutoPlay“ (Automatische Wiedergabe) beginnen.
Se collegato correttamente, il disco rigido dovrebbe essere rilevato
automaticamente e iniziare l’‘ ‘AutoPlay’ (AutoPlay).
適切に接続されると、ハードディスクは自動的に検出し、ʼAutoPlayʼ(自動再生)を
開始します。
正確連接時,應會自動偵測硬碟並開始「AutoPlay」(自動播放)。
如果正确连接,硬盘将被系统自动检测到,然后开“AutoPlay”(自动播放)。
AutoPlay
Disk(D:)
Open folder to view les
v1.01

Frequently Asked Questions:
1) When I connect my external eSATA drive to your eSATA adapter, my drive does not work or spin up, why?
eSATA Technology comes in many forms, Standard eSATA do not provide power to device, it ONLY provides data link, but no power. That
could be the reason why your external eSATA drive does not spin up.
2) If eSATA do not provide power, where do I get power for my device?
There are mainly two types of devices for connecting to eSATA.
Some are self-powered (have their own ac adapter) to provide power to the device and only rely on the eSATA connection for the data
link.
Some are bus-powered (rely on the computer to provide power to the device), for these devices and data link. If you are not sure what
device you have, please contact the eSATA device manufacturer for assistance.
3) What is the proper way for connecting Bus-powered device?
Due to the numerous devices available on the market, In general, most Bus-powered devices will have two types of ports, a USB and an
eSATA. The USB port is used to provide power to the device and the eSATA for providing the Data link. Below is an example of the steps.
The sequence of steps is important.
a) Turn ON your system.
b) Using this adapter, connect eSATA cable to the enclosure and the USB 3.0 end to a USB 3.0 port on the system (this provides the Data
link to the system).
c) Connect another USB cable to your enclosure and to the system (this provides the power link to the system). At this point the drive
should spin up.
d) The laptop eSATA should see the external drive now. If not go into device manager and do a “scan for hardware changes” it should
pick up your new addition.
Do not reverse step #b and #c, if you do that the enclosure will assume you are connecting using USB and turn off eSATA. Only one can
work at a time that is why step #b has to be first.
On SOME situation, if the drive power requirement exceeds that of a single USB port, you have to use 2 USB connections. Please refer to
your external device for more instruction.

Frequently Asked Questions:
4) What is the proper way for connecting Self-powered device?
Connect the Self-powered device power to a wall outlet and the eSATA adapter cable to the device and the other end to your system
USB 3.0 port. Power ON your device, once the drive has spin up to speed, your system should acknowledge the presents of a connected
eSATA device.
If the system cannot see the device, go into device manager and do a “scan for hardware changes” and it should pick up your new
addition.
5) What if I am connecting an External Optical drive with eSATA, will this work?
It depend on the External Optical drive unit, is the Optical drive Self-Powered? If yes, follow the steps in FAQ question#4. If the Optical
drive unit is using Bus-powered, find out from the manufacturer of the Optical drive on how the device is powered.
Some may be using eSATAp, which is very different from eSATA. These eSATAp will not work correctly with this eSATA adapter. If the
Optical drive is using similar connection in FAQ question #3, just follow the step outlined.
6) How do I know if my eSATA device is connected and be ready to use?
Most devices will show in the Windows Explorer as a connected device with a drive letter.
7) I just purchase a new external storage device and when connected it cannot see the drive in Windows Explorer, why?
If the external storage device is new, it needs to be initialized, partition and formatted before it can work correctly. Please refer to the
external storage device instruction for preparing the drive for use in the Operating System of your choice.
8) Is eSATA similar to USB?
No, eSATA is very different from USB.
With USB, when you connect or plug a USB device to a system, the system will acknowledge the connection with a sound and/or popup
display showing the device is ready for use. Most eSATA device May NOT report or acknowledge the connection with sound and/or
popup display. When ejecting to disconnect a USB device, you can use the safe to remove icon to eject and disconnect the USB device,
but eSATA do not have a eject function to safely remove the device, the user have to know that nothing is going on with the device and
power it off.
9) Is there a proper way of ejecting or disconnecting eSATA device?
For ejecting/disconnecting the eSATA device, there are no standard way of ejecting an eSATA device, there are many ways of doing it
including unplugging the eSATA cable when there are not disk activity. Please refer to the manual for your eSATA external device or
contact the technical support for your external eSATA device for assistance.

Federal Communications Commission Statement
This device complies with part 15 of the FCC Rules. Operation is subject to the following two conditions:
(1) This device may not cause harmful interference, and
(2) this device must accept any interference received, including interference that may cause undesired operation.
NOTE: This equipment has been tested and found to comply with the limits for a Class B digital device, pursuant to part 15 of the FCC Rules. These limits are
designed to provide reasonable protection against harmful interference in a residential installation. This equipment generates, uses and can radiate radio
frequency energy and, if not installed and used in accordance with the instructions, may cause harmful interference to radio communications. However, there is
no guarantee that interference will not occur in a particular installation. If this equipment does cause harmful interference to radio or television reception, which
can be determined by turning the equipment off and on, the user is encouraged to try to correct the interference by one or more of the following measures:
- Reorient or relocate the receiving antenna.
- Increase the separation between the equipment and receiver.
- Connect the equipment into an outlet on a circuit different from that to which the receiver is connected.
- Consult the dealer or an experienced radio/ TV technician for help.
FCC Radiation Exposure Statement
The device has been evaluated to meet general RF exposure requirement.
The device can be used in portable exposure condition without restriction.
Warning: Changes or modifications to this unit not expressly approved by the party responsible for compliance could void the user’s authority to operate the
equipment.
Table of contents
Other Vantec Adapter manuals

Vantec
Vantec CB-SATAU3 User manual

Vantec
Vantec UGT-PCE2S1P User manual

Vantec
Vantec CB-USB20SR User manual

Vantec
Vantec NextStarFX User manual

Vantec
Vantec NBV-100U User manual

Vantec
Vantec CB-USB20PL User manual

Vantec
Vantec NexStar FX User manual

Vantec
Vantec CB-IUSB20 User manual

Vantec
Vantec CB-CU300GNA User manual

Vantec
Vantec SATA/IDE to USB 2.0 Adapter None User manual