manuals.online logo
Brands
  1. Home
  2. •
  3. Brands
  4. •
  5. VDC Electronics
  6. •
  7. Batteries Charger
  8. •
  9. VDC Electronics BatteryMINDer Programming manual

VDC Electronics BatteryMINDer Programming manual

1
BatteryMINDer™
6 Volt Battery Charger/Maintainer/Conditioner
with PulseMode™Circuit and AUTOFLOAT CONTROL™
Quick-Start Instructions for BatteryMINDer
Use ONLY after reading full Safety Instructions located inside.
1. Plug battery clip assembly (supplied) into
mating plug at end of
BM
output cord OR
attach RingTerminal Assembly (supplied)
to your battery’s terminals (Red + Blue -)
2. Attach battery clips to posts or terminal
clamps of battery (Red + Black -) (Green
indicator will light when proper connection
is made)
3. Plug
BM
into AC electrical outlet.
(Red indicator lites up)
4. Allow 72 hours MAXIMUM (1 - 4 batteries)
for Green indicator to blink (If Green
indicator does not blink within 72 hours
Press de-sulphation button)
(blinking = full charge with battery in
maintenance + desulphation mode)
(blinking will continue indefinitely, until
disconnected from battery)
Note: RED indicator will remain lit when plugged into
live ac electrical outlet. It
should never go out,
unless
outlet is switched off or
BM
has failed
HOW TO QUALIFY YOUR BATTERY
You have purchased the number #1 rated “Computer Chip” charg-
er / maintainer / conditioner with both Auto-Float Control™ and the
newest technological innovation Pulse Mode™ Circuitry. Although
designed primarily for use with flooded electrolyte -maintenance
type lead acid batteries, including marine deep cycle, it can be
used effectively with ALL maintenance-free types as well. Please
carefully follow these special instructions and the standard safety
and operating instructions for both maximum safety and complete
performance satisfaction.
Note: If your battery does not have a “resting”* voltage of 5.25
volts MINIMUM it cannot be charged or de-sulphated. (*Resting
voltage = Voltage in a battery that has not been charged or
discharged within 8 hours MINIMUM).
It is extremely important that you determine the state of your bat-
tery’s “Health”before attempting to re-charge and re-condition your
battery.If any of your cells are shorted ( no reading on the hydrom-
eter tester) or the difference in charge level is greater than 0.50 SG
between any 2 cells (= 2 ball difference using the hydrometer
tester supplied ), your battery cannot be properly re-charged / re-
conditioned. Discard the battery in an appropriate, lawful manner.
Do not attempt to connect or charge ANY battery with the
BatteryMINDer
Charger / Maintainer / Conditioner before testing
your battery in accordance with the following:Your battery must not
be charged or dis-charged for a minimum of 10 hrs.Testing a bat-
tery which has not been at “rest” for 10 hrs. min. will result in inac-
curate readings.
Maintenance / Maintenance Free lead acid batteries
(with filler caps or manifold type covers)
CAREFULLY remove all 3 caps or both manifold type covers from
your battery. Carefully check water / electrolyte level. If level is now
or has ever been below top of plates, severe lead plate
“Sulphation” has taken place. Significant re-charge / re-condition-
ing time (weeks to months) will be needed to re- store those plates
to a condition were they can be expected to function normally.
Refill each cell with Distilled Water Only to a level of 1/4” minimum
over the top of the cell’s plates. Recharge the battery using
BatteryMINDer
to ensure it is slowly and completely charged
before determining its condition. If
Battery-MINDer
fails to “blink”
within 72 hours, your battery may be to far gone to be re-condi-
tioned. However, to be sure press the de-sulphation button to set
the unit in the PulseMode. Allow battery to remain in this mode for
a minimum of 72 hrs.before testing for “dead cells”, using the
special Hot / Cold calibrated Hydrometer Tester supplied. Here is
what to do:
NOTE: Read Tester Instructions carefully for best most accurate
readings.
Fill theTester to a level sufficient to “float” all of the “balls”.Note the
number of balls which float in each of the 3 cells.If no balls float in
a cell, you can consider the cell to be “shorted”. Your battery is
beyond the point of being properly re-charged or re-conditioned.
Dispose of battery. If each cell “floats” 2 or more balls your battery
can be re-conditioned. Simply leave
BatteryMINDer
connected to
your battery at all times it is not in actual use, year-round. Your
unit’s special high frequency-current pulses will continue to bom-
bard the crystallized sulfuric acid, which has become deposited on
your battery’s cell plates.
NOTE:You cannot over de-sulphate your battery.
IMPORTANT !
Read these special instructions before attempting to desulphate your battery.
2
Sealed, Maintenance Free, Gelled type lead acid batteries
(without filler caps or manifold type covers)
If you cannot gain access to the interior of your battery due to its
being sealed, you can still re-charge / re-condition your battery, but
cannot test it properly before doing so. As a result you may be try-
ing to “save” a battery that has gone beyond
BatteryMINDer
’s or
any other device’s ability to bring it back. Before testing your battery
you must let it “rest” for a minimum of 10 hrs. after fully charging it
with your
BatteryMINDer
, i.e. do not use or charge the battery for
a minimum of 10 hrs.
Charge your battery with your
Battery-MINDer
after reading
REQUIRED SAFETY and OPERATING INSTRUCTIONS provided
herein. If Green LED does not “blink” within the 72 hrs. maximum
time period required, disconnect it and allow the battery to “rest” for
a minimum of 10 hrs. Using a digital voltmeter and waiting the
required 8 hrs. Minimum, check the “resting” (no load ) voltage of
your battery. If it does not show a reading of at least 6.2 volts your
battery is probably at or near the end of its useful life and beyond
the point of being successfully re-charged or re-conditioned. If it
reads 6.3 volts or higher, your battery is “healthy” enough to be a
candidate for re-conditioning.
Note: Green LED will continue blinking indefinitely until disconnect-
ed from battery.
Note: If your battery does not have a “resting”* voltage of 6.25
volts MINIMUM it cannot be properly charged or de-sulphated.
Replace Battery
( *Resting voltage = Voltage in a battery that has not been charged
or discharged within 10 hours MINIMUM)
After carefully reading ALL instructions, (both these and the stan-
dard operating and safety instructions), you have any questions or
concerns, call Toll Free number 1-800 379-5579 and leave us a
complete message explaining your problem or questions and the
best time to reach you.
Thank you for purchasing our product and returning the warranty
card enclosed.
Underwriters Laboratories (UL) REQUIRED SAFETY
INSTRUCTIONS
1. Do not expose charger to rain or snow. It is designed to
operate ONLY INDOORS
2. USE of any attachment not specifically recommended by the
battery charger manufacturer for use with this exact model
of charger may result in risk of fire and electric shock or
injury to person.
3. An extension cord should not be used, unless absolutely
necessary. Use of an improper extension cord could result
in fire or electric shock. If extension cord must be used be
sure: a. Pins on plug of extension cord are the same
number, size, & shape of plug on charger
b. Extension cord is properly wired and in good
condition.
c. Wire size is large enough for AC ampere rating of
charge as specified below: Length of cord, feet
(meters) 25(7.6) 60(15.2) 100(30.5) 150(45.6)
AWG Size 18
4. Do not use charger if it received a sharp blow, been
dropped, or damaged in any way.
5. Charger contains no serviceable parts. If it fails for any
reason, return to the address shown within for a free
replacement under warranty.
6.To reduce risk of electric shock, unplug charger from outlet
before attempting any maintenance or cleaning.
7. WARNING - RISK OF EXPLOSIVE GASES.WHENEVERYOU
WORK NEAR A LEAD ACID BATTERY IT IS DANGEROUS.
BATTERIES GENERATE EXPLOSIVE GASES DURING
NORMAL BATTERY OPERATION. FORTHIS REASON, IT IS
OF UTMOST IMPORTANCE THAT EACH TIME BEFORE
USINGYOUR CHARGER,YOU READ THIS MANUAL AND
FOLLOW THE INSTRUCTIONS EXACTLY.
To reduce risk of battery explosion, follow these instructions
and those published by the battery manufacturer and the man-
ufacturer of any equipment you plan to use in the vicinity of the
battery. Review cautionary markings on the products and the
engine.
8. PERSONAL PRECAUTIONS when working with/near a
lead acid battery.
a. Someone should be in range of your voice or close
enough to come to your aid when you work near a lead
acid battery.
b. Have fresh water and soap nearby in case battery acid
contact skin, clothing, or eyes.
c. Wear complete eye protection and clothing protection.
Avoid touching eyes while working near battery.
d. If battery acid does contact skin or clothing,wash
immediately with soap and water. If acid entered the
eye, immediately flood the eye with running water for at
least 10 minutes and get help immediately.
e. NEVER smoke or allow a spark of flame near battery or
engine.
f. Be extra cautious to reduce risk of dropping a metal
tool or auto part onto battery. It might spark or short
circuit battery or other electrical part that may cause an
explosion.
g. Remove personal metal items such as rings, bracelets,
necklaces, and watches when working with a lead acid
battery. A lead acid battery can produce a short circuit
current high enough to weld a ring or the like to metal,
causing a severe burn.
h. Charger is designed to be used for recharging lead
acid batteries
Never use it to power a low voltage electrical system, or for
attempting to recharge dry cell batteries that are commonly
used in house holds. These batteries may explode and cause
injury to persons and damage property
NEVER CHARGE A FROZEN BATTERY OR
ONE AT A TEMPERATURE ABOVE 123° F.
PREPARING TO CHARGE
a. If necessary to remove battery from equipment to charge,
always remove ground terminal first.Turn off all
accessories in the vehicle, so as not to cause an arc.
b.Be sure area around battery is well ventilated while battery
is being charged. Gas vapors can be forcefully blown away
by using a piece of non-metallic material as a fan.
c. Clean battery terminals. Be careful to keep corrosion from
contacting eyes.
d.Add distilled water to each cell until battery acid reaches
level specified by the manufacturer.This helps Purge
excessive gas from cells. Do not overfill. For a battery
with out cell caps, follow manufacturer’s recharging
instructions.
e. Study all battery manufacturer’s specific instructions such
as removing cell caps while charging and recommended
charge rates.
f. Determine voltage of battery by referring to equipment
owner’s manual and make sure that charger output voltage
is correct.
CHARGER LOCATION
a. Make sure charger is as far away from battery as output cables
permit.
b. Never place charger directly above battery being charged; gases
from battery will corrode and damage charger.
c. Never allow battery acid to drip on charger when reading
3
specific gravity or filling.
d. Do not operate charger in a closed-in area or restrict ventilation
in any way.
e. Do not set battery on top of charger.
DC CONNECTION PRECAUTIONS
a. Connect and disconnect DC output clips only after removing
charger from outlet.
b. Never allow clips to touch each other.
c. Attach clips to battery posts and twist or rock back and forth
several times to make good contact.This tends to keep clips
from slipping off terminals and reduces risk of sparking.
FOLLOW THESE INSTRUCTIONS WHEN BATTERY IS
INSTALLED IN EQUIPMENT (VEHICLE, PWC, BOAT,TRACTOR,
ETC.) A SPARK NEAR BATTERY MAY CAUSE BATTERY TO
EXPLODE.TO REDUCE RISK OF A SPARK NEAR BATTERY:
d. Position DC output cord to reduce risk of damage by hood, door,
covers, or moving engine parts.
e. Stay clear of fan blades, belts, pulleys, and other parts that can
cause injuries.
f. Check polarity of battery posts.POSITIVE (POS, P, +) usually has
a larger diameter than NEGATIVE (NEG, N, -)POST.
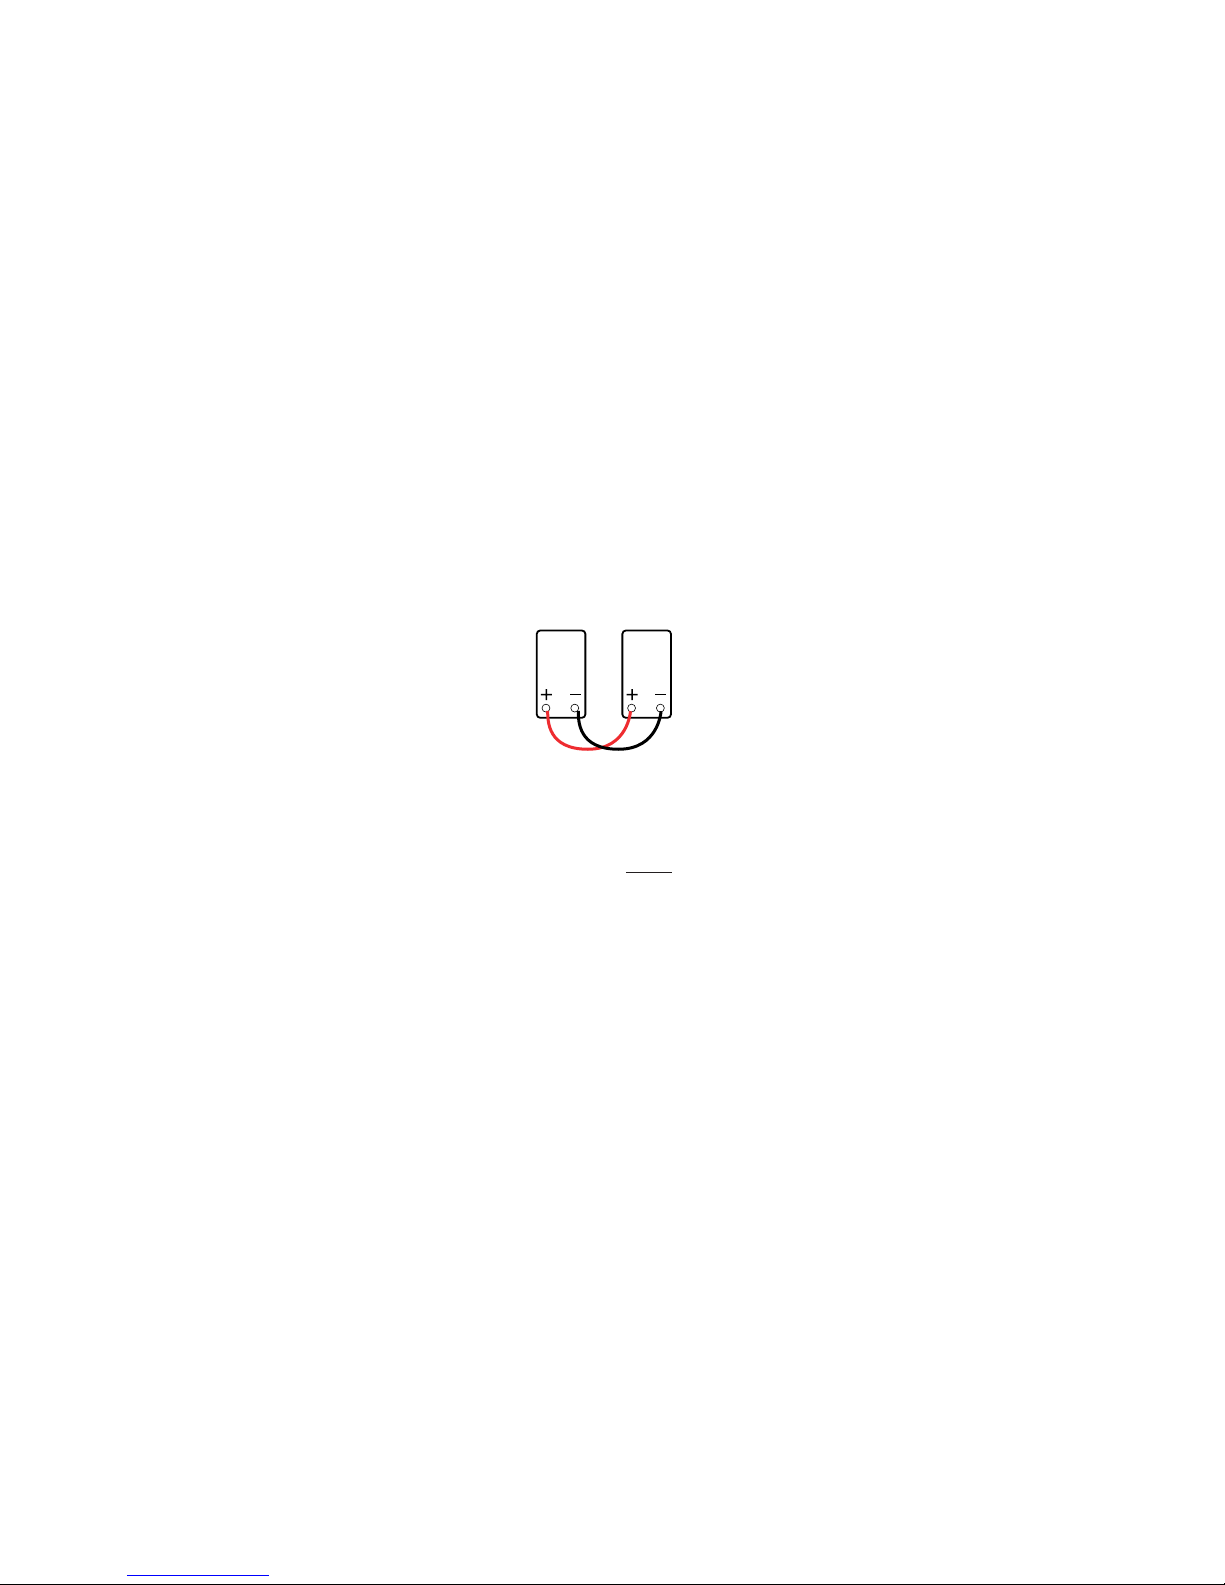
g. Determine which post of battery is grounded (connected) to the
chassis of equipment. If negative post is grounded see Item N. If
positive post is grounded see item P. N. For negative grounded
equipment, connect POSITIVE (RED) clip from charger to
POSITIVE (POS, P, +) ungrounded post of battery. Connect
NEGATIVE (BLACK) clip to vehicle chassis or engine block away
from battery. Do not connect clip to carburetor, fuel lines, or
metal body parts. P. For positive ground equipment, connect
NEGATIVE (BLACK) clip from charger to NEGATIVE (NEG, N, -)
UNGROUNDED POST OF BATTERY. Connect POSITIVE (RED)
CLIP to chassis or engine block away from battery. Do not
connect clip to carburetor, fuel lines, or sheet metal body parts.
Connect to heavy gauge metal part of frame or engine.
h. When disconnecting charger, disconnect charger from AC outlet,
then remove clips from vehicle chassis, and battery posts.
Operating instructions for charge information.
FOLLOW THESE STEPS WHEN BATTERY IS OUTSIDE OF
VEHICLE OR EQUIPMENT.
A SPARK NEAR THE BATTERY MAY CAUSE BATTERY
EXPLOSION.TO REDUCE RISK OF A SPARK NEAR BATTERY:
a. Check polarity of battery posts.POSITIVE (POS,P,+) usually has
a large diameter than NEGATIVE (NEG, N, -) battery post.
b. Attach at least a 24 inch long 6 gauge (AG) insulated battery
cable to NEGATIVE (NEG -), BATTERY POST.
c. Connect (RED) charger clip to (POS+) post of battery
d. Position yourself and free end of cable as far away from battery
as possible,then connect NEGATIVE (BLACK) charger clip to free
end of cable.
e. Do not face battery when making final connections
f. When disconnecting charger, always do so in reverse sequence
of connecting procedure and break first connection while as far
away from battery as is practical.
g. A marine (boat) battery must be removed and charged on shore.
To charge it on board requires equipment specifically designed
for marine use.
MAINTENANCE INSTRUCTIONS
DO NOT ATTEMPT TO REPAIR. UNIT IS NOT DESIGNED TO BE
REPAIRED. ALL SERVICING SHOULD BE PERFORMED BY
VDC Electronics, Inc. PERSONNEL.
GENERAL INFORMATION
It is possible to re-charge a “dead” or shorted cell battery using a
high current i.e.5 Amp + charger which “forces”the battery to accept
a “temporary false charge”. Don’t be fooled by a voltmeter or quick
load test. Only when a battery has been put back into service and a
real life load has been put on it, will it become apparent that the bat-
tery is not “healthy” and fully re-charged. It will collapse under the
load and perform much like a battery that was not fully charged in
the first place. Buy a good quality replacement battery and take
proper care by keeping your
BatteryMINDer
connected to your bat-
tery at all times - (this means all year round) it is not in use for 4
days or more. Remember your
BatteryMINDer
uses less than a
dime’s worth of electricity per month running 24 hrs. per day and it
is warranted for five (5) years.
OPERATING INSTRUCTIONS:
DO NOT ATTEMPTTO OPERATE CHARGER BEFORE READING
AND FULLY UNDERSTANDING ALL SAFETY INSTRUCTIONS
AS OUTLINED PRIOR. CALL OUR TOLL FREE TELEPHONE
NUMBER IFYOU HAVE ANY QUESTIONS WHATSOEVER.
1.
BatteryMINDer
is designed to fully charge your battery(s),
but should be left connected to the battery at all times the bat-
tery is not in use. Failure to maintain the battery in a full charge
condition at all times will cause the battery to sulphate, seri-
ously limiting it’s life and performance. In addition, this
ensures you will always have a fully charged battery. The
amount of electricity it uses when the battery is fully charged
is less than 10¢ month even when electricity costs as much as
14¢ /kWh. Compare this cost to needing to replace a battery
after only one season of use due to sulphation caused by
improper charging and/or storage.
2. After carefully reading and fully understanding the safety
instructions, provided in these instructions, each time you
wish to store your battery or whenever you will not be using it
for a 4 days or more, simply attach
BatteryMINDer
as described
in the safety instructions and let it do its job.
NOTE: It is normal for
BatteryMINDer
to feel warm to the touch
during the charging cycle, especially with older and/or large
batteries. Unit will begin to
cool, when it nears the end of the charging mode and during
the entire float maintenance + de-sulphation mode.
The Green LED de-sulphation + maintenance indicator will light
when you have properly attached unit’s clips to the battery
posts ie: Red marked clip to (+) post and Black marked clip (–)
post of battery. LED will begin to blink when battery has been
fully charged and is now in the Auto-Float Maintenance + de-
sulphation mode. The Red LED will come on when the unit is
plugged into live 120 volt AC electrical outlet. It will remain on
throughout the entire charging mode as well as during the float
maintenance mode.SHOULD THE Red indicator NOT REMAIN
ON, CHECKTO BE SURE UNIT IS PLUGGED IN AND OUTLET IS
STILL LIVE. If outlet is live and Red LED does not light, unit is
NOT PROPERLY CHARGING or MAINTAINING battery correctly.
Disconnect unit and return immediately to VDC Electronics for
inspection / repair or replacement.
NOTE:The Green LED indicator will light even when unit is not
connected to a live outlet, as it is activated by the battery’s own
voltage. Do not leave
BatteryMINDer
connected to the battery
without electrical power. The battery energy used to light the
LED will cause the battery to discharge over time.
IMPORTANT: It is recommended to charge large capacity
deeply discharged batteries with your standard charger before
attaching
BatteryMINDer
to minimize the time it will take for
BatteryMINDer
to enter the Desulphation Maintenance mode. If
the Green LED does not start blinking within 72 hours after unit
has been attached to a fully charged battery the BATTERY MAY
HAVE A SHORTED CELL OR IS TOO HIGHLY SULPHATED TO
ACCEPT A PROPER CHARGE.
DE-SULPHATION BUTTON
If
BatteryMINDer
is unable to bring the battery up to a full charge
voltage, it will not “blink” and will remain in the charge mode (solid
4
VDC ELECTRONICS, INC.
83 Cedar Lane, PO Box 5537
Englewood, NJ 07631-5537
Tech Support 800-379-5579
Green), rather than going into the “Auto-Float/PulseMode” (blinking
Green). Your battery may not be able to be properly charged, or
conditioned. However, by pressing the button the unit will go into
the pulse mode / desulphation stage.You may then be able to save
your battery. Leave your battery connected to
BatteryMINDer
for a
minimum of 1 week before re-testing it.
Note: If your battery does not have a “resting”* voltage of 6.25
volts MINIMUM it cannot be properly charged or de-sulphated.
Replace Battery
( *Resting voltage =Voltage in a battery that has not been charged
or discharged within 10 hours MINIMUM)
IMPORTANT:
BatteryMINDer
will have no electrical output
unless it is connected to a “healthy” battery.Testing it with a Volt or
Amp meter, without the unit being connected across a good bat-
tery, will result in a false reading.If you experience any problems or
are not sure of how to properly use/connect your
Battery-MINDer
,
please call our Toll-Free Technical Support line, 800-379-5579
number and leave us a detailed message explaining your problem.
Note: If your battery does not have a “resting”* voltage of 5.25
volts MINIMUM it cannot be properly charged or de-sulphated.
Replace Battery ( *Resting voltage = Voltage in a battery that has
not been charged or discharged within 10 hours MINIMUM)
Use your
BatteryMINDer
on your battery at ALL times (winter,
summer, spring or fall) that your battery will not be used for 4 days
or more.This will prevent new Sulphation from taking place and will
lead to dramatically increased battery life and performance. DO
NOT REMOVE BatteryMINDer from your battery unless you place
the battery back in service.
FAILURETO KEEP
BatteryMINDer
CONNECTEDTOYOUR BAT-
TERY AT ALL TIMES THE BATTERY IS NOT IN SERVICE WILL
AFFECT PERFORMANCE CLAIMS.
ONE (1)YEAR 100% UNCONDITIONAL
MONEY BACK GUARANTEE:
BatteryMINDer
is Guaranteed to perform as claimed or WE will refund your full purchase price, including all taxes, shipping or handling
cost applicable to the purchase. Unit must be returned with Proof of Purchase directly to VDC Electronics, Inc., NOT TO THE DEALER
FROM WHICH IT WAS PURCHASED.
5 YEAR LIMITED WARRANTY
(This limited warranty is not transferable) VDC Electronics, Inc. warrants this product for FIVE years from date of purchase at
retail against defective material or workmanship. It will be repaired or replaced at no charge providing it is returned to VDC
Electronics, Inc., freight prepaid together with proof of purchase. We make no warranty other than this limited warranty and
expressly exclude any implied warranty including any warranty for consequential damages.
Return unit: to:VDC Electronics, Inc., 83 Cedar Lane, P.O. Box 5537, Englewood, NJ 07631-5537.
12V 12V
PARALLEL
CONNECTION
CHARGING MULTIPLE BATTERIES
Batteries of the same type only (engine starting, deep cycle,
sealed, gelled, agm, maintenance-free) can be charged at the
same time in parallel (+ to +, – to –).
Connect each 12v battery to one another using 18 – 20 gauge (
lamp cord type ) insulated wire, stripped at the points you wish it to
be in electrical contact with the posts of each battery. VDC
Electronics, Inc. does not provide any type of wire harness to
accomplish this due to the many
variations in size and terminal con-
figuration.
Simply attaching
BatteryMINDer
to the + and – terminals of the
same 6v battery. NOTE: If
BatteryMINDer
does not start blinking
within 72 hours of the time you attached it to fully charged batter-
ies (1 - 4) YOU MUST DISCONNECT ONE OR MORE OF THE
BATTERIES UNTIL BatteryMINDer begins to blink, or press the
de-sulphation button to begin de-sulphating batteries. Failure to do
so will cause the unit to possibly burn out, voiding the warranty.
6V 6V

Other VDC Electronics Batteries Charger manuals

VDC Electronics 12117 User manual

VDC Electronics

VDC Electronics 12117 User manual

VDC Electronics BatteryMINDer 2000 Series User manual

VDC Electronics

VDC Electronics BatteryMINDer 2000 Series User manual

VDC Electronics BatteryMINDer 12248-AA-S1 User manual

VDC Electronics

VDC Electronics BatteryMINDer 12248-AA-S1 User manual

VDC Electronics BatteryMINDer 12248 User manual

VDC Electronics

VDC Electronics BatteryMINDer 12248 User manual

VDC Electronics BatteryMINDer 12248 User manual

VDC Electronics

VDC Electronics BatteryMINDer 12248 User manual

VDC Electronics BatteryMINDer Plus 1510 User manual

VDC Electronics

VDC Electronics BatteryMINDer Plus 1510 User manual

VDC Electronics BatteryMINDer OBD-12 User manual

VDC Electronics

VDC Electronics BatteryMINDer OBD-12 User manual

VDC Electronics 12112 User manual

VDC Electronics

VDC Electronics 12112 User manual

Popular Batteries Charger manuals by other brands

Prologix PL2320 Operator's manual

Prologix

Prologix PL2320 Operator's manual

Tripp Lite U280M-S01-10-BK quick start guide

Tripp Lite

Tripp Lite U280M-S01-10-BK quick start guide

Point Mobile PM85 4SBC quick start guide

Point Mobile

Point Mobile PM85 4SBC quick start guide

Black Box VLC36SK-HD user manual

Black Box

Black Box VLC36SK-HD user manual

B-Link DC Fast Charger quick start guide

B-Link

B-Link DC Fast Charger quick start guide

innove MINTYCHARGER quick start guide

innove

innove MINTYCHARGER quick start guide

Vanair Battery Charger user manual

Vanair

Vanair Battery Charger user manual

JJ Plus QST015B user guide

JJ Plus

JJ Plus QST015B user guide

Itec Advance Series user guide

Itec

Itec Advance Series user guide

Black Line G6 Installation and operation guide

Black Line

Black Line G6 Installation and operation guide

pro user NFC1500 instruction manual

pro user

pro user NFC1500 instruction manual

Z.I.P.P.ER MASCHINEN ZI-LGR40V-AKKU user manual

Z.I.P.P.ER MASCHINEN

Z.I.P.P.ER MASCHINEN ZI-LGR40V-AKKU user manual

Holtek HT45F5Q-3 manual

Holtek

Holtek HT45F5Q-3 manual

AccuPower AccuManager 807 operating manual

AccuPower

AccuPower AccuManager 807 operating manual

GYS GYSFLASH 51.12 CNT FV manual

GYS

GYS GYSFLASH 51.12 CNT FV manual

Intermec AC15 supplementary guide

Intermec

Intermec AC15 supplementary guide

WSTECH BATI0 Series Original operating instructions

WSTECH

WSTECH BATI0 Series Original operating instructions

Trust 410BQ quick start guide

Trust

Trust 410BQ quick start guide

manuals.online logo
manuals.online logoBrands
  • About & Mission
  • Contact us
  • Privacy Policy
  • Terms and Conditions

Copyright 2025 Manuals.Online. All Rights Reserved.