VegaStream Vega 50 10 FXO H.323 User manual

Version 0.4 26 February 2004 Page 1 of 33
For use with Vega 50 10 FXO – H.323 version 09.01.05.2 T004 or greater. © 2004 VegaStream Ltd.
This document describes how to configure the Vega 50 10 FXO H.323 gateway using the web
browser interface. The configuration described here will allow the Vega to be rapidly installed and
tested.
The instructions below will configure the Vega 50 FXO (connected to 10 extension ports of a PBX or a
CO Switch) to operate as follows:
• Calls presented to the Vega from the PBX or CO switch will be routed using the H.323
gatekeeper; the telephone number passed to the gatekeeper will be the port ID on which the
call was received (06 .. 13 or 56, 57).
• Calls received by the Vega on the H.323 interface will be routed to one of the telephony
interfaces. The physical interface over which the call is routed will be defined by the leading
two digits of the telephone number (06 .. 13 or 56, 57). The digits following the leading two
digits will be used as the digits to dial.
Initial configuration
V
ega 50 10 FXO
(H.323) – R5.2
gk H.323 Gatekeeper
LAN
Vega 50
10 FXO
pstn
05
…
POTS Telephones
…
06 13
56 57
pb
x

Version 0.4 26 February 2004 Page 2 of 33
For use with Vega 50 10 FXO – H.323 version 09.01.05.2 T004 or greater. © 2004 VegaStream Ltd.
The configuration process is broken down into 11 stages as follows:
1 Connect your Vega to LAN, telephone lines and Power
2 Configure the basic LAN parameters
3 Configure password and login timeout
4 Check and configure LAN settings and Host name
5 Configure the Dial Plan
6 Configure for Gatekeeper operation
7 Configure for Gatekeeper operation
8 Configure POTS parameters
9 Configure pointer to CD ROM documentation
10 Save Changes
11 Archive Vega Configuration
Please also see:
12 Technical Support

Version 0.4 26 February 2004 Page 3 of 33
For use with Vega 50 10 FXO – H.323 version 09.01.05.2 T004 or greater. © 2004 VegaStream Ltd.
1. Connect your Vega to LAN, telephone lines and Power
LAN
Power Switch
AC Power Serial (RS232)
CH 1, FXO 1
CH 8, FXO 8
CH 10, FXO 10
CH 9, FXO 9
Before installing your Vega, ensure that you read the VegaStream VoIP Gateways Safety and
Compliance Information document.
LAN:
Using the yellow booted cable connect the LAN port on the Vega to a standard or fast Ethernet hub or
switch (10 baseT or 100 baseTx). The connector nearest the ferrite core should be plugged into the
Vega.
Telephony:
Connect telephones to FXS ports 1 to 8. Note the port numbers increase in an anticlockwise
direction from the bottom left corner. And to ports 9 and 10 on the separate pair of connectors.
FXO8
IF:13
FXO 7
IF:12
FXO 6
IF:11
FXO 5
IF:10
FXO 9
IF: 56
FXO 10
IF: 57
FXO 1
IF:06
FXO 2
IF:07
FXO 3
IF:08
FXO 4
IF:09
Power:
Insert the power cable into the AC power inlet on the Vega and switch on. The power LED on the
front panel will illuminate.
The LAN LEDs will also illuminate indicating 10 (baseT) or 100 (baseTx) connection, and the FDX LED
will illuminate if Full Duplex mode has been negotiated.

Version 0.4 26 February 2004 Page 4 of 33
For use with Vega 50 10 FXO – H.323 version 09.01.05.2 T004 or greater. © 2004 VegaStream Ltd.
2. Configure the basic LAN parameters
If a DHCP server is available, by default, the Vega will automatically pick up an IP address. If you
know the IP address served to the Vega, skip this section and start at section 3.
If DHCP is not to be used to provide the Vega with an IP address, or you need to check the IP
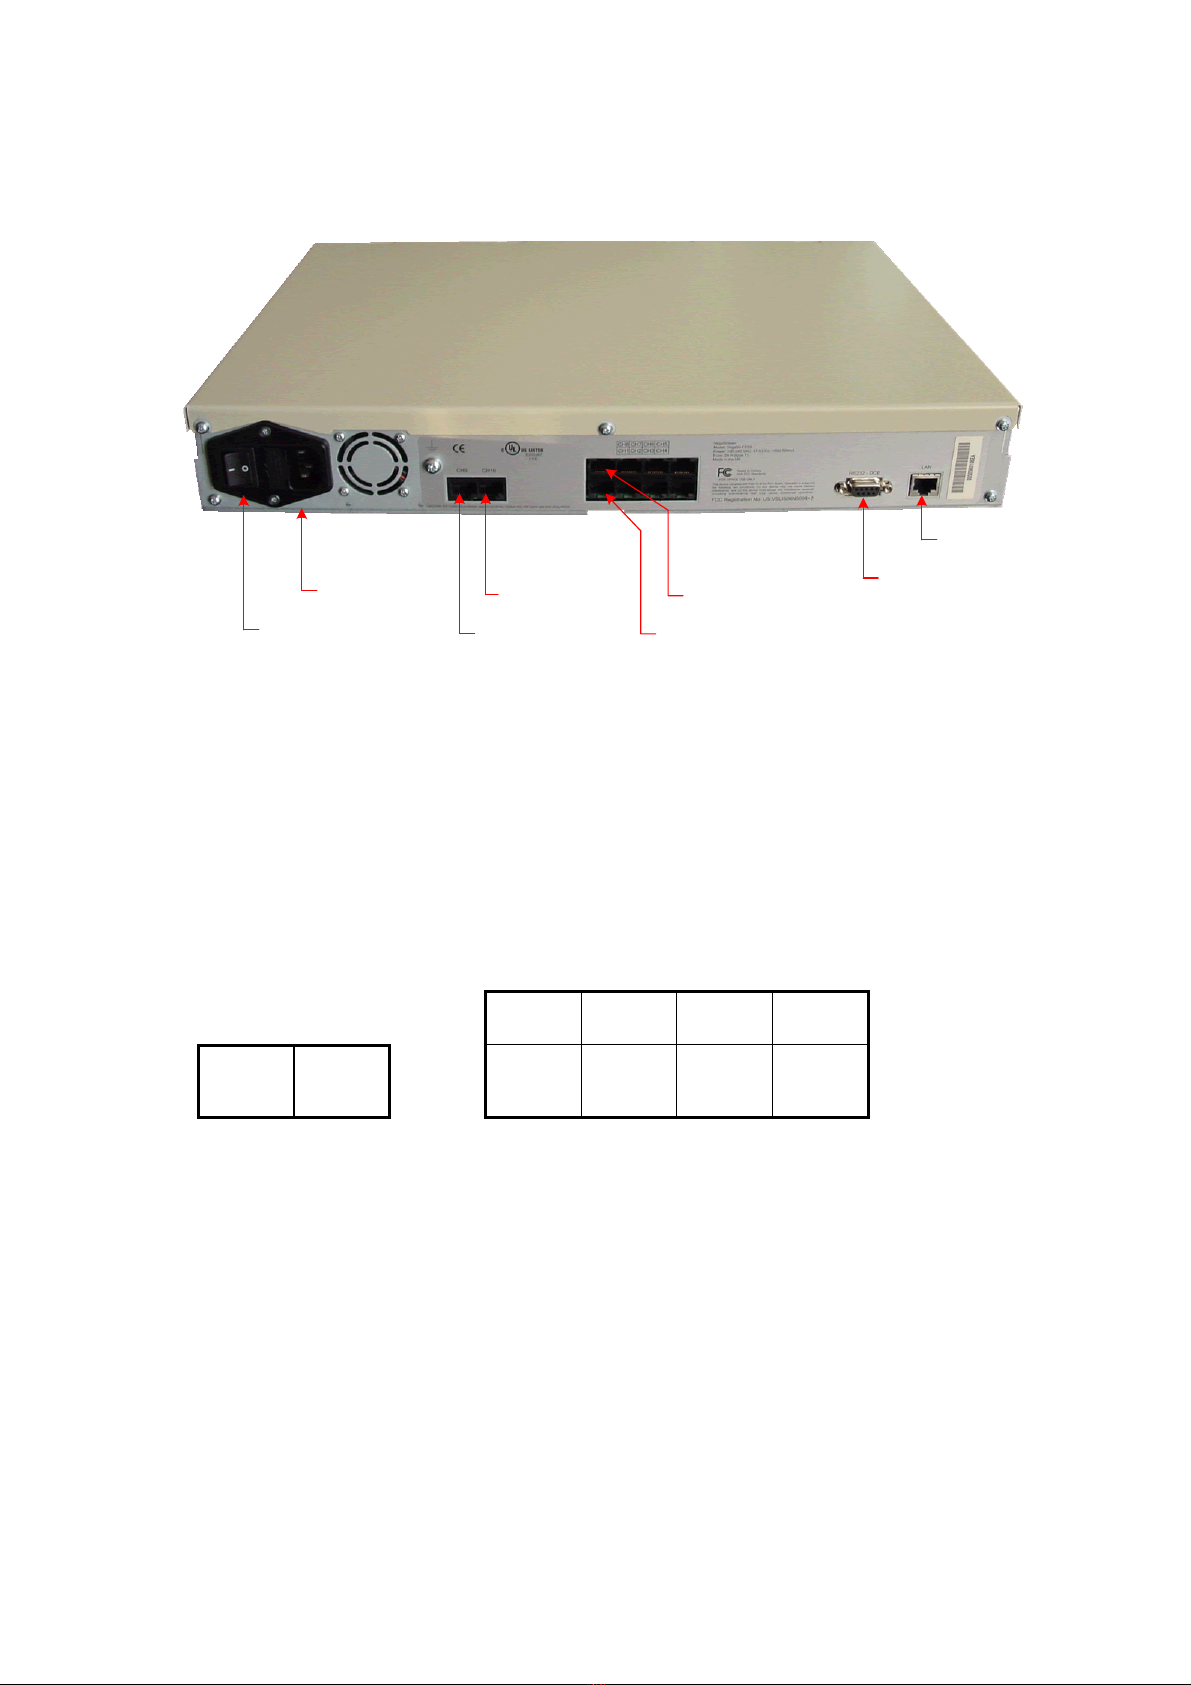
address provided to the Vega, connect the serial interface of the Vega to a PC serial interface using a
9 way male to female straight through cable.
Configure a terminal emulator program (such as Microsoft’s HyperTerminal) for:
• Speed = 115200 baud
• Data bits = 8
• Parity = none
• Stop bits = 1
• Flow Control = none
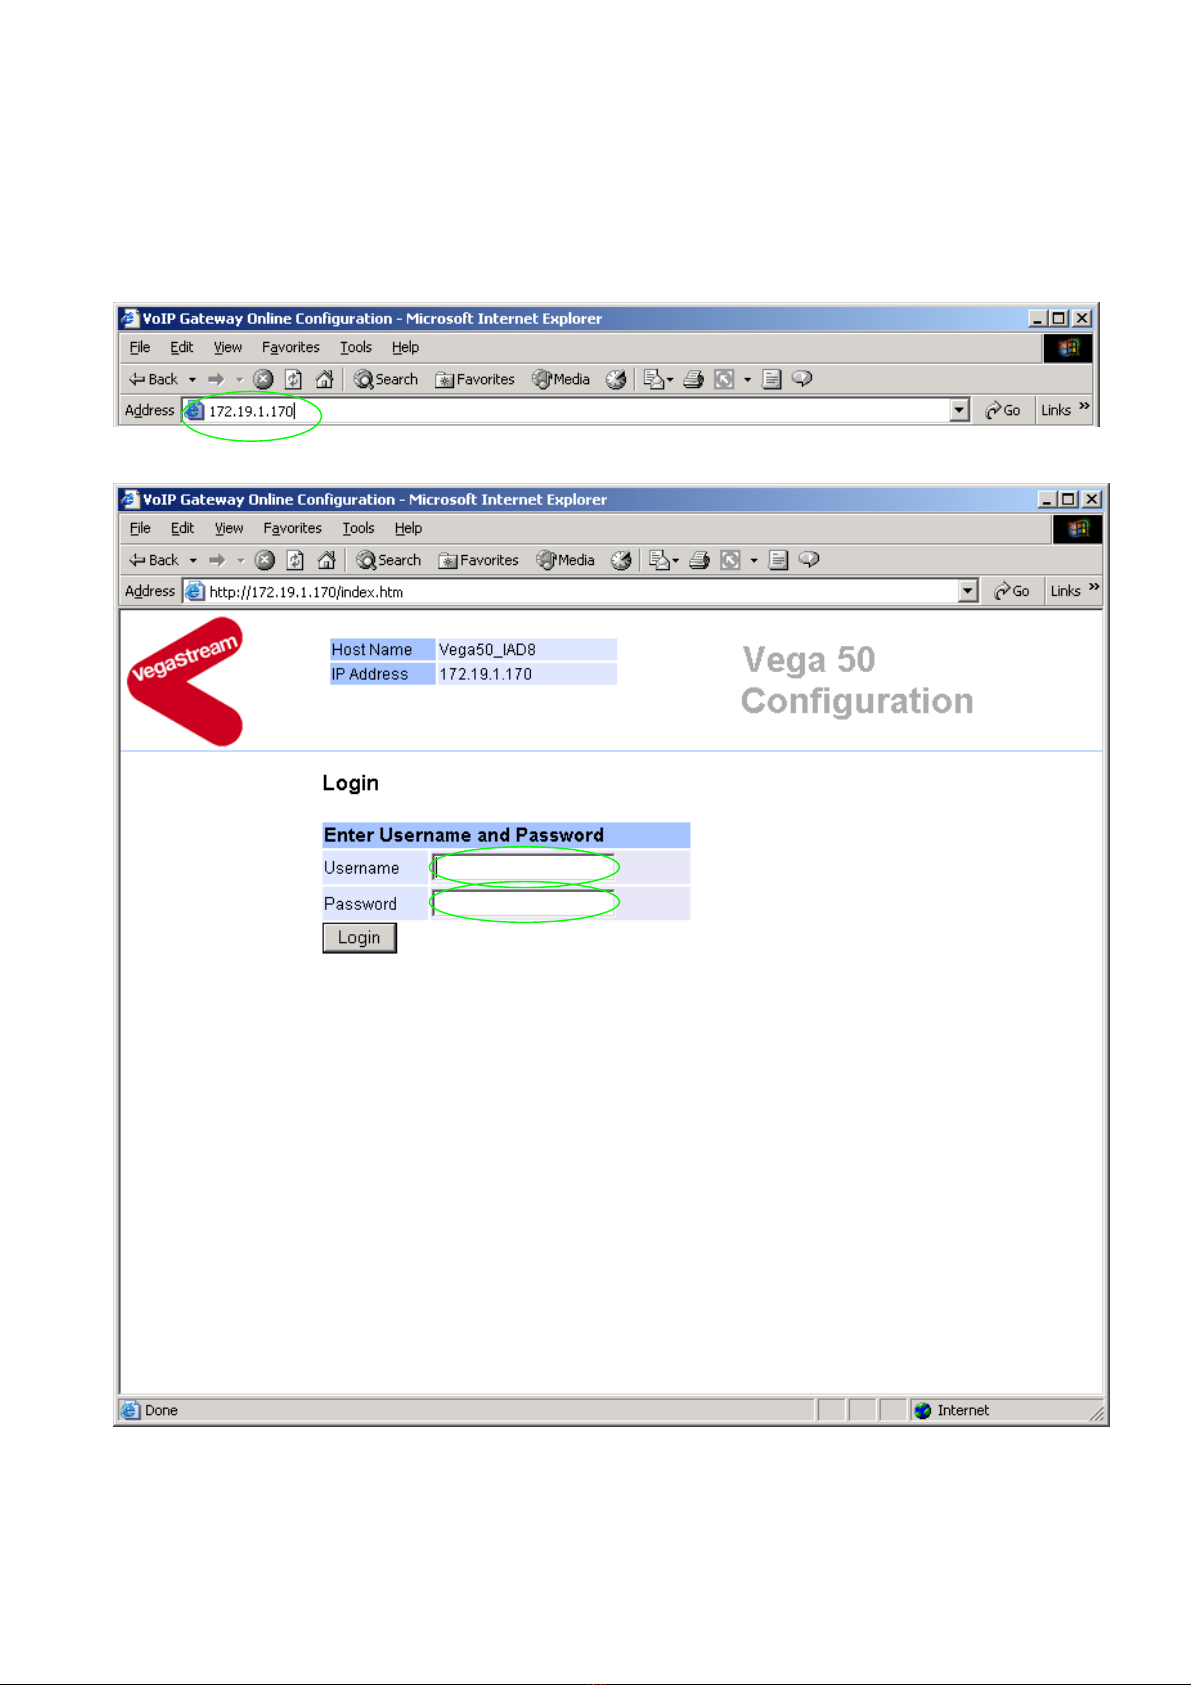
Press <Enter> to get the Username: prompt
At the prompts enter the default user name and password
Username: admin
Password: admin
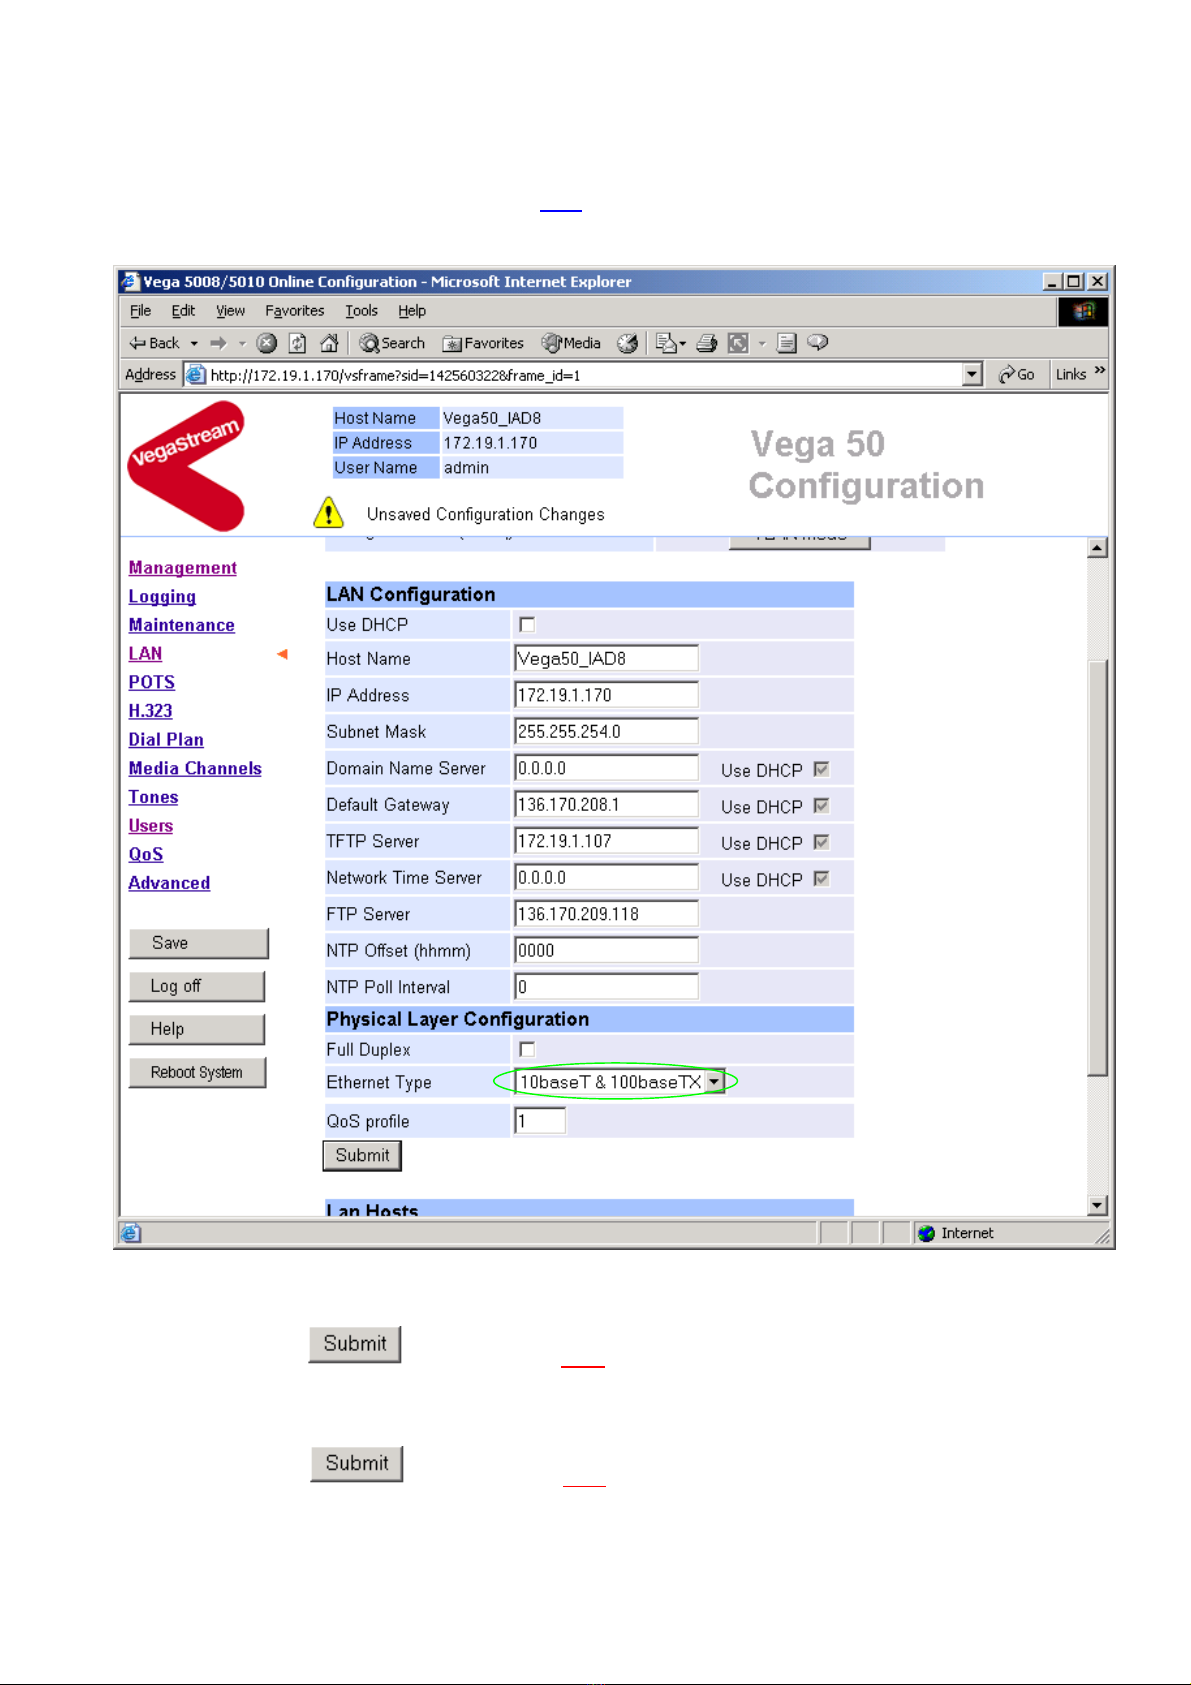
To display the current IP address, type:
show lan.ip
If this is not the IP address required, it can be overridden, together with other LAN parameters by
typing:
set lan.use_dhcp=0
set lan.ip=aaa.bbb.ccc.ddd
set lan.subnet=eee.fff.ggg.hhh
set lan.gateway=iii.jjj.kkk.lll
save
reboot system

Version 0.4 26 February 2004 Page 5 of 33
For use with Vega 50 10 FXO – H.323 version 09.01.05.2 T004 or greater. © 2004 VegaStream Ltd.
3. Configure password and login timeout
Now configuration will be carried out using a web browser.
Enter the IP address of the Vega into the “Address” field of your web browser.
You will then be presented with the login page:

Version 0.4 26 February 2004 Page 6 of 33
For use with Vega 50 10 FXO – H.323 version 09.01.05.2 T004 or greater. © 2004 VegaStream Ltd.
Enter the default Username and Password
Username: admin
Password: admin
Select
On the left hand side menu select Users

Version 0.4 26 February 2004 Page 7 of 33
For use with Vega 50 10 FXO – H.323 version 09.01.05.2 T004 or greater. © 2004 VegaStream Ltd.
Recommended: Change the password
enter New Password and Re-enter Password then
select and then click “here” to return
Optional: Change the timeout1– default is 240 seconds; can extend to 7200 seconds (2hrs)
select and then click “here” to return
1If the web interface is not used for this length of time the Vega will automatically log off the session. This change is
only activated by logging out and back into the web browser session.

Version 0.4 26 February 2004 Page 8 of 33
For use with Vega 50 10 FXO – H.323 version 09.01.05.2 T004 or greater. © 2004 VegaStream Ltd.
4. Check and configure LAN settings and Host name
On the left hand side menu select LAN
Scroll down to see both LAN Configuration and Physical layer Configuration sections
Recommended: In the Physical Layer Configuration section statically select the Ethernet Type as
either 100baseTx or 10 baseT – whichever is appropriate - (not 10baseT & 100baseTx autoselection)
select and then click “here” to return
Optional: If there are any LAN values that need to be set up manually, set them up now (e.g. tftp and
ftp addresses), then
Select and then click “here” to return

Version 0.4 26 February 2004 Page 9 of 33
For use with Vega 50 10 FXO – H.323 version 09.01.05.2 T004 or greater. © 2004 VegaStream Ltd.
5. Configure the Dial Plan
On the left hand side menu select Dial Plan
Firstly, turn off the default profile:
In the Profiles section
Select

Version 0.4 26 February 2004 Page 10 of 33
For use with Vega 50 10 FXO – H.323 version 09.01.05.2 T004 or greater. © 2004 VegaStream Ltd.
disable (un-tick) Enabled, then
select and then click “here” to return
Now create a new profile and in it create a dial plan entry to handle calls being sent outbound on the
LAN:
In the Profiles section
Select
In the Profiles section, on Profile 2 (the new profile):
Select
Set Name = Outbound_To_LAN
select and then click “here” to return

Version 0.4 26 February 2004 Page 11 of 33
For use with Vega 50 10 FXO – H.323 version 09.01.05.2 T004 or greater. © 2004 VegaStream Ltd.
In the Profiles section, on Profile 2 (the new profile):
Select
In the Plans in this Profile, Plan ID 1:
Select

Version 0.4 26 February 2004 Page 12 of 33
For use with Vega 50 10 FXO – H.323 version 09.01.05.2 T004 or greater. © 2004 VegaStream Ltd.
Set Name = Any_Tel_Port
Set Source = IF:<.[^5]> (This takes a call from any of the telephony ports
and stores the interface ID on which the call
arrived in store <1>)
Set Destination = IF:05,TEL:<1> (This routes the call to the H.323 interface and
passes the calling port’s interface ID – stored in
<1> - as the destination telephone number)
Select and then click “here” to return
Select … to return to the Dial Planner Profiles section

Version 0.4 26 February 2004 Page 13 of 33
For use with Vega 50 10 FXO – H.323 version 09.01.05.2 T004 or greater. © 2004 VegaStream Ltd.
Now add a new profile and in it create a dial plan entry to handle calls being received inbound from
the LAN:
In a similar manner to adding profile 2 add another profile, profile 3,
Set Name = Inbound_From_LAN
Modify the first plan for Profile 3:
Set Name = To_FXO_Ports
Set Source = IF:05,TEL:<..><.*> (This takes the two leading digits of the telephone
number presented and stores them in store <1>,
the remainder of the digits are stored in <2>)
Set Destination = IF:<1>,TEL:<2> (Use the 2 digits in store <1> as the interface ID to
dial out from, and the digits in store <2> as the
telephone number to dial)
Select and then click “here” to return
Note 1: The Relationship between physical ports and Interface Ids is as follows:
FXO 1 = IF:06
FXO 2 = IF:07
…
FXO 8 = IF:13
FXO 9 = IF:56
FXO 10 = IF:57
H.323 LAN = IF:05
Note 2: For calls from H.323 to the FXO lines, the gatekeeper must choose the appropriate
interface on the Vega to dial out from; when the gatekeeper presents a call to the Vega the
telephone number field must contain ppttt…t where pp = port number (06, 07, … 13, or
56 or 57) and ttt…t is the telephone number to onward dial.
For more details on the operation of the dial planner, including the various tokens that
may be used, see the section “The Dial Planner” in the Vega Primer.

Version 0.4 26 February 2004 Page 14 of 33
For use with Vega 50 10 FXO – H.323 version 09.01.05.2 T004 or greater. © 2004 VegaStream Ltd.
6. Configure for Gatekeeper operation
On the left hand side menu select H.323
Select
Select

Version 0.4 26 February 2004 Page 15 of 33
For use with Vega 50 10 FXO – H.323 version 09.01.05.2 T004 or greater. © 2004 VegaStream Ltd.
Scroll to the bottom of the page

Version 0.4 26 February 2004 Page 16 of 33
For use with Vega 50 10 FXO – H.323 version 09.01.05.2 T004 or greater. © 2004 VegaStream Ltd.
Either configure the H.323 Gatekeeper “Default Gatekeeper” with the IP address of the
Gatekeeper, or tick Auto Discover.
select and then click “here” to return
Set up the gatekeeper Terminal alias – this needs to match the gatekeeper’s expectations. By default
it is turned off (Name=NULL), set it to, for example, alias Type=h323, Name=Vega50_10FXO.
In the H.323 Gatekeeper Terminal Alias section
select and make the changes
select and then click “here” to return
If more than one alias is required then select and configure as required.

Version 0.4 26 February 2004 Page 17 of 33
For use with Vega 50 10 FXO – H.323 version 09.01.05.2 T004 or greater. © 2004 VegaStream Ltd.
7. Configure audio parameters
On the left hand side menu select Media Channels
Add more codecs so that by default the Vega will handle calls with any of the codecs it supports.
In H.245 Capabilities
Select

Version 0.4 26 February 2004 Page 18 of 33
For use with Vega 50 10 FXO – H.323 version 09.01.05.2 T004 or greater. © 2004 VegaStream Ltd.
In H.245 Capabilities
Select again
Select on H245 Cap ID 1
Select required codec type – in this case g7231
select and then click “here” to return
Modify all H245 Cap ID entries until the list looks as follows:

Version 0.4 26 February 2004 Page 19 of 33
For use with Vega 50 10 FXO – H.323 version 09.01.05.2 T004 or greater. © 2004 VegaStream Ltd.
Now update the Capability Description list that tells the Vega which of the codecs it can use.
Update entry 1 to select all voice codecs, and the other entries to configure them for the correct
capability Ids.
For each capability:
Select
Adjust them so that they have the capabilities as indicated below:
Scroll to the bottom of the Media Channels page

Version 0.4 26 February 2004 Page 20 of 33
For use with Vega 50 10 FXO – H.323 version 09.01.05.2 T004 or greater. © 2004 VegaStream Ltd.
In the H.245 Preferred Index section:
Set Voice Capdesc Index to: 1-voice
select and then click “here” to return
This has selected all voice codecs to be offered for calls.
With Fax Capdesc Index set to “2-t38Tcp” it has selected this codec for fax transfers. Note, it is
recommended that only a single T.38 codec is offered (as configured here), because if both are offered
negotiations do not always complete correctly.
Table of contents
Other VegaStream Gateway manuals
Popular Gateway manuals by other brands

Cisco
Cisco ASR 5000 Series Administration guide

ZyXEL Communications
ZyXEL Communications ZyWall USG 50-H Series user guide

Siemens
Siemens SpeedStream 6500 Series user guide

Draytek
Draytek VigorAccess IP DSLAM A48 quick start guide

Ubee
Ubee DDW366 user guide

ABB
ABB SPA-ZC 302 Installation and commissioning manual