Veho mimi X-3 User manual

X-3 Wireless Speaker
Quick start guide
VSS-005W-X3
X3 Manual (multi-language).indd 1 19/06/2012 11:11

1. Introduction
Thank you for purchasing the Veho X3 Mimi Wireless Speaker. The X
series wireless speaker range utilises 2.4 Ghz WiFi, Lithium polymer
rechargeable batteries and transmitting dongles for PC, Mac and iPhone/
iPod for a completely wire free listening experience.
With a range of up to 50 metres and the ability to stream music through
as many additional speakers as you like, the X series wireless speaker
range is different from other solutions.
This manual covers detailed instructions for using your X3 Mimi Wireless
Speaker. Please read this manual carefully before use and retain for
future reference.
Product Certification: As certified by such authoritative organizations as FCC and CE, this
product complies with the recommended standards and thus guarantees the user’s safety.
ENGLISH
X3 Manual (multi-language).indd 2-3 19/06/2012 11:11

2. What’s in the box 3. Charging your X3 speaker
X3 speaker
USB WiFi transmitter dongle
Q1 WiFi transmitter for iPhone/iPod/iPad
Q1 WiFi receiver for iPhone/iPod/iPad 30 pin speaker docks
Extension dock/cradle
Line in cable
Multi region mains power charger
To charge your X3 speaker, connect the supplied power charger to the
port at the back and connect to the mains. Please charge your speaker
for 8 hours. When fully charged the red LED indicator will turn off.
You can also use your speaker whilst connected to the mains power.
ENGLISH
Power input
AUX IN
POWER
AUX IN
POWER
X3 Manual (multi-language).indd 4-5 19/06/2012 11:11

4. Connecting your USB transmitter dongle 5. Using the extension dock/cradle
Connect the supplied USB transmitter dongle to a USB 2.0 port on your
computer. Please note that you may have to adjust your sound settings
to ensure that the USB transmitter dongle is set as the default for sound
output.
On a Windows operating system you need to open the control panel,
then select ‘Sound’ and then the ‘Playback’ tab and then you can see the
various audio devices available. Select the wireless dongle as the default.
On a Mac operating system select the main menu, ‘System Preferences’,
‘Sound’ and ‘Output’. You should then see the wireless speaker under the
list of devices. Select the wireless dongle as the default.
The blue LED indicator will flash whilst searching for a connection and
once it has connected it will stop flashing.
If your USB port is located at the
back of your computer or you
are finding that the USB dongle is
affecting wireless connectivity you
can attach the extension dock to a
USB 2.0 port on your computer and
then connect the USB transmitter
dongle to the dock.
ENGLISH
X3 Manual (multi-language).indd 6-7 19/06/2012 11:11

6. Connecting the Q1 transmitter to your
iPhone, iPod or iPad
7. Connecting your Q1 receiver to your
iPod dock
To wirelessly connect your
iPhone, iPod or iPad to your
X3 speaker, connect the Q1
transmitter to the port on
you iPhone, iPod or iPad.
You can use the Q1 receiver to wirelessly connect your iPhone, iPod or
iPad to your iPod dock. Connect the Q1 transmitter to your iPhone, iPod
or iPad and then connect the Q1 receiver to the iPod dock where you
would usually connect your Apple device.
Please note that whilst connected to the iPod dock you can also
connect to the X3 speaker from your iPhone, iPod or iPad.
ENGLISH
X3 Manual (multi-language).indd 8-9 19/06/2012 11:11

To increase the volume of the speaker, turn the volume control wheel
clockwise. To decrease the volume of the speaker, turn the volume
control wheel anti-clockwise.
You can also adjust the volume on your computer or via your iPhone,
iPod or iPad.
When you are playing music via your computer or laptop please ensure
that you do not set the volume of your computer’s sound control any
higher than 65%. Higher volume settings on your computer can cause
the sound quality to distort.
9. Adjusting the volume8. Turning on the speaker
ENGLISH
Once you have connected the USB transmitter dongle or Q1 transmitter
turn the speaker on by pressing the power button at the back. This will
put the speaker in standby mode. To take the speaker out of standby
mode press the volume control wheel once. The volume LED indicators
will light up to indicate that the speaker is on and it will automatically
search and connect with your chosen transmitter.
Power button
AUX IN
POWER
AUX IN
POWER
X3 Manual (multi-language).indd 10-11 19/06/2012 11:11

10. Specifications
ENGLISH
Driver
Dimension 2.5 inch (x2) and 4 inch subwoofer
Cone Material Paper
Magnet Material Ferrite
Impedance 4 Ohm
Power Rating 12W + 2x 4W
Audio Specifications
Output Channel Stereo 2.1
Output Power (Max) 20W
Total Continuous Power (RMS) 18W
@ 10% THD @ 60~20KHz
Frequency Response 80Hz ~ 18KHz
Sensitivity 78 dB/W/m
Sound Pressure Level 90dB
Signal to noise ratio @ 1KHz Input >85dB
Wireless Specifications
Frequency Range 2.4 GHz GSM Band (2406~2472MHz)
Modulation GFSK
Transmission Power 10dBm
Channels 34 channels
Transmission Range up to 50m (line of sight)
SNR 80dB
THD+N -60dB
Rx Sensitivity -76dBm
Connectivity
Audio 3.5mm audio jack, RCA
Power DC Jack
Power
Battery Type Built in Li Polymer (4000 mAh)
Playback Time 5 hours
Charging Power 12V 2A
Charging Time 7 hours
Other
Minimum System Requirement All Windows, Max O/S X
Dimensions 310mm x 160mm x 120mm
Storage Temperature: -30°C~60°C
Relative Humidity: 5% to 95%
Operation Temperature: -10°C~40°C
Relative Humidity: 5% to 95%
X3 Manual (multi-language).indd 12-13 19/06/2012 11:11

11. Other Veho Products
In the event you need to contact Veho for support
or troubleshooting for your X3 Wireless Speaker
www.veho-world.com/main/support.aspx
Technical Support
X1 Mimi Wireless Speaker
(VSS-003W-X1)
Z1 Earbuds
(VEP-003-360Z1GB)
Q1 Mimi Wireless Dongle Kit for iPod/
iPhone/iPad
(VWT-Q1-BUN-BLK)
Pebble XT Portable Battery Charger
(VCC-A008-PBP-XT)
ENGLISH
X3 Manual (multi-language).indd 14-15 19/06/2012 11:11

1. Introduction 2. Contenu de l’emballage
FRANÇAIS
Merci d’avoir acheté le X3 Veho Mimi-parleur sans fil. La gamme X-series-
parleurs sans fil utilise 2.4 Ghz WiFi, batteries au lithium-polymère
rechargeables et WiFi dongles de transmission pour PC, Mac et iPhone /
iPod pour une expérience complètement fil de l’écoute libre.
Avec une portée allant jusqu’à 50 mètres et la capacité à écouter de la
musique à travers autant de haut-parleurs supplémentaires que vous le
souhaitez, la gamme X séries enceinte sans fil est différent des autres
solutions.
Ce manuel donne des instructions détaillées pour l’utilisation de votre X3
Mimi-parleur sans fil. S’il vous plaît lisez attentivement ce manuel avant
d’utiliser et de conserver pour référence future.
X3 haut-parleur
Dongle USB WiFi émetteur
Q1 WiFi émetteur pour iPhone/iPod/iPad
Q1 WiFi récepteur pour iPhone/iPod/iPad docks hauts-parleurs 30 broches
Quai Extension/berceau
Ligne dans le câble
Multi chargeur d’alimentation secteur région
X3 Manual (multi-language).indd 16-17 19/06/2012 11:11

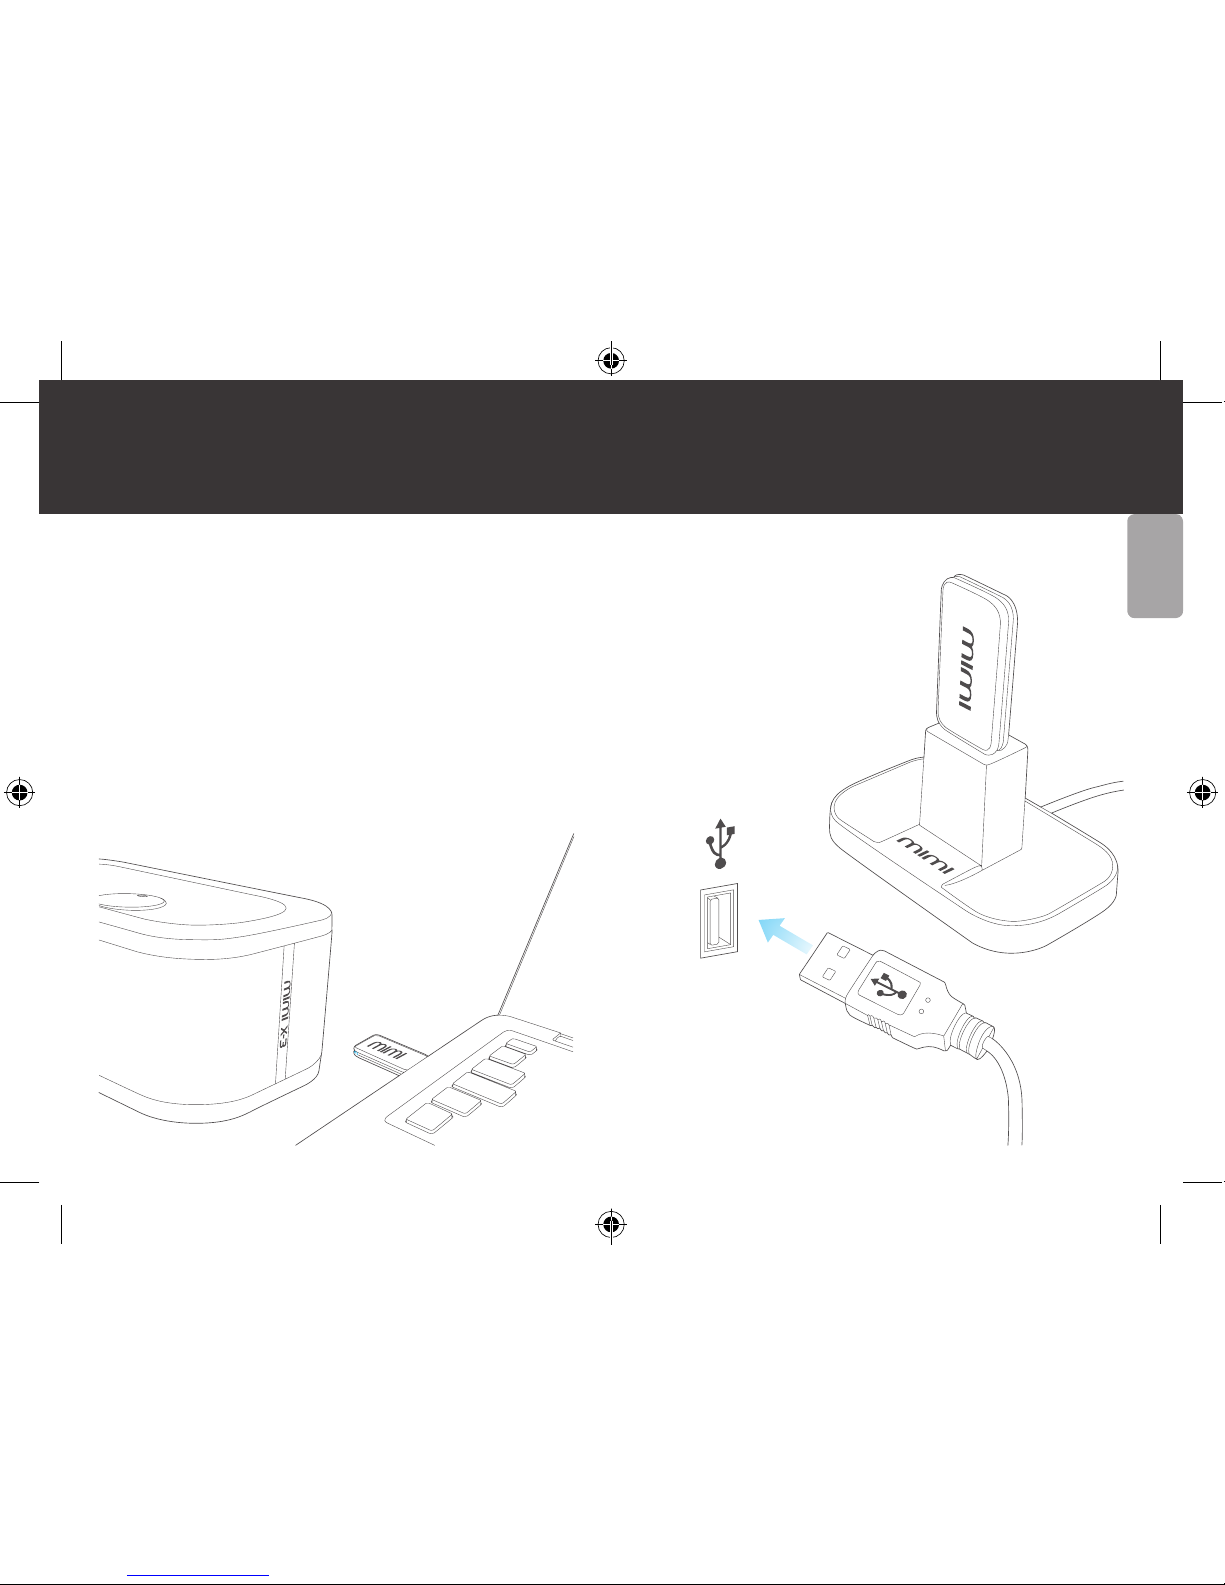
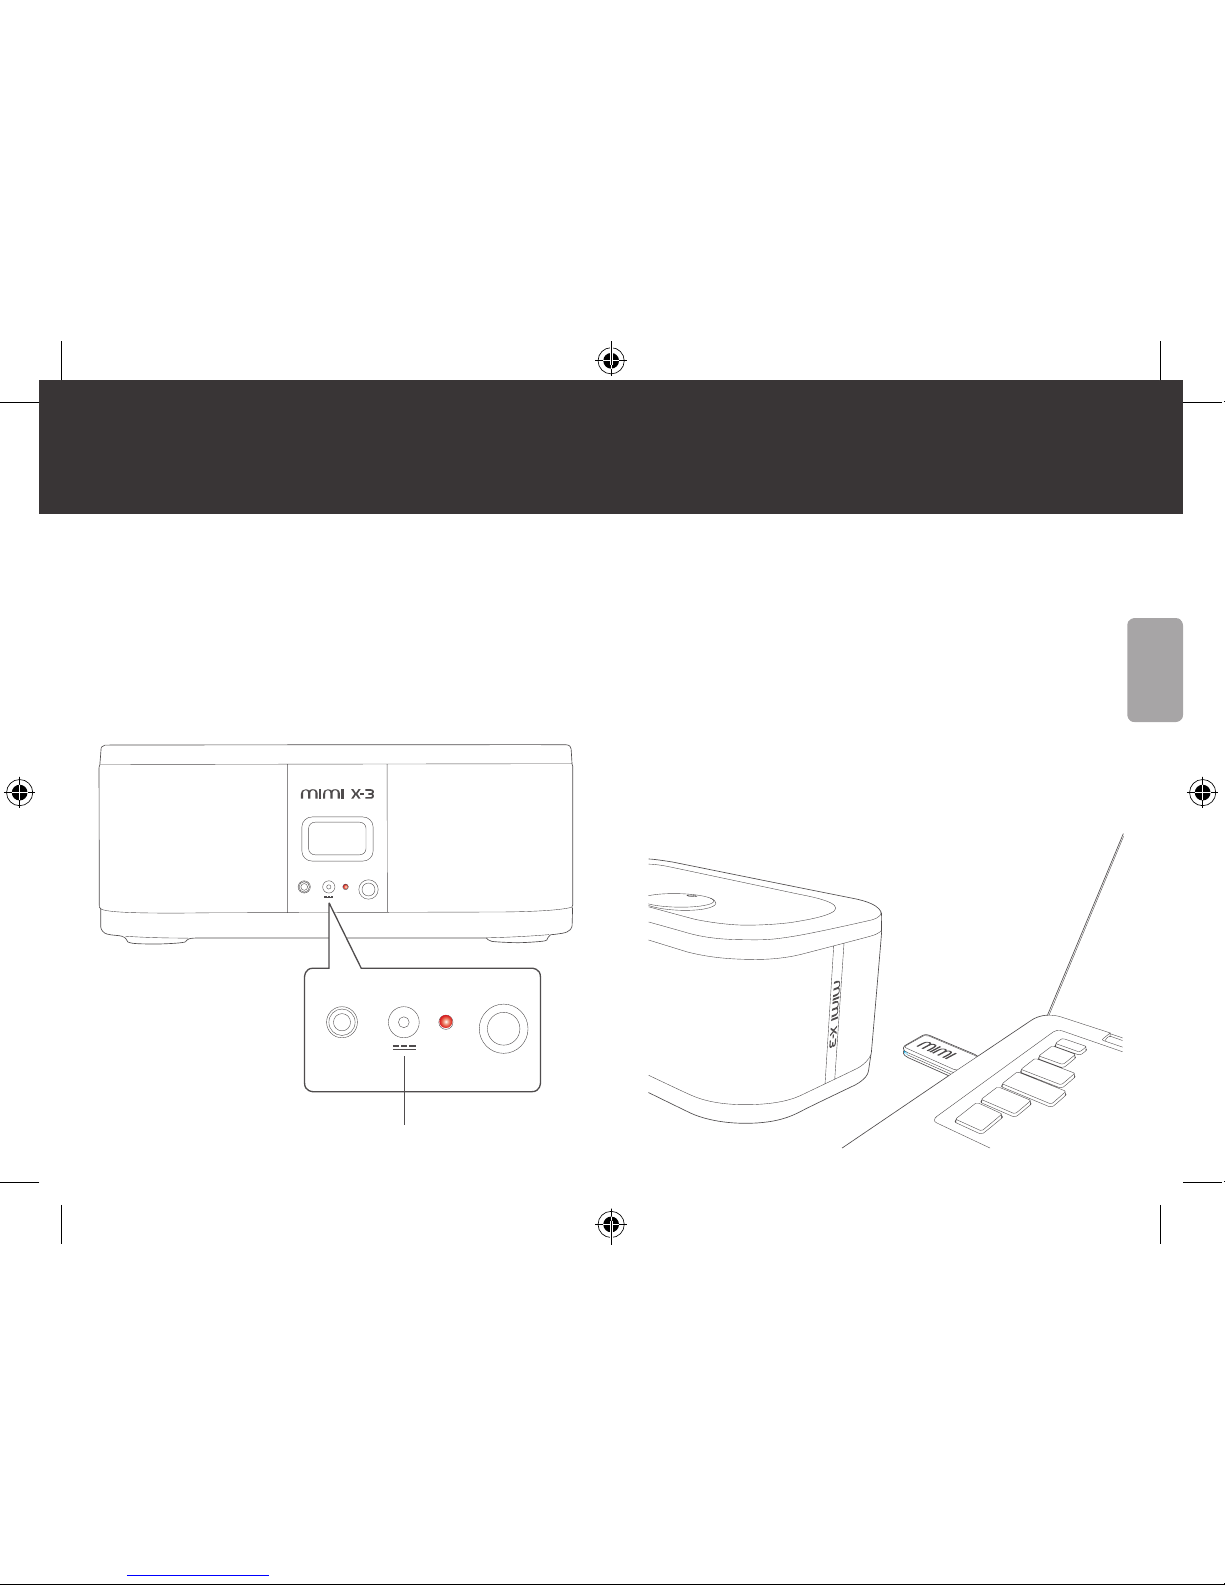
3. Chargement de votre haut-parleur X3 4. Connexion de votre dongle émetteur USB
Pour charger votre haut-parleur X3, branchez le chargeur secteur fourni
sur le port à l’arrière et se connecter au réseau. S’il vous plaît recharger
votre haut-parleur pendant 8 heures. Lorsque complètement chargée, le
voyant rouge s’éteint. Vous pouvez également utiliser votre haut-parleur
en étant connecté au réseau électrique.
Branchez le dongle émetteur USB fourni pour un port USB 2.0 sur votre
ordinateur. S’il vous plaît noter que vous devrez peut-être ajuster vos
paramètres audio afin de s’assurer que le dongle émetteur USB est défini
comme la valeur par défaut pour la sortie audio.
Sur un système d’exploitation Windows dont vous avez besoin pour
ouvrir le panneau de contrôle, puis sélectionnez ‘Sonores’ puis la
‘Playback’ onglet, puis vous pouvez voir les différents dispositifs audio
disponibles. Sélectionnez le dongle sans fil par défaut.
Sur un système d’exploitation Mac sélectionner le menu principal, des
‘Préférences Système’, ‘Sonores’ et ‘Sortie’. Vous devriez alors voir le
haut-parleur sans fil sous la liste des périphériques. Sélectionnez le
dongle sans fil par défaut.
L’indicateur LED bleue clignote alors que la recherche d’une connexion
et une fois qu’il s’est connecté il s’arrête de clignoter.
FRANÇAIS
Power input
AUX IN
POWER
AUX IN
POWER
X3 Manual (multi-language).indd 18-19 19/06/2012 11:11

5. Utilisation de la station d’extension/
berceau
6. Raccorder l’émetteur Q1 à votre iPhone,
iPod ou iPad
Si votre port USB est situé à l’arrière
de votre ordinateur ou vous trouvez
que le dongle USB affecte la
connectivité sans fil vous pouvez
joindre le quai d’extension à un port
USB 2.0 sur votre ordinateur, puis
connecter le dongle émetteur USB à
la station d’accueil.
Pour se connecter sans fil
votre iPhone, iPod ou iPad
à votre haut-parleur X3,
connectez l’émetteur Q1
au port sur votre iPhone,
iPod ou iPad.
FRANÇAIS
X3 Manual (multi-language).indd 20-21 19/06/2012 11:11

FRANÇAIS
7. Connexion de votre récepteur Q1 à votre
station d’accueil iPod
8. Mise en marche du haut-parleur
Vous pouvez utiliser le récepteur Q1 à se connecter sans fil votre iPhone,
iPod ou iPad à votre station d’accueil iPod. Connectez le transmetteur Q1
à votre iPhone, iPod ou iPad, puis connectez le récepteur Q1 à la station
d’accueil iPod où que vous connectez habituellement votre appareil
Apple.
S’il vous plaît noter que si connecté à station d’accueil iPod, vous pouvez
également vous connecter à l’orateur X3 à partir de votre iPhone, iPod
ou iPad.
Une fois que vous avez connecté le dongle émetteur USB ou un émetteur
Q1 tourner le haut-parleur en appuyant sur le bouton d’alimentation
à l’arrière. Cela mettra le haut-parleur en mode veille. Pour prendre
le haut-parleur du mode veille, appuyez sur la molette de réglage du
volume une fois. Les indicateurs de volume LED s’allume pour indiquer
que le haut-parleur est activé et il sera automatiquement rechercher et
vous connecter avec votre émetteur choisi.
Power button
AUX IN
POWER
AUX IN
POWER
X3 Manual (multi-language).indd 22-23 19/06/2012 11:11

9. Réglage du volume 10. Caractéristiques
Pour augmenter le volume du haut-parleur, tournez la molette de réglage
du volume dans le sens horaire. Pour diminuer le volume du haut-parleur,
tournez la molette de réglage du volume dans le sens antihoraire.
Vous pouvez également régler le volume sur votre ordinateur ou via
votre iPhone, iPod ou iPad.
Lorsque vous écoutez de la musique via votre ordinateur de bureau ou
portable s’il vous plaît vous assurer que vous ne réglez pas le volume
de contrôle du son de votre ordinateur supérieure à 65%. Réglages
de volume supérieur sur votre
ordinateur peut causer la qualité
sonore de fausser.
Driver
Dimension 2.5 inch (x2) and 4 inch subwoofer
Cone Material Paper
Magnet Material Ferrite
Impedance 4 Ohm
Power Rating 12W + 2x 4W
Audio Specifications
Output Channel Stereo 2.1
Output Power (Max) 20W
Total Continuous Power (RMS) 18W
@ 10% THD @ 60~20KHz
Frequency Response 80Hz ~ 18KHz
Sensitivity 78 dB/W/m
Sound Pressure Level 90dB
Signal to noise ratio @ 1KHz Input >85dB
Wireless Specifications
Frequency Range 2.4 GHz GSM Band (2406~2472MHz)
Modulation GFSK
Transmission Power 10dBm
Channels 34 channels
FRANÇAIS
X3 Manual (multi-language).indd 24-25 19/06/2012 11:11

FRANÇAIS
11. Autres produits Veho
Transmission Range up to 50m (line of sight)
SNR 80dB
THD+N -60dB
Rx Sensitivity -76dBm
Connectivity
Audio 3.5mm audio jack, RCA
Power DC Jack
Power
Battery Type Built in Li Polymer (4000 mAh)
Playback Time 5 hours
Charging Power 12V 2A
Charging Time 7 hours
Other
Minimum System Requirement All Windows, Max O/S X
Dimensions 310mm x 160mm x 120mm
Storage Temperature: -30°C~60°C
Relative Humidity: 5% to 95%
Operation Temperature: -10°C~40°C
Relative Humidity: 5% to 95%
Si vous devez contacter Veho pour des questions
d’assistance ou de dépannage de votre X3 Wireless
Speaker, rendez-vous sur
www.veho-world.com/main/support.aspx
Assistance technique
X1 Mimi Wireless Speaker
(VSS-003W-X1)
Z1 Earbuds
(VEP-003-360Z1GB)
Q1 Mimi Wireless Dongle Kit for iPod/
iPhone/iPad
(VWT-Q1-BUN-BLK)
Pebble XT Portable Battery Charger
(VCC-A008-PBP-XT)
X3 Manual (multi-language).indd 26-27 19/06/2012 11:12

DEUTSCH
1. Einführung 2. Lieferumfang
Vielen Dank für den Kauf des X3 Veho Mimi Kabelloser Lautsprecher. Die
X-Serie Funklautsprecher Bereich nutzt 2,4 GHz WiFi, Lithium-Polymer-
Akkus und Übertragen von Dongles für PC, Mac und iPhone/iPod für einen
völlig freien Draht Hörerlebnis.
Mit einer Reichweite von bis zu 50 Meter und die Fähigkeit zur
Übertragung von Musik durch so viele zusätzliche Lautsprecher, wie Sie
möchten, die X-Serie mit Wireless Lautsprecher Sortiment unterscheidet
sich von anderen Lösungen.
Dieses Handbuch enthält detaillierte Anweisungen für die Verwendung
Ihres X3 Mimi Wireless Speaker. Bitte lesen Sie diese Anleitung sorgfältig
vor der Benutzung und zum späteren Nachschlagen zu behalten.
X3 Lautsprecher
USB-WiFi-Sender-Dongle
Q1 WiFi-Transmitter für iPhone/iPod/iPad
Q1 WiFi-Empfänger für iPhone/iPod/iPad 30 Pin-Lautsprecher-Docks
Erweiterung Dock/Ladestation
Line-in Kabel
Multi Region Netzladegerät
X3 Manual (multi-language).indd 28-29 19/06/2012 11:12

DEUTSCH
3. Ladevorgang Sie Ihre Lautsprecher X3 4. Verbinden Sie das USB-Dongle Sender
Um Ihre X3 Lautsprecher zu gebühr, schließen Sie das mitgelieferte
Ladegerät zum Anschluss an der Rückseite und an das Stromnetz. Bitte
gebühr Sie Ihre Lautsprecher für 8 Stunden. Voll aufgeladen leuchtet
die rote LED-Anzeige erlischt. Sie können auch die Lautsprecher an das
Stromnetz angeschlossen verwenden werden.
Schließen Sie das mitgelieferte USB-Sender-Dongle an einen USB 2.0
Port Ihres Computers. Bitte beachten Sie, dass Sie eventuell Ihre Sound-
Einstellungen anpassen, um sicherzustellen, dass der USB-Sender-Dongle
als Standard für die Tonausgabe eingestellt ist.
Auf einem Windows-Betriebssystem Sie benötigen, um die
Systemsteuerung zu öffnen, wählen Sie dann ‘Sound’ und dann die
“Wiedergabe” klicken und dann sehen Sie die verschiedenen Audio-Geräte
zur Verfügung. Wählen Sie den WLAN-Dongle als Standard.
Auf einem Mac-Betriebssystem Wählen Sie das Hauptmenü, ‘System
Preferences’, ‘Sound’ und ‘Output’. Sie sollten dann die kabellosen
Lautsprecher unter der Liste der Geräte. Wählen Sie den WLAN-Dongle
als Standard.
Die blaue LED-Anzeige blinkt während der Suche nach einer Verbindung
und sobald es angeschlossen wird es aufhören zu blinken.
Power input
AUX IN
POWER
AUX IN
POWER
X3 Manual (multi-language).indd 30-31 19/06/2012 11:12

DEUTSCH
5. Verwendung der Erweiterung Dock/wiege 6. Anschließen des Q1-Sender auf Ihrem
iPhone, iPod oder iPad
Wenn Ihr USB-Port an der Rückseite
des Computers befinden, oder
Sie bemerken, dass Ihr drahtloses
Internet betroffen ist, können Sie
die Erweiterung Dock an einen USB
2.0 Port Ihres Computers legen und
dann das USB-Dongle-Sender auf die
Anklagebank.
Um eine Funkverbindung mit
Ihrem iPhone, iPod oder iPad
zu Ihrem X3 Lautsprecher,
verbinden Sie den Q1-Sender
an den Port auf Ihrem
iPhone, iPod oder iPad.
X3 Manual (multi-language).indd 32-33 19/06/2012 11:12

DEUTSCH
7. Anschließen des Q1-Empfänger zu Ihrem
iPod-Dock
8. Einschalten des Lautsprecher
Sie können mit dem Q1-Empfänger kabellos verbinden Sie Ihr iPhone, iPod
oder iPad zu Ihrem iPod-Dock. Verbinden Sie den Q1-Sender auf Ihrem
iPhone, iPod oder iPad und verbinden Sie dann den Q1-Empfänger an den
iPod-Dock, wo Sie in der Regel verbinden würde Ihr Apple-Gerät.
Sie können auch auf die X3-Lautsprecher anschließen, wenn Ihr iPod-Dock
von Ihrem iPhone, iPod oder iPad verbunden.
Sobald Sie den USB-Sender-Dongle oder Q1-Sender angeschlossen
ist, schalten Sie den Lautsprecher ein, indem Sie den Netzschalter an
der Rückseite. Dadurch wird der Lautsprecher in den Standby-Modus.
Um den Lautsprecher zu nehmen aus dem Standby-Modus drücken Sie
den Lautstärkeregler einmal. Die Volumen-LED-Anzeige leuchtet auf,
um anzuzeigen, dass der Lautsprecher eingeschaltet ist und es wird
automatisch gesucht und mit dem gewählten Sender zu verbinden.
Power button
AUX IN
POWER
AUX IN
POWER
X3 Manual (multi-language).indd 34-35 19/06/2012 11:12

DEUTSCH
9. Einstellen der Lautstärke 10. Technische Daten
Um die Lautstärke des Lautsprechers erhöhen, drehen Sie den
Lautstärkeregler im Uhrzeigersinn. Um die Lautstärke des Lautsprechers
verringern, drehen Sie den Lautstärkeregler gegen den Uhrzeigersinn.
Sie können die Lautstärke auch auf Ihrem Computer oder via iPhone, iPod
oder iPad.
Wenn Sie die Wiedergabe von Musik über Ihren Computer oder Laptop
stellen Sie bitte sicher, dass Sie nicht die Lautstärke Ihres Computers
Klangregelung nicht höher als 65%. Höhere Lautstärke-Einstellungen
auf Ihrem Computer kann dazu
führen, die Klangqualität zu
beeinträchtigen.
Driver
Dimension 2.5 inch (x2) and 4 inch subwoofer
Cone Material Paper
Magnet Material Ferrite
Impedance 4 Ohm
Power Rating 12W + 2x 4W
Audio Specifications
Output Channel Stereo 2.1
Output Power (Max) 20W
Total Continuous Power (RMS) 18W
@ 10% THD @ 60~20KHz
Frequency Response 80Hz ~ 18KHz
Sensitivity 78 dB/W/m
Sound Pressure Level 90dB
Signal to noise ratio @ 1KHz Input >85dB
Wireless Specifications
Frequency Range 2.4 GHz GSM Band (2406~2472MHz)
Modulation GFSK
Transmission Power 10dBm
Channels 34 channels
X3 Manual (multi-language).indd 36-37 19/06/2012 11:12

11. Andere Produkte Veho
Transmission Range up to 50m (line of sight)
SNR 80dB
THD+N -60dB
Rx Sensitivity -76dBm
Connectivity
Audio 3.5mm audio jack, RCA
Power DC Jack
Power
Battery Type Built in Li Polymer (4000 mAh)
Playback Time 5 hours
Charging Power 12V 2A
Charging Time 7 hours
Other
Minimum System Requirement All Windows, Max O/S X
Dimensions 310mm x 160mm x 120mm
Storage Temperature: -30°C~60°C
Relative Humidity: 5% to 95%
Operation Temperature: -10°C~40°C
Relative Humidity: 5% to 95%
Wenn Sie Unterstützung oder Hilfe bei der Problemlösung
für Ihren X3 Wireless Speaker, wenden Sie sich hier an
Veho:
www.veho-world.com/main/support.aspx
Technischer Kundendienst
DEUTSCH
X1 Mimi Wireless Speaker
(VSS-003W-X1)
Z1 Earbuds
(VEP-003-360Z1GB)
Q1 Mimi Wireless Dongle Kit for iPod/
iPhone/iPad
(VWT-Q1-BUN-BLK)
Pebble XT Portable Battery Charger
(VCC-A008-PBP-XT)
X3 Manual (multi-language).indd 38-39 19/06/2012 11:12
Table of contents
Languages:
Other Veho Portable Speakers manuals