Venta COMFORT PLUS LW15 User manual

VENTA COMFORT PLUS AIRWASHER
LW15 / LW25 / LW45
DE BEDIENUNGSANLEITUNG
EN INSTRUCTIONS FOR USE
FR MODE D‘EMPLOI
ES MANUAL DE INSTRUCCIONES
IT ISTRUZIONI PER L’USO
NL GEBRUIKSAANWIJZING
FI KÄYTTÖOHJE
LV LIETOŠANAS PAMĀCĪBA
LT NAUDOJIMO INSTRUKCIJA
PL INSTRUKCJA OBSŁUGI
HU HASZNÁLATI UTASÍTÁS
CZ NÁVOD K POUŽITÍ
SK NÁVOD NA POUŽÍVANIE
RO MANUAL DE UTILIZARE
RU РУКОВОДСТВО ПО
ЭКСПЛУАТАЦИИ
UA ПРАВИЛА КОРИСТУВАННЯ
KZ ПАЙДАЛАНУ БОЙЫНША
НҰСҚАУЛЫҚ

3DE2DE
INHALT
Sicherheitshinweise 4
Lieferumfang 6
Symbole 6
Bestimmungsgemäße Verwendung 6
Nicht bestimmungsgemäße
Verwendung 6
Übersicht 7
Vor der ersten Benutzung 7
Inbetriebnahme 8
Anzeigen, Funktionen & Einstellungen 9
Reinigung & Pflege 11
Reinigung vom Geräte-Oberteil 13
Zubehör 14
Garantie 14
Recycling und Entsorgung 14
Venta-Service-Team 14
Was ist, wenn …? 15
Technische Daten 16
VIELEN DANK!
Wir sind überzeugt, dass der Venta Luftwäscher Ihre Erwartungen
übertreffen wird, und wünschen Ihnen viel Freude damit.
Bitte registrieren Sie Ihr Venta-Gerät:
venta-luftwaescher.de/produktregistrierung-deutschland
www.venta.at/produktregistrierung-oesterreich
www.venta-luftwaescher.ch/produktregistrierung-schweiz
Bitte lesen Sie diese Bedienungsanleitung vollständig durch, be-
wahren Sie sie zur späteren Verwendung auf und beachten Sie alle Si-
cherheitshinweise sowie die bestimmungsgemäße Verwendung.
Die aktuellste Version der Bedienungsanleitung finden Sie auf unserer Website
www.venta-luftwaescher.de
SEHR GEEHRTER KUNDE,
mit dem Comfort Plus Luftwäscher LW25 und LW45 haben Sie ein leistungs-
starkes Premiumprodukt erworben. Der Comfort Plus unterstützt die gesunde
Luftfeuchtigkeit sowie die natürliche Reduzierung von Schadstoffen in der Luft.
So funktioniert das Venta Prinzip
Die Raumluft wird über einen Lüfter in den mit Wasser befüllten Luftwäscher
geleitet, in dem ausgeklügelt angeordnete Plattenstapel rotieren. Über deren
Flächen wird hygienisch sauberes Wasser in den Raum verdunstet. Gleichzeitig
werden auf den Platten Schadstoffe wie Staub oder Pollen festgehalten, im
Wasser abgewaschen und im Luftwäscher gesammelt.
DE
AT
CH
DE
AT
CH

5DE4DE
∙Dieses Gerät ist für den Gebrauch durch Kinder ab
8 Jahren und Personen mit eingeschränkten körperlichen,
sensorischen oder mentalen Fähigkeiten oder mit man-
gelhafter Erfahrung und Kenntnissen geeignet, sofern sie
beaufsichtigt werden oder hinsichtlich der sicheren Ver-
wendung des Gerätes unterwiesen wurden und die beste-
henden Gefahren verstanden haben.
∙Bedienungsanleitung vor Inbetriebnahme vollständig
durchlesen und zum späteren Nachschlagen gut aufbe-
wahren.
∙Das Gerät ist kein Spielzeug für Kinder.
∙Reinigung und Benutzerpflege darf nicht von Kindern unter
8 Jahren bzw. ohne Aufsicht durchgeführt werden.
∙Das Gerät und dessen Steckernetzteil von Kindern unter
8 Jahren fernhalten.
∙Unsachgemäße Verwendung kann das Gerät beschädigen
und Körperverletzungen verursachen.
∙Das Gerät nur an geeignete Netzsteckdosen anschließen –
Netz-spannung gemäß den Typenschildangaben am Gerät.
∙Der Luftwäscher darf nur mit folgenden Steckernetz-
teilen betrieben werden: „Model Nr. BI13-240050-CdV /
FJSW1982400500E“.
∙Den Luftwäscher nie in Betrieb nehmen, wenn vom Stecker-
netzteil das Netzkabel oder der Netzstecker beschädigt ist.
∙Ziehen Sie vor jedem Reinigungs- oder Wartungseingriff
sowie zum Umstellen oder Transportieren des Gerätes das
Steckernetzteil aus der Steckdose.
∙Den Luftwäscher nie in Betrieb nehmen, wenn dieser
heruntergefallen ist oder auf eine andere Art beschädigt
wurde.
!SICHERHEITSHINWEISE
∙Reparaturen an Elektrogeräten dürfen nur von Fachkräften
durchgeführt werden. Durch unsachgemäße Reparaturen
können erhebliche Gefahren für den Benutzer entstehen.
∙Setzen Sie sich keinesfalls auf das Gerät und legen Sie
keine Gegenstände darauf.
∙Stecken Sie keine Fremdgegenstände in das Gerät.
∙Geräte-Oberteil nie in Wasser oder andere Flüssigkeiten
tauchen.
∙Den Luftwäscher nie überfüllen.
∙Den Luftwäscher nie mit vollem Behälter transportieren
oder kippen.
∙Niemals das Steckernetzteil am Netzkabel oder mit nassen
Händen aus der Steckdose ziehen.
∙Der Luftwäscher darf nur in komplett zusammengebautem
Zustand in Betrieb genommen werden.
∙Den Luftwäscher nur auf eine ebene, trockene Fläche stellen.
∙Das Gerät so aufstellen, dass es nicht umgestoßen werden
kann und dass niemand über das Gerät oder das Kabel
stolpern kann.
∙Halten Sie zu Gegenständen und Wänden einen Mindestab-
∙Maximale Aufstellungshöhe: 2000 Meter
∙Niemals die Lüftungsschlitze abdecken oder blockieren, um
eine Überhitzung/Beschädigung des Gerätes zu verhindern.
∙Dem Wasser ausschließlich Original-Venta-Zusätze beige-
ben. Für Schäden durch fremde Zusätze übernimmt Venta-
Luftwäscher GmbH keine Gewähr.
∙Ziehen Sie das Steckernetzteil aus der Steckdose, wenn Sie
das Gerät nicht gebrauchen.

7DE6DE
LIEFERUMFANG
1 × Venta Luftwäscher
1 ×
1 × Bedienungsanleitung
Falls Teile fehlen oder beschädigt sind, wenden Sie sich bitte an das VENTA-
Service-Team oder an Ihren lokalen Händler.
SYMBOLE
!Sicherheitshinweise: Aufmerksam lesen und befolgen, um Personen- und
Sachschäden zu vermeiden.
Ergänzende Informationen
Hilfreiche Tipps
BESTIMMUNGSGEMÄSSE
VERWENDUNG
Der Venta-Luftwäscher ist ein Haushaltsgerät zur Luftbefeuchtung und Luftrein-
igung von Wohn-, Büro- und Aufenthaltsräumen.
Das Gerät ist nicht für den Außenbereich geeignet. Jegliche anderweitige Ver-
wendung oder Veränderung des Gerätes wird als unsachgemäße Verwendung
betrachtet. Der Hersteller haftet nicht für Schäden oder Verletzungen infolge
einer unsachgemäßen Verwendung.
NICHT BESTIMMUNGS-
GEMÄSSE VERWENDUNG
Ein nicht bestimmungsgemäßer Gebrauch kann Gesundheit und Leben
gefährden. Dazu zählt der Einsatz unter folgenden Bedingungen:
· In Räumen mit explosionsgefährdeten und/oder aggressiven Atmosphären
· In Räumen mit hoher Lösemittelkonzentration
· In der Nähe von Schwimmbädern oder nassen Geländen
· Im Freien
1
2
4
5
6
7
8
3
Comfort Plus LW45 Comfort Plus LW25 Comfort Plus LW15
1 Display
2 Geräte-Oberteil
3 Steckernetzteil (montiert)
4 Transportsicherung
VOR DER ERSTEN BENUTZUNG
8aus Karton
entnehmen. Oberteil 2abnehmen. Transportsicherung 4aus Oberteil 2entfernen.
Plattenstapel 5aus Unterteil 7nehmen und Transportsicherung 6entfernen.
5 Plattenstapel
6 Transportsicherung
7 Geräte-Unterteil
8
ÜBERSICHT
i

9DE8DE
AUnterteil 7mit Leitungswasser bis maximal WATERLINE-Markierung
8zugeben (gesamter Flascheninhalt).
!Das Gerät darf niemals mit
aufgesetztem Oberteil be-
füllt werden!
iDie Zugabe des Hygienemit-
tels ist sehr wichtig, weil
dadurch die Luft optimal
befeuchtet und gereinigt wird.
BPlattenstapel 57einlegen und Oberteil 2auf Unterteil 7setzen.
CNetzstecker vom Steckernetzteil 3an Stromnetz anschließen und Gerät
durch kurzes Berühren auf Power-Taste im Display 1einschalten.
iNur wenn das Gerät am Stromnetz angeschlossen ist, leuchtet die
Power-Taste zum Ein- und Ausschalten des Gerätes.
INBETRIEBNAHME
A
B C
ANZEIGEN, FUNKTIONEN &
EINSTELLUNGEN
Anzeige Funktion
1HUMIDITY Luftfeuchtigkeit im Raum anzeigen.
2Drehzahlstufe Geschwindigkeit 1 - 2 - 3 anzeigen.
Die folgenden Anzeigen können durch leichtes Berühren verändert bzw.
ein- und ausgeschaltet werden.
3- und + Drehzahlstufe einstellen: - reduziert und + erhöht die
Geschwindigkeit.
4SLEEP Nachtmodus
EIN: Gerät dimmt die Displaybeleuchtung und reduziert
die Drehzahlstufe auf 1.
iDrehzahlstufe 2ist manuell mit + oder - Taste 3
veränderbar. Automatikbetrieb 6ist nicht möglich.
AUS: Helle Displaybeleuchtung und Gerät läuft mit einge-
stellter Drehzahlstufe 1 - 3.
5Power-Taste zum Ein- und Ausschalten des Gerätes.
!
1
2
3
4
5
3
6

11DE10 DE
Anzeige Funktion
6AUTO Automatik-Betrieb durch kurzes Berühren der AUTO-Tas-
te ein- bzw. ausschalten.
EIN: AUTO im Display blinkt kontinuierlich und Gerät regelt
automatisch die Drehzahlstufen je nach Luftfeuchtigkeit
im Raum.
iBeim Einschalten von AUTO erscheint in Anzeige
HUMIDITY 1
voreingestellt) zweimal blinkend, anschließend wieder die
gemessene Luftfeuchtigkeit im Raum.
Bei Überschreiten der voreingestellten Luftfeuchtig-
ab und in Geschwindigkeits-Anzeige 2erscheint keine
Drehzahlstufe. Es findet keine Luftbefeuchtung/Luftreini-
gung statt.
AUS: AUTO im Display leuchtet kontinuierlich und Gerät
läuft mit eingestellter Drehzahlstufe 1 - 3.
Gewünschte Luftfeuchtigkeit 30 – 70 % einstellen:
3 Sek. AUTO-Taste halten. Anzeige HUMIDITY 1blinkt kon-
tinuierlich. Mit - oder + Taste 3die gewünschte Luftfeuch-
Sek. halten bis Blinken in Anzeige HUMIDITY 1erlischt
und wieder die gemessene Luftfeuchtigkeit im Raum
angezeigt wird.
REINIGUNG & PFLEGE
!Achtung! Sicherstellen, dass bei allen Maßnahmen das Gerät ausge-
schaltet und das Steckernetzteil aus der Steckdose gezogen ist!
Anzeige Maßnahmen
7WATER Oberteil abnehmen. Unterteil mit Leitungswasser bis zur
WATERLINE-Markierung befüllen. Oberteil auf Unterteil
setzen und Gerät wieder in Betrieb nehmen.
iSobald zu wenig Wasser im Unterteil ist, schaltet das Gerät automa-
tisch ab und die WATER-Anzeige erscheint. In Anzeige HUMIDITY 1
blinken zwei Striche und die Luftfeuchtigkeit im Raum wird nicht
angezeigt.
Um die Raumluft kontinuierlich zu befeuchten und zu reinigen,
empfehlen wir, rechtzeitig Wasser nachzufüllen.
8SERVICE Oberteil abnehmen. Restwasser aus Unterteil leeren. Unterteil
und Plattenstapel abspülen. Unterteil mit Leitungswasser bis
maximal WATERLINE-Markierung befüllen und Venta-Hygie-
nemittel zugeben (Dosierung siehe Skalierung auf Flaschen-
rückseite). Gerät wieder montieren. SERVICE-Anzeige 8im
Display berühren und 3 Sek. halten bis sie erlischt.
iFür einen einwandfrei hygienischen Dauerbetrieb erinnert die SERVICE-
Anzeige alle 14 Tage, diese Maßnahme durchzuführen.
Diese Maßnahme kann immer bei Bedarf durchgeführt werden, auch
wenn SERVICE nicht angezeigt wird. Im Anschluss einfach SERVICE-
Anzeige 8berühren und 3 Sek. halten. Die nächste Erinnerung wird nun wieder
in 14 Tagen mit SERVICE angezeigt.
Sämtliche Rückstände in der Wasserwanne und am Plattenstapel (weiße, grün-gelb-
liche oder braune Ablagerungen bzw. Verfärbungen) beeinträchtigen NICHT die
Funktion des Gerätes. Zur halbjährlichen Reinigung empfehlen wir den Venta-Reiniger.
Bitte beachten Sie die Gebrauchsanweisung, die dem Venta-Reiniger beigefügt ist.
87

13DE
1
6
5
3
4
2
1
3
4
2
3
4
2
1
1
3
5
2
4
6
12 DE
REINIGUNG VOM
GERÄTE-OBERTEIL
Achtung! Sicherstellen, dass bei allen Maßnahmen das Gerät ausge-
schaltet und das Steckernetzteil aus der Steckdose gezogen ist!
01 Oberteil von Unterteil abnehmen. Auf Verriegelungstasten drücken, so
dass die Enden hochstehen.
02 Seitenteile nach außen wegklappen.
03 Gerippte Seitenflügel nach außen wegklappen.
04 Stecker vom Steckernetzteil aus Antriebseinheit ziehen 1. Antriebs-
einheit nach oben herausnehmen 2. Kabel vom Steckernetzteil aus
Halterung lösen 3und durch Öffnung des Oberteils nach unten heraus-
ziehen 4.
∙· Antriebseinheit und Steckernetzteil nicht zerlegen, nicht
ins Wasser tauchen und nicht mit Flüssigkeit in Berührung
bringen!
∙Antriebseinheit mit Ventilatorflügel und Getriebe nur mit
trockenem Tuch reinigen!
∙Zerlegtes Oberteil kann unter fließendem Wasser gereinigt
werden!
∙Zerlegtes Oberteil muss vor Montage absolut trocken sein!
05 Antriebseinheit seitenrichtig in Oberteil setzen 1. Stecker vom Stecker-
netzteil von unten durch Öffnung des Oberteils nach oben ziehen 2
und in Antriebseinheit stecken, bis er einrastet 3. Kabel in Halterung
befestigen 4.
06 Äußere Enden der Verriegelungstasten müssen hochstehen. Gerippte
Seitenflügel 1und 2nach oben klappen, anschließend die Seitenteile
3und 4. Durch Drücken auf die äußeren Enden der Verriegelungstas-
ten 5und 6Oberteil wieder richtig verschließen.
!
!

15DE14 DE
ZUBEHÖR
∙Venta-Hygienemittel für einen einwandfrei hygienischen Dauerbetrieb
∙Venta-Reiniger zur halbjährlichen Reinigung
∙Stimulierende Düfte für jede Jahreszeit und jede Stimmung
∙Venta-Rollwagen für einen mobilen Venta-Luftwäscher (nur für LW25- und
LW45-ComfortPlus)
∙Venta-Thermo-Hygrometer zur Überwachung Ihres idealen Raumklimas in den
einzelnen Räumen.
GARANTIE
Aufgrund der hohen Qualität garantiert die Venta-Luftwäscher GmbH für die
Dauer von zwei Jahren ab Kaufdatum, dass dieses Produkt bei sachgemäßer
Verwendung keine Defekte aufweist. Sollte doch einmal ein Material- oder Ver-
arbeitungsfehler auftreten, wenden Sie sich bitte an das VENTA-Service-Team
oder Ihren Händler. Zudem gelten die allgemeinen Garantiebedingungen von
Venta: www.venta-luftwaescher.de/service/garantie/
RECYCLING UND ENTSORGUNG
Das Verpackungsmaterial ist wiederverwertbar. Die Verpackung bitte
umweltgerecht entsorgen und der Wertstoffsammlung zuführen.
Das Gerät darf nicht im normalen Hausmüll entsorgt werden! Es muss
an einer ausgewiesenen Sammelstelle für Recycling von elektrischen
und elektronischen Geräten entsorgt werden (WEEE). Bitte benutzen Sie
die Ihnen zur Verfügung stehenden lokalen Rückgabe- und Sammelsys-
teme. Damit leisten Sie einen wertvollen Beitrag zum Umweltschutz und für die
menschliche Gesundheit. Für weitere Informationen wenden Sie sich bitte an die
örtlichen Behörden.
VENTA-SERVICE-TEAM
Sie benötigen weitere Informationen rund um den Venta-Luftwäscher oder Sie
möchten Zubehör bestellen? Kein Problem: Das VENTA-Service-Team kümmert
sich um Ihr Anliegen! Rufen Sie direkt an oder besuchen Sie die Venta Website.
DE +49 751 5008 88, www.venta-luftwaescher.de
AT +43 5572 202 539, www.venta.at
CH +41 41 781 15 15, www.venta-luftwaescher.ch
WAS IST, WENN …?
Sicherstellen, dass bei allen Maßnahmen das Gerät ausgeschaltet und
das Steckernetzteil aus der Steckdose gezogen ist!
... im Display E1 angezeigt wird?
Das Gerät hat automatisch abgeschaltet, weil die Verriegelungstasten am
Oberteil nicht richtig verschlossen sind.
Verriegelungstasten durch Drücken auf die äußeren Enden richtig
verschließen. Gerät mit Power-Taste aus- und wieder einschalten.
... im Display E2 angezeigt wird?
Das Gerät hat automatisch abgeschaltet, weil der Motor überlastet ist (z. Bsp.
durch Eindringen von Fremdkörpern o. ä.).
Maßnahme: Oberteil abnehmen. Überprüfen, ob Plattenstapel im Unterteil sowie
Ventilatorflügel im Oberteil frei beweglich sind. Anschließend Gerät wieder
in Betrieb nehmen.
... die Anzeigen im Display mit stärkerem Druck berührt werden?
Dadurch können sichtbare „Druckstellen“ wahrgenommen werden, was keinen
Qualitätsmangel darstellt – Nach Wegfall des Druckes ist diese „Druckstelle“
nicht mehr sichtbar.
... im Display nicht die Power-Taste zum Einschalten des Gerätes
erscheint?
Bitte überprüfen, ob das Steckernetzteil am Stromnetz angeschlossen ist.
... im Display nicht die Power-Taste zum Einschalten des Gerätes er-
scheint, obwohl das Steckernetzteil am Stromnetz angeschlossen ist?
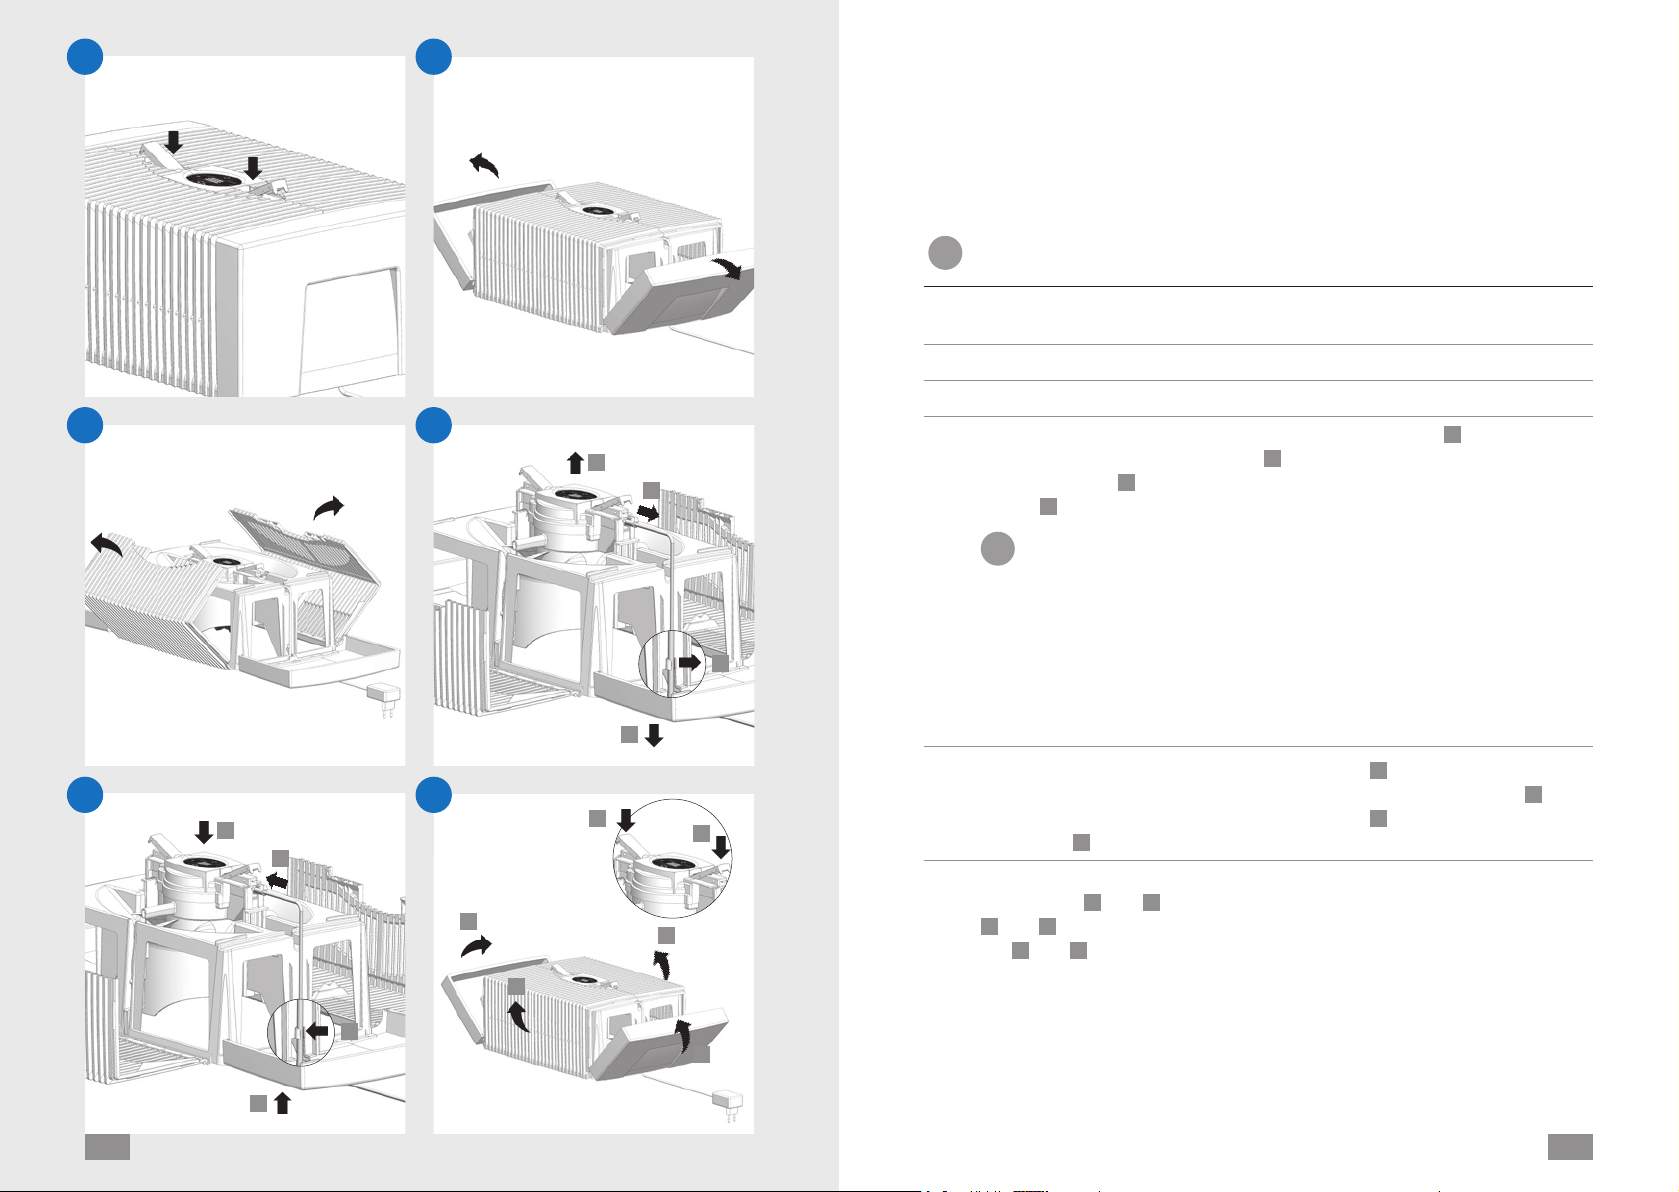
Bitte überprüfen, ob das Steckernetzteil fest in der Antriebseinheit steckt.
Maßnahme: Oberteil abnehmen. Korrekten Sitz überprüfen (siehe An-
leitung Reinigung vom Geräte-Oberteil). Anschließend Gerät wieder in
Betrieb nehmen.
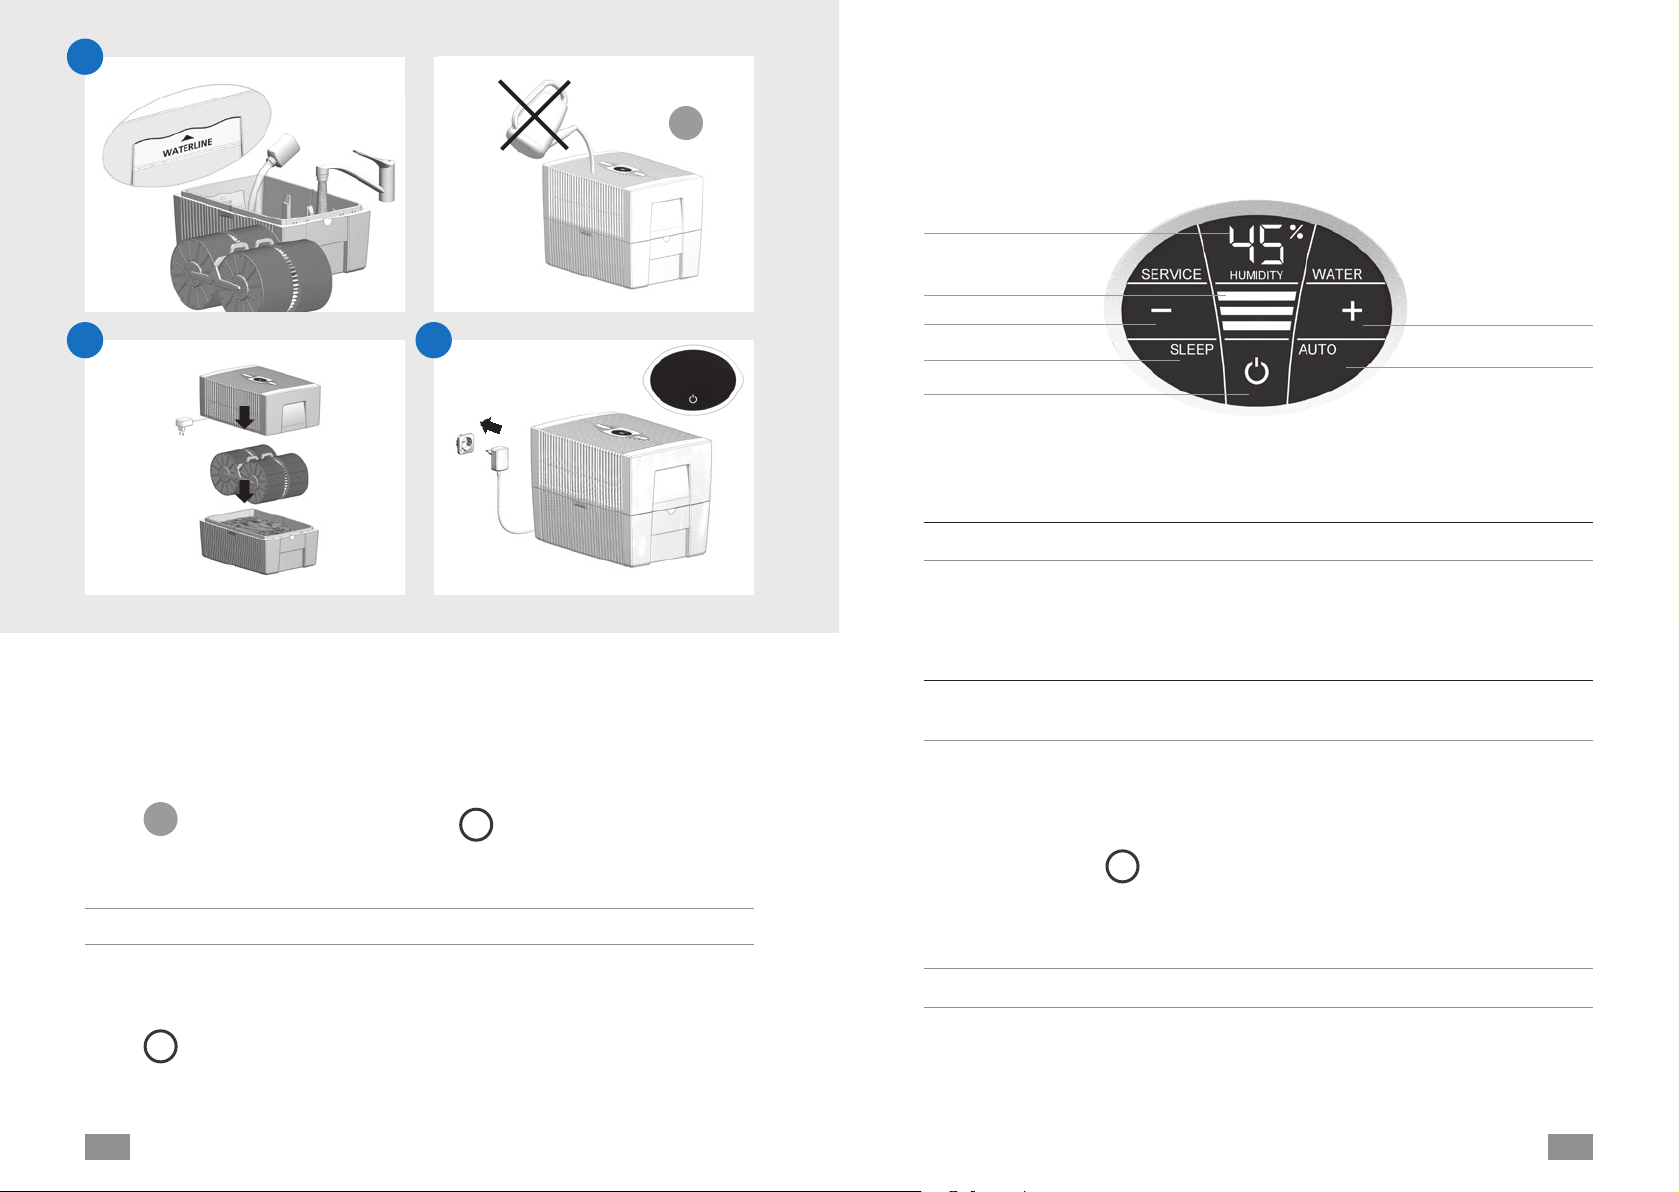
... im Display WATER angezeigt wird, obwohl Wasser im Unterteil ist?
Bitte überprüfen, ob genügend Wasser im Unterteil ist und/oder ob das Oberteil
richtig auf dem Unterteil sitzt.
Maßnahme: Oberteil abnehmen. Unterteil mit Leitungswasser bis zur
WATERLINE Markierung befüllen. Oberteil richtig auf Unterteil setzen.
Dabei darf Steckernetzteil nicht zwischen Ober- und Unterteil eingeklemmt
sein. Anschließend Gerät wieder in Betrieb nehmen.
!
i
i
i
i

Modell Comfort Plus
LW15
Comfort Plus
LW25
Comfort Plus
LW45
Für Räume bis*
Netzspannung
Drehzahlstufen 3 3 3
Schallpegel
Maße
Gewicht
Leistungsaufnahme
(Stufe 1-2-3)
ca. 3-5-8 Watt ca. 3-5-8 Watt ca. 3-5-8 Watt
Wasserinhalt 5 Liter 7 Liter 10 Liter
Garantie 2 Jahre 2 Jahre 2 Jahre
TECHNISCHE DATEN
EN 1716 DE
CONTENT
Safety instructions 18
Scope of delivery 20
Symbols 20
Intended use 20
Not intended use 20
Overview 21
Before first use 21
Commissioning 22
Displays, functions & settings 23
Cleaning & maintenance 25
Cleaning the upper housing
of the device 27
Warranty 28
Recycling and disposal 28
Venta service team 28
What happens if…? 29
Technical data 30
THANK YOU!
We are convinced that the Venta Airwasher will exceed your expectations,
and we hope you enjoy it.
Please register your Venta:
www.venta-luftwaescher.de/produktregistrierung-deutschland
Please read this operating manual in its entirety, keep it for later reference and
note all safety instructions as well as instructions for the proper use of the device.
The most current version of the operating manual can be found on
our website at www.venta-luftwaescher.de
DE
DE
DEAR CUSTOMER,
when you purchased the LW15/LW25/LW45 Comfort Plus of Venta, you acqui-
red a high-performance quality product for air humidification and air purification
so you can create your ideal indoor climate!
Unique Functionality
Dry and polluted ambient air is fed into the device and through a disk stack that
rotates in water. This evaporates pure water and the room air is automatically
humidified according to the recognised best cold humidification method – this
excludes the possibility of over-humidification and lime deposits. The room
over the course of time. The water is the filter: It‘s new and fresh every day, year
after year with consistently high humidification and cleaning performance.

ENEN 1918
∙This appliance is not suitable for use by children over the age of 8 years and
people with restricted physical, sensory, or mental capacities or lack of experi-
ence and knowledge unless they are supervised or have received instructions
on the use of the appliance and understand the existing hazards.
∙Read the operating instructions completely before putting the appliance into
operation and keep them for later reference.
∙The appliance is not a toy for children.
∙Cleaning and user maintenance may not be performed by children under the
age of 8 years or without supervision.
∙Keep the appliance and its switching power supply out of the reach of children
under the age of 8 years.
∙Improper use can damage the appliance and cause physical injuries.
∙Plug the appliance into suitable power outlets only – the mains voltage must
correspond to the nameplate data on the appliance.
∙The Airwasher can only be operated with the “Model No. BI13-240050... /
FJSW1982400500E” switching power supply (included).
∙Never use the Airwasher if it has a damaged switching power supply or cable,
or after it has malfunctioned or if it has been dropped or damaged in any
other way.
∙Disconnect the power plug before every cleaning or maintenance operation or
transportation of the appliance.
∙Never use the Airwasher if it has been dropped or damaged in any other way.
∙Electrical appliances should only be repaired by professional specialists. Ama-
teur repairs could result in considerable danger to the user.
∙Do not sit on the appliance and do not place any objects on it.
∙Do not put any foreign objects into the appliance.
∙Do not immerse the upper housing in water or any other liquid.
∙Never overfill the Airwasher.
∙Never transport or overbalance the Airwasher with a filled lower housing.
∙Never unplug the appliance by pulling on the cable or pulling the switching
power supply out with wet hands.
∙The Airwasher should only be operated when it is completely assembled.
!SAFETY INSTRUCTIONS
∙Place the Airwasher on a stable surface which is flat and dry.
∙Set up the device so that it cannot be knocked over, and so that no one can
trip over it or its cable.
∙
walls.
∙
∙Never cover or block the vents to prevent overheating/damage to the appli-
ance.
∙Only add original Venta additives to the water. Venta-Luftwäscher GmbH
accepts no liability for damage which may be caused by the use of other addi-
tives.
∙Unplug the appliance when it is not in use.

ENEN 2120
SCOPE OF DELIVERY
1 × Venta Airwasher
1 ×
1 × operating manual
If parts are missing or damaged, please contact the VENTA service team or your
local dealer.
SYMBOLS
!Safety instructions: Read and adhere to these instructions carefully, in or-
der to avoid personal and material damages.
Supplementary information
Helpful tips
INTENDED USE
The Venta Airwasher is a domestic appliance for moistening and cleansing the
air in homes, offices and leisure facilities.
The appliance is not suitable for outdoor areas.
Any other use or modification of the appliance is considered to be improper
use. The manufacturer is not liable for any damage or injuries resulting from
improper use.
NOT INTENDED USE
Using the appliance for something other than the intended purpose can endan-
ger health and lives. This includes use under the following conditions:
· In rooms or locations where there is risk of explosion and/or where there is an
aggressive atmosphere.
· In rooms where there is a high concentration of solvents.
· In the vicinity of swimming pools or other wet areas.
· In the outdoor area.
1
2
4
5
6
7
8
3
Comfort Plus LW45 Comfort Plus LW25 Comfort Plus LW15
1 Display
2 Upper housing
3 Switching power supply (assembled)
4 Transport protection
BEFORE FIRST USE
8from
carton. Remove upper housing 2. Remove transport protection 4from upper
housing 2. Remove disk stack 5from lower housing 7and transport protection 6.
5 Disk stack
6 Transport protection
7 Lower housing
8
OVERVIEW
i

ENEN 2322
AFill lower housing 7with tap water up to maximum WATERLINE marking and
8(complete content of bottle).
!The device may never
be filled with the upper
housing in place!
iAdding the hygiene additive is
very important so that the air
is optimally humidified and
cleaned.
BInsert disk stack 57and place upper housing 2on lower
housing 7.
CConnect mains plug of switching power supply 3to the mains and switch on
1.
iOnly once the device is connected to the mains will the
power button glow to switch the device on and off.
COMMISSIONING
A
B C
!
DISPLAYS, FUNCTIONS &
SETTINGS
Display Function
1HUMIDITY Display humidity in the room.
2rotational
speed
Display rotational speed 1 - 2 - 3.
The following displays can be changed or switched on and off by lightly
touching them.
3- and + rotational speed: - reduces and + increases the speed.
4SLEEP Night mode
EIN: The device dims the display lighting and reduces the
rotational speed to 1.
irotational speed 2can be changed manually with +
or - button 3. Automatic operation 6is not possible.
OFF: Bright display lighting and device runs with set rotati-
onal speed 1 - 3.
5Power button to switch the device on and off.
1
2
3
4
5
3
6

ENEN 25
Display Function
6AUTO Switch Automatic operation on device on or off by briefly
touching the AUTO button
ON: AUTO in the display flashes continuously and device
automatically regulates the rotational speed depending on
the humidity in the room.
i
pre-set) flashes twice and then will show the meas-
ured humidity in the room in the HUMIDITY display 1.
the fan will switch off after approx. 60 seconds and
no rotational speed will appear in speed display 2. No air
humidification/air purification will take place.
OFF: AUTO in the display is lit continuously, and the device
runs at the set rotational speed 1 - 3.
Set desired humidity 30 – 70 %:
Hold AUTO-button for 3 seconds. The HUMIDITY 1display
increments) using the - or + buttons 3. Hold AUTO-button
for 3seconds again until the flashing in display HUMIDITY
1and the humidity measured in the room is shown again.
CLEANING & MAINTENANCE
!Attention! Ensure that the device is switched off during any measures
and the switching power supply is disconnected from the outlet!
Display Measures
7WATER Remove upper housing. Fill lower housing with tap water up
to the WATERLINE marking. Place upper housing on lower
housing and put device in operation again.
iAs soon as there is not enough water in the lower housing, the device
is switched off automatically and the WATER display appears. In the
HUMIDITY display 1, two lines will flash and the humidity in the room
is not shown.
To humidify and clean the room air continuously, we recommend
refilling the water in a timely manner.
8SERVICE Remove upper housing. Drain residual water from lower hous-
ing. Rinse lower housing and disk stack. Fill lower housing with
tap water up to the WATERLINE marking maximum and add the
Venta hygiene additive (for dosage see scale on rear of bottle). Re-
assemble the device. Touch SERVICE display 8
hold it for 3 seconds until it goes off.
iFor flawlessly hygienic continuous operation, the SERVICE display
indicates a reminder every 14 days that this measure needs to be
carried out.
This measure can be carried out if required, even if the SERVICE
message is not shown. Afterwards, simply touch SERVICE display 8
and hold for 3 seconds. The next reminder will now be shown again in 14 days
with the SERVICE message
Any remaining liquid in the water tray and on the disk stack (white, green-yellow or
brown deposits or discolorations) do NOT impair the function of the device.
For the six-monthly cleaning, we recommend the Venta Cleaner. Please note the
instruction manual included with the Venta Cleaner.
87
24

6
5
32
1
4
2
3
1
1
3
5
2
4
6
1
4
ENEN 2726
3
4
2
CLEANING THE UPPER
HOUSING OF THE DEVICE
Attention! Ensure that the device is switched off during any measures
and the switching power supply is disconnected from the outlet!
01 Detach upper housing from lower housing. Press locking buttons so
that the ends stand up.
02 Fold side parts out of the way.
03 Fold ribbed wings out of the way.
04 Pull the plug of the switching power supply out of the drive unit 1. Pull
drive unit upwards and out 2. Disconnect the cable from the switching
power supply from the holding bracket 3and pull out through the ope-
ning of the upper housing downward and out 4.
· Do not disassemble the drive unit and switching power
supply, do not submerge into the water and do not bring
in contact with liquid!
∙Only clean the drive unit with fan blades and gear with
a dry cloth!
∙The disassembled upper housing can be cleaned under
running water!
∙The disassembled upper housing must be absolute dry
before assembly!
05 Place drive unit in upper housing and ensure that it is laterally correct 1.
Pull plug of switching power supply from bottom through opening of
the upper housing upwards 2and plug into drive unit up to the limit 3.
Fasten cable in holding bracket 4.
06 The outer ends of the locking buttons must be standing up. Fold ribbed
wings 1and 2upwards, and finally the side parts 3and 4. Close
upper housing properly again by pushing on the outer ends of locking
buttons 5and 6.
!
!

ENEN 2928
ACCESSORIES
∙Venta hygiene additive for flawlessly hygienic continuous operation
∙Venta Cleaner for six-monthly cleaning
∙Stimulating scents for every season and any mood
∙Venta roller cart for a mobile Venta Airwasher (only for LW25 and
LW45 ComfortPlus)
∙Venta thermo hygrometer for the monitoring of your ideal indoor climate
in the individual rooms
WARRANTY
Due to the high quality of the product, the Venta-Luftwäscher GmbH guarantees
that this product when used properly will not be defective for a duration of two
years from the purchase date. If a material or processing error should occur any-
way, please contact the VENTA service team or your dealer. Venta‘s general war-
ranty conditions also apply: www.venta-luftwaescher.de/service/garantie/
RECYCLING AND DISPOSAL
The packaging material is re-usable. Please dispose of the packaging
in an environmentally friendly way and bring it to a collection centre for
recyclable materials.
The device may not be disposed of in normal household waste! It must be
disposed of at a selected collection point for the recycling of electric and
electronic devices (WEEE). Please use the local return and collecting sys-
tems that are available to you. By doing so, you are making a valuable
contribution to environmental protection and human health. For additional infor-
mation, please contact the local authorities.
VENTA-SERVICE-TEAM
Do you need additional information about the Venta Airwasher or do you want to
order accessories? No problem: the VENTA service team will take care of it! Call
the team directly or visit the Venta website.
DE +49 751 5008 88, www.venta-luftwaescher.de
WHAT HAPPENS IF…?
Ensure that the device is switched off during any measures and the
switching power supply is disconnected from the outlet!
... E1 is shown in the display?
The device has switched off automatically because the locking buttons on the
upper housing are not closed properly.
Close upper housing properly again by pushing on the outer ends of lo-
cking buttons. Switch device off and on with the power button .
... E2 is shown in the display?
The device has switched off automatically, because the motor is overstrained
(e.g. through the intrusion of foreign objects or similar).
Measure: Remove upper housing. Check whether the disk stack in the lo-
wer housing as well as fan blades in the upper housing are freely movable.
Next, place the device back in operation.
... the display is touched with stronger pressure?
This can result in visible „pressure points“, which does not represent a quality
defect. After the pressure is removed, these „pressure points“ will disappear.
... the power button to switch on the device does not appear in the display?
Please check whether the switching power supply is connected to the mains.
... the power button to switch on the device does not appear in the display,
even though the switching power supply is connected to the mains?
Please check whether the switching power supply is firmly plugged into the
drive unit
Measure: Remove upper housing. Check correct seating (see instructions
to clean the upper housing of the device). Next, place the device back in
operation.
... WATER is shown in the display, even though there is water in the lower
housing?
Please check whether there is sufficient water in the lower housing and/or
whether the upper housing is placed correctly on the lower housing.
Measure: Remove upper housing. Fill lower housing with tap water to
the WATERLINE marking. Place upper housing correctly on lower housing.
The switching power supply may not be jammed between the upper and
lower housings. Next, place the device back in operation.
!
i
i
i
i

Model Comfort Plus
LW15
Comfort Plus
LW25
Comfort Plus
LW45
For rooms*
Mains voltage
Speeds 3 3 3
Sound level
Dimensions
Weight
Motor output
(Speed 1-2-3)
ca. 3-5-8 Watt ca. 3-5-8 Watt ca. 3-5-8 Watt
Water capacity 5 L 7 L 10 L
Warranty 2 years 2 years 2 years
TECHNICAL DATA
31FREN30
TABLE DES MATIÈRES
Consignes de sécurité 32
Contenu de la livraison 34
Symboles 34
Utilisation conforme 34
Utilisation non conforme 34
Vue d‘ensemble 35
Avant la première utilisation 35
Mise en service 36
Affichages, fonctions et réglages 37
Nettoyage & entretien 39
Nettoyage de la partie supérieure
de l‘appareil 41
Accessoires 42
Garantie 42
Recyclage et élimination 42
Équipe de service venta 42
Que faire si…? 43
Caractéristiques techniques 44
MERCI BEAUCOUP !
Nous sommes convaincus que l‘Airwasher Venta dépassera vos attentes et
nous vous en souhaitons une bonne utilisation.
Enregistrez votre produit Venta:
venta-luftwaescher.de/produktregistrierung-deutschland
www.venta.at/produktregistrierung-oesterreich
Veuillez lire ce mode d‘emploi dans son intégralité, le conserv- er
pour pouvoir vous y reporter ultérieurement et respecter toutes les
consignes de sécurité ainsi que l‘usage auquel il est destiné.
Vous trouverez la dernière version du mode d‘emploi sur notre site Internet
www.venta-luftwaescher.ch, www.venta-airwasher.nl
CHER CLIENT,
Avec le LW15/LW25/LW45 COMFORT Plus de VENTA, vous avez acquis un pro-
duit performant et de qualité pour l‘humidification et la purification de l‘air, créant
ainsi votre climat ambiant idéal !
Fonctionnalité unique
L‘air intérieur sec et vicié est acheminé dans l‘appareil et conduit à travers une
pile de disques qui tourne dans l‘eau. L‘eau pure s‘évapore et l‘air ambiant est
humidifié automatiquement et correctement selon la meilleure méthode recon-
nue d‘évaporation à froid. Toute surhumidification et précipitation calcaire est
exclue. En même temps, l‘air ambiant est purifié. Même les plus petites parti-
pas de filtres qui se salissent avec le temps. L‘eau est le filtre : nouveau et frais
chaque jour et année après année, avec une performance d‘humidification et de
nettoyage élevée et constante.
CH
NL
CH
NL

33FR32 FR
∙Cet appareil n’est pas destiné à être utilisé par des enfants âgés de 8 ans
et plus et par des personnes dont les capacités physiques, sensorielles ou
mentales sont diminuées ou ne disposant pas de l’expérience et de la con-
naissance nécessaires, à moins qu’elles ne soient supervisées ou que des
instructions pour une utilisation sûre de l’appareil ne leur aient été fournies et
qu’ils n’aient compris les dangers existants.
∙Lire le mode d’emploi intégralement avant la mise en service et le conserver
en lieu sûr pour toute consultation ultérieure.
∙Cet appareil n’est pas un jouet pour enfants.
∙Le nettoyage et la gestion des utilisateurs ne doivent pas être effectués par
des enfants âgés de moins de 8 ans ou bien en l’absence de supervision.
∙Tenir l’appareil et la fiche d’alimentation hors de portée des enfants âgés de
moins de 8 ans.
∙Une utilisation non conforme est susceptible d’endommager l’appareil et de
provoquer des blessures corporelles.
∙Raccorder l’appareil uniquement à des prises courant appropriées – ten-
sion du réseau conformément aux indications sur la plaque signalétique de
l’appareil.
∙L‘Airwasher ne doit être utilisé qu’avec la fiche d’alimentation « modèle n°BI13-
240050... / FJSW198240050... ».
∙Ne jamais utiliser l‘Airwasher lorsque le câble ou la fiche d’alimentation sont
endommagés.
∙Avant toute intervention de nettoyage ou de maintenance ainsi que pour dé-
placer ou transporter l’appareil, débrancher la fiche de la prise.
∙Ne jamais utiliser l’Airwasher si ce dernier a chuté ou s’il a été endommagé de
toute autre façon.
∙Les réparations d’appareils électriques doivent être effectuées uniquement
par des spécialistes. Toute réparation non conforme peut entraîner des
risques considérables pour l’utilisateur.
∙Ne s’asseoir en aucun cas sur l’appareil et ne poser aucun objet dessus.
∙Ne pas insérer de corps étranger dans l’appareil.
∙Ne jamais immerger la partie supérieure de l‘appareil dans l’eau ou dans tout
autre liquide.
!CONSIGNES DE SÉCURITÉ
∙Ne jamais remplir trop l’Airwasher.
∙Ne jamais transporter ou basculer l’Airwasher avec la cuve remplie.
∙
sur le câble ou avec des mains humides.
∙L’Airwasher doit être mis en marche uniquement s’il est entièrement assemblé.
∙Poser l’Airwasher uniquement sur une surface plane et sèche.
∙Installer l’appareil de sorte à ce que personne ne puisse trébucher sur le câble
ou sur l’appareil ou le renverser.
∙
∙L’altitude de mettre maximale: 2000 mètre.
∙Ne jamais recouvrir ou bloquer les fentes d’aération afin d’empêcher toute
surchauffeou tout endommagement de l’appareil.
∙N‘ajouter à l‘eau que des additifs Venta originaux. La société Venta-Luft-
wäscher GmbH ne prend aucune garantie pour les dommages dus à des
additifs externes.
∙Retirez la fiche d’alimentation de la prise de courant, lorsque vous n’utilisez
pas l’appareil.

35FR34 FR
CONTENU DE LA LIVRAISON
1 × Airwasher Venta
1 ×
1 × mode d’emploi
En cas de pièces manquantes ou endommagées, veuillez contacter l’équipe du
SAV VENTA ou votre revendeur local.
SYMBOLES
Consignes de sécurité : Lire attentivement et suivre les instructions pour
éviter les blessures corporelles et les dommages matériels.
Renseignements complémentaires
Conseils utiles
UTILISATION CONFORME
L‘Airwasher Venta est un appareil ménager destiné à humidifier et purifier l’air
des bureaux, pièces de séjour et d’habitation.
L’appareil ne convient pas pour une utilisation en extérieur. Toute autre utilisa-
tion ou toute modification de l’appareil est considérée comme utilisation non
conforme. Le fabricant décline toute responsabilité en cas de dommages ou de
blessures résultant d’une utilisation non conforme.
UTILISATION NON CONFORME
Un emploi non conforme peut entraîner un risque pour la santé et la vie. Ceci inclut l’uti-
lisation dans les conditions suivantes :
dans des pièces à atmosphères explosives et/ou agressives.
dans des pièces à concentration en solvant élevée.
à proximité de piscines ou de terrains humides.
pour une utilisation en extérieur.
!
1
2
4
5
6
7
8
3
Comfort Plus LW45 Comfort Plus LW25 Comfort Plus LW15
1 Écran
2 Partie supérieure de l‘appareil
3 Fiche d’alimentation
4 Fixation de transport
AVANT LA PREMIÈRE
UTILISATION
8de
la boîte en carton. Retirer la partie supérieure 2. Retirer la fixation de transport
4de la partie supérieure 2. Retirer la pile de disques 5de la partie inférieure 7et
retirer la fixation de transport 6.
5 Pile de disques
6 Fixation de transport
7 Partie inférieure de l‘appareil
8
VUE D‘ENSEMBLE
i

37FR36 FR
ARemplir la partie inférieure 7avec de l‘eau du robinet au maximum jusqu‘au
8(tout le contenu de la
bouteille).
!L‘appareil ne doit jamais
être rempli lorsque la partie
supérieure est fixée !
iL‘ajout de l‘agent hygiénique
est très important car il
humidifie et purifie l‘air de
manière optimale.
BInsérer la pile de disques 5dans la partie inférieure 7et placer la partie supéri-
eure 2sur la partie inférieure 7.
C3sur le secteur et allumer
l‘appareil en appuyant brièvement sur le bouton marche/arrêt de l‘écran 1.
iLe bouton marche/arrêt de l‘appareil ne s‘allume que lorsque
l‘appareil est branché sur le secteur.
MISE EN SERVICE
A
B C
!
AFFICHAGES, FONCTIONS ET
RÉGLAGES
Affichage Fonction
1HUMIDITY de l‘humidité de la pièce.
2Niveau de
vitesse
vitesse 1 - 2 - 3.
Les affichages suivants peuvent être changés ou activés et désactivés en
les touchant légèrement.
3- et + Régler le niveau de vitesse : - réduit et + augmente la vitesse.
4SLEEP Mode nuit
ON : l‘appareil atténue l‘éclairage de l‘écran et réduit le
niveau de vitesse à 1.
iLe niveau de vitesse 2peut être modifié manuellement
avec les boutons + ou - 3. Le mode automatique 6n‘est
pas possible.
OFF : l‘éclairage de l‘écran s‘allume et l‘appareil fonctionne
à une vitesse réglée aux niveaux 1 à 3.
5Touche marche/arrêt pour allumer et éteindre l‘appareil.
1
2
3
4
5
3
6

39FR38 FR
Affichage Fonction
6AUTO Activer et désactiver le mode automatique en appuyant
sur la touche AUTO.
ON : AUTO clignote en continu sur l‘écran et l‘appareil
règle automatiquement les niveaux de vitesse en fonction
de l‘humidité de la pièce.
iLorsque AUTO est activé, l‘affichage HUMIDITY 1
clignote deux fois, suivie de l‘humidité mesurée dans la
pièce.
Si le taux d‘humidité préréglé est dépassé de plus de
secondes et aucun niveau de vitesse n‘apparaît sur
l‘affichage de vitesse 2. Il n‘y a pas d’humidification/de
purification de l’air.
OFF : AUTO sur l‘écran s‘allume en permanence et
l‘appareil fonctionne au niveau de vitesse réglé 1 - 3.
Régler l‘humidité de l‘air souhaitée sur 30 - 70 % :
Maintenir le bouton AUTO enfoncé pendant 3 secondes.
L‘affichage HUMIDITY 1clignote en continu. Utiliser la
touche - ou + 3pour régler l‘humidité souhaitée (par
enfoncée pendant 3 secondes jusqu‘à ce que HUMIDITY 1
disparaisse de l‘affichage et que l‘humidité mesurée dans
la pièce s‘affiche à nouveau.
NETTOYAGE & ENTRETIEN
!Attention ! S‘assurer que l‘appareil est éteint et que le bloc
d‘alimentation est débranché de la prise de courant !
Affichage Mesures
7WATER Retirer la partie supérieure. Remplir la partie inférieure
avec de l‘eau du robinet jusqu‘au repère WATERLINE. Pla-
cer la partie supérieure sur la partie inférieure et remettre
l‘appareil en service.
iDès qu‘il y a trop peu d‘eau dans la partie inférieure, l‘appareil
s‘éteint automatiquement et l‘affichage WATER apparaît. Dans
l‘affichage HUMIDITY 1, deux tirets clignotent et l‘humidité de la
pièce n‘est pas affichée.
Afin d‘humidifier et de purifier l‘air ambiant en continu, nous vous
recommandons de faire l‘appoint d‘eau en temps utile.n.
8SERVICE Retirer la partie supérieure. Vider l‘eau résiduelle de la
partie inférieure. Rincer la partie inférieure et la pile de
disques. Remplir la partie inférieure avec de l‘eau du robi-
net au maximum jusqu‘au repère WATERLINE et ajouter
l‘agent hygiénique Venta (pour le dosage, voir la graduation
au dos de la bouteille). Remonter l‘appareil. Appuyer sur
l‘affichage SERVICE 8à l‘écran et le maintenir enfoncé
pendant 3 secondes jusqu‘à ce qu‘il s‘éteigne.
iPour un fonctionnement hygiénique parfait en continu, l’affichage
SERVICE vous rappelle d’effectuer cette opération tous les 14 jours.
Cette opération peut toujours être effectuée si nécessaire, même si
SERVICE n’est pas affiché. Il suffit ensuite de toucher l’affichage
SERVICE 8et de le maintenir enfoncé pendant 3 secondes. Le prochain
rappel s’affiche de nouveau 14 jours plus tard, avec SERVICE.
Tous les résidus présents dans le bac à eau et sur la pile de disques (dépôts ou
décolorations blancs, verts-jaunes ou bruns) n‘altèrent PAS le fonctionnement de
l‘appareil. Pour le nettoyage semestriel, nous recommandons le nettoyant Venta.
Veuillez respecter le mode d‘emploi joint au nettoyant Venta.
87
Other manuals for COMFORT PLUS LW15
3
This manual suits for next models
2
Table of contents
Languages:
Other Venta Air Cleaner manuals

Venta
Venta PROFESSIONAL HYBRID AH902 User manual

Venta
Venta LW45 User manual

Venta
Venta LP60 Ultra Purifier User manual

Venta
Venta AW902 User manual

Venta
Venta AW902 User manual

Venta
Venta COMFORT PLUS LW15 User manual

Venta
Venta LP60 Ultra Purifier User manual

Venta
Venta LPH60 WIFI User manual

Venta
Venta LW 14 User manual

Venta
Venta LW60T WiFi User manual