manuals.online logo
Brands
  1. Home
  2. •
  3. Brands
  4. •
  5. Ventair
  6. •
  7. Heater
  8. •
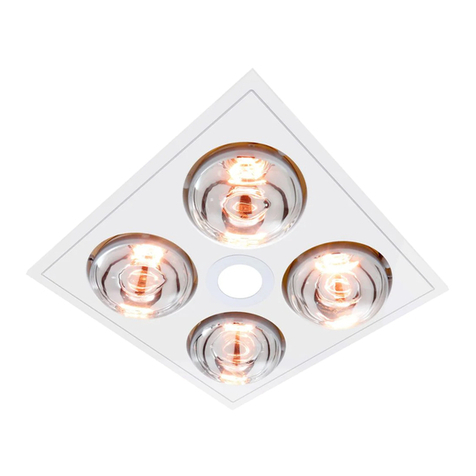
  9. Ventair MYKA 4 User manual

Ventair MYKA 4 User manual

IMPORTANT INSTALLATION AND WARRANTY INSTRUCTIONS
.
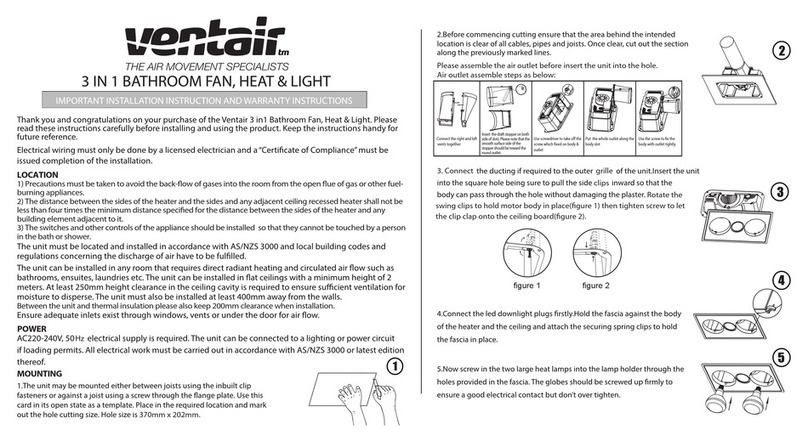
MOUNTING
1.The unit may be mounted either between
joists using the inbuilt clip fasteners or
against a joist using a screw through the
as a template. Place in the required location
and mark out the hole cutting size. Hole
size is 310mm x 300mm .
2.Before commencing cutting ensure that
the area behind the intended location is
clear of all cables, pipes and joists. Once
clear, cut out the section along the
previously marked lines.
3.Remove 4 heat lamps from the unit,then
remove the plug of the led downlight
inside the housing.Unfasten the fascia
retaining spring clips inside the housing
,and remove the fascia.Connet the
ducting(if required) to the outer grill of the
unit.Insert the unit into the square hole
being sure to pull the side springs inward
so that the body can pass through the hole
without damaging the plaster. Ensure that
the unit is held securely in place by the
clips. If required, additional screws can be
used to aid holding the unit in the ceiling.
this purpose.
4.Connect the led downlight plugs fristly
.Hold the fascia against the body of the
heater and the ceiling and attach the
securing spring clips to hold the fascia in
place.
5.Now screw in the four large heat lamps
into the lamp holder through the holes
provided in the fascia. The globes should be
electrical contact but don’t over tighten.
1
2
5
3
4
Thank you and congratulations on your purchase of the
Ventair 3 in1 Bathroom Fan, Heat & Light. Please read
these instructions carefully before installing and using the
product. Keep the instructions handy for future reference.
Electrical wiring must only be done by a licensed
issued completion of the installation.
LOCATION
The unit must be located and installed in accordance with
AS/NZS 3000 and local building codes and regulations
The unit can be installed in any room that requires direct
ceilings with a minimum height of 2.1 meters. At least
250mm height clearance in the ceiling cavity is required
The unit must also be installed at least 400mm away from
the walls.
Ensure adequate inlets exist through windows, vents or
POWER
AC220-240V, 50/60Hz electrical supply is required. The
unit can be connected to a lighting or power circuit if
loading permits. All electrical work must be carried out in
accordance with AS/NZS 3000 or latest edition thereof.
ELECTRICAL WIRING
1.Clip the switches into the backing plate in the desired order and
install the plate on the wall.
2.Connect the wiring to the four switches as shown in the below
electrical diagram.
3.Remove the terminal cover on the heater unitand wire according
to the label adjacent to the terminal block.Make sure all cables are
securely connected and refit the terminal cover.
4.Clean the fascia and globes with a soft moist cloth.Turn on power
and check the switch operation.
The bathroom heater unit must be wired through either a plug and socket or an all-pole
disconnecting switch in accordance with Australian Wiring Rules AS/NZS 3000.
Note: This unit is fitted with a thermostat switch which will operate to automatically
switch the fan on in the event that the internal temperature of the unit exceeds 80
℃
.
REPLACEMENT GLOBES
HEAT LAMPS:The heat lamps must only be replaced with 275 watt
CENTRE LAMP:
CARE AND MAINTENANCE
1.During the installation of this bathroom heater, please make sure
that the person in the bathtub or in the shower area cannot reach the
electrical switches and other electrical controllers.
2.This bathroom heater mustn’t be installed below the electrical outlet.
3.This bathroom heater mustn’t be installed near by the curtains and
other
combustible materials.
4. This bathroom heater must under no circumstances to be covered with
insulation material or similar material.
5. Joists, beams and rafters shall not be cut or notched to install
thisbathroom heater.
6.Lamps must be cool before cleaning. To clean bulbs and surroundswipe
with a cloth dampened with detergent or liquid glass cleaner.
7.To prolong the life of yours 3-in-1 bathroom heater fan light, avoid using
heat lamp alone for longer than 10 minutes.
Using the fan function along with the heat lamp to allow
cooling
of
your
3-in-1 bathroom heater light.
8. This appliance is not intended for use by persons (including children)
with reduced physical, sensory or mental capabilities, or lack of experience
and knowledge, unless they have been given supervision or instruction
concerning use of the appliance by a person responsible for their safety.
Children should be supervised to ensure that they do not play with the
appliance.
(maximum) globes
TERMINAL BLOCK
220-240V a.c 50/60Hz
LIGHT
: 1
0 W
HEATER: 4 x 275W
FAN: 28W
EARTH
NEUTRAL
ACTIVE
S/W LIGHT
S/W FAN
S/W HEAT
S/W HEAT
TLED
Driver
CMotor
~
M
N
A
LIGHT
FAN
HEAT
HEAT
Heat Lamp
10 watt (maximum) led downlight ,4000K,570Lm.
Size:Ф83 X45 mm.(Available from place of purchase of Ventair co. ltd)
BATHROOM HEATER WARRANTY CARD
This unit must be installed by a qualied licensed clectrician. Every
Ventair 3 in 1 is thoroughly inspected and tested before being
released for sale. In addition to any warranties or conditions implied
by applicable Statue or Regulation, Ventiar Design warrants all of its
bathroom heaters against defective workmanship and faulty
materials for 3 years from the original date of purchase. Ventair
Design undertakes, at its option, to repair or replace, free of charge,
each product or part there of subject to the below warranty
conditions:
1)The fan or relevant part has not been modied, subjected to
misuse, neglect, or been involved in an accident.
2)The repairs are not required as a result of normal wear and tear.
3)The product was installed by a licensed electrical contractor in
accordance with this instruction manual.
4)No solid state speed control device has been used with the
appliance.
5)A copy of the original receipt of purchase in presented.
6)Globes supplied are not covered by this warranty.
Please keep this warranty card in a safe place. This card must be
produced in the event of service being required.
MODEL (SKU) NUMBER:
DATE OF PURCHASE:
RETAILER:
RECEIPT NUMBER:
INSTALLED BY:
LICENCE#: PH:
DESCRIPTION OF FAULT:

Other Ventair Heater manuals

Ventair SUNB2000BL User manual

Ventair

Ventair SUNB2000BL User manual

Ventair Steampro STE31HLX User manual

Ventair

Ventair Steampro STE31HLX User manual

Ventair Myka 2 Guide

Ventair

Ventair Myka 2 Guide

Ventair Sahara User manual

Ventair

Ventair Sahara User manual

Ventair SUNB1000BL User manual

Ventair

Ventair SUNB1000BL User manual

Ventair MANROSE MRHGXBL User manual

Ventair

Ventair MANROSE MRHGXBL User manual

Ventair MADRID MAD31HLX User manual

Ventair

Ventair MADRID MAD31HLX User manual

Ventair Myka 4 Guide

Ventair

Ventair Myka 4 Guide

Popular Heater manuals by other brands

Kroll MA22 instruction manual

Kroll

Kroll MA22 instruction manual

Olimpia splendid Caleo 2 Turbo time Instructions for installation, use and maintenance

Olimpia splendid

Olimpia splendid Caleo 2 Turbo time Instructions for installation, use and maintenance

DeLonghi HBC3052T manual

DeLonghi

DeLonghi HBC3052T manual

Bellus 616908 Operation instructions

Bellus

Bellus 616908 Operation instructions

PCB Piezotronics T333B30 Installation and operating manual

PCB Piezotronics

PCB Piezotronics T333B30 Installation and operating manual

Ningbo Innopower Hengda Metal Products H5206 instruction manual

Ningbo Innopower Hengda Metal Products

Ningbo Innopower Hengda Metal Products H5206 instruction manual

VR COATINGS J-138 instruction manual

VR COATINGS

VR COATINGS J-138 instruction manual

Ruffneck CX1 ProVector Series Installation, operation & maintenance instructions

Ruffneck

Ruffneck CX1 ProVector Series Installation, operation & maintenance instructions

Duraflame 10HM8000 user manual

Duraflame

Duraflame 10HM8000 user manual

CLIMASTAR Smart EASY TECH Installation and user guide

CLIMASTAR

CLIMASTAR Smart EASY TECH Installation and user guide

Mellerware MOHABI 2500W manual

Mellerware

Mellerware MOHABI 2500W manual

Rointe Symga instruction manual

Rointe

Rointe Symga instruction manual

Whirlpool FHT1200 Health & safety, use & care and installation guide

Whirlpool

Whirlpool FHT1200 Health & safety, use & care and installation guide

Sure Flame SE405 Service and maintenance manual

Sure Flame

Sure Flame SE405 Service and maintenance manual

HART HACJ01 Operator's manual

HART

HART HACJ01 Operator's manual

THOMSON THCVT2300DT instruction manual

THOMSON

THOMSON THCVT2300DT instruction manual

Klarstein 10032784 manual

Klarstein

Klarstein 10032784 manual

nedis HTBA10GY manual

nedis

nedis HTBA10GY manual

manuals.online logo
manuals.online logoBrands
  • About & Mission
  • Contact us
  • Privacy Policy
  • Terms and Conditions

Copyright 2025 Manuals.Online. All Rights Reserved.